- Dual booting kali linux with windows
- Installation Prerequisites
- Resize Windows Procedure
- Kali Linux Installation Procedure
- Post Installation
- Time/System Clock
- Dual Boot Kali Linux with Windows
- Procedure:
- Install Kali Linux
- Dual booting kali linux with windows
- Installation Prerequisites
- Resize Linux Procedure
- Kali Linux Installation Procedure
- Post Installation
Dual booting kali linux with windows
Installing Kali Linux next to a Windows installation has its benefits. However, you need to exercise caution during the setup process. First, make sure that you’ve backed up any important data on your Windows installation. Since you’ll be modifying your hard drive, you’ll want to store this backup on external media. Once you’ve completed the backup, we recommend you peruse our Kali Linux Hard Disk install guide, which explains the normal procedure for a basic Kali Linux install.
In our example, we will be installing Kali Linux alongside an installation of Windows (10), which is currently taking up 100% of the disk space in our computer. We will start by resizing our current Windows partition to occupy less space and then proceed to install Kali Linux in the newly-created empty partition.
Installation Prerequisites
This guide will make the following assumptions:
- You have read our single boot Kali Linux install guide, as this has the same Installation Prerequisites (System requirements & setup assumptions).
- When downloading Kali Linux, pick the live image, rather than the installer option.
- A single disk to install to (rather than a dedicated disk per operating system).
We need to use a different image from the single boot Kali Linux install guide, as we need the live image. This is because we need to edit the disk structure without mounting any partitions (otherwise they would be in-use). After we have finished altering the disk layout, we can still install Kali Linux using the live image, but there will be a few differences such as:
Both of these can be addressed post installation, as it saves swapping to the installer image (as you will need either multiple CD/DVD/USBs or to re-image half way though).
This installation has the potential to go wrong very easily as it involves editing existing partitions. Be aware of what partitions you are modifying and where you are installing Kali Linux to.
Having a backup of your Linux files available is a good idea in the event something goes wrong.
Resize Windows Procedure
Before we can install Kali Linux, there needs to be room on the hard disk. By booting into a live Kali Linux session with your chosen installation medium, we can resize the partition to our desired size, as the disk will not be in use because Kali Linux will all be in memory.
To start resizing, make sure you insert your Kali Linux installation medium and power on the device. If needed, press any keyboard shortcuts for a “boot order menu” (depends on each manufacture) or boot into BIOS/UEFI and change the boot order to point to the installation medium first.
When the boot menu/options appears, you should see at least one new option. Depending on the manufacture, hardware, how the system is configured and install medium, you may see more options (e.g. Can you boot into non-UEFI?).
You may need to try a few different options in order to find success.
You may need to disable secure boot
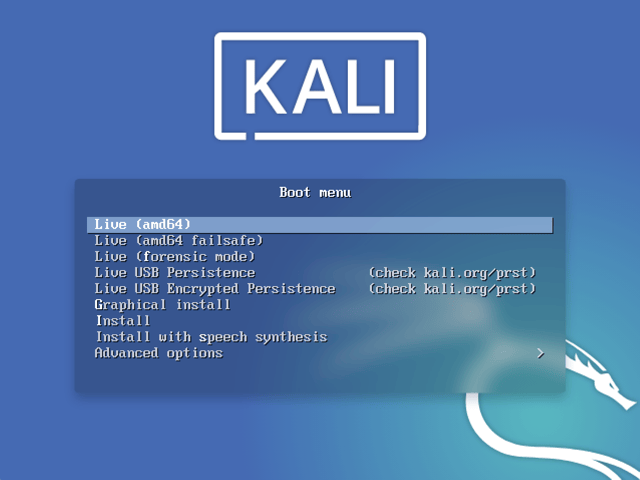
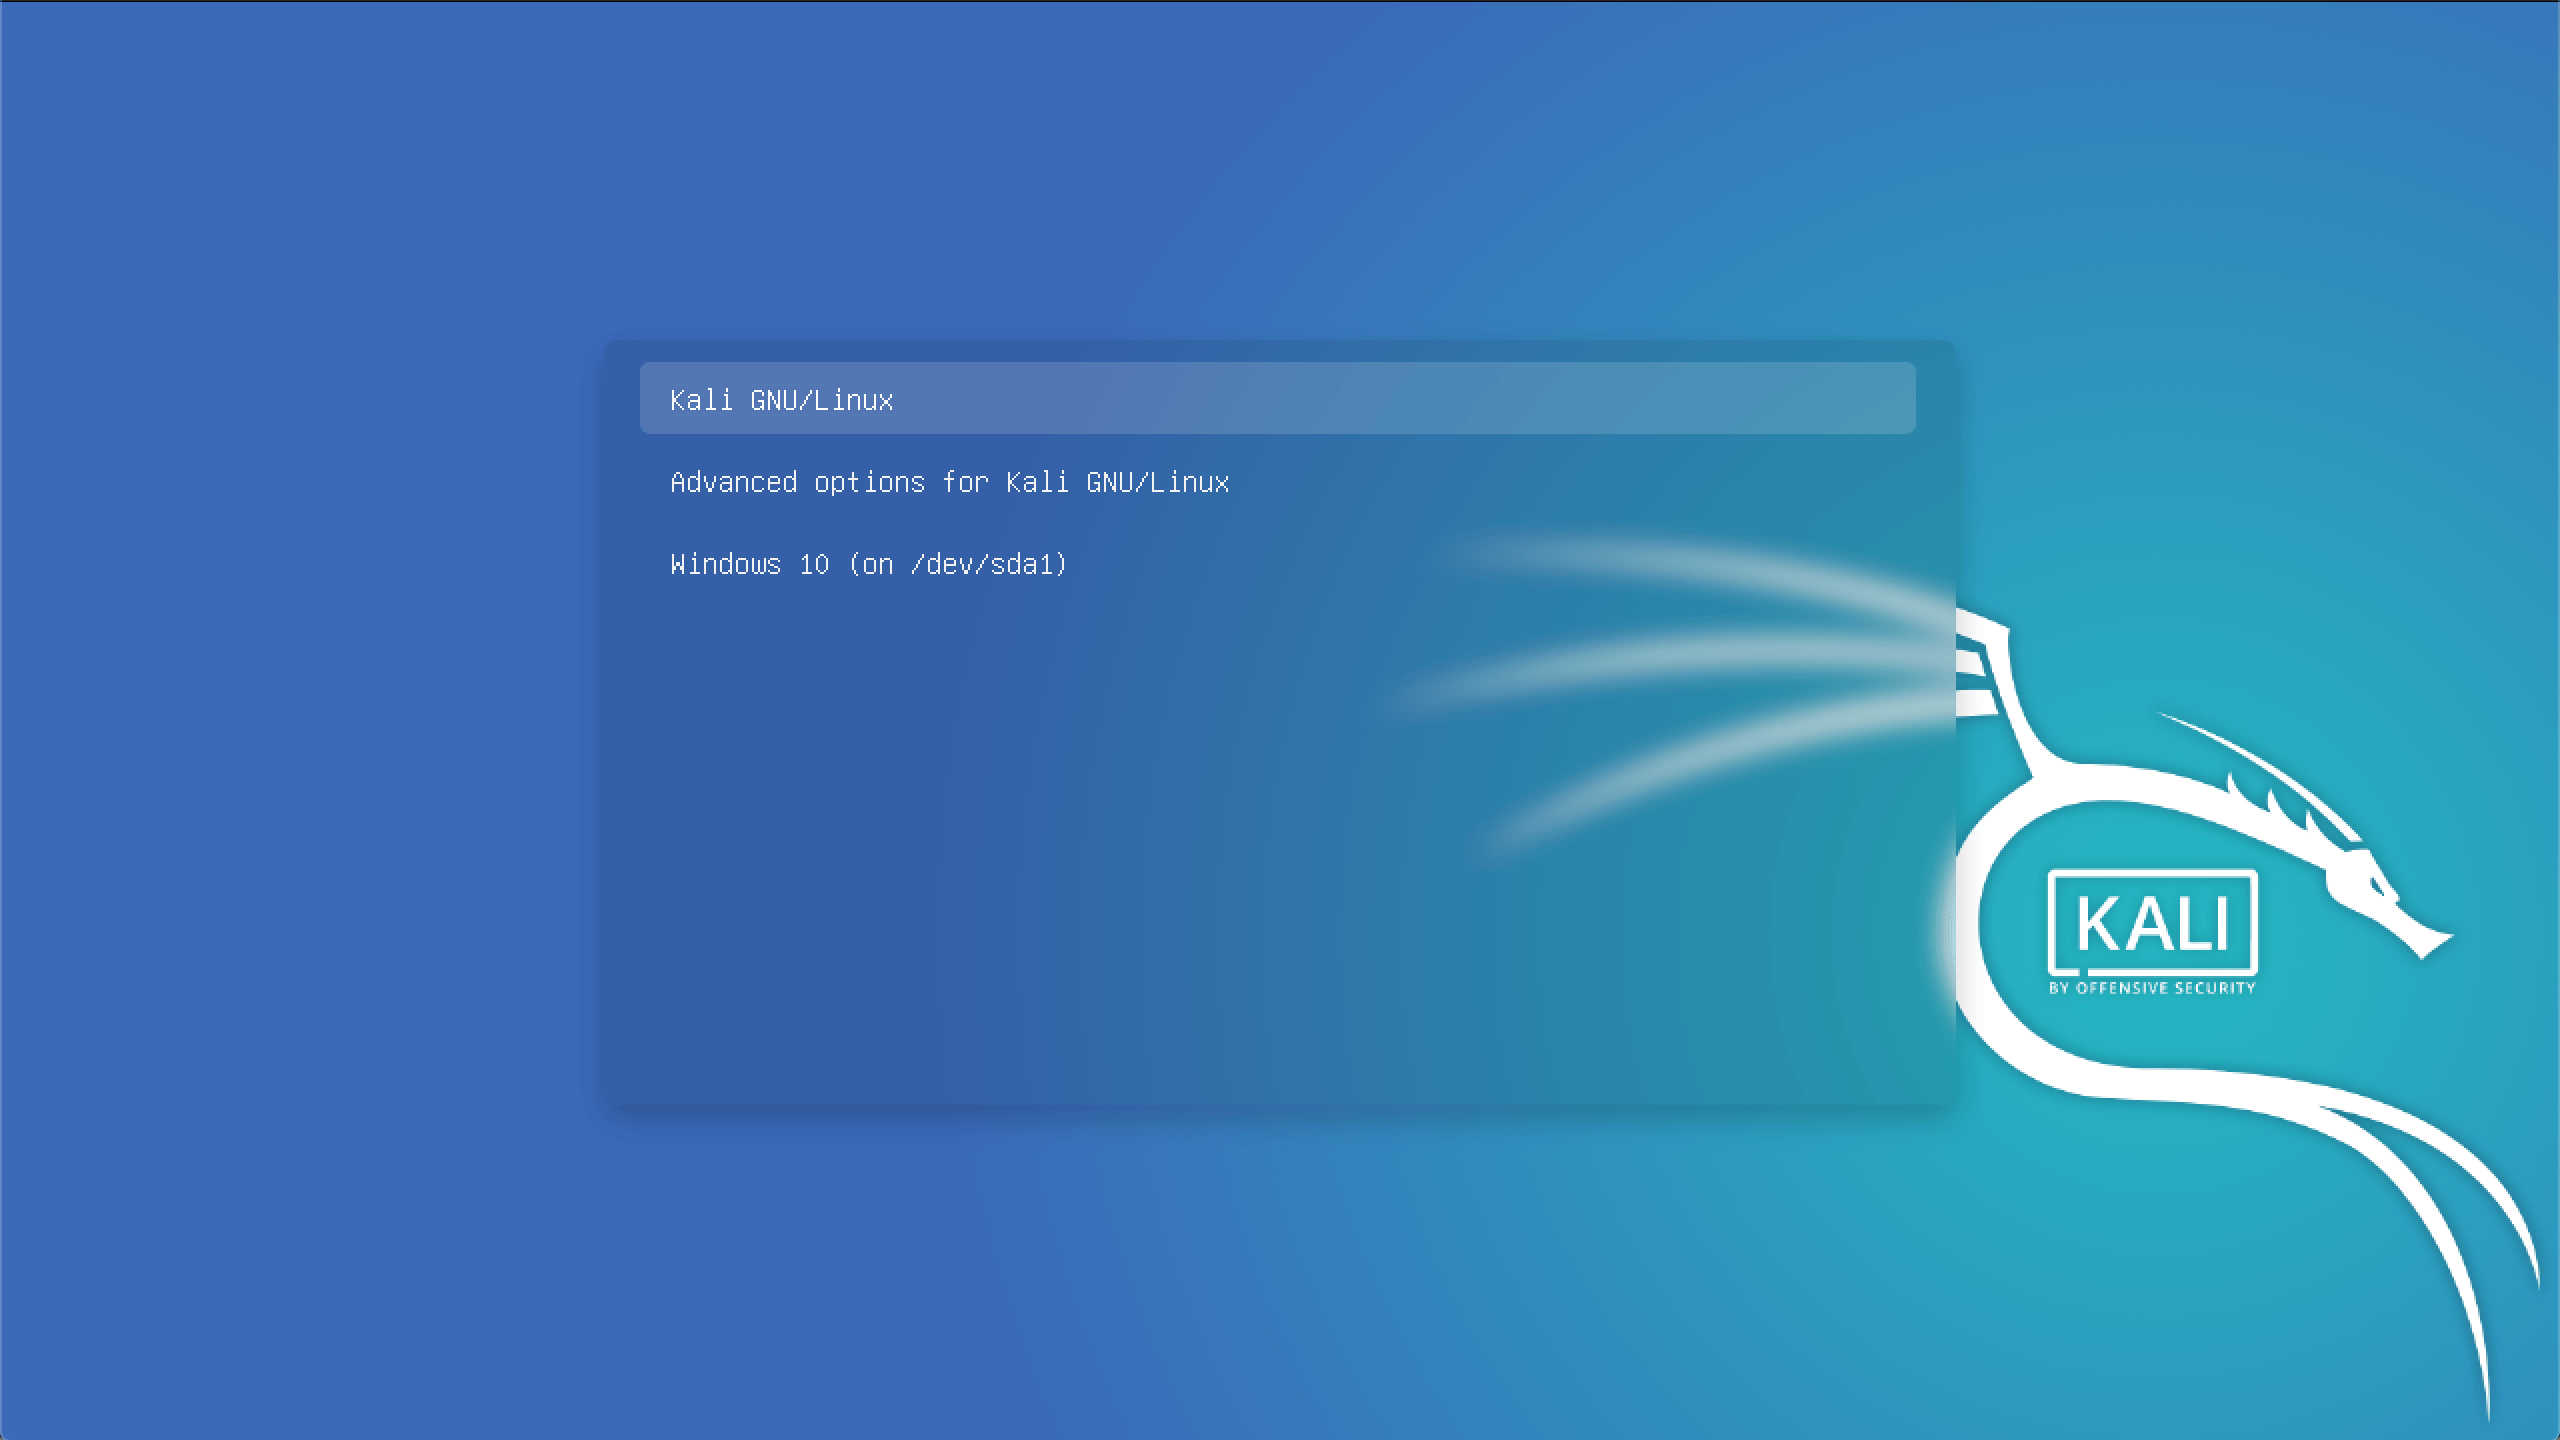
- You should be greeted with the Kali Linux boot screen. Select Live, and you should be booted into the Kali Linux default desktop.
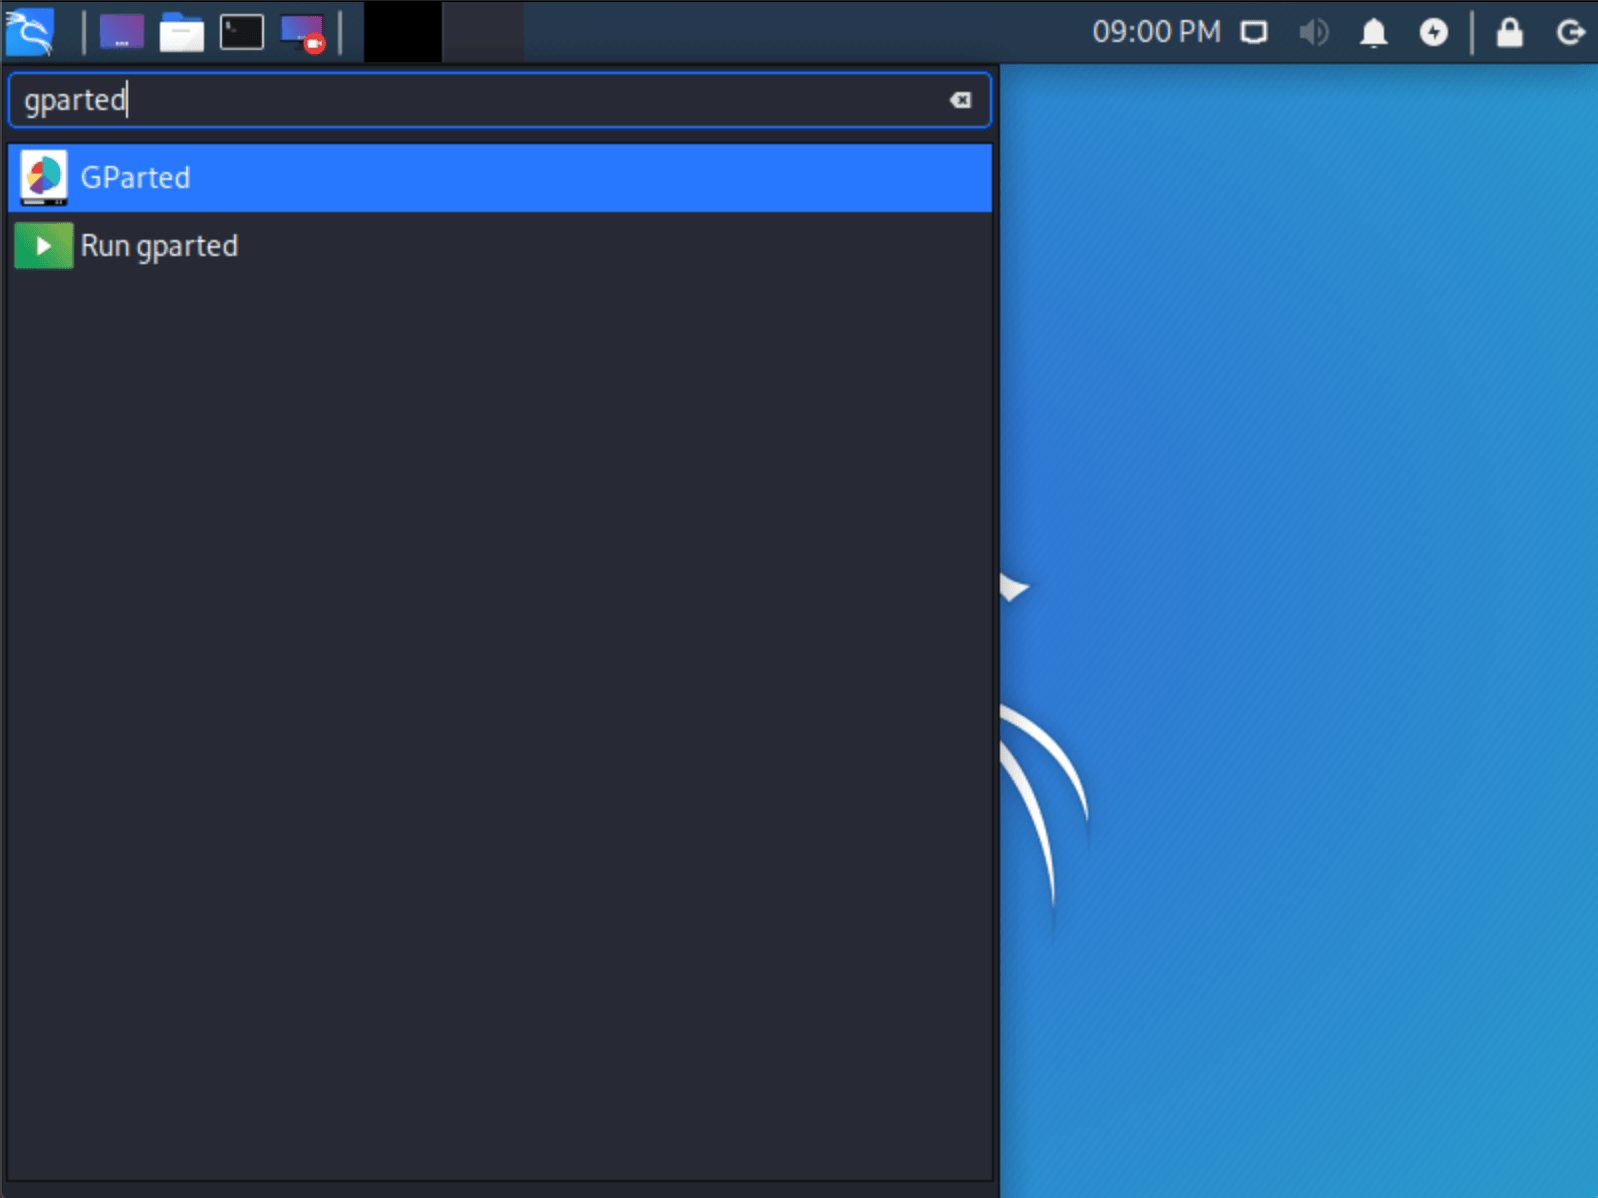
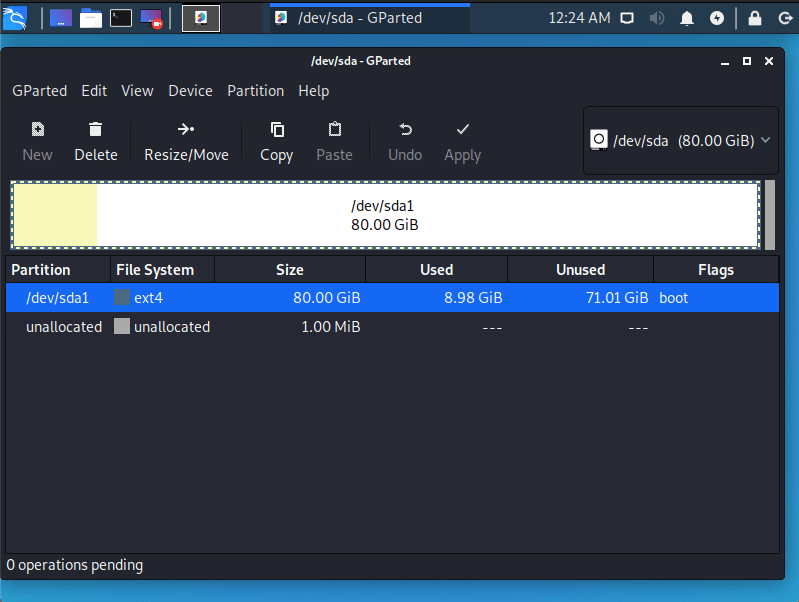
- Now launch GParted, which we’ll use to shrink the existing Windows partition to give us enough room to install Kali Linux in the free space.
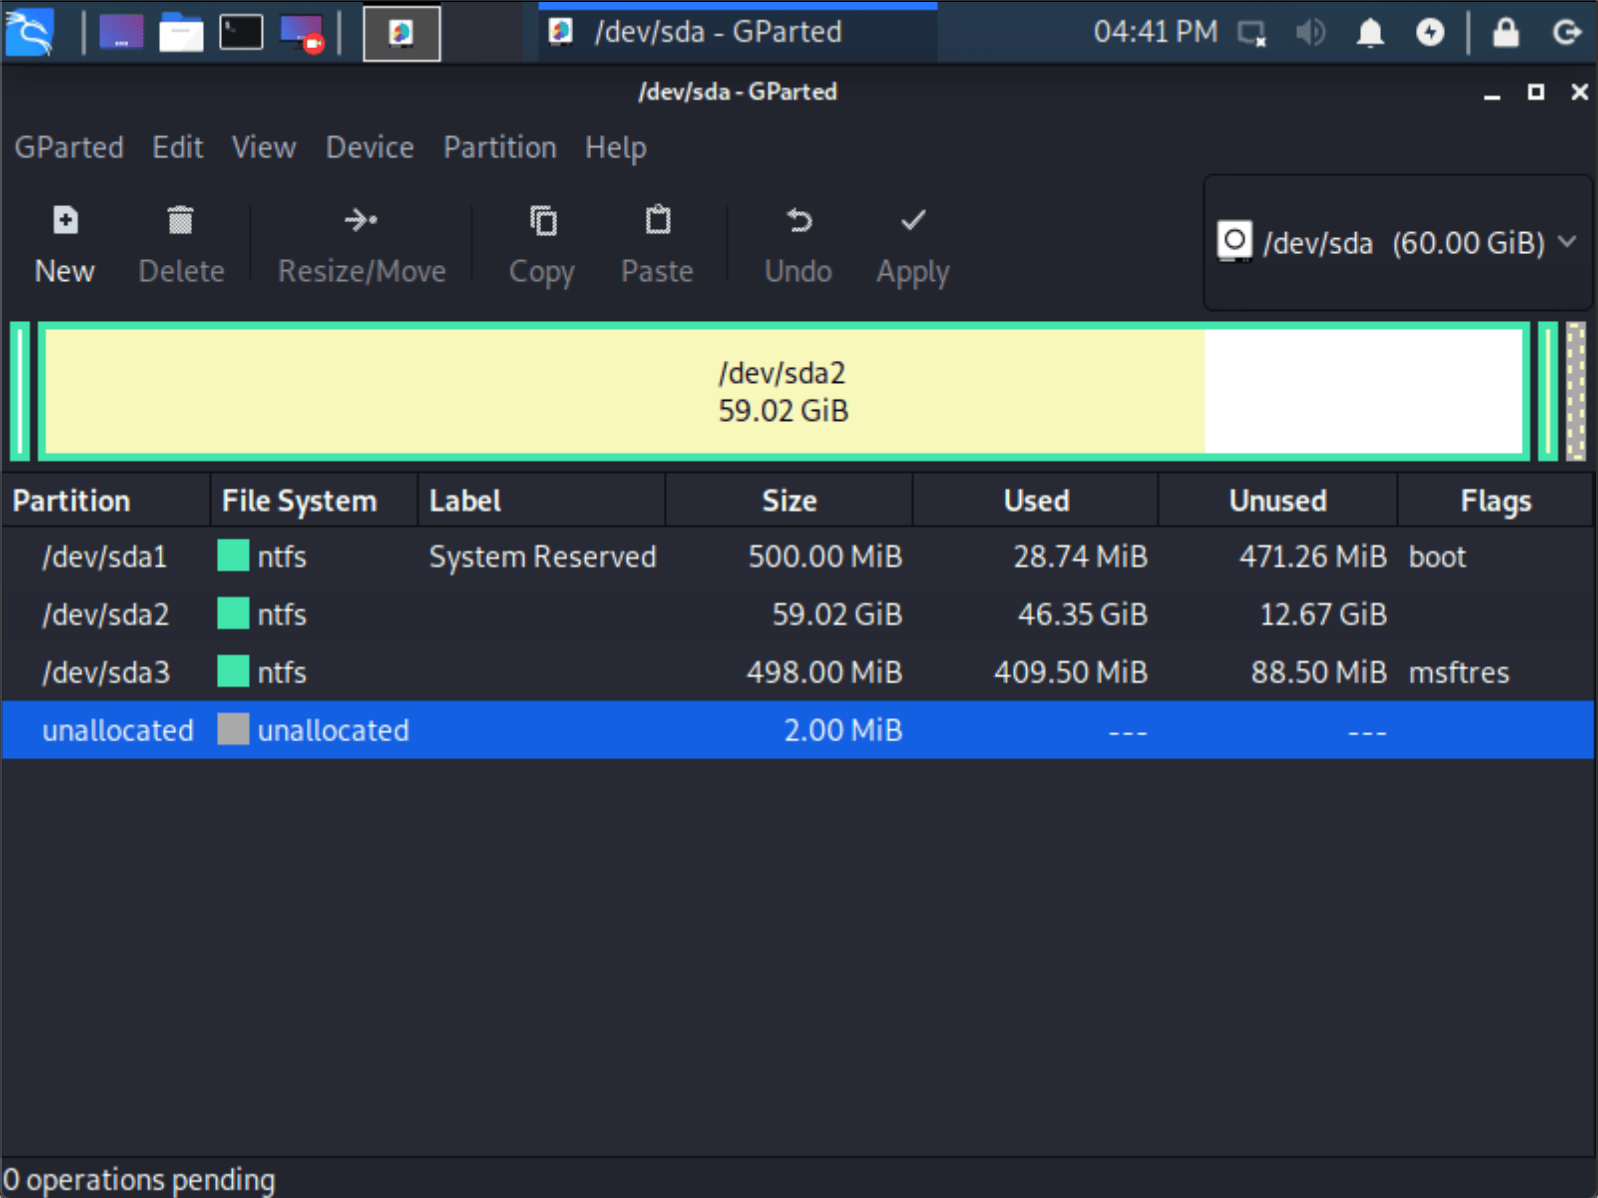
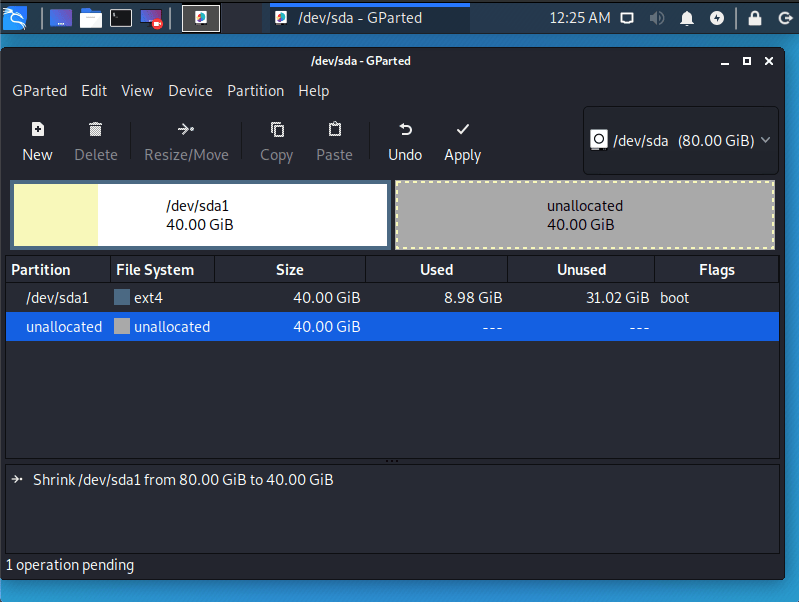
- Once GParted has opened, select your Windows partition ( /dev/sda2 ) & resize it leaving enough space (we recommend at least 20 GB) for the Kali Linux installation.
Depending on your setup, it is often the second option (the largest partition). In our example, there are three partitions:
- Window’s boot partition ( /dev/sda1 )
- Window’s main operating system itself ( /dev/sda2 )
- Window’s System Recovery partition ( /dev/sda3 )
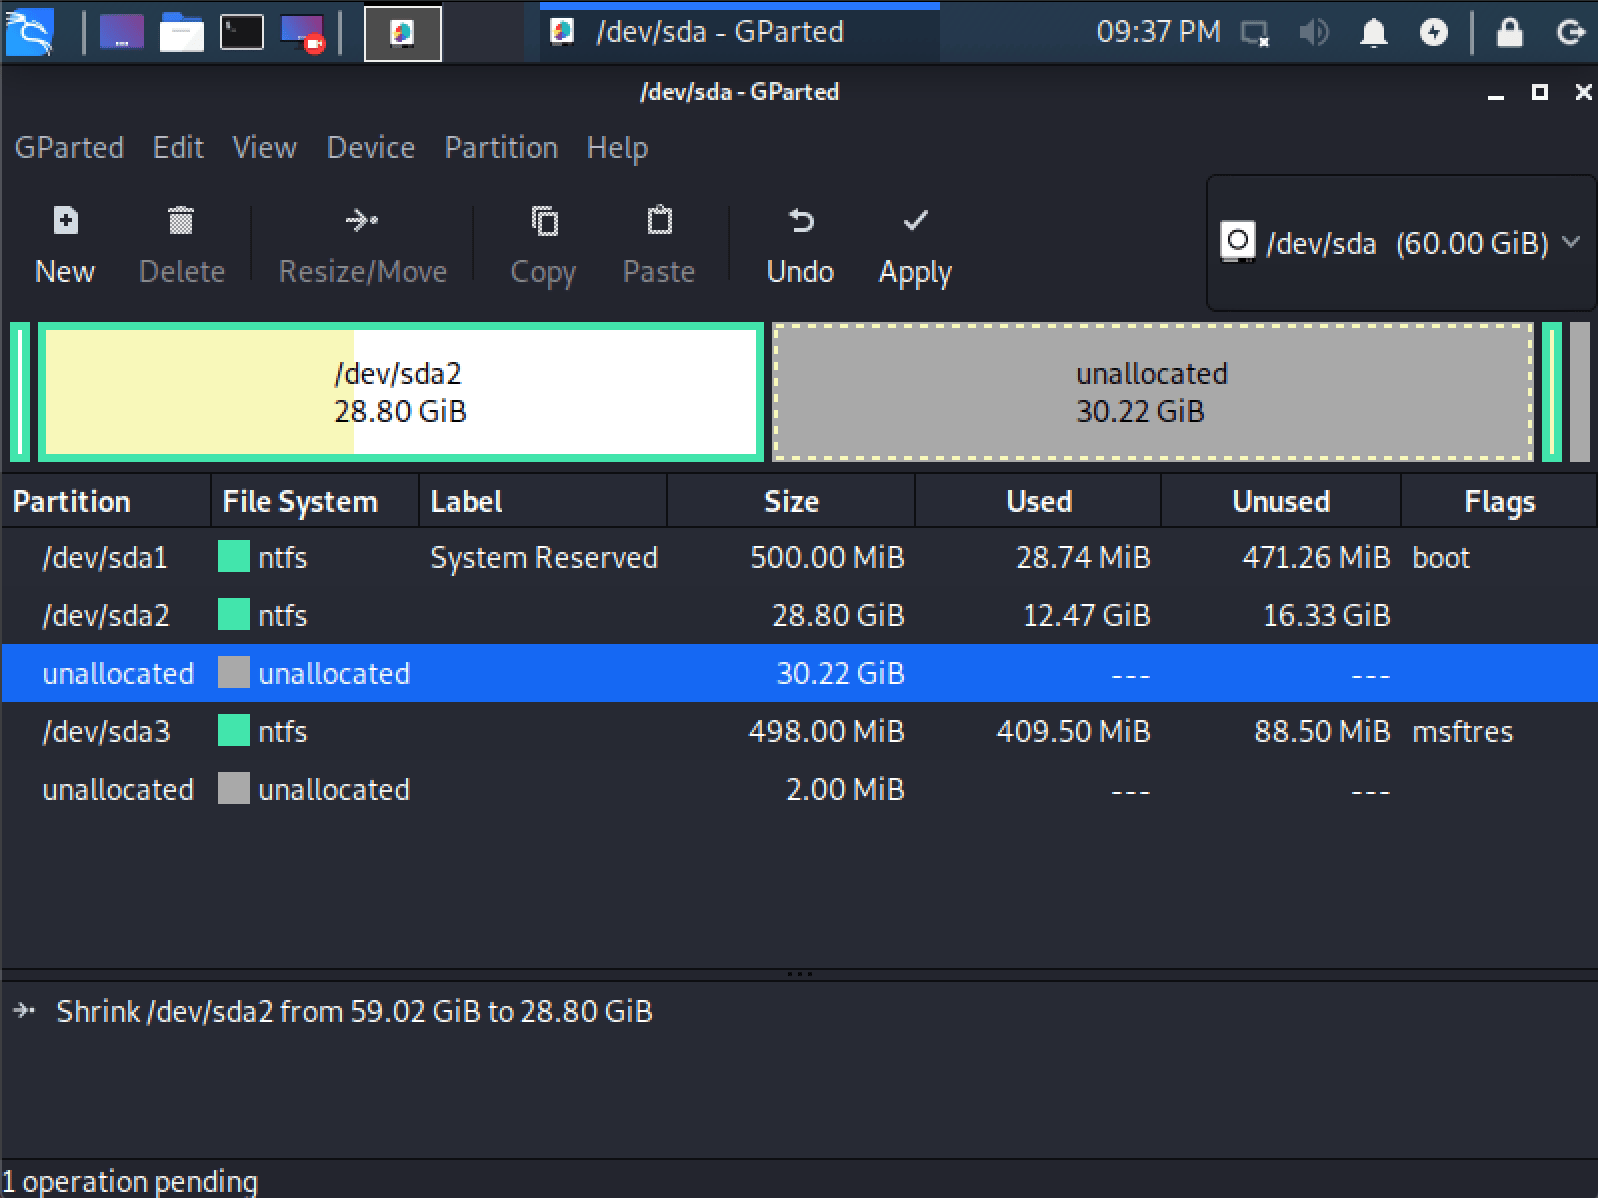
If you are moving past into any non-white in the partition then you are editing a section that is in use.
Only remove from the area of the partition that is not in use.
It is normal to leave the third partition ( /dev/sda3 ), and only shrink the actual install ( /dev/sda2 ).
If you wish to organize the partition to group all the Windows partitions together, placing the free space at the end, you may do so.
- Once you have resized your Windows partition, ensure you “Apply All Operations” on the hard disk. Exit gparted and reboot.
Kali Linux Installation Procedure
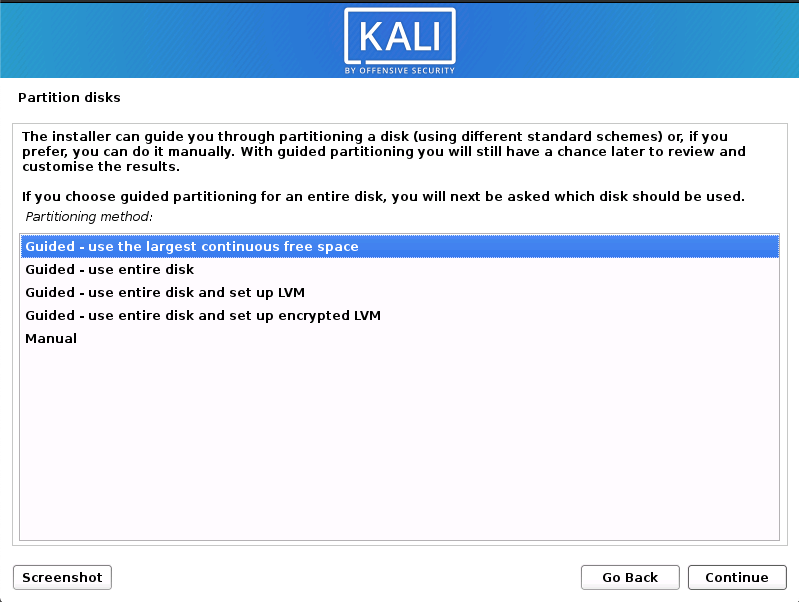
- The installation procedure from this point onwards is similar to a Kali Linux Hard Disk install, until the point of the partitioning. At this point, you need to select “Guided — use the largest continuous free space” (rather than “Guided — the entire disk”) which got created earlier with gparted.

- You can carry on following the single boot Kali Linux install guide, except you will not have the option to select desktop environment or metapackages as you are using the live image. Once the installation is done, reboot.
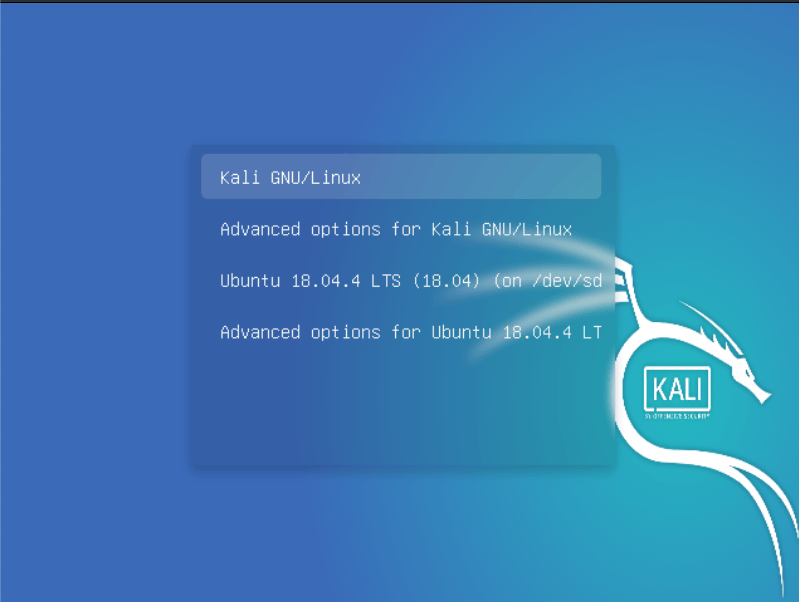
You should be greeted with a GRUB boot menu, which will allow you to boot either into Kali Linux or Windows.
Post Installation
Now that you’ve completed installing Kali Linux, it’s time to customize your system.
The General Use section has more information and you can also find tips on how to get the most out of Kali Linux in our User Forums.
Time/System Clock
One thing that may be worth knowing about is that occasionally the time will get changed between the Windows and the Linux system. To fix this, we can do the following:
To undo this we can simply do:
Updated on: 2021-Sep-27
Author: g0tmi1k
Источник
Dual Boot Kali Linux with Windows
Sometimes we came across situations like when we want to start learning Linux and command line stuff but using Linux as a main Operating System without having a basic idea of it is not a good option. So in order to do that we may install the same alongside windows. And choose which Operating System we want to work on at which time. Before proceeding with the tutorial make sure you have backed up your data to an external drive.
Prerequisites
- 20gb free disk space on other OS
- External Drive to boot Kali Linux
Note: Un allocates a minimum of 20GB of data in your hard disk to Free Space memory.
Procedure:
1. Free up some space in the hard drive and open the run dialogue box by pressing the “windows+r” key combination.
2. Enter the following command in the dialogue box

3. Select the “Disk Management” option from the left pane and select the partition you wish to delete and then right-click on the partition and click on delete partition to free up some space. You may also shrink a volume by right-clicking on the volume, select the shrink volume option, and then enter the size to shrink and hit Enter. It should display the free space as highlighted below

Install Kali Linux
1. Download Kali Linux.
2. Burn the Kali Linux ISO to the External Drive from which Kali Linux is to be booted.
3. Open the BIOS settings of the system and change the Boot device to the external device which has Kali Linux image burned and boot from the device.
4. In order to use the Graphical Version to install the OS click on Graphical Installation.

5. The next option is to select a language, So select your desired language and hit enter.

6. The next step is to select a country, territory, or area. So select your respective one.

7. The next step is to configure your keymap. Confirm the keymap you want to use and click Next.

8. In the next step it is asking for a hostname, Enter the same and press the continue button.

9. The next step is to enter the domain name of your choice you may leave it blank if you don’t have any.

10. Enter a strong password for your Kali Linux OS and click continue.

11. The next step is to select a time zone of your choice which you want to use as a default time zone for the Kali Linux machine.
12. Now click on the “Manual” option and press continue to confirm.

13. Now select the Free Space and create a new partition with that and click continue. Also, it is recommended for new users to not use a separate partition for root, home, and swap areas.

14. Now click on create a new partition.

15. Now enter the partition size to be created.

16. Now select the partition type as “Logical”.
17. Now if you are new to Linux then use the following settings for the partition or you may also adjust them as per your need. And then click on “Done setting up the partition“

18. Now just click on finish partitioning and write changes to disk.

19. Now select the “no” option in order to continue.

20. Now in order to write changes to the disk select the “yes” option and then click on continue.

21. Now, wait for a few minutes for the Kali system to be installed alongside the other Operating System.

22. The next option is to select whether to install the GRUB boot loader to the master boot record or not. Click on yes to add the same.

23. Choose your respective hard disk to boot into, from the list of devices.

24. This will start installing the Kali Linux OS and will take a few minutes to completely install the same and will reboot after the successful completion of the installation.
25. Once the complete process is finished successfully, It will give us a choice to boot form 2 Operating System which means the dual boot is successful.
Источник
Dual booting kali linux with windows
Installing Kali Linux alongside another Linux installation can be quite useful. However, you need to exercise caution during the setup process. First, make sure that you’ve backed up any important data on your Linux installation. Since you’ll be modifying your hard drive, you’ll want to store this backup on external media. Once you’ve completed the backup, we recommend you peruse our Kali Linux Hard Disk install guide, which explains the normal procedure for a basic Kali Linux install.
In our example, we will be installing Kali Linux alongside an installation of Ubuntu (Server 18.04), which is currently taking up 100% of the disk space in our computer. We will start by resizing our current Linux partition to occupy less space and then proceed to install Kali Linux in the newly-created empty partition.
Installation Prerequisites
This guide will make the following assumptions:
- You have read our single boot Kali Linux install guide, as this has the same Installation Prerequisites (System requirements & setup assumptions).
- When downloading Kali Linux, pick the live image, rather than the installer option.
- A single disk to install to (rather than a dedicated disk per operating system).
We need to use a different image from the single boot Kali Linux install guide, as we need the live image. This is because we need to edit the disk structure without mounting any partitions (otherwise they would be in-use). After we have finished altering the disk layout, we can still install Kali Linux using the live image, but there will be a few differences such as:
Both of these can be addressed post installation, as it saves swapping to the installer image (as you will need either multiple CD/DVD/USBs or to re-image half way though).
This installation has the potential to go wrong very easily as it involves editing existing partitions. Be aware of what partitions you are modifying and where you are installing Kali Linux to.
Having a backup of your Linux files available is a good idea in the event something goes wrong.
Resize Linux Procedure
Before we can install Kali Linux, there needs to be room on the hard disk. By booting into a live Kali Linux session with your chosen installation medium, we can resize the partition to our desired size, as the disk will not be in use because Kali Linux will all be in memory.
To start resizing, make sure you insert your Kali Linux installation medium and power on the device. If needed, press any keyboard shortcuts for a “boot order menu” (depends on each manufacture) or boot into BIOS/UEFI and change the boot order to point to the installation medium first.
When the boot menu/options appears, you should see at least one new option. Depending on the manufacture, hardware, how the system is configured and install medium, you may see more options (e.g. Can you boot into non-UEFI?).
You may need to try a few different options in order to find success.
- You should be greeted with the Kali Linux boot screen. Select Live, and you should be booted into the Kali Linux default desktop.

- Now launch GParted, which we’ll use to shrink the existing Linux partition to give us enough room to install Kali Linux in the free space.

- Once GParted has opened, select your Linux partition ( /dev/sda1 ) & resize it leaving enough space (we recommend at least 20 GB) for the Kali Linux installation.
Depending on your setup, the disk structure may be different to include:
- A swap partition
- Separate partitions for certain directories (e.g. /home , /var and /tmp )
You often just want to select the largest partition (commonly the data/home directory)
If you are moving past into any non-white in the partition then you are editing a section that is in use.
Only remove from the area of the partition that is not in use.
If you wish to organize the partition to group all the Linux partitions together, placing the free space at the end, you may do so.
- Once you have resized your Linux partition, ensure you “Apply All Operations” on the hard disk. Exit gparted and reboot.
Kali Linux Installation Procedure
- The installation procedure from this point onwards is similar to a Kali Linux Hard Disk install, until the point of the partitioning. At this point, you need to select “Guided — use the largest continuous free space” (rather than “Guided — the entire disk”) which got created earlier with gparted.
- You can carry on following the single boot Kali Linux install guide, expect you will not have the option to select desktop environment or metapackages as you are using the live image. Once the installation is done, reboot.
You should be greeted with a GRUB boot menu, which will allow you to boot either into Kali Linux or the other Linux operating system.
Post Installation
Now that you’ve completed installing Kali Linux, it’s time to customize your system.
The General Use section has more information and you can also find tips on how to get the most out of Kali Linux in our User Forums.
Updated on: 2021-Sep-27
Author: gamb1t
Источник


