- How To Install Ubuntu Alongside Windows 10
- Dual boot Ubuntu with Windows 10 and Windows 8.1:
- Step 1: Make a backup [optional]
- Step 2: Create a live USB/disk of Ubuntu
- Step 3: Make a partition where Ubuntu will be installed
- Step 4: Disable fast startup in Windows [optional]
- Step 5: Disable secureboot in Windows 10 and 8.1
- Step 6: Installing Ubuntu along with Windows 10, 8.1
- How To Dual boot Windows 10 and Ubuntu
- Get Ubuntu and Create the bootable USB
- Analyze the system
- Partition the disk on windows 10
- Reboot the computer and boot from USB
- Dual boot windows 10 and Ubuntu
- Testing the new dual boot Ubuntu installation
- Leave a Reply Cancel reply
How To Install Ubuntu Alongside Windows 10

Brief: This detailed article shows you how to dual boot Ubuntu with Windows 10, step-by-step, accompanied with proper screenshots.
Previously I had written about dual booting Ubuntu Linux with Windows 7 and 8, but those tutorials did not cover systems that come with Windows 10 pre-installed. The newer systems that come with Windows 8 or Windows 8.1, have UEFI instead of BIOS. This makes thing a little different from the conventional way of dual booting.
In this tutorial, we shall see how to install Ubuntu with Windows 10 already installed.
This tutorial is performed on a newly bought Dell Inspiron 7437 that has Core i7 fourth generation processor, 256 GB SSD, 8 GB RAM and built in 1 GB Intel graphics. I’ll cover all the steps you need to do in order to successfully dual boot Linux with Windows 10 UEFI. If you have already done some of these steps, just skip to the next one. If you have a fresh system, even better.
The steps mentioned here are applicable to other Ubuntu based Linux distributions such as Linux Mint, Elementary OS etc. Cutting the chit-chat, let’s see how to dual boot Linux on a UEFI secure boot enabled Windows 10 system.
Dual boot Ubuntu with Windows 10 and Windows 8.1:
Though I have used Ubuntu 14.04 here, it is applicable to all versions of Ubuntu, be it Ubuntu 15.10 or Ubuntu 16.04. There are various prerequisites to install Ubuntu on a UEFI system. I’ll list them for easier read here:
- Ubuntu ISO burned to a USB or DVD (we’ll see it)
- Windows backup (optional)
- Windows 10 bootable USB (optional yet recommended as it will save your day if anything goes wrong)
Let’s see the steps of installing Ubuntu along side Windows 10.
Step 1: Make a backup [optional]
It is always nice to make a back up, just in case if you mess up with the system. There are numerous articles on the web to show you how to backup your system. You can follow this tutorial here.
Step 2: Create a live USB/disk of Ubuntu
The next thing you need to do is to create a live USB or disk. I recommend Universal USB Installer to create a live USB of Linux OS in Windows.
Step 3: Make a partition where Ubuntu will be installed
Assuming tat you have a fresh system, the first thing we need to do is to make a partition to install Linux. The 256 GB in my system was already had several partitions from manufacturer but mainly for backup and other purposes. Main partition was C drive, of around 220 GB, where Windows 8.1 was installed.
If you have just one partition like this, you need to make some free space out of it for Linux. If you have several partitions of considerable size, use any of them except C drive because it may erase the data.
To make a partition in Windows 8, go to Disk Management tool. You can find disk management tool by searching for ‘disk’ in Control Panel.

In the Disk Management tool, right click on the drive which you want to partition and select shrink volume. In my case, I shrank the C drive to make some free space:

You can leave the free space as it is. We shall use it while installing Ubuntu.
Step 4: Disable fast startup in Windows [optional]
Windows 8 introduced a new feature called “fast startup” for quick boot. While it is not mandatory, it would be better to have it disabled.
Go to Control Panel > Hardware and Sound > Power Options > System Settings > Choose what the power buttons do and uncheck the Turn on fast startup box.
Step 5: Disable secureboot in Windows 10 and 8.1
This is the most important step. The new secure boot feature of Windows 8, originally intended for security feature for rootkit viruses, prevents dual booting of Windows with Linux. To dual boot Windows 8 with Linux, we must disable secure boot in UEFI.
Step 6: Installing Ubuntu along with Windows 10, 8.1
Once you have disabled secure boot, it’s time to install Ubuntu. I hope you already created the live USB as mentioned in step 2. Plug in the USB and boot the system from it.
To boot from USB, will have to choose boot from USB option from within Windows itself. Either with PC Setting (like for UEFI) or pressing shift key while clicking on Restart.
Once you have booted in the live USB, you will be presented with option to try or install Ubuntu. Click on install. You will be presented with few screen options to choose the language. It will then do some checks on available space, power and internet connection etc. Just click on Continue.

The main screen which you should pay attention to is Installation Type. Choose Something else here:

Remember we had created some free space beforehand? We shall use the free space to create Root, Swap and Home. Select the free space and click on the + sign.

It will provide you with option to create Linux partition. We are creating the Root partition. Any thing above 20 GB is more than sufficient for it. Choose the size, select Ext 4 as file type and / (means root) as the mount point.

Clicking on OK in previous step will bring you to the partition screen. Next we will create swap. Like previously, click on the + sign again. This time use the file type as Swap area. Suggestible swap size is double of RAM.

In similar fashion, create a Home partition. Allocate it maximum space (in fact allocate it rest of the free space) because this is where you’ll save music, pictures and downloaded files.

Once you are ready with Root, Swap and Home, click on Install Now:

Well, you have almost won the battle. You can smell victory now. Next you will be asked to set username password etc. Basically, you just need to click next now.
Once the installation is completed, restart the computer, you should be welcomed by a purple grub screen. Enjoy Ubuntu along with Windows 10 in dual boot mode.
Note: If after installing Ubuntu, you boot directly in Windows, check in UEFI settings for changing the boot order.

I hope this guide helped you to dual boot Ubuntu with Windows 10 UEFI. If you want to reverse the process, follow this guide to remove Ubuntu from dual boot with Windows. Though this article is written for Ubuntu, it should be helpful for other Linux OS as well. Any questions or suggestions are always welcomed.
Like what you read? Please share it with others.
How To Dual boot Windows 10 and Ubuntu
Updated — June 16, 2020 by Arnab Satapathi
No doubt Ubuntu is the best Linux distro for beginners. So many Linux beginners prefer to dual boot Windows 10 and Ubuntu , instead of completely removing Windows.
Here in this tutorial you will learn how to install linux and windows alongside on a UEFI based system with GPT partition table.
This tutorial is specially for UEFI based systems, you don’t need to disable UEFI secure boot or enable the legacy boot support.
We’ll assume that Windows 10 is pre-installed on the computer. The hard disk partition type, i.e. GPT or MBR doesn’t matter much.
Get Ubuntu and Create the bootable USB
As you’re going to install Ubuntu, so first you need to get the ISO file, get it from the official ubuntu website, link here.
After downloading the Ububtu ISO, you need to create a bootable USB to install from it.
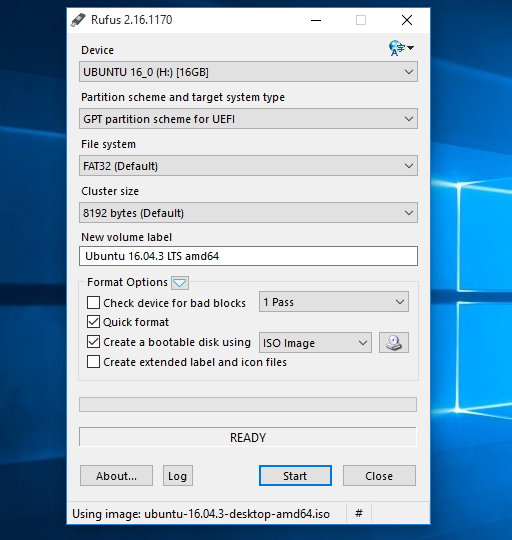
There’s many way to do that, in windows 10, you can use the Rufus USB creator, download Rufus from here.
Alternatively you can use MultibootUSB tool from here.
Analyze the system
Although this step is optional, but it’s to know your system before altering anything. First check the hard disk partition type.
You can use the diskpart command on windows to check the HDD, first open up the CMD as administrator and type the command below one by one.
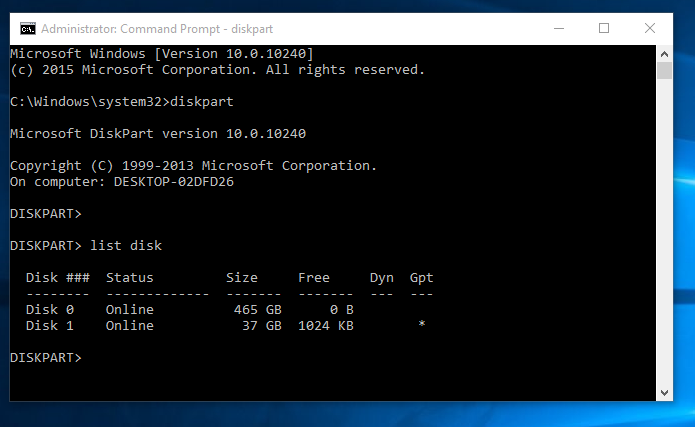
If your HDD has GPT partition table by default, then almost certainly it’s a UEFI system.
Partition the disk on windows 10
You need to free up some HDD space to dual boot ubuntu and windows 10 , at least 6 GB is required to install.
However you can go with 8 GB, but about 20 GB for the linux filesystem root / partition is highly recommended.
You can install Ubuntu without a dedicated /home partition, but it’s always recommended to use a separate home.
Most probably you don’t need a swap partition, as there’s plenty of RAM on any modern system, swap space is rarely used. If you desperately need a swap space, you can you a swap file instead.
Let’s partition the disk,
- First open up the Disk Management tool from the settings application.

- Select the hard drive partition you want to shrink. As example, if your C drive has enough free space, then select it.
- Shrink the volume to desired size, anything between 10 GB to 100 GB should be enough.

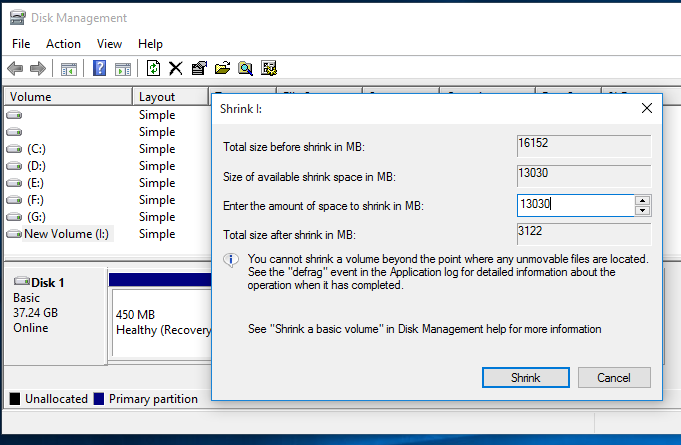
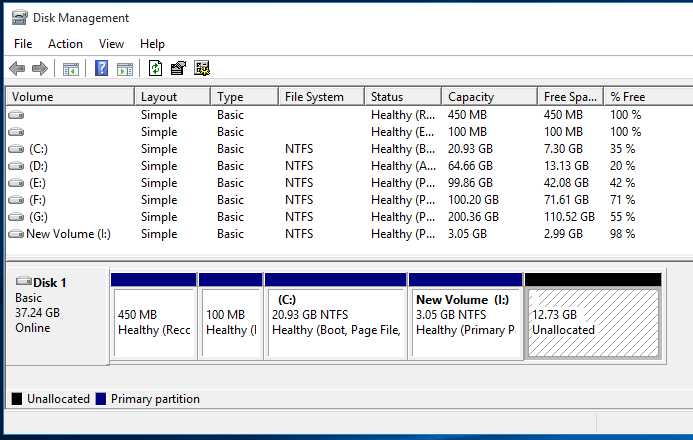
I’m using a 40 GB HDD for testing, and there’s around 12.7 GB free space to dual boot windows 10 and ubuntu.
Reboot the computer and boot from USB
Now reboot the PC and boot it from the USB drive. You need to tap the F12 , F10 or F8 key many times to select the boot device.
On Dell, Acer, Lenovo or Toshiba laptops, it’s the F12 key in most cases.
Note: On many laptops with the Fn key, you need to press Fn + F12 key combo to select the boot device option.
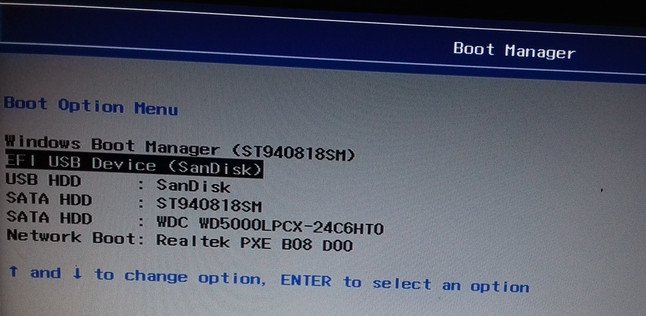
You can select any of the Try Ubuntu without installing or Install Ubuntu on the GRUB boot menu entry.
Dual boot windows 10 and Ubuntu
If you’ve not selected the first option, then just click on the Install Ubuntu shortcut on the desktop, else the system will start the installer directly.
There’s 7 total step, excluding the sub steps and disk partitioning to install Ubuntu.
The first step is to select the language, choose your preferred language and press the continue button.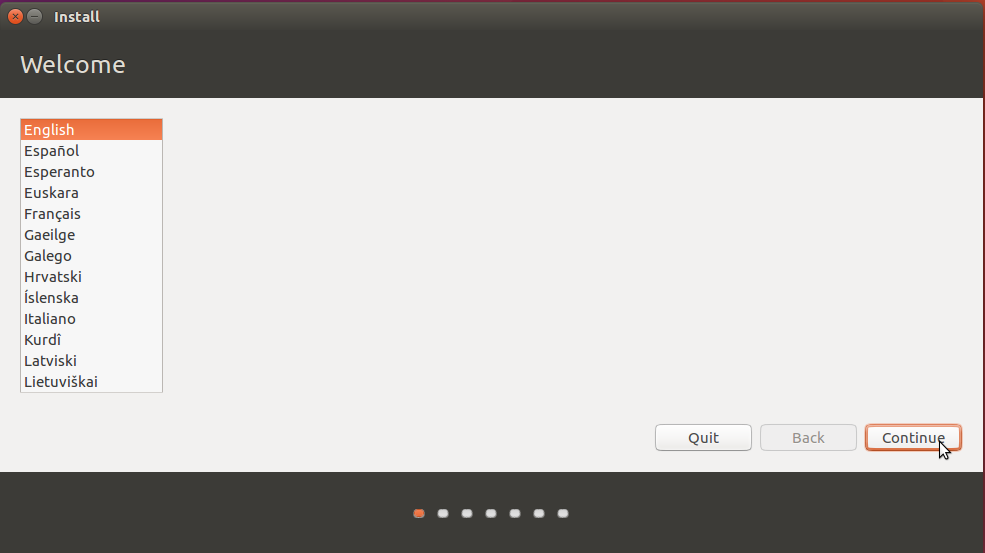
Next you’ll be asked to connect to internet if not connected, this step is optional, you can skip this step by selecting the first ubuntu install option.
Now the installer will ask you to install the updates and third party software like graphics drivers or multimedia codecs. You can skip this step as well, just press Continue. 
The next step is Installation type, important to dual boot windows 10 and ubuntu . As the PC already has windows 10, you must select the Something else option, highlighted on the screen shot below. 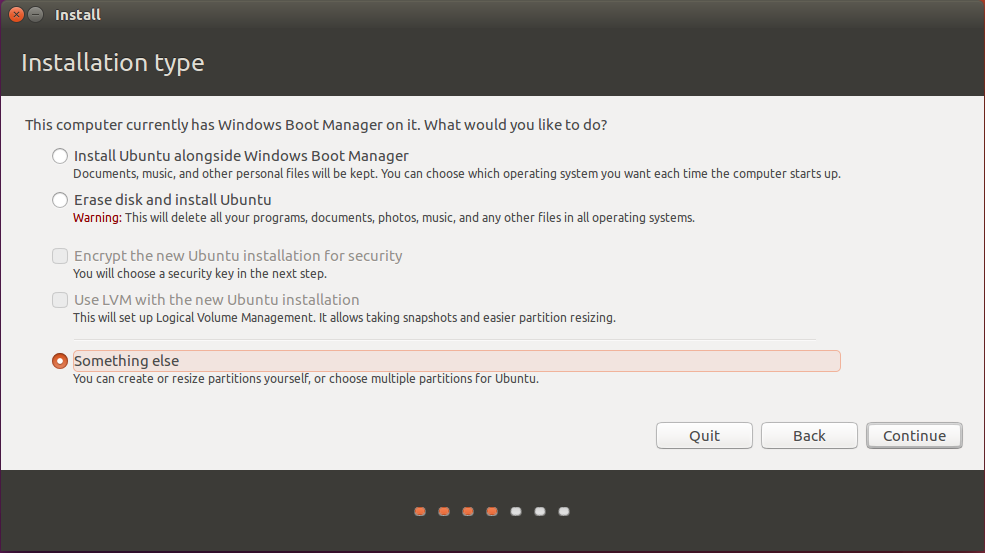
Now you have to partition the hard disk for installation, that’s the most important step. You must be very careful, you could lose important data if anything goes wrong. First select the proper HDD to partition and device to install the boot loader. In my case it’s /dev/sdb , as there’s two HDD in my laptop.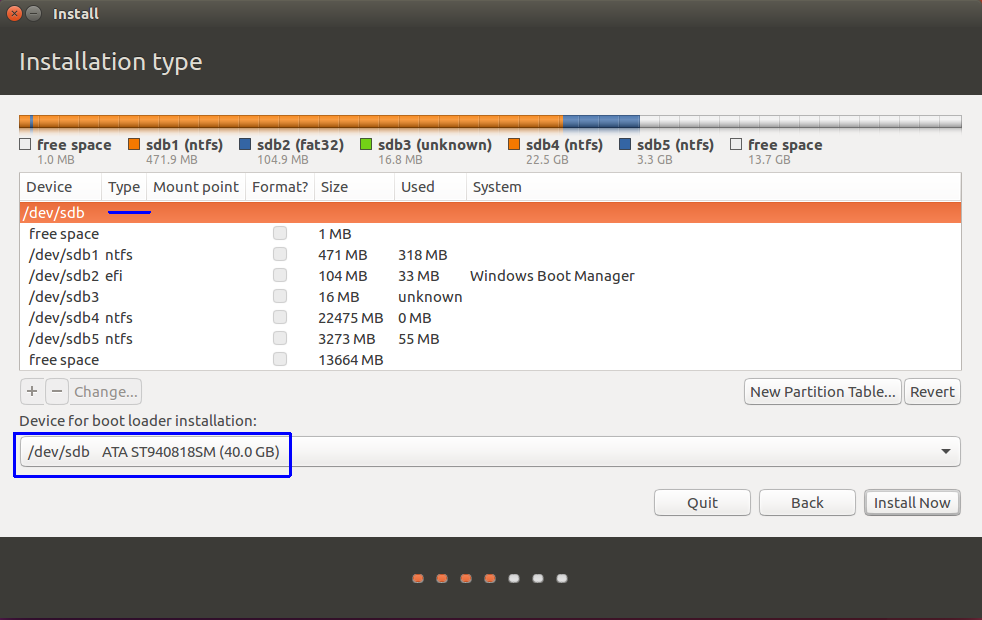
After selecting the proper HDD, you’ve to the select the free space to create the /root partition. Press the + button to create a a new disk partition. I’m creating a 8 GB root partition, which is 8192 MB.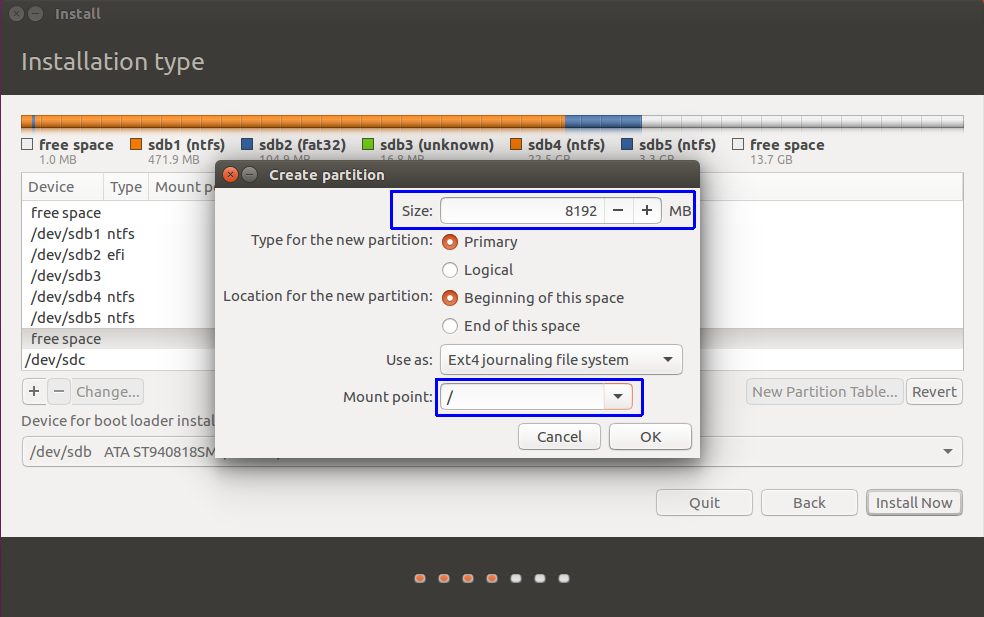
Now you’ve to create the home partition just like above, but the mount point will be /home this time, assign all the free space available to that partition. 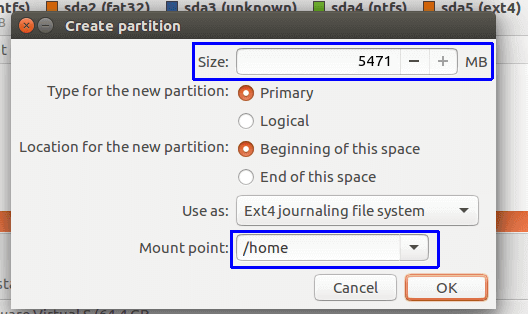
How the final partitioned disk looks like, a screenshot below.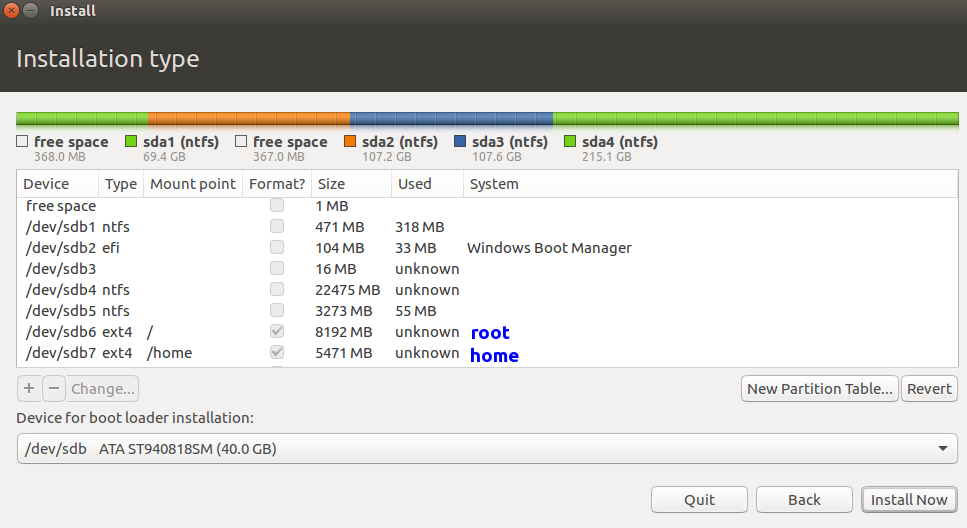
Next the installer will ask you, Do you want to return to the partitioning menu? Of course you don’t, just press continue button.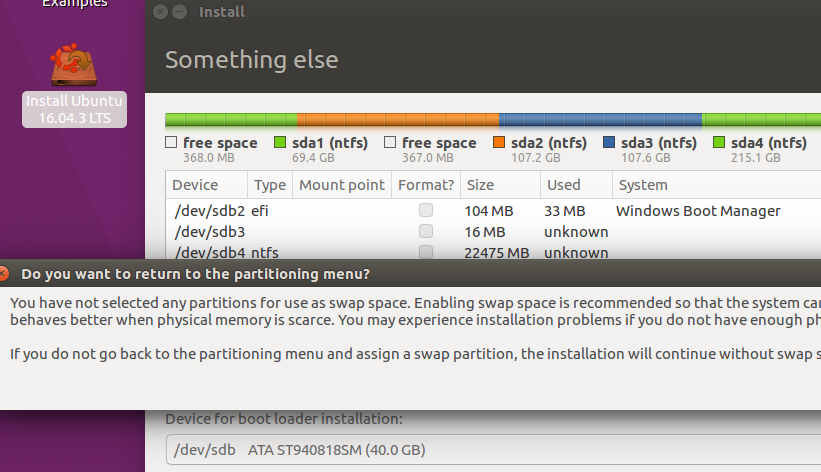
The ubuntu installer will ask you again, Write the changes to the disk? Ironically you have to, just press the continue button again.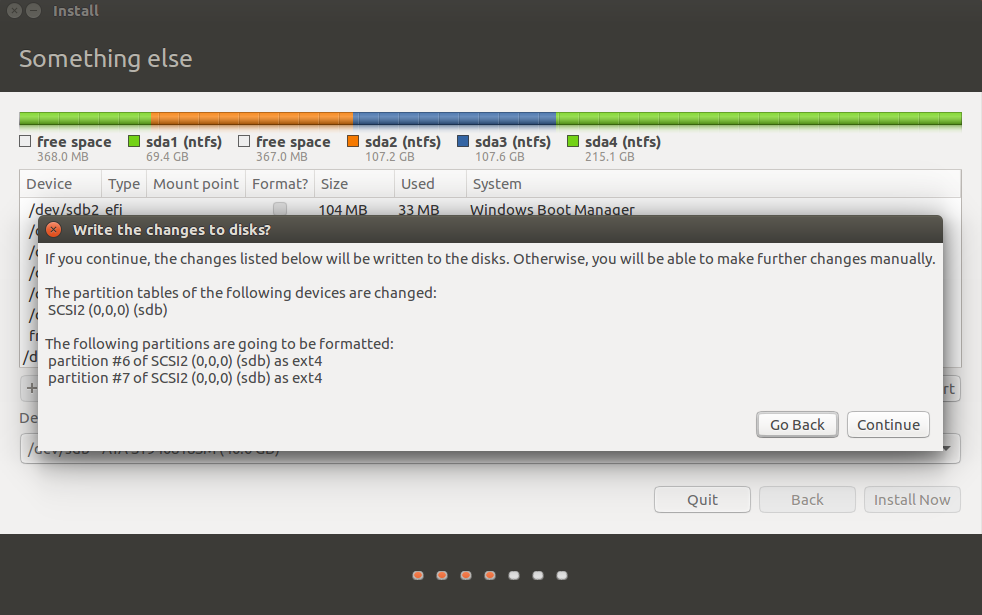
Next you’ve to fill some basic information about you and your computer name, password and so on, a screenshot below.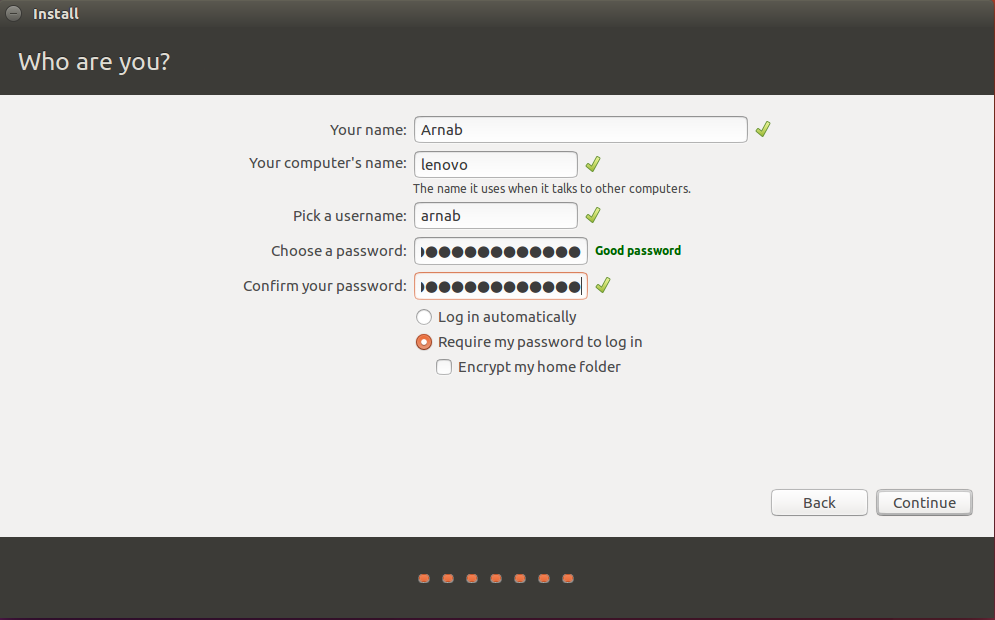
Tip: You might want to change Your computer’s name to something shorter than the default one and choose a long password with special characters. If you’re a linux beginner then you might not want to encrypt home folder right now.
You have to press the Continue button again, and you’re almost done. The installation process will take some time, between 10 to 20 minute, till then watch the slide show.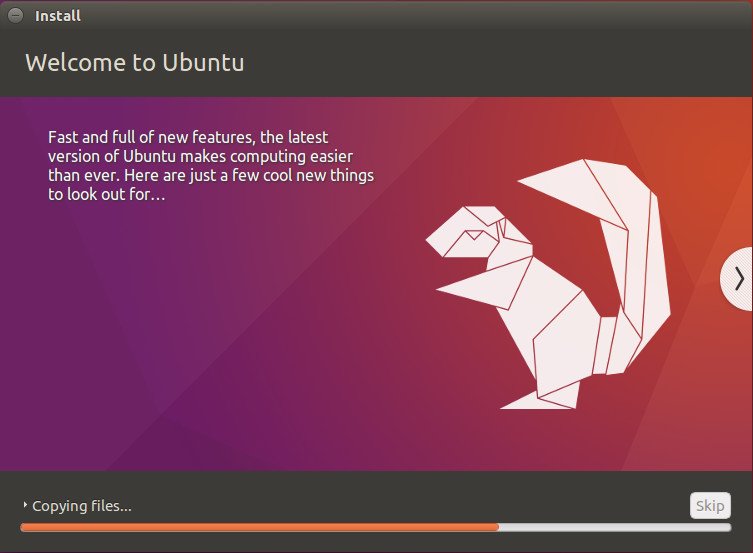
If everything was done properly, then you’ll be asked to reboot your computer.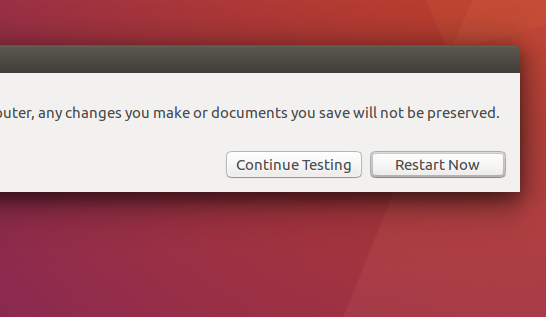
Reboot now and draw out the installation USB drive right after seeing the OEM logo on the screen.
Testing the new dual boot Ubuntu installation
After rebooting, you can see the GRUB boot menu, listing Ubuntu and windows.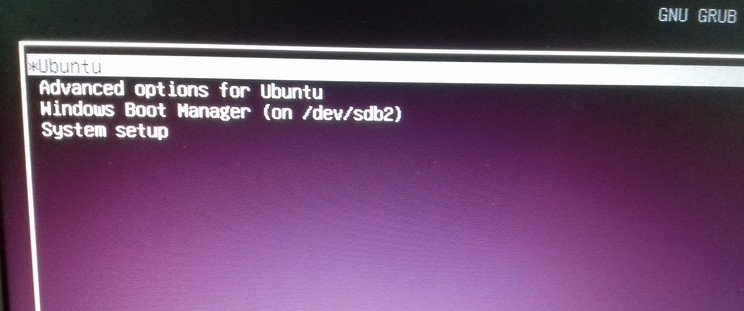
You should be able dual boot windows 10 and ubuntu without any problem from the grub menu.
So, that’s all how you can dual boot ubuntu, hope that’s simple enough to understand. I’ll be soon making a video about dual booting stay tuned.
If you have any question or suggestion, please feel free to ask or suggest through the comments.
Derek Domino says
Hi Arnab, good summary, used it when I found problems installing any Ubuntu-based iso alongside W10 in an HP Pavilion laptop (2018). Each install worked but all gave the error: «the grub-efi-amd64-signed package failed to install» or similar, at the end. I could boot into Linux manually through the boot selection menu, but couldn’t get grub to come up.
I finally fixed it and have a couple of suggestions for your article to help people avoid this in the first place.
Firstly, update the Rufus screenshot. On newer versions, if you select GPT as the partition type for the USB, you can then select «UEFI (non CSM)» for «target system». This forces the target system to boot the USB in UEFI mode.
If you have GPT on HD and USB, and bios and USB all use UEFI, chances of success are higher.
A second point is that some people have found that being disconnected from the network while installing prevents this error. It wasn’t the case for me, but it might be worth mentioning at that point.
Third point, you could add at the end that if you DON’T get grub when you reboot (but you’ve done everything as you have described here, included UEFI mode USB) you should be able to go into the UEFI/bios screens and switch the default boot from Windows to Ubuntu. Then Grub should appear and you can select Ubuntu or W10.
Hope this helps, really nice clear page you’ve written here 🙂 Thank you.
February 14, 2021
Nope. Once again «Executing ‘grub-install /dev/nvme0n1’ failed». Tried hundreds of things so far. It just won’t work. Disabled fast boot, secure boot, fast startup, bitlocker. A created many partition schemes so far. Non of them works. Always the same error.
Daniel Granstrom says
I have attempted multiple times with Mint and Ubuntu to perform this however it fails and Windows 10 is the auto launch. It is now May 2020. Has windows in their newer releases changed their install to block this dual process? Have tried with Win10 versions 1709 and 1909. No luck.
Daniel,
I’m running into exactly the same problem with Windows 10 and LinuxMint 19.2 (Ubuntu based). This is extremely frustrating and if MS thinks this is their way to force the issue, it won’t end well for them (in my case). I’ll reformat the entire drive and install Linux Mint only and goodbye and good riddance Windows 10.
I would like to keep a few programs that are Windows-based and don’t tend to run well with WINE but I can live without them.
I hope someone has a work-around for this issue.
Make sure you have disabled secureboot and fastboot
Thanks for the guide. How do we setup Windows/Ubuntu to boot by default? And also, how to boot to non default OS? Thanks
Work like a charm for me. Thanks for the update on uwfi.
It’s been awhile since last linux mostly bios
February 5, 2020
When go through the steps as outlined, after setting up the partitions I get the following message:»The partition table format in use on your disks normally requires you to create a separate partition for boot loader code. The partition should be marked for use as a ‘Reserved BIOS boot area’ and should be at least 1MB in size. Note that this is not the same partition mounted on /boot. If you do not go back to the partitioning menu and correct this error, boot loader installation may fail later, although it may still be possible to install the boot loader to a partition.»
When I create the «Reserved BIOS boot area», the installation completes, but the system boots to windows10.
The windows partition is a GPT.
February 6, 2020
Reserved BIOS boot area is only needed when you’re booting a GPT partitioned disk on a legacy BIOS only motherbboard.
Tanjim Ahmed says
Thanks a lot it works when i disabled secure boot and fast boot
Zack Preston says
September 29, 2019
Worked like a charm! This is such a handy tutorial. I had to get a new laptop and wanted to keep the preinstalled Windows 10 for the one application I use that doesn’t have a Linux version yet (GoPro’s Quik). Everything else I’ve now grown too used to doing in Ubuntu.
Live long and prosper!
Hi there,
I have tried to install several Linux distros in dual boot with windows 10, but it seems
the installation works fine only in Legacy mode (I used Rufus to create the installation for Linux, and disabled Secure Boot and Fast Startup). I would like to know if may be an hardware problem with the laptop or if there should be, i.e., entries to be cleaned in the bootloader.
Thank you for your help.
Hi Arnab. I installed Windows 7 thru usb by EFI mode, then I installed Ubuntu 18 also thru usb by EFI mode. I can choose to boot into Ubuntu from Grub menu for many times, and
everything is OK. But once I choose to boot into Windows Boot Manager, I will never get back Ubuntu, and the PC(Dell XPS 8500) will boot into Windows 7 directly, and no Grub
menu will appear. I have re-installed Ubuntu many times, but get the same result. Any suggestions? Thanks.
1. Boot up a Ubuntu Live USB via UEFI mode.
2. Use the efibootmgr to set Ubuntu as default EFI boot order.
In this case the command should be like sudo efibootmgr -o 0002,0005,2003,2001,2002
You do *not* have to select «Something Else» during the Ubuntu installation. You may be able to succeed choosing that, but it’s not necessary.
I got dual boot with GRUB working fine selecting «Install Ubuntu alongside Windows Boot Manager» after having Windows 10 installed first. No problems.
The installation didn’t work for me the first time, selecting «Something Else», although there were other issues that may have caused the problem (I’ll never know). Just wanted to note what worked for me.
Fauzan Hamzah says
In my computer its still dont work. Even it makes the laptop to diagnose my pc.
February 21, 2019
Hi,
i have a question about installing Ubuntu alongside Windows 10, i have windows 10 installed on a ssd with 250 GB(GPT) and also HDD with 1 TB(MBR) and the system is UEFI Bios ,so the question is , can i install ubuntu on the free space i created on MBR and should i burn the ISO file from Ubuntu with GPT or MBR partition scheme in Rufus?
February 21, 2019
If the system is already booting Windows 10 in UEFI mode, then you can make the bootable USB with GPT partition scheme.
Also set GRUB as default bootloader.
Chris Hall says
All works great, except I don’t get the GRUB menu on bootup, it just defaults straight to Windows 10 as before. The only way I can force an Ubuntu boot is by hitting escape on bootup (I’m on an HP G5 laptop). How do you get it to default to the GRUB menu on bootup? Thanks
You might need to set the UEFI boot order from the UEFI settings menu itself, or try efibootmgr inside Ubuntu.
Not exactly what you need to do, but this will be helpful to understand the efibootmgr ,
https://www.pcsuggest.com/uninstall-ubuntu-dual-boot-windows/#Troubleshooting
December 11, 2018
I did a dual boot install using Win10Pro and Ubuntu 18.04.1 (Bionic) on a SSD and it seemed to go ok except that when I select Ubuntu from the grub menu I get an error message that a UUID can’t be found. Turns out that’s the UUID for the root partition which, obviously, does exist (confirmed with gparted). I’ve done dual boot installs on BIOS systems without issues so this is a problem unique to UEFI? Also, I set up the disk for GPT. Windows 10 boots OK from the grub menu.
December 11, 2018
I’ve never seen such issue, except without altering the root partition.
You may need to re-install the grub on the SSD. This could be helpful-
https://www.pcsuggest.com/grub-error-no-such-device/
November 16, 2018
I have tried this on my Windows 10 UEFI system. Actually I was trying to install a dual boot Linux Mint system but the screens should be the same. However, I never got the screen asking for the installation type. I didn’t get any options other than setting language after which it appeared to be wanting to continue so I got scared of it overwriting my Windows system and rebooted. Do you have any idea why I would not get the same screens and options as shown above?
November 17, 2018
May be the installer is changed, I need to check the latest installer.
Better not to install it, or get some help from an expert.
October 11, 2018
My laptop is ASUS FX553VD with windows 10 pre installed. When I was trying to install ubuntu 18, everything went well and at last when it asked to restart and when I clicked on it, my laptop freezed. So I had to close it forcefully. Again when I tried to boot it(as it was installed) either ubuntu page (purple one) shows and nothing else or set of errors saying CPU stuck at 22 s(something like that). Works properly in recovery mode. When ubuntu was getting installed, I noticed that it said » removing____(amd64).
Hey,
I followed exact steps from the tutorial.
Ubuntu works fine under UEFI secure boot enabled.
However if I click Windows manager, its just black screen. No activity. Did i loose my windows config?
Most probably yes.
Does it boot when secure boot disabled?
Truly UEFI packs all sort of unnecessary problem.
Billy TOor says
September 25, 2018
I got all the way to were the DEVICE window comes.
The DEVICE window does not have any devices listed
also I don’t have the option «Something Else»
What am i doing wrong?
September 25, 2018
Are you sure that the hard drive where windows ins installed has GPT partition scheme?
Also are you sure you’re booting Ubuntu in pure UEFI mode?
If these are not an issue, then surely something wrong with is Ubuntu installer ISO.
September 16, 2018
Thanks a lot. it worked like a charm,
Thanks again.
Tayyip ananin mezarini sikeyim senin says
i have a msi laptop with preinstalled windows 10 when i hit f12 on boot i get a black screen saying «checking media presence no media present»
May be you need to check your UEFI settings.
Rainer Bunger says
thanks for the nice documentation. I was able to install Ubuntu 16.04, I can also install Fedora 28, but when I try to install Ubuntu 18.04 or Ubuntu 18.04.1 I get this error message:
grub-efi-amd64-signed’ package failed to install into /target/
My hope was that the error will be fixed in 18.04.1, but this does not seem to be the case. It is also clear that I have to but into UEFI in may case. I have the same partition layout like you, 1st=recovery, 2nd=EFI. I thought that the above error message may be caused by the fact that EFI is the second partition with just 100MB.
Do you have any hints.
There are discussions in the net if it is a bug. It is, because I could install 16.04 and Fedora 28.
100 MB of EFI partition is just enough, it should not be the problem.
Probably something wrong with the installer.
At the time of writing the guide, it was Ubuntu 16.04, later updated it to 18.04 with apt. So apparently I don’t know exactly what is causing such problem.
Also thanks for sharing this issue.
Patrick Vincent Aquino says
Hi, would like to ask for suggestion with my HP laptop with pre-installed Windows 8 Pro upgraded to Windows 10 and an upgraded BIOS. I made a bootable USB disk using Rufus as shown in your post, but it seems the BIOS cannot boot using the USB drive, even with Security boot disabled and Legacy enabled. Do I need to do additional steps to boot from this USB drive?
Hey Patrick, no extra step is required, it should have booted.
You could try this,
1> Enable UEFI, and disable secure boot.
2> Format the USB drive to FAT32.
3> Mount the Ubuntu ISO file, and copy everything inside of that ISO to your USB drive.
4> Try to from the USB in pure UEFI mode.
Hope this helps, and you may also try a different USB drive.
Ajay Kumar says
If I wish to make /Home partition on already existing Windows ntfs partition other tha C drive so that files in /Home folder can be «seen» by both Windows and Ubuntu, can I do that? If so, how? Please help.
You can not use a NTFS partition as /home , I believe.
However it’s quite possible to add a separate home partition later, I did it many time.
Here’s a sketchy guide.
You need to create a ext4 partition, then copy everything inside current home directory, finally add the proper fstab entry.
Anom Mnimus says
Good post, but you might want to differentiate the root of the file system versus the home folder of the root user. «/» is the root of the file system under Linux, «/root» is the home folder for the root user. Assigning 20GB to /root would waste a lot of space for users trying to learn Linux.
Opps, that was unintentional. Thanks for pointing out.
I understand 20 GB for /root is insane. It was for linux filesystem / root.
Saptarshi Chakraborty says
Hi Arnab I have successfully installed ubuntu 16.04 lts by following your above steps but when I switch-on or restart my system it directly open windows 10 without giving an option for either ubuntu or windows 10.I use hp laptop that has windows 10 home pre installed in it.I tried several times I had also formatted my system using hp recovery disc but nothing worked
On windows, yopu can try this. Open up CMD as administrator and run the command below.
bcdedit /set «
Or if you can boot to Ubuntu, use efibootmgr, like below.
sudo efibootmgr -o 0002,0005,2003,2001,2002
Of course you need to know which are the correct EFI boot entry.
If nothing else working, you need to manually replace the bootx64.efi file with grubx64.efi. So, you need to mount the ESP partition, using a live CD.
Saptarshi Chakraborty says
Did it. Thanks, can you tell me the use of \home partition and how much space do I need to allocate from a 34gb unallocated space, mind it that I also need to divide it for \ partition also..
Inside the /home partition, all your user data stored. Like downloaded files, your codes, etc. etc.
A bare minimum 8 GB of / partition is enough. Or to be on the safe side, allocate 16 GB for / .
And my advice will be always go with a separate home partition.
Did it. , which method worked for you?
Aayush Kumar says
Hi Arnab
I have a ASUS vivobook with 8gigs of ram and a 1TB hdd. It already runs Win10 pro with GPT and UEFI.
During ubuntu installation i created the Root partition but i was unable to create any another partition. I wanted to multiboot . Whats the prblm??
Thanks Aayush for the feedback.
What it’s actually saying while you’re trying to create other partitions?
By any chance, are you allotting the entire free space to the linux root partition?
On a hard drive with GPT partition table, you’re free to create any number of partitions, (theoretically).
It’s also possible to install Ubuntu just with the root partition, no need of other partitions.
Pablo Tavares says
Hi,
I Have a Lenovo IDEAPAD 30015ISK I’m about to shrink my windows partition but i noticed a diference that makes me unsure if the process is going to end well.
On your example (and other I have found are similar) the partition that you are shrinking is the last one. In my case it is not. I have:
1 — EFI System Partition
2 — Windows (C:) [Boot, Page File, Crash Dump, Primary Partition]
3 — Lenovo (D:) [Primary Partition]
4 — Recovery Partition
5 — Recovery Partition (yes a 2nd one)
6 — OEM Partition
for what I understood of you article the partition that i have to shirnk is de Number 2 (C:). is no problem that it is not at the end of the disk?
You can shrink any partition to install Linux.
It doesn’t matter, specially when the partition table is GPT.
You can either shrink the D: drive or the C: drive.
Pablo Tavares says
thanks for the quick answer.
Drope Stein says
I have a Lenovo notebookk with Windows 10 OEM preinstalled and, as I have been reading, the Windows key inside the BIOS (or UEFI should I say, I think).
My question is: if I modify the partitions and go ahead with those steps, will my Windows 10 OEM still function?. Somewhere I read that if I modify the partitions, my Windows key could stop working. I want to install Linux (I’m thinking on Linux Mint KDE) but I’m afraid of losing my original Windows activation.
I don’t think installing any Linux distro will modify the OEM key, which is hard coded inside the UEFI. And under most circumstance, linux never touches the UEFI firmware.
You can extract and take note the OEM Windows 10 key available inside the /sys/firmware/acpi/tables/MSDM file.
Example- sudo strings /sys/firmware/acpi/tables/MSDM
Or even better, take note of the product key inside Windows 10.
My friend’s Dell Vostro laptop is still working fine, with dual boot Windows 10 and Ubuntu 17.10.
Drope Stein says
Thanks! Then I’ll proceed with the partition resizing and installing.
Thanks.
I follow your tutorial. I have laptop Dell but when I press f12 and choose «kingston UEFI ubuntu» drive, the system scape to Windows..what I miss?
Bad USB door. Thank you
You’re most welcome.
Arnob, Thank You for this very clear step by step guide. It all works as you state. I do not know if you can help or perhaps direct me to a solution, but the problem I am having is that when I bring up ubuntu, after a short while it freezes and I can only shut down the system and reboot — it is completely frozen, mouse, keyboard etc. That happens about 90% of the time I bring it up but not always. I have a ASUS PRIME X299-DELUXE motherboard and 32 gigs of ram. I installed the dual boot ubuntu and windows 10 on a Samsung 1TB 960 PRO M.2 Internal SSD. Thanks in advance. Don
It’s more likely a software related issue.
Which version of Ubuntu you’re using?
You should update and upgrade the whole system.
sudo apt-get update && sudo apt-get dist-upgrade
And use a lighter desktop environment like LXQt or XFCE, instead of Unity or Gnome3.
https://www.pcsuggest.com/install-lxqt-ubuntu-linux-mint/
Hi Arnab. in answer to your first question, I downloaded from ubuntu.com/download/desktop. Ubuntu 16.04.4 LTS. It has been hanging each time I try to get in it now so I can’t do anything with it including run a sudo command. I had wanted to learn linux and figured it would be useful for a few projects but maybe it is going to be too much of a hassle and I have too much on my plate for that. I’ll try a few more things and if it takes me too far astray I’d like to figure out how to un-install. I’ll see if I can find time to look into the other things you suggested. Thanks. Don
It’s running Unity desktop by default, you should try XFCE once.
And may be a CPU microcode and device firmware related issue.
sudo apt-get install intel-microcode linux-firmware
However this reply is too late, hope you’ll give Ubuntu few more chances.
Hi, im having trouble because the installer does not recognize my ssd. Any clue?
Im using a dell xps 15 (9550)
I suppose there’s a M.2 PCIe SSD on your laptop, not a SATA drive.
To get it working, you need to tweak the system a little.
Here’s a sketchy write up on Dell’s website,
dell.com/support/article/us/en/04/sln299303/loading-ubuntu-on-systems-using-pcie-m2-drives?lang=en
Hi Arnab. Thanks for the detailed article. I have carefully followed all your steps. Unfortunately I keep getting the same errors everytime i try to install. (I have tried several times)
«Warning: Source ID 38376 was not found when attempting to remove it
GLib.source_remove(self.rows_changed_id)»
This warning can continue repeating itself for hours when the installation process is about 80% complete.
I have Windows 10 preinstalled
My HDD has GPT partition table and it’s a UEFI system
Windows fastboot is disabled
What could be the problem?
Most probably a there’s some problem with the graphical installer, as GLib libraries are not required for any text mode application.
Or may be the ISO file is corrupted somehow.
Try to install Ubuntu with the alternative installation ISO, i.e. use the text mode installer, though it’s a bit difficult for beginners.
Sandesh Poojary says
February 28, 2018
Thank you so much, Arnab Satapathi.
February 7, 2018
Thanks a lot for taking all the pain to create this step by step guide. Although I have installed Ubuntu alongside Windows on several occasion successfully, I was a bit confused doing it this time as my new laptop has a GPT partition. You have saved my day.
Thanks once again. I am going to try this.
February 8, 2018
Thanks Sanjoy, glad to know you’ve found it useful.
Leave a Reply Cancel reply
This site uses Akismet to reduce spam. Learn how your comment data is processed.


