- How to Burn ISO to DVD on Mac for Free
- Part 1. How to Burn ISO with Mac OS X Finder
- Wondershare DVD Creator
- Guide to Burn ISO with Mac OS X Finder
- Part 2. Burn ISO Image on Mac with Command Line
- Part 3. How to Reinstall Mac OS X from DVD
- Запись CD- и DVD-дисков на Mac
- How to Burn ISO to DVD on Mac
- Part 1. Using Finder MacOS to Burn ISO to DVD
- Steps on how to burn ISO to DVD Mac using Finder:
- Part 2. How to Burn ISO Images to DVD Using Command Line
- Part 3. Burn ISO to DVD Mac with Disk Utility
- Part 4. Best Method to Burn ISO to DVD Mac Without Losing Quality
- Wondershare UniConverter — Best DVD Burner for Windows 10 / Mac (Catalina Included)
- Steps to burn ISO to DVD Mac using Wondershare UniConverter:
- Step 1 load ISO files to Wondershare ISO to DVD Mac tool.
- Step 2 Choose DVD templates and adjust DVD settings.
- Step 3 Burn ISO to DVD Mac.
- Watch Videos to Burn ISO to DVD on Windows 10
How to Burn ISO to DVD on Mac for Free
As much as the ISO files are helpful for the Windows users, it is also very useful for the Mac users who would want to burn the program files to data disc. Burning the ISO files to DVD in Mac isn’t that much of a complicated task as it seems. There are many ways that allow the users to carry out the process. There was a disk utility present in the Mac OS, but the Apple Inc. removed the function due to some reasons. So, in this article, we are going to discuss the most reliable and authentic methods that would allow the users to burn ISO to DVD Mac with the help of different software.
Part 1. How to Burn ISO with Mac OS X Finder
Although with the release of Mac OS X 10.11, the burning functionality of the Mac was removed from the Disk Utility there is still an effective way that would burn the ISO to DVD on Mac. It is the Finder that would carry out the process now. The Finder is the first thing that opens up when you turn on your Mac, and it stays open even when you use other apps. It is called Finder because it helps the users to search and organize the files on your system.
Wondershare DVD Creator
- В· Convert H.264 videos to DVD/Blu-ray Disc/ISO File/DVD Folder/Data Disc with fast speed and high-quality output.
- В· Edit H.264 videos with features of cropping/trimming/rotating videos, add subtitle, apply effects, and others.
- В· Select H.264 to DVD menu with 100+ template design from Movie, Memory, to Travel theme.
- В· Customize H.264 DVD menu with parameters such as background image, music, text, and others.
- В· Additional functions including ISO to DVD, Data Disc, Video Editor, Slideshow Maker, DVD to Video, DVD to DVD, One-click to Burn DVD, etc.
- В· Both DVD5 and DVD9 disc are available.
- В· Supported OS: Windows 10/8/7/XP/Vista, Mac OS 10.14 (Mojave), 10.13 (High Sierra), 10.12, 10.11, 10.10, 10.9, 10.8, 10.7, 10.6.
Guide to Burn ISO with Mac OS X Finder
Step 1 Firstly you will have to open up a new finder window and navigate it to the location of the ISO file that you want to burn. Then click on the file to select it.
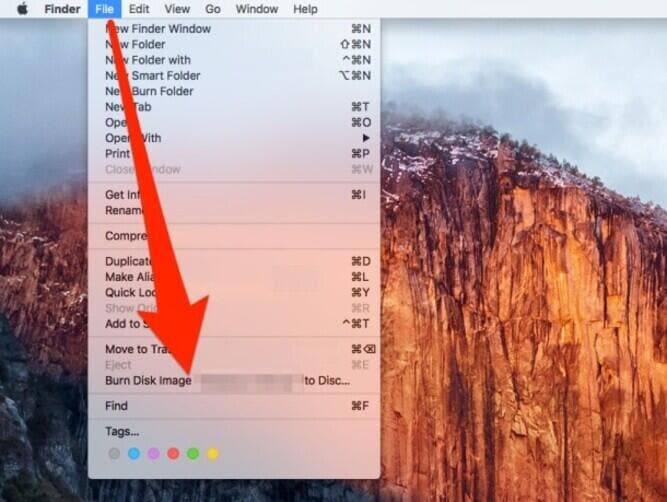
Step 2 Now, from the top menu, tap on the File option and select the Burn Disk Image option from the list.
Step 3 Now insert a disc in your Mac drive and tap on the Burn option to start the process.
You can also right click on the file and choose the Burn Disk Image from there. The Finder will burn the files to the disc immediately and you can remove the disc from the drive and it is ready to use.
Part 2. Burn ISO Image on Mac with Command Line
Another method that can be used to burn the ISO image on Mac is using the Command line. There are many people out there who prefer using the Command line for most of the task they carry out on their computers. It is perfectly fit for such users. Although the users must be precise when it comes to Command line Syntax otherwise the process will result in failure or unexpected consequences.
Step 1 At first, place the ISO file that you want to burn in some place where it can be easily accessed by the command line. It will be best if you place it on the desktop to avoid searching for it.
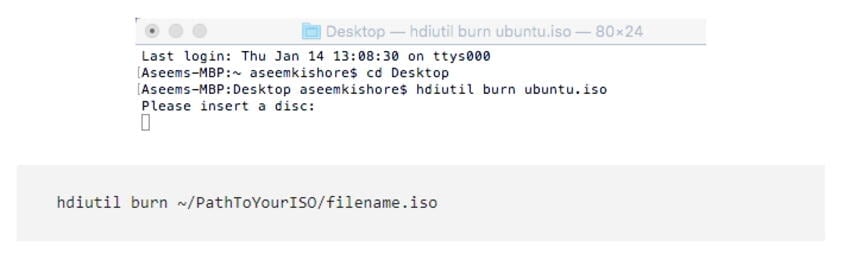
Step 2 Now, insert a Blank disc in the drive and launch the terminal and start typing the commands as-
/Path/To/DiskImageFile.iso. This command will burn the ISO file to the disk immediately.
This method is very powerful and it will burn the ISO image to the DVD very fast thereby making the hdiutil the most valuable ISO burning software for Mac users. The Command line of the Mac is smart enough to detect what kind of file you are trying to burn and will complete the process as soon as possible.
Part 3. How to Reinstall Mac OS X from DVD
Keeping the OS in a Bootable DVD is very common. Many people prefer to use Bootable discs to reinstall the OS in Mac in case any error occurs. You can use an OS X restore disc, installation disc and even a third party disc like Linux to reinstall the Mac OSX.
But to do this, you will need a SuperDrive or a Disc drive from which you can boot the Mac using the keyboard shortcut keys. To create a bootable DVD you first need to burn ISO image on Mac, and you will have your OS on a bootable disc.
Now, to reinstall Mac OS X from DVD, follow the steps below:
Step 1 Insert the DVD into the drive and make sure it is bootable. Then turn off your Mac or simply reboot it.
Step 2 When the Mac is restarting, enter the Boot system and hold the C key during boot up. Keep the key pressed until the Mac boots from DVD. This will guide the system to load from the DVD rather than the internal hard drive. The process might be slow because it takes more time to read the disc as compared to the internal drive. When it is loaded, you will see a Welcome Screen.
Note: If the disc doesn’t boot then, you will see a prohibitory sign or spinning wheel of death or some kernel alert or any other screen rather than the installer. You can directly skip to next step.
Step 3 If the Mac doesn’t boot in the above step, then hold the Option key and it will display the Startup manager. From the Startup menu, you can select which bootable disc you want to use. As you are trying to boot the Mac from DVD, so choose the DVD option.

Step 4 Once you select the DVD, press the Enter Key to boot from it. The Mac OS will boot from the DVD, and you will be able to set up a new OS on your Mac. Follow the installation process and set up the software and utilities of the Mac.
The Booting process is time-consuming and hence, you must be patient while you are reinstalling your OS on your Mac. As there are different versions of Mac OS X, the process might differ for different versions but booting from the DVD process remains almost the same for all.
As we read in the article, there are many methods that can be used to burn the ISO files in the Mac OS without the need of some third party software. But the use of these inbuilt programs can be a little tough for the users which don’t have much technical knowledge of the command line. The Finder can also carry out the process, but using the third party ISO burner for Mac is better for the users as they offer more features without the complex interface.
Источник
Запись CD- и DVD-дисков на Mac
Если Ваш Mac оснащен встроенным дисководом оптических дисков или Вы подключили внешний дисковод DVD (например, дисковод Apple USB SuperDrive), Вы можете записывать файлы на CD- и DVD-диски, чтобы делиться файлами с друзьями, перемещать файлы между компьютерами или выполнять резервное копирование файлов. Диски, записанные на компьютере Mac, можно использовать также на компьютерах Windows и компьютерах других типов.
Вставьте чистый диск в оптический дисковод.
Если отображается диалоговое окно, нажмите всплывающее меню, затем выберите «Открыть Finder». Установите флажок «Установить действие по умолчанию», если Вы хотите, чтобы Finder открывался всякий раз при вставке чистого диска.
Диск появится на рабочем столе.
Дважды нажмите диск, чтобы открыть его, и перетяните необходимые файлы и папки в окно диска.
Псевдонимы файлов помещаются в окно диска. Оригиналы файлов не перемещаются и не удаляются.
Примечание. Если Вы хотите записать одни и те же файлы на несколько дисков, используйте папку записи.
Разместите и переименуйте файлы.
Объекты на записанном диске будут называться и размещаться так же, как в окне диска. После записи диска переименовать или переместить объекты будет невозможно.
Выберите «Файл» > «Записать» [диск] и следуйте инструкциям.
Файлы, на которые указывают псевдонимы, записываются на диск. Кроме того, если Вы добавили на диск папки, содержащие псевдонимы, файлы, на которые указывают эти псевдонимы, также записываются на диск.
Примечание. Если Вы извлекаете диск, не записав его, Finder создает папку записи, которая содержит объекты, скопированные Вами на диск, и помещает эту папку на рабочий стол. Чтобы завершить процесс записи, нажмите значок записи  рядом с папкой в боковом меню Finder либо, удерживая клавишу Control, нажмите любой диск, затем выберите «Запись диска» в контекстном меню.
Чтобы записать образ диска (файл .dmg file) на диск, нажмите файл образа, удерживая клавишу Control, выберите в контекстном меню пункт «Записать образ диска [имя диска] на диск», а затем следуйте инструкциям.
Совет. Чтобы удалить содержимое с перезаписываемого диска, нажмите CD или DVD в боковом меню Finder при нажатой клавише Control, затем в контекстном меню выберите «Очистить перезаписываемый диск».
Источник
How to Burn ISO to DVD on Mac
by Christine Smith • 2021-07-21 16:41:22 • Proven solutions
An ISO is an image file that represents the entire contents of your DVD, CD, or BD. So, if you need to enjoy your ISO file’s video content, you need to burn ISO on DVD so that it can be played on any playable devices. There are a number of tools and solutions available to burn ISO to DVD Mac and Windows, which we’ll discuss in the following parts of the article.
Part 1. Using Finder MacOS to Burn ISO to DVD
One of the most commonly used methods to burn ISO to DVD Mac is using the Finder application. This method works on almost all versions of the OS and is simple and straightforward.
Steps on how to burn ISO to DVD Mac using Finder:
Step 1: Open the Finder window on your Mac, browse the ISO file, and single click to select it.
Step 2: Next, click File > Burn Disk Image (filename) to disc option. Alternatively, you can also select the ISO file, right-click, and choose the Burn Disk Image option.
Step 3: Insert a blank disc into your Mac drive and click the Burn button to start the process.
Part 2. How to Burn ISO Images to DVD Using Command Line
Another solution to burn ISO to DVD Mac Mojave and other OS is through a command line where no third-party software is needed. This method is also known as a Terminal method under which you have to type a single line command for the process to initiate. In this method, if there is a disc present in your drive before running the command, the process will start automatically; else, you will be prompted to insert a DVD.
Step 1: Place your ISO image file on the desktop, home folder, or easily locatable position.
Step 2: Insert a blank disc into your Mac
Step 3: Open the Terminal and type the command – hdiutil burn
The disk image file will start burning by hdiutil to the inserted disc.
Part 3. Burn ISO to DVD Mac with Disk Utility
For the users having OS X 10.10 or lower OS versions, Disk Utility is also a decent method to burn ISO image files to DVD.
Steps on how to burn an ISO to DVD on Mac using Disk Utility
Step 1: Click on the magnifying glass icon, which is for Spotlight at the top-right of the screen and open Disk Utility.
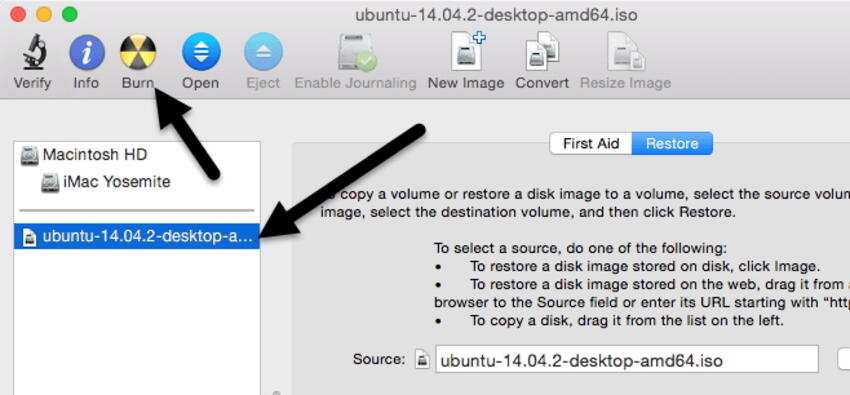
Step 2: Open File Menu and choose the Open Disk Image option. The left side will show the ISO image along with the hard drive list.
Step 3: Insert a Hit the ISO file and then click the Burn tab at the top.
Step 4: Insert a blank DVD into your Mac drive and click the Burn button to start the process.
Part 4. Best Method to Burn ISO to DVD Mac Without Losing Quality
The above listed are basic methods for burning your ISO files to DVD. If you want a professional solution with an added feature, an expert program is needed. We here recommend Wondershare UniConverter for Mac (originally Wondershare Video Converter Ultimate for Mac) as an excellent tool for all your disc-related needs, including ISO file burning to DVD. In addition to Mac, the program also supports Windows 10 and allows quality conversion of ISO to DVD in quick, simple steps. You will also find converting film to DVD is an easy thing to do.
Wondershare UniConverter — Best DVD Burner for Windows 10 / Mac (Catalina Included)

- Burn ISO images files to DVD and Blu-ray disc on Mac/Windows easily.
- Customize DVD with an array of menu templates in different themes.
- Support 1000+ video formats, including MP4, MOV, WMV, MKV, AVI, etc.
- Background image or music can be added to the DVD easily.
- Super fast burning speed and full quality output to convert ISO to DVD in batch.
- Built-in video editor to customize videos with cropping, trimming, adding subtitles, and others.
- Download or record videos from YouTube and other 10,000+ video sharing sites.
- Transfer converted DVD videos to devices and external hard drives directly.
- Versatile toolbox: Add video metadata, GIF maker, video compressor, and screen recorder.
Steps to burn ISO to DVD Mac using Wondershare UniConverter:
Step 1 load ISO files to Wondershare ISO to DVD Mac tool.
Open Wondershare UniConverter for Mac on your system. Choose the DVD Burner tab and open the drop-down menu at Load DVD . Select ISO Files option to browse and add ISO files on your system.
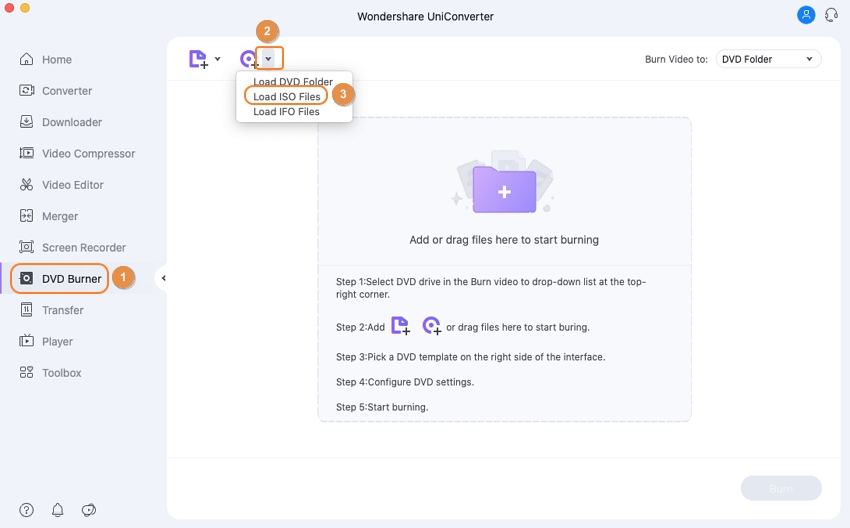
The added files will appear as thumbnails on the interface. Under the thumbnail image, there are editing icons that you can use for cut, crop, trim, and other functions.
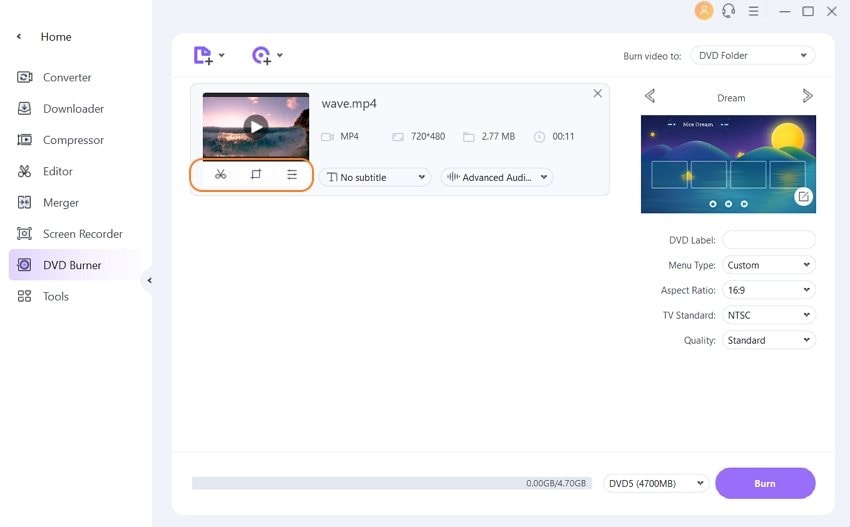
Step 2 Choose DVD templates and adjust DVD settings.
The left side panel of the interface shows the available DVD menu templates. Move the left and right arrow to check the designs. To add background music or image to your disc, click the edit icon to open the DVD templates. Choose the desired image of a music file from here.
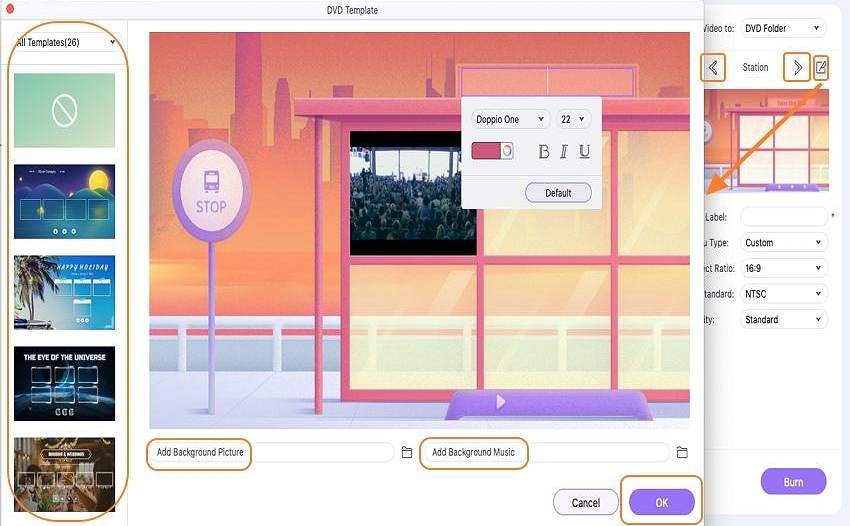
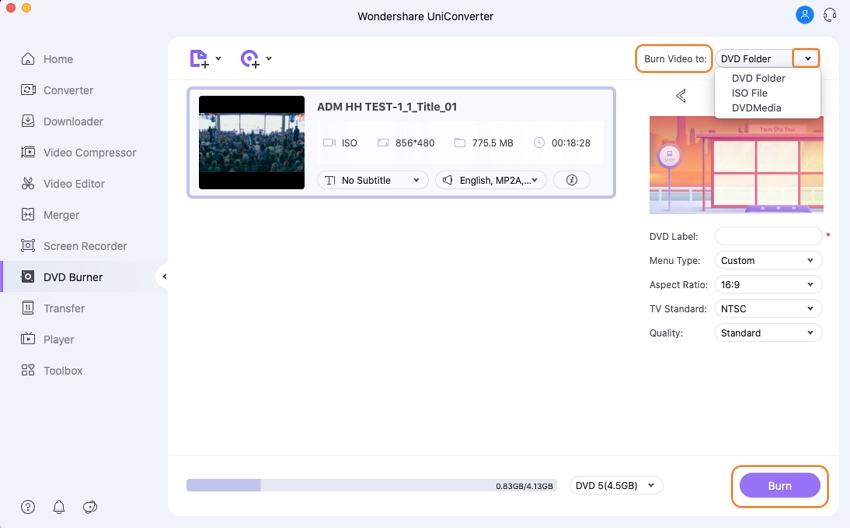
Next, give a label to your disc and choose other parameters like menu type, aspect ratio, TV standard, and quality.
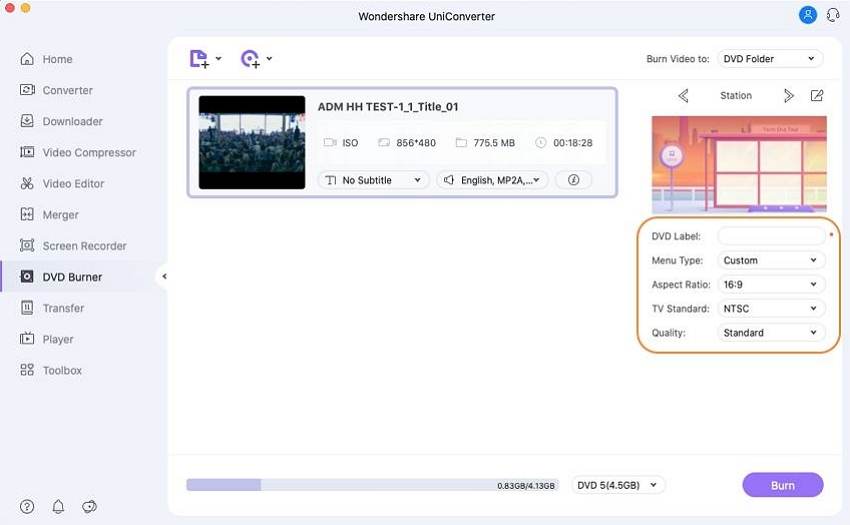
Step 3 Burn ISO to DVD Mac.
Enter a blank disc into your Mac drive. Next, open the drop-down menu at the «Burn video to:» option on the top-right corner. Choose the DVD option. Finally, click Burn on the bottom to start burning your ISO image files to DVD. So far, you have found a pretty simple way on how to burn video to DVD.
Watch Videos to Burn ISO to DVD on Windows 10
Источник


