- AD User Certificate and Wireless 802.1x EAP-TLS on Mac OS X
- Prerequisites
- Wireless EAP-TLS 802.1x Configuration
- Scripting the Wireless 802.1x EAP-TLS Configuration Profile
- Добавление параметров Wi-Fi для устройств macOS в Microsoft Intune
- Подготовка к работе
- Базовые профили:
- Корпоративные профили:
- Understand and configure EAP-TLS using WLC and ISE
- Available Languages
- Download Options
- Contents
- Introduction
- Prerequisites
- Requirements
- Components Used
- Background Information
- EAP-TLS Flow
- Steps in EAP-TLS Flow
- Configure
- Cisco Wireless LAN Controller
- ISE with Cisco WLC
- EAP-TLS Settings
- WLC Settings on ISE
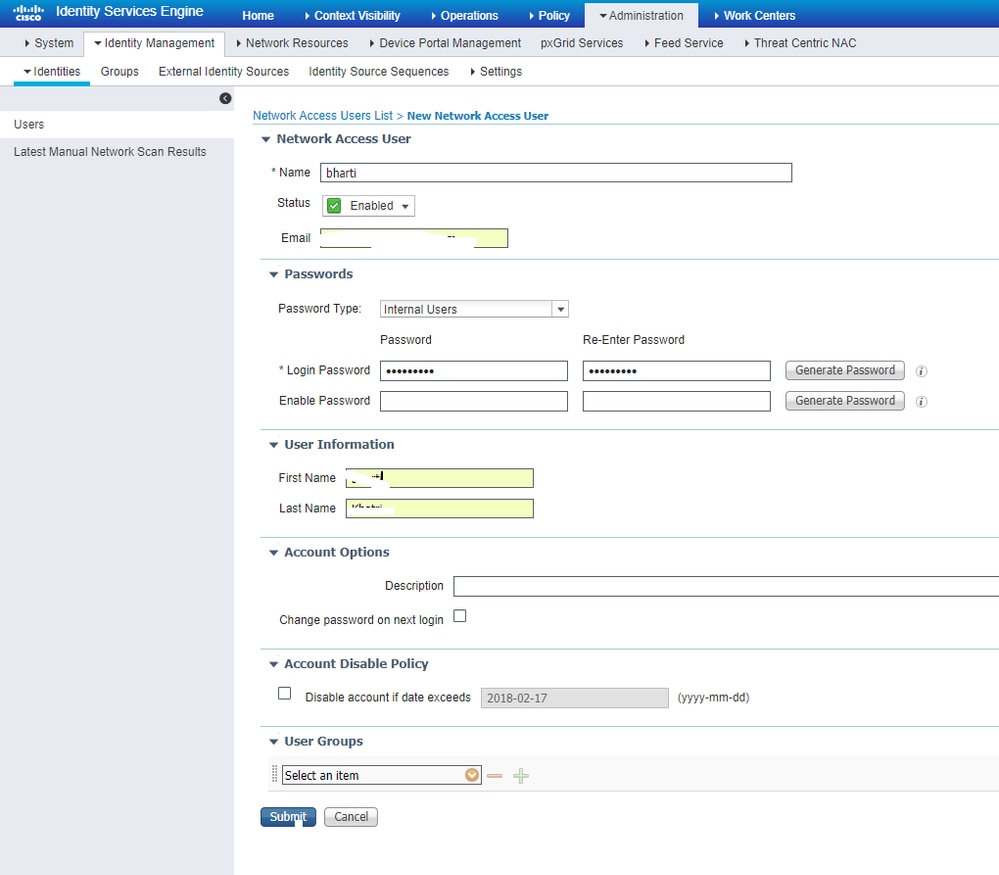
- Create New User on ISE
- Trust Certificate on ISE
- Client for EAP-TLS
- Download User Certificate on Client Machine (Windows Desktop)
- Wireless Profile for EAP-TLS
- Verify
- Troubleshoot
AD User Certificate and Wireless 802.1x EAP-TLS on Mac OS X
You’ve been tasked with ensuring the Mac’s on your domain have the correct certificates and magic tricks to get 802.1x to work, and let’s face it no matter how much as an Admin you want to admit it there is no elegant way to get this configured in a fully automated process (in my experience). So here’s how I’ve managed to get it working for Wireless connections:
Prerequisites
- Copies of your Root-CA and Issuing Certificate Authorities Certificates (.cer formats)
- A User certificate template name configured for EAP-TLS Authentication
- AD service account
- Secure Build Network with line of sight to Active Directory
Wireless EAP-TLS 802.1x Configuration
- Head over to your Casper JSS and create a new configuration profile
- Give it an appropriate name, select a relevant category and select User Level to apply the policy
Scripting the Wireless 802.1x EAP-TLS Configuration Profile
Now at this point you can use the JSS to automatically deploy the configuration profile and hope there are AD users logged into the Mac’s, for me I wanted to control how and when the configuration profile is installed. The best scenario for me is utilising the “Once per user per computer” run frequency so in order to do this, I’d have to install the certificate as the user at login. Here’s how I did it:
- Download the configuration profile created earlier from the JSS
- Package the configuration profile with Composer, this is just to place the configuration profile in a temporary location on the Mac, for my example I place the file in a TEMP folder in the Users > Shared location
Источник
Добавление параметров Wi-Fi для устройств macOS в Microsoft Intune
Вы можете создать профиль с определенными параметрами Wi-Fi и развернуть этот профиль для устройств macOS. Microsoft Intune предлагает множество возможностей, в том числе проверку подлинности в сети, добавление сертификата PKCS или SCEP и многое другое.
Эти параметры Wi-Fi разделены на две категории: основные параметры и корпоративные параметры.
Все они описаны в этой статье.
Подготовка к работе
Эти параметры доступны для всех типов регистрации. Дополнительные сведения о типах регистрации см. в статье о регистрации устройств macOS.
Базовые профили:
Базовый или личный профиль использует WPA/WPA2 для защиты подключения Wi-Fi на устройствах. Обычно WPA/WPA2 используется в домашних или личных сетях. Вы также можете добавить общий ключ для проверки подлинности подключения.
Тип Wi-Fi. Установите переключатель в положение Основной.
SSID. Обозначает идентификатор беспроводной сети. Это настоящее имя беспроводной сети, к которой будут подключаться устройства. Тем не менее при выборе подключения пользователи видят только имя сети, настроенное вами.
Подключаться автоматически. Выберите Включить, чтобы устройство автоматически подключалось к этой сети, когда находится в зоне ее действия. Выберите Отключить, чтобы запретить автоматическое подключение устройств.
Скрытая сеть. Выберите Включить, чтобы скрыть эту сеть в списке доступных сетей на устройстве. Идентификатор SSID не будет передаваться. Выберите Отключить, чтобы сеть отображалась в списке доступных сетей на устройстве.
Тип безопасности. Выберите протокол безопасности, который будет использоваться для проверки подлинности в сети Wi-Fi. Доступны следующие параметры:
- Открыть (без проверки подлинности) . Используйте этот параметр, если сеть не защищена.
- WPA/WPA2-Personal. Введите пароль в поле Общий ключ. Когда создается или настраивается корпоративная сеть, для нее настраивается пароль или ключ сети. Введите этот пароль или ключ сети в качестве значения для общего ключа.
- WEP
Параметры прокси-сервера. Доступны следующие параметры:
Нет: Параметры прокси-сервера не настроены.
Вручную. Введите адрес прокси-сервера в формате IP-адреса и укажите соответствующий номер порта.
Автоматически. Для настройки прокси-сервера будет использоваться файл. Введите URL-адрес прокси-сервера, содержащий файл конфигурации. Например, введите http://proxy.contoso.com , 10.0.0.11 или http://proxy.contoso.com/proxy.pac .
Дополнительные сведения о файлах PAC см. в разделе Файл автоматической настройки прокси-сервера (PAC) (открывается веб-сайт, отличный от Майкрософт).
Корпоративные профили:
Корпоративные профили используют расширяемый протокол проверки подлинности (EAP) для проверки подлинности подключений Wi-Fi. Протокол EAP часто используется предприятиями, поэтому вы можете использовать сертификаты для проверки подлинности и защиты подключений, а также для настройки дополнительных параметров безопасности.
Тип Wi-Fi. Выберите Корпоративный.
SSID. Обозначает идентификатор беспроводной сети. Это настоящее имя беспроводной сети, к которой будут подключаться устройства. Тем не менее при выборе подключения пользователи видят только имя сети, настроенное вами.
Подключаться автоматически. Выберите Включить, чтобы устройство автоматически подключалось к этой сети, когда находится в зоне ее действия. Выберите Отключить, чтобы запретить автоматическое подключение устройств.
Скрытая сеть. Выберите Включить, чтобы скрыть эту сеть в списке доступных сетей на устройстве. Идентификатор SSID не будет передаваться. Выберите Отключить, чтобы сеть отображалась в списке доступных сетей на устройстве.
Тип EAP. Выберите тип протокола расширенной проверки подлинности (EAP), используемый для проверки подлинности безопасных беспроводных подключений. Доступны следующие параметры:
EAP-FAST. Введите параметры Protected Access Credential (PAC) . В этом варианте используются учетные данные защищенного доступа для создания туннеля с аутентификацией между клиентом и сервером аутентификации. Доступны следующие параметры:
- Не использовать (PAC).
- Использовать (PAC) . Если есть PAC-файл, следует его использовать.
- Использовать и подготовить PAC. Создание PAC-файла и добавление его на устройства.
- Использовать и подготовить PAC анонимно. Создание PAC-файла и добавление его на устройства без проверки подлинности на сервере.
EAP-SIM;
EAP-TLS. Кроме того, укажите:
Имена серверов сертификатов. Добавление одного или нескольких общих имен, которые используются в сертификатах, выданных доверенным центром сертификации (ЦС). Указав эти сведения, вы сможете избежать появления окна динамической проверки, которое отображается на устройствах пользователей при подключении к сети Wi-Fi.
Корневой сертификат для проверки сервера. Выберите один существующий профиль доверенного корневого сертификата или несколько. Эти сертификаты предоставляются серверу при подключении клиента к сети. Они проверяют подлинность подключения.
Сертификаты. Выберите профиль сертификата клиента SCEP или PKCS, развернутый на устройстве. Этот сертификат выполняет роль идентификатора, который устройство предоставляет серверу для аутентификации подключения.
Конфиденциальность удостоверений (внешнее удостоверение) . Введите текст, отправляемый в ответ на запрос удостоверения EAP. Этот текст может иметь любое значение, например anonymous . Во время проверки подлинности сначала будет отправлено это анонимное удостоверение, после чего в защищенный туннель будет отправлена фактическая идентификация.
EAP-TTLS. Также введите следующие данные:
Имена серверов сертификатов. Добавление одного или нескольких общих имен, которые используются в сертификатах, выданных доверенным центром сертификации (ЦС). Указав эти сведения, вы сможете избежать появления окна динамической проверки, которое отображается на устройствах пользователей при подключении к сети Wi-Fi.
Корневые сертификаты для проверки серверов. Выберите один существующий профиль доверенного корневого сертификата или несколько. Эти сертификаты предоставляются серверу при подключении клиента к сети. Они проверяют подлинность подключения.
Метод проверки подлинности. Выберите метод проверки подлинности, используемый клиентами устройств. Доступны следующие параметры:
Имя пользователя и пароль. Пользователю предлагается ввести имя пользователя и пароль для аутентификации подключения. Кроме того, укажите:
Метод отличается от EAP (внутреннее удостоверение) . Выберите, как будет выполняться аутентификация подключения. Здесь нужно выбрать тот же протокол, который настроен в используемой сети Wi-Fi.
Доступны следующие параметры: Незашифрованный пароль (РАР) , Протокол проверки пароля (CHAP) , Microsoft CHAP (MS-CHAP) или Microsoft CHAP версии 2 (MS-CHAP v2) .
Сертификаты. Выберите профиль сертификата клиента SCEP или PKCS, развернутый на устройстве. Этот сертификат выполняет роль идентификатора, который устройство предоставляет серверу для аутентификации подключения.
Конфиденциальность удостоверений (внешнее удостоверение) . Введите текст, отправляемый в ответ на запрос удостоверения EAP. Этот текст может иметь любое значение, например anonymous . Во время проверки подлинности сначала будет отправлено это анонимное удостоверение, после чего в защищенный туннель будет отправлена фактическая идентификация.
LEAP;
PEAP. Кроме того, укажите:
Имена серверов сертификатов. Добавление одного или нескольких общих имен, которые используются в сертификатах, выданных доверенным центром сертификации (ЦС). Указав эти сведения, вы сможете избежать появления окна динамической проверки, которое отображается на устройствах пользователей при подключении к сети Wi-Fi.
Корневой сертификат для проверки сервера. Выберите один существующий профиль доверенного корневого сертификата или несколько. Эти сертификаты предоставляются серверу при подключении клиента к сети. Они проверяют подлинность подключения.
Метод проверки подлинности. Выберите метод проверки подлинности, используемый клиентами устройств. Доступны следующие параметры:
Имя пользователя и пароль. Пользователю предлагается ввести имя пользователя и пароль для аутентификации подключения.
Сертификаты. Выберите профиль сертификата клиента SCEP или PKCS, развернутый на устройстве. Этот сертификат выполняет роль идентификатора, который устройство предоставляет серверу для аутентификации подключения.
Конфиденциальность удостоверений (внешнее удостоверение) . Введите текст, отправляемый в ответ на запрос удостоверения EAP. Этот текст может иметь любое значение, например anonymous . Во время проверки подлинности сначала будет отправлено это анонимное удостоверение, после чего в защищенный туннель будет отправлена фактическая идентификация.
Параметры прокси-сервера. Выберите конфигурацию прокси-сервера. Доступны следующие параметры:
Нет: Параметры прокси-сервера не настроены.
Вручную. Введите адрес прокси-сервера в формате IP-адреса и укажите соответствующий номер порта.
Автоматически. Для настройки прокси-сервера будет использоваться файл. Введите URL-адрес прокси-сервера, содержащий файл конфигурации. Например, введите http://proxy.contoso.com , 10.0.0.11 или http://proxy.contoso.com/proxy.pac .
Дополнительные сведения о файлах PAC см. в разделе Файл автоматической настройки прокси-сервера (PAC) (открывается веб-сайт, отличный от Майкрософт).
Источник
Understand and configure EAP-TLS using WLC and ISE
Available Languages
Download Options
Contents
Introduction
This documents describes how to set up a Wireless Local Area Network (WLAN) with 802.1x security and with the use of Extensible Authentication Protocol (EAP) -Transport Layer Security (TLS).
Prerequisites
Requirements
Cisco recommends that you have knowledge of these topics:
- 802.1x authentication process
- Certificates
Components Used
The information in this document is based on these software and hardware versions:
- WLC 5508 version 8.3
- Identity Services Engine (ISE) version 2.1
The information in this document was created from the devices in a specific lab environment. All of the devices used in this document started with a cleared (default) configuration. If your network is live, ensure that you understand the potential impact of any command.
Background Information
EAP-TLS Flow

Steps in EAP-TLS Flow
- Wireless Client gets associated with the Access Point (AP).
- AP does not permit the client to send any data at this point and sends an authentication request.
- The supplicant then responds with an EAP-Response Identity. The WLC then communicates the user-id information to the Authentication Server.
- RADIUS server responds back to the client with an EAP-TLS Start Packet. The EAP-TLS conversation starts at this point.
- The peer sends an EAP-Response back to the authentication server which contains a «client_hello» handshake message, a cipher that is set for NULL.
- The authentication server responds with an Access-challenge packet that contains:
- Client responds with a EAP-Response message that contains:
- After the client authenticates successfully, the RADIUS server responds with an Access-challenge, which contains the «change_cipher_spec» and handshake finished message. Upon receiving this, the client verifies the hash in order to authenticate the radius server. A new encryption key is dynamically derived from the secret during the TLS handshake.
- At this point, the EAP-TLS enabled wireless client can access the wireless network.
Configure
Cisco Wireless LAN Controller
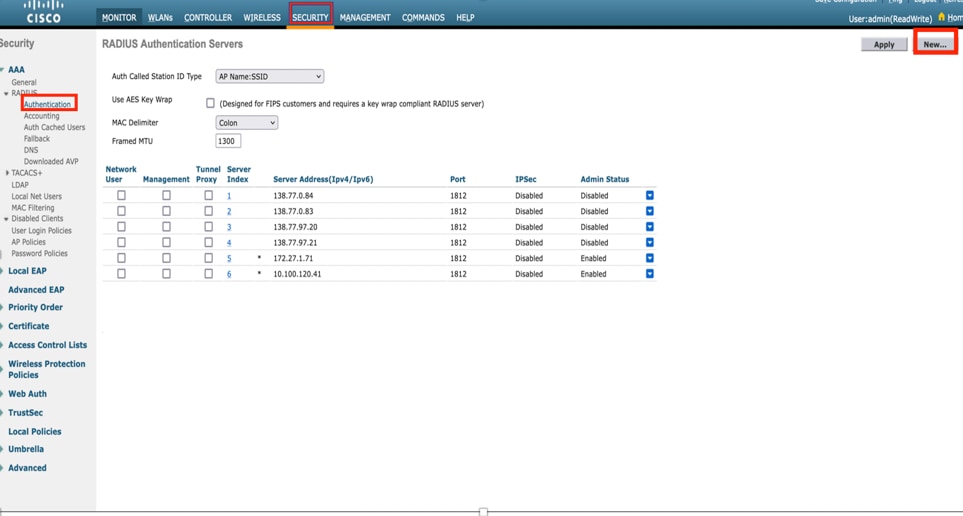
Step 1. The first step is to configure the RADIUS server on the Cisco WLC. In order to add a RADIUS server, navigate to Security > RADIUS > Authentication. Click New as shown in the image.
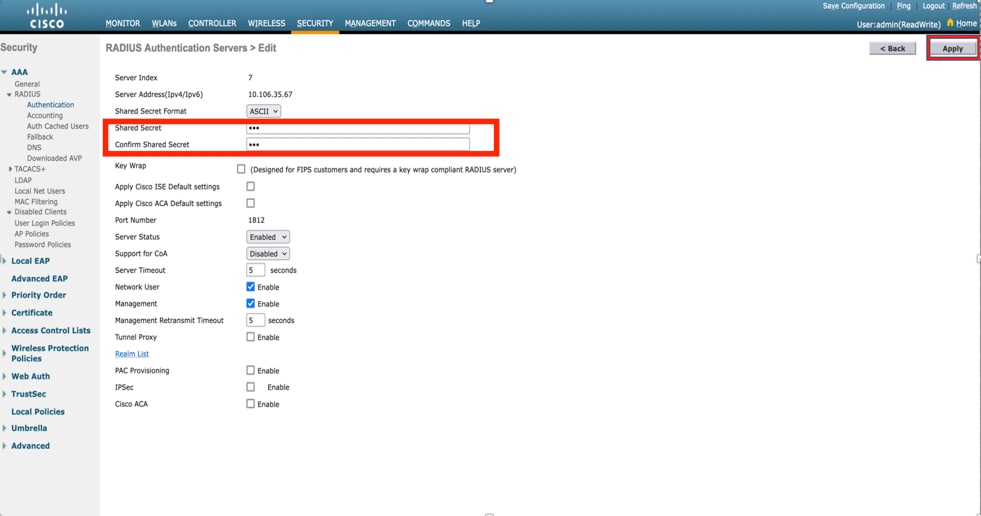
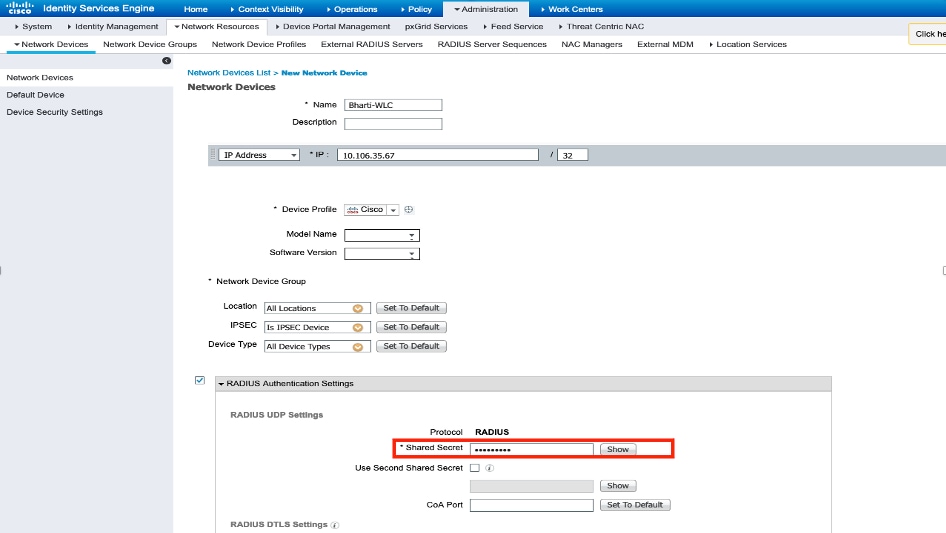
Step 2. Here, you need to enter the IP address and the shared secret
that is used in order to validate the WLC on the ISE. Click Apply in order to continue as shown in the image.
Step 3. Create WLAN for RADIUS Authentication.
Now, you can create a new WLAN and configure it to use WPA-enterprise mode, so it can use RADIUS for authentication.
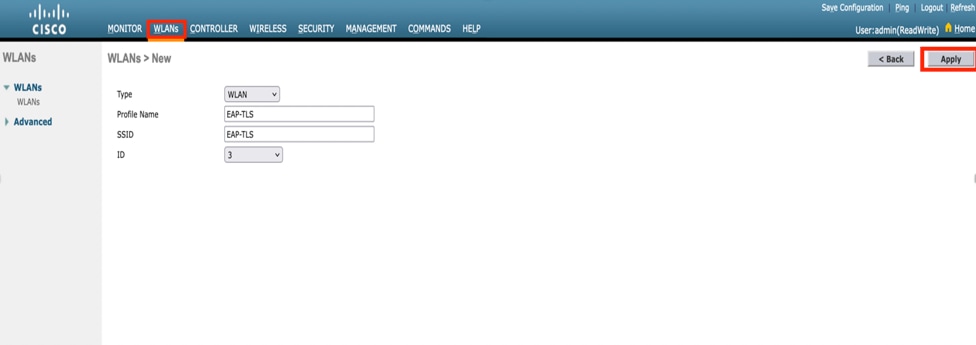
Step 4. Select WLANs from the main menu, choose Create New and click Go as shown in the image.

Step 5. Let’s name the new WLAN EAP. Click Apply in order to continue as shown in the image.
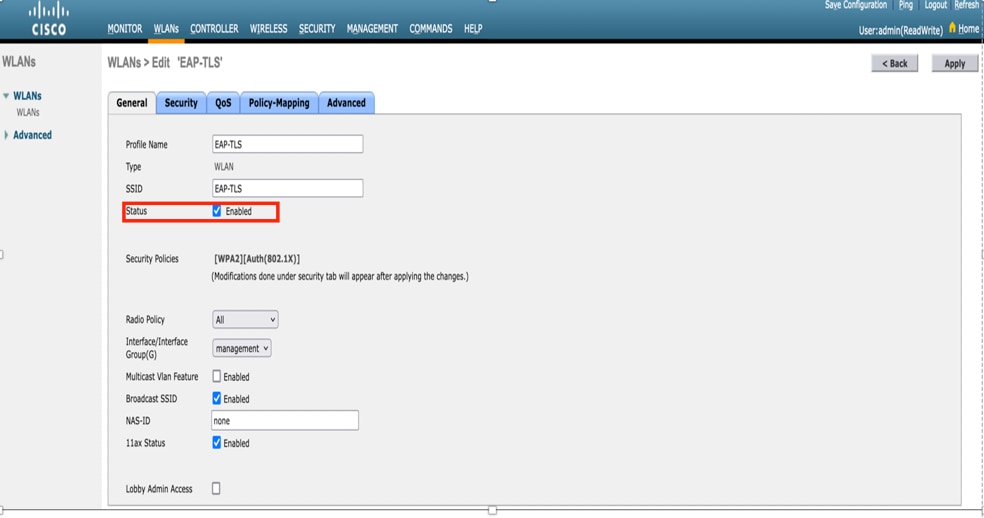
Step 6. Click General and ensure that the Status is Enabled. The default Security Policies is 802.1X authentication and WPA2 as shown in the image.
Step 7. Now, navigate to Security > AAA Servers tab, select the RADIUS server that you just configured and as shown in the image.
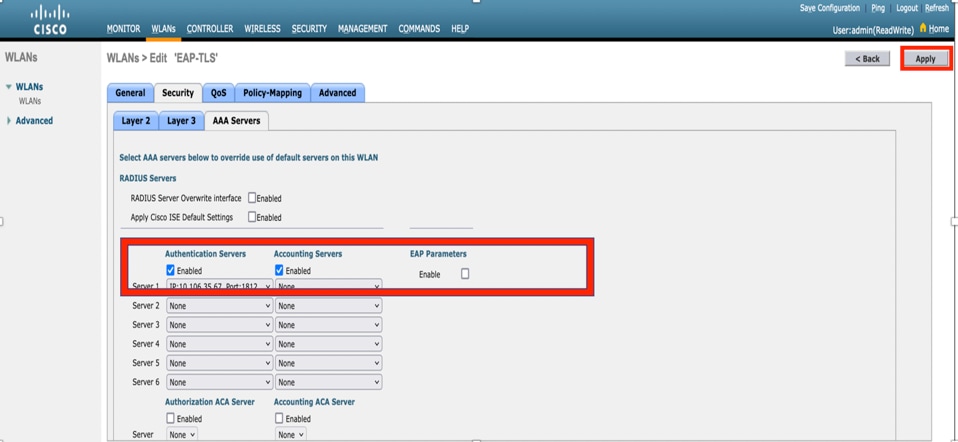
Note: It is a good idea to verify that you can reach the RADIUS server from the WLC before you continue. RADIUS uses UDP port 1812 (for authentication), so you need to ensure that this traffic does not get blocked anywhere in the network.
ISE with Cisco WLC
EAP-TLS Settings
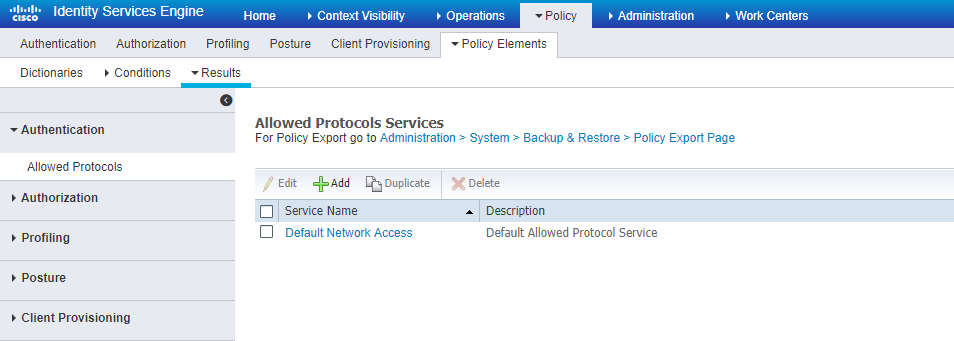
In order to build the policy, you need to create the allowed protocol list to use in our policy. Since a dot1x policy is written, specify the allowed EAP type based on how the policy is configured.
If you use the default, you allow most EAP types for authentication which might not be preferred if you need to lock down access to a specific EAP type.
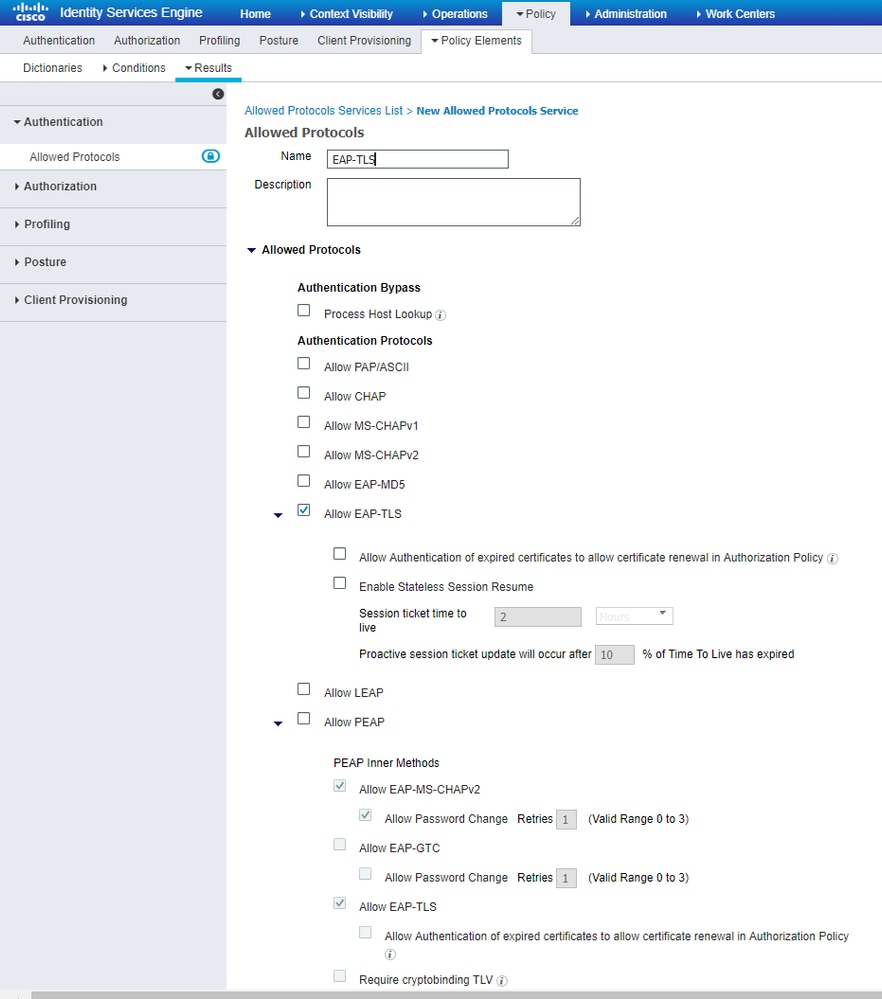
Step 1. Navigate toPolicy > Policy Elements > Results > Authentication > Allowed Protocolsand clickAdd as shown in the image.
Step 2. On this Allowed Protocol list, you can enter the name for the list. In this case, Allow EAP-TLS box is checked and other boxes are unchecked as shown in the image.
WLC Settings on ISE
Step 1. Open ISE console and navigate to Administration > Network Resources > Network Devices > Add as shown in the image.

Step 2. Enter the values as shown in the image.
Create New User on ISE
Step 1. Navigate to Administration > Identity Management > Identities > Users > Add as shown in the image.

Step 2. Enter the information as shown in the image.
Trust Certificate on ISE
Step 1. Navigate to Administration > System > Certificates > Certificate Management > Trusted certificates.
Click Import in order to import a certificate to ISE. Once you add a WLC and create a user on ISE, you need to do the most important part of EAP-TLS that is to trust the certificate on ISE. For that we need to generate CSR.
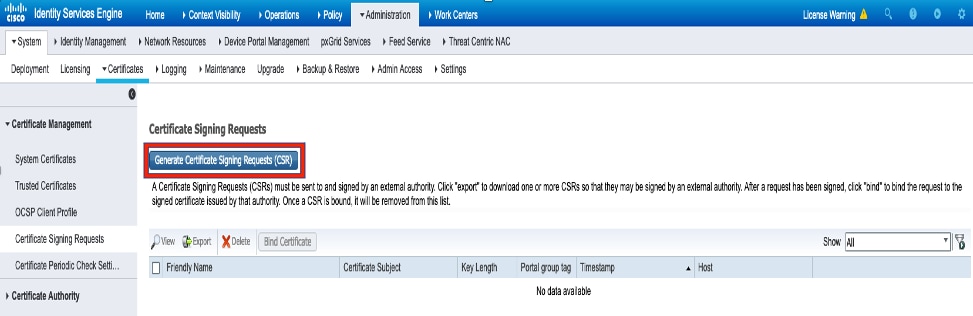
Step 2. Navigate to Administrauon > Certificates > Certificate Signing Requests > Generate Certificate Signing Requests (CSR) as shown in the image.
Step 3. In order to generate CSR, navigate to Usage and from the Certificate(s) will be used for drop down options select EAP Authentication as shown in the image.

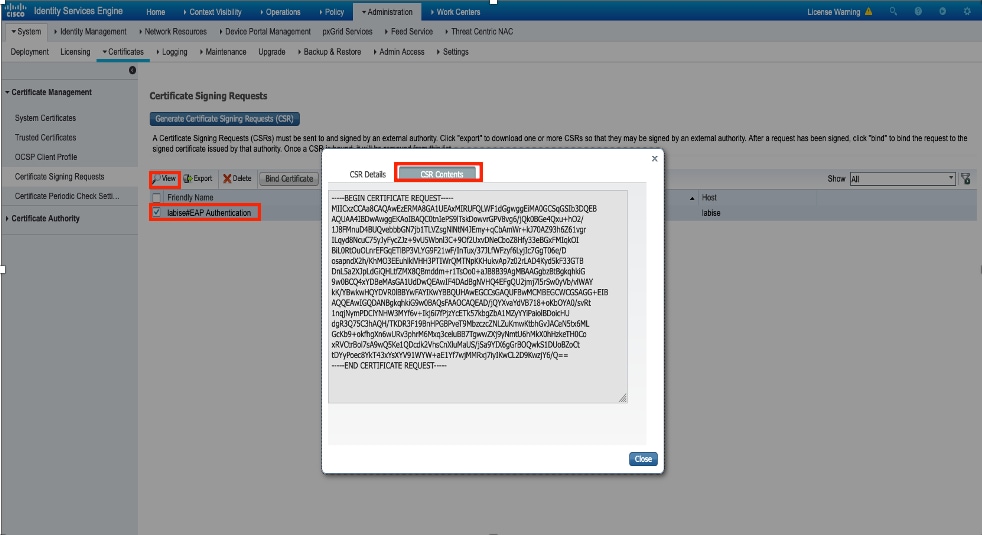
Step 4. The CSR generated on ISE can be viewed. Click View as shown in the image.
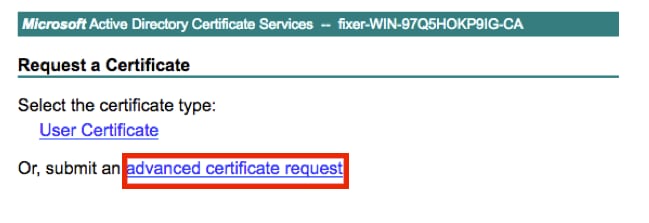
Step 5. Once CSR is generated, browse for CA server and click Request a certificate as shown in the image:

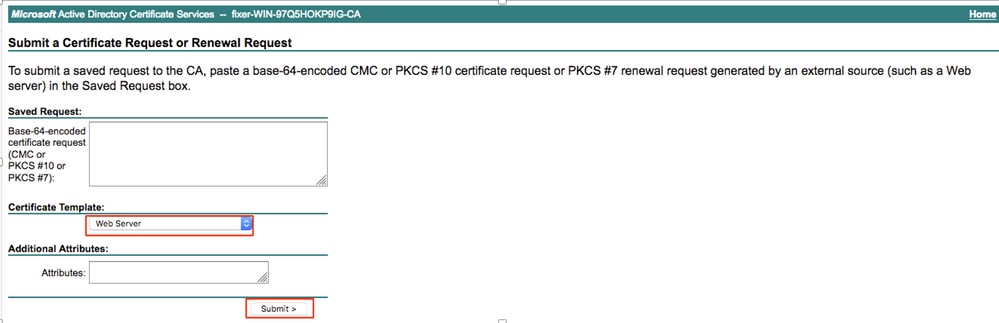
Step 6. Once you request a certificate, you get options for User Certificate and advanced certificate request, click advanced certificate request as shown in the image.
Step 7. Paste the CSR generated in Base-64 encoded certificate request. From the Certificate Template: drop down option, choose Web Server and click Submit as shown in the image.
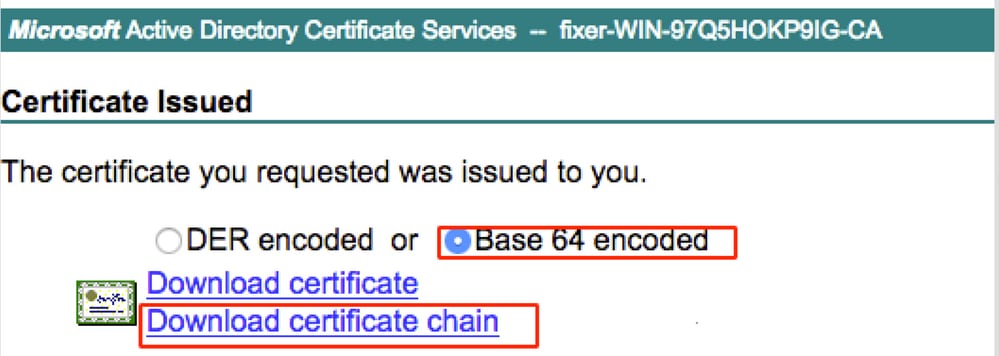
Step 8. Once you click Submit, you get the option to select the type of certificate, select Base-64 encoded and click Download certificate chain as shown in the image.
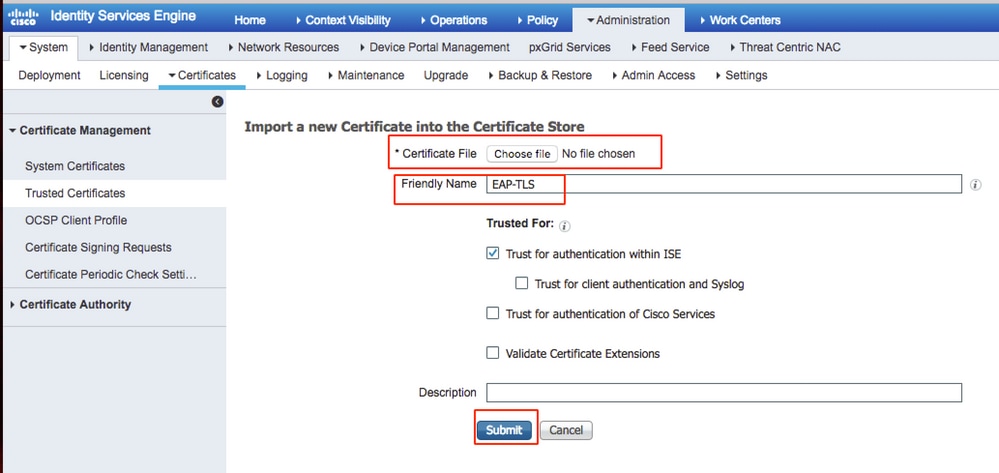
Step 9. The certificate download is completed for the ISE server. You can extract the certificate, the certificate will contain two certificates, one root certificate and other intermediate. The root certificate can be imported under Administration > Certifictes > Trusted certificates > Import as shown in the images.

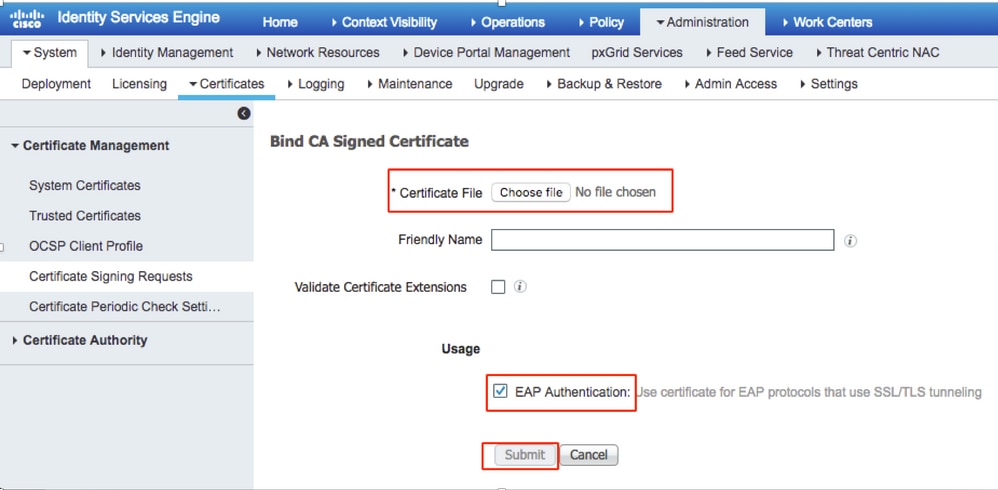
Step 10. Once you click Submit, the certificate is added to the trusted certificate list. Also, the intermediate certificate is needed in order to bind with CSR as shown in the image.

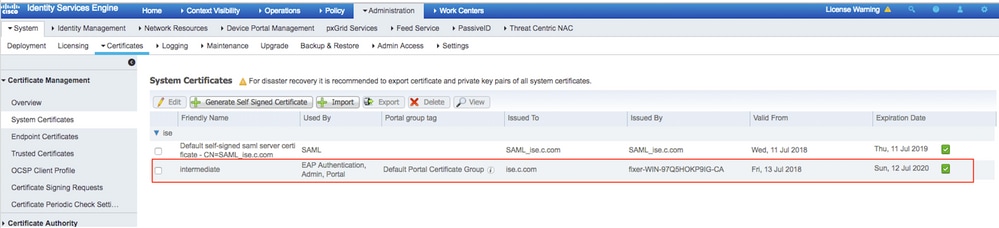
Step 11. Once you click on Bind certificate, there is an option to choose the certificate file saved in your desktop. Browse to the intermediate certificate and click Submit as shown in the image.
Step 12. In order to view the certificate, navigate to Administration > Certificates > System Certificates as shown in the image.
Client for EAP-TLS
Download User Certificate on Client Machine (Windows Desktop)
Step 1. In order to authenticate a wireless user through EAP-TLS, you have to generate a client certificate. Connect your Windows computer to the network so that you can access the server. Open a web browser and enter this address: https://sever ip addr/certsrv—
Step 2. Note that the CA must be the same with which the certificate was downloaded for ISE.
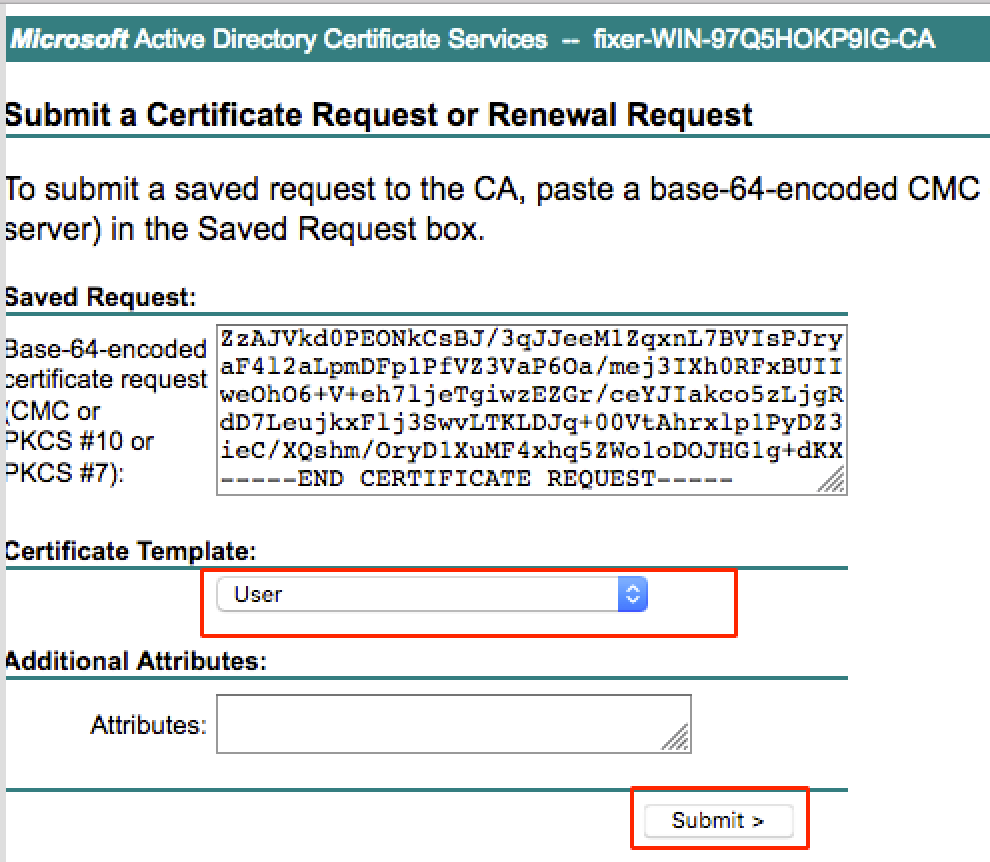
For this, you need to browse for the same CA server that you used to download the certificate for server. On the same CA, click Request a certificate as previously done, however this time you need to select User as the Certificate Template as shown in the image.
Step 3. Then, click download certificate chain as was done previously for server.
Once you get the certificates, follow these steps in order to import the certificate on windows laptop:
Step 4. In order to import the certificate, you need to access it from the Microsoft Management Console (MMC).
- In order to open the MMC navigate to Start > Run > MMC.
- Navigate to File > Add / Remove Snap In
- Double Click Certificates.
- SelectComputer Account.
- Select Local Computer >Finish
- Click OK in order to exit the Snap-In window.
- Click [+] next to Certificates > Personal > Certificates.
- Right click on Certificates and select All Tasks >Import.
- Click Next.
- Click Browse.
- Select the .cer, .crt, or .pfx you would like to import.
- Click Open.
- Click Next.
- Select Automatically select the certificate store based on the type of certificate.
- Click Finish & OK
Once import of certificate is done, you need to configure your wireless client (windows desktop in this example) for EAP-TLS.
Wireless Profile for EAP-TLS
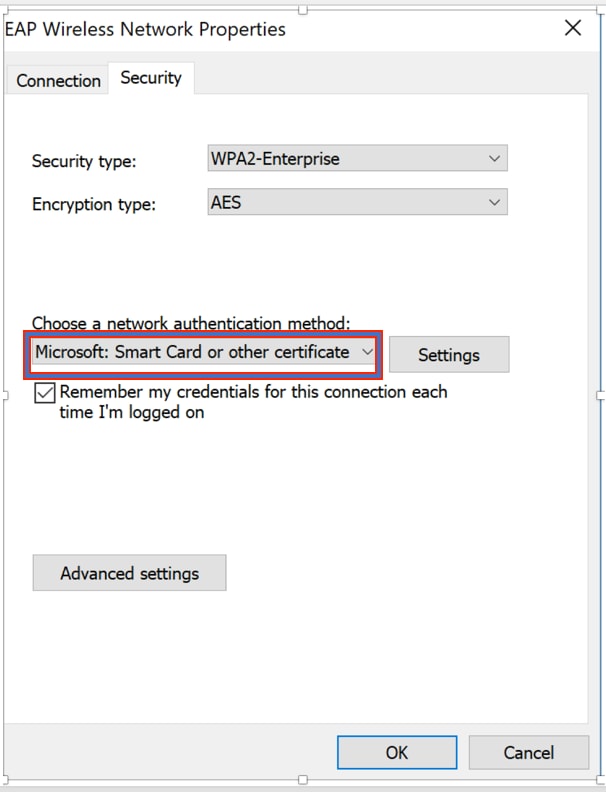
Step 1. Change the wireless profile that was created earlier for Protected Extensible Authentication Protocol ( PEAP) in order to use the EAP-TLS instead. Click EAP wireless profile.
Step 2. Select Microsoft: Smart Card or other certificate and click OK shown in the image.
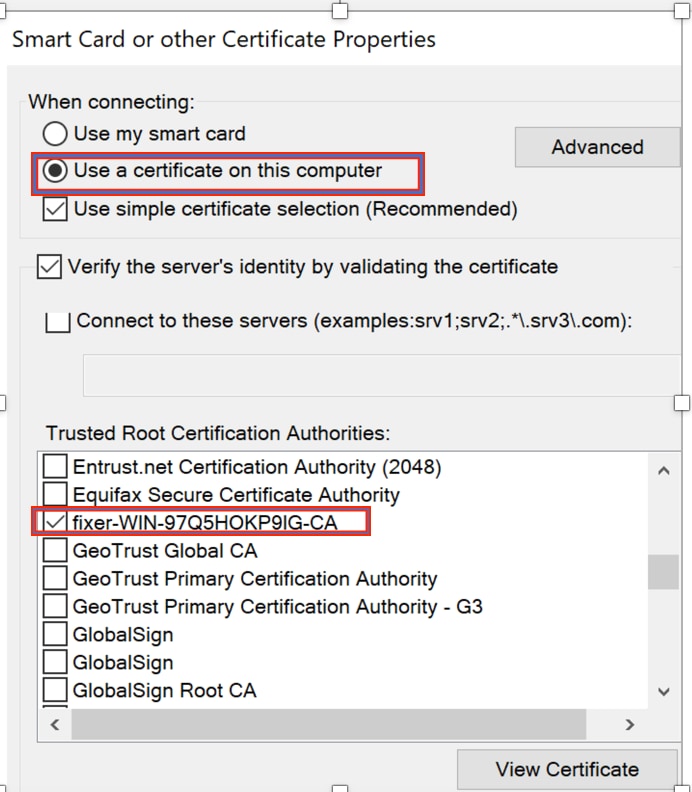
Step 3. Click settings and select the root certificate issued from CA server as shown in the image.
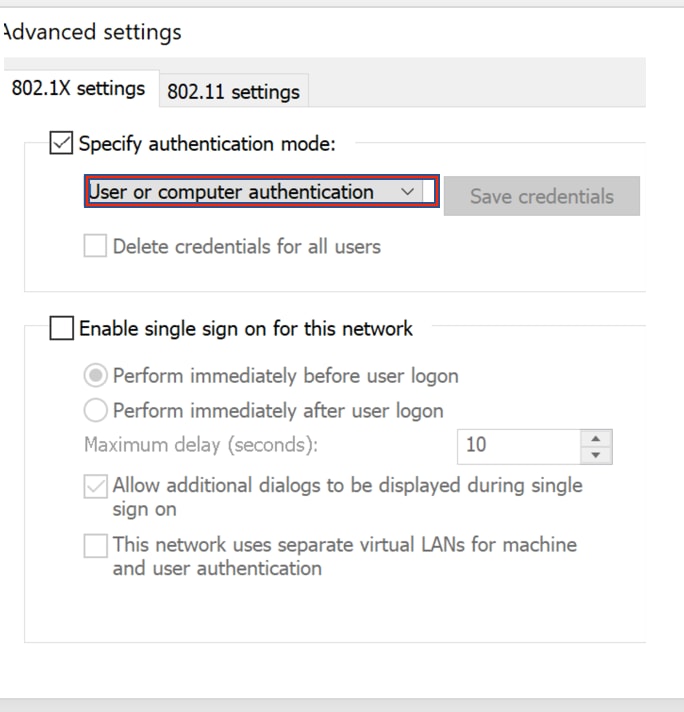
Step 4. Click Advanced Settings and select User or computer authentication from the 802.1x settings tab as shown in the image.
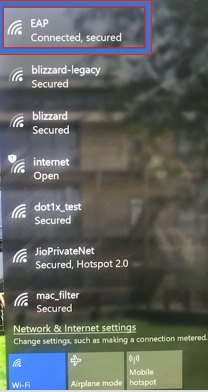
Step 5. Now, try to connect again to the wireless network, select the correct profile (EAP in this example) and Connect. You are connected to the wireless network as shown in the image.
Verify
Use this section in order to confirm that your configuration works properly.
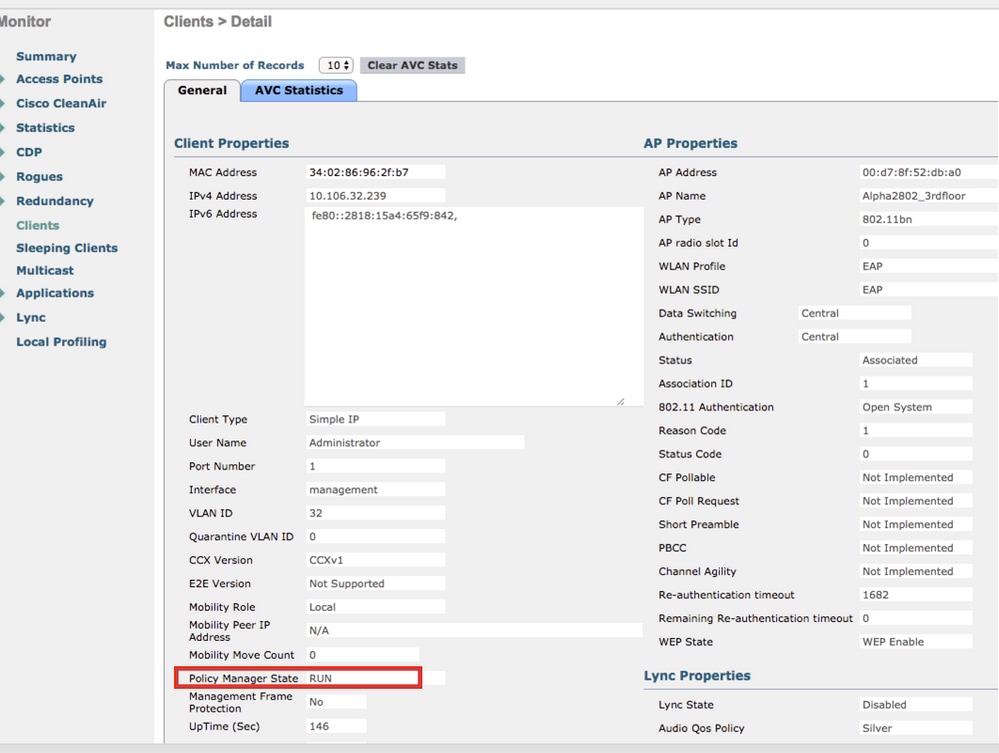
Step 1. The client policy manager state should show as RUN. This means that the client has completed authentication, obtained IP address and is ready to pass the traffic shown in the image.
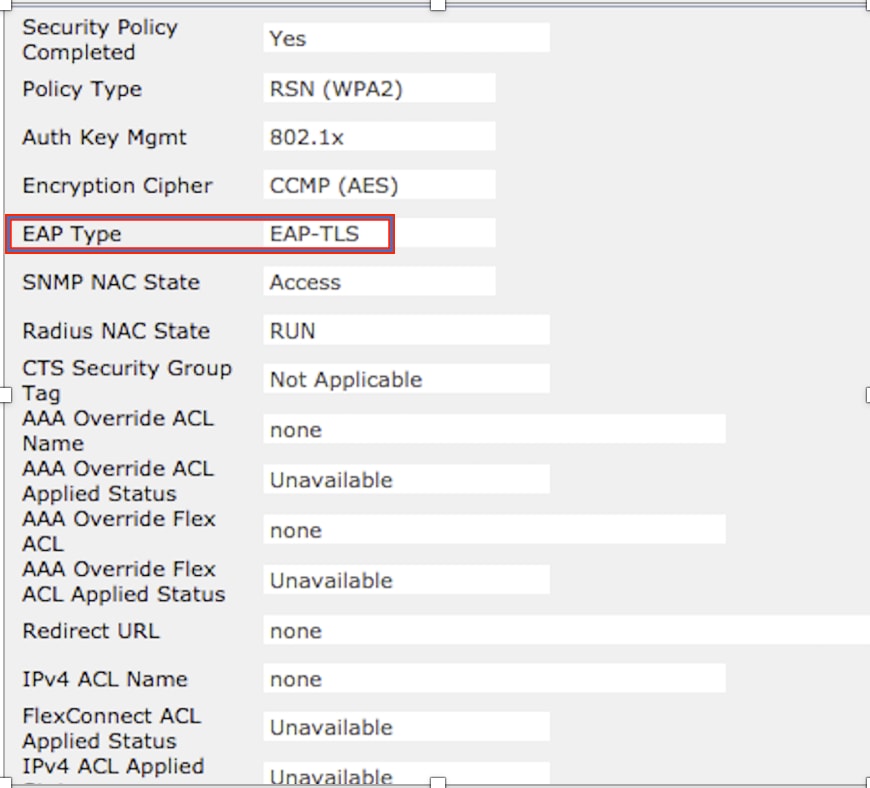
Step 2. Also verify the correct EAP method on WLC in the client details page as shown in the image.
Step 3. Here are the client detail from CLI of the controller (output clipped):
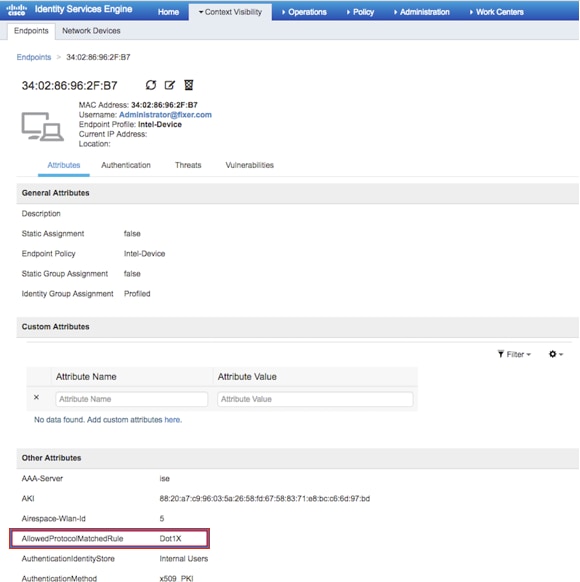
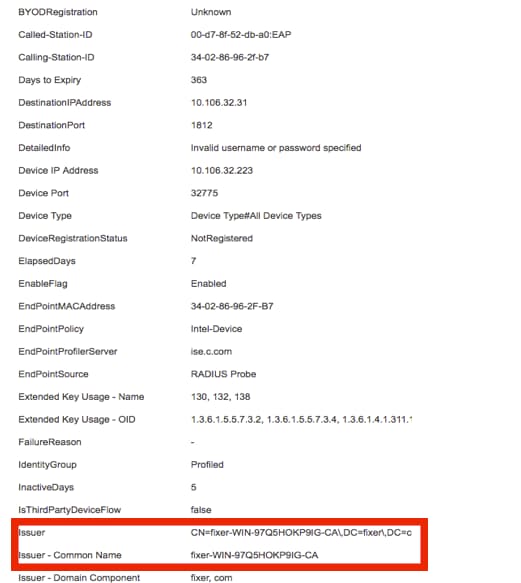
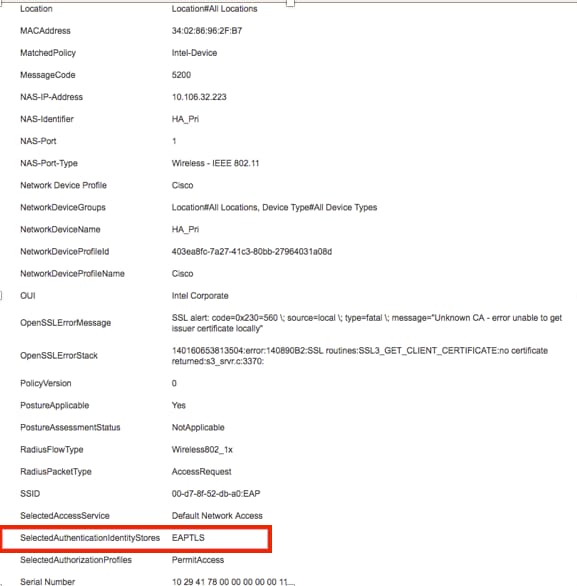
Step 4. On ISE, navigate to Context Visbility > End Points > Attributes as shown in the images.
Troubleshoot
There is currently no specific troubleshooting information available for this configuration.
Источник


