- How to Fix Windows Update Error
- Things to check before starting Windows Update
- 1. Run Windows Update Assistant
- 2. Run Windows Update Troubleshooter
- 3. Install Windows Updates Manually
- More steps to fix Windows Update Error for Advanced users
- 1. Re-configure / Reset Windows Update Components
- 2. Run DISM and SFC Command to fix Windows Update issue
- Re-activate Windows Update in Windows 7
- Microsoft Fix it скачать для Windows 7 с официального сайта как прежде не получится. Вот почему
- Можно ли Microsoft Fix it для Windows 7 скачать с официального сайта?
- Easy to Fix Windows Update Stuck at 0% Issue
- Windows Update Error 0x8024401c [Fixed]
- How do I fix 0x8024401c in Windows? Try these fixes:
- Why does 0x8024401c happen in my computer?
- Method 1: Check the network settings to fix 0x8024401c
- 1. Switch network connection in your computer
- 2. Uncheck IPv6 network
- Method 2: Update drivers to fix 0x8024401c
- Method 3: Modify the setting in Registry Editor to fix 0x8024401c
- Method 4: Run the SFC Scan to fix 0x8024401c
- Method 5: Perform a clean boot to fix 0x8024401c
How to Fix Windows Update Error
How to fix a Windows update error?
Windows update is an essential service in Windows 10 as you get the latest feature updates and security vulnerability updates through this service only. And as Microsoft has announced that it is the last version of the Windows, so Windows updates is your only option to keep your operating system updated.
But every user at least once already have faced some kind of issue related to Windows update. And when users face issue it does not just limited to updates but also create other issues like slow computer performance, unable to boot the computer or displaying error codes like 0x80070020, 0x80240438, 0xC19001E2, 0x80070424, 0x80242006, 0x8007000E, 0x80D02002, 0x80070070, 0x80096004, 0x80080005, 0x8007000D, or 0x80240034.
Things to check before starting Windows Update
So if you are facing issues I will here help you to get rid of the issue. Lets start from preliminary checks before we dig in the problem. Though I assume you have been already performed these steps. Just check and confirm.
- Try restarting computer for 2-3 times.
- Check your internet connection & its speed.
- Confirm that updates are not paused.
- Find out if there is enough space, if not then free up some space by deleting junk files from the system.
Now lets come to the steps which actually fix Windows updates errors.
1. Run Windows Update Assistant
This is the best and easy method to fix any Windows update issue. So you should first try this. It will automatically check for any error and and update the Windows to the latest updates.
- Go to the url : https://www.microsoft.com/en-in/software-download/windows10.
- Click on the ‘Update Now’ button.
- Run the assistant and it will automatically check for the latest updates. During installation it may restart the system for 1 or 2 times.
2. Run Windows Update Troubleshooter
In Windows 10, go to Settings → Update & Security → Troubleshoot → Windows Update → Troubleshoot → Additional troubleshooter and click on the Windows update troubleshooter from the list then click on the button ‘Run the troubleshooter’. It will automatically detect the problem and fix it for you.
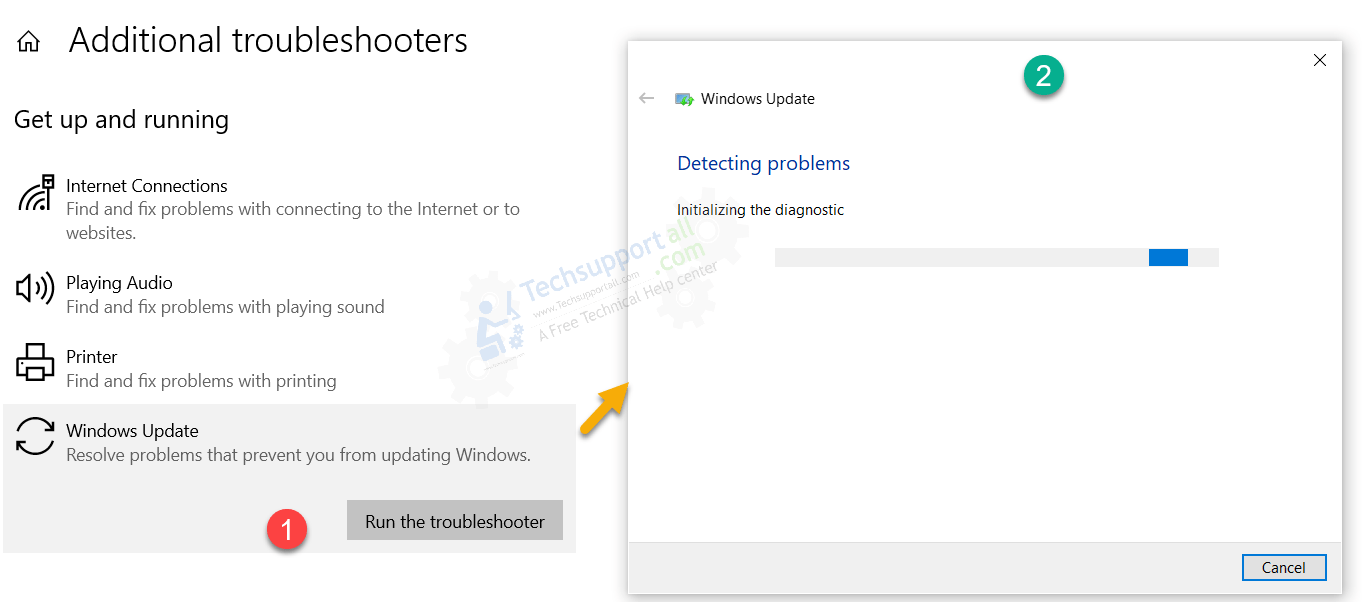 Windows update troubleshooter
For Windows 7
Download the Windows update troubleshooter file and double-click on it after download and follow its on-screen instructions to apply the troubleshooter fix.
3. Install Windows Updates Manually
If the above steps don’t work for you then try installing Windows updates manually. this method will help you to quickly install the latest updates and hopefully it will fix the automatic update issue for the future updates.
And if it doesn’t work then you can continue to try further steps mentioned here or go to the online troubleshooter provided by Microsoft.
More steps to fix Windows Update Error for Advanced users
These steps are only for the advanced users who are comfortable to use DOS or command window.
1. Re-configure / Reset Windows Update Components
While following the steps, you’ll also learn how to re-register all the “.dll” files that are related to Windows update and its services.
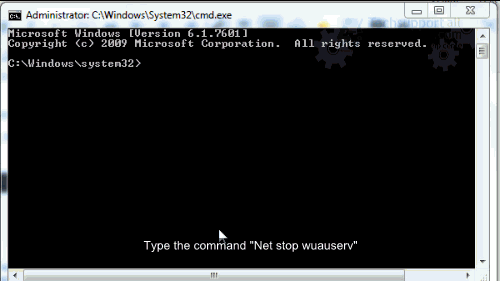
- Open the Command prompt.
Click on start → go to Accessories → and then go to Command Prompt. Then right-click on it and click on ‘Run as Administrator‘. - In the command prompt window, type the following commands one-by-one (which is in the box below) press enter key from your keyboard after running the following commands one-by-one. For more detail please see the following graphical animation.
- Finally, restart your computer now.
These command will work for all windows versions Windows 10, 8, 7.
2. Run DISM and SFC Command to fix Windows Update issue
It could be possible that some Windows system file has corrupted and due to which Windows update is unable to run properly. So in this case you can try to repair the system files in order to resolve the Windows Update issue.
- Run the Command Prompt as an Administrator (How).
- Type the command dism /online /cleanup-image /restorehealth and press Enter key.
- Now type the command sfc /scannow to repair the installation files and press Enter.
If the above steps not working in your case your can try other methods for failed or unfinished Windows 10 updates. Or Restore windows to an earlier date.
Re-activate Windows Update in Windows 7
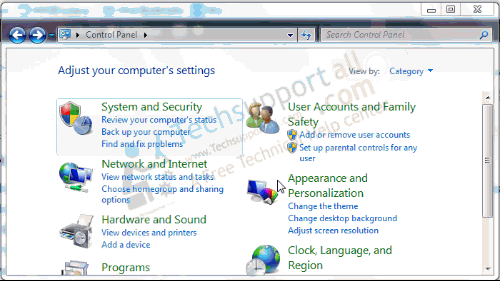
- Go to the Control Panel
- Click on System & Security
- Select on Windows Update
- Click on Change setting from the left side pane.
- Look at the right-side pane and select the option “Never Check for Updates (Not Recommended)” from the drop-down.
- Then click on OK.
- After that reboot your computer once.
- Now, go to the same settings again (Windows update change setting) and then set it “Install Update automatically (Recommended)” Settings. For more detail please see the following graphical animation.
- After that, restart the computer once more.

Why Windows update issue occur?
Most of the Windows update issues occur due to the last Windows update couldn’t download or updated properly. Sometimes Windows update’s downloads get corrupted while downloading. Once it gets corrupted, you may get several error messages while updating the Windows. One of them is: “Windows can’t be update”. That’s why, the Windows update get stopped in between.
My update got stuck between 51-99 % ?
Give it a time but if doesn’t or computer is not reaching up to the desktop then try restarting computer a few times or restart in recovery mode and repair the Windows.
How to stop my computer to run automatic windows updates?
Microsoft recommends to stay updated, however you can pause the updates temporarily.
Microsoft Fix it скачать для Windows 7 с официального сайта как прежде не получится. Вот почему
Друзья, всем привет! В этой статье я хочу рассказать вам об универсальной утилите от компании Microsoft, которая позволяет легко и непринужденно устранять различные проблемы в среде семейства операционных систем Windows.
То есть получается, что если по каким-то причинам ваш компьютер начал «глючить», например, обрываются сетевые соединения, нелады с печатью, установленными программами либо же с самой ОС, то данное чудо-средство должно помочь. По крайней мере, так говорится на сайте официальной службы поддержки.
В общем, все серьезно. Но вот беда, оказывается, уже давно решение Microsoft Fix it не поддерживается как таковое. Оно было переименовано и раздроблено на более профильные ветки по устранению неисправностей. Понимаю, что звучит запутанно, но давайте разбираться.
Можно ли Microsoft Fix it для Windows 7 скачать с официального сайта?
Можно, но уже не нужно. Я нашел одну живую ссылку только на установочный пакет по решению сетевых неполадок. Для этого необходимо проследовать вот по этому адресу и нажать кнопку «Download» в соответствующем разделе. Кстати, там же можно ознакомиться со списком поддерживаемых версий Windows.
Работает утилита Fix it полностью в автоматическом режиме, от пользователя требуется лишь нажимать кнопку «Далее». Она сама находит возникшие неисправности и устраняет их. Такой подход мне нравится, так сказать, для ленивых:
Easy to Fix Windows Update Stuck at 0% Issue
Last Updated: 1 year ago
Windows Update not working issue is common in all Windows versions. In this post, you will learn how to fix Windows Update stucking at 0KB issue. Steps apply to Windows 10, 7 & 8.

Windows Update Stuck at 0KB 0%
Solution 1: Do Nothing
Yes. You just need to wait and be patient. Then you would see the download jump up to a high percentage. The reason why this happens is unknown. But many Windows users who encountered this issue like you got rid of it in this way. Wait for several hours. It may work like a charm for you.
Solution 2: Disable All Non-Microsoft Services
This simple solution has worked for many people. Try it. It may fix your issue too.
Follow these steps.
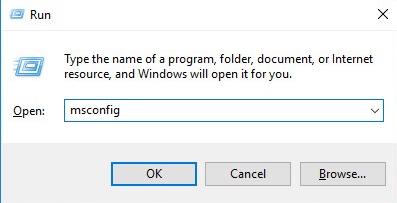
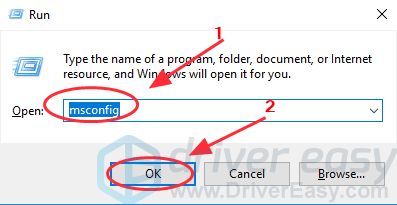
1. Press Win+R (Windows logo key and R key) at the same time. A Run dialog box will open.
2. Type msconfig in the run box and click on OK button.
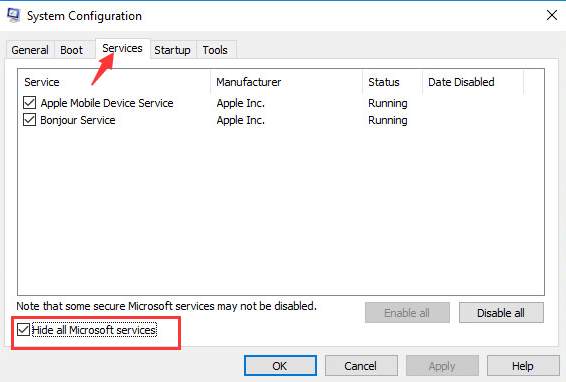
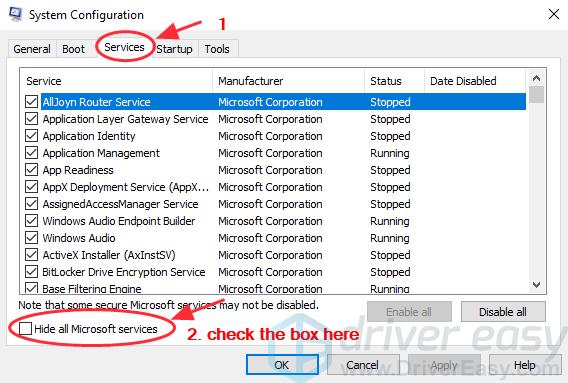
3. Click the Services tab and check the box next to Hide all Microsoft services.
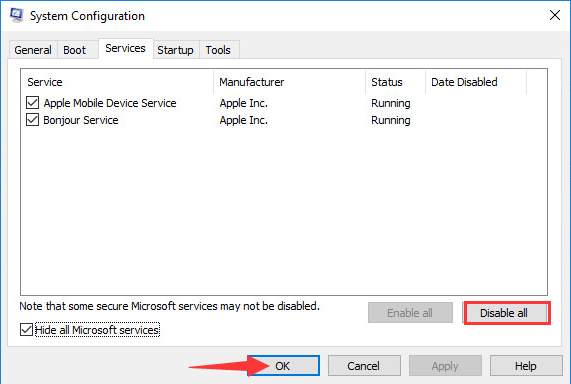
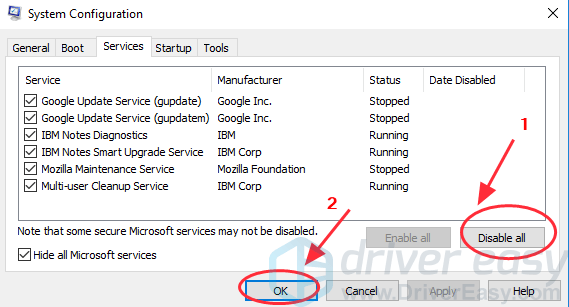
4. Click Disable all button and click OK button.
5. Restart your PC for the changes to take effect.
6. Launch Windows Update and download the updates again.
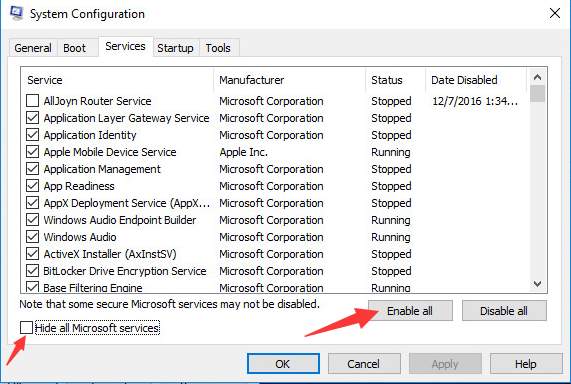
Tip: After downloading the updates, open System Configuration dialog box and enable all disabled services.
Uncheck the box next to Hide all Microsoft services and click Enable all button. Then click OK button.
Solution 3: Temporarily Turn Off Windows Firewall
Windows Firewall may block the download. Turn off Windows Firewall and see if it works for you.
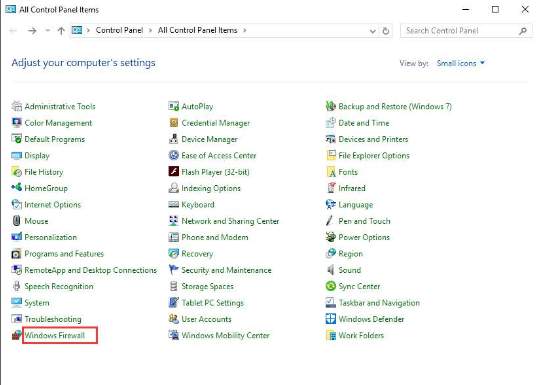
Follow these steps to turn off Windows Firewall.
2. View by Small icons and click on Windows Firewall.
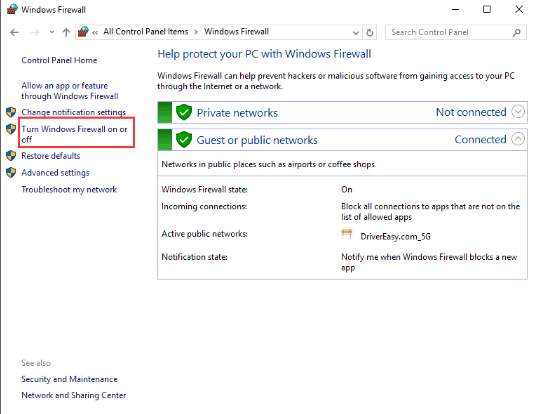
3. In left pane, select Turn Windows Firewall on or off.
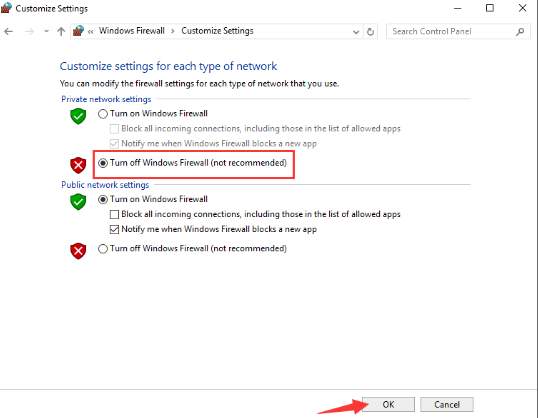
4. Select Turn off Windows Firewall (not recommended). Then click OK button.
Tip: You can turn it on again after Windows updates are done.
5. Download Windows Updates again.
Solution 4: Use Anti-virus Software to Scan Your Computer
The problem could be of Trojans. If you have installed anti-virus software on your computer, use it to scan your computer to detect any possible virus.
Solution 5: Stop and Restart Windows Update Service
Follow these steps:
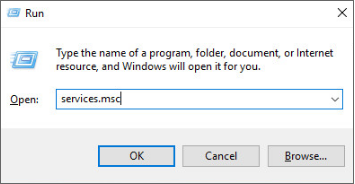
1. Press Win+R (Windows logo key and R key) at the same time. A Run dialog box will open.
2. Type services.msc in the run box and click OK button.
3. Find Windows Update service. Right-click on it and click Stop on the context menu.
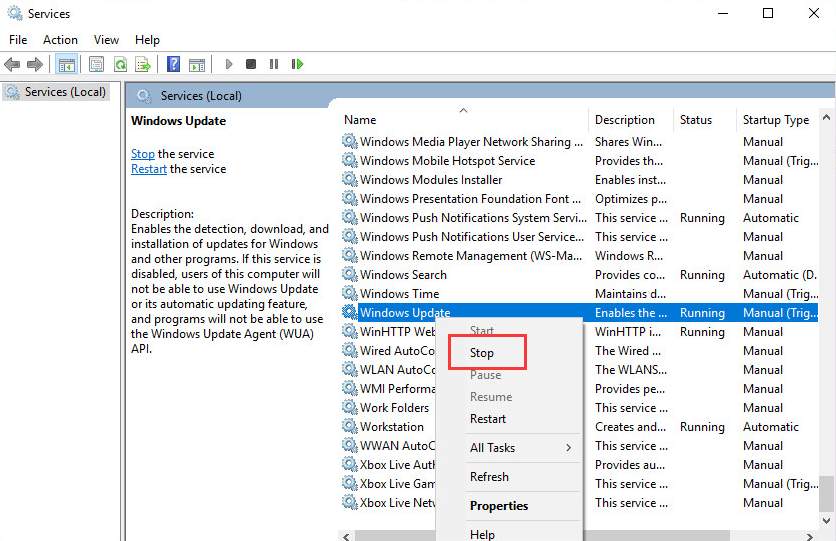
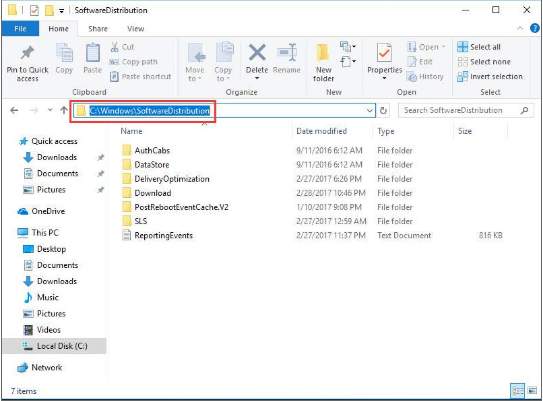
4. Open C:\Windows\SoftwareDistribution and delete all contents there.
5. Restart Windows Update service. Right-click on Windows Update service and click Start.

6. Download the updates again.
Hope the solutions here will fix your Windows Update stuck at 0KB 0% issue. If you find a useful solution not mentioned in this post, welcome to share it here.
Windows Update Error 0x8024401c [Fixed]
Last Updated: 3 years ago
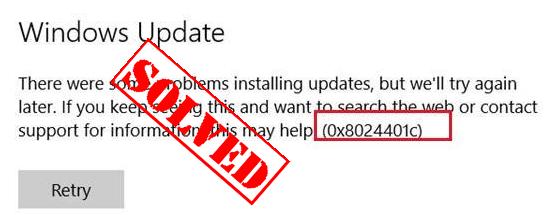
If you see the Windows Update error 0x8024401c in your computer when running the Windows Update, you run into a problem installing the updates and have no idea what to do. No worries! There are fixes to the issue.
How do I fix 0x8024401c in Windows? Try these fixes:
Why does 0x8024401c happen in my computer?
Why does the error occur? the error 0x8024401c usually occurs when you have problems installing or downloading the Windows updates in your computer.
The causes generally are the improper Internet connection, or the server timed out waiting for the request. Another reason is likely because of the inappropriate device drivers in your computer.
You can try the methods below to fix 0x8024401c in your computer.
Method 1: Check the network settings to fix 0x8024401c
As mentioned above, the network issue can cause the 0x8024401c error, so you can check the following two settings of the network to fix the error.
1. Switch network connection in your computer
As many people know, switching the network connection fixes the issue.
Thus, if you are connecting to WiFi in your computer, you can try switching the WiFi connection to wired connection or Ethernet connection and try the Windows Update to see if it works. If you are using the wired connection, you can change to WiFi connection, then try the Windows Update again to see if it works.
2. Uncheck IPv6 network
If switching your network doesn’t work, you can try to uncheck the IPv6 network, and make your computer go with IPv4 network. Follow the instructions to do that:
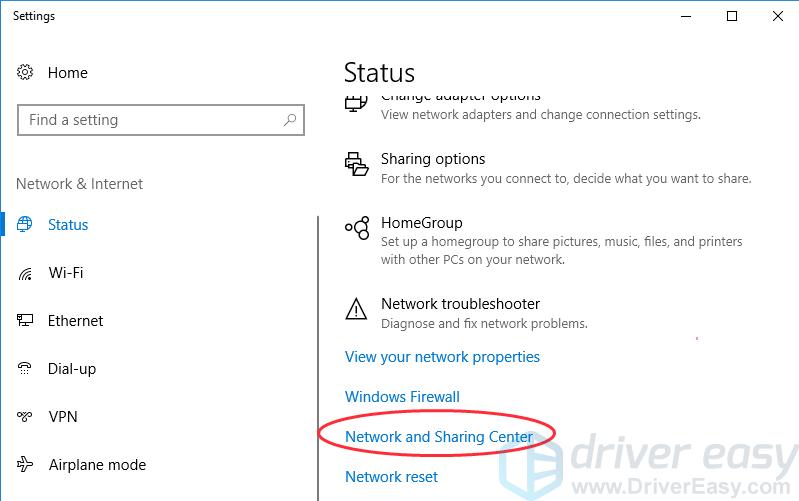
1) Right click the Internet Icon at the bottom right corner on your computer, and click Open Network & Internet settings.
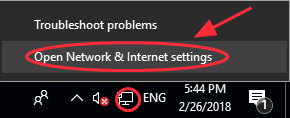
2) Click Network and Sharing Center.
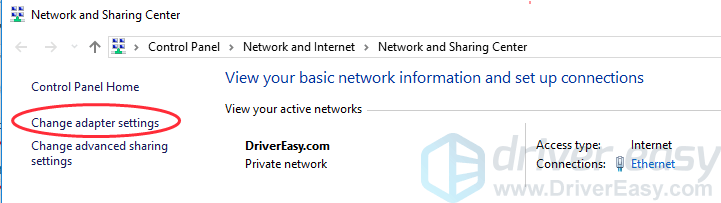
3) Click Change adapter settings.
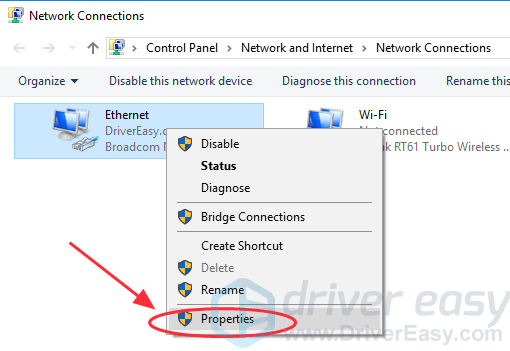
4) Right click the network connection (LAN, Ethernet or WiFi) that you are currently connecting, then click Properties.
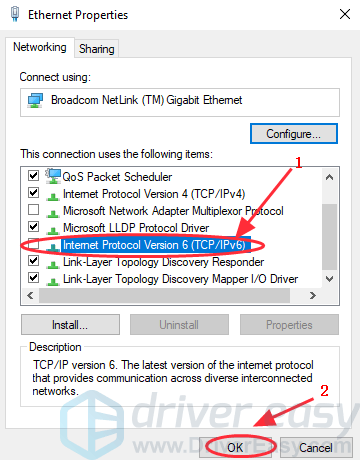
5) In the popup pane, uncheck Internet Protocol Version 6 (TCP/IPv6). Then OK to save the setting.
6) Restart your computer and try to update your Windows again.
Method 2: Update drivers to fix 0x8024401c
The missing or outdated drivers in your computer can also stop the Windows Update from working, so you can update the drivers in your computer to fix it.
There are two ways you can update the drivers: manually or automatically.
Manual driver update – You can update your drivers manually by going to the manufacturer’s website and searching for the most recent correct driver.
Automatic driver update – If you don’t have the time, patience or computer skills to update your network card driver manually, you can, instead, do it automatically with Driver Easy . Driver Easy will automatically recognize your system and find the correct drivers for it:
1) Download and install Driver Easy.
2) Run Driver Easy in your computer, and click Scan Now. Driver Easy will then scan your computer and detect any problem drivers.

3) Click the Update button next to the flagged network card to automatically download and install the correct version of its driver (you can do this with the FREE version).
Or click Update All to automatically download and install the correct version of all drivers that are missing or outdated. (This requires Pro version – You’ll be prompted to upgrade if you click Update All.)
4) After updating all the drivers, restart your PC and try Windows Update again.
Method 3: Modify the setting in Registry Editor to fix 0x8024401c
You can try to modify the settings in Registry Editor to fix Modify the setting in Registry Editor to fix 0x8024401c in your computer. Follow these steps:
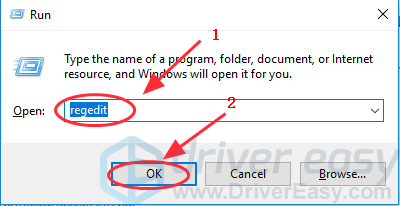
1) Press the Windows logo key  + R at the same time on your keyboard.
2) Type regedit in the Run box, and click OK.
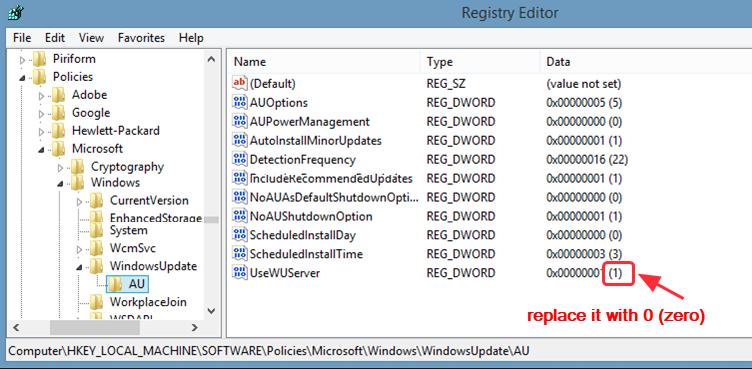
3) Go to HKEY_LOCAL_MACHINE > Software > Policies > Microsoft > Windows > WindowsUpdate.
4) Click AU in WindowsUdpate, and find UseWUServer .
5) Replace whatever is in the registry value data on the right pane with 0 (zero).
6) Click OK to save.
7) Restart the computer and try to install the update again.
Method 4: Run the SFC Scan to fix 0x8024401c
The SFC (System File Checker) is a Windows utility thta helps automatically check and repair the corrupted or incomplete system files, so you can run a SFC scan in your system and let it automatically repaired if there is any issues.
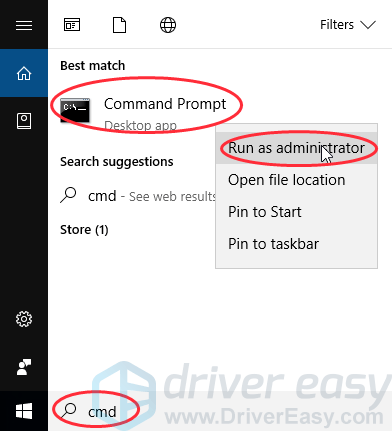
1) Type cmd in the search box.
2) Right click Command Prompt, and select Run as administrator.
3) Type sfc /scannow in the window, and press Enter.
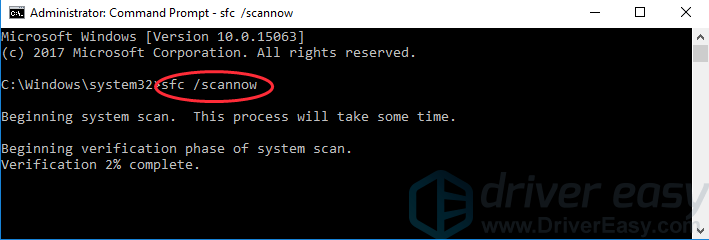
4) This process can take some time, and it will try to automatically fix the issues after scanning. So don’t close the window until verification 100% complete. After it’s completed, restart your PC and try updating Windows again.
Method 5: Perform a clean boot to fix 0x8024401c
You can perform a clean boot in your system. Try the steps:
1) Press the Windows logo key + R at the same time on your keyboard.
2) Type msconfig in the Run box and click OK.
3) Click the Services tab, and check the box next to Hide all Microsoft services.
4) Click Disable all, then click OK.
5) Restart your system and check for the updates.
These’re the useful methods to fix Windows Update error 0x8024401c. If you have any further questions, feel free to comment below and we’ll see what more we can do to help.


