- Начало работы в SketchUp
- Выбор шаблона
- Обзор интерфейса SketchUp
- Строка заголовка
- Панель меню
- Панель инструментов «Начало работы»
- Область рисования
- Строка состояния
- Панели по умолчанию
- Обзор инструментов SketchUp
- Просмотр Quick Reference Card SketchUp
- Создание первой 3D-модели в SketchUp
- Сохранение и повторное открытие модели
- Резервное копирование файла SketchUp или восстановление автоматически сохраненного файла
- Sketch
- Информация
- Описание
- Customizing Your Workspace
- Running SketchUp on multiple displays
- Setting preferences to customize your workspace
- Exporting and importing your SketchUp preferences
- Viewing and customizing toolbars
- Windows
- MacOS
- Arranging dialog boxes on MacOS
- Arranging dialog boxes and trays on Windows
- Changing colors of selected items and other on-screen aids
Начало работы в SketchUp
При первом использовании SketchUp необходимо войти в систему, чтобы активировать пробную версию или подписку. После входа в систему появится диалоговое окно «Добро пожаловать в SketchUp», как показано здесь. Это диалоговое окно является начальной точкой для создания модели и появляется каждый раз при запуске SketchUp (если вы не отключите его в диалоговом окне Настройки SketchUp).
В диалоговом окне «Добро пожаловать в SketchUp» вы можете: выбирать шаблоны для своей модели, устанавливать шаблоны по умолчанию, открывать последние файлы, находить существующий файл или лицензировать копию SketchUp Pro (подробности см. в разделе Общие сведения о вашей лицензии) и узнавать больше о SketchUp.
Содержание
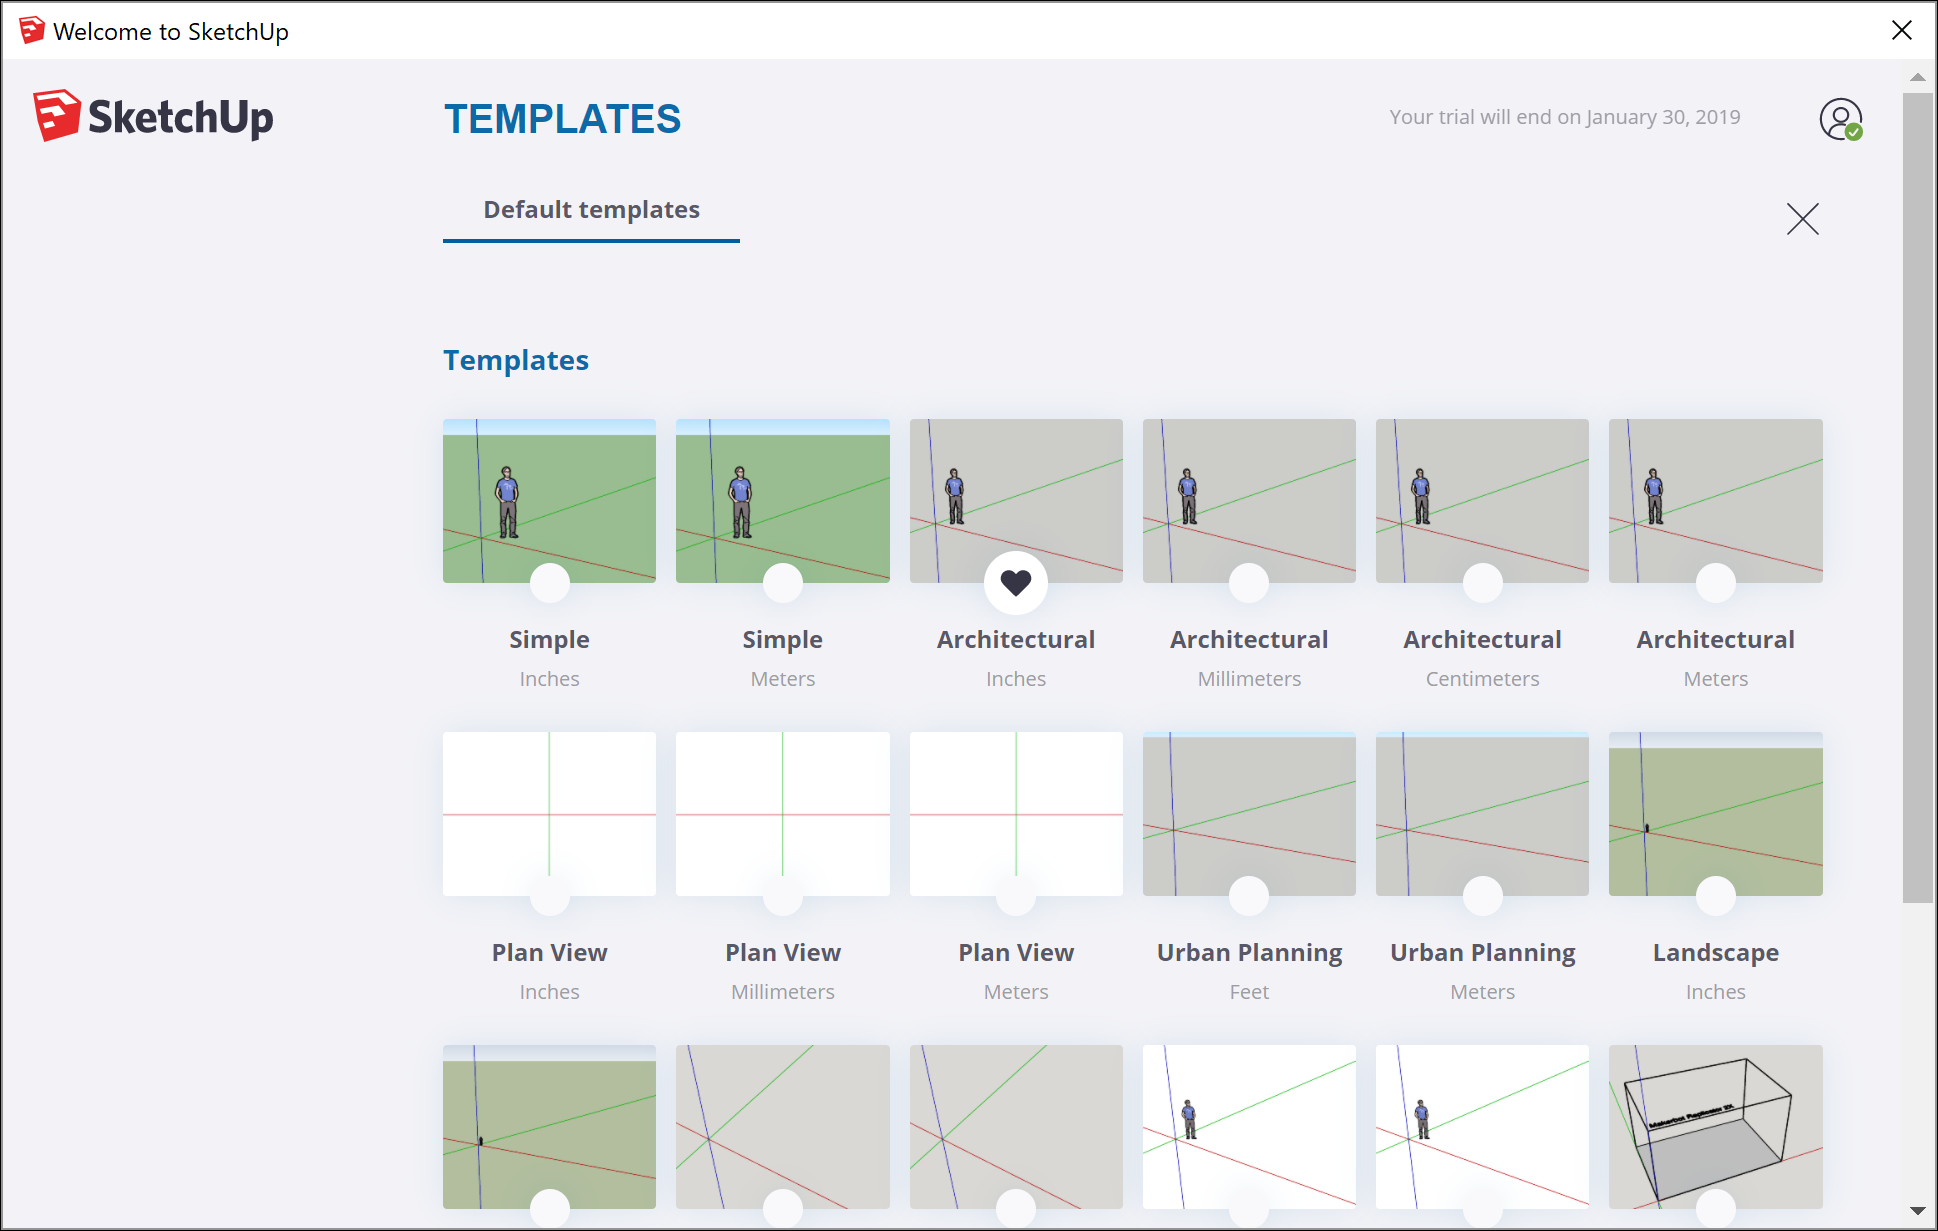
Выбор шаблона
Каждая модель в SketchUp основана на шаблоне, который имеет предварительно заданные настройки фона вашей модели и единиц измерения. Когда вы начинаете создавать новую модель, выбор шаблона с правильными единицами измерения упрощает моделирование.
Вот как выбрать шаблон в диалоговом окне «Добро пожаловать в SketchUp»:
- На панели «Файлы», которая по умолчанию выбрана на левой боковой панели, выберите один из показанных шаблонов (например, «Архитектурные дюймы» или «Дюймы для работы с деревом»).
- (Необязательно) Если вы не видите нужный шаблон, выберите «Другие шаблоны» в правом верхнем углу. Вы увидите дополнительные параметры, как показано на следующем рисунке. Полужирный текст описывает тип работы, для которой был создан шаблон. Единицы отображаются под названием стиля. После выбора шаблона отобразится окно моделирования с примененным шаблоном.

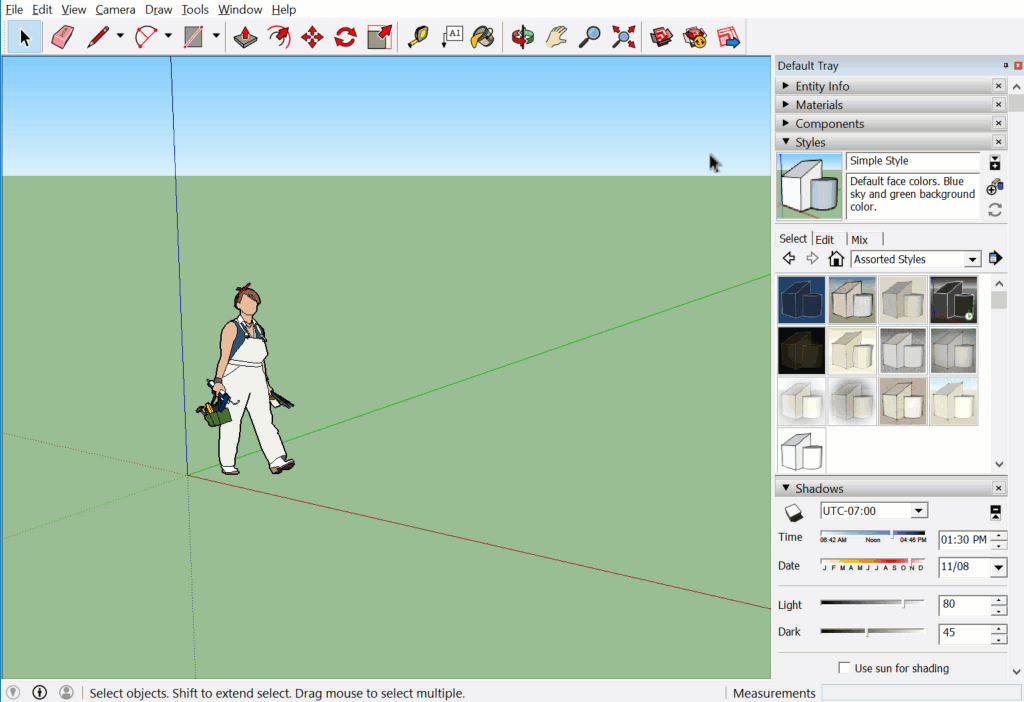
Обзор интерфейса SketchUp
Когда откроется SketchUp, готовый для начала создания 3D-модели, вы увидите экран, который включает в себя следующее:
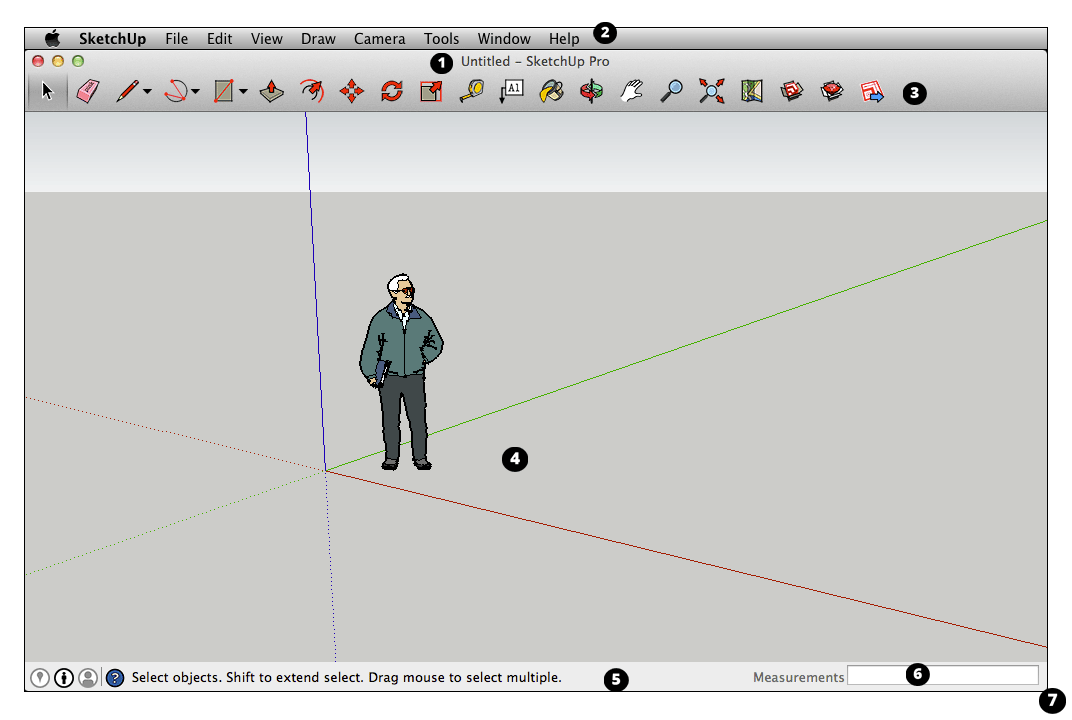
Строка заголовка
Строка заголовка содержит стандартные элементы управления окном (закрыть, свернуть и развернуть) и имя открытого файла. При запуске SketchUp открытый файл имеет имя «Без названия», что означает, что вы еще не сохранили свою работу.
Панель меню
Большинство инструментов, команд и настроек SketchUp доступны в меню на панели меню. Это такие меню, как SketchUp (только Mac), «Файл», «Редактирование», «Просмотр», «Камера», «Рисование», «Инструменты», «Окно» и «Справка».
Панель инструментов «Начало работы»
Когда вы начинаете использовать SketchUp, панель инструментов «Начало работы» отображается по умолчанию. Она содержит основные инструменты, необходимые для создания 3D-моделей.
Чтобы отобразить дополнительные панели инструментов, выберите Просмотр > Панели инструментов. В открывшемся диалоговом окне «Панели инструментов» выберите панели инструментов, которые хотите отобразить, и нажмите «Закрыть». В macOS вы можете отображать панели инструментов, выбрав Просмотр > Панели инструментов. (Дополнительные сведения о панелях инструментов и их настройке см. в разделе Настройка SketchUp Справочного центра.)
Область рисования
Область рисования — это место, где вы создаете свою модель. Трехмерное пространство области рисования визуально определяется осями рисования, которые позволяют чувствовать направления в трехмерном пространстве во время работы.
Область рисования также может содержать простую модель человека, чтобы дать вам ощущение трехмерного пространства.
Строка состояния
Когда вы начинаете работу со SketchUp, двумя важными элементами в строке состояния являются советы посередине и поле «Измерения» справа:
- Советы по использованию инструментов. В средней части строки состояния щелкните значок вопросительного знака, чтобы отобразить окно Инструктора, в котором представлена основная информация об использовании инструмента, выбранного на панели инструментов. В средней области также отображается краткое описание по использованию выбранного инструмента. Эта область полезна, если вы не знаете, как работает инструмент.
- Поле «Измерения». Это поле является важным инструментом для создания точных моделей. В нем отображаются размеры по мере рисования. Вы также можете использовать это поле для управления выбранными объектами (например, для создания линии определенной длины) или для создания равномерно распределенных копий объектов (например, столбов, ограждений или жилых блоков в постиндустриальной антиутопии).


Панели по умолчанию
В правой части экрана вы видите область панелей, включая «Инструктор», «Материалы», «Стили» и т. д. Область по умолчанию появляется при открытии SketchUp, но вы можете закрыть область панелей по умолчанию, нажав кнопку «Закрыть» в правом верхнем углу. Переключите область, чтобы отобразить или скрыть ее, в подменю Окно > Область по умолчанию.
В правой части экрана вы видите область панелей, включая «Инструктор», «Материалы», «Стили» и т. д. Область по умолчанию появляется при открытии SketchUp, но вы можете закрыть любую область, нажав ее кнопку «Закрыть». Чтобы повторно открыть область, выберите ее в меню «Окно».
Обзор инструментов SketchUp
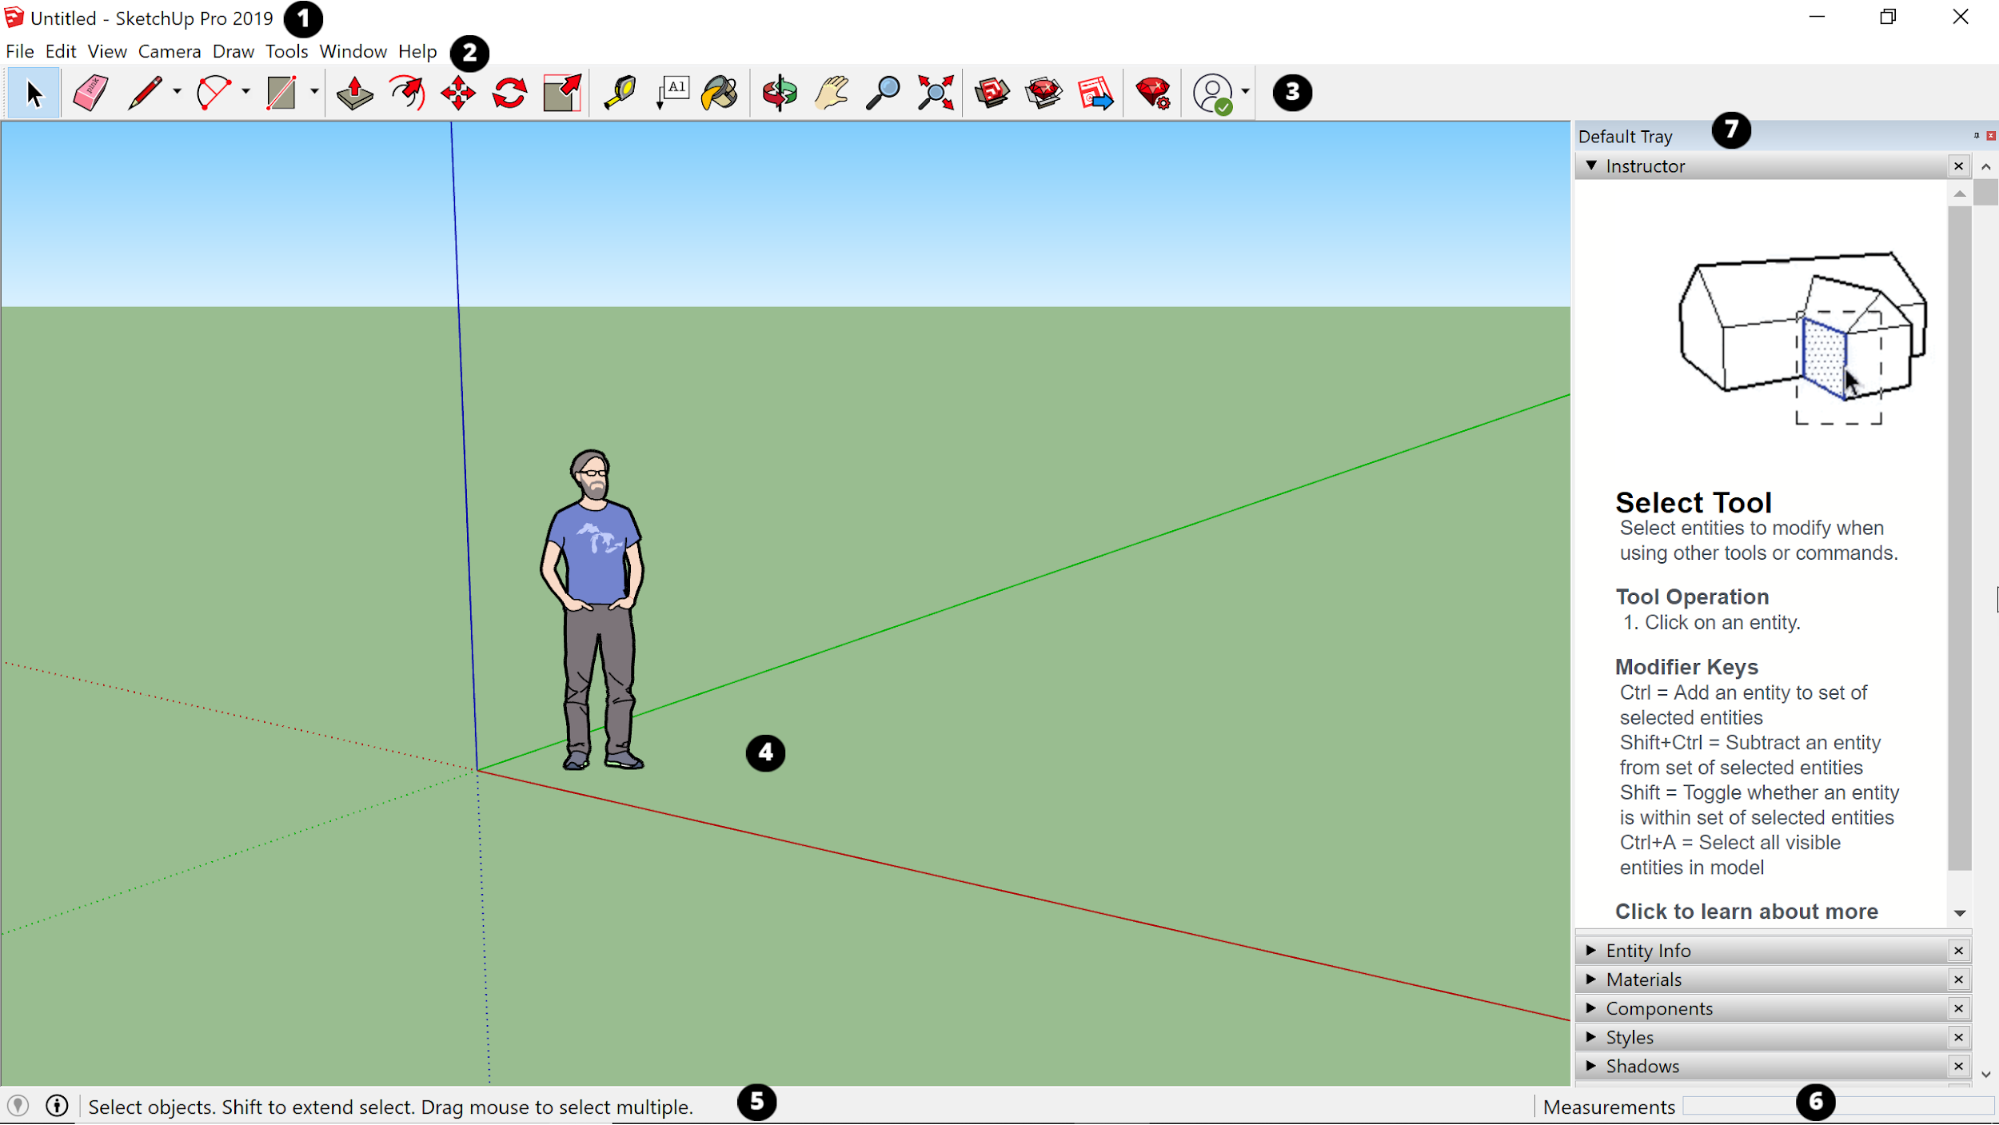
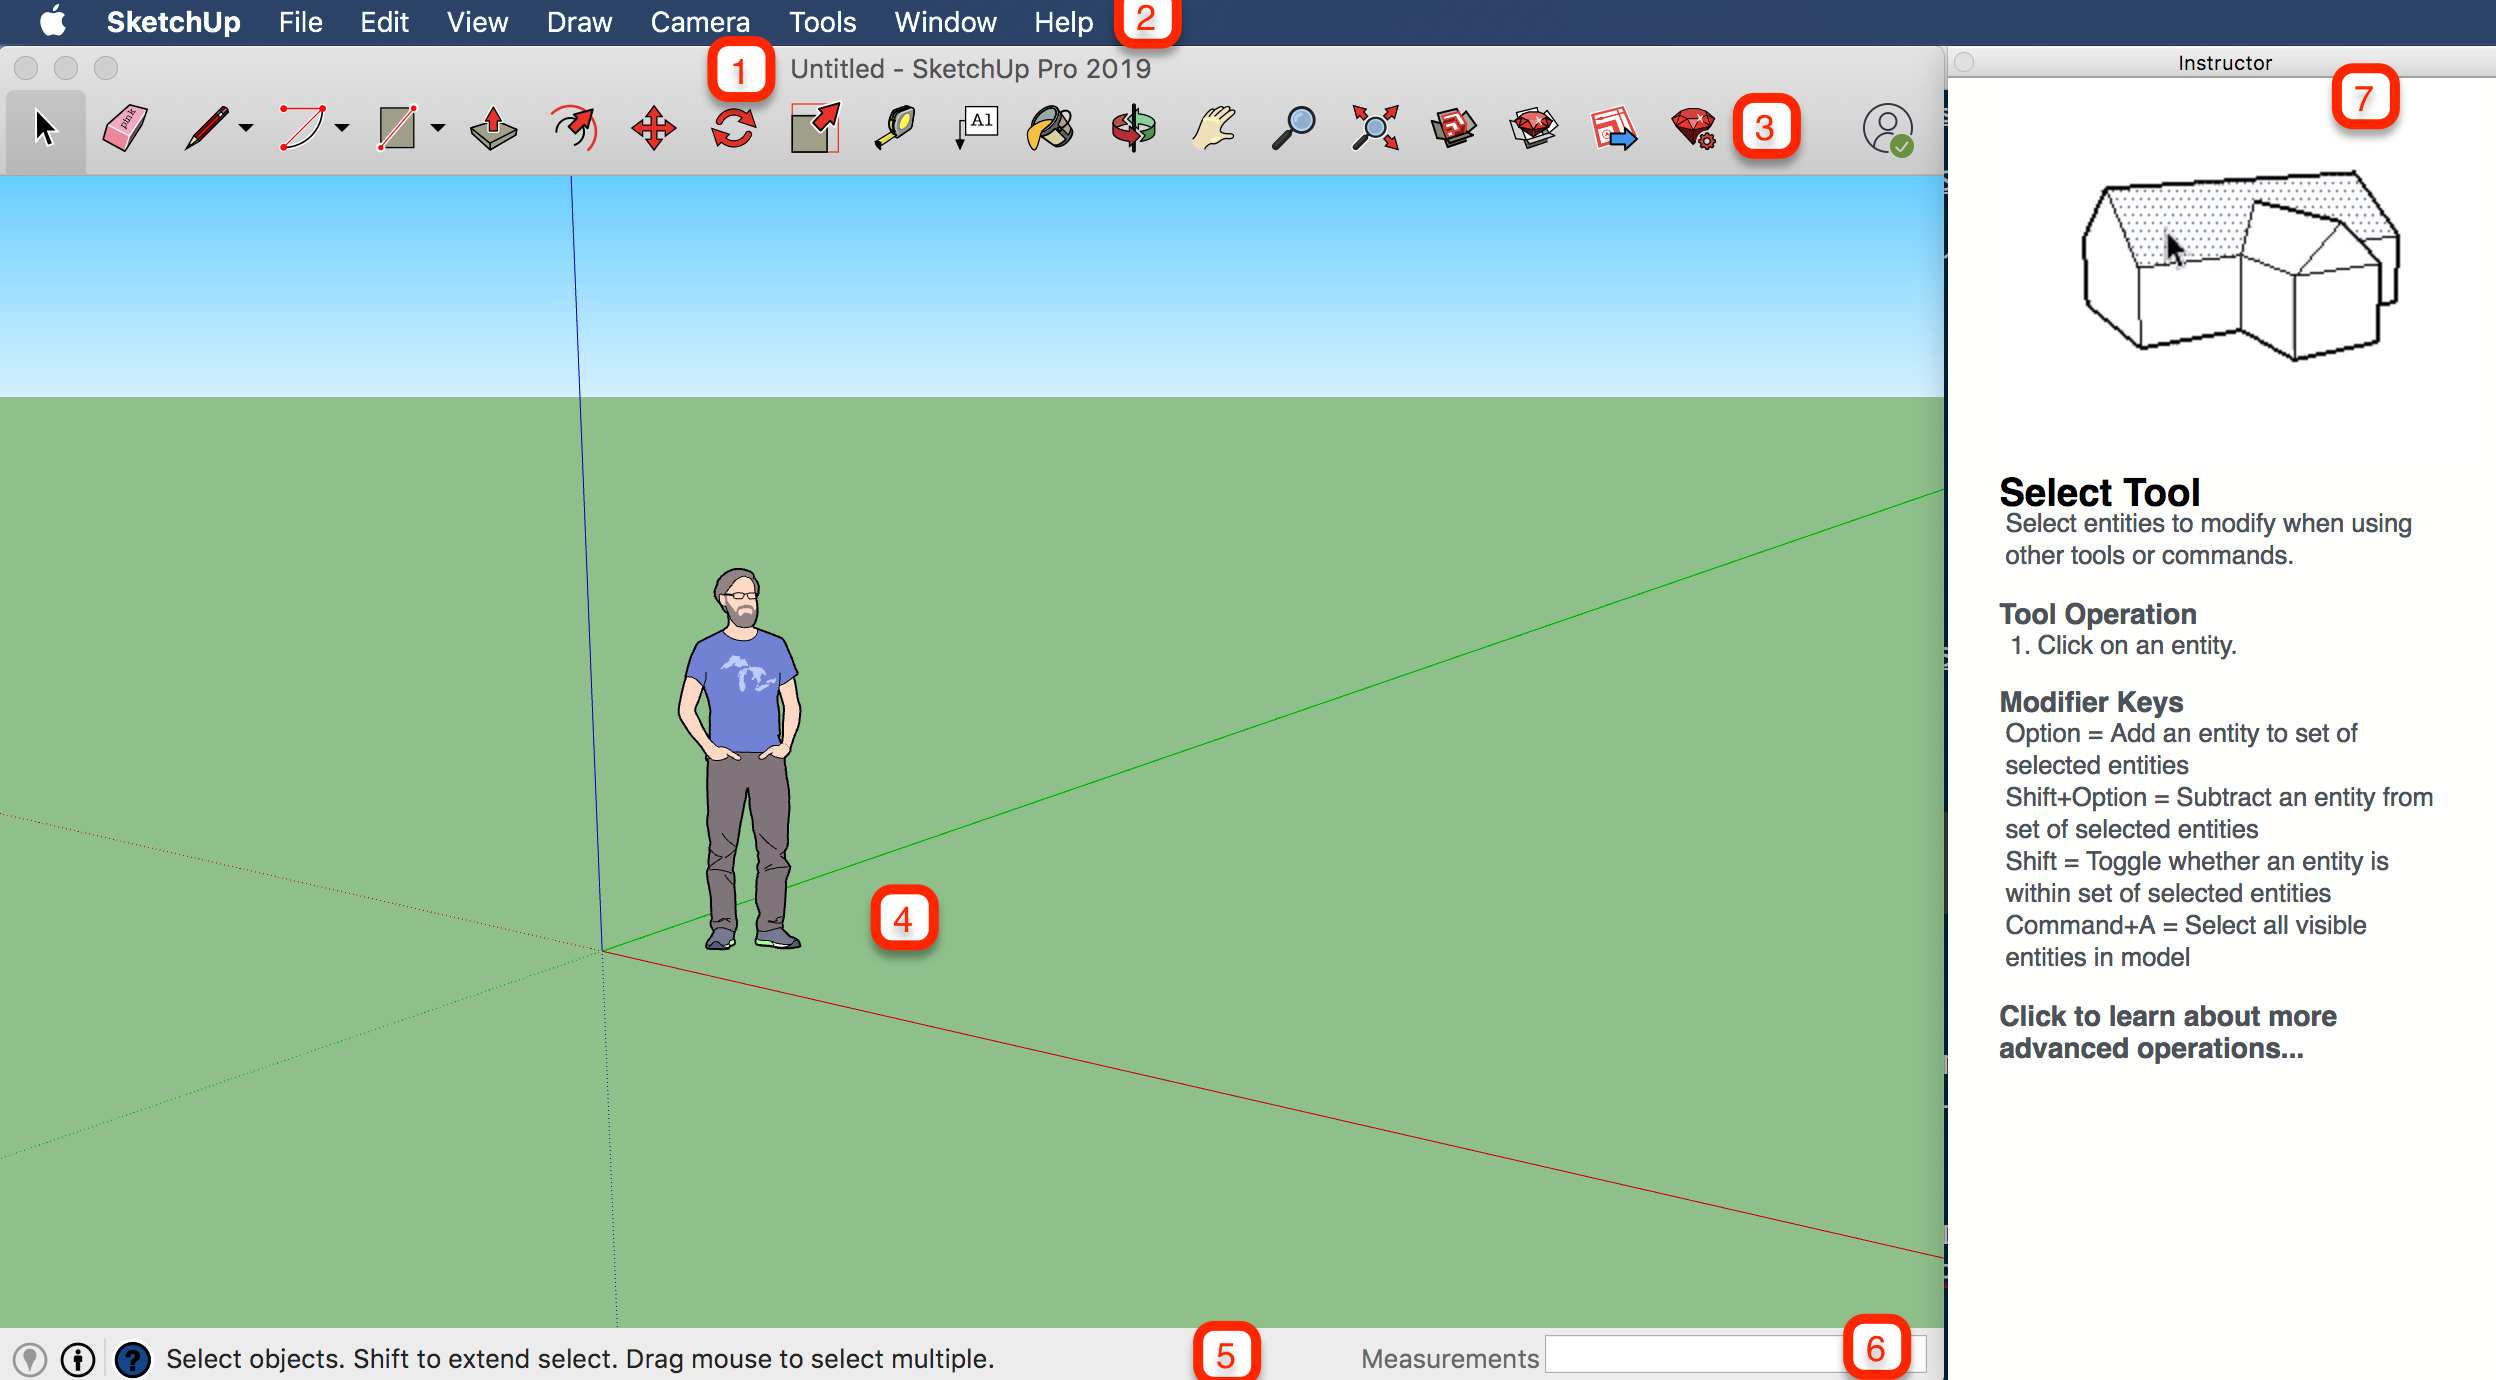
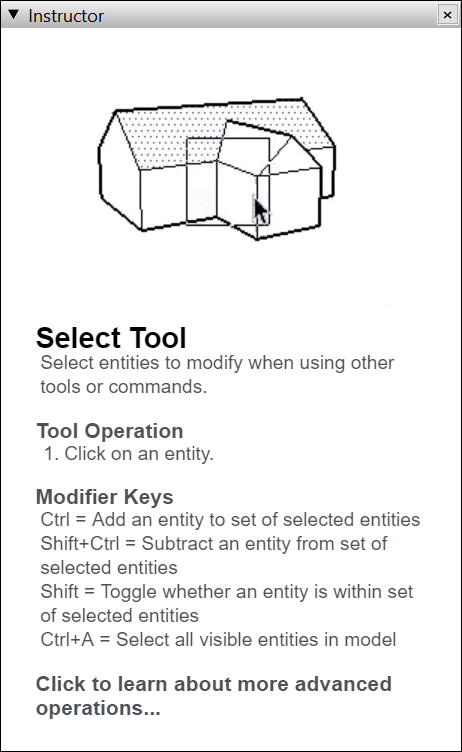
Когда вы используете SketchUp, Инструктор и строка состояния дают вам советы по использованию каждого инструмента.
Инструктор научит вас использовать выбранный инструмент. Чтобы включить приведенный здесь инструктор, выберите Окно > Инструктор или щелкните значок вопросительного знака в строке состояния. Возможности, предоставляемые Инструктором:
Инструктор научит вас использовать выбранный инструмент. Чтобы включить приведенный здесь Инструктор, выберите Окно > Инструктор в пункте Область по умолчанию . Возможности, предоставляемые Инструктором:
Инструктор научит вас использовать выбранный инструмент. Чтобы включить приведенный здесь Инструктор, выберите Окно > Инструктор. Возможности, предоставляемые Инструктором:
- анимация, демонстрирующая базовое использование выбранного инструмента;
- описание функций инструмента;
- шаги по использованию инструмента с соответствующей анимацией;
- клавиши-модификаторы, которые позволяют инструменту выполнять дополнительные функции;
- ссылка на статьи справочного центра о дополнительных функциях инструмента.
Если Инструктор предлагает более подробную информацию, чем вам нужно, помните, что строка состояния также содержит советы по использованию выбранного инструмента. Дополнительные сведения см. в разделе Строка состояния ранее в этой статье.
Просмотр Quick Reference Card SketchUp
Quick Reference Card — это удобное для печати руководство по всем инструментам SketchUp и их клавишам-модификаторам. Держите его под рукой, когда начнете использовать SketchUp, и вы научитесь моделировать быстро и эффективно. Вот как выглядит Quick Reference Card:
Создание первой 3D-модели в SketchUp
Если вы никогда не создавали 3D-модель в SketchUp (или в любой другой программе моделирования), следующие шаги содержат краткий обзор основ:
- Выберите человека, щелкните выборку правой кнопкой мыши и выберите Стереть в появившемся контекстном меню.
- На панели инструментов «Приступая к работе» выберите инструмент Прямоугольник ().
- На плоскости земли в пространстве между красной и зеленой осью щелкните курсор инструмента Прямоугольник (). Затем переместите курсор вправо и щелкните еще раз. На земле появится прямоугольник, как показано здесь.
- На панели инструментов «Приступая к работе» выберите инструмент Вдавить/Вытянуть () и поместите его курсор на только что созданный прямоугольник, как показано на следующем рисунке.
- Щелкните и перетащите прямоугольник на 3D-форму. Следите за окном «Измерения» и отпустите курсор, когда ваша фигура станет примерно 5 футов высотой.
- Ничего не нажимая и не выбирая, введите 6′ и нажмите Enter. Обратите внимание, как высота вашей фигуры изменилась до 6 футов, а введенное вами значение появилось в поле «Измерения».
- На панели инструментов «Приступая к работе» выберите инструмент Орбита (). Поместите курсор инструмента «Орбита» над вашей фигурой. Затем щелкните и удерживайте, перемещая мышь вниз. Обратите внимание на изменение фигуры, как показано на следующем рисунке. Практикуйтесь в перетаскивании с помощью инструмента «Орбита» столько, сколько захотите. Работать с ним довольно забавно!
- На панели инструментов «Приступая к работе» нажмите кнопку Степень масштабирования (). Если вы, двигаясь вокруг модели, потеряли ориентир, кнопка «Степень масштабирования» является удобным способом найти себя в пространстве.
- Если у вас есть мышь с колесом прокрутки, прокрутите вниз, чтобы немного уменьшить масштаб. Работать в SketchUp намного проще с помощью мыши с колесом прокрутки. Однако, если у вашей мыши нет колеса прокрутки, щелкните инструмент «Масштаб» (), чтобы увеличивать и уменьшать масштаб.
 ).
). ). Затем переместите курсор вправо и щелкните еще раз. На земле появится прямоугольник, как показано здесь.
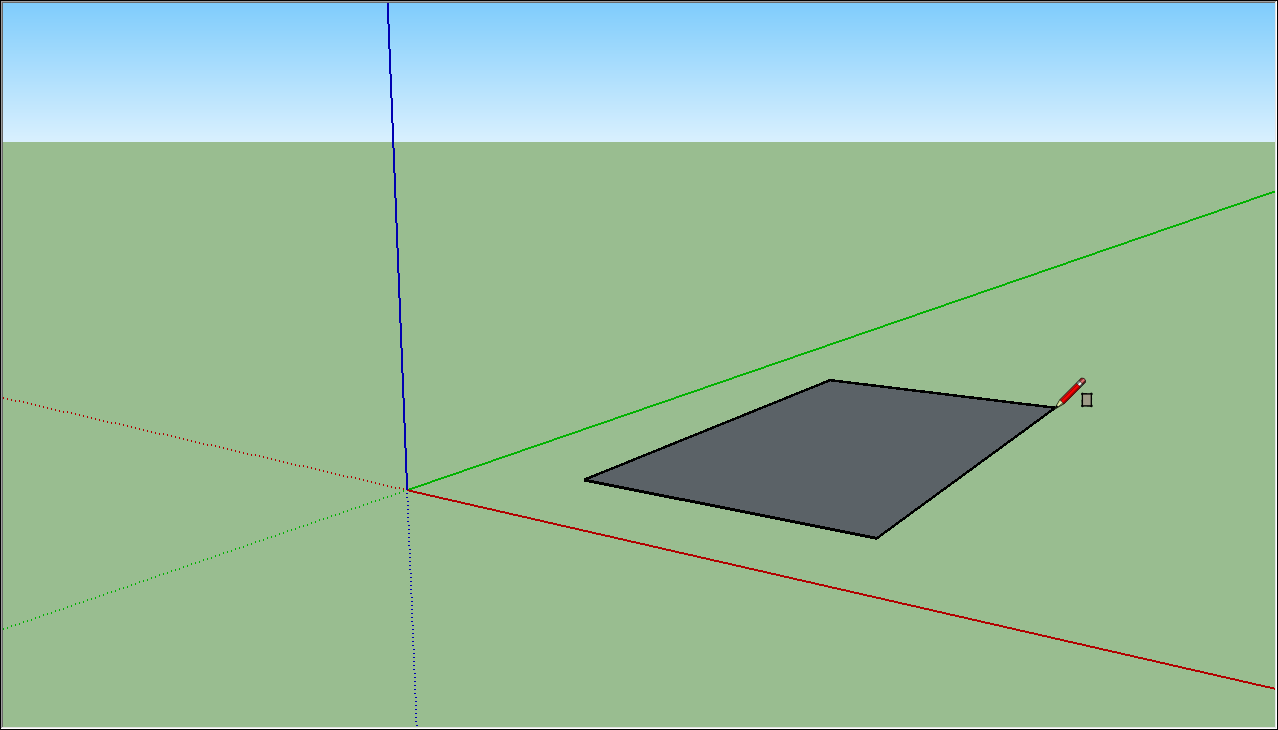
 ) и поместите его курсор на только что созданный прямоугольник, как показано на следующем рисунке.
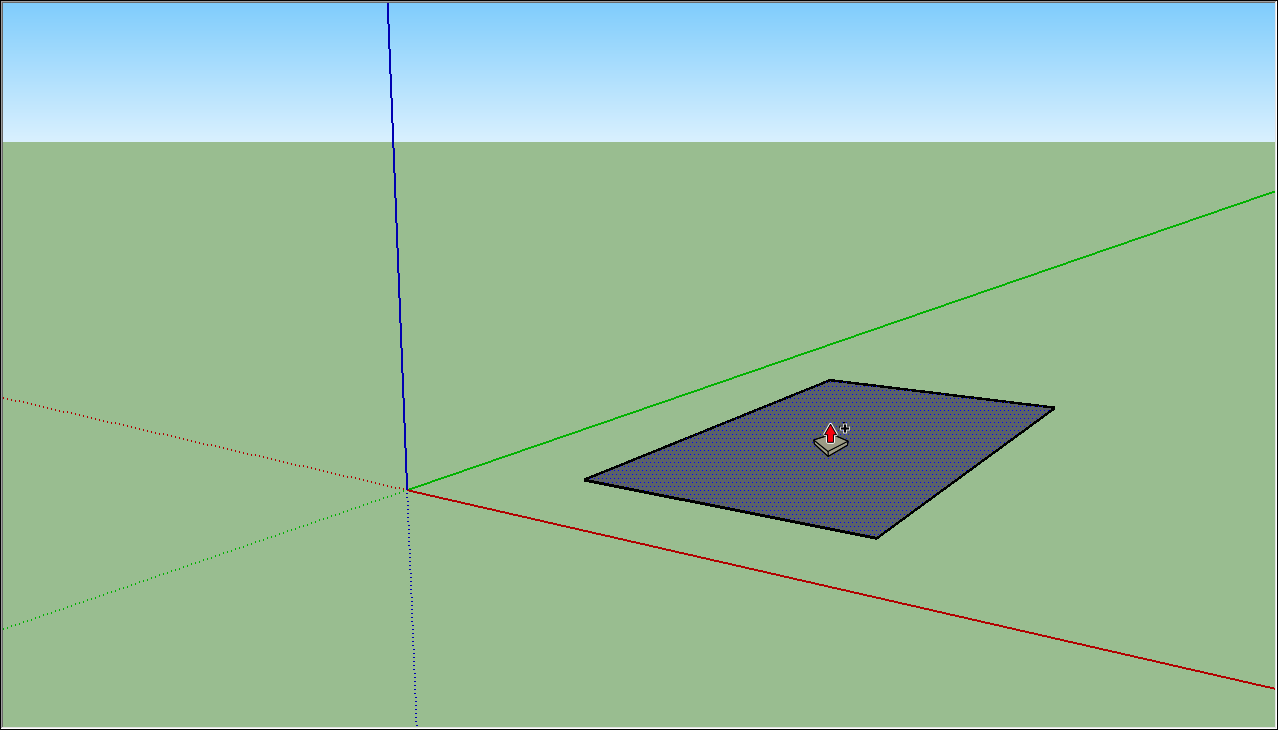
 ). Поместите курсор инструмента «Орбита» над вашей фигурой. Затем щелкните и удерживайте, перемещая мышь вниз. Обратите внимание на изменение фигуры, как показано на следующем рисунке. Практикуйтесь в перетаскивании с помощью инструмента «Орбита» столько, сколько захотите. Работать с ним довольно забавно!
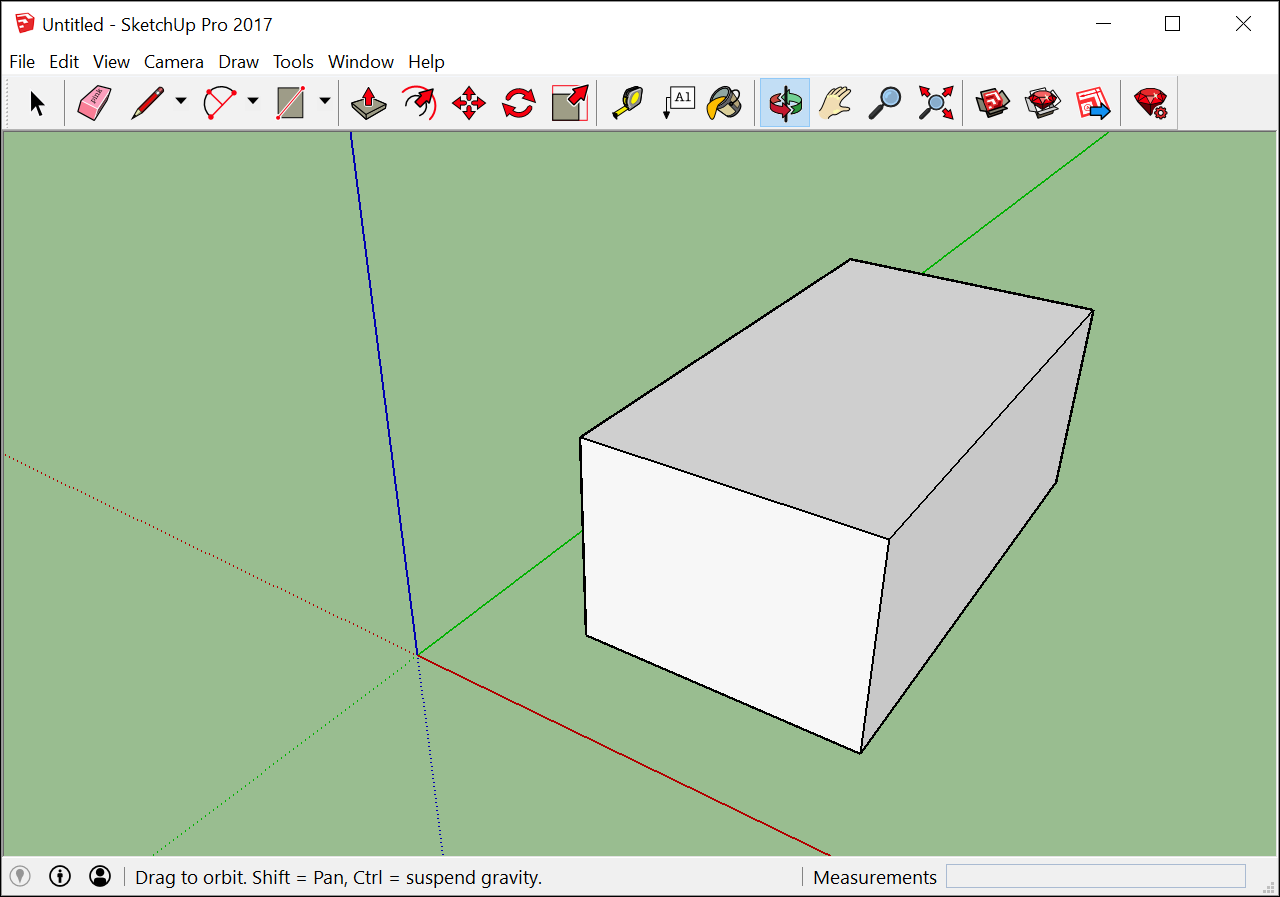
 ). Если вы, двигаясь вокруг модели, потеряли ориентир, кнопка «Степень масштабирования» является удобным способом найти себя в пространстве.
 ), чтобы увеличивать и уменьшать масштаб.
 Сохранение и повторное открытие модели
Чтобы сохранить модель, выполните следующие действия:
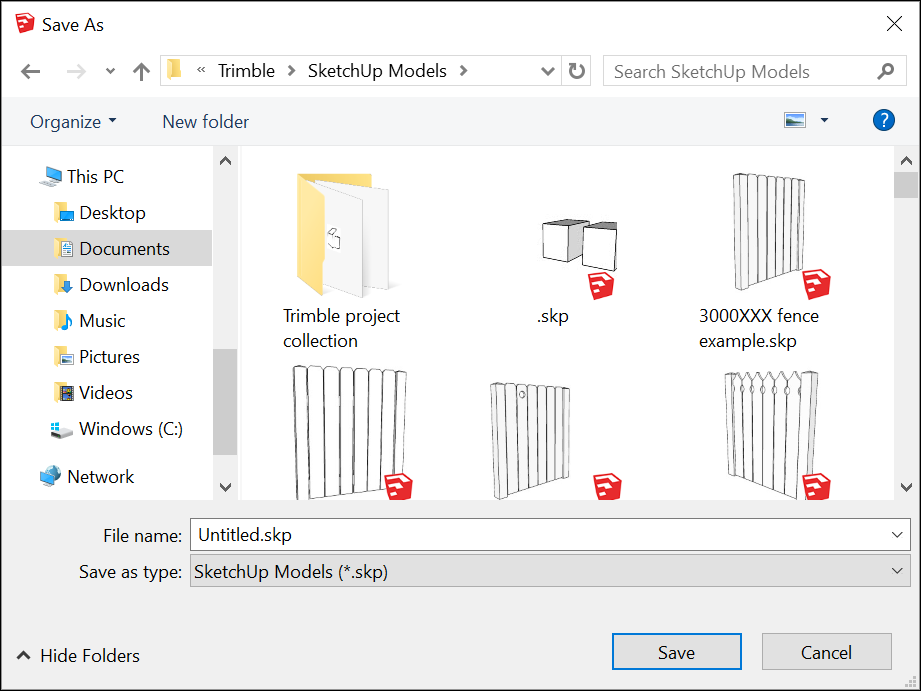
- На панели меню выберите Файл > Сохранить. Если вы сохраняете модель впервые, появится диалоговое окно «Сохранить как», как показано здесь. Чтобы сохранить уже сохраненную модель под новым именем, выберите Файл > Сохранить как.

Резервное копирование файла SketchUp или восстановление автоматически сохраненного файла
SketchUp создает резервный файл при втором успешном сохранении файла SketchUp и при всех последующих сохранениях. Этот файл является точной копией ранее сохраненной версии файла. Резервный файл имеет формат имени FILENAME.skb в Windows и FILENAME
.skp в macOS и находится в той же папке, что и исходный файл.
В случае сбоя SketchUp во время работы с моделью восстановленный файл не удаляется. По умолчанию SketchUp автоматически сохраняет ваши файлы каждые пять минут, когда вы активно работаете. Вы можете восстановить свою работу с момента последнего автоматического сохранения, открыв восстановленный файл. Чтобы найти восстановленный файл, откройте окно «Добро пожаловать в SketchUp», выберите вкладку «Файлы» и выберите файл, который нужно восстановить, из списка «Последние».
Источник
Sketch
Информация
Описание
Sketch — это инструмент для векторного дизайна для Mac с акцентом на дизайн экрана. Он используется главным образом дизайнерами экрана, которые создают веб-сайты, значки и пользовательские интерфейсы для настольных и мобильных устройств. Мощные и простые в использовании инструменты Sketch для начинающих и профессионалов отрасли позволяют дизайнерам сосредоточиться на том, что они делают лучше всего; дизайн.
С его концепции Sketch был адаптирован к потребностям цифровых дизайнеров, и это проявляется в каждом волокне приложения. С тех пор популярность Sketch и его фан-база постоянно растут, и в настоящее время они широко признаны, а также являются инструментом дизайна для многих цифровых компаний и стартапов по всему миру.
Функциональность Sketch расширена благодаря нашим фантастическим сторонним разработчикам, которые создали множество плагинов, чтобы ускорить рабочий процесс проектирования. Sketch также легко интегрируется со многими приложениями для создания прототипов и совместной работы.
Sketch может похвастаться широким набором функций и инструментов, которые помогут на каждом этапе процесса проектирования, от создания каркасов до экспорта художественных работ для использования в производстве.
Sketch была основана в начале 2008 года Питером Омвли и Эмануэлем Са и является частной распределенной компанией, базирующейся в Гааге, Нидерланды.
За прошедшие годы Sketch получил признание и награды в виде ежегодных списков лучших приложений App Store, престижной награды Apple Design Award в 2012 году и Net Award за приложение года в 2015 году. Среди его клиентов много ведущих стартапов, и Fortune 500 компаний по всему миру.
Источник
Customizing Your Workspace
You know how you like to work, and SketchUp enables you to customize the overall workspace to reflect that.
In this article, find out what workspace preference options you have and how those options work. Also, check out the tips and tricks for customizing your toolbars and tidying up dialog boxes that you like to keep open. You’re almost certain to find a few ways to draw more efficiently in SketchUp.
Table of Contents
Running SketchUp on multiple displays
For most people who have a multiple-display system, it’s hard to imagine ever working on a single monitor again. If that describes you, the good news is that you might be able to run SketchUp on a multiple-display system. The not-so-good news is that SketchUp doesn’t officially support multiple-display systems, so if you encounter issues running SketchUp on multiple monitors, Trimble doesn’t provide support for those issues.
Setting preferences to customize your workspace
In SketchUp, preferences options enable you to customize your workspace.
To access these preferences, select Window > Preferences (Microsoft Windows) or SketchUp > Preferences (Mac OS X) from the menu bar. In the sidebar on the left, select the preference panel that you need.
The following table outlines how you can customize the workspace and what preference panel enables you to make a change.
| To Do This | Open this Preference Panel | Good to Know |
|---|---|---|
| Set the default image editor. | Applications | Determines what image editor opens when you want to edit a texture in an external editor. Click Choose and select an application on your operating system. |
| Display crosshairs on your cursor that correspond to axes colors. | Drawing | Select the Display Crosshairs checkbox in the Miscellaneous area. |
| Activate the Paint Bucket tool after you click a material swatch (Mac OS X only). | Drawing | This checkbox is enabled by default. Deselect Auto-activate Paint Tool to disable it. |
| Toggle the Push/Pull tool’s pre-pick feature. | Drawing | Pre-pick is enabled by default so that you can select a face, orbit, and push/pull the face even when the selected face doesn’t appear in the current view. Select Disable Pre-pick on Push/Pull Tool to disable the feature. |
| Display a component bounding box and its edges in different colors. | Compatibility | This feature is disabled by default. Select the Bounding Box Only checkbox, and a component’s edges appear in a different color from the component box when you select the component. |
| Change the size of the toolbar buttons. | Workspace | The large buttons are enabled by default because they’re easier to see and use. For smaller buttons and a larger drawing area, deselect the Use Large Tool Buttons checkbox. |
| Select whether windows cascade and the default window size (Mac OS X only). | Workspace | On a Mac, windows cascade by default. Deselect Cascade Main Windows to turn off cascading. Click the Save Current Window Size button to make the size of the active window your default window size in SketchUp. |
| See the toolbars and panel trays after closing them. | Workspace | Click the Reset Workspace button and your toolbars and panels instantly reappear in the most recent docked position . |
Exporting and importing your SketchUp preferences
When you make changes to your preferences, SketchUp saves your preferences automatically. If you work on your 3D models on two different computers or are upgrading from one computer to another, you can export your preferences from one copy of SketchUp and import them into another. This section explains how to export and import preferences for your current operating system.
To export your preferences in Microsoft Windows, follow these steps:
- Select Window > Preferences.
- Select Files in the sidebar on the left.
- Click the Export button. The Export Preferences dialog box appears.
- Navigate to the folder where you want to save the preferences file. The file is called Preferences.dat by default but you can rename it if you like.
- (Optional) By default, your keyboard shortcuts and file locations are both exported in the same file. If you don’t want to export either of these, click the Options button to open the Export Preferences Options dialog box. Deselect the Shortcuts or File Locations checkboxes and click OK when you’re done.
- In the Export Preferences dialog box, click the Export button, and the preferences file is saved to the location you specified. You can now save the file to your new or other computer and import your preferences into another copy of SketchUp.
When you’re ready to import your preferences into SketchUp on another computer, follow these steps:
- Select Window > Preferences.
- Select Files in the sidebar on the left.
- Click the Import button.
- Navigate to the location on your computer where you saved the exported preferences file and select the file.
- (Optional) Click the Options button and, in the Import Preferences Options dialog box, deselect the Shortcuts or File Locations checkbox if you don’t want to import keyboard shortcuts or file locations. Click OK when you’re done.
- Click the Import button, and your preferences are imported into SketchUp.
On Mac OS X, you can save your keyboard shortcuts file to your new or other computer. Your keyboard shortcuts are automatically saved in the following location: MachintoshHD/Users/[User name]/Library/Application Support/SketchUp #/SketchUp/Shortcuts.plist
Simply copy the file to the same location on another Mac, and your shortcuts will work.
Viewing and customizing toolbars
Depending on what you model in SketchUp or where you are in the 3D modeling process, you’re likely to favor some tools over others. In SketchUp, you can decide which toolbars you want to see. Toolbars are organized differently on Microsoft Windows and Mac OS X. In this section, you discover the options for customizing SketchUp toolbars for your current operating system.
Windows
On Microsoft Windows, you can change which toolbars appear in your SketchUp workspace by selecting View > Toolbars. In the Toolbars dialog box that appears, select the checkbox next to any toolbar you want to see, or deselect the checkbox for any toolbar you don’t want to see. Then click the Close button.
The following table introduces each toolbar and when the toolbar is most useful.
| Toolbar Name | Toolbar | This Toolbar Is Handy When … |
|---|---|---|
| Advanced Camera Tools |  | Modeling movie sets with the ACT tools |
| Camera |  | Looking at your model from many different angles |
Classifier  |  | Modeling with BIM (Building Information Modeling) and IFC data. |
| Construction |  | Modeling precisely |
| Drawing |  | Drawing a 3D model |
| Dynamic Components |  | Developing dynamic components |
| Edit |  | Editing an existing model |
| Getting Started |  | Learning to draw in SketchUp |
| Large Tool Set | Displays the Principal, Drawing, Edit, Construction, and Camera toolbars as well as the Section tool in a long narrow toolbar that docks to the left side of the drawing area. | You need an all-purpose toolbar. |
| Layers |  | Organizing groups or components into layers to control visibility, especially after you have experience working with SketchUp’s layers feature. |
| Location |  | Accessing maps for images, geolocation data, or terrain |
| Principal |  | You need only a basic tool set and want to maximize the drawing area |
| Sandbox |  | Modeling TINs to create terrain or rounded objects |
| Section | 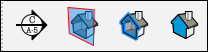 | Adding section planes that create a view inside your model |
| Shadows |  | Adjusting shadow settings or studying shadows at different times of day |
| Solid Tools |  | Modeling complex shapes with the Solid tools |
| Standard |  | Accessing basic file and clipboard commands from a toolbar would be helpful |
| Styles |  | Switching among SketchUp’s face styles frequently, such as when tracing a floor plan in X-Ray view and then checking your geometry in Shaded with Textures view |
| Views |  | Switching among the standard views, such as Top, Front, Iso, and so on |
| Warehouse |  | Sharing models via the 3D Warehouse or adding extensions via the Extension Warehouse |
MacOS
On MacOS, SketchUp has a toolbar at the top as well as several tool palettes. You can customize what tools appear on the toolbar and choose whether to see the toolbar and tool palettes.
To customize the toolbar at the top of SketchUp’s interface, you can do the following:
- Choose how the icons and text appear. Context-click the toolbar, and you can select whether you want to see icons, icons and text, or just text on the toolbar.
- Hide or show the toolbar. If you want more drawing area or just don’t use the toolbar, select View > Hide Toolbar, and it disappears. Alternately, context-click the toolbar and select Hide Toolbar. If the toolbar is hidden and you want to see it again, select View > Show Toolbar.
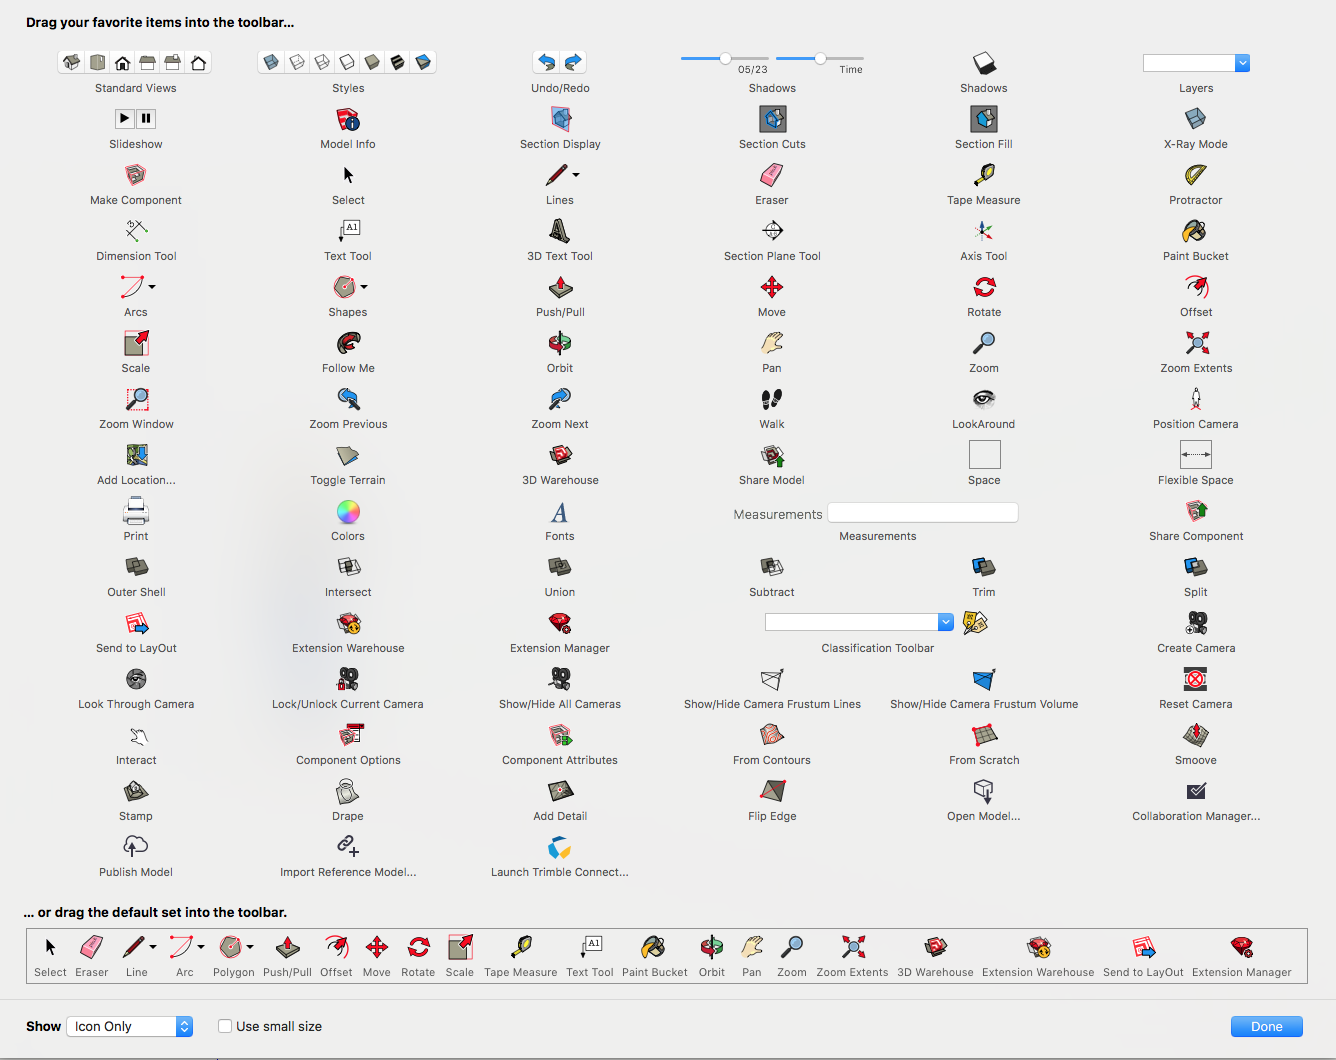
- Select what tools appear on the toolbar. If you only want to see the tools that you use the most or to order tools in a specific sequence, you’ll love this feature. Select View > Customize Toolbar or context-click the toolbar and select Customize Toolbar from the menu that appears. You see the dialog box shown in the following figure, which contains all of SketchUp’s tools. To add a tool, drag it to the toolbar. To remove a tool, drag it off the toolbar. If you want to restore the default set, drag it from the bottom of the dialog box to the toolbar. You can also drag tools into whatever position you prefer. When you’re finished customizing the toolbar, click Done.
You can also customize what tools you see by showing and hiding tool palettes. To see a palette, select View > Tool Palettes and select your desired tool palette from the submenu that appears. Your options are as follows:
- Large Tool Set: This palette offers a handy set of tools used most often when drawing, editing, and viewing a 3D model.
- Location: This palette is handy when acessing for satellite images, geolocation data, or terrain.
- Warehouse: If you want to share models with the 3D Warehouse or download extensions from the Extension Warehouse, this palette keeps all the relevant tools at the ready.
- Sandbox: This palette contains tools for modeling TINs to create terrain or rounded objects. See Setting preferences to customize your workspace earlier in this article for details.
SketchUp Pro users also see the following options:
- Solid Tools: All these tools help you model complex shapes from other shapes. For example, use a peg to create the hole into which the peg must fit.
- Advanced Camera Tools: This palette is for anyone who uses the ACT tools to model movie sets.
- Dynamic Components: Display this palette when you’re developing dynamic components.
Arranging dialog boxes on MacOS
In SketchUp, many dialog boxes are designed to remain open as you create a 3D model. (Technically, these dialog boxes are called modeless, meaning you don’t have to input something and close the dialog box to continue your work.)
Here are a few examples of how you might use modeless dialog boxes:
- When you apply materials to your model, the Materials browser stays open so that you can move in and out of the browser as you apply materials or edit photo textures.
- As you place tree and shrub components around a building, you may need to keep the Components browser open to select your components and use the Outliner so that you can easily select a component and replace it with another.
All these modeless dialog boxes are handy until you need to continue drawing or editing your model. Then, the dialog boxes can clutter the drawing area.
As you create your 3D models, try the following techniques for arranging modeless dialog boxes:
- Stack them up: The dialog boxes’ top and bottom edges stick together, so that you can create a stack. Click and drag the title bar of the topmost dialog box to move the whole stack at once.
- Shrink them down: Click a dialog box’s title bar to collapse the dialog box, so that you see only the title bar. Click a collapsed dialog box to open it again.
- Snap the stack: Drag the stack to the outer edge of the application window, and the stack snaps to the edge.
- Shuffle the stack: Drag a dialog box’s title bar to the left to break it from the stack. You can then drag the dialog box back into the stack wherever you’d like to place it. If a dialog box is at the bottom of the stack, you can drag it down to break it from the stack.
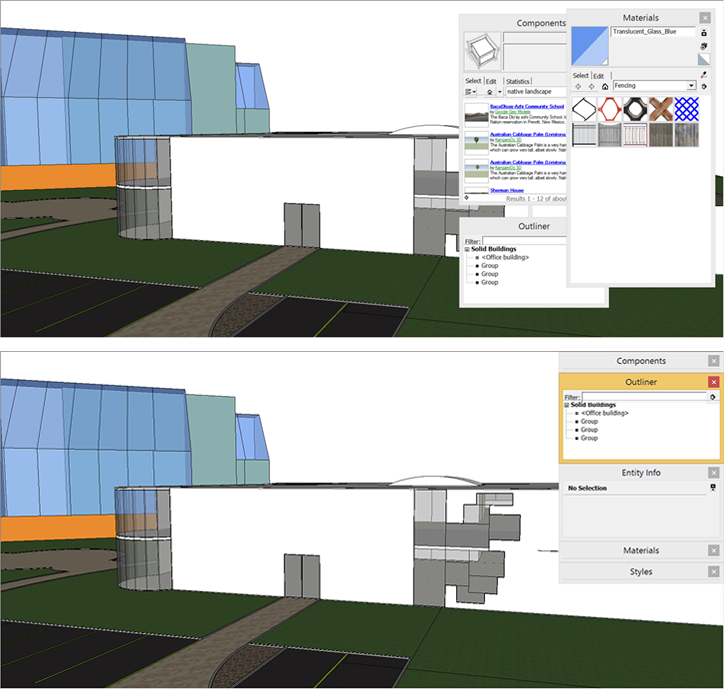
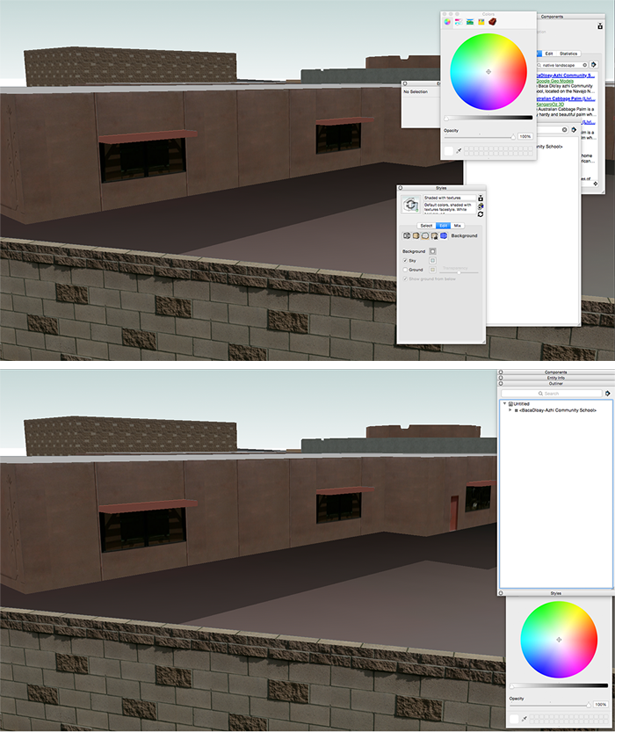
In the following figure, you see how stacking the dialog boxes helps you tidy up the SketchUp interface.
Arranging dialog boxes and trays on Windows
In SketchUp, dialog boxes are maintained in a tray. You can customize the tray in terms of which dialog boxes are expanded or collapsed, as well as which dialog boxes are in a given tray, and the location of the tray on your screen. The default tray has many of the most commonly used dialog boxes.
As you create your 3D models, try the following techniques for arranging dialog boxes in a tray:
- Expand or Open them: Click the dialog box’s title bar to expand or open the dialog box so you can see the contents. If enough dialog boxes are opened so that they go below the SketchUp window, move your mouse cursor over the tray and scroll your mouse.
- Collapse or Close them: Click a dialog box’s title bar to collapse the dialog box, so that you see only the title bar. Click a collapsed dialog box to open it again.
- Add/Remove them: Select Window > Manage Trays… to open the tray manager. Select the tray you want to modify in the left pane, then add a checkmark to dialog boxes you want to see in the tray, and remove the checkmark next to dialog box names that you want to remove from the tray.
- Shuffle or Move them: Drag a dialog box’s title bar up or down through the tray to change the order of the dialog boxes. You can do this if the dialog box is expanded or collapsed, though it’s a bit easier to see what you’re doing if you shuffle the dialog boxes when they’re collapsed. To move a dialog box between trays, drag the dialog box to the destination tray tab at the bottom of the tray window where you would like to move the dialog box.
Managing Trays
When you first install SketchUp, a default tray will be created for you and it will contain the most commonly used dialog boxes. Over time, you may want to create new trays that contain only the dialog boxes you want. To create a new tray, simply select Window > New Tray. This will open the New Tray manager. Give a name to the tray – don’t worry, you can change this name later if you’d like – and select which dialog boxes you want to add to the tray. To toggle between the trays, click the tray name in the tabs listed at the bottom of the tray area.
What’s great about the tray system is that if you would like to have a clean drawing space with no dialog boxes, select the pin icon in the top right corner of the tray. This puts the tray in Auto Hide mode. Move your mouse to the drawing area and the tray will disappear. To unhide the tray, move your mouse to the right side of the drawing window and over the tab with the tray name. If you created additional trays, those trays will also appear as a tab.
Understanding Tray States
Tray States isn’t a nickname for States in the US that resemble a cafeteria tray (sorry Colorado). «States» in this case refers to the ways that trays can be positioned on your computer screen when using SketchUp. The three tray states are Pinned, Auto Hide, and Floating. This section will also cover how to dock, undock, and organize trays.
- Pinned: This is the default state when you first create a new tray. Pinned trays are stuck to the side of the window and always visible – and you can have multiple pinned trays. If you create a new tray, it will pin itself to the side of your window and you will have two tabs at the bottom of the window. Click the X on a tray to hide that tray. Click the thumb tack icon to unpin and re-pin trays.
- Auto Hide: Trays will hide and show when you move your cursor over the tray name on the side of your screen. To auto hide a tray, click the thumb tack icon.
- Floating: A floating tray will sit wherever you put it on the screen. If you have multiple pinned trays (i.e. you see tabs at the bottom), they will all stay in the floating tray.
Docking, undocking, and organizing trays
To make a tray float, grab the tray header and drag it off the side of the screen. To doc a floating tray grab the header and place it on one of the tray icons that appear. If you are docking a floating tray over a pinned tray note that you can doc it to the side or add it as a tab by dropping it over the center icon showing the tray tabs.
Changing colors of selected items and other on-screen aids
You can customize the colors of selected, locked, and other on-screen aids. Perhaps you have trouble seeing a particular color, or your model’s materials closely match a specific color on-screen.
Here’s a quick list of the on-screen aids whose color you can customize:
- Selected item
- Locked geometry
- Guides
- Inactive section planes
- Active section plane
- Section cuts
- Section fills
To customize the colors of these items, follow these steps:
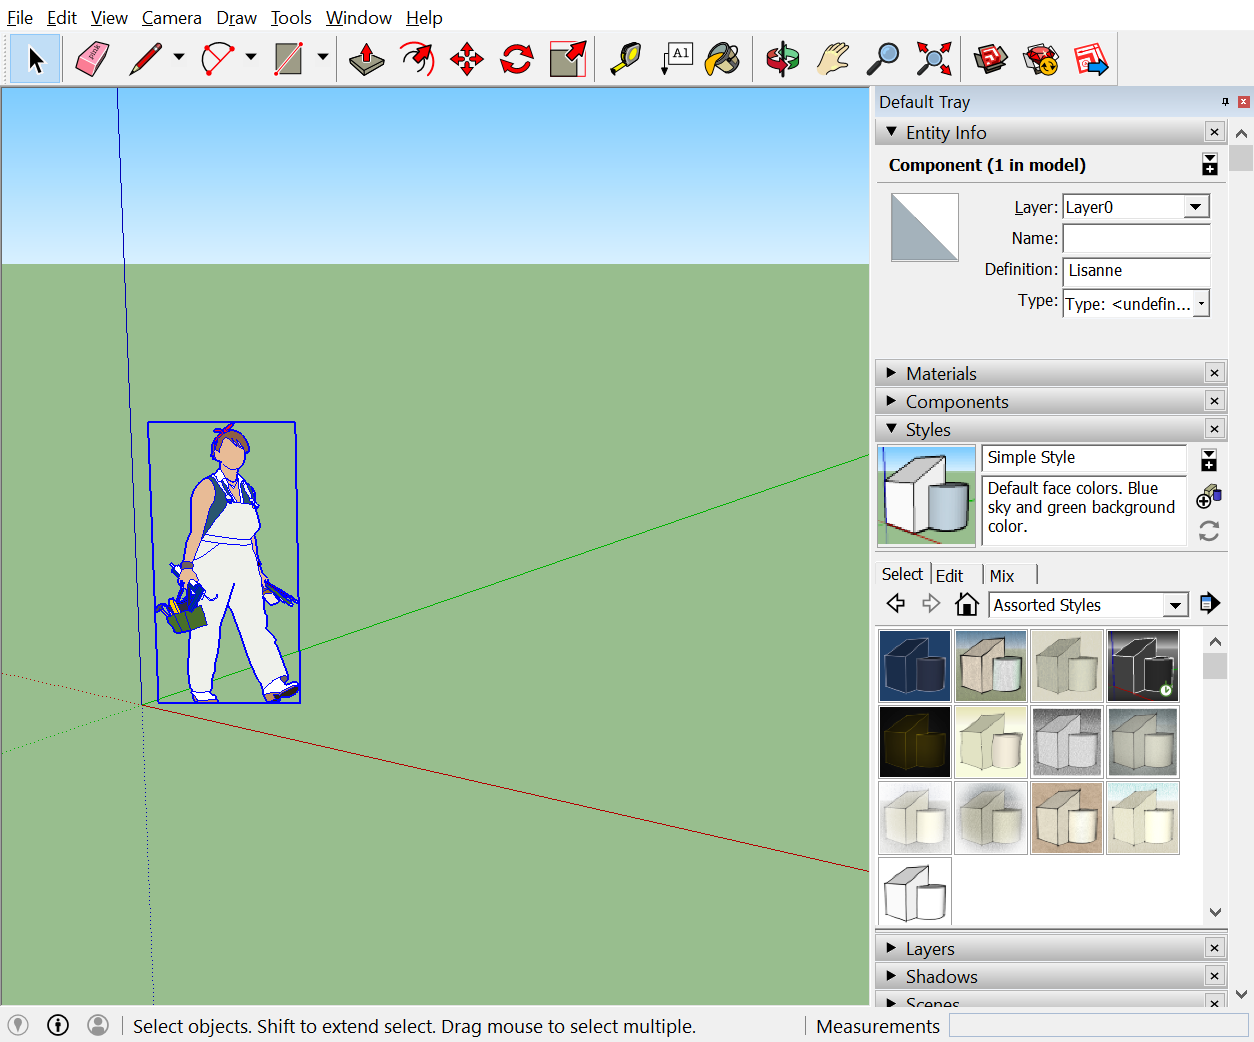
- Open the Styles dialog box in the Default Tray.
- Click the Edit tab.
- Click the Modeling Settings icon (), and you see color swatches for the items you can customize, as shown in the following figure.
- Click the color swatch for the item you want to customize.
- In the Choose Color dialog box, select a new color and click OK. For details about selecting colors, see Mixing Colors in the Color Picker. Your model reflects the new color immediately.
 ), and you see color swatches for the items you can customize, as shown in the following figure.
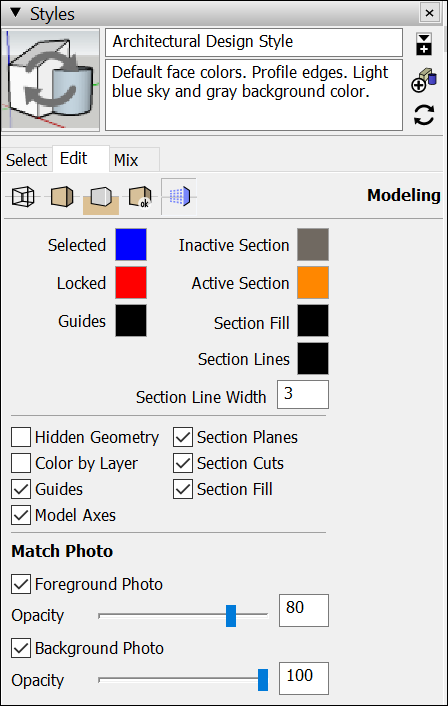
See Matching a Photo to a Model (or a Model to a Photo) for details about the Match Photo settings.
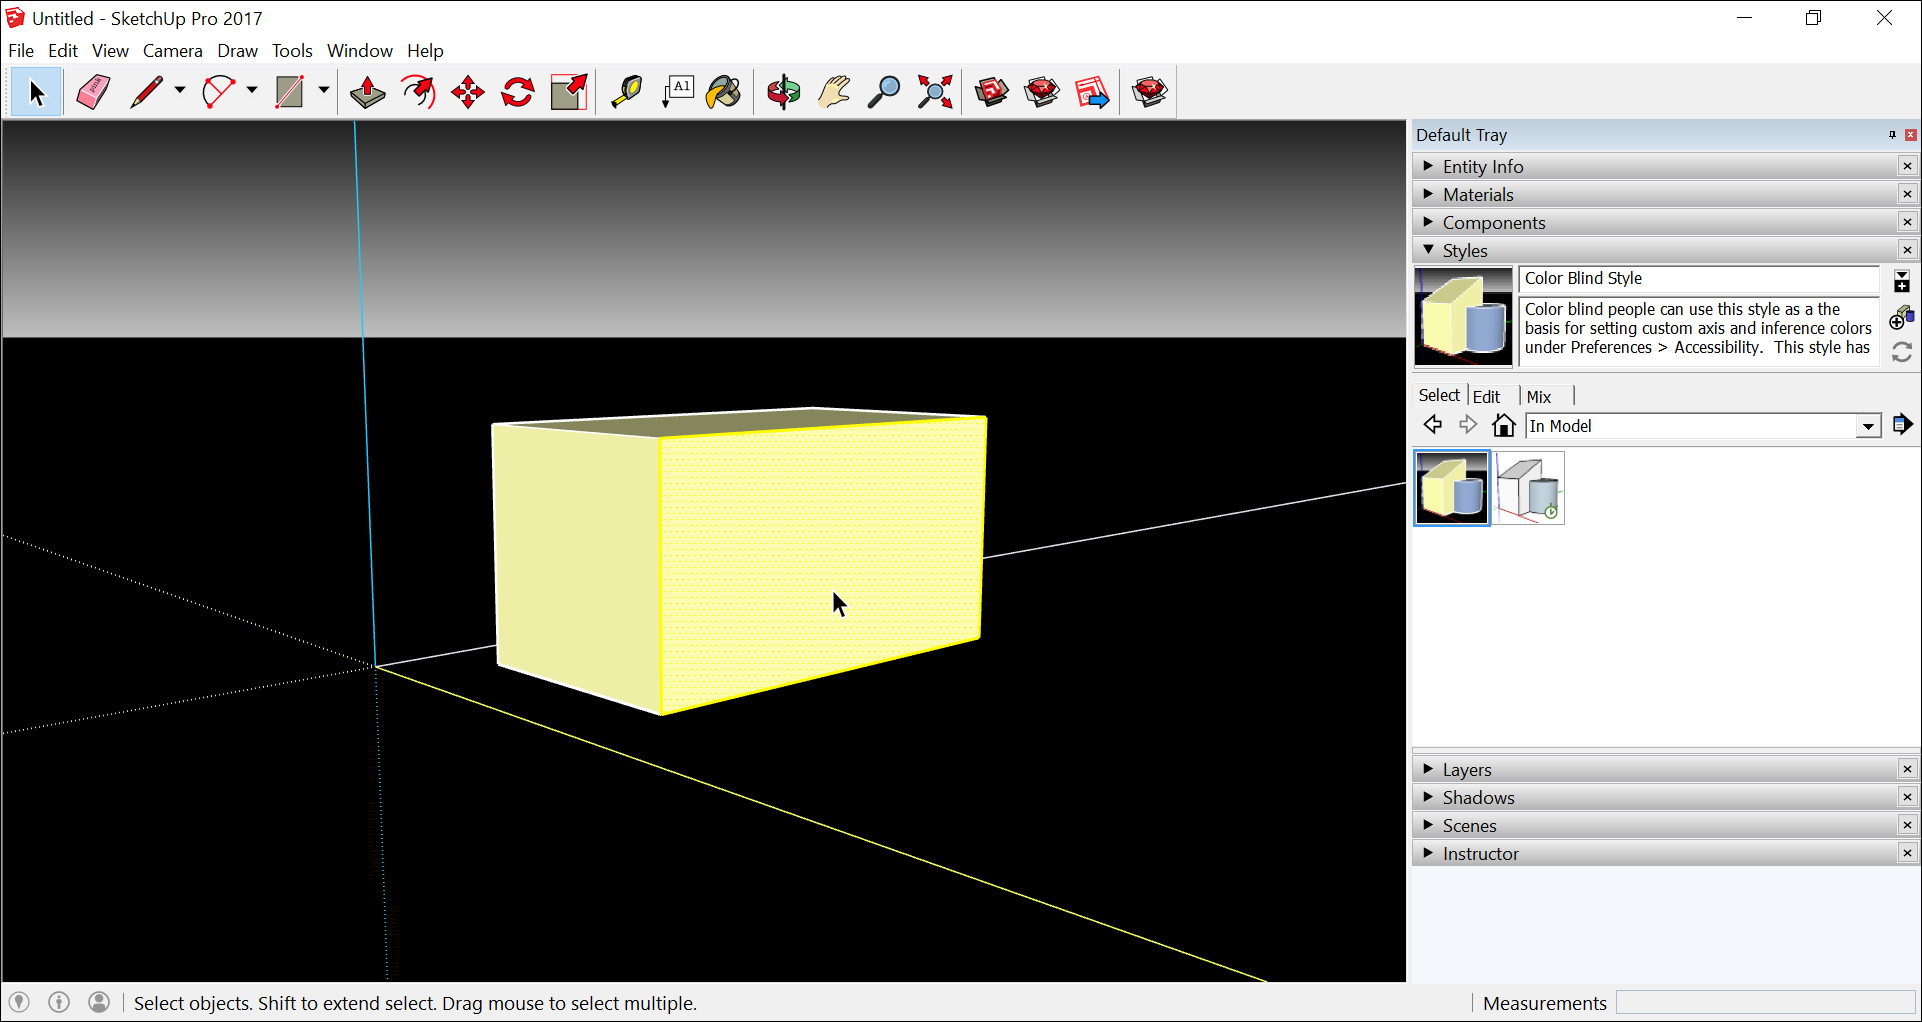
For people who experience color blindness, SketchUp has the following options:
- A Color Blind style changes the colors of on-screen elements so that the drawing axes, inferences, and other color-based visual cues stand out for people who have some degree of color blindness. You find the Color Blind style in the Color Sets group of predefined styles. See Choosing a Style for details about applying predefined styles.
For example, in the 3D model of a cube shown in the following figure, the right-hand face and its edges are selected, and the drawing area has been customized as follows:
- The default Color Blind style is applied.
- The red axis has been changed to yellow.
- The green axis is a light gray.
- The blue axis is a lighter shade of blue to help it stand out from the dark background.
To change axis and inference colors, follow these steps:
Источник


