- Easy access to replacement: Replace the Easy Access button in Windows with useful tools
- Easy access replacement
- April 2021 Update:
- Ease Of Access settings in Windows 10
- Ease of Access Settings in Windows 10
- 1. Vision
- 2. Hearing
- 3. Interaction
- 4 Ways to Open Ease of Access Center in Windows 10
- 4 ways to open Ease of Access Center in Windows 10:
Easy access to replacement: Replace the Easy Access button in Windows with useful tools
We have already released Windows 7 Logon Screen Ease Of Access Button Replacement Tool, which you can use to disable the Ease of Access button on the login screen and replace it with the CMD or Run command or take a screenshot of the login screen. We took it offline and replaced it with the new Ease Of Access Replacer v2, which we are releasing today. With this new tool, another freeware from TWC, you can do all this and more under Windows 8 and Windows 7.
Easy access replacement
April 2021 Update:
We now recommend using this tool for your error. Additionally, this tool fixes common computer errors, protects you against file loss, malware, hardware failures and optimizes your PC for maximum performance. You can fix your PC problems quickly and prevent others from happening with this software:
- Step 1 : Download PC Repair & Optimizer Tool (Windows 10, 8, 7, XP, Vista – Microsoft Gold Certified).
- Step 2 : Click “Start Scan” to find Windows registry issues that could be causing PC problems.
- Step 3 : Click “Repair All” to fix all issues.

Easy to use button provides tools and options such as voice output, magnifier, on-screen keyboard, high contrast, sticky keys and filter keys.
Ease Of Access Replacer v2 (EOAR) is a simple tool that allows you to replace the’Ease of Access’ button on the login screen with several useful options. If you don’t need the Easy Access button, which offers, then replacing it with other useful tools might be an option you might consider.
Freeware replaces the button with the following useful tools :
-
-
- Login screenshot: Take a screenshot of the login screen. Connection screenshots are saved in C:Screenshots.
- Lock screenshot: Take a screenshot of the lock screen. Block screenshots The screenshots are saved in C:Screenshots.
- CMD prompt: Opens a prompt.
- Powershell: Opens a Powershell prompt.
- Registry Editor: Opens the Registry Editor.
- Run dialog: Opens the Run dialog box.
- Task Manager: Opens the Task Manager.
-
Please note that if you want to take a screenshot of the lock screen, wait approximately 1 minute after pressing button until the lock screen is activated and discarded. So far, this is the only safe method I have found, says Lee Whittington, member of the TWC team.
The tool is a stand-alone portable application that does not require installation. To install the’Ease of Access’ button, simply run the’Ease Of Access Replacer’ tool and click’Install’. Although the tool first creates a default system restore point , you can create one manually if you wish, just to be sure. To uninstall, run the tool again and click Uninstall. You may need to run EOAR as an administrator.
With tools such as CMD, Regedit, Task Manager, Run would be great if you realized that you reached the login screen but Windows crashes on the login screen or that for some reason you can’t connect or access certain files. These tools could help you solve such problems. However, access to the CMD could also allow anyone to reset passwords or delete user accounts once they reach the login screen. So it would be a good idea to install it if you are the only user and your machine is physically safe.
Ease Of Access Replacer v2 was developed and tested under Windows 8, 32-bit and 64-bit, but should also run under Windows 10/7.
All donations go to the developer and not the windowsbulletin.com.
Ease Of Access settings in Windows 10
The Ease Of Access in Windows 10 lets you make your computer more accessible, based on your needs. You can change a lot of settings to make your PC work the way you want it to and can be useful to you if you are differently-abled. In this post, we will learn about the accessibility options in Windows 10 via Ease of Access Center.
Ease of Access Settings in Windows 10
Every accessibility option is available in the Settings app. Pressing Win+I will take open the Settings app. Click on Ease of Access to get this window shown below, along with the various settings.
In the left pane, you will see the Ease of Access Settings segregated into three categories – Vision, Hearing, and Interaction.
1. Vision
- Display
- Cursor & pointer
- Magnifier
- Color filters
- High contrast
- Narrator
2. Hearing
- Audio
- Closed captions
3. Interaction
- Speech
- Keyboard
- Mouse
- Eye control
Let us learn more about these settings.
1. Vision
This section of settings allows the users to customize the size of the text and apps, adjust the screen brightness, change zoom level, use color filters, and so on.
- Display
You can make the display on your PC easier to see by making the size of the text and apps bigger. You can adjust the brightness of your built-in display and use night light.
You can further personalize your Windows experience by choosing to show animations and transparency in Windows, to show desktop background image, and to automatically hide scroll bars in Windows. You can also personalize your background and other colors through this tab.
Related settings include additional display settings, background settings, color settings, and theme settings.
- Cursor & pointer
These settings make the cursor, pointer, and touch feedback easier to see. Use the respective sliders to change the size of the pointer and the cursor thickness. You can choose the pointer color from the given options. This tab also allows you to show and make the visual feedback for touch points darker and larger. Related settings include additional mouse settings and touch-pad settings.
- Magnifier
Turning on the Magnifier settings lets you zoom in to the screen. Magnifier can run into full screen, in a separate window, or as a lens that follows your mouse pointer around the screen. Adjust zoom level and zoom increments as preferred.
Further, as you can see, you can select the check boxes where you wish to start magnifier after sign-in, before sign-in for everyone, smooth edges of images and text, invert colors, etc. You can choose a Magnifier view to docked, full screen or lens.
Additionally, you can choose to keep the mouse cursor within the edges of the screen or centered on the screen.
- Color filters
Turn on the color filters to make the photos and colors easier to see. From the given options, you can select a color filter to see the elements on the screen better; or you can select a colorblindness filter from the options mentioned out there.
Related settings will take you color settings and theme settings.
Read: How to enable and use Color Filters for Colorblind users in Windows 10.
- High contrast
The high-contrast theme uses a more distinct and vibrant scheme of colors to make the apps and texts easier to see.
You can choose a high contrast theme from the drop-down menu and customize high contrast colors for text, hyperlinks, background, etc. Related settings include theme settings.
- Narrator
Turn on the Narrator which is a screen reader that describes and reads out everything on your screen. It can be controlled by mouse, touch, and keyboard. You will find the links to open Narrator Home and view the complete guide to Narrator online. Start-up options include settings that allow the shortcut key to start Narrator, show Narrator Home when the Narrator starts, and more. Go through them and check the boxes as required.
It is possible to personalize the Narrator’s voice by choosing a voice of your preference, and changing voice speed, voice pitch, voice volume by dragging the respective sliders. Next is to change the level of detail the Narrator provides about text and controls from the drop-down menu – whether you would prefer text only, some control details, all control details, some text details, or all text details.
Similarly, there are additional settings that allow you to change the level of context Narrator provides for buttons and other controls, and adjust when the Narrator provides details about buttons and other controls.
Make necessary changes to the settings under Change what you hear when typing.
Further, select the keyboard layout, the Narrator modifier key, and the Narrator cursor settings.
Select the Narrator cursor mode.
You can also sync your settings and give feedback about the Narrator.
2. Hearing
This section of settings allows the users to make their device easier to hear and easier to use without sound by displaying audio as text.
- Audio
The Audio tab consists of settings that make your device easier to hear or use without sound. You will find the settings here to change device volume, app volume, and other such sound settings. Audio alerts for notifications can be displayed visually. Related settings include sound settings.
- Closed captions
Closed captions make your device easier to use without sound by displaying audio as text.
Use the drop-down menus to change the caption color, caption transparency, caption style, caption size, and caption effects.
Further, select the desired options from the drop-down menus to change caption background color, caption background transparency, window color, and window transparency. Related settings include video playback settings.
TIP: You can also make the Notifications last longer by adjusting the Show notifications for the setting. Change the notification time from 5 seconds to 5 minutes. You can also control the thickness setting for your cursor.
3. Interaction
This section of settings allows the users to improve the speech, use the on-screen keyboard, control the mouse, and more.
- Speech
You will learn that by pressing the Windows logo key + H, you can start dictation by turning on speech recognition. You can learn more about Cortana and make the necessary changes at how you talk to Cortana.
Related settings includes Cortana settings and additional speech settings.
- Keyboard
Turn on the Keyboard settings for the ones you wish to use the on-screen keyboard, sticky keys, toggle keys, and filter keys.
You can allow the shortcut key to start sticky keys, toggle keys, and Filter Keys.
You can underline access keys when available and use the print screen shortcut. Under Make it easier to type, you can check the boxes if you wish to show a warning message or make a sound by turning on various keys from the keyboard. Related settings include typing settings and language and keyboard settings.
You can control the mouse pointer with the numeric keypad. Drag the respective sliders to adjust the Pointer speed and Pointer acceleration. At the bottom, you will see a link to change other mouse options. You can read here how to use the Windows computer without a keyboard or mouse. You can also Adjust Text Cursor Indicator size, color & thickness for better visibility.
To use the Eye control feature in Windows 10, you need to connect to a supporting eye-tracking device. Eye control supports the following eye-tracking devices –
Tobii
• Tobii Eye Tracker 4C
• Tobii EyeX
• Tobii Dynavox PCEye Plus
• Tobii Dynavox EyeMobile Mini
• Tobii Dynavox EyeMobile Plus
• Tobii Dynavox PCEye Mini
• Tobii Dynavox PCEye Explore
• Tobii Dynavox I-Series+
• Selected laptops and monitors that include eye-tracking integrations
EyeTech
• TM5 Mini
Eye control lets you use eye-tracking technology to control the mouse, type using an on-screen keyboard, and communicate with people using text-to-speech. All you have to do is connect the device, install the software, test the Tobii app, and get started by following the steps. Click on the link Get more info about eye control to learn more about it.
This gets us to the end of the post. All the Ease of Access Settings in Windows 10 related to vision, hearing, and interaction have been covered. Hope you had an interesting read!
4 Ways to Open Ease of Access Center in Windows 10
If you don’t know where Ease of Access Center is in Windows 10 computer, you can use the following 4 methods to turn it on.
Video guide on how to open Ease of Access Center in Windows 10:
4 ways to open Ease of Access Center in Windows 10:
Way 1: Open it by searching.
Type ease in the search box on taskbar, and choose Ease of Access Center from the result.

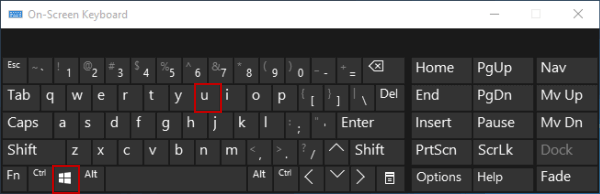
Way 2: Turn it on using keyboard shortcut.
Press Windows+U on the keyboard.
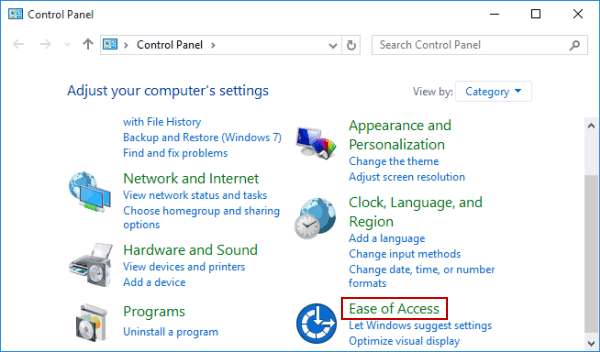
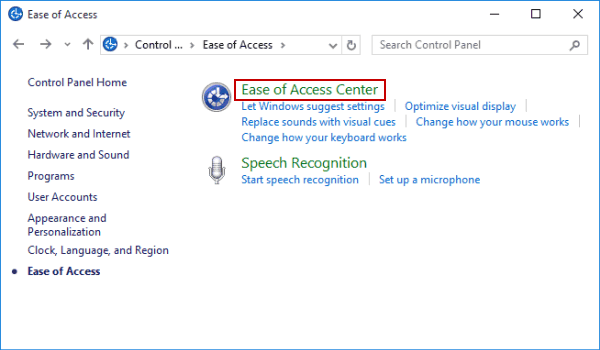
Way 3: Open it in Control Panel.
Step 2: Click Ease of Access.
Step 3: Select Ease of Access Center.
Way 4: Turn it on in Settings.
Step 2: Choose Ease of Access.


