- How to Lock, Manage, Edit Hosts File in Windows 10
- Hosts File in Windows 10
- Host file location
- Lock Hosts file to prevent hijacking
- Block website using the Hosts file
- Edit Hosts file
- HostsMan
- How to Edit the Hosts File in Windows 10
- Edit Your Windows 10 Host File as an Administrator
- An Easier Way to Edit the Hosts File in Windows 10
- How to Edit the HOSTS File in Windows
- Customize your network settings in Windows 10, 8, or 7
- How to Edit the Windows HOSTS File
- What If I Can’t Save the HOSTS File?
- What Is the HOSTS File Used For?
- How to Edit Your Hosts File in Windows 10
- What is a Hosts File?
- Why is a Hosts File Useful?
- Where is the Hosts File Located?
- What Does a Hosts File Contain?
- How Do I Edit my Hosts File?
- Conclusion
How to Lock, Manage, Edit Hosts File in Windows 10
The Hosts file in Windows 10/8/7, is used to map hostnames to IP addresses. This Hosts file is located deep down in the Windows folder. It is a plain text file, and the size of the original default Hosts file is around 824 bytes.
Hosts File in Windows 10
In this post, we will see its location and also how to manage, lock, or edit the Hosts file.
Host file location
The Hosts file in Windows is located at the following location:
Lock Hosts file to prevent hijacking
Imagine clicking on www.thewindowsclub.com and seeing a completely different website load in your browser. Malware can redirect Web addresses on your computer by altering your Hosts file. This is referred to as the Host File Hijack.
To prevent Host file hijacks, you may navigate to it, right-click on it, select Properties and make it a Read-only file. This will lock down your Hosts file and prevent anyone or any malware from writing to it.
Block website using the Hosts file
To block a website using the Hosts File, simply add the following entry:
Although I do not do it, many users like to manually add entries to it in order to block the opening of one or more particular websites. Others, like to download and use List from well-known sources like mvps.org, to add entries which block malware sites from opening.
Edit Hosts file
If you need to edit the Hosts file, navigate to the following folder location:
Here you will see the Hosts file. Right-click on it and select Notepad. Make the changes and Save.
But sometimes, even when you are logged on with administrative credentials, you may receive the following error message:
Access to C:\Windows\System32\drivers\etc\ hosts was denied
Cannot create the C:\Windows\System32\drivers\etc\hosts file. Make sure that the path and file name are correct.
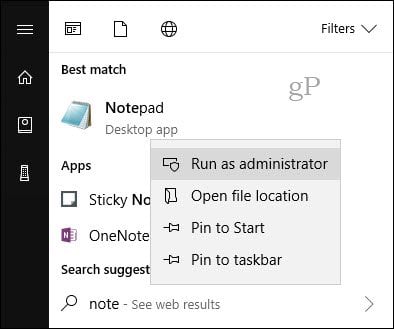
In this case, type Notepad in Start search and right-click on the Notepad result. Select Run as administrator. Open the Hosts file, make the necessary changes, and then click Save.
HostsMan
While you can always manually manage or edit Hosts file manually, I would like to suggest that you use a third-party freeware tool like HostsMan to do it.
HostsMan is a feature-rich tool that lets you add, remove, edit entries in the Hosts file. It also lets you easily add third-party Hosts lists that help in blocking malware sites and lets you easily enable or disable the hosts file. It includes a built-in hosts file updater & a hosts editor. It lets you scan the hosts file for errors, duplicates, and possible hijacks – and also lets you create an Exclusion list. One more useful feature it offers is the Hosts file backup manager. Backup your Hosts file to a safe place and use it to restore it, should the need arise.
Hostman also lets you Flush DNS cache, open Hosts with a text editor, count the number of hosts, find duplicates, replace IP, scan hosts for malicious entries, rearrange hosts, manage DNS Client Service and more. In short, its the only Hosts Manager that you will even need. You can download it from its home page. SysMate Hosts File Manager is another tool that lets you do so.
How to manually reset Hosts file back to default in Windows may also interest you.
If your browser has been hijacked, you might find this post on Browser Hijacking and Free Browser Hijacker Removal Tools helpful.
Date: December 23, 2018 Tags: Hosts, Security
How to Edit the Hosts File in Windows 10


If you’re a regular groovyPost reader, you know that DNS translates domain names like groovyPost.com into IP addresses like 104.24.11.25. But did you know that there’s a file on your Windows 10 PC that can override that? It’s called your hosts file and lets you map specific domain names to an IP address of your choosing. Your HOSTS file only affects your computer, so you can use it to create custom URLs for IP addresses on your network, or you can use it to redirect certain websites.
As you can imagine, editing the HOSTS file can easily break your internet if it’s modified incorrectly or maliciously. So, it’s not particularly easy for a normal user to edit. This is a good thing. But if you want to purposefully change your HOSTS file, here’s how.
Edit Your Windows 10 Host File as an Administrator
The HOSTS file is normally stored in a plain text file in the Windows System folder and can be modified for a variety of use cases. One particular reason I edited the Host file in the past was to block certain websites when I imaged computers for a local high school. This was probably one of the best and easiest ways I could ensure students didn’t load any unauthorized websites such as Facebook or YouTube.
Editing your Windows Hosts file doesn’t have to feel like going down a rabbit hole. In Windows XP and earlier versions, the process was quite easy, just add an exception to your antivirus, open it in Notepad, make your changes then save it.
In Windows 10, if you try to edit your hosts file, you’ll probably be able to open it just fine, but when you go to save it, you’ll get an error:

Here’s how you can edit your hosts file without getting the “You don’t have permission to save in this location. Contact the administrator to obtain permission” error.
Hit the start menu or press the Windows key and start typing Notepad.
Right-click Notepad and choose Run as administrator.
In Notepad, click File then Open… In the File name field, paste the following path in:

Now you’ll be able to edit and save changes to your HOSTS file.
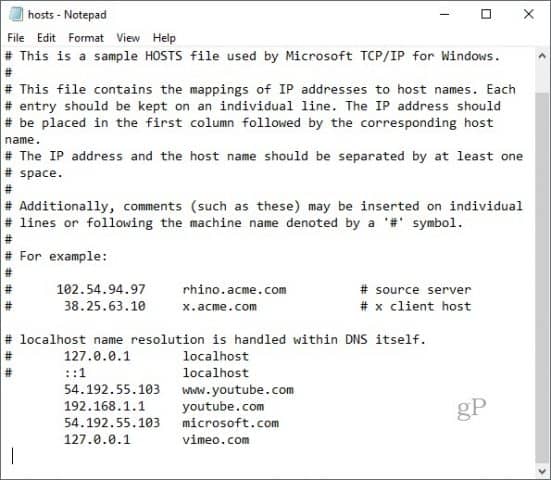
To map a domain, simply add a line based on the examples in the HOSTS file.
Start with the target IP address, then a space, then the domain name. If you want to block a website, redirect it to 127.0.0.1.
Don’t put in the # if you want it to take effect.
Also, remember that www.youtube.com is different than youtube.com.
You may need to restart your computer for the new HOSTS file to take effect.
An Easier Way to Edit the Hosts File in Windows 10
If you found that process a bit cumbersome, there’s a third-party utility you can use to modify your HOSTS file. I found a good one called Hosts File Editor by Scott Lerch. Let’s take a look and see how it works.
Now that you know the basics, here’s how you do it using the app, HOSTS File editor.
Download the 1 MB installer then proceed to set it up. Remember to choose the option just for yourself if you don’t want other users to have access to it.

Launch the app in Start > All apps—this will add the app to the Notification area where can launch the editor anytime you need to.

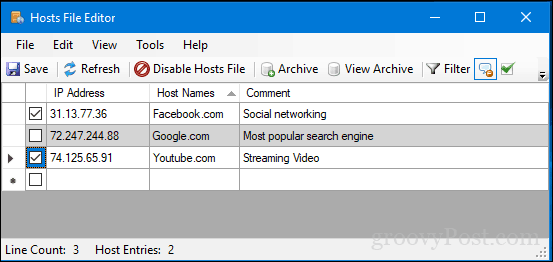
Hosts File Editor features a clean, easy to use interface. To begin using the program, populate the table with IP Addresses, Host Names, and a comment on the websites you want to manage. It’s not just limited to popular Internet websites, even devices on your home network with an IP address can be managed, so your Xbox, iPad, web cameras, or routers are much easier to block access to if needed.

When you are ready to block a website, check the box for the sites you want to prevent access to, click Save and that’s it.
Another nice ease of use feature is the ability to simply right click the Hosts File Editor in the Notification area then click Disable Hosts File or make a quick edit. No need to go hunting or launch the command line anymore.

There are some other cool features included for power users and network administrators such as:
- Cut, copy, paste, duplicate, enable, disable and move one or more entries at a time.
- Filter and sort when there are a large number of host entries
- Archive and restore various hosts file configurations when switching between environments
- Automatically ping endpoints to check availability
So, there you have it, a quick and easy way to edit your Hosts File in Windows 10.
How to Edit the HOSTS File in Windows
Customize your network settings in Windows 10, 8, or 7
The Windows HOSTS file functions like a local copy of a DNS server, so knowing how to edit it might come in handy if you want to make custom domain redirects, block websites, or remove malicious entries set by malware. That said, you might run into permission errors and other problems when you make changes to this file in some versions of Windows.
The instructions in this article apply to Windows XP, Windows 7, Windows 8, and Windows 10.
:max_bytes(150000):strip_icc()/005_how-to-edit-the-hosts-file-153661-5bb512474cedfd0026cf0260.png)
How to Edit the Windows HOSTS File
In Windows 7, 8, and 10, you can’t save edits to the HOSTS file unless you open it directly from Notepad or another text editor. To do so:
Open Notepad or another text editor like Notepad++.
:max_bytes(150000):strip_icc()/001_how-to-edit-the-hosts-file-153661-5bb5126446e0fb0026320d9b.jpg)
In the text editor, select File > Open and open the HOST file location at C:\Windows\System32\drivers\etc\.
:max_bytes(150000):strip_icc()/002_how-to-edit-the-hosts-file-153661-5bb51296c9e77c0051385665.jpg)
Select Text Documents (*txt) in the bottom-right of the Open window and change it to All Files.
:max_bytes(150000):strip_icc()/003_how-to-edit-the-hosts-file-153661-5bb512bdc9e77c0026e3bdf1.jpg)
This step is required because the HOSTS file doesn’t have the .TXT file extension.
When files appear in the folder, double click hosts to open it.
:max_bytes(150000):strip_icc()/004_how-to-edit-the-hosts-file-153661-5bb512ff46e0fb00263227bc.jpg)
Edit the HOSTS file and save your changes.
What If I Can’t Save the HOSTS File?
In some versions of Windows, you don’t have permission to save directly to the \etc\ folder. If this is the case, you might see an error like this one when you try to save:
Instead, you must save the file elsewhere like the Documents or Desktop folder. After saving, go to that folder, copy the HOSTS file, and paste it directly into the location where the HOSTS file should be (C:\Windows\System32\drivers\etc\). You’ll be prompted with permission validation and will have to confirm overwriting the file.
If you still have trouble saving the modified HOSTS file, check the file’s attributes to see if it’s been marked read-only. Right-click the file and select Properties to see the attributes.
Another option is to open your text editor program as an administrator so that the permissions are already applied to the editor. Then, saving the HOSTS file over the original can be performed without having to verify your admin credentials.
If you still can’t save to the HOSTS file location, you probably don’t have the correct permissions to be editing files in that folder. You should be logged in under an account that has administrative rights over the HOSTS file, which you can check by right-clicking the file and going to the Security tab.
What Is the HOSTS File Used For?
The HOSTS file is the virtual equivalent of a phone company’s directory assistance. Where directory assistance matches a person’s name to a phone number, the HOSTS file maps domain names to IP addresses.
Entries in the HOSTS file override DNS entries maintained by the ISP. While this hierarchy might come in handy for regular use, like to block ads or certain malicious IP addresses, its functions also make this file a common target of malware.
By modifying it, malware can block access to antivirus updates or force you to a malicious website. Thus, it’s a good idea to check the HOSTS file periodically or at least know how to remove false entries.
A much easier way to block certain domains from your computer is to use a custom DNS service that supports content filtering or blocklists.
How to Edit Your Hosts File in Windows 10
What is a Hosts File?
The hosts file is a local plain text file that maps servers or hostnames to IP addresses. This file has been in use since the time of ARPANET. It was the original method to resolve hostnames to a specific IP address. The hosts file is usually the first process in the domain name resolution procedure. Here is an example of a hosts file entry.
We use the above code as an example since it almost always included in every hosts file. Another example would be similar to the following entry.
- The first section denotes the IP address where a request will be redirected to.
- The second section designates the location that we want to redirect a request from.
- The third section specifies a comment for the entry.
- Each entry is usually separated by a space or a tab.
We would add the above entry to our hosts file to associate the hostname (or domain name)В liquidweb.comВ with the IP addressВ 67.225.187.61. To provide a working example, let’s move on to the next section.
Why is a Hosts File Useful?
Let’s say we have just completed a migration to a new server. In order to see how our domains will look and operate on our new server before we move our DNS settings, we cannot just type in one of our current domain names as it will resolve to the old server we are moving away from (since we never move our DNS A records from the old server until we are sure the new site is working as expected).
So, to see how our domain will look on the new server, (without having to change our DNS records) we can simply modify our local hosts file to point the domain to the new servers IP. If our domain is liquidweb.com and the old IP is 67.225.187.61 and our new IP will be 72.30.35.10, we can temporarily comment out the current liquidweb.com entry (using a ‘#‘ symbol) and add an alternate entry which points to the new servers IP.
If we added the above entry to our hosts file, every time we open liquidweb.com in our browser, we will now be redirected to the 72.30.35.10 IP.
Where is the Hosts File Located?
The location of the hosts file will differ by operating system. The typical locations are noted below.
- Windows 10 — «C:\Windows\System32\drivers\etc\hosts»
- LinuxВ -В «/etc/hosts»
- Mac OSВ X -В «/private/etc/hosts»
What Does a Hosts File Contain?
A hosts file contains entries similar to the following information. Your entries may differ significantly.
How Do I Edit my Hosts File?
Our \etc\hosts file is only editable as a Windows administrator. В Here is a short video on how to edit a hosts file.
Here are the directions on how to modify your hosts file.
Step 1.
Click the Windows button and type Notepad in the search bar.
Step 2.
Right click on Notepad and then Run as Administrator.
Step 3.
You’ll be asked, “Do you want to allow this app to make changes to your device?”. Choose Yes.
Step 4.
In Notepad, choose File then Open.
Step 5.
Navigate to C:\Windows\System32\drivers\etc\hosts or click the address bar at the top and paste in the path and choose Enter.  If you don’t readily see the host file in the /etc directory then select All files from the File name: drop-down list, then click on the hosts file.
Step 6.
Add the appropriate IP and hostname at the end of your hosts’ file, select Save, and then close the file.
Step 7.
Finally, you will want to flush your DNS cache for your computer to recognize changes to the file. Click the Windows button and search command prompt.
Step 8.
Type the following command in the terminal and press Enter
Conclusion
Modifying a hosts file has many benefits which can significantly impact how you view your new domain or website. Using this method to view a site allows us to see how any new changes affect the layout and functionality of a domain.
Should you have any issues when modifying this file, our Support Teams are filled with experienced Linux technicians and talented system administrators who have an intimate knowledge of how to facilitate this modification. We are always available to answer any inquiries with issues related to this article, 24 hours a day, 7 days a week 365 days a year.
If you are a Fully Managed VPS server, Cloud Dedicated, VMWare Private Cloud, Private Parent server, Managed Cloud Servers, or a Dedicated server owner and you are uncomfortable with performing any of the steps outlined above, we can be reached via phone at 800.580.4985, or via a chat or support ticket to assist you with this process.


