- Ini Editor для Windows
- Отзывы о программе Ini Editor
- Manually edit the Boot.ini file in a Windows Server 2003 environment
- Summary
- Modify Folder Options
- Save a backup copy of the Boot.ini file
- Sample Boot.ini file
- Edit the Boot.ini file
- Remove an Operating System from the menu
- Modify the Operating System menu order
- Modify the default Operating System
- Modify the time-out
- Editing the Boot.ini File
- Bootcfg
- Editing in Notepad
- Desktop.ini Editor v1.0
- What Is an INI File?
- Why software programs use INI files, and how to view one
- How to Open and Edit INI Files
- How an INI File Is Structured
- More Information on INI Files
- How to Convert an INI File
Ini Editor для Windows
| Оценка: |
3.57 /5 голосов — 14 |
| Лицензия: | Бесплатная |
| Версия: | 2.6.3 | Сообщить о новой версии |
| Обновлено: | 18.03.2006 |
| ОС: | Windows 10, 8, 7, XP |
| Интерфейс: | Русский |
| Разработчик: | Тетерин Алексей Михайлович |
| Категория: | другое |
| Загрузок (сегодня/всего): | 1 / 17 908 | Статистика |
| Размер: | 940 Кб |
| СКАЧАТЬ | |

Ini Editor является расширенным редактором файлов инициализации, которые имеют расширение .ini и используются многими программами и частично операционной системой для хранения различных настроек.
Примерами таких файлов являются system.ini, win.ini, control.ini и другие. Ini Editor позволяет работать с ними как с реестром и отображает информацию в виде двух столбцов: секций и параметров с их значениями.
- Основные и дополнительные операции редактирования файла
- Создание файлов инициализации
- Поиск параметров
- Возможность отмены любых сделанных в файле изменений
- Создание списка избранных файлов и параметров
ASPack — программа для сжатия исполняемых файлов (EXE, DLL, OCX) и защиты от непрофессионального.
SPRuler — экранная линейка, с помощью которой можно быстро и легко измерить в пикселях любые объекты на экране монитора.
CHM Editor — удобная программа для работы с CHM файлами, которые используются при создании.
PHP Expert Editor — редактор PHP скриптов и HTML страниц. Имеет встроенный браузер, отладчик, FTP-клиент.
Ini Editor — Программа является расширенным редактором файлов инициализации, которые имеют.
Logical Designer — небольшая программа для проектирования логических цепочек и схем.
Отзывы о программе Ini Editor
Ваше имя про Ini Editor 2.6.3 [09-03-2019]
хотел линягу редактировать в l2.ini не видит содержимого
2 | 2 | Ответить
Desttt про Ini Editor 2.6.3 [23-07-2011]
Хорошая программа, спасибо!
2 | 3 | Ответить
Bestguest про Ini Editor 2.6.3 [24-11-2009]
нет batch-conversion, потоковой обработки множества ini файлов
2 | 2 | Ответить
BNV про Ini Editor 2.2.1 [16-01-2006]
Мало функций. Неподдерживает Юникод.
Дистрибутив 962кб, а программа (со справкой) весит 300кб (Uninstal-600кб, почему то. )
Поменяй инсталятор на NSIS что ли.
2 | 3 | Ответить
Manually edit the Boot.ini file in a Windows Server 2003 environment
This article describes how to manually edit the Boot.ini file in a Microsoft Windows Server 2003 environment.
Original product version: В Windows Server 2003
Original KB number: В 323427
Summary
The Ntldr file uses information in the Boot.ini file to display the bootstrap loader screen from which you select the operating system. This screen is based on the information in the Boot.ini file. If you do not select an entry before the counter reaches 0 (zero), Ntldr loads the operating system that is specified by the default parameter in the Boot.ini file.
Windows Server 2003 Setup places the Boot.ini file in the root of the system partition.
Before you edit the Boot.ini file, modify your folder options so you can view hidden files, and then back up the Boot.ini file.
You can also edit the Boot.ini file by using the System Configuration Utility (Msconfig.exe). To start the System Configuration Utility, click Start, click Run, type msconfig in the Open box, and then click OK.
Modify Folder Options
- Right-click Start, and then click Explore.
- On the Tools menu, click Folder Options, and then click View.
- Under Advanced Settings, click Show hidden files and folders, click to clear the Hide protected operating system files (Recommended) check box, click Yes, and then click OK.
- Locate the system partition, locate and right-click the Boot.ini file, and then click Properties.
- Click to clear the Read-only check box, and then click OK.
Save a backup copy of the Boot.ini file
- Right-click Start, and then click Explore.
- Locate the system partition, locate and right-click the Boot.ini file, and then click Copy.
- Locate and click the folder where you want to copy the Boot.ini file, and then click Paste on the Edit menu.
Sample Boot.ini file
The following is a sample of a default Boot.ini file from a Windows Server 2003-based computer:
The following is a sample of the same Boot.ini file after the addition of another partition that runs Microsoft Windows XP Professional.
Edit the Boot.ini file
- Click Start, point to Programs, point to Accessories, and then click Notepad.
- On the File menu, click Open.
- In the Look in box, click the system partition, in the Files of type box, click All Files, locate and click the Boot.ini file, and then click Open.
- Make the changes that you want to the Boot.ini file, and then click Save on the File menu.
Examples of changes that you can make are described in the following sections of this article.
Remove an Operating System from the menu
To remove an operating system from the menu, follow these steps:
In Notepad, select the line that contains information about the operating system that you want to remove, and then click Delete on the Edit menu. For example, select the following line:
multi(0)disk(1)rdisk(0)partition(2)\WINDOWS=»Microsoft Windows XP Professional» /fastdetect
On the File menu, click Save.
Modify the Operating System menu order
To modify the operating system menu order, follow these steps:
- In Notepad, select the line that you want to move, click Copy on the Edit menu, and then press DELETE.
- Click where you want to insert the line, and then click Paste on the Edit menu.
- Repeat step 1 and step 2 for each line that you want to move, and then click Save on the File menu.
Modify the default Operating System
The default operating system is the operating system that is started if no selection is made before the time-out occurs. (The time-out is the number of seconds in which you can select an operating system from the menu before the default operating system is loaded.) To modify the default operating system, follow these steps:
In Notepad, modify the following line to change the default operating system:
For example, to change the default operating system from Windows Server 2003 to Windows XP Professional, modify the following
to the following:
On the File menu, click Save.
Modify the time-out
To modify the time-out value, follow these steps:
In Notepad, edit the following line to change the time-out (where the value is 30 seconds):
On the File menu, click Save.
Editing the Boot.ini File
This topic describes the boot options supported in Windows XP and Windows Server 2003. If you are changing boot options for modern versions of Windows, see Boot Options in Windows Vista and Later.
Prior to Windows Vista, BIOS-based computers running Windows store boot options in a Boot.ini text file. You can edit Boot.ini using Bootcfg ( bootcfg.exe ), a tool included in Windows XP and Windows Server 2003, or using a text editor such as Notepad. Bootcfg is documented in Windows Help and Support. You can also view and change some boot options in Control Panel under System. In the System Properties dialog box, on the Advanced tab, select Settings under Startup and Recovery. Because this functionality is limited, it is not discussed in this section. For information about the Startup and Recovery dialog box, see Help and Support Center.
Bootcfg
Bootcfg is a command-line tool that can edit boot options on local and remote computers. Using the same Bootcfg commands and procedures, you can edit Boot.ini, as well as the boot options in Extensible Firmware Interface Non-Volatile Random Access Memory (EFI NVRAM). Bootcfg is included in the %Systemroot%\\System32 directory in Windows XP and Windows Server 2003. (The Bootcfg display is slightly different on systems that store boot options in EFI NVRAM, but the commands are the same.)
You can use Bootcfg to add, delete, and change all boot entry parameters and boot options; however, you cannot use it to set an indefinite boot time-out value. You can also use Bootcfg commands in a script or batch file to set boot options or to reset them after you replace or upgrade an operating system.
Unlike manual editing, Bootcfg edits boot options without changing the protective attributes on Boot.ini. It also helps you avoid typing errors that might prevent the operating system from starting.
You must be a member of the Administrators group on the computer to use Bootcfg. For detailed instructions about using Bootcfg, see Help and Support Center.
Editing in Notepad
You can use a text editor, such as Notepad, to edit Boot.ini. However, because this method is prone to error, use it only when Bootcfg is not available.
Before editing Boot.ini, you must remove the file attributes that Windows uses to protect the file from inadvertent changes. When Boot.ini is on an NTFS volume, you must be a member of the Administrators group on the computer to change its attributes.
Use the following procedure to prepare Boot.ini for manual editing. This procedure removes the system, hidden, and read-only attributes of the file.
To configure Boot.ini attributes for editing
Open Windows Command Prompt.
Navigate to the root of the system volume.
Type the following text at the command line:
System, hidden, and read-only attributes are removed from the file.
Open the file in Notepad for editing. Since you are in Windows Command Prompt, the following command should do the trick quickly:
Desktop.ini Editor v1.0

The desktop.ini file is a hidden Windows operating system configuration settings file located in every folder and used to store information about the arrangement of a Windows folder. Essentially, if the layout or settings for a folder are changed, a desktop.ini file is automatically generated to save those changes. When you create a new folder in Windows it is created with the standard folder icon, one common use of the desktop.ini file is to use to it set a custom icon for a folder, however this is not the only thing that it is used for. The desktop.ini file can contain alot of attributes but the following custom attributes are the most common:
ConfirmFileOp : Set this entry to 0 to avoid a “You Are Deleting a System Folder” warning when deleting or moving the folder.
IconFile : If you want to specify a custom icon for the folder, set this entry to the icon’s file name. The .ico file extension is preferred, but it is also possible to specify .bmp files, or .exe and .dll files that contain icons.
IconIndex : Set this entry to specify the index for a custom icon. If the file assigned to IconFile only contains a single icon, set IconIndex to 0.
InfoTip : Set this entry to an informational text string. It is displayed as an infotip when the cursor hovers over the folder. If the user clicks the folder, the information text is displayed in the folder’s information block, below the standard information.
Click for more Desktop.ini Commands
How to use Desktop.ini Editor
Desktop.ini editör is a portable freeware to simplify the Desktop.ini operations , it can help you to edit desktop.ini files and set custom folder icons , Folder Info Tips , adding CLSID , reset folder settings to default usw. If Windows determine to ignore any changes to desktop.ini file use “Desktop.ini Editor”
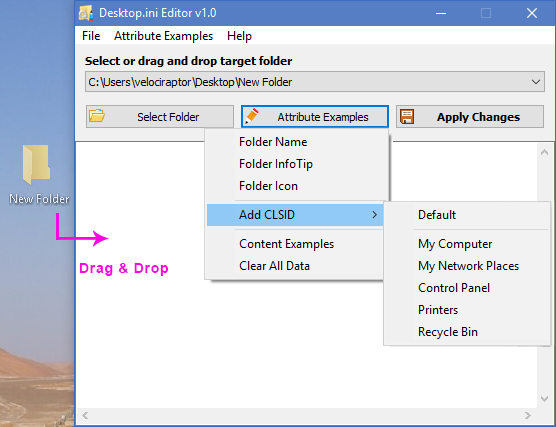
It has a minimalist GUI. Drag & Drop any folder to edit Desktop.ini file you can also use the “Select Folder” button . Under “Attribute Examples” Button you will find many features you can also edit desktop.ini file manually

To Apply your custom settings use the “Apply Changes” button after that if you not see any changes please use the “Rebuild Shell Icon cache” Option under the File menu
Desktop.ini Editor also offers CMD support.

Supported operating systems: Windows 10 , Windows 8.1 , Windows 8 , Windows 7 , Windows Vista , Windows Xp – (x86 & x64)
What Is an INI File?
Why software programs use INI files, and how to view one
:max_bytes(150000):strip_icc()/tim-fisher-5820c8345f9b581c0b5a63cf.jpg)
A file with the INI file extension is a initialization file for Windows or MS-DOS. These files are plain text files that contain settings that dictate how something else—usually a program—should operate.
Various programs use their own INI files but they all serve the same purpose. CCleaner, for example, uses an INI file to store the different options. This particular INI file is stored as the name ccleaner.ini under the CCleaner installation folder, usually at C:\Program Files\CCleaner\.
A common INI file in Windows called desktop.ini is a hidden file that stores information about how folders and files should appear.
How to Open and Edit INI Files
:max_bytes(150000):strip_icc()/ccleaner-ini-5c127ac9c9e77c0001cc36c4.png)
It’s not a common practice for people to open or edit INI files, but they can be opened and changed with any text editor. Just double-clicking on an INI file will automatically open it in the Notepad application in Windows.
See our Best Free Text Editors list for some alternative text editors that also edit INI files.
How an INI File Is Structured
INI files contain keys (also called properties) and some use optional sections to group keys together. A key should have a name and a value, separated by an equals sign, like this:
INI files work differently across programs. Some INI files are really tiny (a few kilobytes) with only one or two lines of information, and others can be extremely lengthy (several megabytes) with lots of customizable options.
In this example, CCleaner defines the English language with the 1033 value. So, when CCleaner opens, it reads the INI file to determine in which language to display the program text. Although it uses 1033 to indicate English, the program natively supports other languages, too, which means you can change it to 1034 to use Spanish instead.
The same can be said for all the other languages the software supports, but you have to look through its documentation to understand which numbers mean other languages.
If this key existed under a section, it may look like this:
This particular example is in the INI file that CCleaner uses. You can change this INI file yourself to add more options to the program because it refers to this INI file to determine what should be erased from the computer. This particular program is popular enough that there’s a tool you can download called CCEnhancer that keeps the INI file updated with lots of different options that don’t come built-in by default.
More Information on INI Files
Some INI files may have a semicolon within the text. These just indicate a comment to describe something to the user if they’re looking through the INI file. Nothing following the comment is interpreted by the program that’s using it.
Key names and sections are not case sensitive, at least in Windows. The same effect is produced in an INI file that uses uppercase letters as one that has lowercase letters.
A common file called boot.ini in Windows XP details the specific location of the Windows XP installation. If problems occur with this file, see How to Repair or Replace Boot.ini in Windows XP.
Although it’s safe to delete desktop.ini files, Windows recreates the file and apply default values to it. So, if you’ve applied a custom icon to a folder, for example, and then delete the desktop.ini file, the folder reverts to its default icon.
INI files were used a lot in early versions of Windows before Microsoft began encouraging the Windows Registry to store application settings. Now, even though many programs still use the INI format, XML serves same purpose.
If you’re getting «access denied» messages when trying to edit an INI file, it means you don’t have the proper administrative privileges to make changes to it. You can usually fix this by opening the INI editor with admin rights (right-click it and choose to run it as administrator). Another option is to copy the file to your desktop, make changes there, and then paste that desktop file over the original.
Some other initialization files you may come across that don’t use the INI file extension are CFG and CONF files. Some programs even stick with TXT.
How to Convert an INI File
There’s no real reason to convert an INI file to another file format. The program or operating system that’s using the file will only recognize it under the specific name and file extension that it’s using.
However, since INI files are just regular text files, you can use a program like Notepad++ to save it to another text-based format like HTM/HTML or TXT.


