- How to Install Elasticsearch on Mac OS X
- Using Homebrew
- Installing Homebrew
- Brewing the Elasticsearch Formula
- Manual Elasticsearch Installation
- Install Java
- Get Elasticsearch
- Modify Your .bash_profile Variables
- Use Elasticsearch
- Elasticsearch mac os install
- Installing Elasticsearch Yourselfedit
- Configuration Management Toolsedit
- Installing Elasticsearch on OSX Mavericks
- UPDATE
- 6 Answers 6
- Short Version:
- Long version:
- How to Install Elasticsearch On Mac Brew Tutorial Step By Step
- Step 1. Installing with HomeBrew
- Installing Homebrew
- Elasticsearch with brew
- Step 2. Manual Installation
- How to install Elasticsearch on MacOS | Opensource.com
- Installing Elasticsearch is complex! Here’s how to do it on a Mac.
- Subscribe now
- Downloading Elasticsearch for MacOS
- wwa1f3_600px.png
- Running Elasticsearch from the MacOS command line
- io6t1a_600px.png
- Running Elasticsearch using the GUI
- o43yku_600px.png
- elasticsearch_security_warning_500px.jpg
- the_general_tab_of_the_system_preferences_security_and_privacy_window.jpg
- confirmation_dialog_box.jpg
- y5dvtu_600px.png
- Learning more
How to Install Elasticsearch on Mac OS X
When installing applications in a Unix-based operating system like OS X occasionally issues may arise. The reasons can range from missing dependencies that the new application relies on to incompatible versions of existing libraries and packages.
In this tutorial, we’ll explore two methods to help you properly install Elasticsearch on OS X.
Using Homebrew
Most OS X users should be familiar with Homebrew (often simply called brew ). Homebrew is a basic package manager utility for OS X that allows for simple installation of other applications while Homebrew takes care of all the messy stuff in the background. For this reason, it is highly recommended that you use Homebrew to help you install Elasticsearch (or many other packages you may desire down the road).
Installing Homebrew
If you don’t have Homebrew already installed, you can easily install it by following the instructions on the official homepage. As of the time of writing, this involves simply executing the below command in a terminal prompt, then following the on-screen instructions as necessary:
Brewing the Elasticsearch Formula
With Homebrew installed, you can then execute a few brew commands to quickly install Elasticsearch and all the appropriate dependencies your system will need:
Manual Elasticsearch Installation
If you need to manually install Elasticsearch, things become significantly more complicated, but it’s still possible if Homebrew won’t work for you.
Install Java
If you haven’t done so recently, start by installing/updating Java on your system. If you plan to do development with Elasticsearch, get the JDK, otherwise the JRE will suffice. Both can be obtained from the official downloads page.
Get Elasticsearch
Download the latest release version of Elasticsearch from the official downloads page. Typically for OS X users you’ll want the tar.gz file.
Copy the file into your preferred installation directory, then extract it. If working in a terminal, you can extract a tar.gz file using the tar -xvf [filename] command:
Modify Your .bash_profile Variables
Next, open the .bash_profile file in your home directory with your favorite text editor:
Within the profile you need to add/modify some export lines to indicate the appropriate environment variables in order for Elasticsearch to function. Your file may have some of these present, and the values may be different, so double-check the values as necessary:
- The ES_HOME variable indicates the directory you installed (extracted) the elasticsearch.tar.gz file into.
- JAVA_HOME is the home installation directory of your Java package (either JDK or JRE). Verify your own path and modify this variable if necessary.
- PATH is, of course, the standard PATH variable that tells OS X where to find many executables. In this case, the export line is effectively adding onto the existing PATH variable so the system can find where Elasticsearch and Java are located.
Note: Be sure to close your terminal and open a new terminal window so that the PATH variable will be properly updated.
Use Elasticsearch
Finally, you’re able to run Elasticsearch from the terminal window by simply executing the elasticsearch command:
Источник
Elasticsearch mac os install
You can run Elasticsearch on your own hardware or use our hosted Elasticsearch Service that is available on AWS, GCP, and Azure. Try the Elasticsearch Service for free.
Installing Elasticsearch Yourselfedit
Elasticsearch is provided in the following package formats:
Linux and MacOS tar.gz archives
The tar.gz archives are available for installation on any Linux distribution and MacOS.
Windows .zip archive
The zip archive is suitable for installation on Windows.
The deb package is suitable for Debian, Ubuntu, and other Debian-based systems. Debian packages may be downloaded from the Elasticsearch website or from our Debian repository.
The rpm package is suitable for installation on Red Hat, Centos, SLES, OpenSuSE and other RPM-based systems. RPMs may be downloaded from the Elasticsearch website or from our RPM repository.
[ beta ] This functionality is in beta and is subject to change. The design and code is less mature than official GA features and is being provided as-is with no warranties. Beta features are not subject to the support SLA of official GA features. The msi package is suitable for installation on Windows 64-bit systems with at least .NET 4.5 framework installed, and is the easiest choice for getting started with Elasticsearch on Windows. MSIs may be downloaded from the Elasticsearch website.
Images are available for running Elasticsearch as Docker containers. They may be downloaded from the Elastic Docker Registry.
Formulae are available from the Elastic Homebrew tap for installing Elasticsearch on macOS with the Homebrew package manager.
Configuration Management Toolsedit
We also provide the following configuration management tools to help with large deployments:
Источник
Installing Elasticsearch on OSX Mavericks
I’m trying to install Elasticsearch 1.1.0 on OSX Mavericks but i got the following errors when i’m trying to start:
Also when i’m executing the same command with -v arg, i got this error:
Here’s my environment:
Instalation path (downloaded .tar.gz archive from elasticsearch download page and extracted here):
UPDATE
i finally make it working, unfortunally not sure how because i tried a lot of changes :). But here’s a list of changes i made that can help:
i deleted all the cache dirs.I suppose this can be the ’cause’ for that it’s working now
/Library/Caches
i removed CLASSPATH env var.
ES_PATH and ES_HOME env vars are not set either, but i think this is not so important.
Note: now it’s working also if i’m installing with brew.
6 Answers 6
You should really consider using brew. It’s a great tool that will take care of dependencies, version control and much more.
To install Elasticsearch using brew, simply:
After that follow Elasticsearch instructions :
To have launchd start Elasticsearch at login:
Then to load Elasticsearch now:
Or, if you don’t want/need launchctl, you can just run:
As there are not very good instructions for actually «installing» it onto a Mac:
Short Version:
- Install Java (prefer latest supported release)
- Set JAVA_HOME environment variable.
- Download Elasticsearch version (tar or zip).
- Extract Elasticsearch from the downloaded file.
- Run bin/elasticsearch from the extracted directory.
Long version:
Only need the JRE if you will not be writing code on the same machine.
I assume that you are getting the latest JDK, which is currently JDK 8 (as you appear to have, and I have installed working on my machine).
Download and extract Elasticsearch and extract it into some directory.
- For example: mkdir -p
Optionally move the downloaded file to there:
Extract the downloaded file:
/dev/elasticsearch (if you moved it in step 2)
If it’s the zip, then unzip elasticsearch-1.1.0.zip (or if you don’t want to cd into the directory, then just run unzip elasticsearch-1.1.0.zip -d
If it’s the tar, then tar -xvf elasticsearch-1.1.0.tar.gz (or if you don’t want to cd into the directory, then just run tar -xvf elasticsearch-1.1.0.tar.gz -C
Cleanup (if you want) by removing the downloaded file:
Open your .bash_profile file for your bash profile settings:
In the file, export your environment variable(s)
Close and re-open your Terminal OR
/.bash_profile to update the environment variables
- The more traditional way to run it is to do pretty much all of the above, but not add $ES_HOME/bin to the PATH . Then, just go to ES_PATH ( cd $ES_PATH , then bin/elasticsearch ) or run $ES_PATH/bin/elasticsearch .
Note: Do not setup your CLASSPATH without a very good reason. The scripts will do that for you.
Источник
How to Install Elasticsearch On Mac Brew Tutorial Step By Step
How to Install Elasticsearch On Mac With or without Brew is today’s tutorial.
Elasticsearch is the tool which helps web developers to implement the search filter feature in web apps.
One can integrate the elasticsearch using various programming languages like Java, PHP, Ruby etc.
To use the elasticsearch in frameworks like Laravel, Codeigniter, Ruby on Rails etc. , we need to install it on our computer.
We can install the elasticsearch on apple mac OS using two methods.
One method is by using the package manager called “Homebrew” and another method is manual installation from terminal.
We will go through both of these methods step by step.
Step 1. Installing with HomeBrew
Homebrew is the package manager which simplify the process of installing command line tools and software in the mac OS.
If you want to install the unix based command line tools like htop, cask, , nmap, wget, irssi , tree, ,links, colordiff etc. then homebrew can do it for you with minimum commands.
Homebrew can also install elasticsearch with just two commands.
If you have installed homebrew already then it’s okay otherwise you can follow the steps below to install it on your apple Mac.
Installing Homebrew
Open your terminal and fire the below command
System may ask you for your computer’s password during the process, just enter your password and it will install the homebrew.
Now you have homebrew on your mac computer.
Elasticsearch with brew
To install the elasticsearch, hit the below command in the terminal
This command will update the version of the homebrew.
Now run the second command
Once you have tapped the Elastic Homebrew repo, you can install the default distribution of Elasticsearch by below command :
This command will install the latest version of elastic search on your mac.
Step 2. Manual Installation
In this method, we will download .tar file which is installer for mac OS.
So click on official download page and it will take you to below screen
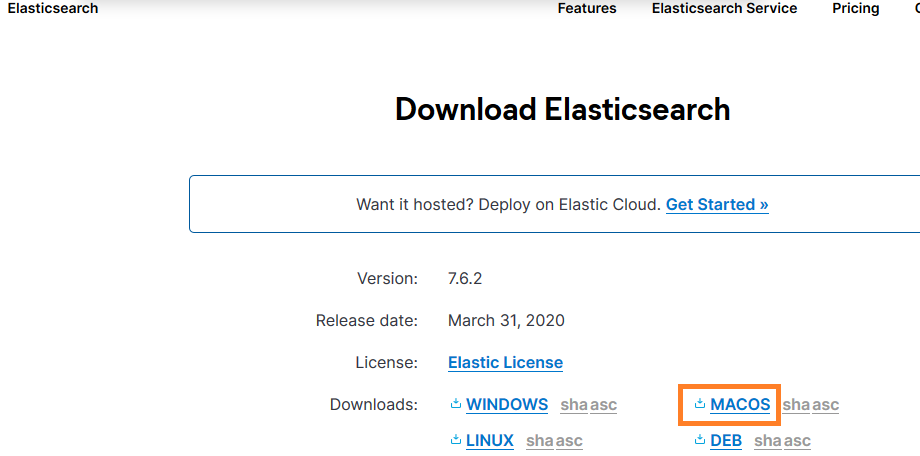
You need to click on the orange rectangular box in order to download .tar file.
Do double click this downloaded file to unpack it into its own folder (for example, elasticsearch-7.6.2), which contains all of the files that were in the TAR
You may keep this folder on the desktop for more comfort than any other directory. But if you wish then you can put this folder anywhere you want.
Now open your terminal and navigate to the directory where you have put the extracted elasticsearch folder.
Again use cd command to navigate to the bin folder.
Above command says that you have folder called “elasticsearch-7.6.2” on your desktop and there is a folder called “bin” inside the folder “elasticsearch-7.6.2“.
If you have set the ” elasticsearch-7.6.2 ” folder somewhere else then you need to navigate to that directory.
Now you can simply run below command to start the elasticsearch.
Above command will start some process which you can see in your terminal.
Once it is done, your elasticsearch is started successfully.
Источник
How to install Elasticsearch on MacOS | Opensource.com
Installing Elasticsearch is complex! Here’s how to do it on a Mac.

Subscribe now
Get the highlights in your inbox every week.
Elasticsearch is an open source, full-text search engine developed in Java. Users upload datasets as JSON files. Then, Elasticsearch stores the original document before adding a searchable reference to the document in the cluster’s index.
Less than nine years after its creation, Elasticsearch is the most popular enterprise search engine. Elastic released its latest update—version 7.2.0 —on June 25, 2019.
Kibana is an open source data visualizer for Elasticsearch. This tool helps users create visualizations on top of content indexed in an Elasticsearch cluster.
Sunbursts, geospatial data maps, relationship analyses, and dashboards with live data are just a few options. And thanks to Elasticsearch’s machine learning prowess, you can learn which properties might influence your data (like servers or IP addresses) and find abnormal patterns.
At DevFest DC last month, Dr. Summer Rankin—lead data scientist at Booz Allen Hamilton—uploaded a dataset of content from TED Talks to Elasticsearch, then used Kibana to quickly build a dashboard. Intrigued, I went to an Elasticsearch meetup days later.
Since this course was for newbies, we started at Square One: Installing Elastic and Kibana on our laptops. Without both packages installed, we couldn’t create our own visualizations from the dataset of Shakespeare texts we were using as a dummy JSON file.
Next, I will share step-by-step instructions for downloading, installing, and running Elasticsearch Version 7.1.1 on MacOS. This was the latest version when I attended the Elasticsearch meetup in mid-June 2019.
Downloading Elasticsearch for MacOS
- Go to https://www.elastic.co/downloads/elasticsearch, which takes you to the webpage below:
wwa1f3_600px.png
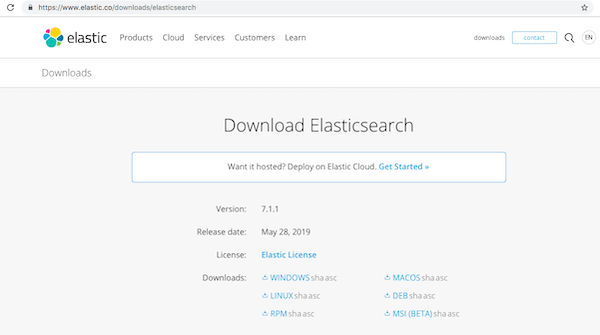
- In the Downloads section, click MacOS, which downloads the Elasticsearch TAR file (for example, elasticsearch-7.1.1-darwin-x86_64.tar) into your Downloads folder.
- Double-click this file to unpack it into its own folder (for example, elasticsearch-7.1.1), which contains all of the files that were in the TAR.
Tip: If you want Elasticsearch to live in another folder, now is the time to move this folder.
Running Elasticsearch from the MacOS command line
You can run Elasticsearch only using the command line if you prefer. Just follow this process:
- Open a Terminal window.
- In the terminal window, enter your Elasticsearch folder. For example (if you moved the program, change Downloads to the correct path):
- Change to the Elasticsearch bin subfolder, and start the program. For example:
$ cd bin $ ./elasticsearch
Here’s some of the output that my command line terminal displayed when I launched Elasticsearch 1.1.0:
io6t1a_600px.png
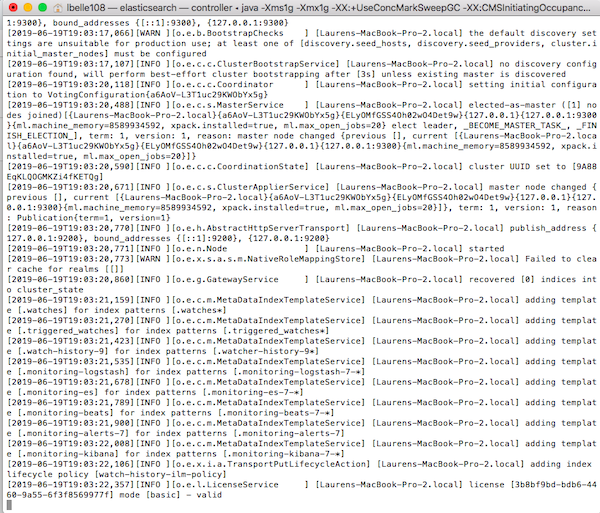
NOTE: Elasticsearch runs in the foreground by default, which can cause your computer to slow down. Press Ctrl-C to stop Elasticsearch from running.
Running Elasticsearch using the GUI
If you prefer your point-and-click environment, you can run Elasticsearch like so:
- Open a new Finder window.
- Select Downloads in the left Finder sidebar (or, if you moved Elasticsearch to another folder, navigate to there).
- Open the folder called (for the sake of this example) elasticsearch-7.1.1. A selection of eight subfolders appears.
o43yku_600px.png
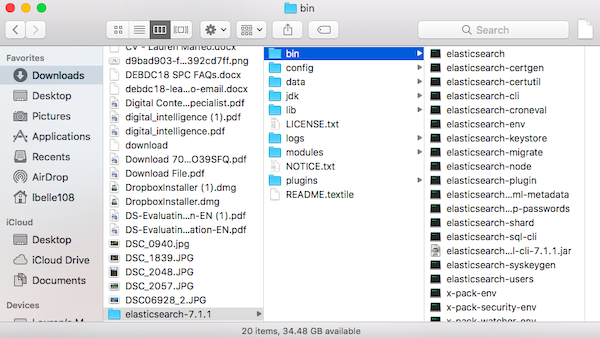
- Open the bin subfolder. As the screenshot above shows, this subfolder yields 20 assets.
- Click the first option, which is elasticsearch.
Note that you may get a security warning, as shown below:
elasticsearch_security_warning_500px.jpg
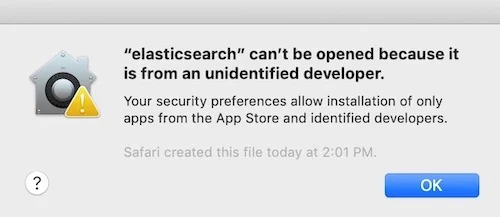
In order to open the program in this case:
- Click OK in the warning dialog box.
- Open System Preferences.
- Click Security & Privacy, which opens the window shown below:
the_general_tab_of_the_system_preferences_security_and_privacy_window.jpg
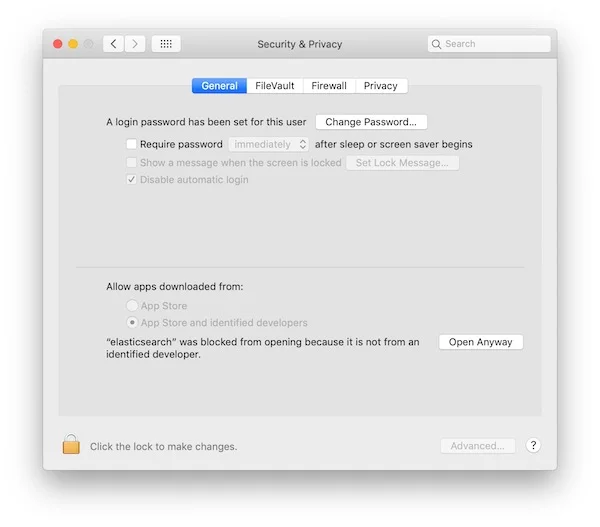
- Click Open Anyway, which opens the confirmation dialog box shown below:
confirmation_dialog_box.jpg

- Click Open. A terminal window opens and launches Elasticsearch.
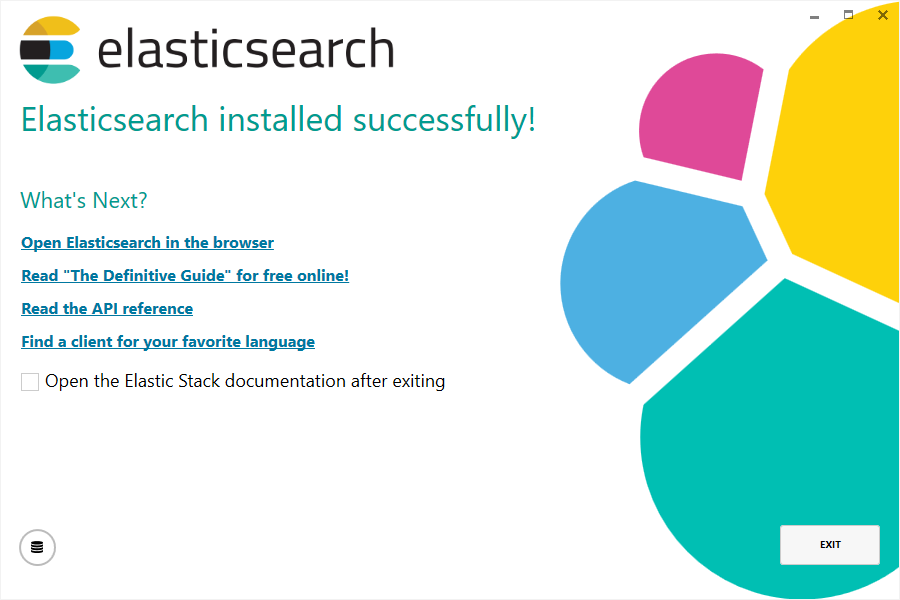
The launch process can take a while, so let it run. Eventually, it will finish, and you will see output similar to this at the end:
y5dvtu_600px.png

Learning more
Once you’ve installed Elasticsearch, it’s time to start exploring!
The tool’s Elasticsearch: Getting Started guide directs you based on your goals. Its introductory video walks through steps to launch a hosted cluster on Elasticsearch Service, perform basic search queries, play with data through create, read, update, and delete (CRUD) REST APIs, and more.
This guide also offers links to documentation, dev console commands, training subscriptions, and a free trial of Elasticsearch Service. This trial lets you deploy Elastic and Kibana on AWS and GCP to support your Elastic clusters in the cloud.
In the follow-up to this article, we’ll walk through the steps you’ll take to install Kibana on MacOS. This process will take your Elasticsearch queries to the next level via diverse data visualizations. Stay tuned!
Источник


