- Инструменты Kali Linux
- Список инструментов для тестирования на проникновение и их описание
- MITMf
- Описание MITMf
- Активная фильтрация/модификация пакетов
- Email spoofing kali linux
- Как взломать почту при помощи hydra из Kali Linux
- Как взломать почту при помощи Hydra
- Kali Linux – Sniffing and Spoofing
- Wireshark :
- macchanger :
- MITMPROXY:
- Burpsuite:
Инструменты Kali Linux
Список инструментов для тестирования на проникновение и их описание
MITMf
Описание MITMf
MITMf — это фреймворк для атак человек-посередине (Man-In-The-Middle attacks). Этот инструмент основывается на sergio-proxy и является попыткой возродить и обновить этот проект.
Описание
Цель MITMf — быть инструментом всё-в-одном для сетевых атак и атак человек-по-середине, при этом обновляя и усовершенствую существующие атаки и техники.
Первоначально будучи созданной для исправления значительных недостатков других инструментов (например, Ettercap, Mallory), программа была практически полностью переписана с нуля для обеспечения модульного и легко масштабируемого фреймворка, который каждый может использовать для реализации своих собственных атак MITM.
Особенности
- Этот фреймворк содержит встроенные сервера SMB, HTTP и DNS, которые могут управляться и использоваться множеством плагинов, он также содержит модифицированную версию SSLStrip proxy, которая позволяет HTTP модификацию и частичный обход HSTS.
- Начиная с версии 0.9.8, MITMf поддерживает активную фильтрацию пакетов и манипуляцию (в основном то, что делали etterfilters, только лучше), позволяя пользователям модифицировать любой вид трафика или протокола.
- Конфигурационный файл может быть отредактирован на лету в то время когда MITMf запущен, изменения будут переданы во фреймворк: это позволяет вам делать тонкую настройку плагинов и сервера во время выполнения атаки.
- MITMf будет захватывать FTP, IRC, POP, IMAP, Telnet, SMTP, SNMP (community strings), NTLMv1/v2 (все поддерживаемые протоколы вроде HTTP, SMB, LDAP и т.д.) и учётные данные Kerberos с использованием Net-Creds, который запускается при старте программы.
- Интеграция с Responder позволяет LLMNR, NBT-NS и MDNS poisoning, а также поддержку жульнического сервера WPAD.
Активная фильтрация/модификация пакетов
Теперь вы можете модифицировать любой пакет/протокол, который перехвачен MITMf, используя Scapy! (больше никаких etterfilters! ура!)
Например, вот тупой маленький фильтр, который просто меняет IP адрес назначения ICMP пакетов:
- Используйте переменную пакета для доступа к пакету в Scapy совместимом формате
- Используйте переменную данных для доступа к сырым данным пакета
Теперь для использование фильтра всё, что нам нужно сделать это: python mitmf.py -F
Возможно вы захотите комбинировать это с плагином Spoof, чтобы в действительности перехватывать пакеты от кого-то ещё 😉
Примечание: вы можете изменять фильтры на лету без перезапуска MITMf!
Источник
Email spoofing kali linux
A few Python programs designed to help penetration testers with email spoofing.
Email servers do not accept connections from normal computers. In an effort to limit the amount of spam, most MTAs will only accept connections from relays that have a fully-qualified domain name (FQDN). As such, the easiest way to use this project is from a Linux Virtual Private Server. There are several free or cheap options available, such as Digital Ocean, Linode, and Amazon EC2.
Once the server is set up, the next step is to install and start an SMTP server. This is required to actually send the spoofed emails. I personally use Postfix, though any will do. This script defaults to using localhost:25 for the mail server.
On Kali Linux, the easiest method of doing this is:
sudo apt-get install postfix sudo service postfix start
When installing postfix, specify Internet-facing and provide the correct FQDN when prompted.
This script has two dependencies:
These can be installed using pip:
pip install -r requirements.txt
Add the desired contents of the email in HTML format to an HTML file. Then, execute the following command:
./SimpleEmailSpoofer.py -e [Path to Email file] -t [To address] -f [From address] -n [From name] -j [Email subject]
Additional flags can be found by running
Email Spoofing 101
Email spoofing has been an issue since the earliest days of the SMTP protocol. The root cause of email spoofing is that SMTP does not require authentication between mail relays. An attacker can stand up or find an «Open Relay» (i.e. an SMTP server that can send from arbitrary domains), which is the default configuration for SMTP servers, and use that to send arbitrary emails from arbitrary email addresses.
In an effort to combat spam, many SMTP servers now block any mail relay that does not have a Fully-qualified Domain Name (FQDN). An FQDN is a DNS A record that points to the relay’s IP address. This can be either a domain purchased from a domain registrar, or by using a domain automatically associated with a virtual private server.
As email spoofing is a serious and widespread issue, over the years several protection mechanisms have been added to combat it. However, all of these protections are opt-in and require significant configuration. As such, as much as 98% of the internet is still vulnerable. For additional information, please see the Bishop Fox blog post on the subject.
To determine if a domain is vulnerable to email spoofing, Bishop Fox has created two tools:
- A web interface that produces a report with analysis and recommendations
- A command line utility that only performs analysis
Only use this tool for education, research, or in the course of approved social engineering assessments. While email spoofing is a powerful tool in the social engineer’s arsenal, it is also trivial to identify the server that sent any email. Furthermore, this tool makes no claims to bypass any products such as Barracuda or ForcePoint email protections suites. Please use responsibly.
The Spoofcheck program, which allows users to identify whether or not domains are vulnerable to email spoofing, has moved to the following repository:
Источник
Как взломать почту при помощи hydra из Kali Linux
Сегодня мы рассмотрим не совсем новый но достаточно надежный инструмент который позволяет осуществить взлом почты на таких известных системах как Майл, Яндекс, Рамблер, Gmail, неважно. Этот способ универсален и применим ко всем сервисам. Ведь почта, нынче — это буквально ключ от всего. Имея доступ к e-mail’у можно восстановить пароли от соц. сетей, слить личную переписку и даже получить доступ ко всем контактам из телефонной книги. Итак как взломать почту? Читаем далее!

Как взломать почту при помощи Hydra
Запускаем графическую оболочку скрипта hydra. Это многофункциональный брутфорсер паролей с помощью которого мы сейчас попробуем подобрать passдля одного из моих тестовых ящиков на mail.ru

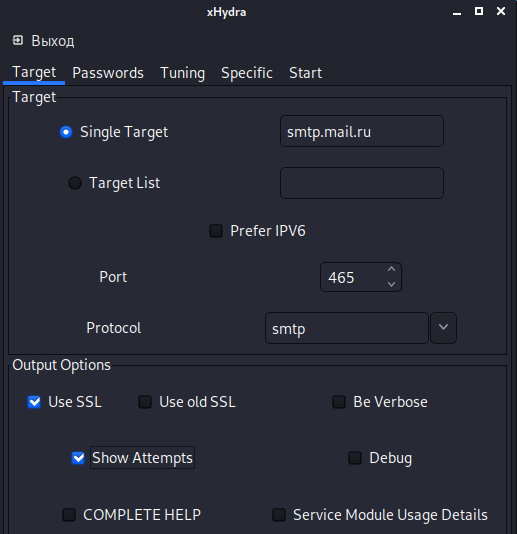
В появившемся окне, на вкладке «Target» прописываем в строке «Single Target» адрес smtp-сервера исходящей почты нужного сервиса. Порт 465 и протокол выбираем соответственно SMTP. Ставим галочку использовать SSL-соединение. И отмечаем пункт, отвечающий за отображение результатов брутфорса в реальном времени.
В соседней вкладочке «Password» указываем ящик, на который будет производиться атака. В пункте Password листа указываем путь к словарю. Найти их довольно просто, в том же гугле, всего лишь стоит набрать словари для брута. На всякий случай ещё ставим галочку отвечающую за проверку логина в качестве возможного пароля и идём дальше.

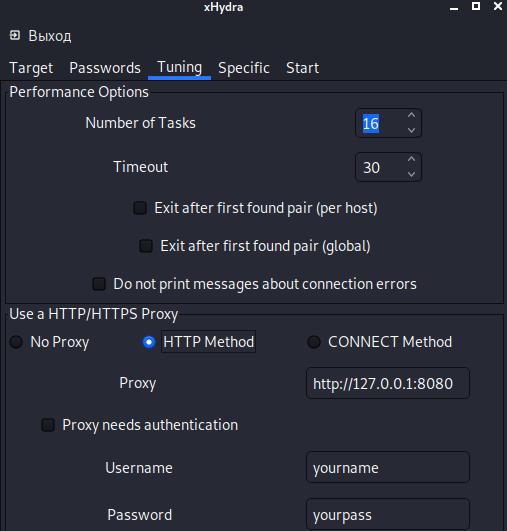
В «Tuning» меняем метод на HTTP.
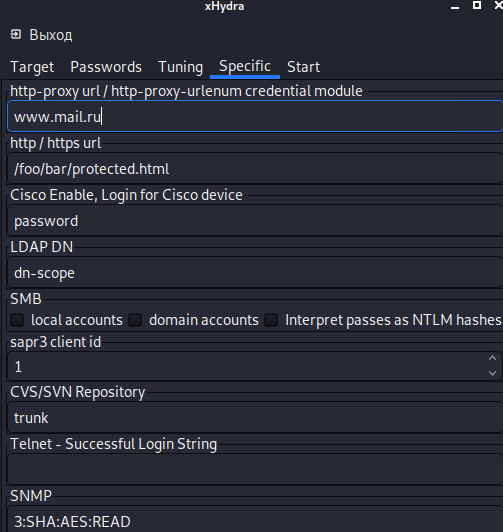
Во вкладке «Specific» пишем полной адрес почтового сервиса где расположен наш ящик.
Долгожданная последняя вкладка. Выдыхаем, и жмём на «Start». Перебор начался. В случае успешной попытки логина, прога выдаст соответствующее сообщение, говорящее о том, что валидный пароль к данной почте подобран.
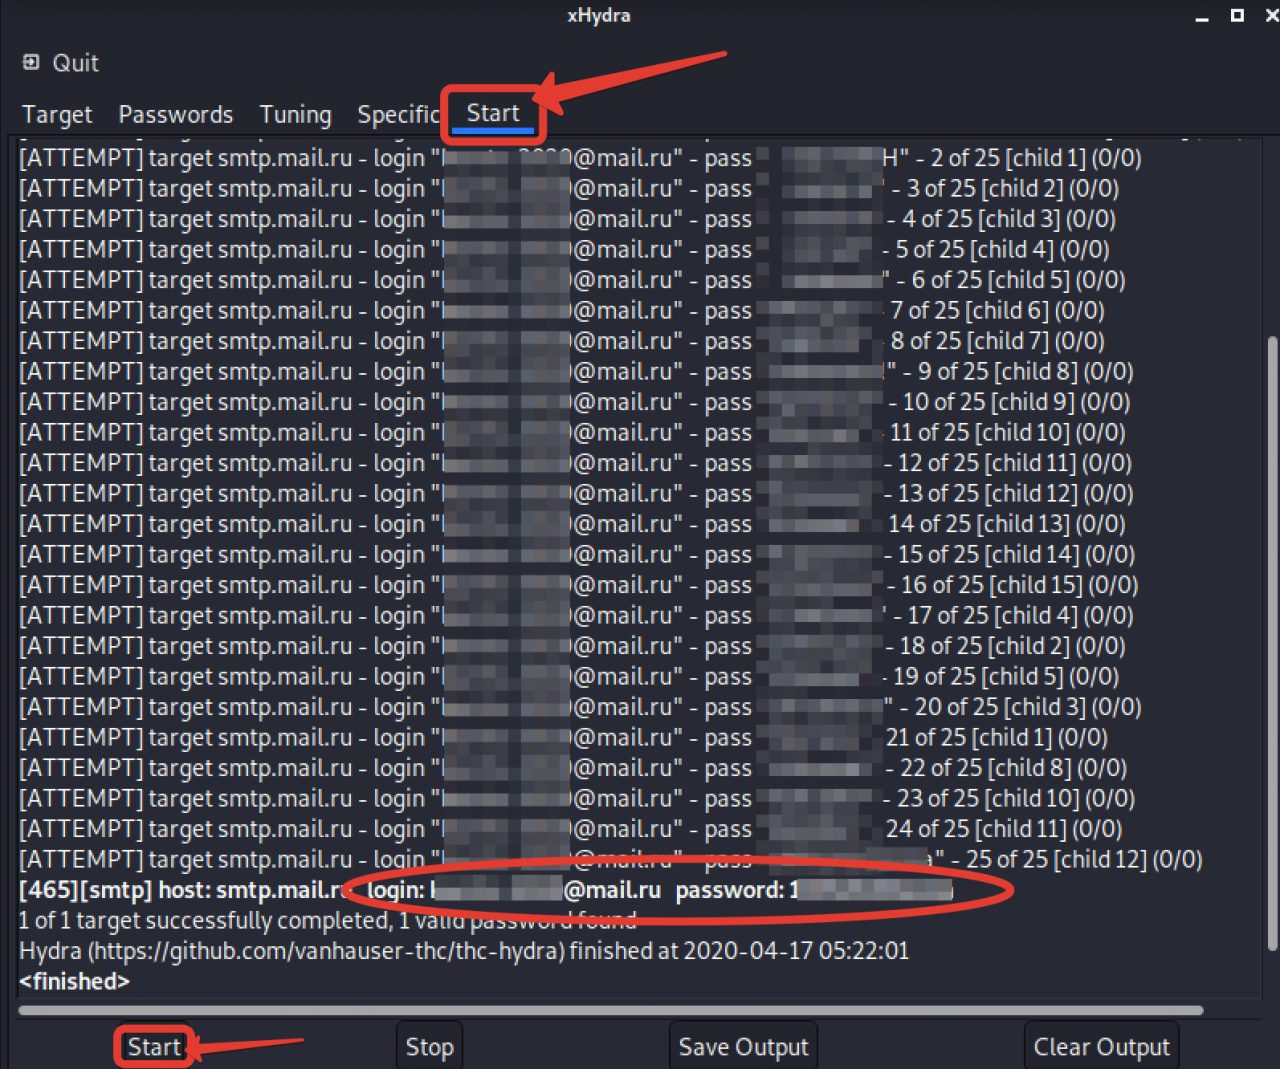
Взлом занял около 5 минут. Примерно столько по времени брутятся все ящики, пароль от которых состоит из даты рождения, клички пса или номера мобильного телефона.
Буквально несколько лет назад электронку моего хорошего знакомого ломанули просто из-за красивого ника. И он очень долго и упорно доказывал майловскому саппорту, что ящик принадлежит ему уже много лет.
Благо, та история со счастливым концом. Ящик восстановили и передали в руки владельца. Но это только потому, что товарищ сам много лет проработал админом и имея врождённый дар красноречия смог убедить коллег из техподдержки.
А теперь задумайтесь, чтобы было, реши злоумышленник не палиться? Сливал бы по тихой грусти на внешний винт рабочие переписки. Договора, контракты, личные фотографии.
Затем продал бы эту историю в даркнете, а человек при этом так бы и не допёр, где таилась утечка. Поэтому, мой вам совет. Всегда устанавливайте на электронку мега-большой и сложный пароль.
В идеале сконфигурированный с помощью генератора случайных символов. И не забывайте менять его раз в 2-3 недели. Установите двухфакторную аутентификацию, чтобы заходить в ящик только после подтверждения на личном смартфоне.
Ну и до кучи, старайтесь не использовать электронку для решения жизненно-важных вопросов. Личная встреча куда надёжней и безопасней. Однако, увы таковая не всегда возможна. Особенно в наше тяжёлое время.
Как создать пароль для брута самостоятельно я показывал вам в этом видео:
Источник
Kali Linux – Sniffing and Spoofing
Sniffing is the process in which all the data packets passing in the network are monitored. Sniffers are usually used by network administrators to monitor and troubleshoot the network traffic. Whereas attackers use Sniffers to monitor and capture data packets to steal sensitive information containing password and user accounts. Sniffers can be hardware or software installed on the system.
Spoofing is the process in which an intruder introduces fake traffic and pretends to be someone else (legal source or the legitimate entity). Spoofing is done by sending packets with incorrect source address over the network. The best way to deal and tackle with spoofing is to use a digital signature.
Though Kali Linux comes packed with many tools for sniffing and spoofing the ones listed below, are mostly used by attackers these days.
Wireshark :
Wireshark is a network protocol analyzer that is termed to be the most used and best tool around the word. With Wireshark, you can see what is happening in your network and apply filters to get the most efficient results for what you are looking for. In Kali, Linux Wireshark is already installed and can be located under Applications — sniffing and spoofing — Wireshark.
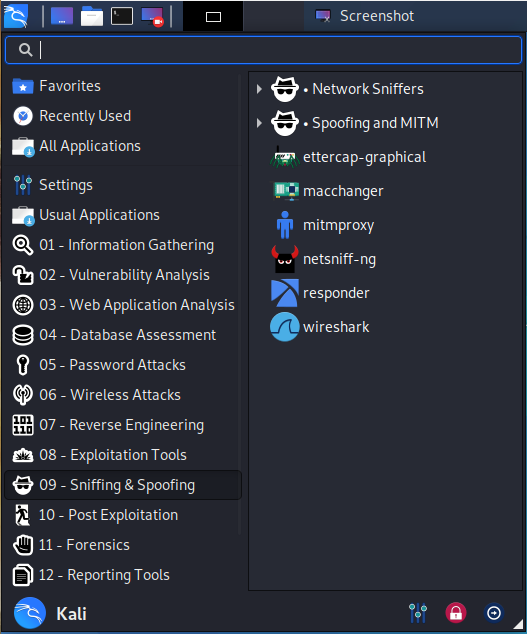
Wireshark is a GUI based tool, so once you click on the icon Wireshark GUI will open
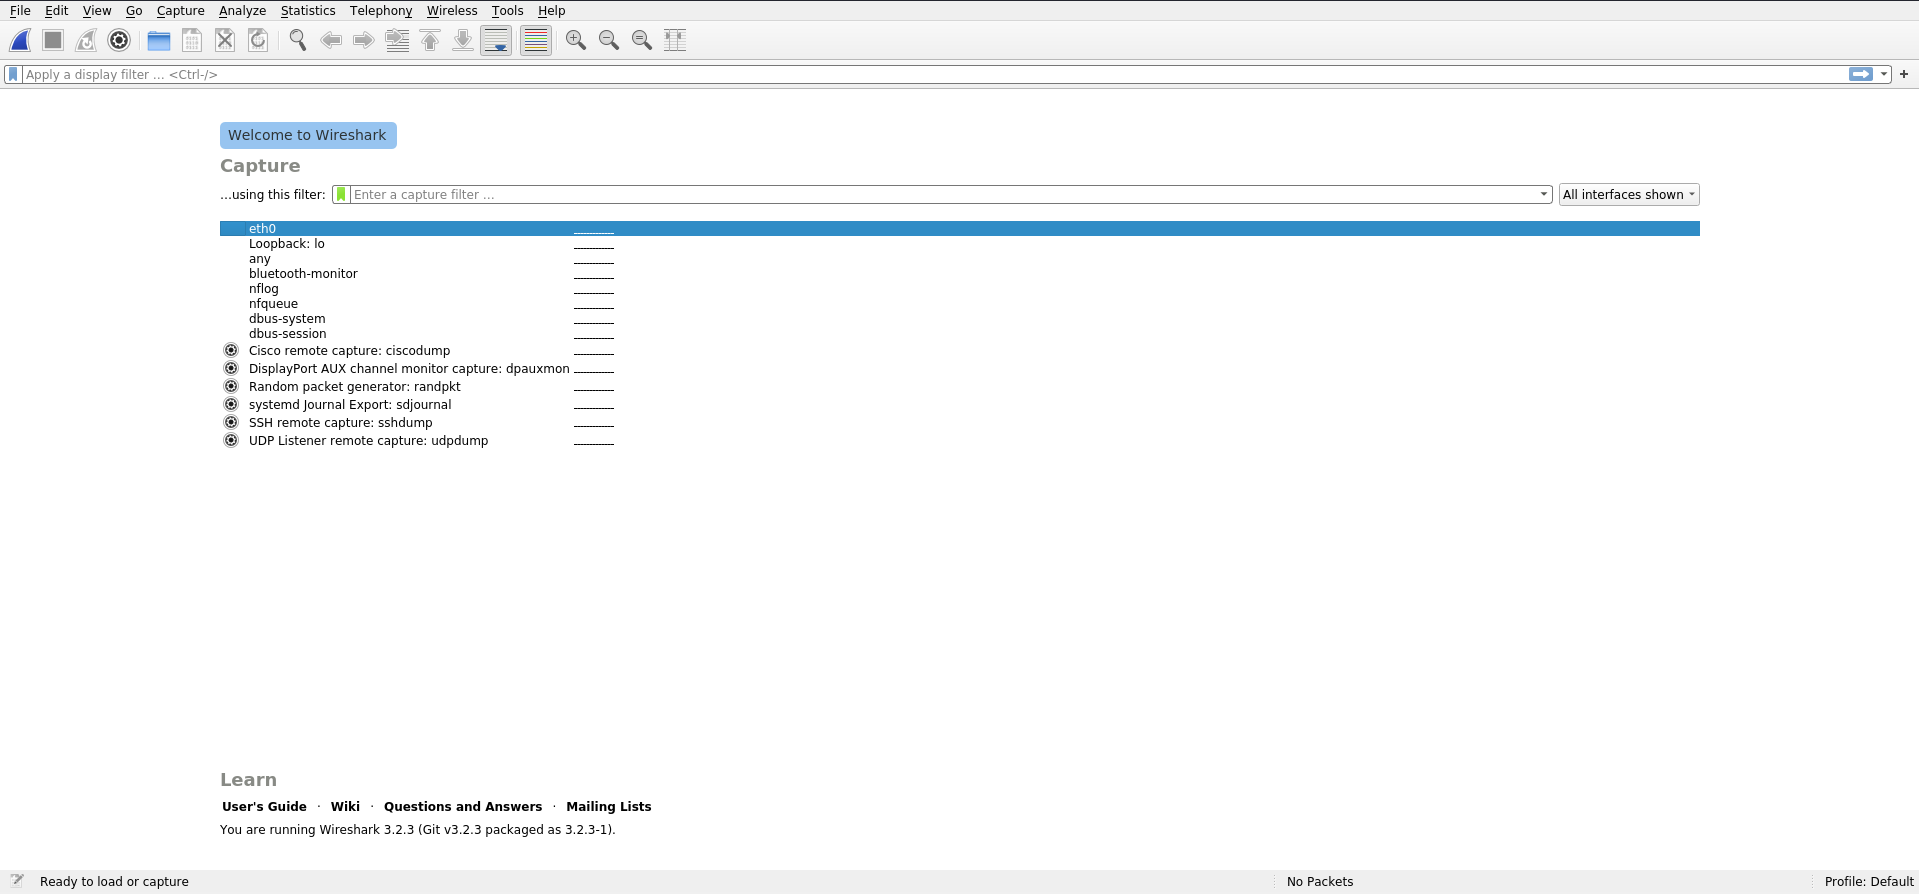
Once the GUI loads you can see several interfaces like Ethernet, Wi-Fi, Bluetooth, and so on, based on your connection to the network you can choose the interface and start capturing the network traffic. In this case, we are on Ethernet(eth0), so select the eth0 interface and click on the start capturing packets icon which is located in the top left corner.
Once you start capturing packets it will look something like this :
You can also apply specific filters for better searching, for example, if you want to track only HTTP requests you can use apply a display filter bar and apply all the filters you need for better track results.
macchanger :
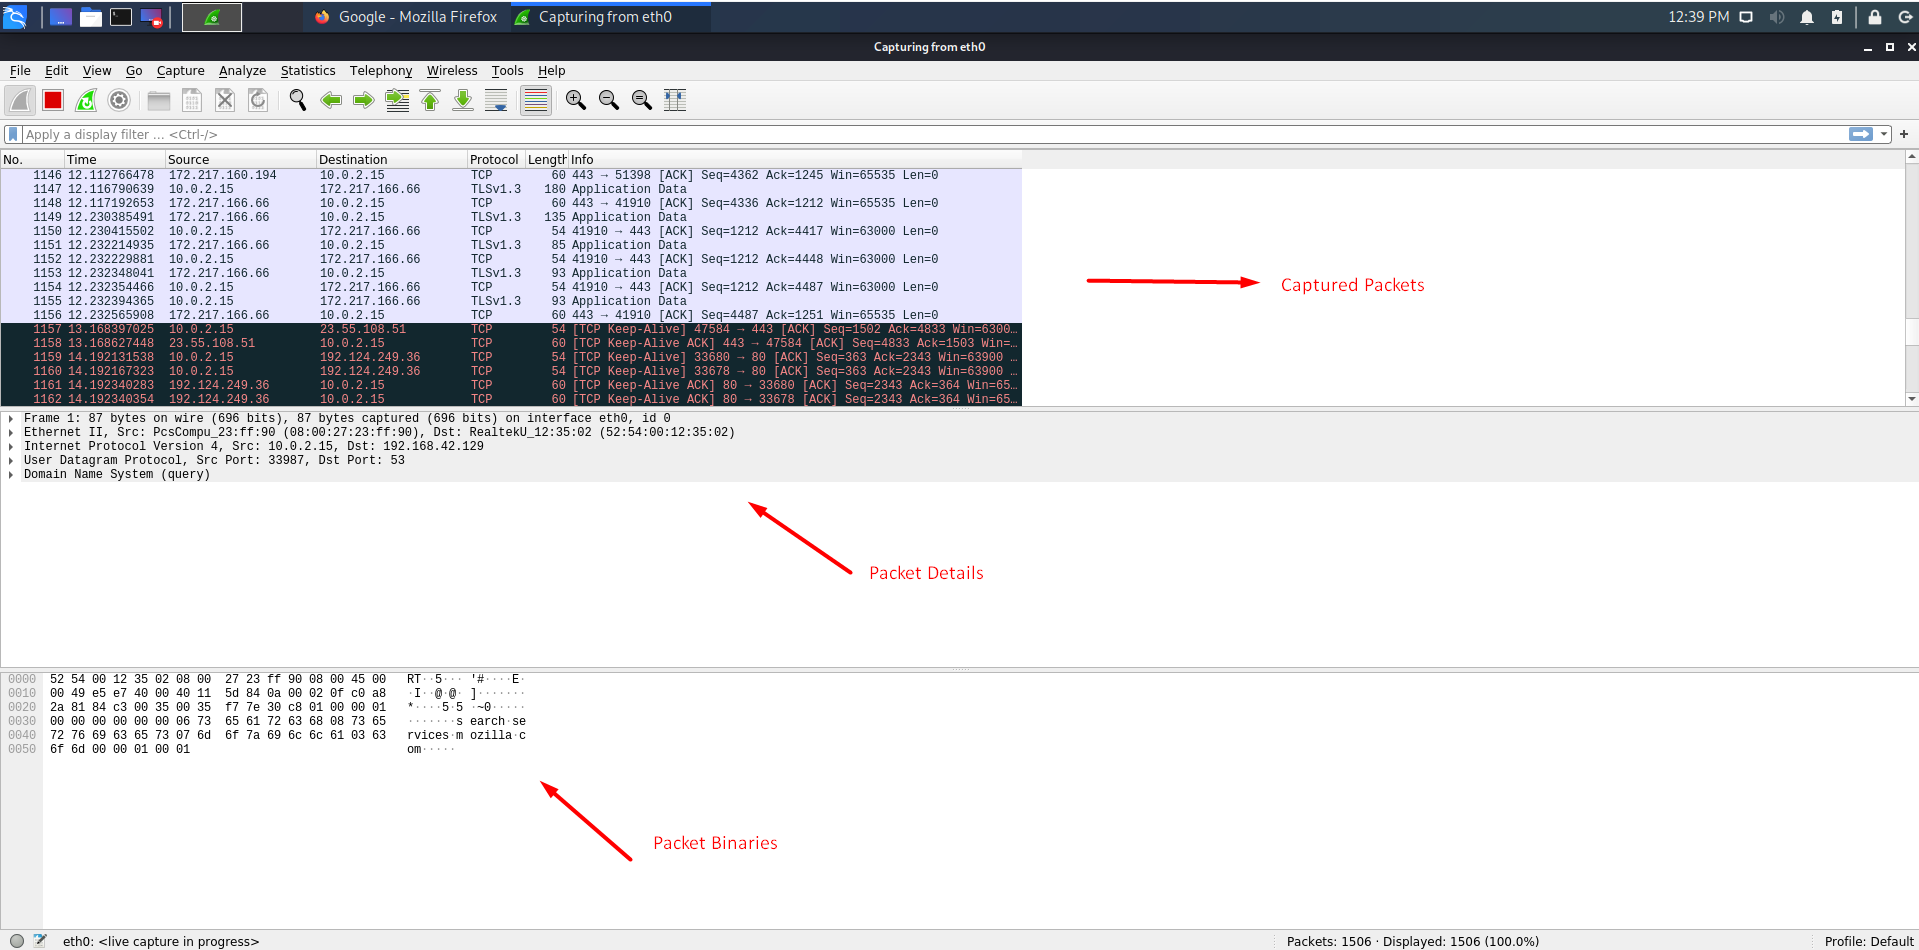
macchanger is the most used tool under sniffing and spoofing, macchanger can change your mac address, or we can say your physical address to hide your actual identity in the network.
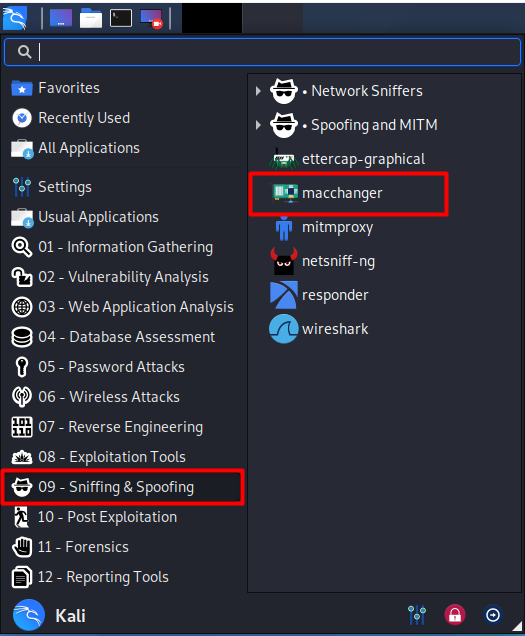
You can locate macchanger in Kali Linux under Applications — sniffing and spoofing — macchanger
macchanger is a command-line based tool so once you click on macchanger a shell will pop up with the help menu
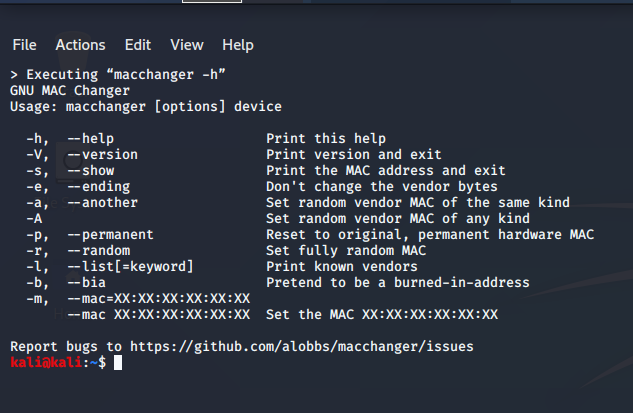
Here is the example of macchanger tool application.
Change random mac address: First, let’s change the network card’s hardware MAC address to a random address. First, we will find the MAC address of the eth0 network interface. To do this we execute macchanger with an option -s and an argument eth0.
Now the network interface you are about to change a MAC address should be turned off before changing the mac address. Use ifconfig command to turn off your network interface.
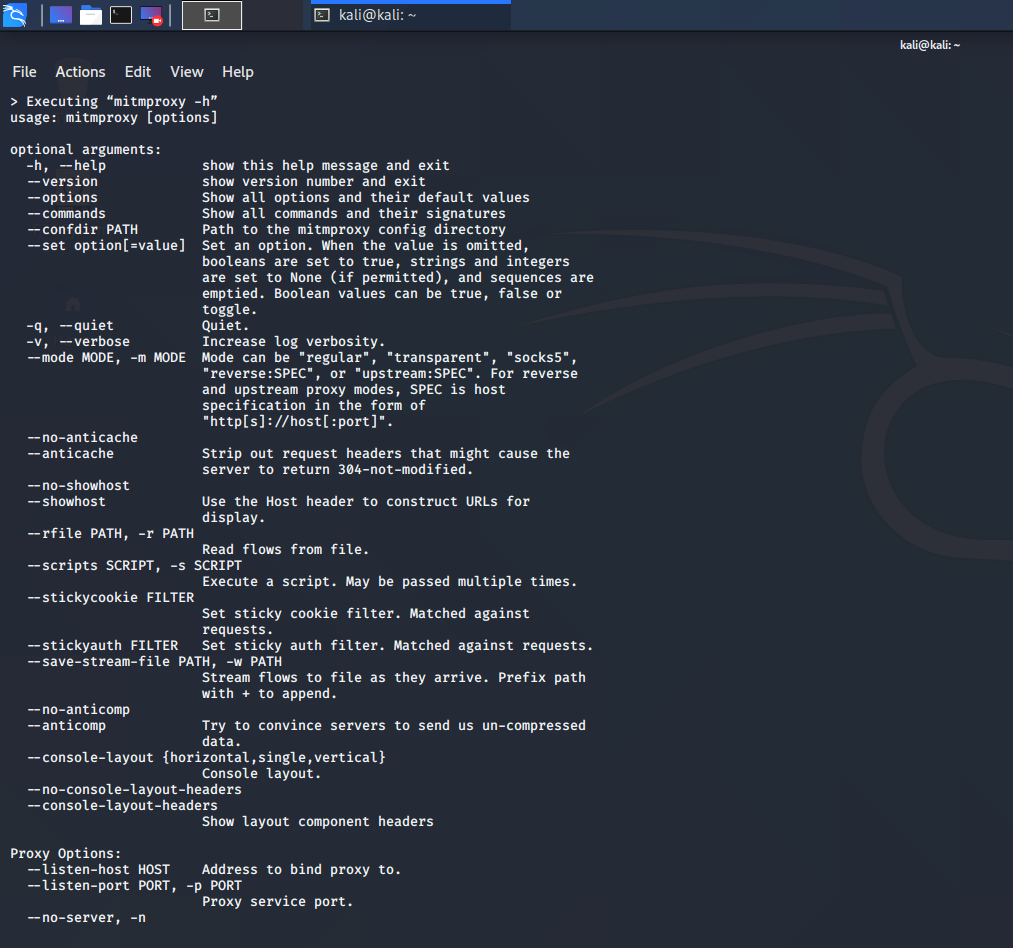
MITMPROXY:
MITMPROXY is an SSL-capable man-in-the-middle HTTP proxy, providing a console interface that allows traffic flows to be inspected and edited at the moment they are captured. With mimproxy you can inspect and modify network traffic, save HTTP conversations for inspection, SSL inspection, and more.
To open mitmproxy in Kali Linux you can simply locate it under Applications — sniffing and spoofing — mitmproxy or you can use a terminal and type the following command to display the help menu of the tool.
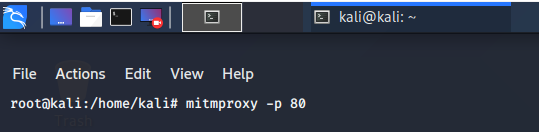
Let’s see a simple example of using mitmproxy on port number, to do this you can simply use “mitmproxy -p portnumber”.
In our case, let’s use port 80
Burpsuite:
Burpsuite is a java based penetration testing framework that is recognized as an industry-standard tool. Burp has many use cases in penetration testing and can also be used as a sniffing tool between your browser and web servers to find parameters the web application uses.
In Kali Linux, you can locate burpsuite under Applications — web analysis — burpsuite.

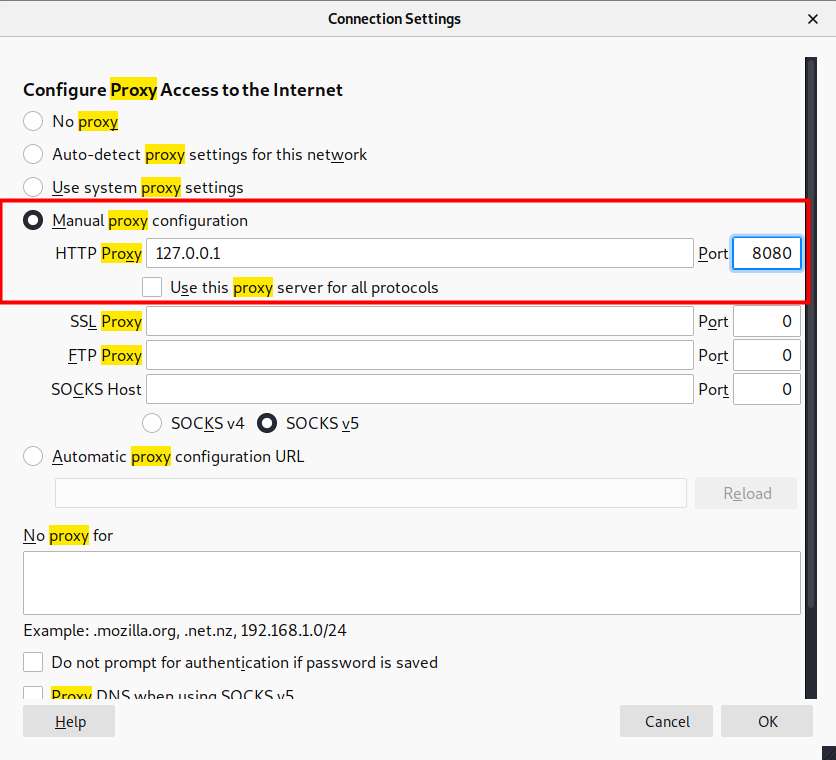
To use burpsuite as a sniffing tool we need to configure it to behave like a proxy. Open burpsuite and go to options and select interface “127.0.0.1:8080”
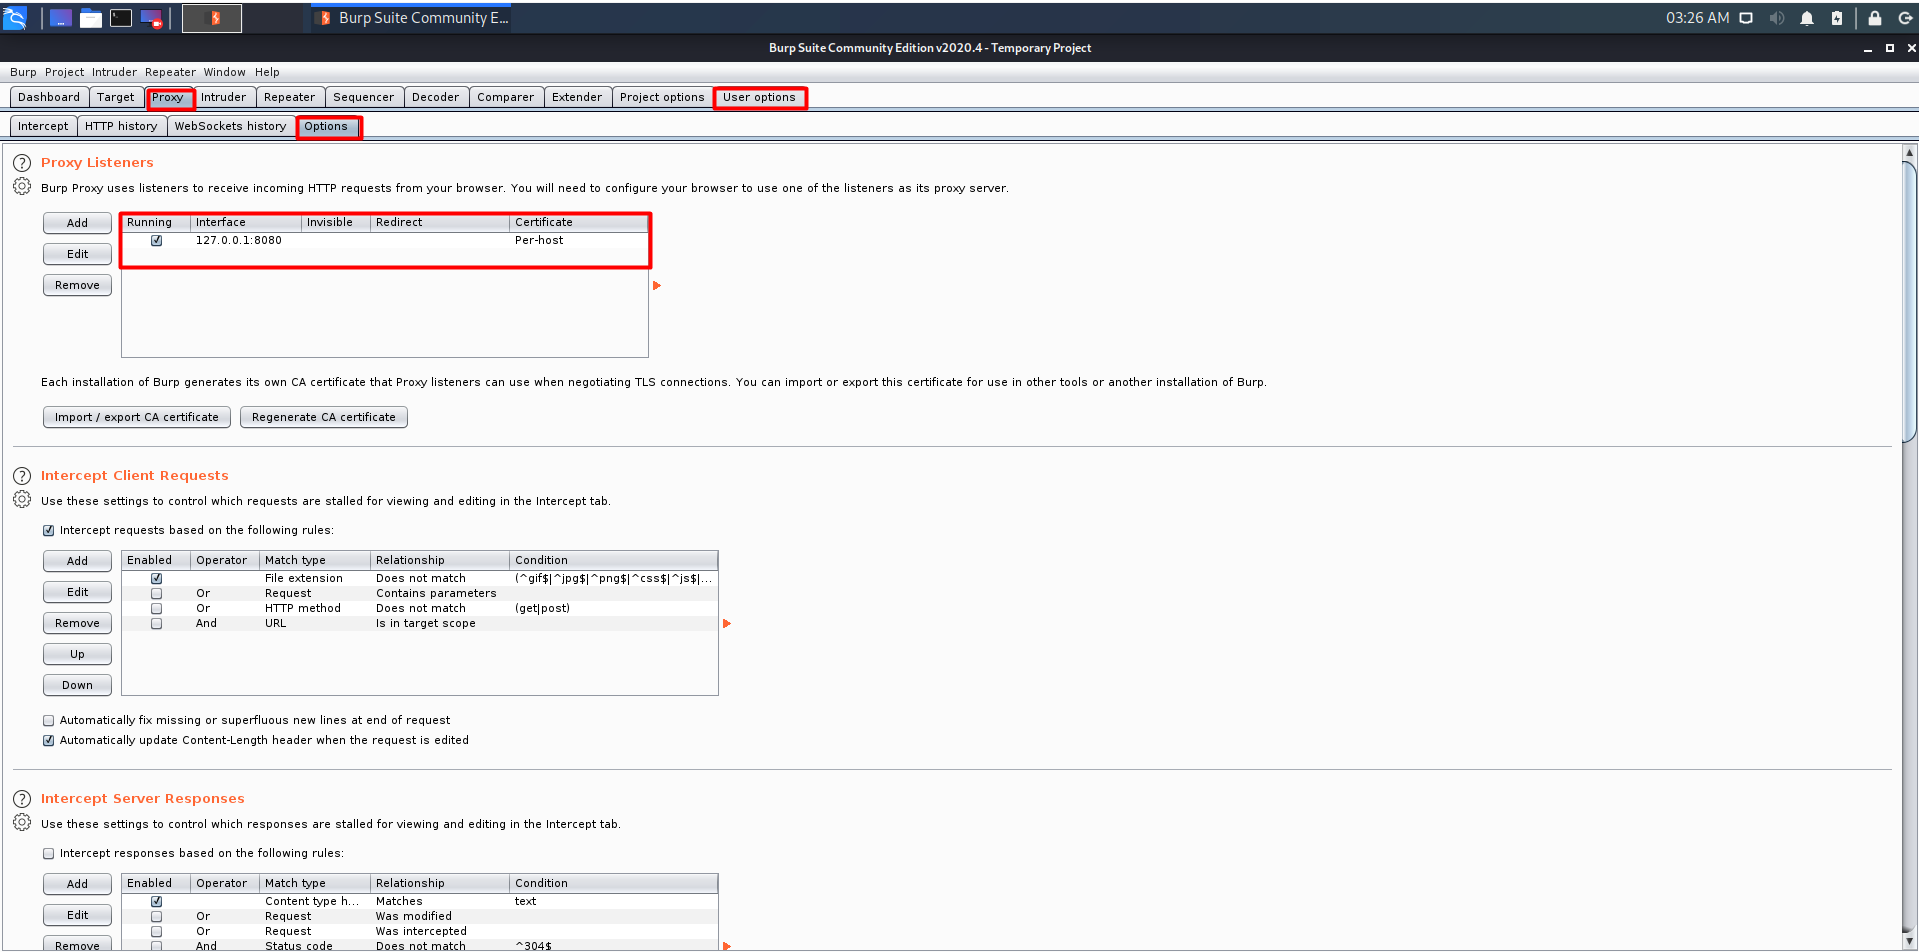
Now configure the browser proxy the same as the IP of burpsuite machine and the port.
To start the interception go to Proxy — intercept and click “intercept is on”. Now all the requests going through your browser will be intercepted and you can navigate all the requests.
Sniffing and spoofing deals a lot in information security, an intruder can track all the data flowing through your system, so make sure you follow the rules of CIA trait.
Источник


