- Embedded Linux development: 5 steps to get started
- Build a complete embedded system using Buidroot
- Boot your Linux embedded system
- Install additional software to your root Filesystem
- Develop your own embedded application
- Deploy your software to your embedded device
- How to go further with embedded Linux development
- Litgu.ru — Литературный Гуру
- Embedded Linux System Design and Development
- Embedded Linux System Design and Development
- Embedded Linux в двух словах. Первое
- Das U-Boot
- ARM Toolchain
- Ядро Linux
- Корневая файловая система. BusyBox
Embedded Linux development: 5 steps to get started
This is the quickstart guide you need to generate an industrial grade embedded system for the board sitting on your desk and be ready to work with it. Embedded Linux development is a vast domain and there are plenty of documentation out there to help you with all necessary details but do not hesitate to as questions in the comment section.
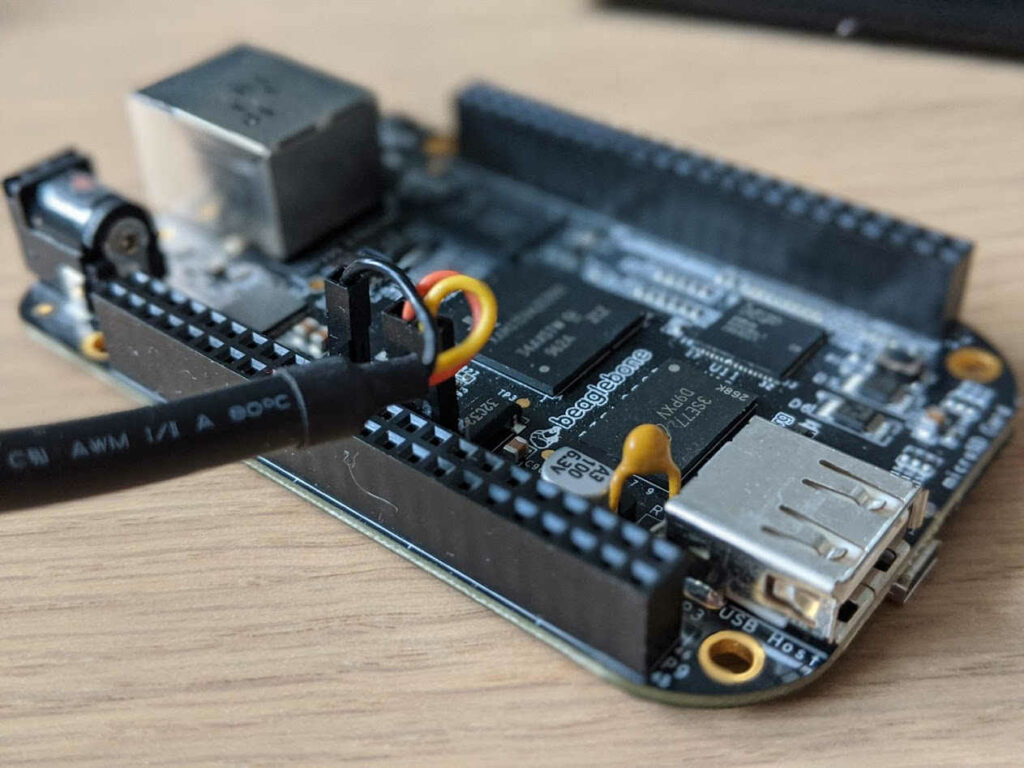 The Beaglebone black is a great board to learn embedded Linux
Build a complete embedded system using Buidroot
Buildroot and Yocto are Embedded Linux most important tools. You could compare them to embedded Linux distributions, but as you will find out, they are much more than this.
For this blog post we use Buildroot, at Openest we think it is easyer to use and much quicker to set up. If you prefer Yocto, let us know in the comments we likely update this article later.
Let’s clone Buildroot source code and jump into its sources:
Look at the latest tag available (currently it is 2019.11) and checkout it.
Now we want to find your embedded Linux board support package within the “board” directory. It is sorted by board manufacturer so it is relatively easy to find your own. For the rest of this tutorial we will use the Beaglebone Black aka beagleboard, it can be found in “board/beaglebone” directory. From there I suggest you to read the readme.txt you will find in this directory.
Now, apply the corresponding configuration and build your system:
In the case you have a Raspberry-Pi 4, simply run:
Now you will have to wait about 30 minutes ( it takes longer the first time), Buildroot will download and compile all the necessary software. Now you can jump to the next step.
Wait ! I can not find my board into the “board” directory.
Ok, this is bad luck, it means it is not (yet?) supported within Buildroot. If it is a fully custom board or a really rare one this is not surprising. In such case I suggest you to find a a board with the same microprocessor:
This will give you some boards with the same CPU, find one that is similar to yours. Use it as a base to create your own board/ and config/ updated to your precise needs.
Boot your Linux embedded system
At the end of the compilation process you will find the most usefull files in the output/images directory:
What are all the files in output/images ? Well, there would be a lot to say. Often you will find:
- dtb: (device tree binary) files: they are generated from dts files: basically they describe the hardware to Linux, tell it where to find the various component present on a PCB and what registers and what drivers to use
- zImage: the Linux binary image, zImage a binary image format but there are other formats such as uImage
- u-boot.img: is a bootloader binary image, usually we use U-Boot. It initialize some components (usually DDR, sdcard controller, often ethernet network too).
- rootfs.ext2: the root filesystem: the partition where Linux will expect to find all the necessary files.
- An sdcard.img a ready to use image that can be flashed to an SDcard
In the case of the Beaglebone Black, you will also find a MLO file. The MLO is the early boot program, it makes basic initialization and then starts U-Boot.
How to start the board:
Insert a microsd to your PC, check its name with dmesg and flash the generated image using DD.
Warning! Double check the destination device, especially ensure it is not sda, sdb: you could absolutely erase your PC hard drive.
Now, insert the SDcard on the Beaglebone Black and plug the Power Supply. You will see it boot on your console through the UART. you can now login into buildroot. The default user is root.
Install additional software to your root Filesystem
Buildroot does not only support dozen of hardware boards. It contains more that 2300 well maintained packages. The term package is not exactly true, in fact we should say compilation recipes. Anyway you can add new packages to your rootfs, on you PC go back to Buildroot main directory:
This will open a graphical interface:
 make menuconfig on Buildroot
From the main menu you can explore the available embedded softwares, go into the “Target Packages” section:
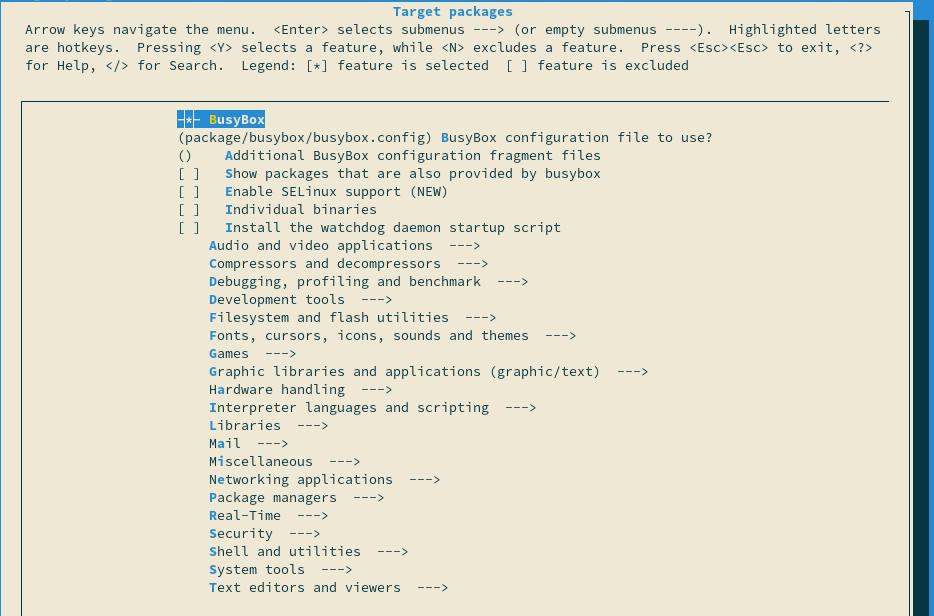
If you now what to look for simply type “/” and enter the name of the application or library you are looking for.
Once you are done, press escape, save the new configuration and re-run make once you are back on your console.
Develop your own embedded application
The great thing with embedded Linux development is that you can use any language, from Java to Go or even javascript. Of course you must take care of the available resources on you board but nowadays we see plenty of nodeJS or Python software running on embedded system. So you can choose your favourite one or keep your legacy software and port them to an embedded platform.
The development process may vary depending on your project, but you can easily start developing on any Linux PC and take care of the hardware specific aspects later.
For non compiled languages, simply install the necessary tool with the make menuconfig menu. Then jump to the next section.
For compiled languages, such as C or C++ you could directly install a compiler on your embedded system but it would not be efficient. Instead you can use a Cross toolchain: a cross toolchain compiles software for a different architecture, in our case we will compile ARM code on a PC.
Where is the Buildroot cross compilation toolchain ? When we generated our filesystem, Buildroot also compiled its own toolchain. From Buildroot’s main directory you can find it in output/host :
output/host is where Buildroot puts all the files needed for the host system ( your PC) to generate the target system (your board). You will find gcc and all its related tools in the bin directory.
The compiler isn’t everything. You likely want to link your program with libraries the libraries of your embedded system. They are located in output/target:
It contains all the files installed on your target system including the binaries of your libraries and programs. You can add those path to the “-L” option to your gcc command line to ensure you can link with these programs.
Headers files are not installed in the target directory, instead you will find them in output/build/ .
Deploy your software to your embedded device
When you develop a program you want to test it very often. Therefore you need to an efficient workflow that allows you to transfer your program and data quickly.
There are various options on the table, you can try NFS, or SSHFS but they slightly more difficult to set up. Instead we will simply use the scp command.
How to Install an ssh server on your embedded system? Again, use Buildroot’s configuration tool: make menuconfig. Now you can look for dropbear, a small ssh server designed for embedded systems. You will find it in “target packages/Networking applications/dropbear”:
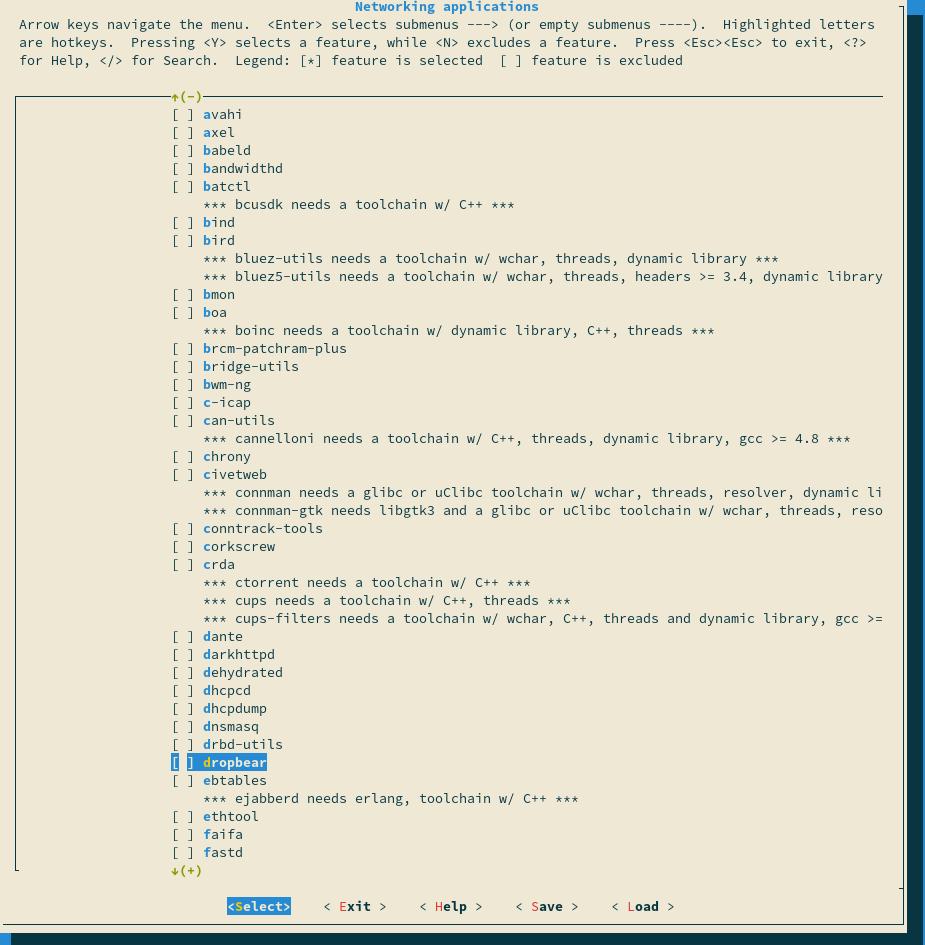 Dropbear is located in “target packages/Networking applications/dropbear”, simply select it.
To use ssh we need to make the network functional. The easiest way to do this is by using Ethernet. If you don’t have an Ethernet port on you board you can use Wi-Fi with wpa-supplicant instead. We can tell Buildroot to ensure the default network interface gets an IP address by DHCP in the “System configuration/Network interfaces to configure through DHCP” menu:
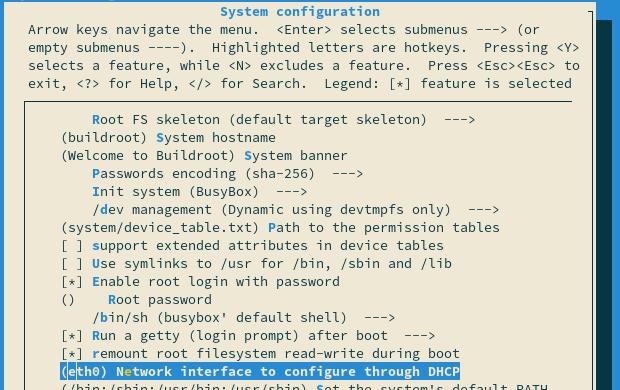
Enter the name of the default network interface there. Often it is eth0.
Now you can exit Buildroot menu, save the configuration and run make to build dropbear and re-generate your whole rootfs. After this, flash the SD card and boot the system. It will get an IP address from your DHCP server and dropbear will be started. Note the IP address of your this interface:
Now, all we have to do is transfer the executable file to the embedded system. On your PC run:
Back on your embedded system you should now be able to execute your program:
How to go further with embedded Linux development
Embedded Linux development is a vast field of expertise. It takes years for embedded Linux experts to master it.
Please note that this document does not mention security. And of course it would not be the best idea to run everything as the root user or to install dropbear on the final product!
Nevertheless, we hope this article give you some of the keys you needed. Depending on your needs we suggest you to read our other blog articles, about embedded systems upgrades or on how you should select the hardware to ensure great hardware/software integration.
Let us know what you think in the comment section. We seek to improve our tutorials so any remark is welcome.
Источник
Litgu.ru — Литературный Гуру
Embedded Linux System Design and Development
 Название: Embedded Linux System Design and Development
Автор: P. Raghavan and Amol Lad
Издательство: Auerbach Publications
Год: 2005
Формат: PDF
Размер: 6 Мб
Язык: английский / English
Based upon the authors’ experience in designing and deploying an embedded Linux system with a variety of applications, Embedded Linux System Design and Development contains a full embedded Linux system development roadmap for systems architects and software programmers. Explaining the issues that arise out of the use of Linux in embedded systems, the book facilitates movement to embedded Linux from traditional real-time operating systems, and describes the system design model containing embedded Linux.
This book delivers practical solutions for writing, debugging, and profiling applications and drivers in embedded Linux, and for understanding Linux BSP architecture. It enables you to understand: various drivers such as serial, I2C and USB gadgets; uClinux architecture and its programming model; and the embedded Linux graphics subsystem. The text also promotes learning of methods to reduce system boot time, optimize memory and storage, and find memory leaks and corruption in applications.
This volume benefits IT managers in planning to choose an embedded Linux distribution and in creating a roadmap for OS transition. It also describes the application of the Linux licensing model in commercial products.
Источник
Embedded Linux System Design and Development
Intended for architects and software programmers, this guide provides a roadmap for transitioning from a traditional RTOS to the embedded Linux development environment. The Indian authors explain the bootloader interface, system memory map, MTD subsystem for accessing flash devices, embedded file systems, embedded drivers, various mechanisms for building kernel and user-space applications, debugging memory tools, kernel function instrumentation profiling methods, and embedded graphics. Distributed by CRC.
Embedded Linux System Design and Development:
— Contains an entire roadmap for embedded Linux systems — Explains the MTD (Memory Technology Device) model for Flash based storage — Illustrates real-time programming techniques using POSIX.1b real-time extensions such as memory locking, real-time signals and asynchronous IO — Examines uClinux architecture and its programming model — Discusses porting applications from a traditional RTOS to embedded Linux
Based upon the authors’ experience in designing and deploying an embedded Linux system with a variety of applications, Embedded Linux System Design and Development contains a full embedded Linux system development roadmap for systems architects and software programmers. Explaining the issues that arise out of the use of Linux in embedded systems, the book facilitates movement to embedded Linux from traditional real-time operating systems, and describes the system design model containing embedded Linux.
This book delivers practical solutions for writing,debugging, and profiling applications and drivers in embedded Linux, and for understanding Linux BSP architecture. It enables you to understand: various drivers such as serial, I2C and USB gadgets; uClinux differences with standard Linux; RTAI hard real-time; and the embedded Linux graphics subsystem. The text also promotes learning of methods to reduce system boot time, optimize memory and storage, and find memory leaks and corruption in applications.
This volume benefits IT managers in planning to choose an embedded Linux distribution and in creating a roadmap for OS transition. It also describes the application of the Linux licensing model in commercial products.
Not a good one. This is a collection of bulleted lists, I did not like it.
I bought it mainly for the uClinux chapter and the graphics one, but I did not find it useful.
Источник
Embedded Linux в двух словах. Первое
В этой небольшой серии статей я попытаюсь пролить свет на тему построения Embedded Linux устройств, начиная от сборки загрузчика и до написания драйвера под отдельно разработанный внешний модуль с автоматизацией всех промежуточных процессов.
Платформой послужит плата BeagleBone Black с процессором производства Техасских Инструментов AM3358 и ядром Arm Cortex-A8, и, чтобы не плодить мигающие светодиодами мануалы, основной задачей устройства будет отправка смайлов в топовый чат, широко известного в узких кругах, сайта, в соответствии с командами от смайл-пульта. Впрочем, без мигания светодиодами тоже не обошлось.
Итак, на столе лежит чистая, т.е. без каких-либо предустановленных дистрибутивов, плата BeagleBone Black, блок питания, переходник USB-UART. Для общения с платой, переходник нужно подключить к 6-ти выводному разъему, где первый вывод обозначен точкой — это GND, выводы 4/5 — RX/TX соответственно. После установки скорости в какой-либо терминальной программе, например putty, на 115200, можно взаимодействовать с платой, о подключении подробнее и с картинками здесь.
Топовые чаты, пульты и светодиоды будут позже, а сейчас на плату подается питание и плата отвечает CCCCCCCCCCC

В переводе с бутлоадерского это означает, что первичному загрузчику, зашитому в ROM процессора, нечего загружать. Ситуацию проясняет Reference Manual, где на странице 5025 в разделе 26.1.5 описана процедура начальной загрузки. Процедура такая: первичный загрузчик проводит некоторую инициализацию: тактирование процессора, необходимой периферии, того же UART, и, в зависимости от логических уровней на выводах SYSBOOT, строит приоритетный список источников где можно взять следующий загрузчик, т.е. посмотреть сначала на MMC карте, SPI-EEPROM или сразу ждать данных по Ethernet.
Я использую способ загрузки с помощью SD карты, вот что говорит об этом раздел RM 26.1.8.5.5 на странице 5057: первичный загрузчик сначала проверяет несколько адресов 0x0/ 0x20000/ 0x40000/ 0x60000 на наличие так называемой TOC структуры, по которой он может определить загрузочный код, если так код не найти, то первичный загрузчик, предполагая на SD карте наличие файловой системы FAT, будет искать там файл с названием MLO, как это расшифровывается в RM не сказано, но многие склоняются что Master LOader. Возникает резонный вопрос, где же взять этот MLO?
Das U-Boot
Das U-Boot или просто U-Boot — Universal Boot Loader, один из самых, если не самый, распространенный загрузчик для встроенных систем, именно с его помощью можно создать требуемый вторичный загрузчик (MLO), который будет загружать третичный загрузчик (сам U-Boot), который будет загружать ядро Linux.
Перед скачиванием U-Boot, стоит сходить в репозиторий и найти тег последней версии, далее
U-Boot содержит больше тысячи конфигураций, в том числе нужную:
Это конфигурация платы AM335x evaluation module, этот модуль лежит в основе других плат, в том числе BeagleBone Black, что можно видеть, к примеру, по Device Tree, но о нем позже. Настраивается и собирается U-Boot с помощью Kconfig, то же, что используется и при сборке ядра Linux.
Установка нужного конфига:
Можно, к примеру, убрать, установленную по умолчанию, 2-х секундную задержку при загрузке платы с U-Boot
Boot options —> Autoboot options —> (0) delay in seconds before automatically booting
В вышеуказанных командах, используется компилятор по умолчанию, если таковой в системе установлен, и, скорее всего, он не подходит для ARM процессоров, и здесь пора упомянуть о кросскомпиляции.
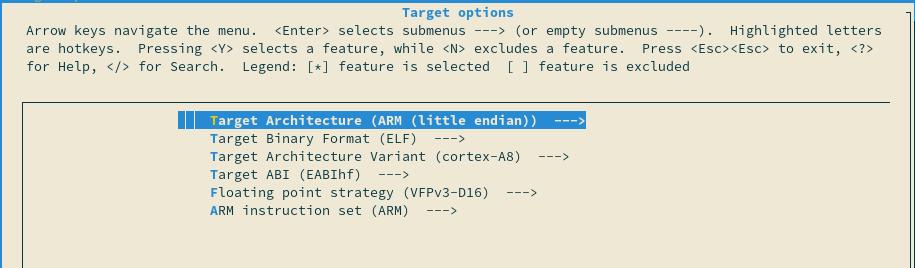
ARM Toolchain
Один из видов кросскомпиляции это сборка на одной архитектуре, как правило x86-64, именуемой HOST, исходного кода для другой, именуемой TARGET. Например, для TARGET архитектуры ARMv7-A, ядра ARM CortexA-8 процессора AM3358, платы BeagleBone Black. К слову, чтобы не запутаться в ARM’ах, даже есть свой справочник, так их много и разных.
Сама сборка осуществляется набором инструментов — компилятор, компоновщик, runtime библиотеки, заголовочные файлы ядра; так называемый Toolchain. Toolchain можно собрать самостоятельно либо с помощью crosstool-NG, а можно взять готовый от компании Linaro, или самой ARM. Здесь я буду использовать Toolchain от ARM “GNU Toolchain for the A-profile Architecture Version 10.2-2020.11, x86_64 Linux hosted cross compilers, AArch32 target with hard float (arm-linux-none-gnueabihf)», если не вдаваться в излишние подробности, то это все означает, что набор инструментов будет работать на десктопной машине с Linux и собирать программы для 32-х битной ARM платформы с аппаратной поддержкой операций с плавающей запятой.
Теперь для успешной сборки U-Boot, нужно указать в переменных ARCH и CROSS_COMPILE требуемые архитектуру и путь к кросскомпилятору соответственно, например так
Либо использовать export ARCH/CROSS_COMPILE , чтобы каждый раз не набирать все это. Я, для наглядности, буду каждый раз набирать все это.
После сборки U-Boot, в папке появятся необходимые файлы, а именно
MLO — вторичный загрузчик (напомню, первичный зашит в самом процессоре)
u-boot.img — третичный загрузчик, собственно U-Boot
Для успешной загрузки с SD карты, нужно ее некоторым образом разметить. Карта должна содержать минимум два раздела, первый, отмеченный как BOOT, с файловой системой FAT, второй раздел с ext4. Разметить карту можно, к примеру, программой fdisk.
Теперь нужно просто скопировать результаты сборки U-Boot в FAT раздел, вставить карту в BeagleBone Black и в терминале наблюдать уже более осознанный ответ платы
В ответе платы есть такие строки
Failed to load ‘boot.scr’
Failed to load ‘uEnv.txt’
U-Boot, во время загрузки, смотрит наличие дополнительных команд, сначала в файле boot.scr, при его наличии, затем, если boot.scr не нашлось, в uEnv.txt. Эти файлы, помимо очередности при поиске, отличаются тем, что в файле uEnv.txt, дополнительные команды представлены в текстовом виде, т.е. он проще для восприятия и редактирования. U-Boot не создает файлы с дополнительными командами, делать это нужно самостоятельно.
Здесь происходят некоторые манипуляции в результате которых U-Boot загружает из SD карты в RAM по адресу [loadaddr] — образ ядра [zImage], и по адресу [fdtaddr] — дерево устройств [Flattened Device Tree]. Формируются аргументы, передаваемые ядру Linux, это параметры консоли, к которой подключен переходник USB-UART [console=ttyS0,115200n8], место размещения корневой файловой системы [bootpartition=mmcblk0p2], параметры разрешения на чтение/запись корневой файловой системы [rw], ее тип [ext4] и ожидание появления корневой файловой системы [rootwait]. Чтобы раскрутить всю цепочку действий U-Boot, можно, после того как U-Boot прекратит попытки найти что бы загрузить и выдаст приглашение на работу в виде =>, ввести команду printenv , она покажет значения всех переменных, которыми располагает U-Boot.
В завершении своей работы U-Boot, командой bootz , вместе с вышеуказанными аргументами и адресом дерева устройств, передает управление ядру Linux.
Ядро Linux
Прежде чем приступать к любым действиям с ядром, стоит заглянуть сюда и убедится в наличии необходимых пакетов. Следующим шагом нужно определиться с тем, какую версию ядра использовать. Здесь я использую версию 5.4.92 и вот по каким соображениям. Одной из основных причин того, что не стоит брать просто последнюю версию ядра, доступную на данный момент, наряду с наличием драйверов, является невозможность быстро протестировать это ядро на всем разнообразии платформ поддерживаемых Linux, а значит можно потратить кучу сил и времени на исправление неполадок, если что-то пойдет не так, и не факт что это вообще получится сделать. BeagleBone Black имеет официальный репозиторий, где можно найти версию ядра, протестированную на данной платформе, и long term версия 5.4.92 была последней на тот момент.
Нужный конфиг, расположенный в /arch/arm/configs, называется omap2plus_defconfig, OMAP — это название линейки процессоров, продолжением которых является AM3358, впринципе, подойдет и более общий multi_v7_defconfig.
Сам конфиг пока остается без изменений, поэтому можно просто его установить и запустить компиляцию ядра(zImage), модулей(modules) и дерева устройств(dtbs)
Проходит некоторое время.
Результат сборки, в виде zImage, находится в /arch/arm/boot, там же в папке /dts находится скомпилированное дерево устройств am335x-boneblack.dtb, оба отправляются на SD карту к файлам загрузчика. На этом FAT раздел SD карты можно считать скомплектованным. Итого, там присутствуют:
MLO — вторичный загрузчик
u-boot.img — третичный загрузчик
uEnv.txt — дополнительные команды загрузчика
zImage — образ ядра Linux
am335x-boneblack.dtb — скомпилированное дерево устройств платы
Еще при сборке ядра заказывались модули ядра, но они уже относятся к корневой файловой системе.
Корневая файловая система. BusyBox
Ядро получает корневую файловую систему путем монтирования блочного устройства, заданного в, переданном при запуске ядра, аргументе root=, и далее, первым делом, исполняет оттуда программу под названием init.
Если запустить BeagleBone Black, имея только вышеуказанные файлы для FAT раздела, то ядро будет паниковать по причине отсутствия init и, в целом, по причине пустой rootfs, т.е. корневой файловой системы.
Можно шаг за шагом создать все минимально необходимые компоненты корневой файловой системы, такие как оболочка, различные демоны запускаемые init, сам init, конфигурационные файлы, узлы устройств, псевдофайловые системы /proc и /sys и просто системные приложения. Для желающих совершать подобные подвиги, существует проект Linux From Scratch, здесь же я воспользуюсь швейцарским ножом встроенных систем с Linux, утилитой BusyBox.
Скачивание последней, на тот момент, версии:
Настройка конфигурации по умолчанию:
Чтобы не думать сейчас о разделяемых библиотеках, стоит установить статическую сборку BusyBox:
Settings —> Build static binary (no shared libs)
Установка в папку по умолчанию _install:
Теперь в папке _install можно видеть будущую корневую файловую систему, в которую нужно добавить некоторые вещи.
Папки, помимо созданных BusyBox:
Стартовый скрипт. Дело в том, что, запускаемая в первую очередь, программа init, делает много полезного, например, выводит в консоль приглашение, но до выдачи приглашения, init проверяет наличие стартового скрипта /etc/init.d/rcS, и, при наличии, запускает его.
Этот скрипт монтирует псевдофайловые системы proc и sysfs, и ничего не мешает ему запускать, к примеру, пользовательскую программу, отвечающую за функционал устройства, но лучше будет делать это в отдельных скриптах, скомпонованных по функциональному назначению.
Стоит сказать, что работа init, на самом деле, начинается с чтения конфигурационного файла /etc/inittab, но BusyBox’овская init включает таблицу inittab по умолчанию, если таковой не окажется в корневой файловой системе.
Теперь пора вспомнить про модули ядра. Их также нужно разместить в корневой файловой системе в /lib/modules/5.4.92/, но сейчас они разбросаны по всей папке в которой собиралось ядро. Чтобы собрать модули в кучу, нужно в папке с ядром выполнить
Где в INSTALL_MOD_PATH указать путь к папке с корневой файловой системой, кросскомпилятор указывать не нужно, т.к. здесь модули ядра просто копируются по месту назначения. В результате папка /lib корневой файловой системы пополнится разделом /lib/mudules/5.4.92/ содержащим модули ядра, полученные при компиляции ядра.
Осталось скопировать все содержимое папки _install во второй раздел SD карты, тот который с ext4, и поменять владельца всего содержимого на root.
После запуска BeagleBone Black с корневой файловой системой, через 1.910315 секунды после старта ядра, система предложит активировать консоль и начать работу.
Но начать работу в такой системе, скорее всего не получится, т.к. в ней нет ничего кроме системных утилит BusyBox и моей небольшой программы, нарисовавшей приветствие, зато, эта система поможет получить общее представление о том, какая магия происходит внутри подобных устройств. Именно общее, т.к. в реальных устройствах, из-за необходимости минимизации времени загрузки, ограниченности ресурсов, заточенности под конкретную задачу, различий между ARM процессорами, построение системы может сильно отличаться. Например, на малинке, вообще сначала стартует графический процессор, который затем запускает все остальное.
По поводу же заявленных в начале драйверов, взаимодействия с внешними устройствами, автоматизации сборки и некоторого полезного функционала, пойдет рассказ в следующей статье.
Источник


