- Сборка Embedded Linux от Yocto для QEMU x86 и первое приложение к нему
- Сборка образа Linux
- Средства разработки
- Eclipse, Cross GCC
- Сборка в ADT
- Подготовка сборки
- Настройка Yocto ADT в Eclipse
- Проект Hello, World! в Eclipse c Yocto ADT
- Запуск и отладка из IDE Eclipse
- Embedded Linux development: 5 steps to get started
- Build a complete embedded system using Buidroot
- Boot your Linux embedded system
- Install additional software to your root Filesystem
- Develop your own embedded application
- Deploy your software to your embedded device
- How to go further with embedded Linux development
Сборка Embedded Linux от Yocto для QEMU x86 и первое приложение к нему
Эта статья — быстрый старт с картинками для тех, кому нужно собрать Embedded Linux с помощью Yocto.
Если вы собрались собирать Embedded Linux для специфичных аппаратных средств, например, для SoC на FPGA, то, наверное, как и я столкнётесь с проектом Yocto.
Yocto — проект, объединяющий
- инструментарий разработчика;
- систему сборки;
- набор программных интерфейсов;
- коллекцию мета-пакетов, расширяющих возможности платформы;
- плагины для Eclipse и Anjuta.
Я постарался описать процесс так, чтобы вам можно было меньше тратить времени на проблемы с настройкой и подготовкой и поскорее приступить к творчеству.
Сборка образа Linux
Основа для сборки — статья
«Yocto Project Quick Start».
Собирать буду в папке
Небольшое отступление:
Запустив терминал, все команды выполняйте в нём, потому что в ходе работы создаются и используются переменные среды. Если закрыли терминал и открыли новый, то заходите в
и придётся повторять некоторые команды. Например,
создаю репозиторий git
теперь текущая директория
теперь, согласно терминам Yocto, получилось
Source Directory — «poky»
local working area (local branch) — dizzy
Первым делом выполняется
Этой командой настраивается окружение оболочки, создается начальный изменяемый набор файлов конфигурации и осуществляется взаимодействие с окружением выполнения системы BitBake путем использования файла сценария, позволяющего Poky установить, выполняются ли минимальные системные требования. Результат выполнения команды сообщит или о проблемах, например, недостающих пакетах, или о возможности продолжить редактированием файла conf/local.conf.
Здесь следует указать число нитей, которое будет запускать средство сборки bitbake. Чтобы максимально использовать вычислительные возможности, число нитей должно соответствовать числу ядер процессора. Я указал на 1 меньше, чтобы компьютером во время сборки удобнее было пользоваться.
Так же я добавил дополнительные возможности, полезные для разработки.
Так как собираем для стандартной QEMU x86, то остальное можно не изменять.
Далее можно выбрать “рецепт” — вариант сборки со своим набором библиотек, утилит, создаваемых файлов, образов и т.п.
Список рецептов с их краткими описаниями можно посмотреть здесь:
рецепты openembedded-core
пролистайте до рецептов, начинающихся с core-…
Не советую собирать core-image-minimal для ознакомления. Там нет ssh и других удобных для отладки инструментов.
Я выбрал core-image-sato. Это сборка с GUI SATO
Будьте готовы, что ждать завершения сборки придётся, возможно, от 3 часов до 3 и более дней. В счастью, процесс можно приостановить и возобновить.
Чтобы приостановить, нажмите + один (!) раз и подождите, когда завершатся все начатые операции. Иначе, возможно, появятся ошибочки и придётся переделывать. Чтобы возобновить, повторите
Если закрыли терминал, то в новом терминале перед сборкой придётся повторить установку переменных среды:
По завершении сборки можно проверить, что получилось, запустив эмулятор QEMU
Появится окно терминала xterm, там надо будет ввести пароль root хоста для создания интерфейса tap. Там же можно увидеть IP host-машины на tap интерфейсе и IP эмулируемой машины. У меня 192.168.7.1 и 192.168.7.2 соответственно.
Затем, если собран SATO должно появится окно графического интерфейса:
Если запущенный эмулятор мешает, пока его можно закрыть. Полистайте стрелочками в верхней части GUI до появления соответствующей иконки выключения или введите poweroff через терминал SATO или по ssh. Про ssh будет позже.
Не закрывайте QEMU крестиком на главном окошке эмулятора. Закрывайте штатными средствами эмулируемой машины. Иначе у вас в системе от QEMU останутся интерфейсы ethX, tapX, virbrX, которые придётся будет ifconfig… ifdown, или как это делается на вашей ОС. Или каждый раз при запуске QEMU будут новые IP хоста и QEMU, что неудобно.
Средства разработки
Используется Eclipse IDE for C/C++ Developers, версия Luna. В этой сборке имеются плагины CDT, GNU ARM и некоторые другие полезные для кросс-компиляции и разработки встроенного ПО плагины.
Можно скачать отсюда:
Eclipse Luna SR2.
Будем собирать приложения Hello, world!
Eclipse, Cross GCC
Сначала простой путь, соберём обычными средствами Eclipse: CDT + GNU ARM
Если этих плагинов в вашем Eclipse ещё нет, то добавьте плагин CDT из стандартного репозитория Eclipse и отсюда GNU ARM Plugin for Eclipse GNU ARM C/C++ Cross Compiler и что ещё захочется.
Создаём новый проект C++:
Меню Eclipse File->New->Project…->C/C++->C++ Project
Нужно выбрать
Project type: Executable->Hello World C++ Project
Toolchains: Cross GCC 
заполните поле Author
Теперь самое важное, что касается системы сборки:
Cross compiller prefix: i586-poky-linux-
Cross compiler path: /home/. /My_Designs/Poky/poky/build/tmp/sysroots/x86_64-linux/usr/bin/i586-poky-linux
Компилируем проект
Project->Build Project
Должен появиться исполняемый файл
Так как компилировали для QEMU x86 Linux, то должен запуститься и на вашей host машине, если, конечно, вы работаете на x86 Linux или совместимой с ней. У меня запустилось на IA64 Ubuntu.
Теперь, если успели закрыть QEMU, то запустите опять
Появится окно терминала xterm, надо будет ввести пароль root для создания tap интерфейса.
Как видно, у меня IP host-машины 192.168.7.1, IP qemu 192.168.7.2
Затем появится окно QEMU с графическим интерфейсом
Можно подсоединиться к QEMU через ssh и sftp. Первый полезен для запуска программы, второй — для отправки этой программы на эмулируемую машину.
Файл я отправлял с помощью файлового менеджера Krusader. В Windows можно использовать FileZilla или другими.
В Krusader я выбрал Tools->New Net Connection…, в диалоговом окне нужно выбрать sftp://, ввести IP и Username: root
В домашнюю папку на QEMU я скопировал исполняемый файл hello_cross_gcc_02 из папки Debug проекта
Далее можно открыть терминал в графическом интерфейсе QEMU и запустить программу на выполнение оттуда. Мне более удобным показалось соединиться через ssh. В окне терминала host-машины запускаем ssh
и запускаем недавно скопированный исполняемый файл:
Должно получиться
Hello World!
Сборка в ADT
Подготовка Eclipse
Делалось на основе этого: Yocto — Настройка Eclipse
В Eclipse нужны плагины из стандартной комплектации:
Linux Tools
- LTTng — Linux Tracing Toolkit
Mobile and Device Development
- C/C++ Remote Launch
- Remote System Explorer End-user Runtime
- Remote System Explorer User Actions
- Target Management Terminal
- TCF Remote System Explorer add-in
- TCF Target Explorer
Programming Languages
- Autotools Support for CDT
- C/C++ Development Tools
И нужно добавить плагин от Yocto. Скачать можно отсюда: Yocto Plugin for Eclipse
Подготовка сборки
Для организации взаимодействия с IDE и средствами разработки, предусмотрены скрипты:
для запуска QEMU плагином Yocto нужен rpcbind
нужно отредактировать файл /etc/default/rpcbind
нужно распаковать root filesystem в ту папку в sysroots, где лежит файловая система эмулируемой машины. В нашем случае qemux86:
Настройка Yocto ADT в Eclipse
В Eclipse меню Windows->Preferences, Yocto Project ADT
Cross Compiler Options
Build system derived toolchain
Toolchain Root Location:
/home/. /Poky/poky/build/
Sysroot Location:
/home/. /Poky/poky/build/tmp/sysroots/qemux86
Target Architecture: i586-poky-linux
Target Options:
QEMU
Kernel: /home/. /Poky/poky/build/tmp/deploy/images/qemux86/bzImage-qemux86.bin
Проект Hello, World! в Eclipse c Yocto ADT
Создаём новый проект
New Project->C++ Project
Project name: hello_qemu_cmake_04
Project type: Yocto Project ADT CMake Project->Hello World C++ CMake Project
Next, Next, Finish
Build project
В папке проекта -> Debug должен получиться hello_qemu_cmake_04
Теперь можно запустить приложение так же как это было с проектом, созданным через Cross GCC за исключением того, что QEMU запускается теперь в Eclipse через меню
Run->External Tools->qemu_i586-poky-linux
Запуск и отладка из IDE Eclipse
Теперь настроим Eclipse так, чтобы можно было запускать и отлаживать приложение прямо из IDE.
Инструкция взята отсюда:
Загрузка и отладка приложения средствами ADT в Eclipse
Для удобства перед настройкой удалённая машина должна быть запущена (Run->External Tools->qemu_i586-poky-linux, как в предыдущем разделе).
Для настройки отладки выбираем в меню Eclipse
Run -> Debug Configurations…
В списке слева нужно отыскать “C/C++ Remote Application”, там должен быть пункт с названием нашего проекта и виртуальной машины. У меня это “hello_qemu_cmake_04_gdb_i586-poky-linux”. Надо его выбрать.
В руководстве от Yocto предлагается указать Remote Absolute File Path for C/C++Application. Но сейчас не самое лучшее время для этого. Удобнее будет сначала настроить связь с удалённой машиной.
А пока в правой области выбираем вкладку Debugger, здесь надо в выпадающем списке Debugger выбрать remote gdb/mi. У меня это единственный элемент списка, но его всё равно нужно выбрать. При этом заполняться некоторые другие поля формы. Debug Configurations — Debugger» data-src=»https://habrastorage.org/files/578/799/303/5787993038a54954bb16b360004daac3.png»/>
Возвращаемся на вкладку Main и создаём соединение.
В разделе Connection выбираем New…. В окне New Connection выбираем TCF. У меня их два. Я не знаю, зачем второй, но выбор первого точно приводит к положительному результату.
Debug Configurations — Main->New Connection» data-src=»https://habrastorage.org/files/28f/05c/dea/28f05cdeade343ae876ee4beaede83be.png»/>
В поле Host name вписываем IP машины в QEMU. Поле Connection name можно оставить заполненным IP. , … Чтобы меньше было возни позже, здесь же можно указать login при соединении. В разделе Connection нажмите Edit… и заполните Default User ID. Логин root.
Debug Configurations — Main->Edit — Properties» data-src=»https://habrastorage.org/files/334/24c/4e6/33424c4e612d48fc95439282cf009346.png»/>
На вкладке Main выбираем только что созданное соединение.
Теперь указываем путь к файлу и имя файла, с которым Eclipse будет загружать отлаживаемое приложение на удалённую машину.
Если QEMU запущен, то можно нажать Browse… и, если с соединением всё в порядке, можно будет посмотреть файловую систему удалённой машины и выбрать место, куда загружать приложение. У вас не обязательно будет такая же картинка, как на скриншоте снизу. Но вот что важно: нужно указать файл. Если вы собираетесь указать папку, в которой нет файла с тем именем, с которым хотите загружать исполняемый файл, то в этим окном вы не ограничитесь. Нажмите и допишите имя файла в окне Debug Configurations.
Debug Configurations — Main->Select remote application file» data-src=»https://habrastorage.org/files/ffc/9c1/3cd/ffc9c13cd54a4f2aaa4a64c05469848e.png»/>
Итог должен получиться примерно такой:
Debug Configurations — Main» data-src=»https://habrastorage.org/files/5bb/ee6/a91/5bbee6a91d3849d7b2e250735bcd4bec.png»/>
Теперь можно нажать .
У меня в окне консоли Eclipse “Remote Shell” было так:
Затем приглашение переключиться в перспективу Debug. Есть смысл согласиться.
Отладчик остановился на строке
Жмём Step Over (F6)
В терминале
Теперь можно писать программу. Пока для QEMU x86.
Источник
Embedded Linux development: 5 steps to get started
This is the quickstart guide you need to generate an industrial grade embedded system for the board sitting on your desk and be ready to work with it. Embedded Linux development is a vast domain and there are plenty of documentation out there to help you with all necessary details but do not hesitate to as questions in the comment section.
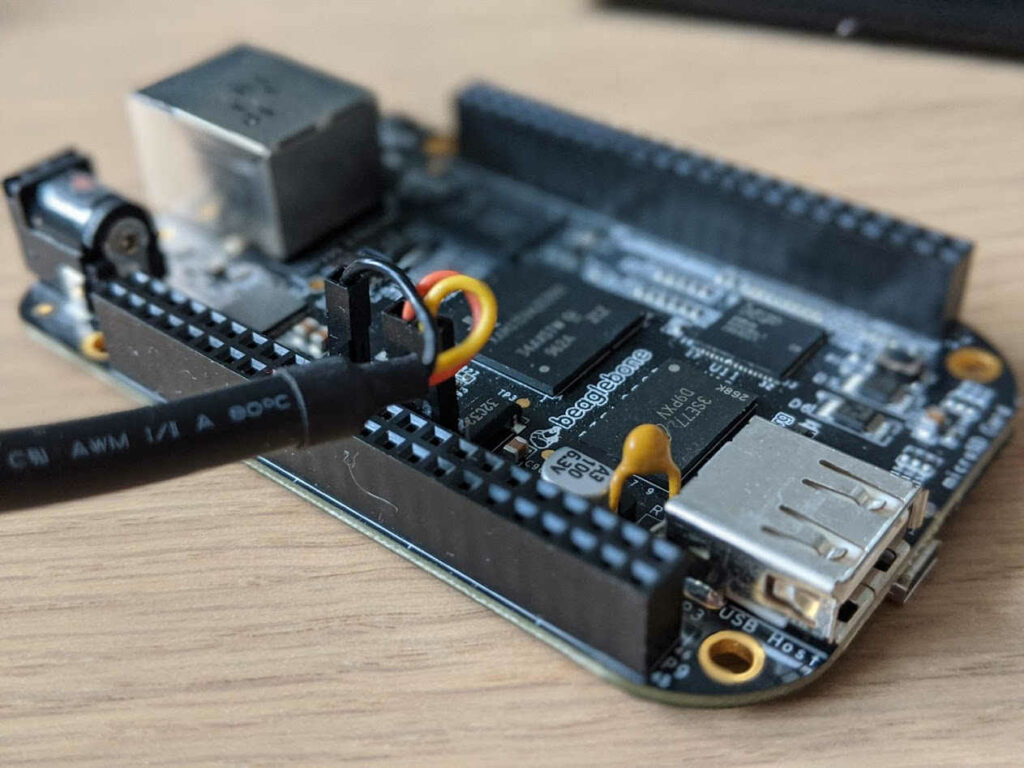 The Beaglebone black is a great board to learn embedded Linux
Build a complete embedded system using Buidroot
Buildroot and Yocto are Embedded Linux most important tools. You could compare them to embedded Linux distributions, but as you will find out, they are much more than this.
For this blog post we use Buildroot, at Openest we think it is easyer to use and much quicker to set up. If you prefer Yocto, let us know in the comments we likely update this article later.
Let’s clone Buildroot source code and jump into its sources:
Look at the latest tag available (currently it is 2019.11) and checkout it.
Now we want to find your embedded Linux board support package within the “board” directory. It is sorted by board manufacturer so it is relatively easy to find your own. For the rest of this tutorial we will use the Beaglebone Black aka beagleboard, it can be found in “board/beaglebone” directory. From there I suggest you to read the readme.txt you will find in this directory.
Now, apply the corresponding configuration and build your system:
In the case you have a Raspberry-Pi 4, simply run:
Now you will have to wait about 30 minutes ( it takes longer the first time), Buildroot will download and compile all the necessary software. Now you can jump to the next step.
Wait ! I can not find my board into the “board” directory.
Ok, this is bad luck, it means it is not (yet?) supported within Buildroot. If it is a fully custom board or a really rare one this is not surprising. In such case I suggest you to find a a board with the same microprocessor:
This will give you some boards with the same CPU, find one that is similar to yours. Use it as a base to create your own board/ and config/ updated to your precise needs.
Boot your Linux embedded system
At the end of the compilation process you will find the most usefull files in the output/images directory:
What are all the files in output/images ? Well, there would be a lot to say. Often you will find:
- dtb: (device tree binary) files: they are generated from dts files: basically they describe the hardware to Linux, tell it where to find the various component present on a PCB and what registers and what drivers to use
- zImage: the Linux binary image, zImage a binary image format but there are other formats such as uImage
- u-boot.img: is a bootloader binary image, usually we use U-Boot. It initialize some components (usually DDR, sdcard controller, often ethernet network too).
- rootfs.ext2: the root filesystem: the partition where Linux will expect to find all the necessary files.
- An sdcard.img a ready to use image that can be flashed to an SDcard
In the case of the Beaglebone Black, you will also find a MLO file. The MLO is the early boot program, it makes basic initialization and then starts U-Boot.
How to start the board:
Insert a microsd to your PC, check its name with dmesg and flash the generated image using DD.
Warning! Double check the destination device, especially ensure it is not sda, sdb: you could absolutely erase your PC hard drive.
Now, insert the SDcard on the Beaglebone Black and plug the Power Supply. You will see it boot on your console through the UART. you can now login into buildroot. The default user is root.
Install additional software to your root Filesystem
Buildroot does not only support dozen of hardware boards. It contains more that 2300 well maintained packages. The term package is not exactly true, in fact we should say compilation recipes. Anyway you can add new packages to your rootfs, on you PC go back to Buildroot main directory:
This will open a graphical interface:
 make menuconfig on Buildroot
From the main menu you can explore the available embedded softwares, go into the “Target Packages” section:
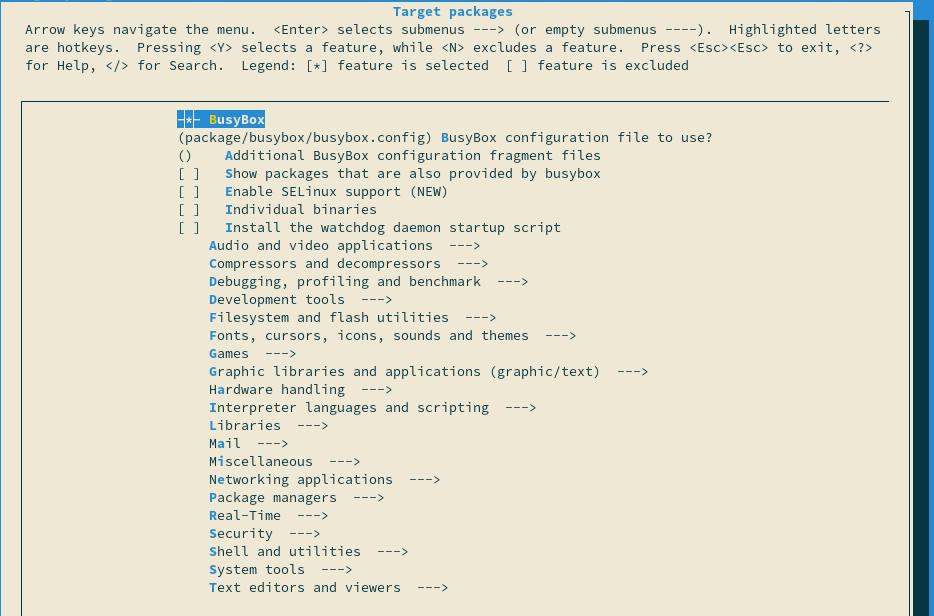
If you now what to look for simply type “/” and enter the name of the application or library you are looking for.
Once you are done, press escape, save the new configuration and re-run make once you are back on your console.
Develop your own embedded application
The great thing with embedded Linux development is that you can use any language, from Java to Go or even javascript. Of course you must take care of the available resources on you board but nowadays we see plenty of nodeJS or Python software running on embedded system. So you can choose your favourite one or keep your legacy software and port them to an embedded platform.
The development process may vary depending on your project, but you can easily start developing on any Linux PC and take care of the hardware specific aspects later.
For non compiled languages, simply install the necessary tool with the make menuconfig menu. Then jump to the next section.
For compiled languages, such as C or C++ you could directly install a compiler on your embedded system but it would not be efficient. Instead you can use a Cross toolchain: a cross toolchain compiles software for a different architecture, in our case we will compile ARM code on a PC.
Where is the Buildroot cross compilation toolchain ? When we generated our filesystem, Buildroot also compiled its own toolchain. From Buildroot’s main directory you can find it in output/host :
output/host is where Buildroot puts all the files needed for the host system ( your PC) to generate the target system (your board). You will find gcc and all its related tools in the bin directory.
The compiler isn’t everything. You likely want to link your program with libraries the libraries of your embedded system. They are located in output/target:
It contains all the files installed on your target system including the binaries of your libraries and programs. You can add those path to the “-L” option to your gcc command line to ensure you can link with these programs.
Headers files are not installed in the target directory, instead you will find them in output/build/ .
Deploy your software to your embedded device
When you develop a program you want to test it very often. Therefore you need to an efficient workflow that allows you to transfer your program and data quickly.
There are various options on the table, you can try NFS, or SSHFS but they slightly more difficult to set up. Instead we will simply use the scp command.
How to Install an ssh server on your embedded system? Again, use Buildroot’s configuration tool: make menuconfig. Now you can look for dropbear, a small ssh server designed for embedded systems. You will find it in “target packages/Networking applications/dropbear”:
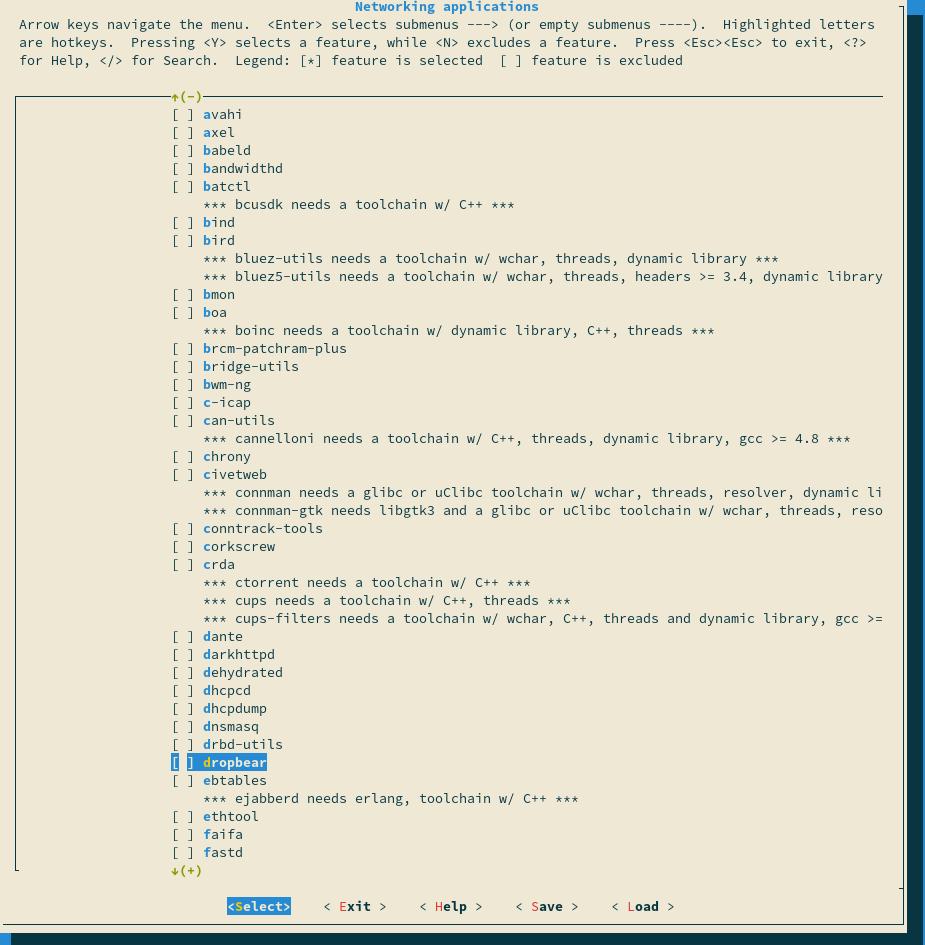 Dropbear is located in “target packages/Networking applications/dropbear”, simply select it.
To use ssh we need to make the network functional. The easiest way to do this is by using Ethernet. If you don’t have an Ethernet port on you board you can use Wi-Fi with wpa-supplicant instead. We can tell Buildroot to ensure the default network interface gets an IP address by DHCP in the “System configuration/Network interfaces to configure through DHCP” menu:
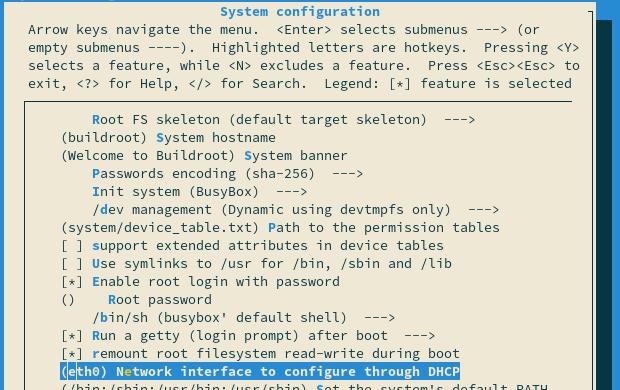
Enter the name of the default network interface there. Often it is eth0.
Now you can exit Buildroot menu, save the configuration and run make to build dropbear and re-generate your whole rootfs. After this, flash the SD card and boot the system. It will get an IP address from your DHCP server and dropbear will be started. Note the IP address of your this interface:
Now, all we have to do is transfer the executable file to the embedded system. On your PC run:
Back on your embedded system you should now be able to execute your program:
How to go further with embedded Linux development
Embedded Linux development is a vast field of expertise. It takes years for embedded Linux experts to master it.
Please note that this document does not mention security. And of course it would not be the best idea to run everything as the root user or to install dropbear on the final product!
Nevertheless, we hope this article give you some of the keys you needed. Depending on your needs we suggest you to read our other blog articles, about embedded systems upgrades or on how you should select the hardware to ensure great hardware/software integration.
Let us know what you think in the comment section. We seek to improve our tutorials so any remark is welcome.
Источник


