- Электрический блогнот
- мои заметки на полях
- python embedded или как добавить python в свое приложение
- Шаг 1 — загружаем встраиваемый Python
- Шаг 2 — устанавливаем встраиваемый Pyton
- Шаг 3 — pip
- Шаг 4 — модули
- Шаг 5 — тестирование
- Embedding Python in a C++ project with Visual Studio
- Let’s get started
- Modifying without recompiling
- Debugging Python and C++
- Type hints for Python code
- Summary
- Extending and Embedding the Python Interpreter
- Recommended third party tools
- Creating extensions without third party tools
- Embedding the CPython runtime in a larger application
Электрический блогнот
мои заметки на полях
python embedded или как добавить python в свое приложение

У Pyhon есть прекрасный инсталлятор, который все сдеает сам и установит Python со всеми стандартными модулями. Но, что делать, если ваше приложение использует python скрипты, а заставлять пользователя скачивать и устанавливать весь Python вам не хочется. Для этого существует Python Embedded (встраиваемый). Этот пакет не требует установки и может быть просто скопирован в папку с вашим приложением. Так же вы сможете установить все необходимые модули для работы и создать миниокружение для работы. Тем самым полностью избавить пользователя от лишних действий. Он даже и не узнает, что часть вашего приложения запускает Python. Этот прием я использовал в приложении Fpska (конвертация видео в 60 fps).
Далее я подробно распишу, как внедрить Python в свое приложение. Все эллементарно. Несколько простых шагов.
Шаг 1 — загружаем встраиваемый Python
Идем на python.org и скачиваем нужную версию python embedded:

Шаг 2 — устанавливаем встраиваемый Pyton
Вся установка сводится к простой распаковке архива:

На этом шаге можно было бы и остановиться, но чистый Python редко, кто использует. Нужны еще и модули. А чтобы поставить модули нужен pip (package installer for Python).
Шаг 3 — pip
Перед устанвкой pip настроим пути к библиотекам. Для этого в файле python37._pth нужно раскомментировать строку:
Скачиваем pip. Для этого рекомендуют использовать утилиту curl:
но можно просто скачать из браузера
Далее переходим в папку с embedded Python и устанавливаем инсталлятор пакетов (pip):
После установки pip появятся папки Lib и Scripts: 
Сразу же проверим работает ли pip: 

Шаг 4 — модули
Устанавливаем модули. Для примера установим модуль wxPython (добавляет графический интерфейс).

Шаг 5 — тестирование
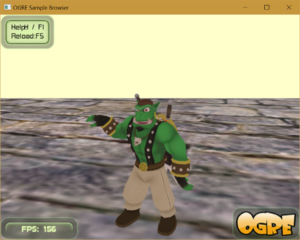
Тестируем только что собранный Python. При тестировании очент важно проверить, что получился абсолютно независимый дистрибутив Python со всеми проинсталлированными модулями. Для этого устанавливаем все необходимые модули. Делаем архив папки, где установлен Python Embedded с модулями. И загружаем его куда-нибудь на файлообменник. Затем находим чистый Windows 10, где Python никогда не был установлен. Скачиваем архив и распаковываем. Запускаем любой тестовый скриптик. На следующей картинке тестовый запуск wxPython приложения:
Embedding Python in a C++ project with Visual Studio

Watch the video version of this post on VS Toolbox
Let’s get started
In this post, we’re going to walk through a sample project that demonstrates scripting a C++ application with Python using CPython, PyBind11 and Visual Studio 2017. The sample code is available at github.com/zooba/ogre3d-python-embed and setup instructions are below.
Ogre3d is an open-source game engine written in C++ that has been used in games such as Hob and Torchlight 2. Both the engine and its source code are freely available from their website. For this sample, we have taken one of their character animation demos and extended it with Python. Rather than using the keyboard to move the character around, we can use Python code to call into the C++ functions that control him.
To build and run this sample on your own machine, you will require Visual Studio 2017 with the Python workload, the Python Native Development option, and Python 3.6 32-bit. If you already have Visual Studio 2017, these can be added by launching “Visual Studio Installer” and modifying the existing install.
Note: When you install Python 3.6 32-bit through Visual Studio, it automatically includes debugging symbols. If you install it yourself, you will need to select “Customize installation” and include debugging symbols. If you have already installed it, you can use Programs and Features to modify your install and add debugging symbols.
Clone our repository using git clone --recurse-submodules https://github.com/zooba/ogre3d-python-embed.git or using Team Explorer in Visual Studio. There is a PowerShell script in the root of the repository called get_externals.ps1 that will download and extract the version of the Ogre3d and SDL2 runtimes needed, and will prompt if you are missing either Python 3.6 32-bit or the DirectX redistributables (you can download the latter here, but be aware that this is a very old installer that will offer to install a browser toolbar – feel free to deselect that).
Once everything is installed, open srcPythonCharacter.sln in Visual Studio 2017 and press Ctrl+F5 to build and run the sample. While running, the sample will capture your mouse cursor, but you can use Alt+Tab to switch to another window. We will do that next to look at some of the code.
In Visual Studio, open Solution Explorer and then open the following files. We will be looking at each in the next few sections.
Modifying without recompiling
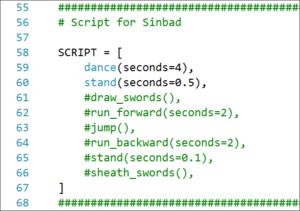
The Python module ai.py is where we define the behavior of Sinbad, our dancing ogre. Collapse the command definitions region by clicking the “-” symbol to the left of #region Command definitions and look at the SCRIPT variable. Each item in this list is the movement we want Sinbad to do, including the amount of time he should do it for. There are already some extra movements listed but commented out, so try uncommenting them or adding your own. You can do this while the demo is running in the background.
Once you’ve made changes, save this file, use Alt+Tab to go back to the running sample, and press F5. The F5 key will reload the script, and you will see your changes (or an error) immediately. Compare this to normal C++ development, where you would have had to stop running, modify the code, recompile (and wait!), start running again, and return to the same state you were previously.
This is possible because of CPython’s support for embedding, and made simple by the powerful pybind11 library. Embedding allows you to host the Python runtime in any native application, on any platform and using any compiler supported by CPython. So rather than launching “python.exe” with a script, you can load python36.dll into your own application and use it directly.
It is very easy to make Python representations of your C++ classes with pybind11. Switch to the ogre_module.h file to see what we did for this sample.
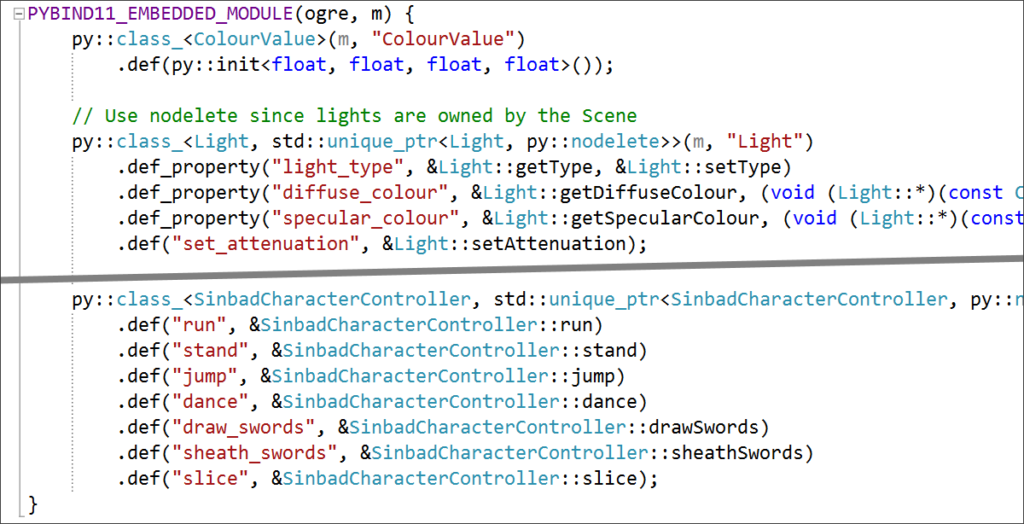
This file defines the mapping between a Python module named “ogre” and the classes and functions we want to make available. Using the metaprogramming features added in C++11, the pybind11 library automatically generates code to do the type conversions necessary to make Python code transparently interact with your C++ code. If you switch back to ai.py, you will see that the ogre.CharacterController class is imported and used in Python code to call back into C.
But how can we be sure that it is really doing all this? It seems pretty magical, and barely enough work on our part to make a game engine suddenly support Python scripting. In the next section, we will look at the proof that it is doing what we claim.
Debugging Python and C++
If you’ve got the demo running, now is the time to exit it by clicking on the Stop Debugging button. Visual Studio is famous for its debugging features, and this one is pretty cool. When you installed the Python Native Development option, we included the ability to do mixed Python/C++ debugging, whether you’re in a Python project or a C++ project. You can find information about doing this from Python project in our documentation, but in this case we are going to launch a C++ project with Python debugging enabled.
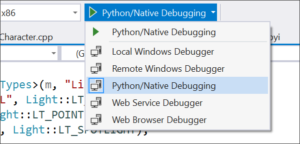
Find the Start debugging button on the toolbar. Depending on your settings and the file you have open, it be labelled “Start”, “Local Windows Debugger”, “Python/Native Debugging” or “Attach…”. Clicking the small down arrow next to the button will display your options.
Select “Python/Native Debugging” here to make it your new default. All the settings required to make the sample correctly load are already configured for this project (see this page for the details), so you can now press F5 to launch the sample again, but this time with the debugger attached.
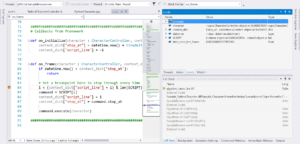
Open ai.py again and set a breakpoint in the on_frame function near the end of the file. This function is called for each frame, but normally returns quickly until it’s time to run the next step in the script. So while the demo is running, sooner or later this function will be hit. When it is, you’ll see a mixed call stack showing both Python and C++ frames. (In this screenshot, I’ve hidden external code, so you may see some extra frames from pybind11.)
As you press F11 to step through the code, you will jump between Python and C++ just as naturally as either language on its own, and anywhere you view a Python object you’ll be able to see the regular Python view. Breakpoints set in native code or Python code will be hit, and switching up and down the call stack will let you view both kinds of frames.
Type hints for Python code
Finally, let’s take another look at the Python code and how Visual Studio helps you be a productive developer. In general, when you have defined a Python class in C++ you are not going to get IntelliSense when editing the code using it. This is unfortunate, as IntelliSense is most useful when using code that does not have easily read sources, but we now have the ability to provide IntelliSense separately.

Open the ogre.pyi file. While it looks very much like Python code, it’s actually a type stub file that exists solely for its type hints. We include class and function definitions, but no bodies. With function annotations, we can specify the expected types and the return type of each function, and we will also extract and present documentation strings.
As this file is named ogre.pyi, when the ai.py module imports the native ogre module, IntelliSense will import the type stub instead. Without the type stub, we would not be able to resolve the ogre module at all, as it is generated at runtime by pybind11 and there is no other way for us to find it.
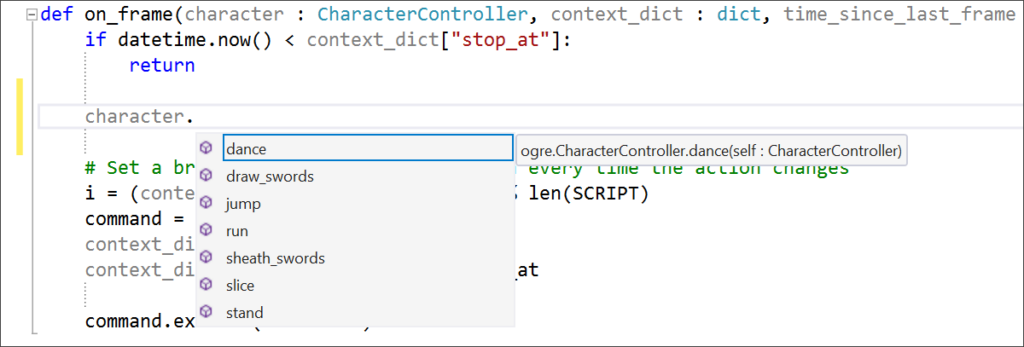
Switch back to ai.py and find the on_frame function. As this is called from C++, we have no information about the arguments that are passed to it, so to get IntelliSense we use type annotations to specify the parameter types. If you start typing character. within this function then you will see all the members that were specified in the type stub.
While this is very convenient and necessary in some situations, most of the time we are able to show you good IntelliSense without needing type hints. If you hover over command in this function you will see all the possible command types; using Go To Definition (F12) on command.execute will take you to either of the implementations of that function; and even though there are no type hints on these functions, we are still able to provide all the completions on character through our type analysis engine. Type stub files are useful for when you want to provide users with IntelliSense for code that cannot be automatically analyzed, and annotations can fill in the gaps that occur when using complex or unusual Python code.
Summary
If you develop native applications that have frequently-changing logic or business rules, it is easy to move that logic from C or C++ into Python, where it can be easily modified and updated without needing to recompile or restart your application. The combination of Visual Studio 2017 with the official CPython releases and pybind11 is the most productive way to develop and debug all aspects of your hybrid C++ and Python project. Download the free Visual Studio 2017 Community to get started today.
Extending and Embedding the Python Interpreter
This document describes how to write modules in C or C++ to extend the Python interpreter with new modules. Those modules can not only define new functions but also new object types and their methods. The document also describes how to embed the Python interpreter in another application, for use as an extension language. Finally, it shows how to compile and link extension modules so that they can be loaded dynamically (at run time) into the interpreter, if the underlying operating system supports this feature.
This document assumes basic knowledge about Python. For an informal introduction to the language, see The Python Tutorial . The Python Language Reference gives a more formal definition of the language. The Python Standard Library documents the existing object types, functions and modules (both built-in and written in Python) that give the language its wide application range.
For a detailed description of the whole Python/C API, see the separate Python/C API Reference Manual .
Recommended third party tools
This guide only covers the basic tools for creating extensions provided as part of this version of CPython. Third party tools like Cython, cffi, SWIG and Numba offer both simpler and more sophisticated approaches to creating C and C++ extensions for Python.
The Python Packaging User Guide not only covers several available tools that simplify the creation of binary extensions, but also discusses the various reasons why creating an extension module may be desirable in the first place.
Creating extensions without third party tools
This section of the guide covers creating C and C++ extensions without assistance from third party tools. It is intended primarily for creators of those tools, rather than being a recommended way to create your own C extensions.
Embedding the CPython runtime in a larger application
Sometimes, rather than creating an extension that runs inside the Python interpreter as the main application, it is desirable to instead embed the CPython runtime inside a larger application. This section covers some of the details involved in doing that successfully.


