- How to Enable Administrator Account in Windows 10, 7, 8
- How to Enable Administrator Account in Windows 10
- Method 1: Enable administrator account through command prompt
- Method 2: Enable Administrator Account through .bat file
- Enable and Disable the Built-in Administrator Account
- Enabling the Built-in Administrator Account
- Use an answer file
- Log on by using audit mode
- Use the Local Users and Groups MMC (server versions only)
- Disabling the Built-in Administrator Account
- Configuring the Built-in Administrator Password
- Управление встроенной учетной записью Администратор в Windows 10
- Встроенный аккаунт Administrator Windows
- Как включить встроенную учетную запись администратора в Windows 10?
- Пропали права администратора Windows
How to Enable Administrator Account in Windows 10, 7, 8
Question: Solved
How do I enable an administrator account (hidden) in Windows 10?
Solution:
Usually, this Administrator account (Windows built-in account) is disabled by default. Since it is disabled, it doesn’t appear on the login screen or anywhere else. If you want to enable it, you can do it easily by following a simple command in the command prompt.
However, enabling an administrator account in Windows 10 is an easy task, but sometimes it becomes tricky, especially when you don’t have administrator rights on your current account or trying to enable it through your standard account (without admin rights).
So we are going through both the scenarios, one if you have administrator rights and second if you don’t have administrator rights.
We are going to share some methods to enable administrator account on your login screen. Go to the steps below and apply them on your computer according to your scenario. Steps are properly annotated with the screenshots and a video tutorial so that you can easily understand the procedure. Please follow these steps:
How to Enable Administrator Account in Windows 10
There are two methods to enable an administrator account. We have explained both of them down below. Opt for one method and then follow its given instructions. We have performed these steps in Windows 7 computer, but the same steps can be worked on all the Microsoft Windows operating system like Windows 10, 8, 8.1, Vista, XP.
Method 1: Enable administrator account through command prompt
In method1, you’ll get manual commands to enable the administrator account. The following steps are for Windows 7, 8, 8.1, Windows 10, Vista, XP, Servers.
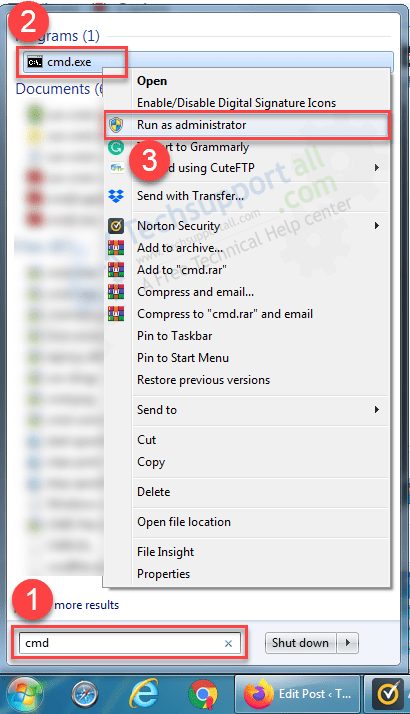
Step 1: Open Command Prompt with the administrator rights.
- Click on the Start button.
- Type “cmd” in the search bar.
- Right-click on the found cmd.exe as a search result and click on “Run as Administrator”. A command prompt window will open up with administrative privileges. Click here to get more details on how to open the command prompt with administrative rights.

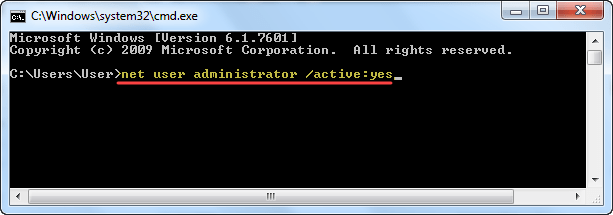
Step 2: Run following command in the command prompt.
- Type the following command into the command prompt.
- Press the enter button from your keyboard.
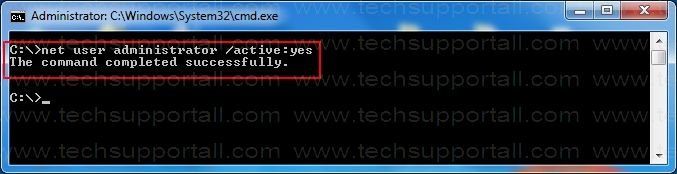
If you receive this message: “The command completed successfully” it, means your administrator account has been activated.
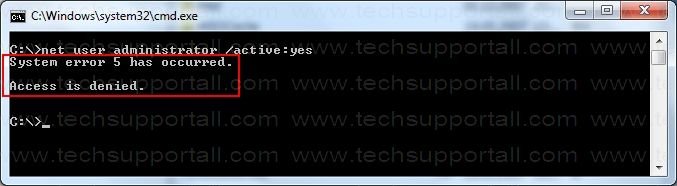
If you receive “Access is Denied” message it means either you did not open your command prompt with administrator privileges or your current user account doesn’t have administrative rights. In this case, we suggest you to just start the command prompt with “Run as administrator”. If you don’t have administrative rights, then you cannot enable the administrator account.
Here are the steps if you want to de-activate (Hide/disable) your Administrator Account.
- If you want to disable the administrator account then type the following command in CMD.
- When done, logout of your current account or reboot your computer.
- After rebooting, the Administrator account should not be present on your login screen.
Method 2: Enable Administrator Account through .bat file
If you are looking forward to doing it automatically, then you can easily do it by using the “.bat” file. Please follow the following steps: Your administrator account will be in an active state on the login screen.
- Download activate_administrator_user.bat
- Download de-activate_administrator_user.bat
- Step 1:Download “activate_administrator_user.bat”
- Step 2:Right-click on the activate_administrator_user.bat file and click on “ Run as Administrator ” It will flash the command prompt and make the administrator account automatically in the Windows login screen. If you want to disable the administrator account, then you can run its de-activator file: de-activate_administrator_user.bat
Hopefully, this article helped you enable or disable the administrator account (Windows built-in account) on your logon screen in Windows 10, 7, 8. If you have any questions or any suggestions regarding the issue, please let us know in the comment section down below.
Enable and Disable the Built-in Administrator Account
When manufacturing PCs, you can use the built-in Administrator account to run programs and apps before a user account is created.
NoteВ В This topic is about manufacturing PCs. For help with the admin account on your own PC, try one of these pages:
This account is used when you log into the system by using audit mode, or when you add scripts to the auditUser configuration pass.
Enabling the Built-in Administrator Account
You can use any of the following methods to enable the built-in Administrator account:
Use an answer file
You can enable the built-in Administrator account during unattended installations by setting the AutoLogon setting to Administrator in the Microsoft-Windows-Shell-Setup component. This will enable the built-in Administrator account, even if a password is not specified in the AdministratorPassword setting.
You can create an answer file by using Windows® System Image Manager (Windows SIM).
The following sample answer file shows how to enable the Administrator account, specify an Administrator password, and automatically log on to the system.
NoteВ В Both the Microsoft-Windows-Shell-Setup\ Autologon section and the Microsoft-Windows-Shell-Setup\ UserAccounts \ AdministratorPassword section are needed for automatic logon in audit mode to work. The auditSystem configuration pass must include both these settings.
The following XML output shows how to set the appropriate values:
To prevent having to enter a password for the built-in Administrator account after you complete the out-of-box experience, set Microsoft-Windows-Shell-Setup\ UserAccounts \ AdministratorPassword in the oobeSystem configuration pass.
The following XML output shows how to set the appropriate values:
For Windows Server® 2012, the built-in Administrator password must be changed at first logon. This prevents the built-in Administrator account from having a blank password by default.
Log on by using audit mode
If the computer has not yet gone through Out-Of-Box Experience (OOBE), you can enter the built-in Administrator account by re-entering audit mode. For more information, see Boot Windows to Audit Mode or OOBE.
Use the Local Users and Groups MMC (server versions only)
Change the properties of the Administrator account by using the Local Users and Groups Microsoft Management Console (MMC).
Open MMC, and then select Local Users and Groups.
Right-click the Administrator account, and then select Properties.
The Administrator Properties window appears.
On the General tab, clear the Account is Disabled check box.
Administrator access is now enabled.
Disabling the Built-in Administrator Account
For new installations, after the end user creates a user account in OOBE, the built-in Administrator account is disabled.
For upgrade installations, the built-in Administrator account remains enabled when there is no other active local administrator on the computer, and when the computer is not joined to a domain.
Use either of the following methods to disable the built-in administrator account:
Run the sysprep /generalize command
When you run the sysprep /generalize command, the next time that the computer starts, the built-in Administrator account will be disabled.
Use the net user command
Run the following command to disable the Administrator account:
You can run this command after you configure the computer and before you deliver the computer to a customer.
Original equipment manufacturers (OEMs) and system builders are required to disable the built-in administrator account before delivering the computers to customers. To do this, you can use either of the following methods.
Configuring the Built-in Administrator Password
Instructions
When you run the sysprep /generalize command on Windows Server 2012 and Windows Server 2008 R2, the Sysprep tool resets the built-in Administrator account password. The Sysprep tool only clears the built-in Administrator account’s password for server editions, not for client editions. The next time that the computer starts, Setup displays a prompt for a password.
NoteВ В In Windows ServerВ 2012, Windows ServerВ 2008В R2, and WindowsВ ServerВ 2008, the default password policy requires a strong password for all user accounts. To configure a weak password, you can use an answer file that includes the Microsoft-Windows-Shell-Setup\ UserAccounts \ AdministratorPassword setting. You cannot configure a weak password, either manually or by using a script such as the net user command.
Управление встроенной учетной записью Администратор в Windows 10
Как вы знаете, при установке Windows 10, система просит создать учетную запись пользователя и предоставляет этой учетной записи права локального администратора. Однако, в процессе установки Windows создается еще один скрытый встроенный аккаунт Администратор (Administrator), который по соображениям безопасности отключен. В этой статье мы поговорим о встроенной записи администратора Windows 10, для чего она нужна, как ее включить, заблокировать и сбросить пароль.
Встроенный аккаунт Administrator Windows
Аккаунт Administrator создается при установке Windows автоматически и используется для инициализации системы. Затем этот аккаунт отключается и пользователю предлагается создать собственную учетную запись, которая добавляется в локальную группу Administrators.
Учётная запись встроенного администратора имеет полные, не ограниченные права на компьютере. На эту учету не распространяется действие UAC (User Account Control), а все программы выполняются без запроса UAC (в этом ее важное отличие от пользовательских учетных записей с правами администратора). Встроенный Administrator в Windows в какой-то степени похож на root в Linux – у него есть максимальные права в системе (не System, конечно, но близкие).
По умолчанию в Windows 10 и Windows Server 2016 встроенный Administrator отключен. Этот аккаунт нельзя удалить или исключить из группы Администраторы.
Если вы загружаете Windows в безопасном режиме или режиме восстановления, аккаунт администратора включается автоматически.
Переименование аккаунта администратора несколько снижает риск его использования злоумышленниками или подбора пароля, но главная проблема в том, что его SID не меняется, что упрощает подбор. У встроенного аккаунта администратора всегда известный идентификатор безопасности SID S-1-5-domain-500.
Как включить встроенную учетную запись администратора в Windows 10?
Рассмотрим несколько простых способов включения встроенной учетной записи администратора в Windows 10.
Быстрее и проще всего активировать учетную запись администратора из командной строки (или консоли PowerShell), запущенной с повышенными привилегиями.
Для этого, выполните команду:
net user administrator /active:yes

Get-LocalUser -Name «Administrator» | Enable-LocalUser
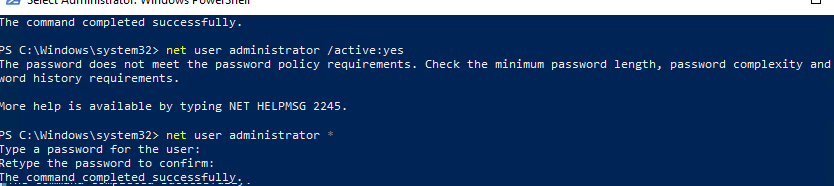
Как мы уже говорили ранее, в современных версиях Windows у аккаунта администратора не задан пароль. Если на компьютер действует доменная политика сложности паролей, при включении аккаунта администратора вы можете увидеть сообщение:
В этом случае перед включением аккаунта администратора нужно установить для него пароль:
net user administrator *
Рекомендуем использовать достаточно сложный и надежный пароль, можете сгенерировать его (пароль нужно будет указать дважды).
Если предыдущая команда пишет, что пользователь не найден “The user name could not be found”, скорее всего аккаунт администратора на компьютере переименован.
Вы можете определить, как на вашем компьютере называется аккаунт встроенного администратора по его известному SID (в конце он обязательно содержит -500). Воспользуйтесь командой:
wmic useraccount where «SID like ‘S-1-5-%-500′» get name
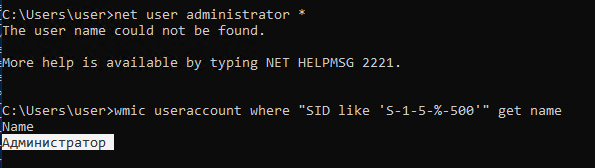
В этом примере используется русская версия Windows 10, поэтому встроенный аккаунт администратора называется “Администратор”.
Чтобы включить его, выполните:
net user Администратор/active:yes
Либо вы можете вывести список всех локальных учетных записей:
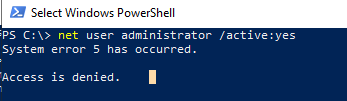
Если при попытке включить встроенного администратора Windows вы получаете ошибку Отказ в доступе ( System error 5 has occurred. Access is denied ), убедитесь, что консоль cmd.exe или powershell.exe запущена с правами администратора. Также проверьте, что ваша учетная запись входит в группу локальных администраторов компьютера.
Выведите список групп, в которых состоит ваш аккаунт:
В этом примере пользователь user1 не состоит в локальной группе Administrators, поэтому у него нет прав на включение аккаунта администратора.
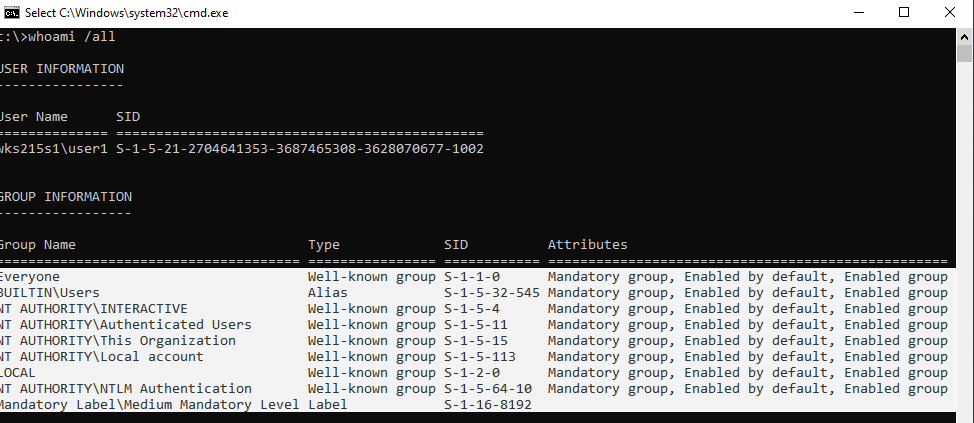
Вывести список пользователей в группе локальных администраторов в Windows можно так:
net localgroup administrators
или
net localgroup администраторы
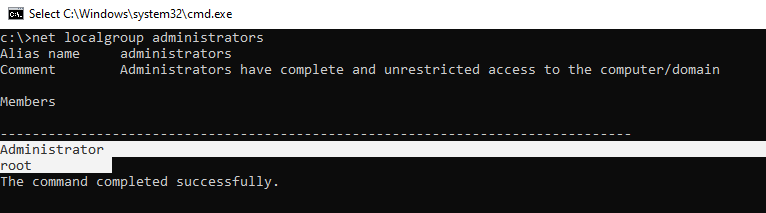
В данном примере в группу Administrators добавлены только два аккаунта. Если вы не знаете пароль ни для одного из них, значит у вас нет прав администратора на компьютере. Чтобы включить аккаунт встроенного администратора и предоставить своей учетной записи права локального админа, смотрите следующий раздел статьи.
Откройте MMC оснастку Local Users and Groups, набрав в строке поиска или командой строке lusrmgr.msc . В окне консоли разверните раздел Users. Откройте свойства учетной записи с именем Администратор и снимите чекбокс Account is Disabled (Учетная запись отключена). Сохраните изменения.
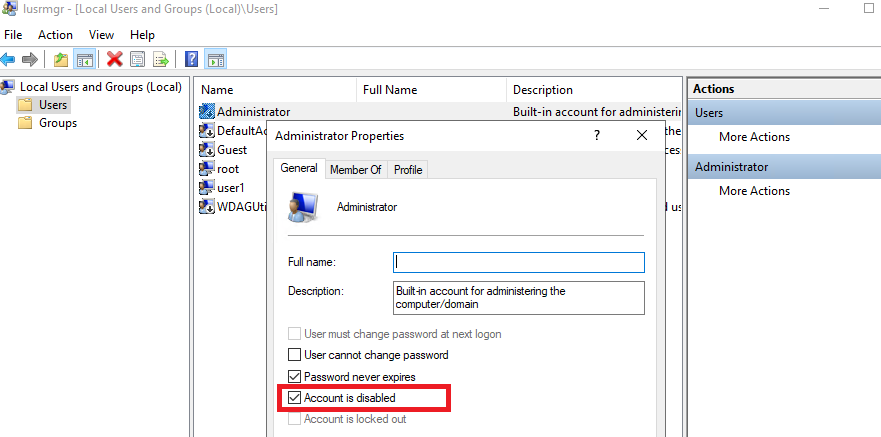
Учетная запись администратора теперь включена. В этой же консоли можно изменить его пароль, выбрав в контекстном меню Set Password.
Можно включить встроенную учетную запись администратора через локальную GPO. Откройте редактор локальной групповой политики gpedit.msc (или редактор локальной политик безопасности — secpol.msc ). Перейдите в раздел Computer Configuration -> Windows Settings -> Security Settings -> Local Policies -> Security Options. Найдите и отредактируйте политику Accounts: Administrator account status (Учетные записи. Состояние учетной записи ‘Администратор’), переведя ее в состояние Enable.
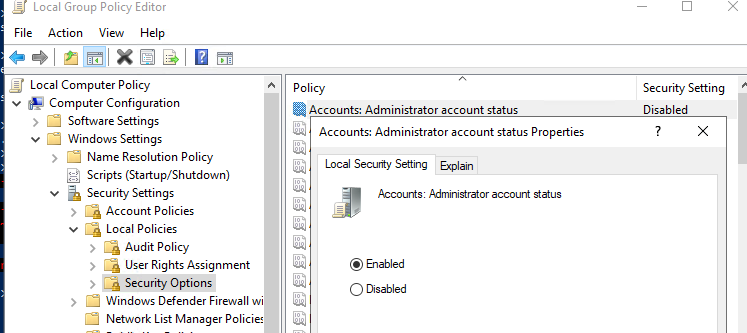
Обновите настройки групповых политик командой: gpupdate /force или просто перезагрузите компьютер.
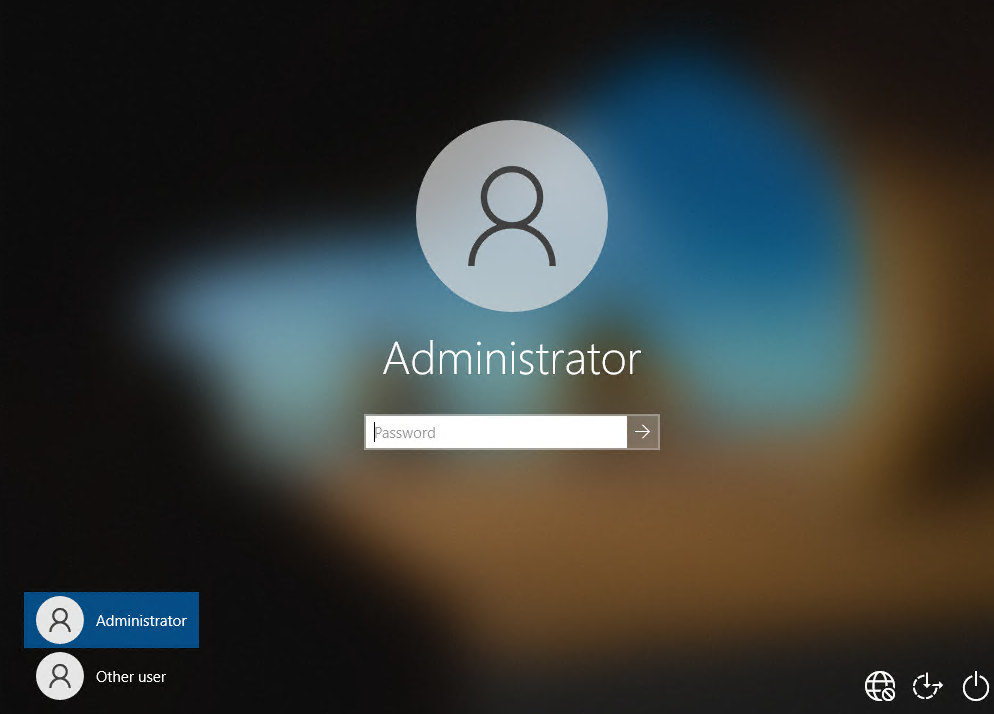
После включения учетной записи администратора любым из рассмотренных способов, она будет отображаться на экране входа в систему Windows.
Чтобы отключить аккаунт встроенного администратора, воспользуйтесь командой строкой:
net user administrator /active:no
net user администратор /active:no
Если вы включили администратора через политику Accounts: Administrator account status, придется ее отключить (или полностью сбросить все настройки локальной GPO).
Пропали права администратора Windows
Бывают ситуации, когда вы случайно заблокировали свою учетную запись пользователя с правами администратора. Рассмотрим, как в этом случае включить встроенного администратора или добавить свой аккаунт в группу локальных админов, когда невозможно войти в Windows.
Вам нужно загрузить ваш компьютер с LiviCD (но не диска восстановления MSDaRT) или установочного диска с Windows 10. Проще всего создать загрузочную USB флешку с установочным образом Windows 10 с помощью Media Creation Tool.
На экране начала установки Windows нажмите Shift + F10 . Откроется командная строка.
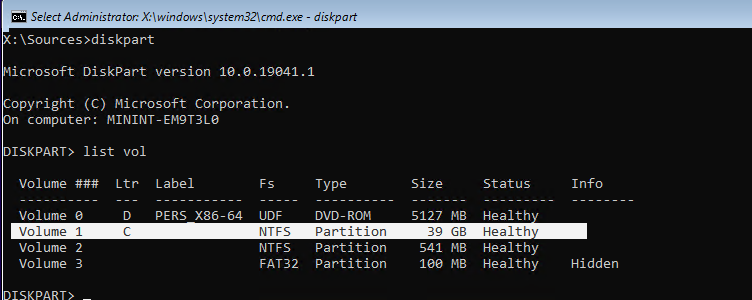
Теперь вам нужно определить на каком диске находится ваша Windows. Запустите diskpart и выполните list vol .
В моем примере видно, что Windows находится на диске C:. Именно эту букву диска я буду использовать в следующих командах. Чтобы завершить diskpart, наберите exit
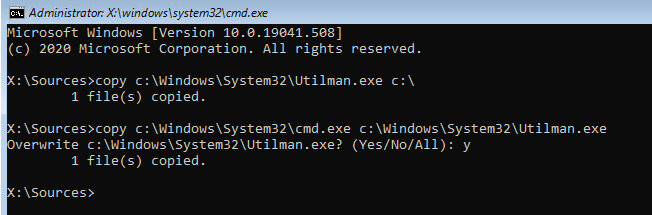
Выполните следующие команды, чтобы создать копию файла utilman.exe (апплет Центра специальных возможностей) и заменить его исполняемым файлом cmd.exe:
copy c:\windows\System32\utilman.exe c:\
copy c:\windows\System32\cmd.exe c:\windows\System32\utilman.exe
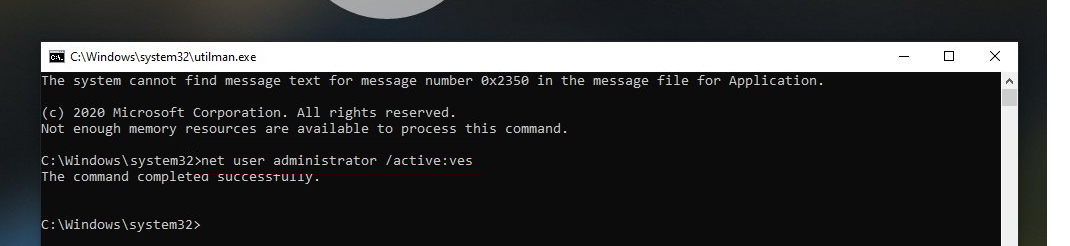
Выполните обычную загрузку Windows. На экране входа в систему (со списком учетных записей) нажмите сочетание Win+U.
Откроется окно командной строки с правами System. Чтобы добавить свою учетную запись в группу локальных администраторов, включить встроенного администратора Windows и сбросить его пароль, выполните команды:
net localgroup administrators user1 /add
net user Administrator /active:yes
net user administrator *
Теперь вы можете зайти на компьютер под Administrator или своим аккаунтом, которому назначены права локального админа.


