- Установка и настройка шифрования BitLocker в Windows10
- Функция шифрования в Windows 10
- Нужен ли ключ TPM для BitLocker?
- Аппаратное или программное шифрование
- Что делать, если мой компьютер несовместим с BitLocker
- How to use BitLocker Drive Encryption on Windows 10
- Things to know before diving into this guide
- How to check if your device has a TPM chip
- How to ensure you can turn on BitLocker without TPM
- How to turn on BitLocker on the Operating system drive
- BitLocker Drive Encryption options
- How to turn on BitLocker To Go
- Quick access to manage your BitLocker drive
- Wrapping things up
- More Windows 10 resources
- The Dell XPS 15 is our choice for best 15-inch laptop
- Halo: MCC’s live service elements make it better, not worse
- Microsoft’s Surface Duo is not ‘failing up’
- These are the best PC sticks when you’re on the move
Установка и настройка шифрования BitLocker в Windows10
Если на компьютере установлен Windows 10 Pro или Enterprise, то сможете использовать функцию BitLocker, которая шифрует данные на жестком диске. Узнаем подробнее, как ее настроить.

Функция шифрования в Windows 10
Одной из дополнительных функций, которые получаете с установкой версии Windows 10 Pro, в отличие от Home, является BitLocker. Она позволяет шифровать данные на жестком диске так, чтобы никто не смог получить к ним доступ без ввода пароля.
Если кто-то извлечет диск из вашего компьютера и попытается получить доступ к нему на другом, содержимое будет нечитаемым. Это полезный инструмент, чтобы уберечь личные данные от сторонних глаз, но есть недостатки и требования, которые должны знать перед активацией функции:
- BitLocker снижает производительность, особенно при использовании программного шифрования.
- Если забудете пароль, то не сможете получить доступ к своим файлам.
- Для лучшей защиты используется ключ запуска TPM.
- Следует также знать, что существует альтернатива BitLocker: SSD с полным шифрованием диска. Содержимое шифруется автоматически.
Как правило, шифрование не активировано по умолчанию, поэтому может потребоваться скачать программное обеспечение производителя (например, Samsung Magician). При установке программа может запросить форматирование диска, тогда нужно сохранить на другой носитель данные, а если этот системный раздел С, то и переустановить Windows.
Нужен ли ключ TPM для BitLocker?
Ключ не обязателен, BitLocker будет использовать программный метод, который не так безопасен.
Программный режим снижает производительность чтения и записи. При аппаратном шифровании нужно подключать USB устройство с ключом и вводить пароль при каждой загрузке компьютера. При использовании ключа нужно, чтобы BIOS поддерживал загрузку с USB устройств.
Чтобы проверить соответствует ли ваш компьютер требованиям BitLocker в Windows 10 версии 1803 и выше – откройте Центр безопасности Защитника Windows, выберите вкладку Безопасность устройства.
Чтоб включить защиту откройте Панель управления и перейдите в раздел Шифрование диска BitLocker.
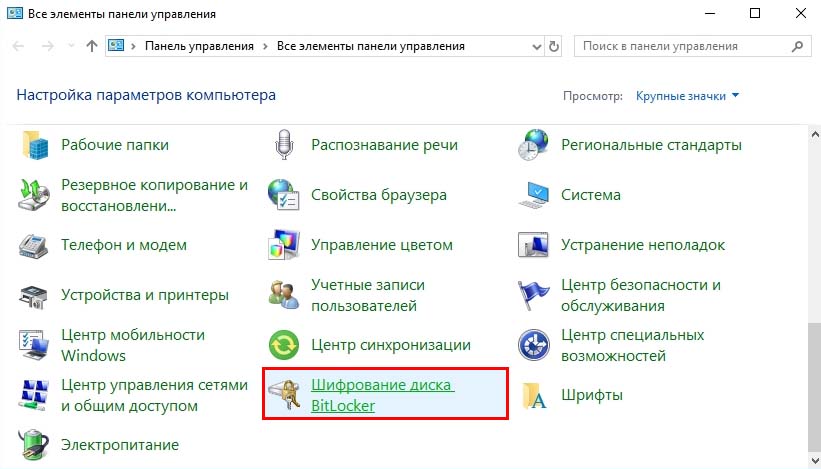
Выберите диск из списка, на котором хранится личная информация и кликните на ссылку «Включить BitLocker».

Еще способ включить шифрование – открыть Проводник, перейти на вкладку «Этот компьютер» и кликнуть правой кнопкой мыши на любом жестком диске.
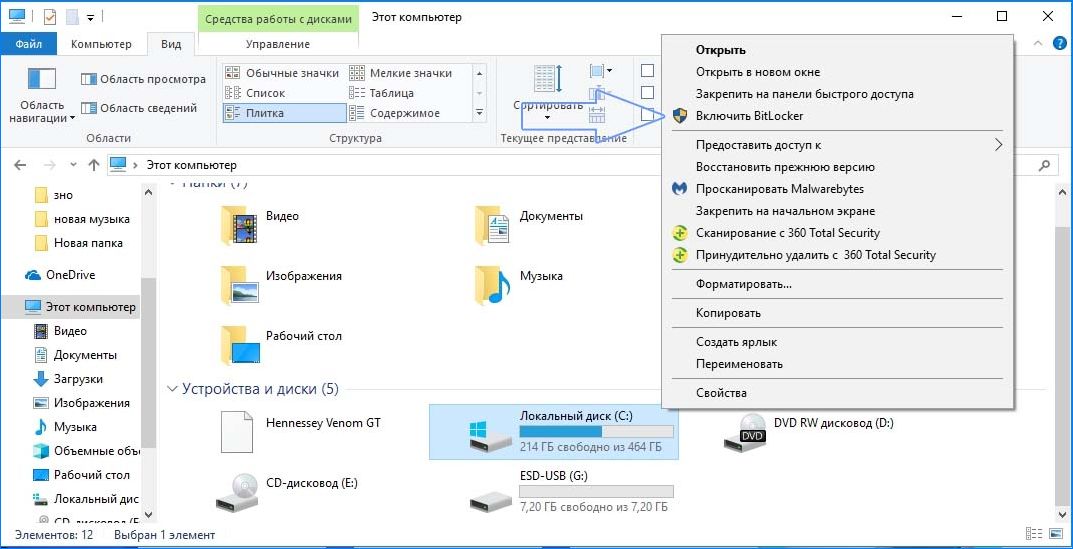
После следуйте инструкциям на экране, чтобы настроить дисковую защиту.
Если диск уже достаточно заполнен, процесс займет много времени
После активации защиты появится значок замка на диске в Проводнике.
Аппаратное или программное шифрование
Функция поддерживает оба метода. Если включить аппаратное шифрование TPM, то можно зашифровать весь диск.
Когда решили зашифровать том (то есть один или несколько разделов), воспользуйтесь программным шифрованием. Можно использовать программный метод, если компьютер не соответствует требованиям BitLocker.
Что делать, если мой компьютер несовместим с BitLocker
Если вместо запуска мастера установки на экране видите уведомление, подобное приведенному ниже, то его можно обойти.
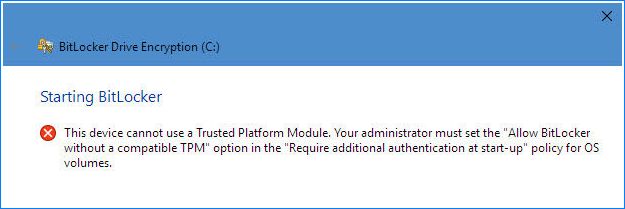
Уведомление не обязательно означает, что оборудование несовместимо. Может быть не включены соответствующие параметры в BIOS. Откройте Bios / UEFI найдите параметр TPM, и убедитесь, что включен.
Если компьютер собран на материнской плате AMD, то параметр находится в разделе PSP. Это Платформа Безопасности Процессора, интегрированная в сам процессорный чип, например, Ryzen, который имеет модуль безопасности вместо TPM.
Обратите внимание, в январе 2018 было обнаружено, что AMD PSP имеет брешь в безопасности, поэтому обновления микрокода (доставляются через обновления безопасности Windows) отключены. В этом случае не сможете использовать аппаратный режим.
При активации программного режима, при котором снижается производительность чтения / записи, воспользуйтесь редактором локальных групповых политик.
Нажмите сочетание клавиш Windows+R, введите команду gpedit.msc.
В левой панели перейдите по пути:
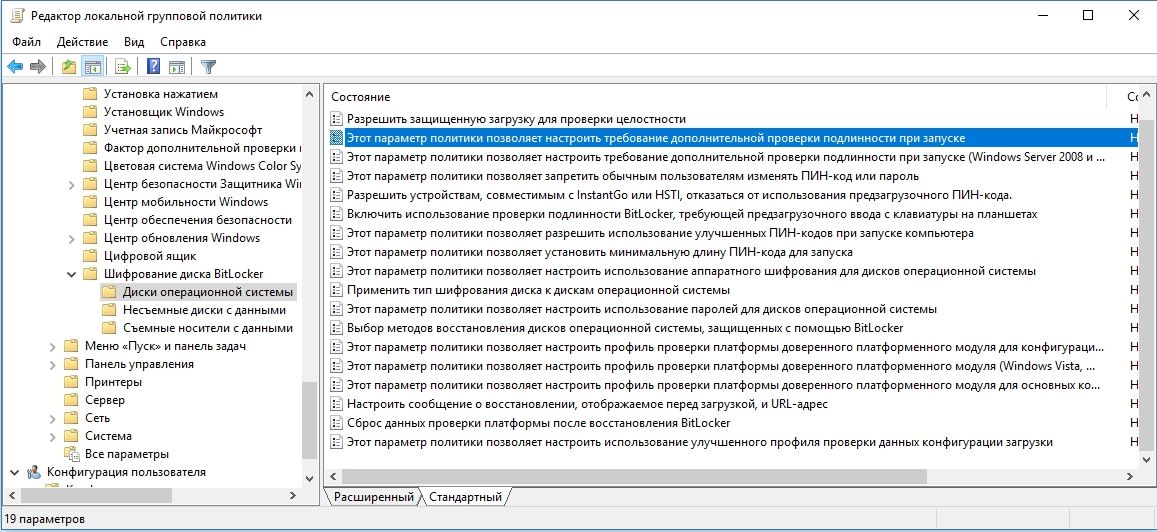
Конфигурация компьютера — Административные шаблоны — Компоненты Windows — Шифрование диска BitLocker — Диски операционной системы.
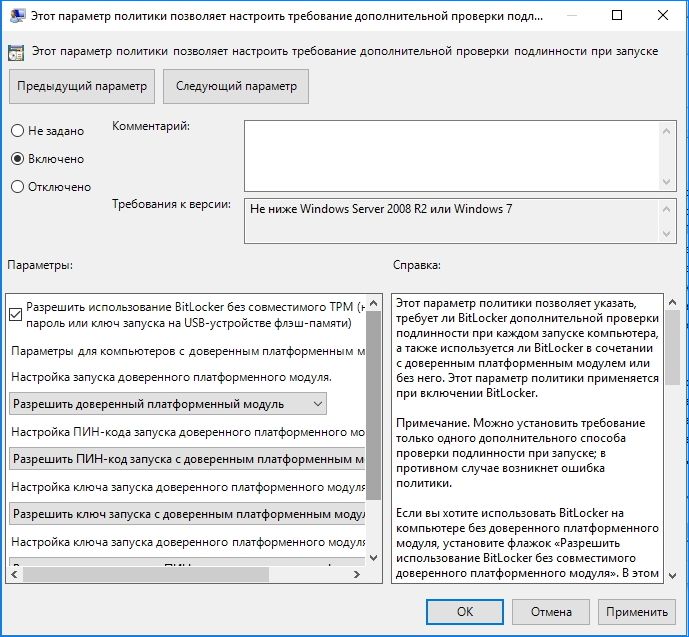
В правой части окна кликните дважды на пункте «Этот параметр политики позволяет настроить требование дополнительной проверки подлинности при запуске». В открывшемся окне установите значение «Включить» и отметьте «Разрешить использование BitLocker без совместимого TPM».
How to use BitLocker Drive Encryption on Windows 10

When you store sensitive data on your computer, it’s crucial that you take the necessary steps to protect that data (especially if you use a laptop or tablet). This is not just to stop the NSA from accessing your files, but it’s more about preventing your private data from falling into the wrong hands in the slightly change you lose your device, or it gets stolen.
On way you can protect your data is by using encryption. Briefly, encryption is basically the process of making any type of data unreadable by anyone without proper authorization. If you use encryption to scramble your data, it will continue to be unreadable even after sharing it with other people. In other words, only you with the right encryption key can make the data readable again.
Windows 10, similar to previous versions, includes BitLocker Drive Encryption, a feature that allows you to use encryption on your PC’s hard drive and on removable drives to prevent prying eyes from snooping into your sensitive data.
In this Windows 10 guide, we’ll walk you through the steps to set up BitLocker on your PC to make sure your sensitive data stays secure.
Things to know before diving into this guide
- BitLocker Drive Encryption is available only on Windows 10 Pro and Windows 10 Enterprise.
- For best results your computer must be equipped with a Trusted Platform Module (TPM) chip. This is a special microchip that enables your device to support advanced security features.
- You can use BitLocker without a TPM chip by using software-based encryption, but it requires some extra steps for additional authentication.
- Your computer’s BIOS must support TPM or USB devices during startup. If this isn’t the case, you’ll need to check your PC manufacturer’s support website to get the latest firmware update for your BIOS before trying to set up BitLocker.
- Your PC’s hard drive must contain two partitions: a system partition, which contains the necessary files to start Windows, and the partition with the operating system. If your computer doesn’t meet the requirements, BitLocker will create them for you. Additionally, the hard drive partitions must be formatted with the NTFS file system.
- The process to encrypt an entire hard drive isn’t difficult, but it’s time-consuming. Depending the amount of data and size of the drive, it can take a very long time.
- Make sure to keep your computer connected to an uninterrupted power supply throughout the entire process.
Important: While BitLocker is a stable feature on Windows 10, as any significant change you make to your computer has its risks. It’s always recommended that you make a full backup of your system before proceeding with this guide.
How to check if your device has a TPM chip
- Use the Windows key + X keyboard shortcut to open the Power User menu and select Device Manager.
Expand Security devices. If you have a TPM chip, one of the items should read Trusted Platform Module with the version number.

Note: Your computer must have a TPM chip version 1.2 or later to support BitLocker.
Alternatively, you can also check your PC manufacturer’s support website to find out if your device includes the security chip, and for instructions to enable the chip in the BIOS (if applicable).
Devices, such as Surface Pro 3, Surface Pro 4, or Surface Book come with the TMP chip to support BitLocker encryption.
How to ensure you can turn on BitLocker without TPM
If your computer doesn’t include a Trusted Platform Module chip, you won’t be able to turn on BitLocker on Windows 10. In this is your case, you can still use encryption, but you’ll need to use the Local Group Policy Editor to enable additional authentication at startup.
- Use the Windows key + R keyboard shortcut to open the Run command, type gpedit.msc, and click OK.
- Under Computer Configuration, expand Administrative Templates.
- Expand Windows Components.
- Expand BitLocker Drive Encryption and Operating System Drives.
On the right side, double-click Require additional authentication at startup.
Click OK to complete this process.
![]()
How to turn on BitLocker on the Operating system drive
Once you made sure BitLocker can be properly enabled on your computer, follow these steps:
- Use the Windows key + X keyboard shortcut to open the Power User menu and select Control Panel.
- Click System and Security.
Click BitLocker Drive Encryption.
Under BitLocker Drive Encryption, click Turn on BitLocker.
Choose how you want to unlock your drive during startup: Insert a USB flash drive or Enter a password. For the purpose of the guide, select Enter a password to continue.
Enter a password that you’ll use every time you boot Windows 10 to unlock the drive, and click Next to continue. (Make sure to create a strong password mixing uppercase, lowercase, numbers, and symbols.)
You will be given the choices to save a recovery key to regain access to your files in case you forget your password. Options include:
- Save to your Microsoft account
- Save to a USB flash drive
- Save to a file
- Print the recovery
Select the option that is most convenient for you, and save the recovery key in a safe place.
Quick Tip: If you trust the cloud, you can choose to save your recovery key in your Microsoft account using the Save to your Microsoft account option. In which case, you can retrieve your encryption key at this location: https://onedrive.live.com/recoverykey.
Click Next to continue.
Select the encryption option that best suits your scenario:
- Encrypt used disk space only (faster and best for new PCs and drives)
- Encrypt entire drive (slower but best for PCs and drives already in use)
Choose between the two encryption options:
- New encryption mode (best for fixed drives on this device)
Compatible mode (best for drives that can be moved from this device)
On Windows 10 version 1511, Microsoft introduced support for XTS-AES encryption algorithm. This new encryption method provides additional integrity support and protection against new attacks that use manipulating cipher text to cause predictable modifications in clear text. BitLocker supports 128-bit and 256-bit XTS AES keys.
Click Next to continue.
Make sure to check the Run BitLocker system check option, and click Continue.
On reboot, BitLocker will prompt you to enter your encryption password to unlock the drive. Type the password and press Enter.
After rebooting, you’ll notice that your computer will quickly boot to the Windows 10 desktop. However, if you go to Control Panel > System and Security > BitLocker Drive Encryption, you’ll see that BitLocker is still encrypting your drive. Depending on the option you selected and the size of the drive, this process can take a long time, but you’ll still be able to work on your computer.
Once the encryption process completes, the drive level should read BitLocker on.
You can verify that BitLocker is turned on by the lock icon on the drive when you open This PC on File Explorer.
BitLocker Drive Encryption options
When BitLocker is enabled on your main hard drive, you’ll get a few additional options, including:
- Suspend protection: When you’re suspending protection your data won’t be protected. Typically, you would use this option when applying a new operating system, firmware, or hardware upgrade. If you don’t resume the encryption protection, BitLocker will resume automatically during the next reboot.
- Back up your recovery key: If you lose your recovery key, and you’re still signed into your account, you can use this option to create a new backup of the key with the options mentioned on step 6.
- Change password: You can use this option to create a new encryption password, but you’ll still need to supply the current password to make the change.
- Remove password: You can’t use BitLocker without a form of authentication. You can remove a password only when you configure a new method of authentication.
- Turn off BitLocker: In the case, you no longer need encryption on your computer, BitLocker provides a way to decrypt all your files. However, make sure to understand that after turning off BitLocker your sensitive data will no longer be protected. In addition, decryption may take a long time to complete its process depending on the size of the drive, but you can still use your computer.
How to turn on BitLocker To Go
BitLocker is not an encryption feature that you can enable globally on every drive connected to your computer at once. It has two part: you can use BitLocker Drive Encryption to encrypt your sensitive data on the main hard drive of your PC, and then you can use BitLocker To Go. This last feature will help you to use encryption on remove drives and secondary hard drives connected to your computer.
To turn on BitLocker To Go on a removable drive do the following:
- Connect the drive you want to use with BitLocker.
- Use the Windows key + X keyboard shortcut to open the Power User menu and select Control Panel.
- Click System and Security.
Click BitLocker Drive Encryption.
Click the Turn on BitLocker link.
Click Next to continue.
You will be given the choices to save a recovery key to regain access to your files in case you forget your password. Options include:
- Save to your Microsoft account
- Save to a file
- Print the recovery
Select the option that is most convenient for you, and click Next.
Choose the encryption option that best suits your scenario:
- Encrypt used disk space only (faster and best for new PCs and drives)
- Encrypt entire drive (slower but best for PCs and drives already in use)
Select between the two encryption options:
- New encryption mode (best for fixed drives on this device)
Compatible mode (best for drives that can be moved from this device)
In this step is recommended that you select the «Compatible mode,» as it will ensure you can unlock the drive if you move it to another computer running a previous version of the operating system.
Click Start encrypting to finish the process.
When encrypting a storage try to start with an empty removable media, as it’ll speed up the process, then new data will encrypt automatically.
In addition, similar to BitLocker Drive Encryption, you will get the same additional options using BitLocker To Go, plus a few more, including:
- Add smart card: This option will allow you to configure a smart card to unlock the removable drive.
- Turn on auto-unlock: Instead of having to type a password every time you re-connect the removable drive, you can enable auto-unlock to access your encrypted data without entering a password.
Quick access to manage your BitLocker drive
Whether you turn on BitLocker for your system hard drive or removable drive, you can always get quick access to the BitLocker settings for a particular drive using the following steps:
- Use the Windows key + E keyboard shortcut to open File Explorer.
- Click This PC from the left pane.
Right-click the encrypted drive and select Manage BitLocker.
Wrapping things up
While Microsoft only includes BitLocker on Windows 10 Pro and Enterprise, this is one of those features that should be standard in every edition, including on Windows 10 Home. Even more, considering that we continue to move into a digital world, where every day, we’re creating more sensitive data on our computers than ever before, and data encryption is crucial to protect our data from prying eyes.
It’s worth pointing out that enabling data encryption may slightly slow down the performance of your device due to the encryption process that will continue to run in the background. However, it’s a feature worth using to keep your sensitive data secure.
Do you use data encryption on your computer? Tell us in the comments below.
More Windows 10 resources
For more help articles, coverage, and answers on Windows 10, you can visit the following resources:
We may earn a commission for purchases using our links. Learn more.
![]()
The Dell XPS 15 is our choice for best 15-inch laptop
For a lot of people, a 15-inch laptop is a perfect size that offers enough screen for multitasking, and in a lot of cases, some extra performance from powerful hardware. We’ve rounded up the best of the best at this size.
![]()
Halo: MCC’s live service elements make it better, not worse
Halo: The Master Chief Collection is more popular than ever, but some fans don’t agree with the live service approach 343 Industries has taken with it. Here’s why those elements are, at the end of the day, great for the game and for Halo overall.
![]()
Microsoft’s Surface Duo is not ‘failing up’
Microsoft announced this week that it was expanding Surface Duo availability to nine new commercial markets. While Surface Duo is undoubtedly a work in progress, this is not a sign of a disaster. It’s also doesn’t mean that Surface Duo is selling a ton either. Instead, the reason for the expansion is a lot more straightforward.
![]()
These are the best PC sticks when you’re on the move
Instant computer — just add a screen. That’s the general idea behind the ultra-portable PC, but it can be hard to know which one you want. Relax, we have you covered!


