- HomeGroup removed from Windows 10 (Version 1803)
- What’s changed?
- What hasn’t changed?
- How to Create and Join a HomeGroup in Windows 10
- Setting Up a HomeGroup in Windows 7, Windows 8, and Windows 10
- Joining a Homegroup
- Browse Homegroups
- Troubleshooting HomeGroups
- Managing Your HomeGroups
- Conclusion
- HomeGroup from start to finish
- What’s a homegroup?
- Create a homegroup
- Add your other PCs to the homegroup
- Find homegroup files
- To get to shared libraries on other homegroup PCs
- Share libraries and devices, or stop sharing them
- To share devices and entire libraries
- To share individual files or folders
- Share a printer
- To share or stop sharing your printer with the homegroup
- To print to a homegroup printer
- Change homegroup settings if needed
- What’s a homegroup?
- Create a homegroup
- To create a homegroup
- Add your other PCs to the homegroup
- Find homegroup files
- To get to shared libraries on other homegroup PCs
- Share libraries and devices, or stop sharing them
- To share devices and entire libraries
- To share individual files or folders
- Share a printer
- To share your printer with the homegroup
- To print to a homegroup printer
- Change homegroup settings if needed
- Change the homegroup password
- What’s a homegroup?
- Create a homegroup
- Add your other PCs to the homegroup
- Access homegroup files
- To access files or folders on other homegroup PCs
- Control which files or folders are shared with your homegroup
- To prevent a library from being shared
- To prevent specific files or folders from being shared
- Share printers
- To share your printer with the homegroup
- To automatically connect to a homegroup printer
- To manually connect to a homegroup printer
- Change homegroup settings if needed
HomeGroup removed from Windows 10 (Version 1803)
HomeGroup has been removed from Windows 10 (Version 1803). However, even though it has been removed, you can still share printers and files by using features that are built into Windows 10.
To learn how to share printers in Windows 10, see Share your network printer.
To learn how to share files, see Share files in File Explorer.
Here’s more info about what’s changed and what hasn’t.
What’s changed?
After you update your PC to Windows 10 (Version 1803):
HomeGroup won’t appear in File Explorer.
HomeGroup won’t appear in Control Panel, which means that you can’t create, join, or leave a homegroup.
HomeGroup won’t appear on the Troubleshoot screen when you go to Settings > Update & Security > Troubleshoot .
You won’t be able to share new files and printers using HomeGroup.
Note: The HomeGroup (view) and HomeGroup (view and edit) options still appear in Windows 10 (Version 1803 or later) when you right-click a folder in File Explorer and then point to Give access to. However, neither option does anything. To share a file or folder, select Specific people from the same shortcut menu instead.
What hasn’t changed?
Any folders, files, or printers that you previously shared using HomeGroup will continue to be shared. This means that:
Shared network folders will still be available. You can open them in File Explorer by typing the name of the PC and the shared folder name in this format: \\homePC\SharedFolderName
If one user account was set up on a PC for sharing, you can continue using that one account for sharing.
You can still get to any shared printers through the Print dialog box.
How to Create and Join a HomeGroup in Windows 10

The Windows HomeGroup feature lets you share files, folders, and printers with other Windows computers connected to your local area network. Each computer connected to the HomeGroup can share its library of pictures, music, videos, documents and printers with other computers on the same HomeGroup. Any computer running Windows 7 or later can join a HomeGroup.
This tutorial is for setting up a Windows Homegroup in Windows 10, but the steps are also applicable for Windows 7 and Windows 8/8.1. You can also check out our previous articles: Windows 7: How To Set Up Homegroup Sharing and Set Up Windows 8 HomeGroup Sharing with a Windows 7 PC.
Setting Up a HomeGroup in Windows 7, Windows 8, and Windows 10
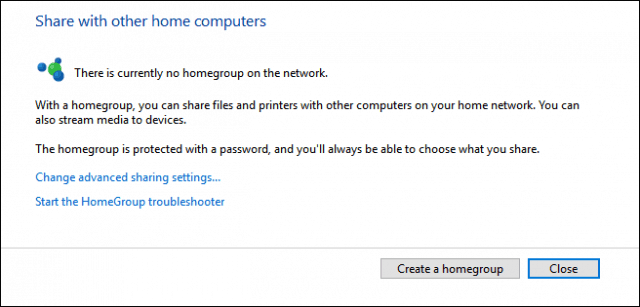
To create your first HomeGroup, click Start > Settings > Networking & Internet > Status > HomeGroup. This will open the HomeGroups control panel.

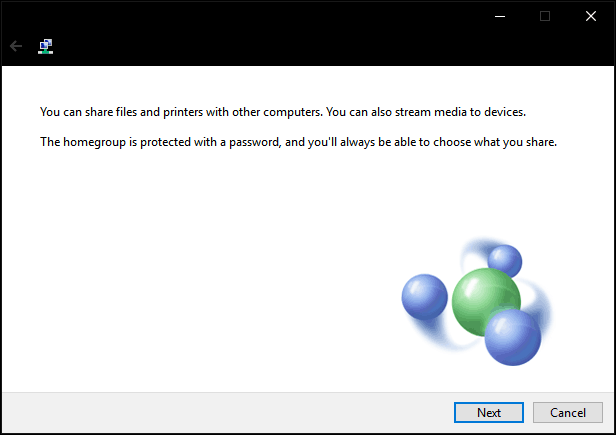
Click Create a homegroup to begin.
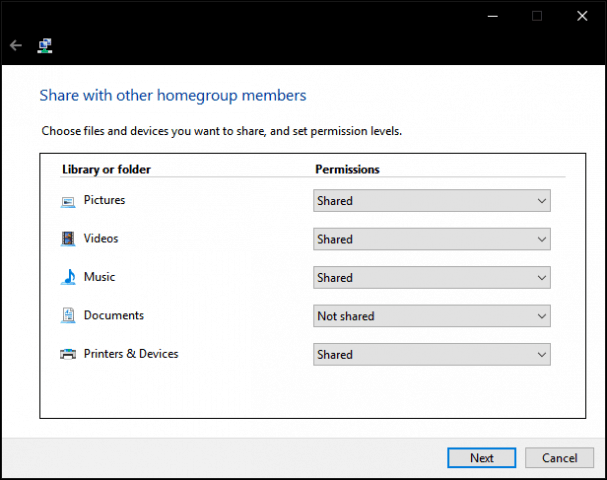
Click in the list box under Permissions then choose the items you would like to share with other computers on your home network. These items are your libraries for your Windows user account. Read our article on how libraries work in Windows if you’re not sure what’s in these.
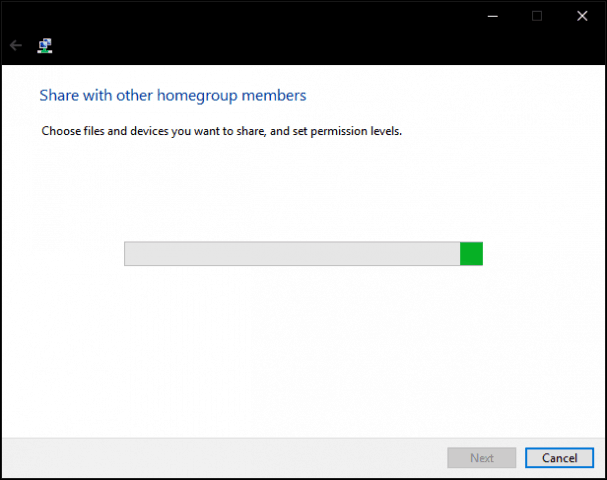
Wait while Windows configures your selections.
A password will be generated. Write this down; you’ll need to enter this when joining other computers to this homegroup.

Joining a Homegroup
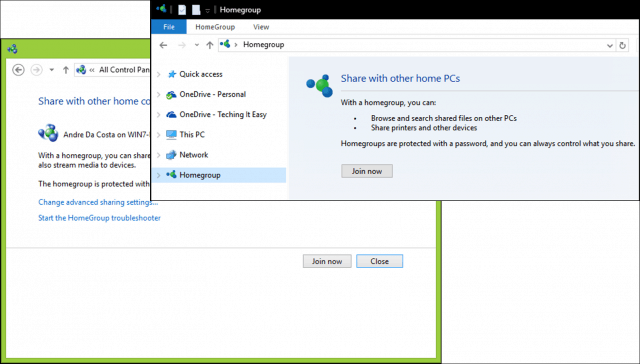
Next, open File Explorer, click Homegroup in the Navigation pane then click Join now. If you don’t see HomeGroups in File Explorer, open Settings > Network & Internet > Status > Homegroup and click Join now. If you still don’t see Homegroups, read the Troubleshooting Homegroups section below.
Choose what you want to share and then click Next.
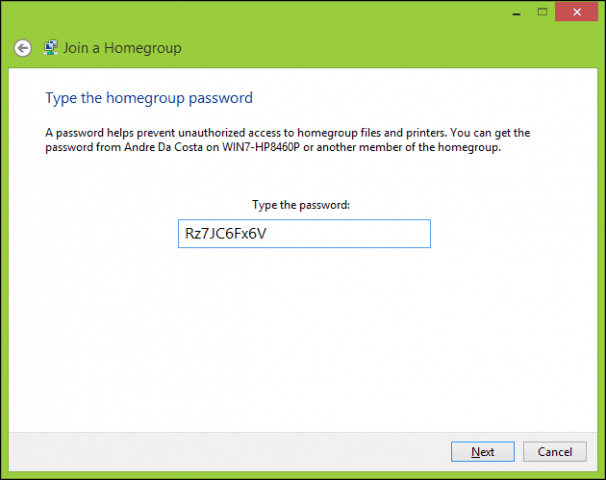
Enter the password generated earlier then click Next. This might take a while, so hang tight while Windows configures your homegroups permissions. If Windows no longer detects a homegroup, close the wizard then try again.
Browse Homegroups
To view the contents of a homeGroup, open File Explorer, expand homegroup then choose one of the available homegroups listed.

Troubleshooting HomeGroups
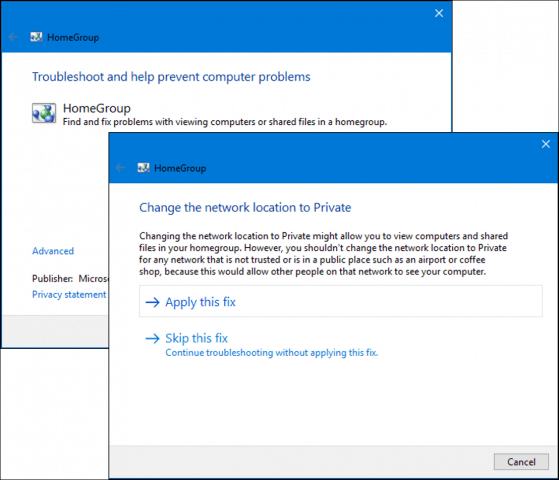
Before you can get HomeGroups up and running, your network environment must be set to Private. To do this, right-click the network icon in the Notification Area, click Open Network and Sharing Center, click HomeGroup in the left-hand corner of the window. Click the Start the HomeGroup troubleshooter link to begin troubleshooting then follow the on-screen instructions. You might also need to run the HomeGroup troubleshooter on the computer where you created the HomeGroup.
There’s another way you can configure your network as private: open Network and Sharing Center and click Change advanced sharing settings. Expand Private, select Turn off network discovery then click Save changes.

Open Network Explorer, then click the Network discovery is turned off banner then choose Private.

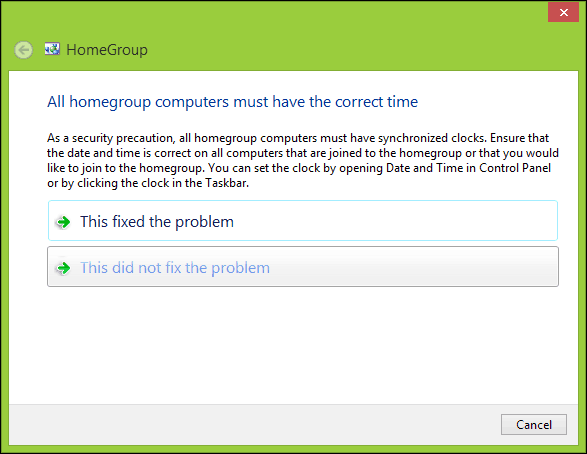
Another issue I discovered that can prevent HomeGroups from being detected is the date and time. You should ensure computers connecting to HomeGroups have synchronized clocks. Check out our article for instructions on how to adjust your date and time.
If you still experience problems connecting to HomeGroup, Windows Firewall might be blocking it. Click Start, type: Windows Firewall and hit Enter. Click Allow an app or feature through Windows Firewall, click Change settings, make sure HomeGroup is checked, then click OK. Repeat these steps on each computer.

Managing Your HomeGroups
If at any time you would like to modify or change the settings of your HomeGroups, open Settings > Network & Internet > Status > HomeGroups. There you can update your HomeGroups password, change what type of media gets shared with other computers or leave the HomeGroup.

Conclusion
As you can see, getting all your Windows computers on the same page with HomeGroups can sometimes be a tricky process. But once you’ve set up your HomeGroup, sharing libraries and printers among your connected computers is incredibly easy and convenient. This is a great way to share photos with all your computers from your main PC or access a music library from a centralized location.
Do you use HomeGroups? Let us know in the comments.
HomeGroup from start to finish
HomeGroup has been removed from Windows 10 (Version 1803). For more info, see HomeGroup removed from Windows 10 (Version 1803).
After you install the update, you won’t be able to share files and printers using HomeGroup. However, you can still do these things by using features that are built into Windows 10.
To learn how to share printers in Windows 10, Share your network printer.
To learn how to share files, see Share files in File Explorer.
What’s a homegroup?
A homegroup is a group of PCs on a home network that can share files and printers. Using a homegroup makes sharing easier. You can share pictures, music, videos, documents, and printers with other people in your homegroup.
You can help protect your homegroup with a password, which you can change at any time. Other people can’t change the files that you share unless you give them permission to do so.
After you create or join a homegroup, you select the libraries (for example, My Pictures or My Documents) that you want to share. You can prevent specific files or folders from being shared, and you can share additional libraries later.
HomeGroup is available in Windows 7, Windows 8.1, Windows RT 8.1, and Windows 7. You can join a homegroup on a PC running Windows RT 8.1, but you can’t create a homegroup or share content with the homegroup. In Windows 7 Starter and Windows 7 Home Basic, you can join a homegroup, but you can’t create one.
Create a homegroup
Open HomeGroup by typing homegroup in the search box on the taskbar, and then selecting HomeGroup.
Select Create a homegroup > Next.
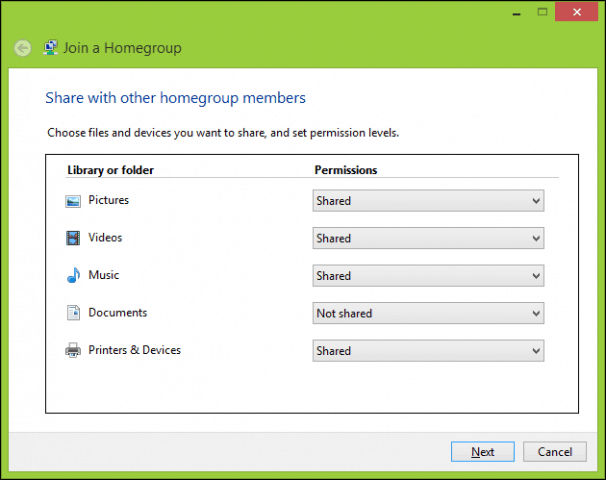
Select the libraries and devices you want to share with the homegroup, and then select Next.
A password will appear—print it or write it down. You’ll need this password to add other PCs to your homegroup.
If a homegroup already exists on your network, you’ll be asked to join it instead of creating a new one.
If your PC belongs to a domain, you can join a homegroup but you can’t create one. You can get to libraries and devices on other homegroup PCs, but you can’t share your own libraries and devices with the homegroup.
You can join a homegroup on a PC running Windows RT 8.1, but you can’t create a homegroup or share content with the homegroup.
After you create a homegroup, other PCs running Windows 7, Windows 8.1, Windows RT 8.1, or Windows 7 on your network can join it.
Add your other PCs to the homegroup
After someone on your network creates a homegroup, the next step is to join it. You’ll need the homegroup password, which you can get from any homegroup member. All user accounts except the Guest account will belong to the homegroup. Each person controls access to his or her own libraries.
To join a homegroup, follow these steps on the PC that you want to add to the homegroup:
Note: If you don’t see a space to enter a password, there might not be a homegroup available. Make sure that someone has created a homegroup, or you can create a homegroup yourself.
Open HomeGroup by typing homegroup in the search box on the taskbar, and then selecting HomeGroup.
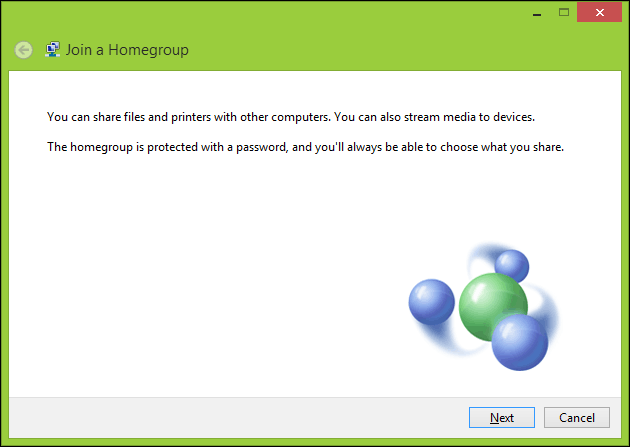
Select Join now > Next.
Select the libraries and devices you want to share with the homegroup, and then select Next.
Type the homegroup password in the box, and then select Next.
Find homegroup files
PCs that belong to your homegroup will appear in File Explorer.
To get to shared libraries on other homegroup PCs
Open File Explorer, by typing file explorer in the search box in the taskbar, and then selecting File Explorer.
Under Homegroup, select the user account name of the person whose libraries you want to get to.
In the file list, double-tap or double-click the library you want to get to, and then double-tap or double-click the file or folder you want.
PCs that are turned off, hibernating, or asleep won’t be available as part of the homegroup.
If you’ve made homegroup files or folders available offline, and then you disconnect from the network, the files or folders will no longer be visible in the Libraries window. To find them, open the Network folder.
Share libraries and devices, or stop sharing them
When you create or join a homegroup, you select the libraries and devices you want to share with other people in the homegroup. Libraries are initially shared with Read access, which means that other people can look at or listen to what’s in the library, but they can’t change the files in it. You can adjust the level of access at any time, and you can exclude specific files and folders from sharing.
Only those people who belong to the homegroup can see shared libraries and devices. You can choose to share libraries, devices, or individual files and folders with specific people in your homegroup or with everyone.
Note: Keep in mind that children who use homegroup PCs will have access to all shared libraries and devices.
To share devices and entire libraries
Open HomeGroup by typing homegroup in the search box on the taskbar, and then select HomeGroup.
Select Change what you’re sharing with the homegroup.
Select the libraries and devices you want to share with homegroup, and then select Next > Finish.
To share individual files or folders
Open File Explorer by typing file explorer in the search box in the taskbar, and then selecting File Explorer.
Select the item, and then select the Share tab.
Choose an option in the Share with group. There are different Share with options depending on whether your PC is connected to a network and what kind of network it is.
To share items with a particular person, choose that person’s account.
To share with all the members of your homegroup, choose one of the Homegroup options. (Select libraries to share with all the members of your homegroup by opening HomeGroup.)
To prevent a file or folder from being shared with anyone, select the Share tab, and then select Stop sharing.
To change the level of access to a file or folder, select the Share tab, and then select either Homegroup (view) or Homegroup (view and edit).
If you need to share a location such as a drive or system folder, select the Advanced sharing option.
Share a printer
Printers that are connected with a USB cable can be shared with a homegroup. After the printer is shared, you can get to it through the Print dialog box in any program, just like a printer that’s directly connected to your PC.
To share or stop sharing your printer with the homegroup
Open HomeGroup by typing homegroup in the search box on the taskbar, and then select HomeGroup.
Select Change what you’re sharing with the homegroup.
Next to Printers & Devices, select Shared or Not shared (this will be set to Shared by default).
Select Next > Finish.
To print to a homegroup printer
Open the Print menu of the app you want to print from (like Microsoft Word), select the homegroup printer, and then select Print.
Note: The PC that the printer is connected to must be turned on to use the printer.
Change homegroup settings if needed
At any time after you set up your homegroup, you can change settings by following these steps:
Open HomeGroup by typing homegroup in the search box on the taskbar, and then select HomeGroup.
Select the settings you want.
These are the settings you can change:
Change what you’re sharing with the homegroup
Select the libraries, printers, and devices you want to share with your homegroup.
Allow all devices on this network such as TVs and game consoles to play my shared content
Use this setting to share content with all devices on your network. For example, you can share pictures with a digital picture frame, or share music with a network media player.
Note: Shared content isn’t secure. Anyone connected to your network can receive your shared content.
View or print the homegroup password
View the password for your homegroup. If someone else wants to join the homegroup, give them this password.
Change the password
Change your homegroup password. All other PCs in your homegroup will need to type in the new password you generate.
Leave the homegroup
Leave your homegroup. You can’t delete a homegroup, but if everyone leaves the homegroup it will be gone. You can then set up a new homegroup if you’d like.
Change advanced sharing settings
Change network discovery, file and printer sharing, HomeGroup connection, and advanced security options.
Start the HomeGroup troubleshooter
Troubleshoot homegroup problems.
What’s a homegroup?
A homegroup is a group of PCs on a home network that can share files and printers. Using a homegroup makes sharing easier. You can share pictures, music, videos, documents, and printers with other people in your homegroup.
You can help protect your homegroup with a password, which you can change at any time. Other people can’t change the files that you share unless you give them permission to do so.
After you create or join a homegroup, you select the libraries (for example, My Pictures or My Documents) that you want to share. You can prevent specific files or folders from being shared, and you can share additional libraries later.
HomeGroup is available in Windows 10, Windows 8.1, Windows RT 8.1, and Windows 7. You can join a homegroup on a PC running Windows RT 8.1, but you can’t create a homegroup or share content with the homegroup. In Windows 7 Starter and Windows 7 Home Basic, you can join a homegroup, but you can’t create one.
Create a homegroup
When you set up a PC with Windows 8.1 or Windows RT 8.1, a homegroup is created automatically. If a homegroup already exists on your home network, you can join it.
To create a homegroup
Open HomeGroup by swiping in from the right edge of the screen, tapping Settings (or if you’re using a mouse, pointing to the lower-right corner of the screen, moving the mouse pointer up, and then clicking Settings), tapping or clicking Change PC settings, tapping or click Network, and then tapping or clicking HomeGroup.
Tap or click Create.
Select the libraries and devices you want to share with the homegroup.
If a homegroup already exists on your network, you’ll be asked to join it instead of creating a new one.
If your PC belongs to a domain, you can join a homegroup but you can’t create one. You can get to libraries and devices on other homegroup PCs, but you can’t share your own libraries and devices with the homegroup.
You can join a homegroup on a PC running Windows RT 8.1, but you can’t create a homegroup or share content with the homegroup.
«Find devices and content» must be turned on for HomeGroup to work.
After you create a homegroup, the other PCs running Windows 10, Windows 8.1, Windows RT 8.1, or Windows 7 on your network can join it.
Add your other PCs to the homegroup
After someone on your network creates a homegroup, the next step is to join it. You’ll need the homegroup password, which you can get from any homegroup member. All user accounts except the Guest account will belong to the homegroup. Each person controls access to his or her own libraries.
To join a homegroup, follow these steps on the PC that you want to add to the homegroup:
Open HomeGroup by swiping in from the right edge of the screen, tapping Settings (or if you’re using a mouse, pointing to the lower-right corner of the screen, moving the mouse pointer up, and then clicking Settings), tapping or clicking Change PC settings, tapping or click Network, and then tapping or clicking HomeGroup.
Enter the homegroup password, and then tap or click Join.
Note: If you don’t see a space to enter a password, there might not be a homegroup available. Make sure that someone has created a homegroup, or you can create a homegroup yourself.
Select the libraries and devices you want to share with the homegroup.
Tap or click the control under Media devices if you want to allow devices on the network, such as TVs and game consoles, to play your shared content.
Find homegroup files
PCs that belong to your homegroup will appear in File Explorer.
To get to shared libraries on other homegroup PCs
Open File Explorer by swiping in from the right edge of the screen, tapping Search (or if you’re using a mouse, pointing to the upper-right corner of the screen, moving the mouse pointer down, and then clicking Search), entering File Explorer in the search box, and then tapping or clicking File Explorer.
Under Homegroup, tap or click the user account name of the person whose libraries you want to get to.
In the file list, double-tap or double-click the library you want to get to, and then double-tap or double-click the file or folder you want.
PCs that are turned off, hibernating, or asleep won’t appear as part of the homegroup.
If you’ve made homegroup files or folders available offline, and then you disconnect from the network, the files or folders will no longer be visible in the Libraries window. To find them, open the Network folder.
Share libraries and devices, or stop sharing them
When you create or join a homegroup, you select the libraries and devices you want to share with other people in the homegroup. Libraries are initially shared with Read access, which means that other people can look at or listen to what’s in the library, but they can’t change the files in it. You can adjust the level of access at any time, and you can exclude specific files and folders from sharing.
Only those people who belong to the homegroup can see shared libraries and devices. You can choose to share libraries, devices, or individual files and folders with specific people in your homegroup or with everyone.
Note: Keep in mind that children who use homegroup PCs will have access to all shared libraries and devices.
To share devices and entire libraries
Open HomeGroup by swiping in from the right edge of the screen, tapping Settings (or if you’re using a mouse, pointing to the lower-right corner of the screen, moving the mouse pointer up, and then clicking Settings), tapping or clicking Change PC settings, tapping or click Network, and then tapping or clicking HomeGroup.
Select the libraries and devices you want to share with the homegroup.
To share individual files or folders
Open File Explorer by swiping in from the right edge of the screen, tapping Search (or if you’re using a mouse, pointing to the upper-right corner of the screen, moving the mouse pointer down, and then clicking Search), entering File Explorer in the search box, and then tapping or clicking File Explorer.
Select the item, and then tap or click the Share tab.
Choose an option in the Share with group. There are different Share with options depending on whether your PC is connected to a network and what kind of network it is.
To share items with a particular person, choose that person’s account.
To share with all the members of your homegroup, choose one of the Homegroup options. To select libraries to share with all the members of your homegroup, swipe in from the right edge of the screen, tap Settings, and then tap Change PC settings. (If you’re using a mouse, point to the upper-right corner of the screen, move the mouse pointer down, click Settings, and then click Change PC settings.) Then tap or click HomeGroup.
To prevent a file or folder from being shared with anyone, tap or click the Share tab, and then tap or click Stop sharing.
To change the level of access to a file or folder, tap or click the Share tab, and then select either Homegroup (view) or Homegroup (view and edit).
If you need to share a location such as a drive or system folder, use the Advanced sharing option.
Share a printer
Printers that are connected with a USB cable can be shared with a homegroup. After the printer is shared, you can get to it through the Print dialog box in any program, just like a printer that’s directly connected to your PC.
To share your printer with the homegroup
Open HomeGroup by swiping in from the right edge of the screen, tapping Settings (or if you’re using a mouse, pointing to the lower-right corner of the screen, moving the mouse pointer up, and then clicking Settings), tapping or clicking Change PC settings, tapping or click Network, and then tapping or clicking HomeGroup.
Tap or click the control to share Printers and devices.
To print to a homegroup printer
Open the Print menu of the app you want to print from, select the homegroup printer, and then tap or click Print.
Note: The PC that the printer is connected to must be turned on to use the printer.
Change homegroup settings if needed
At any time after you set up your homegroup, you can change settings by following these steps:
Open HomeGroup by swiping in from the right edge of the screen, tapping Settings (or if you’re using a mouse, pointing to the lower-right corner of the screen, moving the mouse pointer up, and then clicking Settings), tapping or clicking Change PC settings, tapping or click Network, and then tapping or clicking HomeGroup.
Select the settings you want.
These are the settings you can change:
Share libraries and devices
Select the libraries, printers, and devices you want to share with your homegroup.
Use this setting to share media with all devices on your network. For example, you can share pictures with a digital picture frame, or share music with a network media player.
Note: Shared media isn’t secure. Anyone connected to your network can receive your shared media.
View the homegroup password
View the password for your homegroup. If someone else wants to join the homegroup, give them this password.
Leave the homegroup
Leave your homegroup. You can’t delete a homegroup, but if everyone leaves the homegroup it will be gone. You can then set up a new homegroup if you’d like.
Change the homegroup password
To change your homegroup password, follow these steps:
Swipe in from the right edge of the screen, and then tap Search.
(If you’re using a mouse, point to the lower-right corner of the screen, move the mouse pointer up, and then click Search.)
In the search box, enter homegroup, and then click Settings.
In the list of results, tap or click Change homegroup password.
Tap or click Change the password, and then follow the instructions. You might be asked for an admin password or to confirm your choice.
What’s a homegroup?
A homegroup is a group of PCs on a home network that can share files and printers. Using a homegroup makes sharing easier. You can share pictures, music, videos, documents, and printers with other people in your homegroup.
You can help protect your homegroup with a password, which you can change at any time. Other people can’t change the files that you share unless you give them permission to do so.
After you create or join a homegroup, you select the libraries (for example, My Pictures or My Documents) that you want to share. You can prevent specific files or folders from being shared, and you can share additional libraries later.
HomeGroup is available in Windows 10, Windows 8.1, Windows RT 8.1, and Windows 7. You can join a homegroup on a PC running Windows RT 8.1, but you can’t create a homegroup or share content with the homegroup. In Windows 7 Starter and Windows 7 Home Basic, you can join a homegroup, but you can’t create one.
Create a homegroup
When you set up a PC with Windows 7, a homegroup is created automatically. If a homegroup already exists on your home network, you can join it.
Open HomeGroup by clicking the Start button, clicking Control Panel, typing homegroup in the search box, and then clicking HomeGroup.
On the Share with other home computers running Windows 7 page, click Create a homegroup, and then follow the instructions.
If a homegroup already exists on your network, you’ll be asked to join it instead of creating a new one.
If your PC belongs to a domain, you can join a homegroup but you can’t create one. You can access files and resources on other homegroup PCs, but you can’t share your own files and resources with the homegroup.
After you create a homegroup, the other PCs running Windows 7 on your network can join it.
Add your other PCs to the homegroup
After someone on your network creates a homegroup, the next step is to join it. You’ll need the homegroup password, which you can get from the person who created the homegroup.
To join a homegroup, follow these steps on the PC that you want to add to the homegroup:
Open HomeGroup by clicking the Start button, clicking Control Panel, typing homegroup in the search box, and then clicking HomeGroup.
Click Join now, and then follow the steps on your screen.
Note: If you don’t see the Join now button, there might not be a homegroup available. Make sure that someone has created a homegroup, or you can create a homegroup yourself.
Access homegroup files
PCs that belong to your homegroup will appear in Windows Explorer.
To access files or folders on other homegroup PCs
Click the Start button, and then click your user name.
In the navigation pane (the left pane), under Homegroup, click the user account name of the person whose files you want to access.
In the file list, double-click the library you want to access, and then double-click the file or folder you want.
PCs that are turned off, hibernating, or asleep won’t appear in the navigation pane.
If you’ve made homegroup files or folders available offline, and then you disconnect from the network, the files or folders will no longer be visible in the Libraries window. To find them, open the Network folder.
Control which files or folders are shared with your homegroup
When you created or joined your homegroup, you selected the libraries you wanted to share with other people in the homegroup. Libraries are initially shared with Read access, which means that you can look at or listen to what’s in the library, but you can’t make changes to the files in it. You can adjust the level of access later, and you can exclude specific files and folders from sharing.
To prevent a library from being shared
Open HomeGroup by clicking the Start button, clicking Control Panel, typing homegroup in the search box, and then clicking HomeGroup.
Clear the check box for each library you don’t want shared, and then click Save changes.
To prevent specific files or folders from being shared
Click the Start button, and then click your user name.
Browse to the file or folder you want to exclude from sharing, and then select it.
Do one of the following:
To prevent the file or folder from being shared with anyone, in the toolbar, click Share with, and then click Nobody.
To share the file or folder with some people but not others, in the toolbar, click Share with, click Specific people, select each person you want to share with, and then click Add. Click Share when you’re finished.
To change the level of access to a file or folder, in the toolbar, click Share with, and then select either Homegroup (Read) or Homegroup (Read/Write).
Share printers
Printers that are connected with a USB cable can be shared with a homegroup. After the printer is shared, you can access it through the Print dialog box in any program, just like a printer that’s directly connected to your PC.
To share your printer with the homegroup
Open HomeGroup by clicking the Start button, clicking Control Panel, typing homegroup in the search box, and then clicking HomeGroup.
Click Install printer.
Select the Printers check box, and then click Save changes.
To automatically connect to a homegroup printer
Click the Windows found a homegroup printer message that appears.
To manually connect to a homegroup printer
On the PC the printer is physically connected to, click the Start button, click Control Panel, type homegroup in the search box, and then click HomeGroup.
Make sure the Printers check box is selected.
Go to the PC you want to print from.
Open HomeGroup by clicking the Start button, clicking Control Panel, typing homegroup in the search box, and then clicking HomeGroup.
Click Install printer.
If you don’t already have a driver installed for the printer, click Install driver in the dialog box that appears.
Note: The PC that the printer is connected to must be turned on to use the printer.
Change homegroup settings if needed
At any time after you set up your homegroup, you can change settings by following these steps:
Open HomeGroup by clicking the Start button, clicking Control Panel, typing homegroup in the search box, and then clicking HomeGroup.
Select the settings you want, and then click Save changes.
These are the settings on the HomeGroup settings page:
Share libraries and printers
Select the libraries and printers you want to share in their entirety with your homegroup.
Share media with devices
Use this setting to share media with all devices on your network. For example, you can share pictures with a digital picture frame, or share music with a network media player.
Note: Shared media isn’t secure. Anyone connected to your network can receive your shared media.
View or print the homegroup password
View or print the password for your homegroup.
Change the password
Change the password for your homegroup.
Leave the homegroup
Leave your homegroup.
Change advanced sharing settings
Change settings for network discovery, file sharing, Public folder sharing, password-protected sharing, homegroup connections, and file sharing connections.


