- Set Up a Mobile Hotspot in Windows 10 Anniversary Update
- Enable Mobile Hotspot in Windows 10
- Автоматический запуск Мобильный хот-спот в Windows 10 при включении компьютера
- Шаг 1 – создаем два файла для автоматического запуска хот-спот
- Шаг 2 – включаем выполнение сценариев в Windows Powershell
- Проверка созданных нами файлов
- Шаг 3 – добавляем скрипт запуска хот-спот в автозагрузку
- Как отключить автоматический запуск?
- How to Disable or Enable Mobile Hotspot in Windows 10
- Use your PC as a Mobile Hotspot
- Disable or Enable Mobile Hotspot in Windows 10
- Using Registry Editor
- Related Posts
- How to fix DHCP Lookup Failed error
- The network folder specified is currently mapped using a different user name and password
- How to clear Mapped Network Drive Cache in Windows 10
- [email protected]
Set Up a Mobile Hotspot in Windows 10 Anniversary Update


We’ve shown you how to use Virtual Router Manager for configuring a Windows 10 device as a mobile hotspot. For years, users have been asking Microsoft to make this easy to do. What’s interesting is, this feature has been available on Windows Phone for a while now, and it’s easy to setup.
Yes, it’s technically possible to use the command line to do this, but it’s 2016. I don’t think you should have to resort to coding for something like this. With the upcoming Windows 10 Anniversary Update, making your device a mobile hotspot is easier than ever.
Enable Mobile Hotspot in Windows 10
First, ensure your device is connected to the Internet. Go to Settings > Network & Internet > Mobile hotspot. Toggle on Share your Internet with other devices.
Then select Wi-Fi or Ethernet from the “Share my Internet connection from” menu.
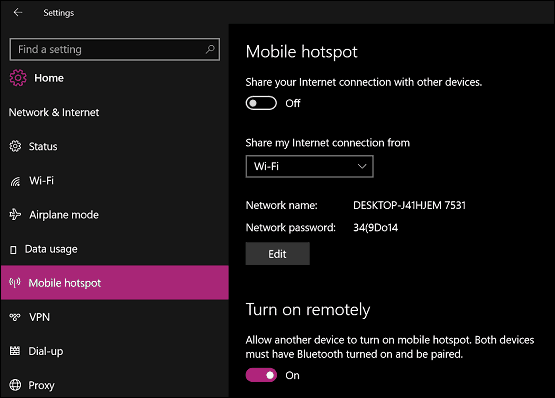
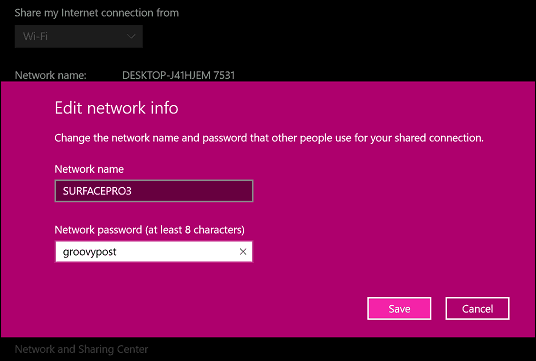
Then click the Edit button and enter a name and password for the network you’re creating.
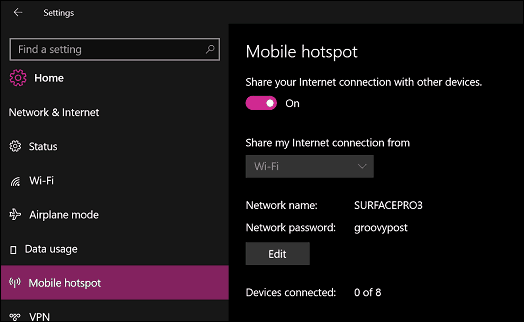
Just like its mobile sibling, the Mobile hotspot interface will display all currently connected devices.
Connecting to the hotspot is just as easy. Locate the wireless settings on your device, click or tap the network, and enter the password.

Once your device is connected, it will be displayed in the Mobile hotspot interface along with its assigned IP and MAC address.

If you happen to be sharing a mobile data connection from your Windows 10 device, I suggest you toggle off the “Turn on remotely” option. That will prevent devices like the iPhone, which remembers your wireless networks and automatically connect to them, from depleting your data in the background.
Also, if you have other Windows 10 devices connecting to your hotspot, check out our article for managing limited mobile data. The Mobile hotspot features are exclusive to the Windows 10 Anniversary Update, which will be a free upgrade for devices running older versions of Windows 10. If you have no intentions of upgrading to Windows 10, check out our article about the free Virtual Router Manager.
Автоматический запуск Мобильный хот-спот в Windows 10 при включении компьютера
В этой статье я покажу решение, с помощью которого можно настроить автоматический запуск функции Мобильный хот-спот. Чтобы хот-спот автоматически включался после загрузки Windows 10 и сразу начинал раздавать Wi-Fi сеть на другие устройства.
Так как в Windows 10 не всегда удается настроить раздачу Wi-Fi с помощью командной строки, то решение, которое описано в статье автоматический запуск раздачи Wi-Fi при включении ноутбука тоже не работает. Раздавать Wi-Fi с ноутбука или ПК намного удобнее через Мобильный хот-спот (о настройке этой функции я подробно писал здесь), но в настройках хот-спот нет возможности настроить автоматический запуск.
Я нашел решение (на англоязычных сайтах) немного его доработал (так как у меня изначально хот-спот не хотел запускаться автоматически) и сейчас поделюсь этим решением с вами. Постараюсь показать и объяснить все максимально подробно, чтобы у вас не возникло проблем в процессе настройки.
Шаг 1 – создаем два файла для автоматического запуска хот-спот
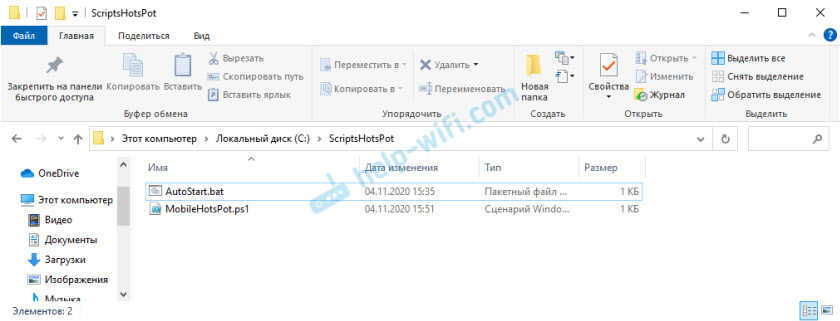
Заходим в «Этот компьютер» и открываем диск C. Создаем там папку с названием ScriptsHotsPot.

Открываем эту папку и создаем там первый файл. Нужно нажать правой кнопкой мыши на пустую область, выбрать «Создать» – «Текстовый документ». Открываем его и вставляем в файл следующий текст:
Не забудьте подтвердить сохранение изменений после закрытия, или нажмите на «Файл» – «Сохранить».

Дальше переименовываем этот файл в AutoStart.bat. Удалив имя и расширение файла .txt. Мы меняем не только называние файла, но и расширение на .bat, поэтому подтверждаем смену расширения файла.

Первый файл создан. Если у вас не получается сменить расширение файла с .txt на .bat (иконка файла не поменялась) , то вам сначала нужно включить отображение расширений файлов.
Точно так же создаем еще один текстовый файл, открываем его и копируем туда следующий текст:
$connectionProfile = [Windows.Networking.Connectivity.NetworkInformation,Windows.Networking.Connectivity,ContentType=WindowsRuntime]::GetInternetConnectionProfile()
$tetheringManager = [Windows.Networking.NetworkOperators.NetworkOperatorTetheringManager,Windows.Networking.NetworkOperators,ContentType=WindowsRuntime]::CreateFromConnectionProfile($connectionProfile)
$tetheringManager.StartTetheringAsync()
Сохраняем (при закрытии файла, или нажав в блокноте на «Файл» – «Сохранить») .

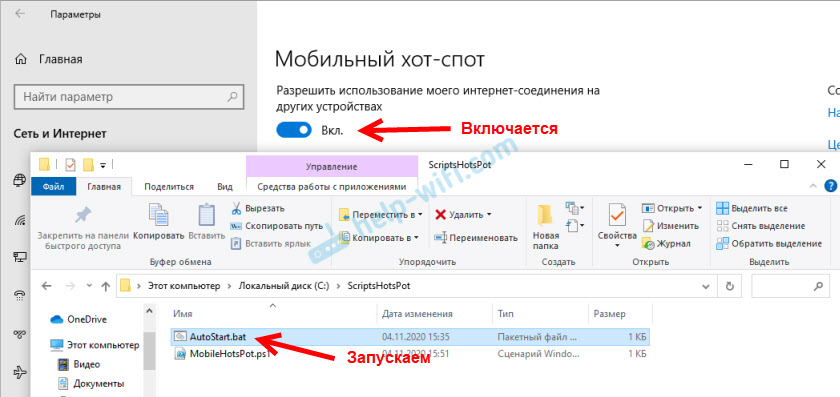
Переименовываем файл (и меняем его расширение) в MobileHotsPot.ps1. В итоге у нас в папке будет два файла.
Файлы созданы, и по идеи, после запуска файла (двойным кликом мыши) AutoStart.bat хот-спот должен включаться. Но у меня не работало. Как оказалось, причина в том, что отключено выполнение сценариев в Windows Powershell. Нужно это исправить.
Шаг 2 – включаем выполнение сценариев в Windows Powershell
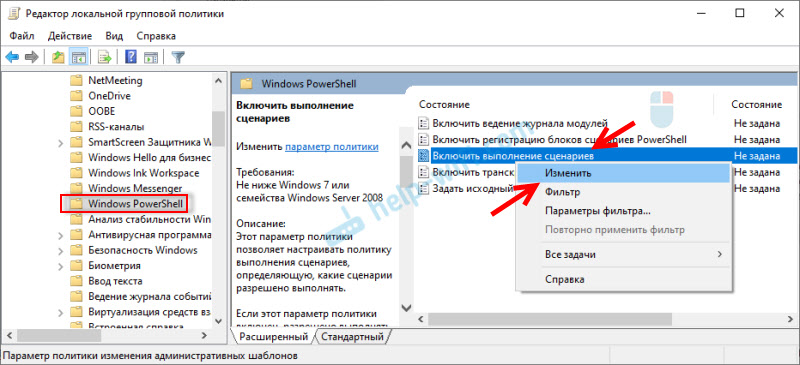
- Нажмите сочетание клавиш Win+R, скопируйте в окно «Выполнить» команду gpedit.msc и нажмите Ok.
- В левой части окна «Редактор локальной групповой политики» перейдите в раздел Конфигурация компьютера — Административные шаблоны — Компоненты Windows — Windows Powershell.
- Справа будет пункт «Включить выполнение сценариев». Нажмите на него правой кнопкой мыши и выберите «Изменить».

- Ставим переключатель возле «Включено», ниже в выпадающем меню выбираем пункт «Разрешить локальные сценарии и удаленные подписанные сценарии». Нажимаем на кнопку «Применить» и «Ok».
- Готово. Окно можно закрыть.
 Нажимаем на кнопку «Применить» и «Ok».
Проверка созданных нами файлов
Чтобы проверить, правильно ли мы создали файлы, можно открыть настройки функции мобильный хот-спот, выключить его (если он включен) и запустить файл AutoStart.bat. Хот-спот должен включиться.
Если хот-спот не запускается после запуска файла, то проверьте содержимое каждого файла (нажав на него правой кнопкой мыши и выбрав «Изменить») . Если там все правильно, но появляется какая-то ошибка, или еще что-то, то напишите о проблеме в комментариях. Постараюсь подсказать решение.
Если же все Ok, то нам нужно добавить этот файл в автозагрузку, чтобы он выполнялся при включении компьютера (входе в Windows 10) и автоматически активировал работу hotspot.
Шаг 3 – добавляем скрипт запуска хот-спот в автозагрузку
По идеи, если закинуть файл AutoStart.bat в папку «Автозагрузка» (открыть папку можно командой shell:startup в окне «Выполнить» (Win+R)) , то все должно работать. Но я предлагаю сделать все красиво. Через Планировщик заданий.
- Открываем меню Пуск, или поиск и пишем «планировщик заданий». Запускаем его.
- Наводим курсор на пункт «Действие» и выбираем «Создать задачу. «.
- Указываем имя для задачи. Например, «Запуск хот-спот».
- Переходим на вкладку «Триггеры» и снизу нажимаем на кнопку «Создать». В выпадающем меню «Начать задачу» выбираем «При входе в систему» (думаю, так же можно ставить «При запуске») . Если не будет работать, создайте триггер «При любом входе в систему» (если у вас есть этот пункт) .
- Переходим на вкладку «Действия» и нажимаем «Создать». Дальше в меню оставляем «Запуск программы» и нажимаем на кнопку «Обзор». Нужно выбрать файл AutoStart.bat, который мы создавали. Нажимаем на кнопку «Ok».
- Мы создали задачу в планировщике заданий. Можно закрывать окно нажав на кнопку «Ok».


 Нажимаем на кнопку «Ok».
Мобильный хот-спот будет автоматически включаться после загрузки Windows 10. Я все проверил, у меня работает. На несколько секунд будет появляться черное окно командной строки. Но если поставить выполнение задачи не «При входе в систему» а «При запуске», то скорее всего это окно вы не будете видеть.
Как отключить автоматический запуск?
Очень просто. Нужно удалить задачу в планировщике заданий.

Все отлично работает, пользуйтесь. Если у вас что-то не получается, или хотите дополнить статью полезной информацией – пишите в комментариях.
How to Disable or Enable Mobile Hotspot in Windows 10
We all connect to the Internet using a wired adapter or a wireless one. However, did you know Windows 10 allows you to share an internet connection with other devices over a feature called Mobile Hotspot? Windows 10 allows users to turn their PC into a mobile hotspot by sharing the Internet connection with other devices over Wi-Fi. Read on to know how to enable or disable this interesting feature.
Use your PC as a Mobile Hotspot
A Windows 10 PC can be turned into a Wi-Fi hotspot by sharing its internet connection with other devices. The Mobile Hotspot feature can be extremely useful and a life savior during critical meetings or presentations. A Wi-Fi, Ethernet, or cellular data connection, the kind of connection does not matter – you can practically share it all.
By default, this feature is configurable by the users. But if a system does not support the hosting network due to hardware insufficiency, this feature may not work or maybe totally absent. Another important note for those using cellular data. If you plan to share your cellular data connection it will use data from your data plan or data balance.
So, how do you turn your PC into a hotspot? Follow these steps:
- From the Start Menu select Settings.
- Then select Network & Internet > Mobile hotspot.
- Under Share my Internet connection from, select the Internet connection you wish to share with other devices.
- Now select Edit and enter a New Network Name and Password.
- Click Save to confirm the changes.
- Finally, turn on the Share my Internet connection with other devices toggle.
To connect the shared Wi-Fi on the other user’s device, go to the Wi-Fi settings on that device, find the network name, select it, enter the password, and then connect.
Disable or Enable Mobile Hotspot in Windows 10
Firstly, why will you need to disable this feature? In case you are on a multiple user system and do not want users to access your Internet freely – you can simply disable it. Basically, once Windows 10 Mobile hotspot is enabled, the user cannot monitor the other Internet users who use the mobile hotspot and share the internet with their mobile phones, PCs, tablets, and other devices. This is where little control becomes imperative.
Follow the next steps to enable or disable mobile hotspot in Windows 10.
Using Registry Editor
Follow these steps:
1] Press Win + R to open the Run dialog.
2] To open Registry Editor type regedit and click Ok.
3] Navigate to the following registry key from the left pane of Registry Editor window:
4] Now come to the right pane of the Network Connections registry key, right-click, and select New and click DWORD (32-bit) Value.
4] Name the newly created registry DWORD to NC_ShowSharedAccessUI
5] Now, this registry DWORD can be used to enable/disable your Mobile hotspot feature in Windows 10.
To disable:
Double click on this DWORD file and set the Value data for this registry DWORD to ‘0’. Once done, click ‘Ok’ and close the Registry Editor.
Once you disable go to Settings app > Network & Internet > Mobile hotspot. You will see that this feature can no longer be enabled or configured. This is because of the manipulation you did in the Group Policy Editor.
To enable:
For enabling the Mobile hotspot feature once again, just delete the NC_ShowSharedAccessUI registry DWORD that we created.
Attention: The method discussed above involves registry manipulation. Any mistakes made while manipulating the registry can affect your system adversely. Hence, be careful while editing the registry entries. Creating a System Restore point before messing with the registry entries is a good idea.
We hope this guide helps you get better control over your internet usage and sharing.
Date: August 24, 2020 Tags: Network
Related Posts
How to fix DHCP Lookup Failed error
The network folder specified is currently mapped using a different user name and password
How to clear Mapped Network Drive Cache in Windows 10
[email protected]
Ankit Gupta is a writer by profession and has more than 7 years of global writing experience on technology and other areas. He follows technological developments and likes to write about Windows & IT security. He has a deep liking for wild life and has written a book on Top Tiger Parks of India.


