- File sharing over a network in Windows 10
- How to Turn on Network Discovery and File Sharing in Windows 10
- What is network discovery and file sharing ?
- Enable Network Discovery and File Sharing on Windows 10
- How to enable Internet Connection Sharing in Windows 8.1?
- Enable or Disable Network Discovery or Sharing in Windows 10
- Enable or Disable Network Discovery
- 1] Via Windows Settings
- 2] Using Control Panel
- 3] Using CMD
- Cannot turn on Network Discovery
- How to set up network file sharing on Windows 10
- How to share files using File Explorer
- Sharing files using basic settings
- Sharing files using advanced settings
- Sharing files with a specific user
- How to share files over the network without password
- How to share files using Homegroup (deprecated)
- Creating a Homegroup
- Joining a Homegroup
- Sharing files on a Homegroup
- How to share files using OneDrive
- Sharing OneDrive files from the web
File sharing over a network in Windows 10
In Windows 10, some features of file and folder sharing over a network have changed, including the removal of HomeGroup. Read on for answers to common questions about other changes to file and folder sharing in Windows 10.
To share a file or folder in File Explorer, do one of the following:
Right-click or press a file, select Give access to > Specific people.

Select a file, select the Share tab at the top of File Explorer, and then in the Share with section select Specific people.

If you select multiple files at once, you can share them all in the same way. It works for folders, too—share a folder, and all files in it will be shared.
To stop sharing in File Explorer, do one of the following:
Right-click or press a file or folder, then select Give access to > Remove access.

Select a file or folder, select the Share tab at the top of File Explorer, and then in the Share with section select Remove access.

File Explorer shows the «Remove access» option («Stop sharing» in older versions of Windows 10) for all files, even those that aren’t being shared over a network.
Open File Explorer, then type \\localhost into the address bar.
Note: When you’ve shared a file from a folder in your user profile and you go to \\localhost, you’ll see your user profile and all its files there. This doesn’t mean that all of your files are shared—just that you have access to all your own files.
If you open File Explorer, go to Network, and see an error message («Network discovery is turned off….»), you’ll need to turn on Network discovery to see devices on the network that are sharing files. To turn it on, select the Network discovery is turned off banner, then select Turn on network discovery and file sharing.

To troubleshoot problems with sharing files or folders, follow the steps below on all computers from which you’re trying to share.
Make sure the computers are on the same network. For example, if your computers connect to the internet through a wireless router, make sure they all connect through the same wireless router.
If you’re on a Wi-Fi network, set it to Private. To find out how, read Make a Wi-Fi network public or private in Windows 10.
Turn on network discovery and file and printer sharing, and turn off password protected sharing.
Select the Start button, then select Settings > Network & Internet , and on the right side, select Sharing options.
Under Private, select Turn on Network discovery and Turn on file and printer sharing.
Under All Networks, select Turn off password protected sharing.
Make sharing services start automatically.
Press the Windows logo key + R.
In the Run dialog box, type services.msc, and then select OK.
Right-click each of the following services, select Properties, if they’re not running, select Start, and next to Startup type, select Automatic:
How to Turn on Network Discovery and File Sharing in Windows 10
In Windows 10 network discovery and file sharing are turned off by default. In this Tutorial we are going to learn how to turn on network discovery and file sharing on Windows 10 Operating System.
What is network discovery and file sharing ?
Network discovery and File Sharing allow windows to auto detect shared computers on your network and also allow other computers on your network to discover your computer.
Enable Network Discovery and File Sharing on Windows 10
- Open Network and Sharing Center — Right click on the windows start button and click on Control Panel. From Control Panel Go to Network and Internet > Network and Sharing Center.
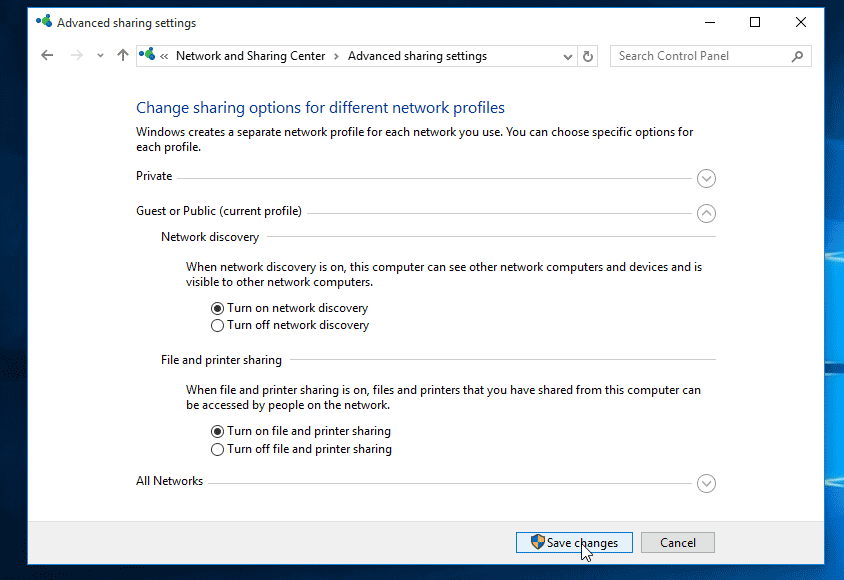
- Go to Advanced Sharing Settings — from the Network and Sharing Center Click on the Change Advanced Sharing Setting Link on the left.
- Turn on Network Discovery and File Sharing — Under the Public Network section Turn on Network Discovery and File and Printer Sharing Options.
After enabling Network Discovery, you should now see the available shared computer and devices on your network Under the Network Section in the Windows 10 File Explorer.
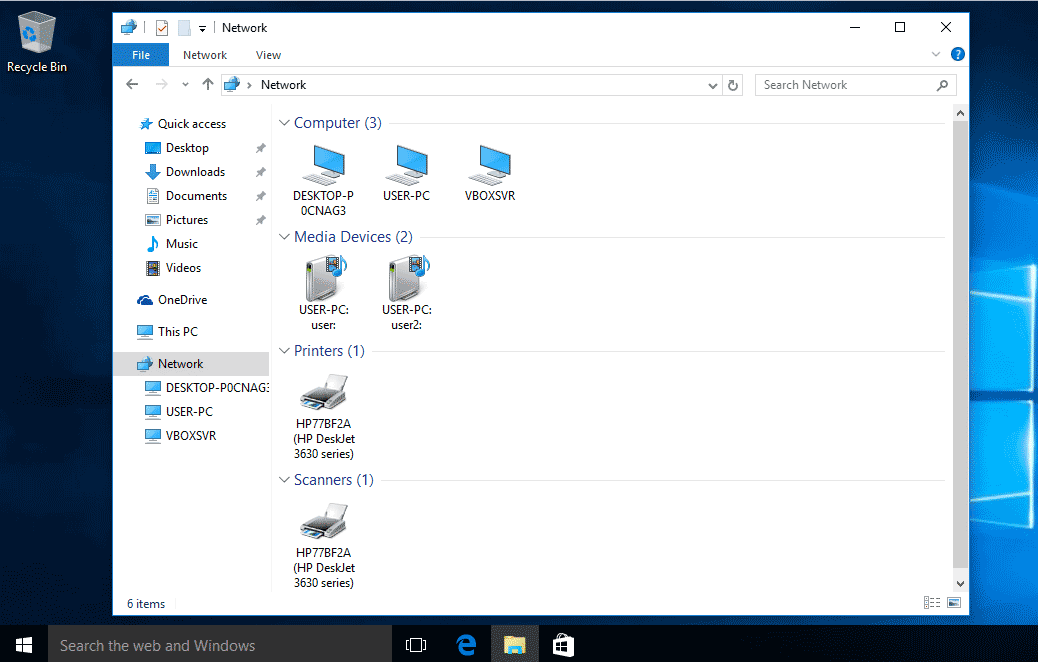
As Above screenshot shows, you can see windows 10 has automatically detected shared computers and devices in Our Network (Including Printers and Scanners).
How to enable Internet Connection Sharing in Windows 8.1?
Original Title: ICS (Internet Connection Sharing)
I’m trying to enable ICS on Windows 8.1. The only discussion I can find is referenced to Windows 7 or Vista. Has it been discontinued? If so, how do I «upgrade» my Win 8.1 system to Win 7?
Internet Connection sharing is supported in Windows 8.1 operating system.
Refer to the steps mentioned below to enable Internet Connection sharing in your Windows 8.1 operating system.
Check if your network card supports Internet Connection sharing.
a. Type cmd on the Start Screen, right-click the icon, and click Run as Administrator.
b. Type netsh wlan show drivers and verify if Hosted network supported says Yes. If it is No, your network card doesn’t support Wi-Fi sharing.
If your network card supports Internet Connection sharing, let’s enable it. Refer to these steps.
a. Press Windows key +X, click Control Panel . In the search box, type adapter , and then, under Network and Sharing Center, click View network connections .
b. Right-click the connection that you want to share, and then click Properties . If you’re prompted for an administrator password or confirmation, type the password or provide confirmation.
c. Click the Sharing tab, and then select the Allow other network users to connect through this computer’s Internet connection check box, click Ok.
Note: The Sharing tab won’t be available if you have only one network connection.
Hope the information provided is helpful. Do reply, if you need any help.
Enable or Disable Network Discovery or Sharing in Windows 10
Network Discovery in the Windows operating system is a network setting, using which you can set whether other computers on the network can see your Windows 10/8/7 computer or whether your computer can find other computers and devices on the network. If Network Discovery is enabled, sharing files and printers over a network becomes easier.
If you remember, when you first connected to any network on your Windows PC, you would have been asked if it was a Private, Public or a Domain base network.
Enable or Disable Network Discovery
If you are using a standalone PC you may want to disable Network Discovery as you will have no use for it. You can turn off Network Discovery using Settings in Windows 10, or via the Control Panel or Comand Prompt ins Windows 10/8/7. Let us see how to do it.
1] Via Windows Settings
Click on the Start button and open Setting and select Network & Internet and then Dial-Up (or Ethernet).
Select the network and then click on Advanced options. From the panel which opens, turn the slider to the Off position for the Make this PC discoverable setting.
To enable it again, simply move the slider back to the On position.
It is the same for WiFi Networks. Open Settings > Network & Internet > Wi-Fi > Manage known networks > Select a WiFi network > Properties > Turn slider to the Off position the Make this PC discoverable setting.
In the case of an Ethernet connection, you have to click on the Adapter and then toggle the Make this PC discoverable switch.
2] Using Control Panel
From the WinX Menu, open Control Panel > All Control Panel Items > Network and Sharing Center > Advanced sharing settings.
Uncheck the Turn on Network Discovery checkbox for Private as well as Public/Guest profiles.
Save the changes and exit.
3] Using CMD
To turn off Network Discovery run the following command in an elevated command prompt:
To turn on Network Discovery run the following command in an elevated command prompt:
In this way, you can enable or disable Network Discovery.
Cannot turn on Network Discovery
If you cannot turn on Network Discovery you may want to Run services.msc to open Services Manager and check if the following services are started and set to Automatic.
- DNS Client
- Function Discovery Resource Publication
- SSDP Discovery
- UPnP Device Host
Hope this helps.
Date: January 6, 2020 Tags: Network, Tutorials
How to set up network file sharing on Windows 10
Windows 10 lets you quickly share files with other users over a network — here are three ways to do it.

On Windows 10, you can share files on your computer with other users over the network. While this might seem complicated, it’s actually a simple task when using the tools the operating system provides.
Depending on your network environment and what you want to accomplish, there are at least four ways to set up file sharing on Windows 10. You can use the Public folder, a special setup that allows you to share files over the local network without configuring permissions. Or you can share content using the File Sharing feature on Windows 10. And if you are looking to share files with other people across the internet, you can use file sharing with OneDrive.
In previous versions, you were also able to use Homegroup, which unlike the Public folder, automatically shared Windows 10 libraries folders (Pictures, Videos, Music, Documents), Printers, and other devices connected to your computer. However, it is no longer a feature on Windows 10.
In this guide, you will learn the steps to share files over the network using File Sharing and OneDrive on Windows 10. (Although Homegroup is no longer available in the latest version of Windows 10, the steps to use the feature will continue to be available, as it’s still a feature in older releases.)
How to share files using File Explorer
Using the built-in File Sharing feature on Windows 10 is the best method you can use to share files in a local network, as it is more flexible. You can use more restrictive permissions, and you can share files with virtually any device, including Mac, Android, and Linux devices.
There are two ways to share files using File Explorer. You can use the basic settings, which allows you to share files on the network with minimal configuration quickly, or you can use the advanced settings to set custom permissions and set other advanced options.
Sharing files using basic settings
To share files on a local network using the express settings, use these steps:
Open File Explorer on Windows 10.
Navigate to the folder you want to share.
Right-click the item, and select the Properties option .
 Folder Properties option
Click on the Sharing tab.
Click the Share button.
 Folder Sharing tab
Use the drop-down menu to select the user or group to share a file or folder. (For this guide, select the Everyone group.)
Click the Add button.
 Choose people to share with
Under the “Permission Level” section, select the sharing permissions you want the folder to have. For example, you can select Read (default) if you only want users to view and open files. If you select Read/Write, users can view, open, modify, and delete the content on the folder you are sharing.
Click the Share button.
 Share permission level
Confirm the folder’s network path that other users will need to access the network’s content and click the Done button.
Click the Close button.
 Shared folder path
Sharing files using advanced settings
To share files on a local network using the advanced sharing settings, use these steps:
Open File Explorer.
Navigate to the folder you want to share.
Right-click the item, and select the Properties option.
 Folder Properties option
Click on the Sharing tab.
Click the Advanced Sharing button.
 Folder Sharing tab, Advanced Sharing
Check the Share this folder option.
Windows 10, by default, allows other users read-only access to the content you share, which means that they can only view files, but they cannot do anything else. If you want users to edit the files, delete, and create new documents in the location, you will need to click the Permissions button.
 Advanced Sharing options
On the “Permissions” window, you will notice the “Everyone” group is the default option highlighted. In the section below, you can customize the permissions for a specific user or group. If you want users to open, edit, delete, and create files, then make sure to check the Read and Change permissions under the “Allow” column.
Click the Apply button.
Click the OK button.
 Share Permissions options
Click the OK button again.
Sharing files with a specific user
If you only want to share files with only a specific user, you can follow the same steps, but on step 8, use these instructions:
Select the Everyone group and click the Remove button.
Click the Add button.
 Add or remove users and groups.
Type the name of the user you want to share the files with.
Click the Check Name button.
Click the OK button.
 Select users and groups to share with
Select the user account, and you will notice that the “Read” permission is checked by default. If you want the user to be able to edit, delete, and create new files, make sure also to check the Change permission option.
Click the Apply button.
Click the OK button.
 Share permissions for a specific user.
Once you complete the steps, the shared content should be available when browsing the remote computer on File Explorer > Network.
How to share files over the network without password
On Windows 10, any file you share is by default secured with a username and password. This means only people who have an account and password on the computer can access shared files.
If you’re setting up file sharing on a local network for your family members or people you know, it is possible to disable the requirement to sign-in with Windows credentials to allow users to access files on the sharing computer without needing a password.
To disable password protection for file sharing on Windows 10, use these steps:
Open Control Panel.
Click on Network and Internet.
Click on Network and Sharing Center.
On the left pane, click the Change advanced sharing settings link.
 Change advanced sharing settings.
Expand the All Networks tab.
Under the “Password protected sharing” section, select the Turn off password protected sharing option.
Click the Save changes button.
 Password protections sharing
After you complete the steps, users should be able to access the shared folder without a password.
How to share files using Homegroup (deprecated)
Microsoft created Homegroup to be an easy to use method for non-technical users to securely share files between computers running Windows 7 and later versions of the operating system connected to the same local network.
Typically, home users are the ones who will use Homegroup, as it offers a straightforward and convenient way to share files, but this method has limited options. For example, you can share your libraries (Pictures, Videos, Music, Documents), folders, printers, and other devices connected to your computer. However, you cannot share files with versions of Windows older than Windows 7 or other devices running a different operating system, such as Android and iOS.
Creating a Homegroup
To create a Homegroup on a local network, use these steps:
Open Control Panel.
Click on Network and Internet.
Click on Homegroup.
Click the Create a homegroup button.
 Create Homegroup on Windows 10
Click the Next button.
Use the drop-down menu to select which folders and resources (Pictures, Videos, Music, Documents, Printer & Devices) you want to share. If you don’t want to share an item, make sure to select the Not Shared option.
Click the Next button.
 Share libraries with Homegroup
Make sure to note the Homegroup password as you will need it to join other computers, and click Finish to complete the task.
 Homegroup password
Once you complete the task, the Homegroup settings page will be updated, displaying the libraries you are currently sharing and additional options, including the ability to leave the Homegroup and change the resources you are sharing.
Joining a Homegroup
Use these steps to join another computer to the Homegroup to access the files you are sharing on your device:
Open Control Panel.
Click on Network and Internet.
Click on the Choose homegroup and sharing options link.
 Control Panel Network and Internet
Click the Join now button.
 Join a PC to a Homegroup
Continue with the on-screen directions to complete the setup.
If you do not see the Join now button, click the Start the Homegroup troubleshooter option, which will force a rescan of the network and make the option available.
Sharing files on a Homegroup
Once you have a Homegroup created, your PC is already sharing those files and folders within the libraries you shared during the setup process. However, if you want to share files on a different location with users connected to the Homegroup, do the following.
Use these steps to start sharing files using Homegroup:
Open File Explorer.
Navigate to the content you want to share.
Right-click the folder you want to share and select the Give access to option.
You will see several sharing options in the submenu, including Homegroup (view) and Homegroup (view and edit).
If you only want users to read permissions to your files, select the Homegroup (view) option.
If you want users to have read and write permissions (which also allows them to delete and create files and folders), select the Homegroup (view and edit) option.
 Share additional folders on a Homegroup.
In the case, you want to stop sharing a folder you previously shared, right-click the folder, select the Give access to option, and select the Remove access option.
Once you complete the steps, the shared content should be available when browsing the remote computer from File Explorer > Homegroup.
How to share files using OneDrive
You can also share files with other people across a network or around the world using OneDrive.
To share files using OneDrive on Windows 10, use these steps:
Open your OneDrive folder on Windows 10.
Navigate to the folder you want to share.
Right-click the folder and select the Share option.
 OneDrive share option in File Explorer
Specify the email for the person you want to share the content with. (Or the available options to copy the link or share files using other apps.)
 OneDrive share options on Windows 10
Click the Send button.
Any user who receives your message will be able to click the link and view the folder’s content on any web browser.
Sharing OneDrive files from the web
If you want users to view and edit the content inside of an OneDrive folder, you’ll need to share the folder using OneDrive on the web.
To share OneDrive files from the web, use these steps:
Open OneDrive online.
Navigate to the file or folder you want to share.
Right-click the item and select the Share option.
 OneDrive online share option
Specify the email for the person you want to share the content with. (Or the available options to copy the link.)
 OneDrive online share settings
Click the Send button.
Once you complete the steps, anyone with the link can view and edit the file or the content inside of the folder.
If you only want to share files with specific users privately, you want to select the option to share via email.
Files you share will only be available to users as long as your computer is turned on, except for the OneDrive sharing method. However, using OneDrive, users must have an internet connection to access the shared content.
Update January 26, 2021: This guide has been revised to ensure the instructions are still accurate.
We may earn commission for purchases using our links to help keep offering the free content. Privacy policy info.
All content on this site is provided with no warranties, express or implied. Use any information at your own risk. Always backup of your device and files before making any changes. Privacy policy info.


