- Run command for remote desktop (RDP client)
- Mstsc command
- Run command for opening remote desktop session in full screen mode
- Run command for specifying the remote computer name from the command itself
- Run command to specify remote desktop connection settings using a rdp file
- Run command for Remote desktop manager
- Relevant Posts:
- Enable remote desktop from command line (CMD)
- Enable remote desktop from CMD
- Enable Remote assistance:
- How to Enable and Use Remote Desktop for Windows 10
- Enable Remote Desktop for Windows 10 Pro
- Remote Into Your PC
- More About Remote Desktop Connections
- How to Enable Remote Desktop Connection in Windows 10
- Enable remote desktop connection from Windows Firewall
Run command for remote desktop (RDP client)
The Run command for Windows Remote desktop application is Mstsc
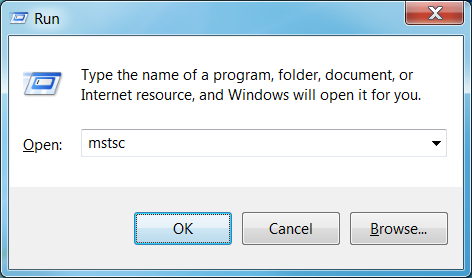
Just open Run from start menu and type mstsc in the text box next to open and press enter. 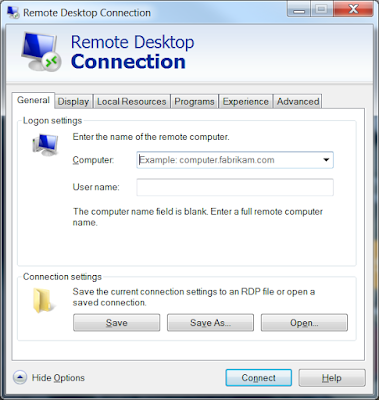
This command mstsc can be used from command line too.
A system running Windows 7/Windows 10 allows only one remote desktop connection at a time, means only one remote user can work on it any time. A computer running Windows server edition can support remote sessions for multiple users at the same time.
Mstsc command
Every time we connect to the server it opens a new user session. To avoid this we can open a connection to the console. This allows us to login back to the same user session if we already have one. To do this we need to add /console switch to the mstsc command.
This command can be run from command prompt or from Run window.
Run command for opening remote desktop session in full screen mode
Add /f switch to the command.
Run command for specifying the remote computer name from the command itself
Use /v switch in this case.
Run command to specify remote desktop connection settings using a rdp file
A RDP file can be created using the ‘Save As‘ button in the General tab in mstsc(Remote desktop connection client) window.
These commands work on XP, Vista, Windows 7 and Server 2003/2008 operating systems.
Run command for Remote desktop manager
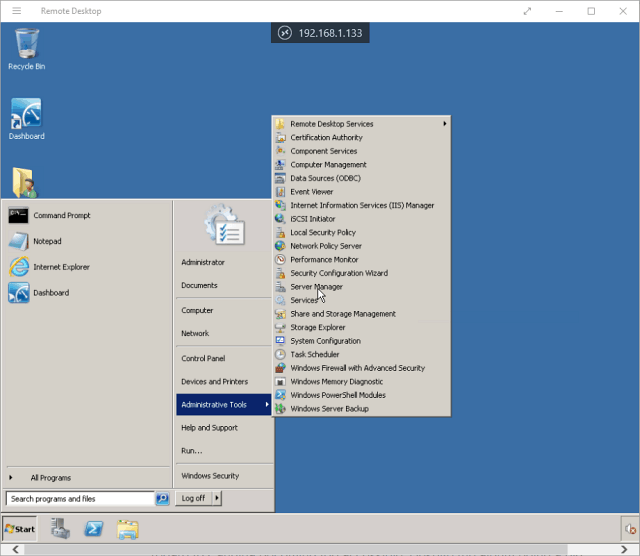
There is no Run command for opening remote desktop connection manager directly. It is usually installed in the path C:\Program Files\Remote Desktop Connection Manager\RDCman.exe . By specifying this complete path we can launch connection manager.
Relevant Posts:
Good information on the command line switches available with the mstsc command. thank you.
i would like to write command script to check whether the servers could RDP or not.
we have around 30 servers hence cant run mstsc /v:servername for each. Hence just would like to write cmd script to check all the servers. Could you please help me ?
can you please assist me with the system to enable remote access desktop/working into the network user without being there physically,i have i.p address and computer name of the workstation and we are all in one network.
Possibly you only have Windows Home Edition, which doesn’t support Remote Connections.
Remote Desktop Assistance is a feature of Windows Pro Editions.
can user able to see the desktop in mstsc command
It is not mstsc/console anymore. Now it is mstsc/admin. You can also add it to a desktop shortcut by changing the Target to %windir%\system32\mstsc.exe -admin
“admin” is different than “console” actually. Admin allows you to boot another user. My bad.
Hello..is there any option to trigger MSTC on windows boot up, preferably with pre-specified destination server and credentials?
Also, if the user logs out of the terminal server, he should get logged out of the local desktop as well.
I don’t want to give the user the option of a local desktop.
Enable remote desktop from command line (CMD)
Remote desktop can be enabled/disabled by opening My computer properties and then by changing the settings in the ‘Remote‘ tab. We can do the same by editing registry key settings. This is explained below. Remote desktop is also called Terminal services or TS or RDP. This is an in-built remote desktop software for Windows users.
Enable remote desktop from CMD
- Open registry editor by running regedit from Run.
- Go to the node
- Change the data of the value fDenyTSConnections to 0.
We can enable remote desktop from windows command line by running the following command.
To disable remote desktop we need to run the below command.
Reboot or logoff is not required after running the above command. I have tested this on Windows XP and Windows 7 and it has worked fine. It would work fine on Windows Vista too.
Enable Remote assistance:
Thanks for sharing this.. I want to enable and disable remote desktop to test a scenario. I need to do this repeatedly so was looking for command line way of the same.
Thanks so much! This was very helpful. One hint to those that follow – I found that if I copied & pasted directly from this page – the ” symbols were corrupted and gave me a different character set which did not work in the bat file. You have to either paste as text or delete & retype the “s.
Thanks Jo for pointing that out. Now I have placed the commands in a code block ; copy & paste would work fine.
How do you go a step further and add in the trusted users/groups for remote desktop? It puts in administrators by default, but I have to manually go in and add “domain users” to each machine.
Option 1:
You can run the below command for each user you want to allow to connect remotely.
Option 2:
If you have a group of domain users and want to allow the whole group to do remote desktop on the computer, you can do that as well with a single command. Just replace the loginid in the above command with the group name.
Thanx for this cool tip it helped me in creating my batch file which maybe dangerous for my target friends… 🙂
I want to create something like this as well but there’s a few problems
great job. thank u
So, i take the given command line to enable or disable the remote access, but it tells me Error: Access denied
I guess you are not running it from elevated command prompt.
I have a question to
Danish November 10, 2011 at 8:35 pm Feed.
How can we determine target machine? By the code posted by Danish.
Where /f = full screen
/v:–specifies the name of the computer to connect to.
/f–starts the connection in a full screen.
/w:–specifies the width of the remote desktop screen.
/h:–specifies the height of the remote desktop screen
eg
mstsc /v: JD2043614 /f
Thank you for your information..
Awesome…
Thanks man…
How can i add specific IPs to allow remote session?
Regards,
[email protected]
you may have to configure your firewall to allow only certain IPs to connect to 3389. I’m sure Terminal Services also has some built in filters too…
Thank! good shared
Thank you for suggestion.
Please send me your email id. i can learn many more.
Thanks, This post help me lot.
hi danish,
this batch file will act on every Windows edition
im in the same network with my junior,i want to enable his remote access over the network.i can ping his computer and respond.i have his computer name and i.p address.network users are not in domain,they are in workgroup.how can you assist me without going to the user’s desk?
You could use PsExec to open an remote command prompt. Thus you need to download PsTools Suite from Microsoft Tech-Net.
Hi, i need to disable/enable remote desktop on my server during the time i run some automation. The tip you suggested works on all of my servers except for the one that i really need. Would you know of any other parameter that could disable that registry key?
Yeah, this doesn’t work. You’re missing one critical step – opening the firewall
netsh firewall set service remotedesktop enable
mstsc /v:SERVER /admin
lol lol lol thank you Matthew Bradley, I couldn’t find this vital piece of information for like 20 minutes on google.
I wonder can anyone write a script like that to automate this whole thing (including firewall, elevated cmd line etc)? C+ may be. May be even for a reasonable donation))
Why to enable RDP from command line? Simple use remote access tools.
HUGE help, I’m in MA, remote system in CA, no one in the office right now. I’m running Teamviewer for remote access and I just upgraded. Post upgrade the system is almost entirely hung, can’t do much of anything (though I can run a command prompt). I enabled RDP, logged on and reinstalled TV. Thanks so much!
How to Enable and Use Remote Desktop for Windows 10


Remote Desktop Protocol (RDP) has been a feature of Windows since the XP Pro days. It makes it easy to connect from one PC or device to another to retrieve files or provide PC support.
There are several free utilities out there that will get you set up with a remote connection. Some that come to mind are services such as join.me, TeamViewer, and Chrome Remote Desktop and are especially handy when connecting between different platforms. But if you’re in a pure Windows environments, here’s a look at how to enable the built-in RDP utility in Windows 10 which will allow you to connect to your Windows box remotely.
Enable Remote Desktop for Windows 10 Pro
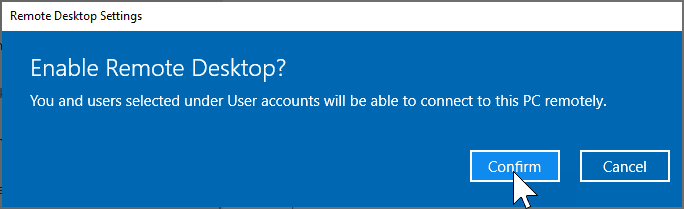
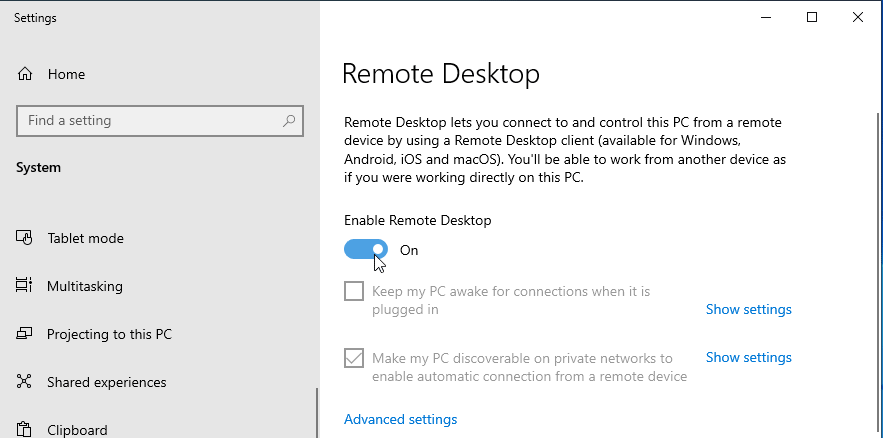
The Remote Desktop or RDP feature is disabled by default so you will need to enable it in the settings. There are several ways to do this, let’s review the easiest.
- Open Settings
- Click System >Remote Desktop
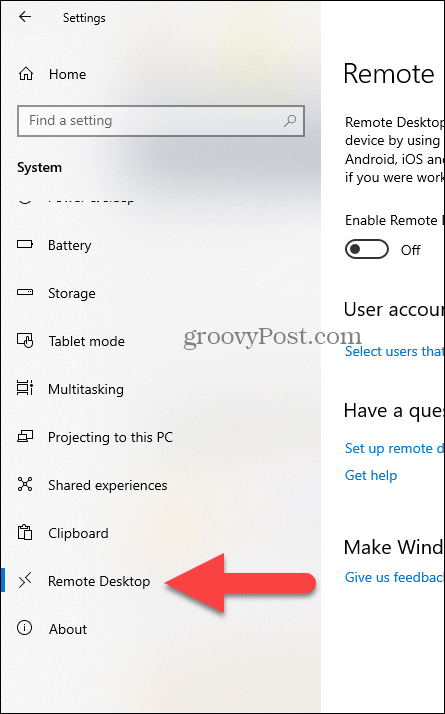
Click the toggle Enable Remote Desktop
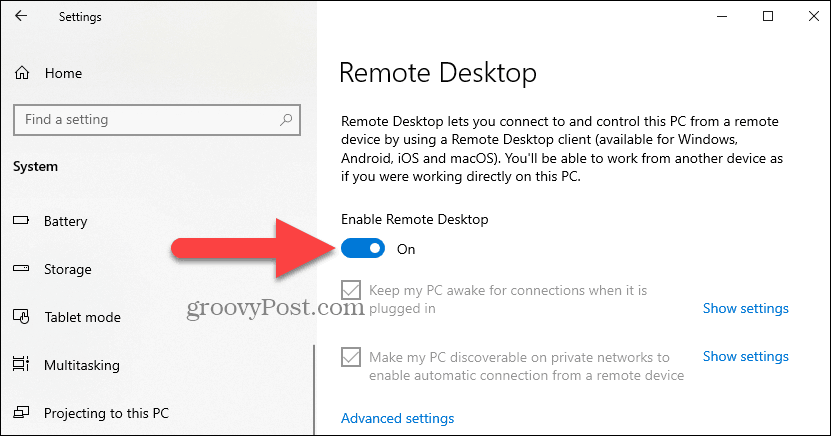
Click Confirm when promoted.
Expert Note:
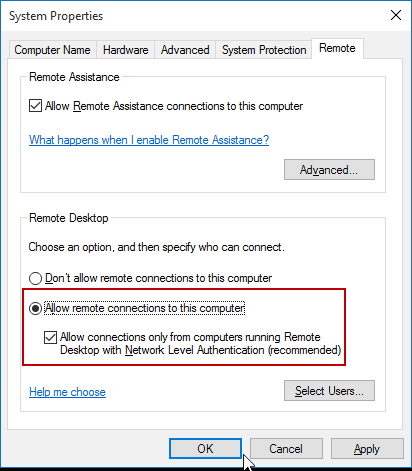
You can also enable Remote Desktop using the System Properties. Press the Windows Key and Type: advanced system. Click View advanced system settings.

Click the Remote tab and select Allow remote connections to this computer. Keep the box checked for Network Level Authentication for better security. Also, note that you will need to enable incoming remote connections on the PC you’re connecting.
Remote Into Your PC
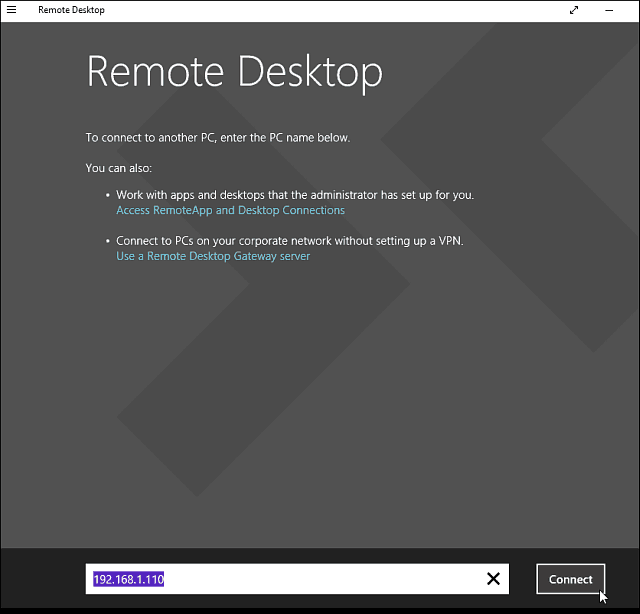
You have a couple of choices when it comes to how you remotely connect to the other computer. You can use the traditional desktop app or the Remote Desktop universal app. For this, I’m connecting to my Windows Home Server on my home network. I’m also going to use the app that you can install from the Store. It’s more versatile and can be used on mobile platforms including iOS and Android.
Tip: If you have a lot of PCs and devices on your home network, a useful free utility to use is Advanced IP Scanner.
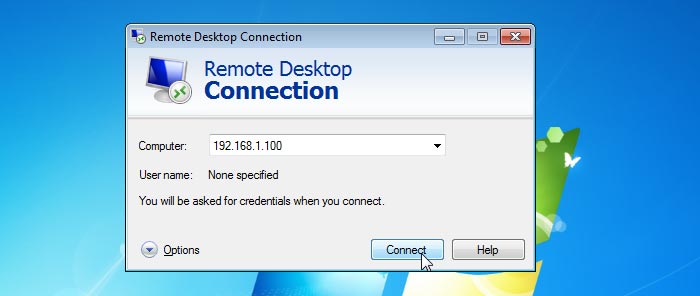
Launch the app and type a name for the PC or device, its hostname or IP address, and select Connect.
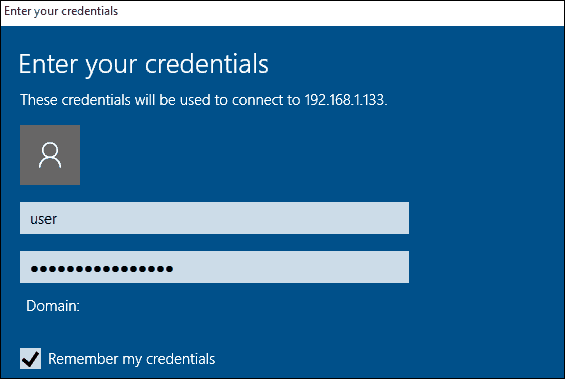
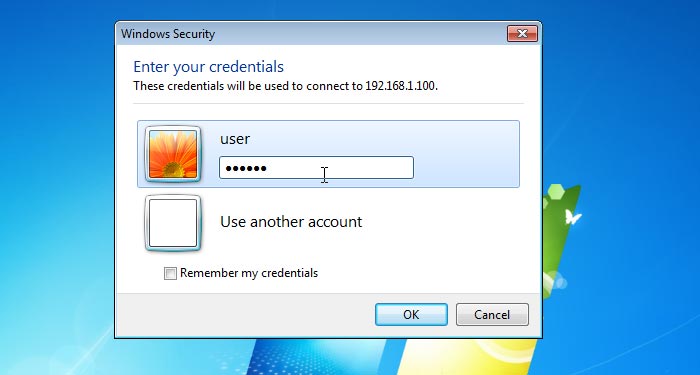
Next enter the username and password used for the computer you’re connecting into. Also, if you’re going to remote into it often, check the box to remember your credentials.
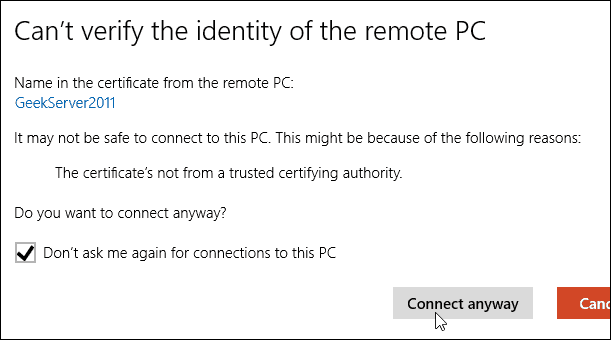
If you get the following security message, click Go ahead and Connect and check the box for it to not remind you again. You know what you’re doing, no reason to for Windows to be constantly nagging you.
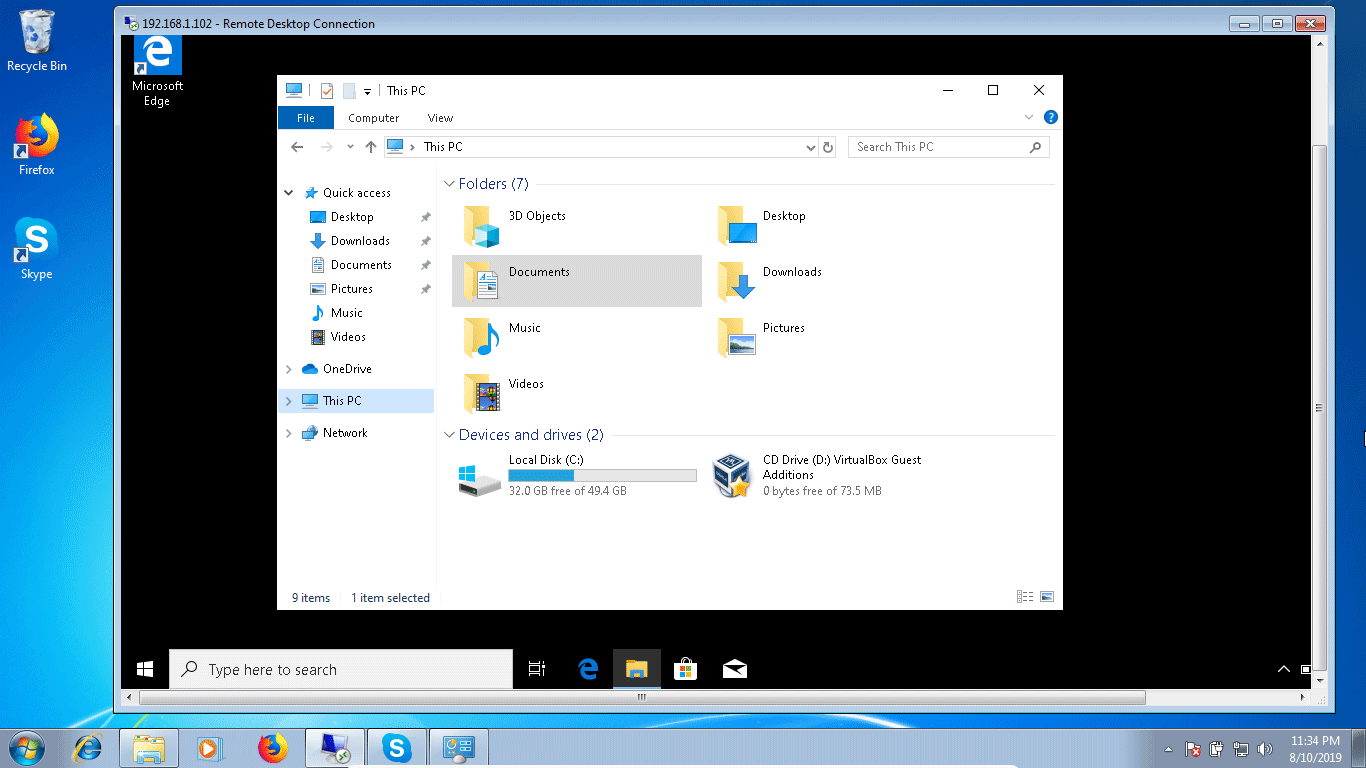
There you have it. You can now start using the remote computer for configuration, remote support, or however you need to use it.
I should also mention that you can go to Settings > connection settings in the app and configure the appearance, devices, and make other adjustments that work for you.

More About Remote Desktop Connections
If you’re running a previous version of Windows or looking to remote access your Windows PC from your smartphone or tablets, check out the articles linked below for more.
How to Enable Remote Desktop Connection in Windows 10
The Remote desktop feature in Microsoft windows 10 allows user to access their Windows 10 PC from a remote Computer using a remote desktop client. Once you enable the remote desktop, you can access your windows 10 computer from anywhere from any device.
By default, remote desktop connection is disabled and blocked by the windows firewall in windows 10. In this tutorial we are going to learn how to enable remote desktop connection in Windows 10 Operating System.
- Open System Settings — Right click on the Windows start button and select System from the menu.
- Open Remote Desktop Settings — Click on the Remote desktop link on the left to open remote Settings window.
- Allow Remote Connections — Under the remote desktop section, Turn «Enable Remote Desktop» on, and then choose Confirm.

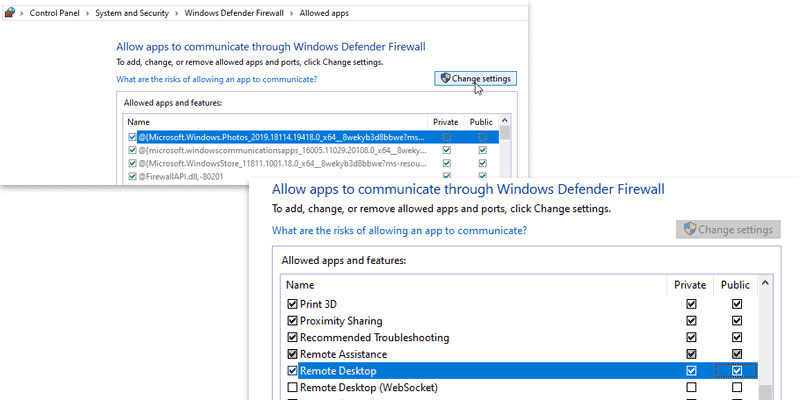
Enable remote desktop connection from Windows Firewall
Now we need to allow remote desktop connections to our Windows 10 PC from the windows firewall. (enabled by default in Windows 10).
- Open Windows Firewall (Start button >Windows System >Control Panel) — From the Control Panel Go to Systems and Security >Windows Defender Firewall.
- From the Firewall, Click on the Allow and app or feature through Windows Defender Firewall link in the left pane.
- Click Change settings and then check the box next to Remote Desktop, for both private and public networks.
- Click OK to save the new settings.
You can now connect to your Windows 10 PC from a remote computer using a Remote Desktop Client.
From the RDP Client use the IP Address of your Windows 10 PC to connect.
Then, login using your Windows username and password.
This way you can access your Microsoft Windows desktop from any operating system or from any device using an RDP Client.
If your RDP client throws an error when connecting to the remote PC (for example: ERROR: CredSSP: Initialize failed, do you have correct kerberos tgt initialized?), try turning off Network Level Authentication.
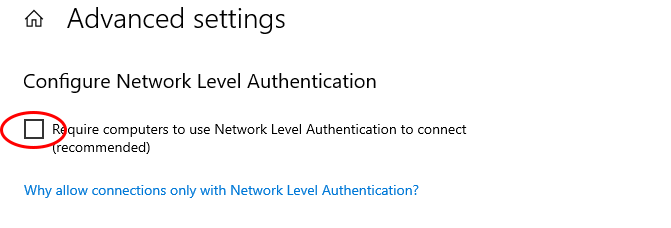
Go to Advanced settings in the Remote Desktop pane and then uncheck: «Require computers to use Network Level Authentication to connect» option.


