- Ubuntu Documentation
- Make sure that the sound is not muted
- Check that the speakers are turned on and connected properly
- Check that the correct sound device is selected
- Check that the sound card was detected properly
- Управление уровнем звука из командной строки Ubuntu
- Установка ALSA
- Использование Alsamixer — графического интерфейса для Alsa
- Представления Alsamixer
- Представление Capture
- Представление All
- Представление Playback
- Выбор звуковой карты
- Управление свойствами звука
- Использование Amixer для управления звуком с помощью команд
- Advanced Linux Sound Architecture
- Contents
- Installation
- User privileges
- ALSA utilities
- OSS compatibility
- PulseAudio compatibility
- ALSA and systemd
- ALSA firmware
- Unmuting the channels
- Unmute with amixer
- Unmute with alsamixer
- Unmute 5.1/7.1 sound
- Enable the microphone
- Test your changes
- Additional notes
- Configuration
- Basic syntax
- Assignments and Separators
- Data types
- Operation modes
- Nesting
- Including configuration files
- Set the default sound card
- Setting the default sound card via defaults node
- Configuring the index order via kernel module options
- Select the default PCM via environment variable
- Alternative method
- Verifying correct sound modules are loaded
- Getting S/PDIF output
- System-wide equalizer
- Using ALSAEqual (provides UI)
- Using mbeq
- High quality resampling
- Upmixing/downmixing
- Upmixing
- Downmixing
- Tips and tricks
- Disabling auto mute on startup
- Hot-plugging a USB sound card
- Simultaneous output
- Keyboard volume control
- Virtual sound device using snd-aloop
- Debugging ALSA
- Retrieving the driver state
- Reconfiguring input/output ports
- Resetting codecs
- Correctly detect microphone plugged in a 4-pin 3.5mm (TRRS) jack
Ubuntu Documentation
If you cannot hear any sounds on your computer, for example when you try to play music, go through the following troubleshooting tips.
Make sure that the sound is not muted
Open the system menu and make sure that the sound is not muted or turned down.
Some laptops have mute switches or keys on their keyboards — try pressing that key to see if it unmutes the sound.
You should also check that you have not muted the application that you are using to play sound (for example, your music player or movie player). The application may have a mute or volume button in its main window, so check that.
Also, you can check the Applications tab in the Sound GUI:
Open the Activities overview and start typing Sound .
Click on Sound to open the panel.
Under Volume Levels , check that your application is not muted.
Check that the speakers are turned on and connected properly
If your computer has external speakers, make sure that they are turned on and that the volume is turned up. Make sure that the speaker cable is securely plugged into the “output” audio socket on your computer. This socket is usually light green in color.
Some sound cards can switch between the socket they use for output (to the speakers) and the socket for input (from a microphone, for instance). The output socket may be different when running Linux, Windows or Mac OS. Try connecting the speaker cable to a different audio socket on your computer.
A final thing to check is that the audio cable is securely plugged into the back of the speakers. Some speakers have more than one input, too.
Check that the correct sound device is selected
Some computers have multiple “sound devices” installed. Some of these are capable of outputting sound and some are not, so you should check that you have the correct sound device selected. This might involve some trial-and-error to choose the right one.
Open the Activities overview and start typing Sound .
Click on Sound to open the panel.
Under Output , change the Profile settings for the selected device and play a sound to see if it works. You might need to go through the list and try each profile.
If that does not work, you might want to try doing the same for any other devices that are listed.
Check that the sound card was detected properly
Your sound card may not have been detected properly probably because the drivers for the card are not installed. You may need to install the drivers for the card manually. How you do this depends on the type of the card.
Run the lspci command in the Terminal to find out what sound card you have:
Go to the Activities overview and open a Terminal.
Run lspci as superuser ; either type sudo lspci and type your password, or type su , enter the root (administrative) password, then type lspci .
Check if an audio controller or audio device is listed: in such case you should see the make and model number of the sound card. Also, lspci -v shows a list with more detailed information.
You may be able to find and install drivers for your card. It is best to ask on support forums (or otherwise) for your Linux distribution for instructions.
If you cannot get drivers for your sound card, you might prefer to buy a new sound card. You can get sound cards that can be installed inside the computer and external USB sound cards.
Источник
Управление уровнем звука из командной строки Ubuntu
Оригинал: Control Audio volume through the Ubuntu Command Line
Автор: Karim Buzdar
Дата публикации: 10 июля 2019 года
Перевод: А. Кривошей
Дата перевода: февраль 2020 г.
Человек, разбирающийся в терминале, найдет способ выполнить любое действие, находясь в командной строке. В основном мы делаем системные настройки в графическом интерфейсе Ubuntu, но есть определенные ситуации, когда вы можете сделать это из командной строки. ALSA или Advanced Linux Sound Architecture обеспечивает поддержку аудио для большинства дистрибутивов Linux.
В этой статье мы объясним, как вы можете установить пакет утилит ALSA, если он еще не установлен в вашей Ubuntu. Мы также объясним, как вы можете управлять звуковыми свойствами ваших звуковых карт с помощью:
Alsamixer — графический интерфейс для ALSA
Amixer — командный интерфейс для ALSA
Мы запускали команды и процедуры, упомянутые в этой статье, в системе Ubuntu 18.04 LTS.
Установка ALSA
Пакет Alsa-utils содержит утилиты Alsamixer и Amixer. Этот пакет доступен в официальных репозиториях Ubuntu и может быть легко установлен в командной строке с помощью команды apt-get.
Откройте терминал либо через системный поиск приложений, либо с помощью сочетания клавиш Ctrl+Alt+T.
Следующим шагом является обновление индекса репозиториев вашей системы с помощью следующей команды:
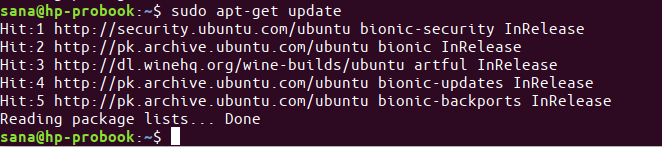
Это поможет вам установить последнии доступные версии программ из интернета. Обратите внимание, что только авторизованный пользователь может добавлять, удалять и настраивать программное обеспечение в Ubuntu.
Теперь вы готовы установить Alsa-utils; вы можете сделать это, выполнив следующую команду от имени sudo:

Система может попросить вас ввести пароль для sudo, а также запросить выбор Y/n для продолжения установки. Введите Y, а затем нажмите Enter; программное обеспечение будет установлено в вашей системе. Однако процесс может занять некоторое время в зависимости от скорости вашего интернета.
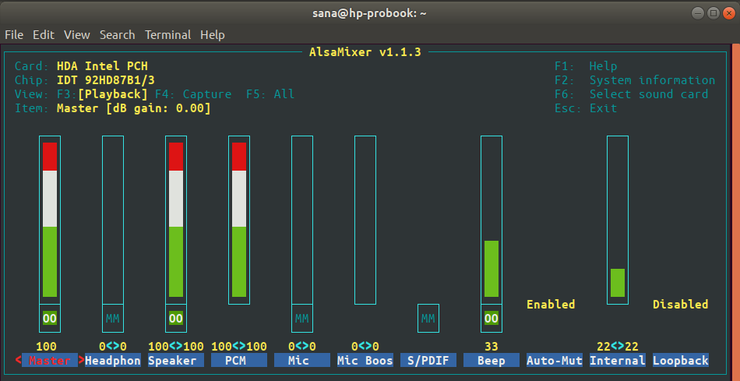
Использование Alsamixer — графического интерфейса для Alsa
Alsamixer предлагает графическое представление звуковых карт, установленных в вашей системе, и позволяет вам легко просматривать и управлять свойствами этих карт. Alsamixer создан на базе Ncurses, так что вы можете оставаться в терминале, работая с громкостью звуковой карты.
Вы можете запустить этот графический интерфейс, выполнив следующую команду в вашем терминале:
Alsamixer отобразит свойства вашей звуковой карты по умолчанию следующим образом:
Если вы не можете увидеть все свойства, как показано на снимке экрана выше, либо разверните окно терминала или используйте клавиши со стрелками влево и вправо, чтобы просмотреть свойства, которые не видны.
Представления Alsamixer
Когда вы открываете интерфейс Alsamixer, вы видите его в представлении Payback. Это означает, что из этого представления вы можете управлять только параметрами, связанными с воспроизведением звука. Два других вида, на которые вы можете переключиться:
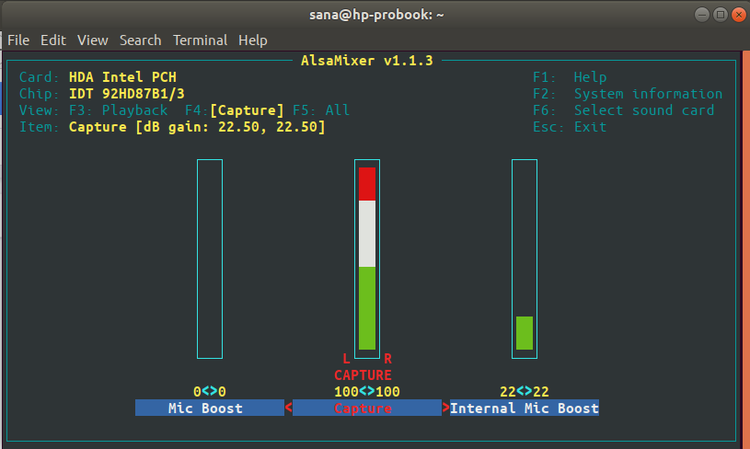
Представление Capture
Чтобы просмотреть свойства, относящиеся только к захвату звука, вы можете переключиться в режим Capture, нажав F4, когда открыт Alsamixer. Вот так выглядит представление Capture:
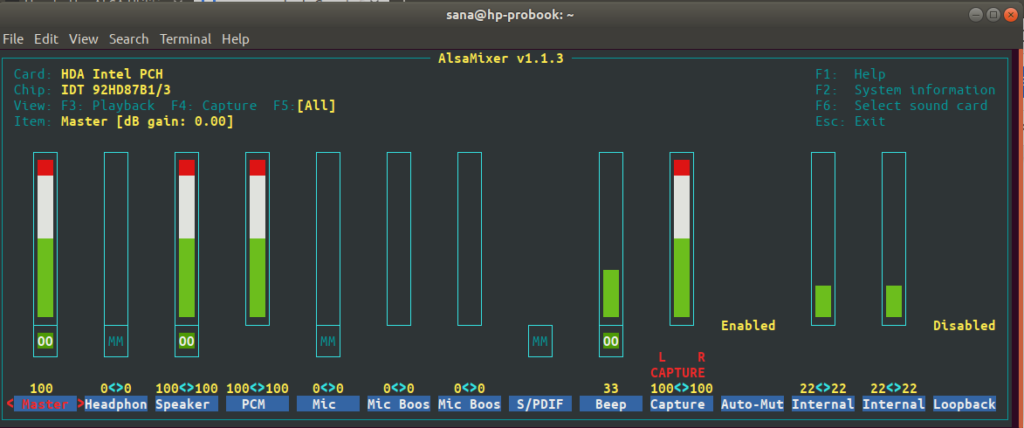
Представление All
Чтобы просмотреть свойства, связанные как с захватом, так и с воспроизведением звука, вы можете переключиться в режим «All», нажав клавишу F5, когда открыт Alsamixer. Вот так выглядит All:
Представление Playback
Чтобы вернуться в режим Playback, нажмите кнопку F3.
Выбор звуковой карты
Утилита Alsamixer отображает свойства карты, которая выбрана «по умолчанию». Для просмотра/редактирования свойств другой звуковой карты, установленной в вашей системе, вы можете нажать F6.
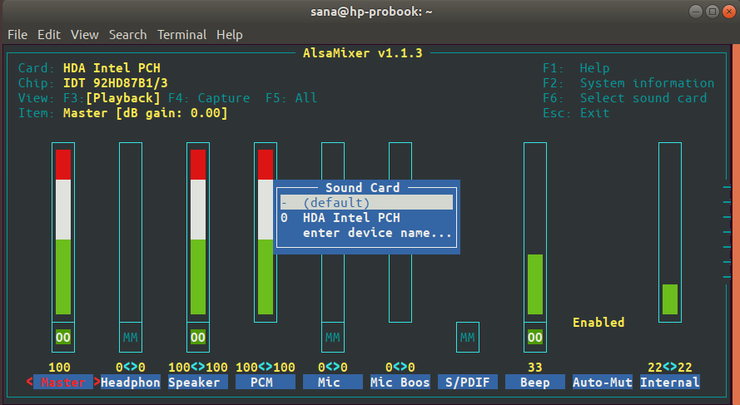
Меню звуковой карты, как показано выше, появляется при нажатии клавиши F6. Вы можете перемещаться вверх и вниз по меню и затем нажать Enter, чтобы выбрать другую карту. Вы также можете вручную ввести имя карты, если оно не отображается в списке, выбрав пункт меню «enter device name».
Вы можете выйти из этого меню, нажав Esc.
Управление свойствами звука
Самая важная часть использования Alsamixer — это возможность увеличивать и уменьшать громкость определенного устройства.
Вы можете перемещаться влево и вправо, чтобы выбрать устройство, громкость которого вы хотите увеличить, уменьшить или отключить.
Когда вы выбрали устройство, используйте клавиши вверх и вниз, чтобы увеличить или уменьшить громкость соответственно.
Чтобы отключить устройство/элемент управления, нажмите клавишу m, когда выбрано это свойство.
Для получения информации обо всем, что вы можете сделать с помощью Alsamixer, нажмите элемент управления F1. Это отобразит справку следующим образом:
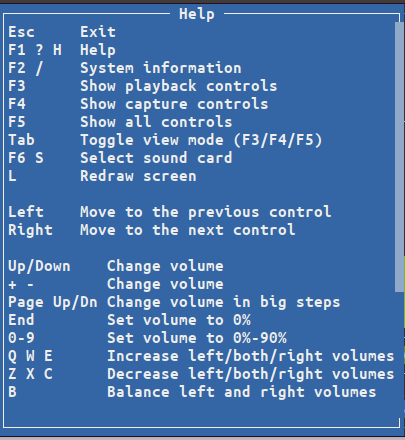
Вы можете использовать клавишу Esc, чтобы выйти из этого окна справки.
Использование Amixer для управления звуком с помощью команд
Amixer — это командный подход к управлению свойствами ваших звуковых карт. Он предоставляет набор команд, которые можно использовать для увеличения, уменьшения и даже отключения звука указанного устройства.
Введите следующую команду, чтобы увидеть все, что вы можете сделать с Amixer:
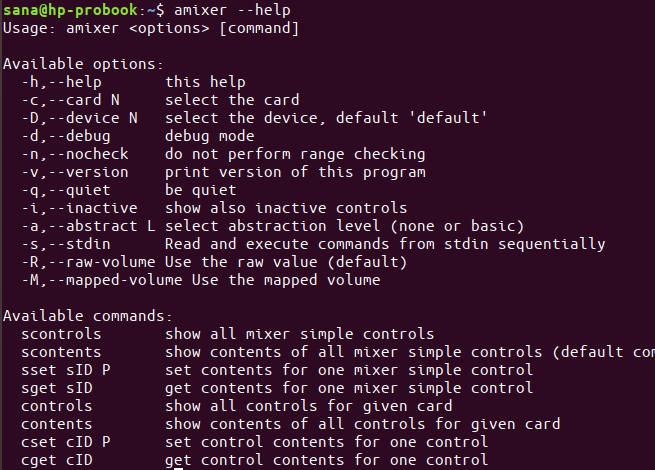
Ваша команда amixer выглядит в целом так:
Во всех ваших командах amixer вам нужно указывать три вещи:
1. Звуковая карта (номер карты), свойством которой вы хотите управлять.
2. Устройство/элемент управления, громкостью которого вы хотите управлять.
3. Значение громкости в процентах или децибелах, которое вы хотите установить, увеличить или уменьшить. Вы также можете указать, хотите ли вы отключить звук для звуковой карты.
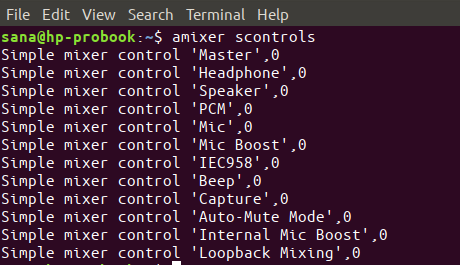
Команда scontrols позволяет просматривать список элементов управления, которыми вы можете управлять:
1. Следующая команда установит громкость на главном элементе управления/устройстве первой звуковой карты на 100%.
2. Следующая команда установит громкость на элементе управления/устройстве Speaker второй звуковой карты на 30%.
3. Следующая команда установит громкость на элементе управления/устройстве Speaker второй звуковой карты на 3 дБ.
4. Следующая команда увеличит громкость на элементе управления/устройстве Speaker второй звуковой карты на 2 дБ.
5. Используйте следующие команды, чтобы отключить или включить звук устройства.
Источник
Advanced Linux Sound Architecture
The Advanced Linux Sound Architecture (ALSA) provides kernel driven sound card drivers. It replaces the original Open Sound System (OSS).
Besides the sound device drivers, ALSA also bundles a user space driven library for application developers. They can then use those ALSA drivers for high level API development. This enables direct (kernel) interaction with sound devices through ALSA libraries.
Contents
Installation
ALSA is a set of built-in Linux kernel modules. Therefore, manual installation is not necessary.
udev will automatically detect your hardware and select needed drivers at boot time, therefore, your sound should already be working. However, your sound may be initially muted. If it is, see Unmuting the channels.
User privileges
Usually, local users have permission to play audio and change mixer levels.
To allow remote users to use ALSA, you need to add those users to the audio group, however this is not recommended by default (see note below).
ALSA utilities
Install the alsa-utils package. This contains (among other utilities) the alsamixer and amixer utilities. amixer is a shell command to change audio settings, while alsamixer provides a more intuitive ncurses based interface for audio device configuration.
If you need high quality resampling install the alsa-plugins package to enable upmixing/downmixing and other advanced features.
OSS compatibility
ALSA has some ability to intercept OSS calls and re-route them through ALSA instead. This emulation layer is useful e.g. for legacy applications which try to open /dev/dsp and write sound data to them directly. Without OSS or the emulation library, /dev/dsp will be missing, and the application will not produce any sound.
If you want OSS applications to work with dmix, install the alsa-oss package as well. Then load the snd-seq-oss , snd-pcm-oss and snd-mixer-oss kernel modules to enable OSS emulation.
PulseAudio compatibility
apulse AUR lets you use ALSA for applications that support only PulseAudio for sound. Usage is simply $ apulse yourapplication .
ALSA and systemd
The alsa-utils package comes with systemd unit configuration files alsa-restore.service and alsa-state.service by default.
These are automatically installed and activated during installation (via package provided symlink to sound.target). Neither will run by default, as they rely on some conscious decisions by the user to know which method should be preferred. The options are as follows:
- alsa-restore.service Reads /var/lib/alsa/asound.state on boot and writes updated values on shutdown, granted it is already present by having ran alsactl store at some point
- alsa-state.service (Re-)Starts alsactl in daemon mode to continouously keep track of, and persist, volume changes, again under the condition that the user has consciously started alsactl daemon at least once
Both methods are mutually exclusive and you can decide for one of the two approaches depending on your requirements, for further information see alsactl(1)
You can check their status using systemctl .
ALSA firmware
The alsa-firmware package contains firmware that may be required for certain sound cards (e.g. Creative SB0400 Audigy2).
sof-firmware and alsa-ucm-conf are required for few newer laptop models (end of 2019/2020) which implement their drivers with firmware provided by the Sound Open Firmware project.
Unmuting the channels
By default ALSA has all channels muted. Those have to be unmuted manually.
Unmute with amixer
Unmuting the sound card’s master volume can be done by using amixer:
Unmute with alsamixer
Unmuting the sound card can be done using alsamixer:
The MM label below a channel indicates that the channel is muted, and OO indicates that it is open.
Scroll to the Master and PCM channels with the ← and → keys and unmute them by pressing the m key.
Use the ↑ key to increase the volume and obtain a value of 0 dB gain. The gain can be found in the upper left next to the Item: field.
Unmute 5.1/7.1 sound
To get full 5.1 or 7.1 surround sound you will likely need to unmute other channels such as Front , Surround , Center , LFE (subwoofer) and Side . (Those are channel names with Intel HD Audio, they may vary with different hardware)
Enable the microphone
To enable your microphone, switch to the Capture tab with F4 and enable a channel with Space . See /Troubleshooting#Microphone if microphone does not work.
Test your changes
Next, test to see if sound works:
Change -c to fit your speaker setup. Use -c 8 for 7.1, for instance:
If audio is being outputted to the wrong device, try manually specifying it with the argument -D .
-D accepts PCM channel names as values, which can be retrieved by running the following:
If that does not work, consult the #Configuration section or the /Troubleshooting page.
Additional notes
- If your system has more than one soundcard, then you can switch between them by pressing F6
- Some cards need to have digital output muted or disabled in order to hear analog sound. For the Soundblaster Audigy LS mute the channel labeled IEC958 .
- Some machines, (like the Thinkpad T61), have a Speaker channel which must be unmuted and adjusted as well.
- Some machines, (like the Dell E6400) may also require the Front and Headphone channels to be unmuted and adjusted.
- If your volume adjustments seem to be lost after you reboot, try running alsamixer as root.
Configuration
The system configuration file is /etc/asound.conf , and the per-user configuration file is
Basic syntax
ALSA configuration files follow a simple syntax consisting of hierarchical value to parameter (key) assignments. The syntax is also shown in [2].
Assignments and Separators
Assignments define a value of a given key. There are different assignment types and styles available.
Separators are used to indicate the start and end of an assignment, but using commas or whitespace is also possible.
Compound assignments use braces as separators.
For easier reading, it is recommended to use first style for definitions including more than three keys.
Array definitions use brackets as separators.
Everything depends on user preferences when it comes to different styles of configuration, however one should avoid mixing different styles. Further information on basic configuration can be found in [3].
Data types
ALSA uses different data types for parameter values, which must be set in the users respective configuration file. Some keys accept multiple data types, while most do not. A list of configuration options and their respective type requirements for PCM plugins can be found in [4].
Operation modes
There are different operation modes for parsing nodes, the default mode is merge and create. If operation mode is either merge/create or merge type checking is done. Only same type assignments can be merged, so strings cannot be merged with integers. Trying to define a simple assignment in default operation mode to a compound (and vice versa) will also not work.
Prefixes of operation modes:
- «+» — merge and create
- «-» — merge
- «?» — do not override
- «!» — override
Using override operation mode, when done correctly, is usually safe, however one should bear in mind, that there might be other necessary keys in a node for proper functioning.
An example of setting default device using «defaults» node
Assuming that «defaults» node is set in /usr/share/alsa/alsa.conf , where «defaults.pcm.card» and its «ctl» counterpart have assignment values «0» (type integer), user wants to set default pcm and control device to (third) sound card «2» or «SB» for an Azalia sound card.
Using double quotes here automatically sets values data type to string, so in the above example setting defaults.pcm.!card «2» would result in retaining last default device, in this case card 0. Using double quotes for strings is not mandatory as long as no special characters are used, which ideally should never be the case. This may be irrelevant in other assignments.
Nesting
Sometimes it may be useful and even easier to read using nesting in configuration.
Including configuration files
Set the default sound card
Setting the default sound card via defaults node
To put the previous example regarding defaults.pcm.card and defaults.pcm.device into practice assuming we have 2 cards with index 0 and 1 respectively and wish to simply change the default card to index 1, would lead to the following configuration in /etc/asound.conf or the user-specific
/.asoundrc to change both the playback and the mixer control card.
Configuring the index order via kernel module options
If your sound card order changes on boot, you can specify their order in any file ending with .conf in /etc/modprobe.d ( /etc/modprobe.d/alsa-base.conf is suggested). For example, if you want your mia sound card to be #0:
Use $ cat /proc/asound/modules to get the loaded sound modules and their order. This list is usually all that is needed for the loading order. Use $ lsmod | grep snd to get a devices & modules list. This configuration assumes you have one mia sound card using snd_mia and one (e.g. onboard) card using snd_hda_intel .
You can also provide an index of -2 to instruct ALSA to never use a card as the primary one. Distributions such as Linux Mint and Ubuntu use the following settings to avoid USB and other «abnormal» drivers from getting index 0 :
These changes require a system reboot.
Select the default PCM via environment variable
Probably it is enough to set ALSA_CARD to the name of the device. First, get the names with aplay -l , then set ALSA_CARD to the name which comes after the colon and before the bracket; e.g. if you have
card 1: HDMI [HDA ATI HDMI], device 3: HDMI 0 [HDMI 0]
then set ALSA_CARD=HDMI.
Other variables are also checked in the default global configuration:
Alternatively, you can override the behavior in your own configuration file, preferably the global one (/etc/asound.conf). Add:
In this case as well, replace Audigy2 with the name of your device. You can get the names with aplay -l or you can also use PCMs like surround51. But if you need to use the microphone it is a good idea to select full-duplex PCM as default.
Now you can select the sound card when starting programs by just changing the environment variable ALSAPCM . It works fine for all program that do not allow to select the card, for the others ensure you keep the default card. For example, assuming you wrote a downmix PCM called mix51to20 you can use it with mplayer using the commandline ALSAPCM=mix51to20 mplayer example_6_channel.wav
Alternative method
First you will have to find out the card and device id that you want to set as the default:
/.asoundrc or if user deliberately wants to address sound card directly (digital output through eic958 or dedicated music server for example).
For example, the last entry in this list has the card ID 2 and the device ID 0. To set this card as the default, you can either use the system-wide file /etc/asound.conf or the user-specific file
/.asoundrc . You may have to create the file if it does not exist. Then insert the following options with the corresponding card.
In most cases it is recommended to use sound card names instead of number references. Card names are easier to grasp, and also overcomes the boot order problem. Therefore the following would be correct for the above example.
To get valid ALSA card names, use aplay:
Alternatively use cat, which might return unused devices:
The ‘pcm’ options affect which card and device will be used for audio playback while the ‘ctl’ option affects which card is used by control utilities like alsamixer.
The changes should take effect as soon as you (re-)start an application (MPlayer etc.). You can also test with a command like aplay.
If you receive an error regarding your asound configuration, check the upstream documentation for possible changes to the configuration file format.
Verifying correct sound modules are loaded
You can assume that udev will autodetect your sound properly. You can check this with the command:
If the output looks similar, your sound drivers have been successfully autodetected.
You might also want to check the directory /dev/snd/ for the right device files:
If you have at least the devices controlC0 and pcmC0D0p or similar, then your sound modules have been detected and loaded properly.
If this is not the case, your sound modules have not been detected properly. To solve this, you can try loading the modules manually:
- Locate the module for your sound card: ALSA Soundcard Matrix The module will be prefixed with ‘snd-‘ (for example: snd-via82xx ).
- Load the module.
- Check for the device files in /dev/snd (see above) and/or try if alsamixer or amixer have reasonable output.
- Configure snd-NAME-OF-MODULE and snd-pcm-oss to load at boot.
Getting S/PDIF output
S/PDIF is a digital audio interface often used to connect a computer to a digital amplifier (such as a home theatre with 5.1/7.1 surround sound).
Depending on what shell you use, add the following line to your shell’s configuration file:
You can see the name of your card’s digital output with:
System-wide equalizer
Using ALSAEqual (provides UI)
Install the alsaequal AUR package. Also install lib32-alsaequal AUR for 32-bit application support.
After installing the package, add the following to your ALSA configuration file:
And you are ready to change your equalizer using command
Note that configuration file is different for each user (until not specified else) it is saved in
/.alsaequal.bin . so if you want to use ALSAEqual with mpd or another software running under different user, you can configure it using
or for example, you can make a symlink to your .alsaequal.bin in his home directory.
Managing ALSAEqual states
Configure the equalizer as usual with
When you are satisfied with the state, you may give it a name («foo» in this example) and save it:
The state «foo» can then be restored at a later time with
This however only restores
/.alsaequal.bin . You then have to update the equalizer by alsamixer -D equal .
You can thus create different equalizer states for games, movies, music genres, VoIP apps, etc. and reload them as necessary.
See the project page and the help message for more options.
Using mbeq
Install the alsa-plugins , ladspa and swh-plugins packages if you do not already have them.
If you have not already created either an
/.asoundrc or a /etc/asound.conf file, then create either one and insert the following:
High quality resampling
When software mixing is enabled, ALSA is forced to resample everything to the same frequency (48 kHz by default when supported). By default, it will try to use the speexrate converter to do so, and fallback to low-quality linear interpolation if it is not available[6]. Thus, if you are getting poor sound quality due to bad resampling, the problem can be solved by simply installing the alsa-plugins package.
For even higher quality resampling, you can change the default rate converter to speexrate_medium or speexrate_best . Both perform well enough that in practice it does not matter which one you choose, so using the best converter is usually not worth the extra CPU cycles it requires.
To change the default converter place the following contents in your
/.asoundrc or /etc/asound.conf :
Upmixing/downmixing
Upmixing
In order for stereo sources like music to be able to saturate a 5.1 or 7.1 sound system, you need to use upmixing. In darker days this used to be tricky and error prone but nowadays plugins exist to easily take care of this task. We will use the upmix plugin, included in the alsa-plugins package.
Then add the following to your ALSA configuration file of choice (either /etc/asound.conf or
You can easily change this example for 7.1 upmixing to 5.1 or 4.0.
The following example adds a new PCM channel that you can use for upmixing. If you want all sound sources to go through this channel, add it as a default below the previous definition like so:
The plugin automatically allows multiple sources to play through it without problems so setting is as a default is actually a safe choice. If this is not working, you have to setup your own dmixer for the upmixing PCM like this:
and use «dmix6» instead of «surround71». If you experience skipping or distorted sound, consider increasing the buffer_size (to 32768, for example) or use a high quality resampler.
Downmixing
If you want to downmix sources to stereo because you, for instance, want to watch a movie with 5.1 sound on a stereo system, use the vdownmix plugin, included in the alsa-plugins package.
Again, in your configuration file, add this:
Mixing enables multiple applications to output sound at the same time. Most discrete sound cards support hardware mixing, which is enabled by default if available. Integrated motherboard sound cards (such as Intel HD Audio), usually do not support hardware mixing. On such cards, software mixing is done by an ALSA plugin called dmix . This feature is enabled automatically if hardware mixing is unavailable.
To manually enable dmix, add the following to your ALSA configuration file:
Tips and tricks
Disabling auto mute on startup
Auto-Mute Mode can be configured on startup with amixer . For example, to disable it:
Alternatively, the graphical interface can be utilized through alsamixer . In order to save any modifications, use:
Hot-plugging a USB sound card
Simultaneous output
You might want to play music via external speakers connected via mini jack and internal speakers simultaneously. This can be done by unmuting Auto-Mute item using alsamixer or amixer :
and then unmuting other required items, such as Headphones, Speaker, Bass Speaker.
Keyboard volume control
Map the following commands to your volume keys: XF86AudioRaiseVolume , XF86AudioLowerVolume , XF86AudioMute
To raise the volume:
To lower the volume:
To toggle mute/unmute of the volume:
Virtual sound device using snd-aloop
You might want a jack alternative to create a virtual recording or play device in order to mix different sources, using the snd-aloop module:
List your new virtual devices using:
now you can for example using ffmpeg:
In the hw:R,W,N format R is your virtual card device number, W 1 recording devices 0 for writing, N is your sub device you can use all the virtual devices available and play/stop using applications like mplayer:
Another thing you could do with this approach, is using festival to generate a voice into a recording stream using an script like this:
Debugging ALSA
Retrieving the driver state
The alsa-utils package also contains the alsa-info.sh command, which can be used to gather detailed data on the ALSA driver and user-space state.
Reconfiguring input/output ports
The alsa-tools package contains the hdajackretask tool, which can be used (on Intel HDA cards) to reconfigure the sound card input/output ports; for instance, to turn a microphone jack into a headphone jack.
Resetting codecs
The ALSA driver can fully reconfigure attached codecs (the parts of the sound system that actually process audio streams), by doing:
Before doing this, all processes using the ALSA driver (such as Pulseaudio or JACK) must be stopped.
Correctly detect microphone plugged in a 4-pin 3.5mm (TRRS) jack
On some modern laptops you may have a combined 3.5mm headset jack, instead of two separated ones, which may not be correctly detected by default. To make ALSA correctly detect plug-in status on your 3.5mm jack, you could put the following line into your /etc/modprobe.d/alsa-base.conf :
For complete list of options to put in your_model_setting , see HD-Audio Codec-Specific Models or its source located at /usr/lib/modules/$(uname -r)/build/Documentation/sound/hd-audio/models.rst (provided by the linux-docs package).
Tested with Gigabyte Aero15 2017 (P65 Model), with ALC255 and set model to dell-headset-multi .
Источник


