- Как включить RDP в Powershell на удаленном компьютере
- Включение RDP в Powershell используя WMI
- Enable-PSRemoting
- Syntax
- Description
- Examples
- Example 1: Configure a computer to receive remote commands
- Example 2: Configure a computer to receive remote commands without a confirmation prompt
- Example 3: Allow remote access on clients
- Example 4: Create a remote session to the newly enabled endpoint configuration
- Parameters
- Inputs
- Outputs
- Notes
- How to enable Remote Desktop using PowerShell on Windows 10
- How to enable Remote Desktop using PowerShell
- How to disable Remote Desktop using PowerShell
Как включить RDP в Powershell на удаленном компьютере
30 августа 2019
Для включения RDP в Powershell нет готовых команд, но мы можем включить эту возможность помощью редактирование параметров реестра.
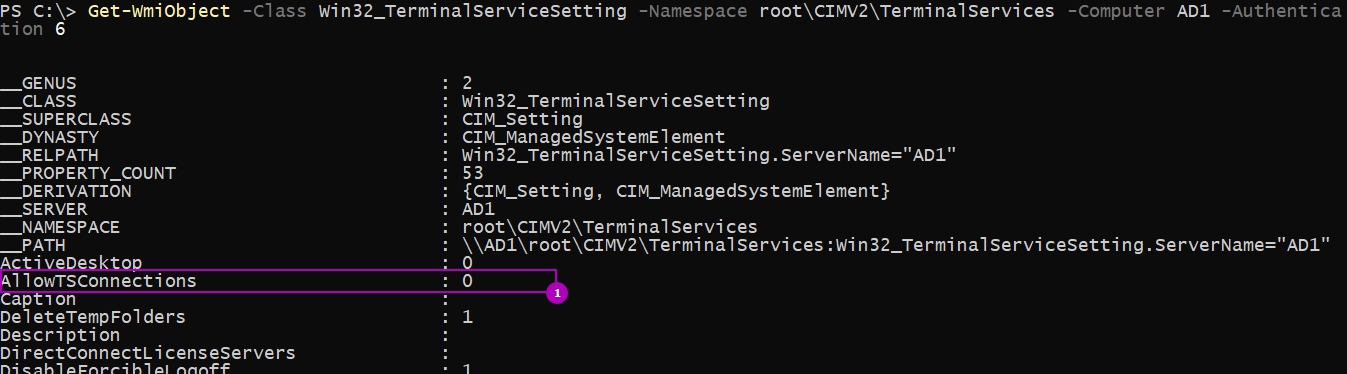
Свойства, которые мы будем редактировать выделены на скриншоте ниже:
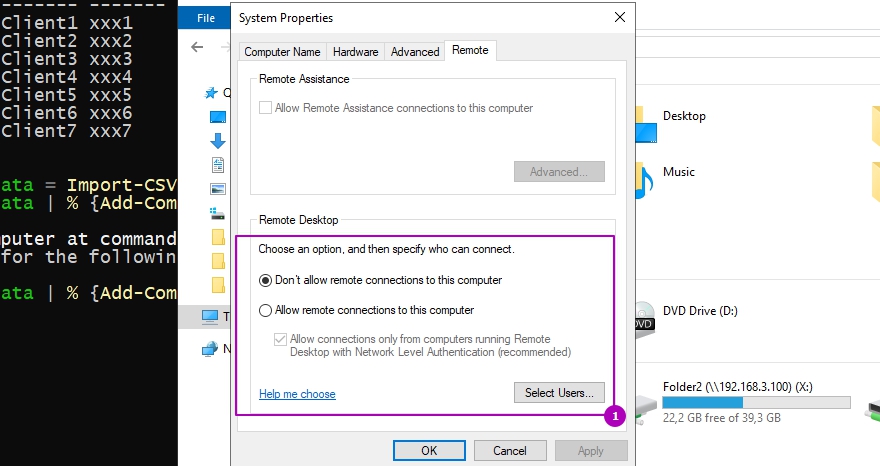
Если вы хотите включить терминальные сеанс RDP на компьютере на котором в данный момент работаете нужно сделать следующее:
Конечно консоль должна быть запущена от имени администратора либо под ним вы должны быть залогинены. Если вы измените значение на Value на 1, то мы отключим возможность RDP подключения.
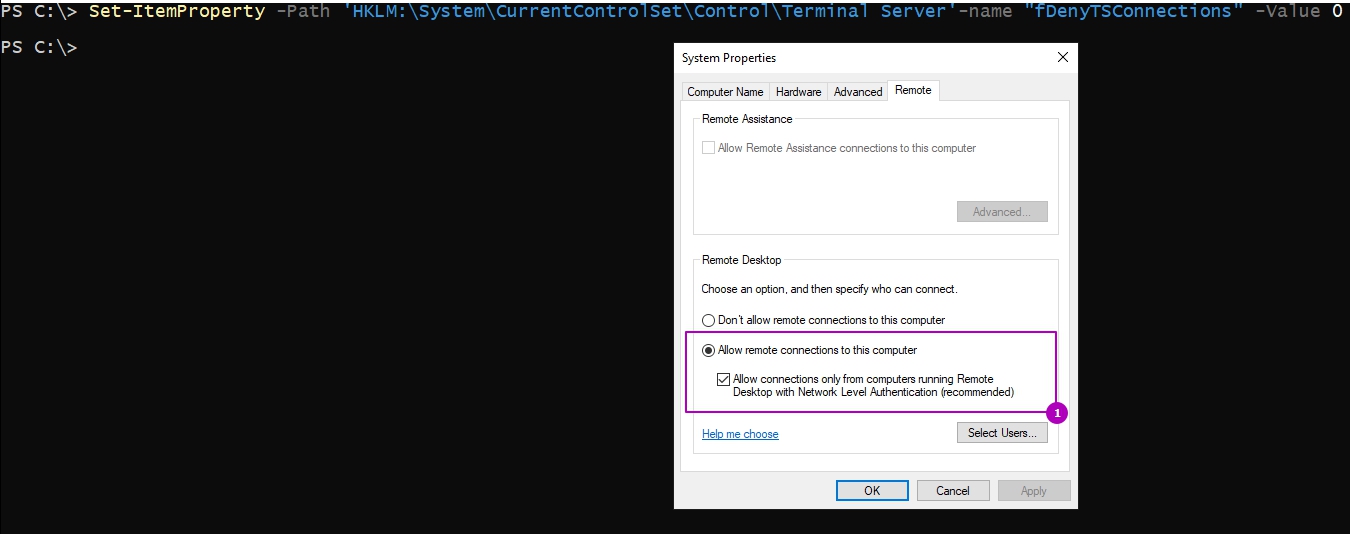
Если мы хотим снять галку с «Allow connections only from computers running Remote Desktop with Network Level Authentication» подойдет следующий командлет:
Возможно вы захотите сделать эту процедуру удаленно. Этот вопрос уже рассматривался в статье как выполнять команды Powershell удаленно и если вы столкнетесь с ошибками, то я бы советовал ее прочитать.
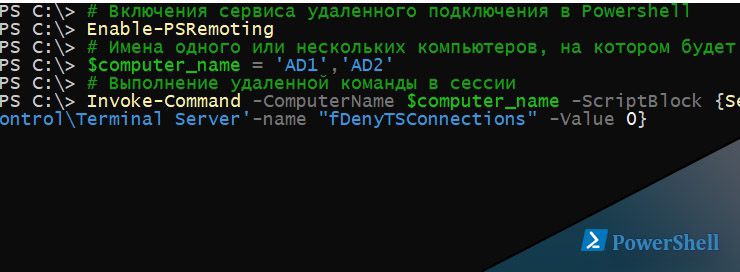
Рассмотрим пример удаленного выполнения команды в условиях где оба компьютера участники AD. Для этого нам нужно использовать имена компьютеров, а не IP. Если вы будете использовать IP, то смените проверку подлинности с Kerberos на NTLM и это потребует других настроек.
Для удаленного включения RDP в Powershell потребуется такая последовательность команд:
В моем случае я выполнял команду от имени администратора обоих компьютеров, поэтому мне не нужно было вводить учетные данные. Если вы хотите выполнить команду от другого пользователя добавьте ключ со значением -Credential (Get-Credential) после переменной $computer_name, у вас запросят учетные данные.
После этого вам может понадобиться включить правило на фаерволе:
Если этого правила нет, можно создать:
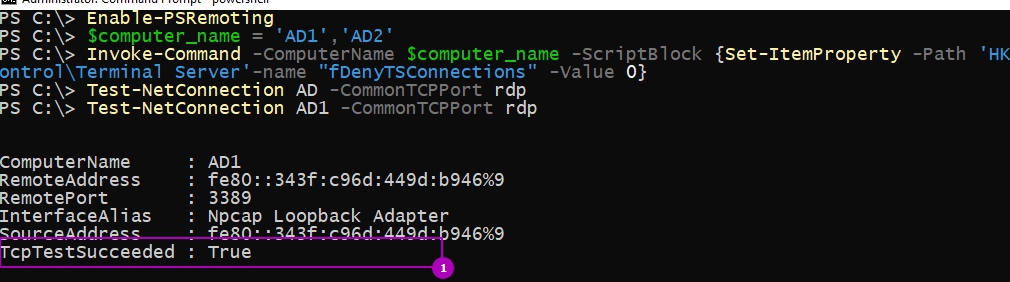
Ну и проверим, что порт открыт и работает:
Если пользователь не принадлежит к группе Администраторов компьютера, то может понадобиться его добавить в соответствующую группу:
Включение RDP в Powershell используя WMI
Так как мы можем работать с объектами WMI в Powershell, то можем включить настройки и таким способом. Если так мы можем увидеть состояние настройки на удаленном компьютере:
То таким образом включим:
Так как WMI использует другие порты, может потребоваться дополнительная настройка из статьи выше.
Enable-PSRemoting
Configures the computer to receive remote commands.
Syntax
Description
The Enable-PSRemoting cmdlet configures the computer to receive PowerShell remote commands that are sent by using the WS-Management technology. WS-Management based PowerShell remoting is currently supported only on Windows platform.
PowerShell remoting is enabled by default on Windows Server platforms. You can use Enable-PSRemoting to enable PowerShell remoting on other supported versions of Windows and to re-enable remoting if it becomes disabled.
You have to run this command only one time on each computer that will receive commands. You do not have to run it on computers that only send commands. Because the configuration starts listeners to accept remote connections, it is prudent to run it only where it is needed.
Enabling PowerShell remoting on client versions of Windows when the computer is on a public network is normally disallowed, but you can skip this restriction by using the SkipNetworkProfileCheck parameter. For more information, see the description of the SkipNetworkProfileCheck parameter.
Multiple PowerShell installations can exist side-by-side on a single computer. Running Enable-PSRemoting will configure a remoting endpoint for the specific installation version that you are running the cmdlet in. So if you run Enable-PSRemoting while running PowerShell 6.2, a remoting endpoint will be configured that runs PowerShell 6.2. If you run Enable-PSRemoting while running PowerShell 7-preview, a remoting endpoint will be configured that runs PowerShell 7-preview.
Enable-PSRemoting creates two remoting endpoint configurations as needed. If the endpoint configurations already exist, then they are simply ensured to be enabled. The created configurations are identical but have different names. One will have a simple name corresponding to the PowerShell version that hosts the session. The other configuration name contains more detailed information about the PowerShell version which hosts the session. For example, when running Enable-PSRemoting in PowerShell 6.2, you will get two configured endpoints named PowerShell.6, PowerShell.6.2.2. This allows you to create a connection to the latest PowerShell 6 host version by using the simple name PowerShell.6. Or you can connect to a specific PowerShell host version by using the longer name PowerShell.6.2.2.
To use the newly enabled remoting endpoints, you must specify them by name with the ConfigurationName parameter when creating a remote connection using the Invoke-Command , New-PSSession , Enter-PSSession cmdlets. For more information, see Example 4.
The Enable-PSRemoting cmdlet performs the following operations:
- Runs the Set-WSManQuickConfig cmdlet, which performs the following tasks:
- Starts the WinRM service.
- Sets the startup type on the WinRM service to Automatic.
- Creates a listener to accept requests on any IP address.
- Enables a firewall exception for WS-Management communications.
- Creates the simple and long name session endpoint configurations if needed.
- Enables all session configurations.
- Changes the security descriptor of all session configurations to allow remote access.
- Restarts the WinRM service to make the preceding changes effective.
To run this cmdlet on the Windows platform, start PowerShell by using the Run as administrator option. This cmdlet is not available on Linux or MacOS versions of PowerShell.
This cmdlet does not affect remote endpoint configurations created by Windows PowerShell. It only affects endpoints created with PowerShell version 6 and greater. To enable and disable PowerShell remoting endpoints that are hosted by Windows PowerShell, run the Enable-PSRemoting cmdlet from within a Windows PowerShell session.
Examples
Example 1: Configure a computer to receive remote commands
This command configures the computer to receive remote commands.
Example 2: Configure a computer to receive remote commands without a confirmation prompt
This command configures the computer to receive remote commands. The Force parameter suppresses the user prompts.
Example 3: Allow remote access on clients
This example shows how to allow remote access from public networks on client versions of the Windows operating system. The name of the firewall rule can be different for different versions of Windows. Use Get-NetFirewallRule to see a list of rules. Before enabling the firewall rule, view the security settings in the rule to verify that the configuration is appropriate for your environment.
By default, Enable-PSRemoting creates network rules that allow remote access from private and domain networks. The command uses the SkipNetworkProfileCheck parameter to allow remote access from public networks in the same local subnet. The command specifies the Force parameter to suppress confirmation messages.
The SkipNetworkProfileCheck parameter does not affect server versions of the Windows operating system, which allow remote access from public networks in the same local subnet by default.
The Set-NetFirewallRule cmdlet in the NetSecurity module adds a firewall rule that allows remote access from public networks from any remote location. This includes locations in different subnets.
Example 4: Create a remote session to the newly enabled endpoint configuration
This example shows how to enable PowerShell remoting on a computer, find the configured endpoint names, and create a remote session to one of the endpoints.
The first command enables PowerShell remoting on the computer.
The second command lists the endpoint configurations.
The third command creates a remote PowerShell session to the same machine, specifying the PowerShell.6 endpoint by name. The remote session will be hosted with the latest PowerShell 6 version (6.2.2).
The last command accesses the $PSVersionTable variable in the remote session to display the PowerShell version that is hosting the session.
The name of the firewall rule can be different depending on the version of Windows. Use the Get-NetFirewallRule cmdlet to list the names of the rules on your system.
Parameters
Prompts you for confirmation before running the cmdlet.
| Type: | SwitchParameter |
| Aliases: | cf |
| Position: | Named |
| Default value: | False |
| Accept pipeline input: | False |
| Accept wildcard characters: | False |
Forces the command to run without asking for user confirmation.
| Type: | SwitchParameter |
| Position: | Named |
| Default value: | None |
| Accept pipeline input: | False |
| Accept wildcard characters: | False |
Indicates that this cmdlet enables remoting on client versions of the Windows operating system when the computer is on a public network. This parameter enables a firewall rule for public networks that allows remote access only from computers in the same local subnet.
This parameter does not affect server versions of the Windows operating system, which, by default, have a local subnet firewall rule for public networks. If the local subnet firewall rule is disabled on a server version, Enable-PSRemoting re-enables it, regardless of the value of this parameter.
To remove the local subnet restriction and enable remote access from all locations on public networks, use the Set-NetFirewallRule cmdlet in the NetSecurity module.
This parameter was introduced in PowerShell 3.0.
| Type: | SwitchParameter |
| Position: | Named |
| Default value: | None |
| Accept pipeline input: | False |
| Accept wildcard characters: | False |
Shows what would happen if the cmdlet runs. The cmdlet is not run.
| Type: | SwitchParameter |
| Aliases: | wi |
| Position: | Named |
| Default value: | False |
| Accept pipeline input: | False |
| Accept wildcard characters: | False |
Inputs
None
You cannot pipe input to this cmdlet.
Outputs
This cmdlet returns strings that describe its results.
Notes
This cmdlet is only available on Windows platforms.
On server versions of the Windows operating system, Enable-PSRemoting creates firewall rules for private and domain networks that allow remote access, and creates a firewall rule for public networks that allows remote access only from computers in the same local subnet.
On client versions of the Windows operating system, Enable-PSRemoting creates firewall rules for private and domain networks that allow unrestricted remote access. To create a firewall rule for public networks that allows remote access from the same local subnet, use the SkipNetworkProfileCheck parameter.
On client or server versions of the Windows operating system, to create a firewall rule for public networks that removes the local subnet restriction and allows remote access , use the Set-NetFirewallRule cmdlet in the NetSecurity module to run the following command: Set-NetFirewallRule -Name «WINRM-HTTP-In-TCP-PUBLIC» -RemoteAddress Any
Enable-PSRemoting enables all session configurations by setting the value of the Enabled property of all session configurations to $True .
Enable-PSRemoting removes the Deny_All and Network_Deny_All settings. This provides remote access to session configurations that were reserved for local use.
How to enable Remote Desktop using PowerShell on Windows 10
You can quickly enable or disable Remote Desktop on Windows 10 using the PowerShell commands, and here’s how.

On Windows 10, the Remote Desktop feature allows you to access a computer remotely to help other users or manage services without having to physically be present at the location.
While you can manage this feature through the Settings app, you can also enable or disable Remote Desktop on Windows 10 using PowerShell. You may want to use this method to create a script that you can use to quickly configure Remote Desktop on multiple devices, or send the script to a user, which they can just simply double-click to set up the feature automatically without additional steps.
In this guide, you’ll learn the steps to use PowerShell to enable or disable Remote Desktop on Windows 10, and the steps to open the required firewall ports for a successful connection.
How to enable Remote Desktop using PowerShell
Use these steps to enable the remote desktop protocol with PowerShell:
Open Start on Windows 10.
Search for PowerShell, right-click the top result, and select the Run as administrator option.
Type the following command to enable the remote desktop protocol and press Enter:
 Enable Remote Desktop using PowerShell
(Optional) Type the following command to enable remote desktop through the Windows Firewall and press Enter:
Once you complete the steps, you’ll be able to use the Remote Desktop modern app or the old Remote Desktop Connection app to access your computer remotely even with the firewall enabled.
How to disable Remote Desktop using PowerShell
Use these steps to disable the remote desktop protocol with PowerShell:
Open Start.
Search for PowerShell, right-click the top result, and select the Run as administrator option.
Type the following command to disable the remote desktop protocol and press Enter:
 Disable Remote Desktop using PowerShell
(Optional) Type the following command to disable remote desktop through the Windows Firewall and press Enter:
After you complete the steps, the Remote Desktop feature will be disabled and the firewall port will be closed.
We’re focusing this guide on PowerShell, but you can use these steps to perform the same tasks using Command Prompt.
We may earn commission for purchases using our links to help keep offering the free content. Privacy policy info.
All content on this site is provided with no warranties, express or implied. Use any information at your own risk. Always backup of your device and files before making any changes. Privacy policy info.


