- Enable-PSRemoting
- Syntax
- Description
- Examples
- Example 1: Configure a computer to receive remote commands
- Example 2: Configure a computer to receive remote commands without a confirmation prompt
- Example 3: Allow remote access on clients
- Example 4: Create a remote session to the newly enabled endpoint configuration
- Parameters
- Inputs
- Outputs
- Notes
- Как включить PowerShell Remoting с помощью групповой политики
- Включение PowerShell Remoting с помощью групповой политики
- Настройка политики WinRM Listeners
- Настройка автозапуска службы WinRM
- Настройка брандмауэра Windows
- Chapter 8 — PowerShell remoting
- One-To-One Remoting
- One-To-Many Remoting
- PowerShell Sessions
- Summary
Enable-PSRemoting
Configures the computer to receive remote commands.
Syntax
Description
The Enable-PSRemoting cmdlet configures the computer to receive PowerShell remote commands that are sent by using the WS-Management technology. WS-Management based PowerShell remoting is currently supported only on Windows platform.
PowerShell remoting is enabled by default on Windows Server platforms. You can use Enable-PSRemoting to enable PowerShell remoting on other supported versions of Windows and to re-enable remoting if it becomes disabled.
You have to run this command only one time on each computer that will receive commands. You do not have to run it on computers that only send commands. Because the configuration starts listeners to accept remote connections, it is prudent to run it only where it is needed.
Enabling PowerShell remoting on client versions of Windows when the computer is on a public network is normally disallowed, but you can skip this restriction by using the SkipNetworkProfileCheck parameter. For more information, see the description of the SkipNetworkProfileCheck parameter.
Multiple PowerShell installations can exist side-by-side on a single computer. Running Enable-PSRemoting will configure a remoting endpoint for the specific installation version that you are running the cmdlet in. So if you run Enable-PSRemoting while running PowerShell 6.2, a remoting endpoint will be configured that runs PowerShell 6.2. If you run Enable-PSRemoting while running PowerShell 7-preview, a remoting endpoint will be configured that runs PowerShell 7-preview.
Enable-PSRemoting creates two remoting endpoint configurations as needed. If the endpoint configurations already exist, then they are simply ensured to be enabled. The created configurations are identical but have different names. One will have a simple name corresponding to the PowerShell version that hosts the session. The other configuration name contains more detailed information about the PowerShell version which hosts the session. For example, when running Enable-PSRemoting in PowerShell 6.2, you will get two configured endpoints named PowerShell.6, PowerShell.6.2.2. This allows you to create a connection to the latest PowerShell 6 host version by using the simple name PowerShell.6. Or you can connect to a specific PowerShell host version by using the longer name PowerShell.6.2.2.
To use the newly enabled remoting endpoints, you must specify them by name with the ConfigurationName parameter when creating a remote connection using the Invoke-Command , New-PSSession , Enter-PSSession cmdlets. For more information, see Example 4.
The Enable-PSRemoting cmdlet performs the following operations:
- Runs the Set-WSManQuickConfig cmdlet, which performs the following tasks:
- Starts the WinRM service.
- Sets the startup type on the WinRM service to Automatic.
- Creates a listener to accept requests on any IP address.
- Enables a firewall exception for WS-Management communications.
- Creates the simple and long name session endpoint configurations if needed.
- Enables all session configurations.
- Changes the security descriptor of all session configurations to allow remote access.
- Restarts the WinRM service to make the preceding changes effective.
To run this cmdlet on the Windows platform, start PowerShell by using the Run as administrator option. This cmdlet is not available on Linux or MacOS versions of PowerShell.
This cmdlet does not affect remote endpoint configurations created by Windows PowerShell. It only affects endpoints created with PowerShell version 6 and greater. To enable and disable PowerShell remoting endpoints that are hosted by Windows PowerShell, run the Enable-PSRemoting cmdlet from within a Windows PowerShell session.
Examples
Example 1: Configure a computer to receive remote commands
This command configures the computer to receive remote commands.
Example 2: Configure a computer to receive remote commands without a confirmation prompt
This command configures the computer to receive remote commands. The Force parameter suppresses the user prompts.
Example 3: Allow remote access on clients
This example shows how to allow remote access from public networks on client versions of the Windows operating system. The name of the firewall rule can be different for different versions of Windows. Use Get-NetFirewallRule to see a list of rules. Before enabling the firewall rule, view the security settings in the rule to verify that the configuration is appropriate for your environment.
By default, Enable-PSRemoting creates network rules that allow remote access from private and domain networks. The command uses the SkipNetworkProfileCheck parameter to allow remote access from public networks in the same local subnet. The command specifies the Force parameter to suppress confirmation messages.
The SkipNetworkProfileCheck parameter does not affect server versions of the Windows operating system, which allow remote access from public networks in the same local subnet by default.
The Set-NetFirewallRule cmdlet in the NetSecurity module adds a firewall rule that allows remote access from public networks from any remote location. This includes locations in different subnets.
Example 4: Create a remote session to the newly enabled endpoint configuration
This example shows how to enable PowerShell remoting on a computer, find the configured endpoint names, and create a remote session to one of the endpoints.
The first command enables PowerShell remoting on the computer.
The second command lists the endpoint configurations.
The third command creates a remote PowerShell session to the same machine, specifying the PowerShell.6 endpoint by name. The remote session will be hosted with the latest PowerShell 6 version (6.2.2).
The last command accesses the $PSVersionTable variable in the remote session to display the PowerShell version that is hosting the session.
The name of the firewall rule can be different depending on the version of Windows. Use the Get-NetFirewallRule cmdlet to list the names of the rules on your system.
Parameters
Prompts you for confirmation before running the cmdlet.
| Type: | SwitchParameter |
| Aliases: | cf |
| Position: | Named |
| Default value: | False |
| Accept pipeline input: | False |
| Accept wildcard characters: | False |
Forces the command to run without asking for user confirmation.
| Type: | SwitchParameter |
| Position: | Named |
| Default value: | None |
| Accept pipeline input: | False |
| Accept wildcard characters: | False |
Indicates that this cmdlet enables remoting on client versions of the Windows operating system when the computer is on a public network. This parameter enables a firewall rule for public networks that allows remote access only from computers in the same local subnet.
This parameter does not affect server versions of the Windows operating system, which, by default, have a local subnet firewall rule for public networks. If the local subnet firewall rule is disabled on a server version, Enable-PSRemoting re-enables it, regardless of the value of this parameter.
To remove the local subnet restriction and enable remote access from all locations on public networks, use the Set-NetFirewallRule cmdlet in the NetSecurity module.
This parameter was introduced in PowerShell 3.0.
| Type: | SwitchParameter |
| Position: | Named |
| Default value: | None |
| Accept pipeline input: | False |
| Accept wildcard characters: | False |
Shows what would happen if the cmdlet runs. The cmdlet is not run.
| Type: | SwitchParameter |
| Aliases: | wi |
| Position: | Named |
| Default value: | False |
| Accept pipeline input: | False |
| Accept wildcard characters: | False |
Inputs
None
You cannot pipe input to this cmdlet.
Outputs
This cmdlet returns strings that describe its results.
Notes
This cmdlet is only available on Windows platforms.
On server versions of the Windows operating system, Enable-PSRemoting creates firewall rules for private and domain networks that allow remote access, and creates a firewall rule for public networks that allows remote access only from computers in the same local subnet.
On client versions of the Windows operating system, Enable-PSRemoting creates firewall rules for private and domain networks that allow unrestricted remote access. To create a firewall rule for public networks that allows remote access from the same local subnet, use the SkipNetworkProfileCheck parameter.
On client or server versions of the Windows operating system, to create a firewall rule for public networks that removes the local subnet restriction and allows remote access , use the Set-NetFirewallRule cmdlet in the NetSecurity module to run the following command: Set-NetFirewallRule -Name «WINRM-HTTP-In-TCP-PUBLIC» -RemoteAddress Any
Enable-PSRemoting enables all session configurations by setting the value of the Enabled property of all session configurations to $True .
Enable-PSRemoting removes the Deny_All and Network_Deny_All settings. This provides remote access to session configurations that were reserved for local use.
Как включить PowerShell Remoting с помощью групповой политики
PowerShell Remoting — это очень мощный инструмент, которым пользуется каждый администратор. Он позволяет удаленно управлять клиентскими и серверными версиями Windows при помощи PowerShell.
В Windows Server 2016 и Windows Server 2012 R2 функция PowerShell Remoting включена по умолчанию. Однако в предыдущих версиях Windows Server, а также в клиентских версиях Windows эту функцию необходимо включать самостоятельно. Поскольку нецелесообразно и не удобно включать эту функцию персонально на каждом сервере (используя cmdlet Enable-PSRemoting в интерактивном режиме), мы воспользуемся групповой политикой.
Для включения PowerShell Remoting не существует конкретной политики, поэтому нам необходимо будет создать новую групповую политику и настроить все необходимые параметры. Мы создадим HTTP(S) Listener, настроим автоматический запуск службы WinRM и установим соответствующие правила в брандмауэре Windows.
Включение PowerShell Remoting с помощью групповой политики
Для начала откройте окно «Group Policy Management Console» и создайте новый объект групповой политики. Вам не нужно сразу применять групповую политику для целевой OU с серверами. Перед тем как применять политику ко всем серверам крайне рекомендуется сначала ее работу протестировать.
Настройка политики WinRM Listeners
В окне редактора GPO перейдите в раздел Computer Configuration -> Administrative Templates -> Windows Components -> Windows Remote Management (WinRM) -> WinRM Service
Откройте политику «Allow remote server management via WinRM» и выберите пункт «Enabled». В полях «iPv4 filter» и «iPv6 filter» введите символ (*), чтобы указать все IP-адреса. Для большей безопасности вы можете указать определенный диапазон IP-адресов, с которых будет доступно подключение через WinRM.

Настройка автозапуска службы WinRM
Запуск службы WinRM (по умолчанию) происходит автоматически, но это только в последних версиях Windows Server. Однако это не относится к клиентским компьютерам c Windows. Можно также запустить службу при помощи групповой политики. Следует помнить, что групповая политика запустит службу WinRM только после перезагрузки компьютера, т.е. через GPO не получится динамически запустить службу сразу на всех ПК.
Откройте окно Computer Configuration -> Windows Settings -> Security Settings -> System Services. В списке служба найдите и выберите службу «Windows Remote Management (WS-Management)». Откроется окно «Windows Remote Management (WS-Management) Properties». Выберите пункт «Automatic», как показано на рисунке ниже.

Настройка брандмауэра Windows
Откройте раздел групповых политик Computer Configuration -> Policies -> Windows Settings -> Security Settings -> Windows Firewall with Advanced Security
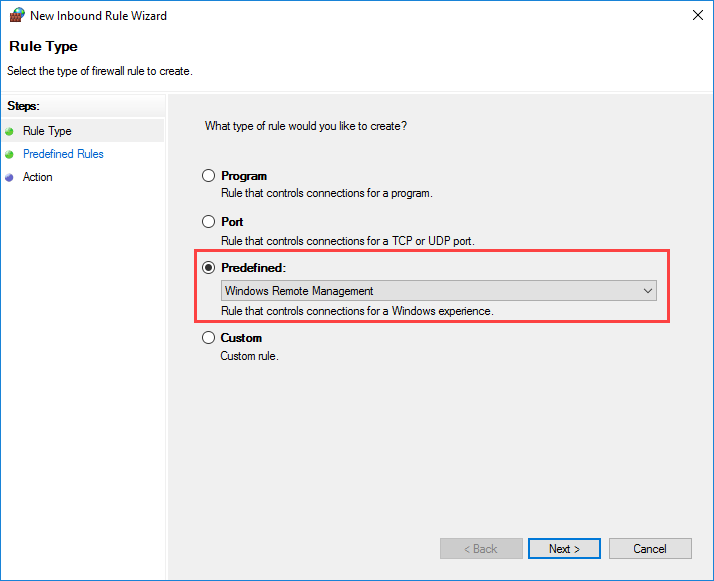
Щелкните правой кнопкой мыши по пункту «Inbound Rules» и выберите пункт «New Rule» для создания нового правила. В появившемся окне активируйте пункт «Predefined» и выберите значение «Windows Remote Management».
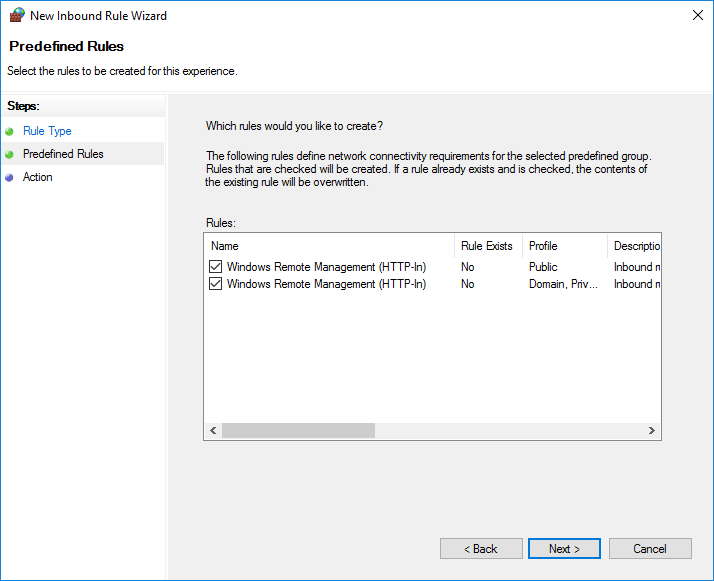
Из списка выберите необходимые типы сетей Domain / Private / Public для которых разрешено подключение через Windows Remote Managment.
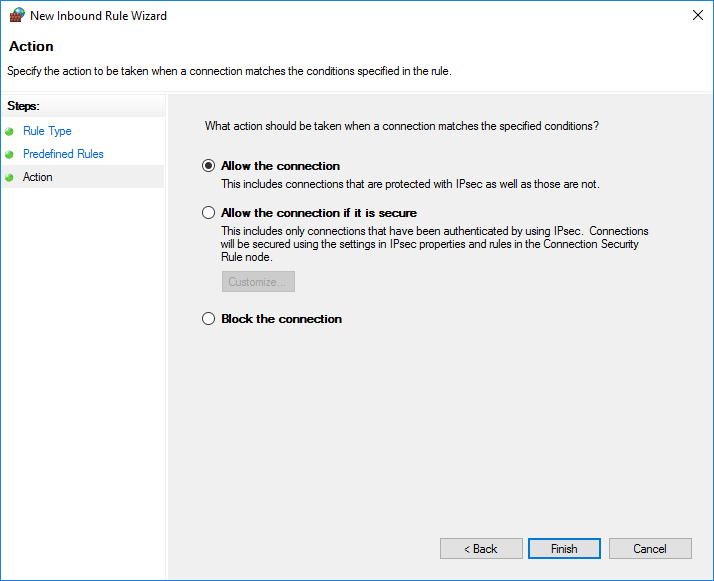
В заключении, выберите пункт «Allow the connection» и нажмите кнопку «Finish», после этого в брандмауэре Windows будет создано новое правило.
Осталось протестировать политику включения WinRm на тестовых OU и можно внедрят ее в продакшн!
Chapter 8 — PowerShell remoting
PowerShell has many different ways to run commands against remote computers. In the last chapter, you saw how to remotely query WMI using the CIM cmdlets. PowerShell also includes several cmdlets that have a built-in ComputerName parameter.
As shown in the following example, Get-Command can be used with the ParameterName parameter to determine what commands have a ComputerName parameter.
Commands such as Get-Process and Get-Hotfix have a ComputerName parameter. This isn’t the long-term direction that Microsoft is heading for running commands against remote computers. Even if you find a command that has a ComputerName parameter, chances are that you’ll need to specify alternate credentials and it won’t have a Credential parameter. And if you decided to run PowerShell from an elevated account, a firewall between you and the remote computer can block the request.
To use the PowerShell remoting commands that are demonstrated in this chapter, PowerShell remoting must be enabled on the remote computer. Use the Enable-PSRemoting cmdlet to enable PowerShell remoting.
One-To-One Remoting
If you want your remote session to be interactive, then one-to-one remoting is what you want. This type of remoting is provided via the Enter-PSSession cmdlet.
In the last chapter, I stored my domain admin credentials in a variable named $Cred . If you haven’t already done so, go ahead and store your domain admin credentials in the $Cred variable.
This allows you to enter the credentials once and use them on a per command basis as long as your current PowerShell session is active.
Create a one-to-one PowerShell remoting session to the domain controller named dc01.
Notice that in the previous example that the PowerShell prompt is preceded by [dc01] . This means you’re in an interactive PowerShell session to the remote computer named dc01. Any commands you execute run on dc01, not on your local computer. Also, keep in mind that you only have access to the PowerShell commands that exist on the remote computer and not the ones on your local computer. In other words, if you’ve installed additional modules on your computer, they aren’t accessible on the remote computer.
When you’re connected to a remote computer via a one-to-one interactive PowerShell remoting session, you’re effectively sitting at the remote computer. The objects are normal objects just like the ones you’ve been working with throughout this entire book.
When you’re done working with the remote computer, exit the one-to-one remoting session by using the Exit-PSSession cmdlet.
One-To-Many Remoting
Sometimes you may need to perform a task interactively on a remote computer. But remoting is much more powerful when performing a task on multiple remote computers at the same time. Use the Invoke-Command cmdlet to run a command against one or more remote computers at the same time.
In the previous example, three servers were queried for the status of the Windows Time service. The Get-Service cmdlet was placed inside the script block of Invoke-Command . Get-Service actually runs on the remote computer and the results are returned to your local computer as deserialized objects.
Piping the previous command to Get-Member shows that the results are indeed deserialized objects.
Notice that the majority of the methods are missing on deserialized objects. This means they’re not live objects; they’re inert. You can’t start or stop a service using a deserialized object because it’s a snapshot of the state of that object the point when the command ran on the remote computer.
That doesn’t mean you can’t start or stop a service using a method with Invoke-Command though. It just means that the method has to be called in the remote session.
I’ll stop the Windows Time service on all three of those remote servers using the Stop() method to prove this point.
As mentioned in a previous chapter, if a cmdlet exists for accomplishing a task, I recommend using it instead of using a method. In the previous scenario, I recommend using the Stop-Service cmdlet instead of the stop method. I chose to use the Stop() method to prove a point since many people are under the misconception that methods can’t be called when using PowerShell remoting. They can’t be called on the object that’s returned because it’s deserialized, but they can be called in the remote session itself.
PowerShell Sessions
In the last example in the previous section, I ran two commands using the Invoke-Command cmdlet. That means two separate sessions had to be set up and torn down to run those two commands.
Similar to the CIM sessions discussed in Chapter 7, a PowerShell session to a remote computer can be used to run multiple commands against the remote computer without the overhead of a new session for each individual command.
Create a PowerShell session to each of the three computers we’ve been working with in this chapter, DC01, SQL02, and WEB01.
Now use the variable named $Session to start the Windows Time service using a method and check the status of the service.
Once the session is created using alternate credentials, it’s no longer necessary to specify the credentials each time a command is run.
When you’re finished using the sessions, be sure to remove them.
Summary
In this chapter you’ve learned about PowerShell remoting, how to run commands in an interactive session with one remote computer, and how to run commands against multiple computers using one-to-many remoting. You’ve also learned the benefits of using a PowerShell session when running multiple commands against the same remote computer.


