- How to Disable/Enable SMB v 1.0 in Windows 10/Server 2016?
- Auditing Shared Folder Access via SMB v1.0
- Enable/Disable SMB 1.0 on Windows Server 2016/2019
- How to Enable/Disable SMBv1 on Windows 10?
- Disabling SMBv1 Client and Server via Group Policy
- Как включить SMB в Windows 10
- Обновление за апрель 2021 года:
- Включить SMB v1 в Windows 10 с помощью графического интерфейса
- Как узнать, включен ли SMBv2 на вашем ПК
How to Disable/Enable SMB v 1.0 in Windows 10/Server 2016?
In Windows Server 2016/2019 and Windows 10 (starting with build 1709), the Server Message Block 1.0 (SMBv1) network protocol used to access shared folders is disabled by default. In most cases, this protocol is required to access shared folders hosted on legacy systems, such as no longer supported Windows XP, Windows Server 2003 and older OSs. In this article, we’ll look on how to enable or disable SMBv1 client and server support on Windows 10 and Windows Server 2016/2019.
In one of the previous articles, we showed the table of client- and server-side SMB version compatibility. According to the table, old client versions (XP, Server 2003 and some *nix clients) can access network shared folders only using SMB v1.0 protocol. If there are no such clients in the network, you can completely disable SMB 1.0 on the side of file servers (including AD domain controllers) and client desktops.
In Windows 10 and Windows Server 2016, the SMBv1 protocol is split into two separate components – SMB client and SMB server, which can be enabled/disabled independently.
Auditing Shared Folder Access via SMB v1.0
Before disabling or completely removing SMB 1.0 driver on the side of the SMB file server, it’s worth making sure that there are no legacy clients that use it in your network. To do this, enable the audit of file server access over SMB v1.0 using the following PowerShell command:
Set-SmbServerConfiguration –AuditSmb1Access $true
After a couple of days, open the Event Viewer on the server, check the log Applications and Services -> Microsoft -> Windows -> SMBServer -> Audit and see if any clients accessed the file server over SMB1.
In our example, an event with EventID 3000 from the SMBServer source was found in the log. The event indicates that the client 192.168.1.10 is trying to access the server using the SMB1 protocol.
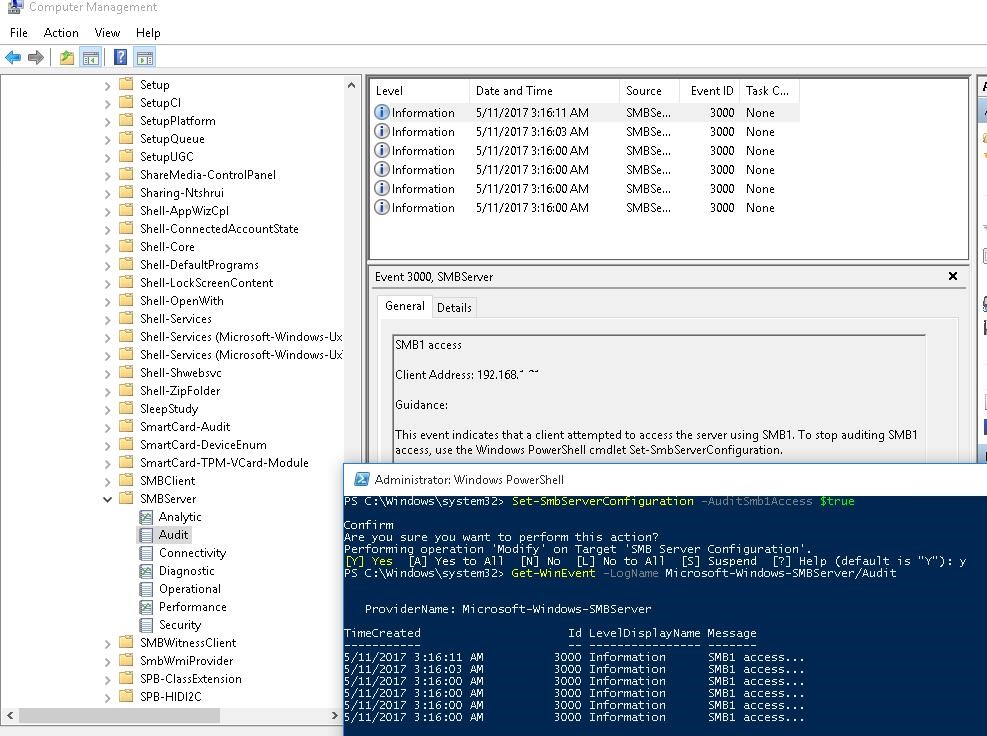
You need to find this computer or device on the network and update the OS or firmware to a version that supports newer SMB protocol versions: SMBv2 or SMBv3.
In our case we’ll ignore this information, but you should bear in mind that later this client won’t be able to access shared folders on this SMB server.
Enable/Disable SMB 1.0 on Windows Server 2016/2019
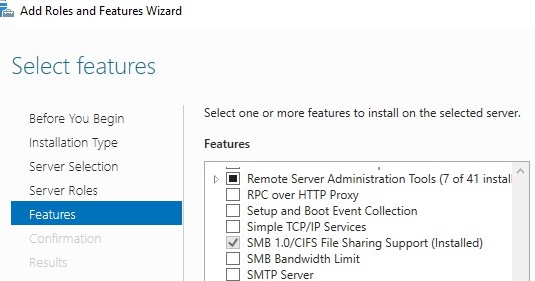
In Windows Server 2016 starting with build 1709 and Windows Server 2019, SMBv1 is disabled by default. To enable support for the SMBv1 client protocol in newer versions of Windows Server, you need to install the separate SMB 1.0/CIFS File Sharing Support feature.
You can install the SMBv1 feature using Server Manager, or through PowerShell.
You can check that SMBv1 is enabled with the PowerShell command:
To install the FS-SMB1 feature, run:
To uninstall the SMBv1 client feature (requires a reboot), run the command:
Uninstall-WindowsFeature –Name FS-SMB1 –Remove
Disable-WindowsOptionalFeature -Online -FeatureName SMB1Protocol -Remove
In order for your server to handle SMBv1.0 client access, you need to enable SMBv1 support at the SMB file server level in addition to the FS-SMB1 component. To check if SMBv1 access is enabled for network shares on your server, run:
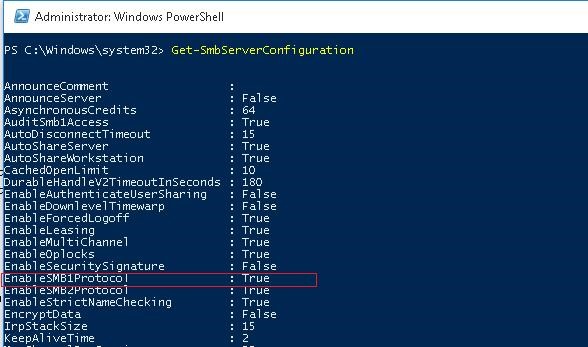
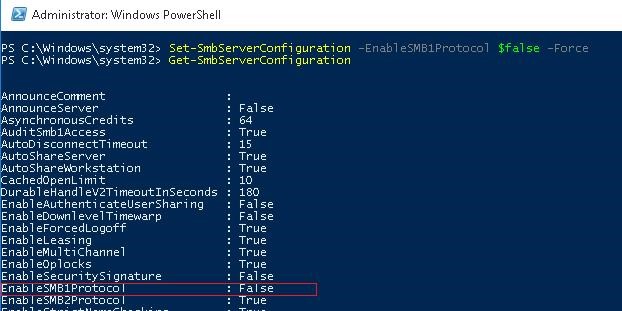
The line “ EnableSMB1Protocol: True ” means that you are allowed to access shared folders on this server using the SMBv1 protocol. To disable SMBv1 server support in Windows Server, run the PowerShell command:
Set-SmbServerConfiguration -EnableSMB1Protocol $false -Force
Now use the Get-SmbServerConfiguration cmdlet to make sure SMB1 server is disabled.
To enable SMBv1 support on the server, run the command:
Set-SmbServerConfiguration -EnableSMB1Protocol $True -Force
sc.exe config lanmanworkstation depend= bowser/mrxsmb20/nsi
sc.exe config mrxsmb10 start= disabled

How to Enable/Disable SMBv1 on Windows 10?
As we already said, in all new builds of Windows10 (starting from 1709) support for the SMB1 protocol is disabled (guest access via the SMBv2 protocol is also disabled).
In Windows 10, you can check the status of the SMBv1 protocol components with the DISM command:
Dism /online /Get-Features /format:table | find «SMB1Protocol»

In our example, you can see that all SMBv1 features are disabled:
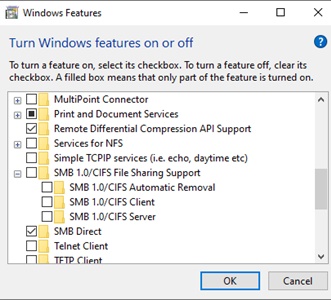
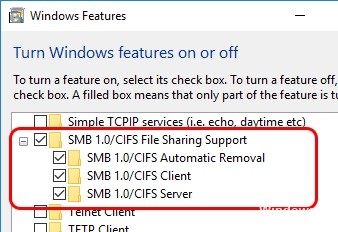
In Windows 10, you can also manage SMB 1 features from the Control Panel ( optionalfeatures.exe ). Expand the SMB 1.0 /CIFS File Sharing Support option. As you can see, 3 SMBv1 components are also available here:
- SMB 1.0/CIFS Automatic Removal
- SMB 1.0/CIFS Client
- SMB 1.0/CIFS Server
You can enable SMBv1 client and server on Windows 10 from the feature management window or using the commands:
Dism /online /Enable-Feature /FeatureName:»SMB1Protocol»
Dism /online /Enable-Feature /FeatureName:»SMB1Protocol-Client»
Dism /online /Enable-Feature /FeatureName:»SMB1Protocol-Server»
Enable-WindowsOptionalFeature -Online -FeatureName SMB1Protocol-Server
Enable-WindowsOptionalFeature -Online -FeatureName SMB1Protocol-Client
If after enabling SMBv1 client, it is not used for more than 15 days, it is automatically disabled.
To disable SMB1 client and server support in Windows 10, run the following DISM commands:
Dism /online /Disable-Feature /FeatureName:»SMB1Protocol»
Dism /online /Disable-Feature /FeatureName:»SMB1Protocol-Client»
Dism /online /Disable-Feature /FeatureName:»SMB1Protocol-Server»
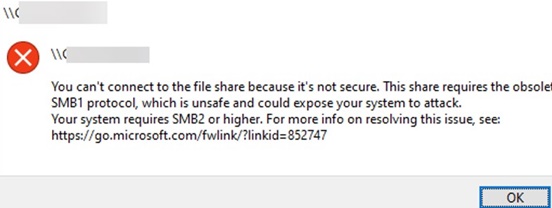
If you disabled the SMBv1 client in Windows 10, then when you access a snared folder on a file server that only supports SMBv1 (the SMBv2 and v3 protocols are disabled or not supported), you may receive the following errors:
Additionally, if you disable the SMBv1 client, the Computer Browser service, which is used by the legacy NetBIOS protocol to discover devices on the network, stops working on the computer. To correctly display neighboring computers on the Windows 10 network, you must configure the Feature Discovery Provider Host service (check this article).
Disabling SMBv1 Client and Server via Group Policy
In an Active Directory domain environment, you can disable SMBv1 on all servers and computers using Group Policies (GPOs). Since there is no separate SMB configuration policy in the standard Windows Group Policies, you will have to disable it through the registry policy.
- Open the Group Policy Management console ( gpmc.msc ), create a new GPO (disableSMBv1) and link it to the OU containing the computers on which you want to disable SMB1;
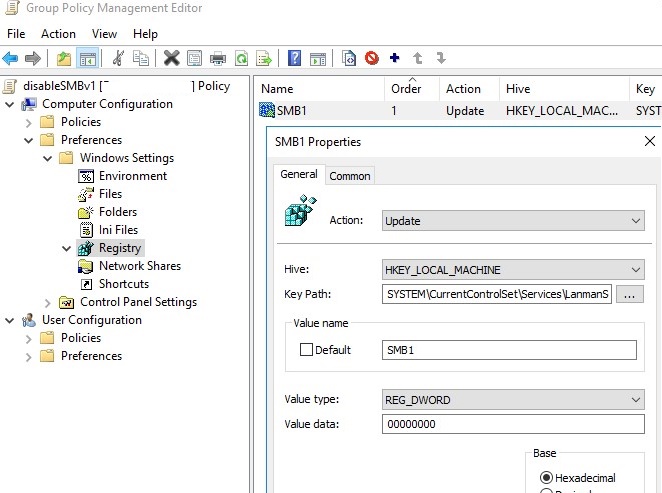
- Switch to the policy editing mode. Expand the GPO section Computer Configuration ->Preferences ->Windows Settings ->Registry;
- Create a new Registry Item with the following setting:
Action: Update
Hive: HKEY_LOCAL_MACHINE
Key Path: SYSTEM\CurrentControlSet\Services\LanmanServer\Parameters
Value name: SMB1
Value type: REG_DWORD
Value data: 0
This policy will disable support for the SMBv1 server component through the registry on all computers.
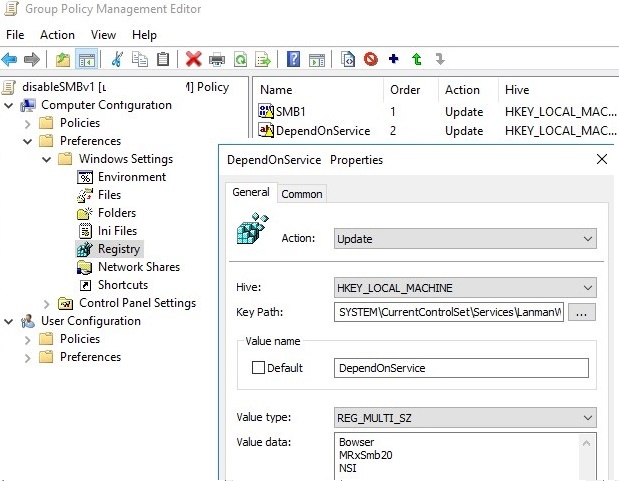
If you want to disable the SMB client on domain computers via GPO, create two additional registry parameters:
- The Start parameter (REG_DWORD type) with value 4 in the registry key HKLM\SYSTEM\CurrentControlSet\services\mrxsmb10;
- The DependOnService parameter (REG_MULTI_SZ type) with the value Bowser, MRxSmb20, NSI (each value on a new line) in the reg key HKLM\SYSTEM\CurrentControlSet\Services\LanmanWorkstation.
It remains to update the Group Policy settings on the clients ( gpupdate /force ) after the reboot make sure that the SMBv1 components are completely disabled.
- Configure SMB v1 server;
- Configure SMB v1 client driver.
Как включить SMB в Windows 10
Блок сообщений сервера (SMB) — это сетевой протокол обмена файлами, включенный в Windows 10, который позволяет читать и записывать файлы и выполнять другие запросы на обслуживание на сетевых устройствах. Как правило, вы используете SMB для подключения к устройствам, отличным от Windows, таким как маршрутизатор с возможностью обмена файлами, NAS (сетевое хранилище) или другие компьютеры под управлением Linux.
Вы можете использовать SMB практически во всех популярных настольных операционных системах, включая Windows 10, MacOS и Linux. SMB не включен по умолчанию в Windows 10. Для связи с сервером SMB необходимо сначала включить его в Windows 10. Это несложно включить, но не сразу очевидно, какие переключатели нужно включить. Вот что вам нужно сделать.
Реализация протокола SMB от Microsoft включает следующие дополнения:
- Диалект Переговоры
- Обнаружьте другие серверы протокола Microsoft SMB в сети или просмотрите сеть
- Печать в сети
- Аутентификация файлов, каталогов и общих ресурсов
- Блокировка файлов и записей
- Уведомление об изменениях файлов и каталогов
- Расширенное управление атрибутами файлов
- Поддержка Unicode
- Оппортунистические замки
Обновление за апрель 2021 года:
Теперь мы рекомендуем использовать этот инструмент для вашей ошибки. Кроме того, этот инструмент исправляет распространенные компьютерные ошибки, защищает вас от потери файлов, вредоносных программ, сбоев оборудования и оптимизирует ваш компьютер для максимальной производительности. Вы можете быстро исправить проблемы с вашим ПК и предотвратить появление других программ с этим программным обеспечением:
- Шаг 1: Скачать PC Repair & Optimizer Tool (Windows 10, 8, 7, XP, Vista — Microsoft Gold Certified).
- Шаг 2: Нажмите «Начать сканирование”, Чтобы найти проблемы реестра Windows, которые могут вызывать проблемы с ПК.
- Шаг 3: Нажмите «Починить все», Чтобы исправить все проблемы.

Включить SMB v1 в Windows 10 с помощью графического интерфейса

- Перейдите в окно «Дополнительные функции» Windows.
- Нажмите клавишу Windows + R, чтобы позвонить и войти в диалог запуска:
optionalfeatures - Установить поддержку SMB 1
- В окне «Включение или выключение компонентов Windows» разверните «Поддержка общего доступа к файлам SMB 1.0 / CIFS» и установите флажок рядом с «Клиент SMB 1.0 / CIFS».
- нажмите OK
Теперь установка будет продолжена, и вы сможете снова получить доступ к общим ресурсам по протоколу SMB 1.
Если вы предпочитаете выполнять установку из командной строки, используйте следующую команду в поднятом приглашении Powershell:
Enable-WindowsOptionalFeature -Online -FeatureName «Клиент протокола SMB1» -Все
Как узнать, включен ли SMBv2 на вашем ПК
Если вы больше не можете получить доступ к сетевым файлам, ваше устройство, вероятно, все еще использует Протокол SMB версии 1, который больше не поддерживается Windows 10. Вот обходной путь для восстановления доступа к вашим файлам.
SMB версии 2 должен быть включен по умолчанию при установке Windows 10, но вы можете проверить это, выполнив следующие действия:
- Откройте «Старт».
- Найдите PowerShell, щелкните правой кнопкой мыши верхний результат и выберите Запуск от имени администратора.
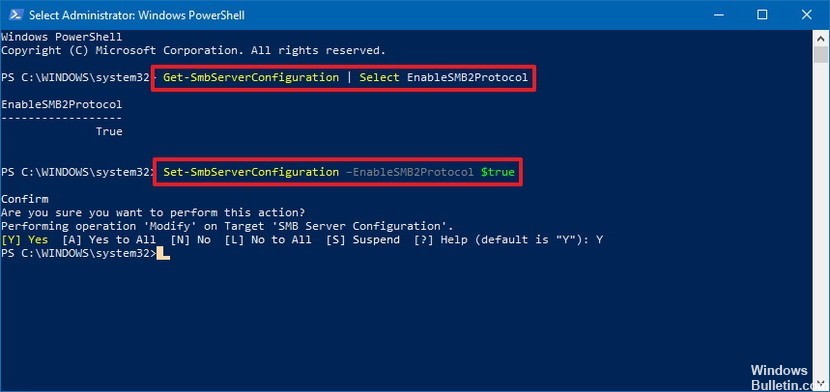
- Введите следующую команду, чтобы убедиться, что SMBv2 включен, затем нажмите Enter
- Если вывод возвращает True, тогда SMBv2 включен. Если вывод False, активируйте его с помощью этой команды и нажмите Enter:
Если вы не знакомы с SMB, его активация — это только первый шаг в настройке. Вам, вероятно, придется поработать. Если в какой-то момент вас попросят указать порт для вашей системы Windows 10, попробуйте 445 или 139.
Настроить SMB немного сложно, но оно того стоит. Если вам нужно использовать разные операционные системы, такие как Mac и ПК с Windows 10, вы обнаружите, что общий доступ к сети — это самый простой способ перемещать файлы между ними. На самом деле это проще, чем использовать USB, потому что две операционные системы не используют одну и ту же файловую систему. Вы можете попробовать USB на exFAT, но тогда вам понадобится специальный жесткий диск только для передачи файлов. Еще одно большое преимущество использования SMB — это степень контроля, которую вы имеете, поэтому вы можете ограничить доступ к некоторым файлам, но разрешить доступ к ним другим.

CCNA, веб-разработчик, ПК для устранения неполадок
Я компьютерный энтузиаст и практикующий ИТ-специалист. У меня за плечами многолетний опыт работы в области компьютерного программирования, устранения неисправностей и ремонта оборудования. Я специализируюсь на веб-разработке и дизайне баз данных. У меня также есть сертификат CCNA для проектирования сетей и устранения неполадок.


