- Configure the Simple Network Management Protocol (SNMP) Service in Windows Server 2003
- Summary
- Configure SNMP agent information
- Configure SNMP communities and traps
- Configure SNMP security for a community
- Установка и настройка службы SNMP в Windows 10
- Установка службы SNMP в WIndows 10
- Настройка службы SNMP в Windows 10
- Setting up the WMI SNMP Environment
- Installing the SNMP Provider
- Creating an SNMP Namespace
- Inserting SNMP MIB Data into WMI
- Setting Up SNMP Communities
- Generating MOF Files from MIB Files
- Adding SNMP MOF Files to the WMI Repository
Configure the Simple Network Management Protocol (SNMP) Service in Windows Server 2003
This article describes how to configure the Simple Network Management Protocol (SNMP) Service in Windows Server 2003. This article describes how to configure SNMP agent properties, SNMP traps, and SNMP security.
Original product version: В Windows Server 2003
Original KB number: В 324263
Summary
The SNMP Service, when configured for an agent, generates trap messages that are sent to a trap destination, if any specific events occur. For example, you can configure the SNMP service to send a trap when it receives a request for information that does not contain the correct community name and does not match an accepted host name for the service.
Configure SNMP agent information
Click Start, point to Control Panel, point to Administrative Tools, and then click Computer Management.
In the console tree, expand Services and Applications, and then click Services.
In the right pane, double-click SNMP Service.
Click the Agent tab.
Type the name of the user or administrator of the computer in the Contact box, and then type the physical location of the computer or contact in the Location box.
These comments are treated as text and are optional.
Under Service, click to select the check boxes next to the services that are provided by your computer. Service options are:
- Physical: Specifies whether the computer manages physical devices, such as a hard disk partition.
- Applications: Specifies whether the computer uses any programs that send data by using TCP/IP.
- Datalink and subnetwork: Specifies whether this computer manages a TCP/IP subnetwork or datalink, such as a bridge.
- Internet: Specifies whether this computer acts as an IP gateway (router).
- End-to-end: Specifies whether this computer acts as an IP host.
Click OK.
If you have installed additional TCP/IP network devices, such as a switch or a router, see Request for Comments (RFC) 1213 for additional information. To view RFC 1213, visit the Internet Engineering Task Force (IETF) Web site
Microsoft provides third-party contact information to help you find technical support. This contact information may change without notice. Microsoft does not guarantee the accuracy of this third-party contact information.
Configure SNMP communities and traps
Click Start, point to Control Panel, point to Administrative Tools, and then click Computer Management.
In the console tree, expand Services and Applications, and then click Services.
In the right pane, double-click SNMP Service.
Click the Traps tab.
In the Community name box, type the case-sensitive community name to which this computer will send trap messages, and then click Add to list.
Under Trap destinations, click Add.
In the Host name, IP or IPX address box, type the name, IP, or IPX address of the host, and then click Add.
The host name or address appears in the Trap destinations list.
Repeat steps 5 through 7 to add the communities and trap destinations that you want.
Click OK.
Configure SNMP security for a community
- Click Start, point to Control Panel, point to Administrative Tools, and then click Computer Management.
- In the console tree, expand Services and Applications, and then click Services.
- In the right pane, double-click SNMP Service.
- Click the Security tab.
- Click to select the Send authentication trap check box (if it is not already selected) if you want a trap message sent whenever authentication fails.
- Under Accepted community names, click Add.
- To specify how the host processes SNMP requests from the selected community, click the permission level that you want in the Community Rights box.
- In the Community Name box, type the case-sensitive community name that you want, and then click Add.
- Specify whether or not to accept SNMP packets from a host. To do so, do one of the following:
- To accept SNMP requests from any host on the network, regardless of identity, click Accept SNMP packets from any host.
- To limit the acceptance of SNMP packets, click Accept SNMP packets from these hosts, click Add, and then type the appropriate host name, IP, or IPX address in the Host name, IP or IPX address box.
- Click Add.
- Click OK.
If you remove all of the community names, including the default name Public, SNMP does not respond to any community names that are presented.
Установка и настройка службы SNMP в Windows 10
Протокол Simple Network Management Protocol (SNMP) используется для мониторинга, оповещения о событиях и управления устройствами в сети. Протокол состоит из набора стандартов по управления сетью, в том числе протокол прикладного уровня (Application Layer protocol), схемы базы данных и набор объектов данных. SNMP может получать различную информацию (время аптайма, счетчики производительности, параметры устройств и т.д.) от любых сетевых устройств: коммутаторов, серверов, маршрутизаторов или простых компьютеров, на которых установлен агент SNMP.
В Windows 10 служба SNMP доступна в виде отдельного компонента Windows и по умолчанию не устанавливается. Рассмотрим, как установить и настроить SNMP в Windows 10.
Установка службы SNMP в WIndows 10
Вы можете проверить, установлена ли в вашей системе служба SNMP с помощью PowerShell командлета Get-Service:
Get-Service -Name snmp*
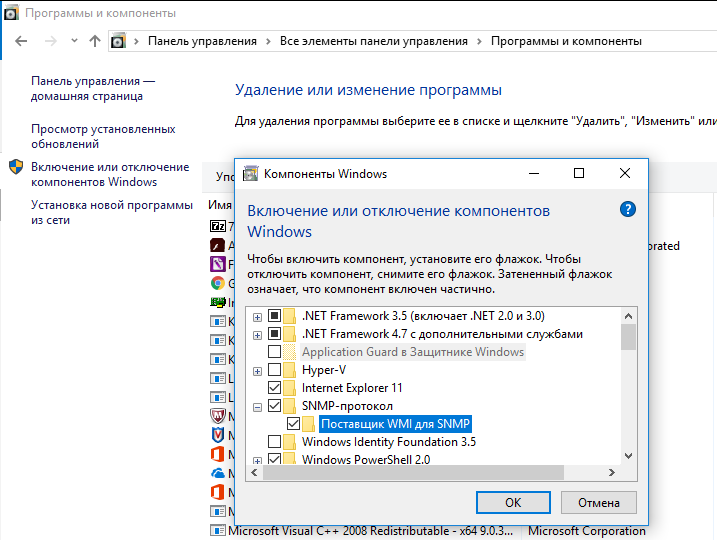
Вы можете установить службу SNMP через панель управления. Перейдите в Панель управления\Все элементы панели управления\Программы и компоненты\ Включение или отключение компонентов Windows).
В списке компонентов выберите Simple Network Management Protocol (SNMP)/протокол, и WMI SNMP Provider / Поставщик WMI для SNMP (обеспечивает доступ к информации SNMP через интерфейсы Windows Management Instrumentation) и нажмите Ок.
Также вы можете установить службы SNMP из командной строки PowerShell:
Enable-WindowsOptionalFeature -online -FeatureName SNMP
Настройка службы SNMP в Windows 10
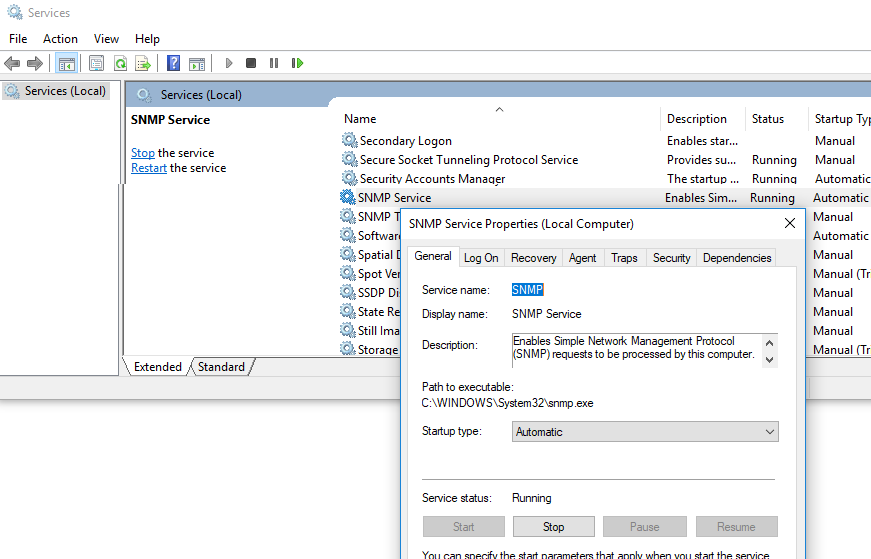
После установки службы SNMP должны запустится автоматически. Откройте консоль управления Services (services.msc). В списке службы должны появится две новые службы:
- SNMP Service – это основная служба SNMP агента, которая отслеживают активность и отправляет информацию;
- SNMP Trap — получает сообщения ловушки (trap messages) от локальных или удаленных агентов SNMP, и пересылает сообщения в управляющие программы SNMP, которые работают на этом компьютере.
Откройте свойства службы SNMP. Если она остановлена, запустите ее, нажав кнопку Start и измените тип запуска (Startup type) на автоматический.
Перейдите на вкладку Agent. Заполните поля contact и location (здесь вы можете указать контактное имя пользователя и местоположение компьютера), и выберите список сервисов, данные которых нужно собирать и отправить устройству мониторинга.
Доступны следующие типы сервисов:
- Physical
- Applications
- Internet
- End-to-end
- Datalink and subnetwork

Перейдите на вкладку Security. Здесь вы можете настроить различные параметры безопасности для различных серверов SNMP.
В списке Accepted community names перечислены имена сообществ, чьи SNMP узлы проходят аутентификацию для отправки SNMP-запросов на этот компьютер.
Нажмите кнопку Добавить и укажите имя Community и один из пяти уровней доступа (None, Notify, READ ONLY, READ WRITE, READ CREATE). READ WRITE – это максимальный уровень доступа, при которых сервер управления SNMP может вносить изменения в систему. В системах мониторинга обычно достаточно выбрать READ ONLY, при этом сервер мониторинга может только опрашивать систему, но не вносить изменения.
В нашем примере мы добавили комьюнити public с разрешениями READ ONLY.
Далее добавьте список серверов системы мониторинга (по DNS имени или по IP адресам), от которых вы хотите разрешить получать SNMP пакеты.

Сохраните изменения и перезапустите службу SNMP.
На этом настройка службы SNMP в Windows 10 по сути завершена. Если вам нужно включить SNMP сразу на множестве компьютеров, вы можете удаленно установить и настроить службы с помощью PowerShell или GPO.
Setting up the WMI SNMP Environment
Communicating with a network device using the WMI SNMP interface requires the configuration of the device, SNMP, and WMI services. The information in this topic explains how to set up the WMI SNMP environment.
The following sections are discussed in this topic:
Installing the SNMP Provider
The SNMP service is not enabled by default. You can enable the SNMP service and the WMI SNMP Provider through the Control Panel. Be aware that the SNMP service must be enabled and running for the WMI SNMP provider to work.
Starting with WindowsВ Vista, use the following procedure to install the SNMP provider.
To install the SNMP Provider
- From the Control Panel, select Programs.
- Under Programs and Features, select Turn Windows features on or off.
- In the Windows features list, scroll down to SNMP feature and expand the list so that you can see WMI SNMP Provider.
- Select the check box for WMI SNMP Provider. The check box for SNMP feature is selected automatically because the provider requires SNMP.
- Click OK.
- From a command prompt or the Start menu, run Services.msc and ensure that the SNMP service is started.
Creating an SNMP Namespace
An SNMP namespace defines a view of a network device.
For more information about support and installation of this component on a specific operating system, see Operating System Availability of WMI Components.
The following procedure describes how to create an SNMP WMI namespace.
To create an SNMP namespace
Create an instance of the __Namespace system class either by compiling a Managed Object Format .mof file or by using the COM API for WMI.
Associate SNMP provider qualifiers with the namespace definition.
The SNMP provider qualifiers contain implementation-specific context information and transport properties that define how the SNMP provider accesses an SNMP device. For more information, see Qualifiers Specific to the SNMP Provider.
Use the mofcomp command line tool to load the MOF code into the WMI repository.
For more information, see Compiling MOF files.
The following MOF code example defines the \snmp namespace with a subset of the qualifiers that can be associated with an SNMP namespace.
Inserting SNMP MIB Data into WMI
As a provider, the SNMP provider acts as a bridge between SNMP data and WMI classes. Therefore, you must have classes in WMI that represent different aspects of an SNMP-enabled device. To do so, you must use the SNMP information module compiler (smi2smir) to compile SNMP management information from the SNMP format into the equivalent CIM schema definitions. You can then direct the output of the information compiler into an SNMP schema database called the «SNMP Module Information Repository (SMIR)» or to several different kinds of MOF files.
The compiler runs in the command-line mode, using one MIB file as input. The following command loads the specified MIB file into the SMIR.
smi2smir /a
Setting Up SNMP Communities
As a security measure, the SNMP «public» community is not created by default. You can create the community as described in Communities Registry Settings. If you do not have any community, then create the «public» community to access the SNMP provider.
Generating MOF Files from MIB Files
The following commands are an example of how to generate MOF files from the MIB files that are installed when the SNMP provider is installed.
cd %windir%\system32\wbem\SNMP
Smi2smir /g ..\..\hostmib.mib > hostmib.mof
Smi2smir /g ..\..\ipforwd.mib > ipforwd.mof
Smi2smir /g ..\..\nipx.mib > nipx.mof
Smi2smir /g ..\..\mib_ii.mib > mib_ii.mof
Smi2smir /g ..\..\lmmib2.mib > lmmib2.mof
Smi2smir /g ..\..\mcastmib.mib > mcastmib.mof
Smi2smir /g ..\..\rfc2571.mib > rfc2571.mof
Smi2smir /g ..\..\wfospf.mib > wfospf.mof
Smi2smir /g ..\..\dhcp.mib..\..\msft.mib > dhcp.mof
Smi2smir /g ..\..\wins.mib..\..\msft.mib > wins.mof
Smi2smir /g ..\..\mipx.mib..\..\msft.mib > mipx.mof
Smi2smir /g ..\..\mripsap.mib..\..\msft.mib > mripsap.mof
Smi2smir /g ..\..\msipbtp.mib..\..\msft.mib > msipbtp.mof
Smi2smir /g ..\..\msiprip2.mib..\..\msft.mib > msiprip2.mof
Adding SNMP MOF Files to the WMI Repository
The following commands are an example of how to add the MOF files that are generated from the MIB files to the WMI repository. If you want to add the MOF files to the list of files to be automatically restored in a WMI repository recovery, add the -AUTORECOVER flag to the end of each command. For more information about the WMI Mofcomp.exe command-line tool, see mofcomp.
mofcomp hostmib.mof
mofcomp ipforwd.mof
mofcomp nipx.mof
mofcomp mib_ii.mof
mofcomp lmmib2.mof
mofcomp mcastmib.mof
mofcomp rfc2571.mof
mofcomp wfospf.mof
mofcomp dhcp.mof
mofcomp mipx.mof
mofcomp mripsap.mof
mofcomp msipbtp.mof
mofcomp msiprip2.mof


