- How to Enable Virtualization in Windows 10
- What Do You Need?
- What is Hyper-V?
- Turn On Virtualization in BIOS
- Turning On Hyper-V
- Control Panel
- PowerShell
- Creating a Virtual Machine
- Включаем виртуализацию в BIOS
- Важное предупреждение
- Включение виртуализации на процессоре Intel
- Включение виртуализации на процессоре AMD
- How to Enable Virtualization (Hypervisor) in BIOS/UEFI
- How to determine if virtualization technology is enabled on my computer
- How to enable virtualization technology (VT-X) in UEFI-based computers
- How to enable virtualization technology in Lenovo, Asus, HP, Dell, Acer
- Lenovo
- Find virtualization in popular motherboard (Asus, MSI, Gigabyte)
- Gigabyte
- AMD virtualization:
How to Enable Virtualization in Windows 10
A virtual machine emulates a computer system so anyone can run different operating systems and programs. It works great for testing out new features without risking your current ecosystem. You will also be able to test software compatibility in an isolated environment.
Running a virtual machine can be demanding and not all computers are capable of doing so. But these days, users can create one using Windows 10.

What Do You Need?
Your computer needs to meet a couple of requirements for you to be able to create and run a virtual machine. Here’s what you’ll need:
- A 64-bit processor that has Secondary Level Address Translation or SLAT. Find info about your processor using these tools.
- Windows 10 Pro, Education, or Enterprise.
Note: Windows Home users can upgrade to the Pro version. Go to Settings (Windows + I) > Update and Security > Activation.

- At least 4 GB of memory. Having more RAM would be better.
- A BIOS setup where virtualization has been enabled.
- Hard drive space for the OS you’ll be adding.
What is Hyper-V?
Windows 10 uses a software called Hyper-V to handle virtualization. You will need to activate it if you want to add virtual machines. Some Hyper-V features include being able to run operating systems and entire hardware components like hard drives and network switches.
Advanced users can even use it for server virtualizations if they want.
Turn On Virtualization in BIOS
First, restart your computer. As the computer boots, press the corresponding key that lets you enter BIOS. The button differs from one PC to another. However, it’s usually F10, Delete,or the F2 key.
Once you enter the BIOS, you can start enabling virtualization settings. The BIOS interface varies depending on the brand.
Exit once you’re done making all the changes to the BIOS settings and restart your PC.
Turning On Hyper-V
You will need Hyper-V to manage your virtual machines. This can be done by accessing the Control Panel or PowerShell.
Control Panel
Open the Control Panel. Now go to Programs and Features > Turn Windows Features On or Off.
Search for a folder called Hyper-V. Tick all the subfolders under Hyper-V and hit OK.
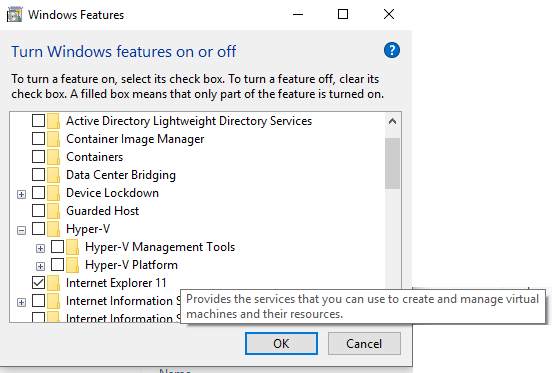
Windows will then try to configure Hyper-V. This might prompt a restart after it confirms all the changes.
PowerShell
Open PowerShell and enter the following line:
Enable-WindowsOptionalFeature -Online -FeatureName Microsoft-Hyper-V -All

If PowerShell responds and says that the command cannot be found, make sure you’re running it as an administrator. Restart the computer after you’re done.
Creating a Virtual Machine
Once ready, you can start using Hyper-V to create virtual machines in Windows 10. Here’s what you need to do:
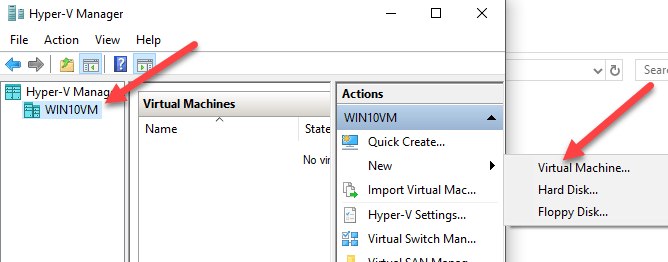
Go to Control Panel > Administrative Tools and double-click Hyper-V to launch the application.
On the left-hand pane of Hyper-V, select the name of your computer so you can work on it. You can add a new virtual machine by going to Action > New > Virtual Machine.
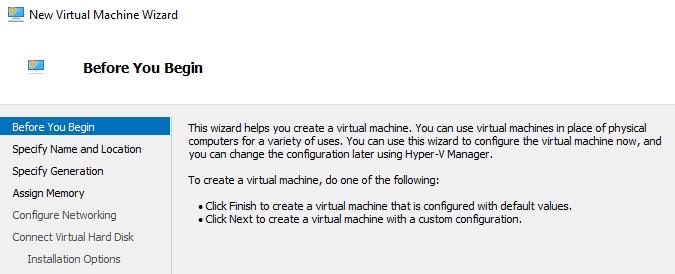
A new window will open called New Virtual Machine Wizard. Complete the steps and click Finish when you’re done to create a new machine.
New machines will be shown inside Hyper-V. The same application is used to control the machines. For example, you can turn the machines on and off through Hyper-V.
Christopher Jan Benitez is a freelance writer for hire who provides actionable and useful web content to small businesses and startups. In his spare time, he religiously watches professional wrestling and finds solace in listening to ’80s speed metal. Read Christopher’s Full Bio
Включаем виртуализацию в BIOS

Виртуализация может понадобиться тем пользователям, которые работают с различными эмуляторами и/или виртуальными машинами. И те и те вполне могут работать без включения данного параметра, однако если вам требуется высокая производительность во время использования эмулятора, то его придётся включить.
Важное предупреждение
Изначально желательно убедиться, есть ли у вашего компьютера поддержка виртуализации. Если её нет, то вы рискуете просто зря потратить время, пытаясь произвести активацию через BIOS. Многие популярные эмуляторы и виртуальные машины предупреждают пользователя о том, что его компьютер поддерживает виртуализацию и если подключить этот параметр, то система будет работать значительно быстрее.
Если у вас не появилось такого сообщения при первом запуске какого-нибудь эмулятора/виртуальной машины, то это может значить следующее:
- Технология «Intel Virtualization Technology» в БИОСе уже подключена по умолчанию (такое бывает редко);
- Компьютер не поддерживает этот параметр;
- Эмулятор не способен произвести анализ и оповестить пользователя о возможности подключения виртуализации.
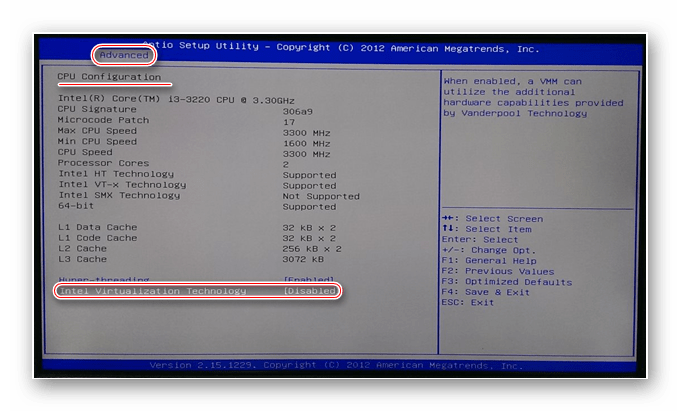
Включение виртуализации на процессоре Intel
Воспользовавшись этой пошаговой инструкцией, вы сможете активировать виртуализацию (актуальна только для компьютеров, работающих на процессоре Intel):
- Перезагрузите компьютер и войдите в BIOS. Используйте клавиши от F2 до F12 или Delete (точная клавиша зависит от версии).
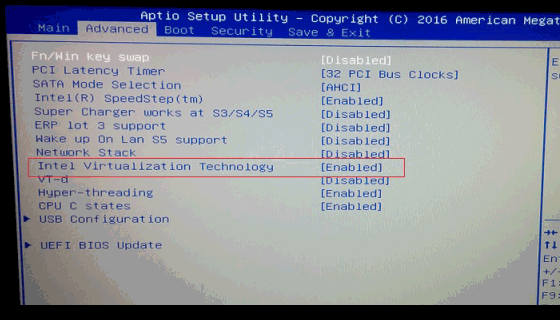
- Теперь вам нужно перейти в пункт «Advanced». Также он может называться «Integrated Peripherals».
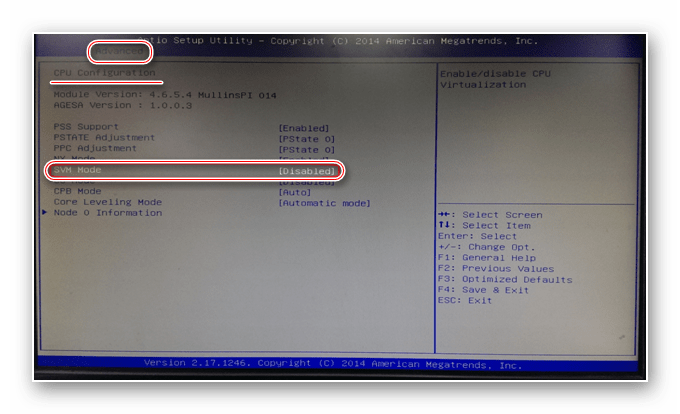
- В нём нужно перейти в «CPU Configuration».
- Там необходимо найти пункт «Intel Virtualization Technology». Если данного пункта нет, то это значит, что ваш компьютер не поддерживает виртуализацию.
Включение виртуализации на процессоре AMD
Пошаговая инструкция выглядит в этом случае похожим образом:
- Войдите в BIOS.
- Перейдите в «Advanced», а оттуда в «CPU Configuration».
- Там обратите внимание на пункт «SVM Mode». Если напротив него стоит «Disabled», то вам нужно поставить «Enable» или «Auto». Значение меняется по аналогии с предыдущей инструкцией.
Включить виртуализацию на компьютере несложно, для этого нужно лишь следовать пошаговой инструкции. Однако если в BIOS нет возможности включить эту функцию, то не стоит пытаться это сделать при помощи сторонних программ, так как это не даст никакого результата, но при этом может ухудшить работу компьютера.
How to Enable Virtualization (Hypervisor) in BIOS/UEFI
Modern CPUs include hardware virtualization capabilities that help accelerate VirtualBox, VMware, Hyper-V, Windows Sandbox and other virtual machine applications.
However, Intel VT-x is not always enabled by default. If the hypervisor is not enabled, you will see a message like «The processor on this computer is not compatible with Hyper-V» or or «No hypervisor was found». In this post, you will learn how to enable virtualization technology in BIOS/UEFI on on popular computer systems (Lenovo / HP / Dell / Asus / Acer).
How to determine if virtualization technology is enabled on my computer
Some Acer systems enable Virtualization Technology by default if the system supports it. Use the following steps to verify that virtualization technology is available on your system:
1. Right-click any space on the taskbar and select Task Manager to open it.
2. Click on the Performance tab.
3. On the right side of CPU tab, you can see Virtualization is Enabled or Disabled.

If «Virtualization: disabled» is displayed, it can be enabled in the BIOS by following the steps.
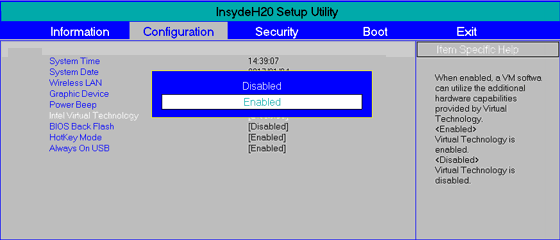
How to enable virtualization technology (VT-X) in UEFI-based computers
On a UEFI-based computer, you don’t have to press a key when the computer starts. Instead, you need to hold down the Shift key and click Restart to reboot directly from the Advanced Startup options to the UEFI firmware settings.
Once you enter the setup menu, you can start looking for options labeled “Intel VT-x,” “Intel Virtualization Technology,” “Virtualization Extensions,” “Vanderpool,” or similar. When this option is enabled, press F10 to save the settings changes and reboot the PC.
Typically, you can find the option under the Processor submenu. This submenu can be located somewhere under the “Chipset,” “Northbridge,” “Advanced Chipset Control,” or “Advanced CPU Configuration” menus.
Note: CPU virtualization has a different name depending on the CPU manufacturer.
Intel CPUs, this feature is called Intel Virtualization Technology or Intel VT, while for AMD CPUs, it is called AMD-V. Whatever it is called, each virtualization technology generally provides the same functionality and benefits to the operating system.
How to enable virtualization technology in Lenovo, Asus, HP, Dell, Acer
Lenovo
Turn on the computer.
Press the BIOS access key to start the BIOS.
Navigate to the Configuration tab and select Intel Virtual Technology, then switch to Enabled.
Press F10. Then, press Enter on YES to save the settings and confirm booting to Windows.
Open the Acer system. Press the F2 key in the boot BIOS Setup.
Select the System Configuration tab, then select Virtualization Technology and press Enter.
Select Enabled and press Enter. Press the F10 key to save your changes.

Turn on your computer.
Press the F2 key to start the BIOS Setup.
Go to the Advanced tab, select Virtualization Technology and then Enable it.
Press the F10 key, select Yes, then press Enter to save your changes and reboot to Windows.
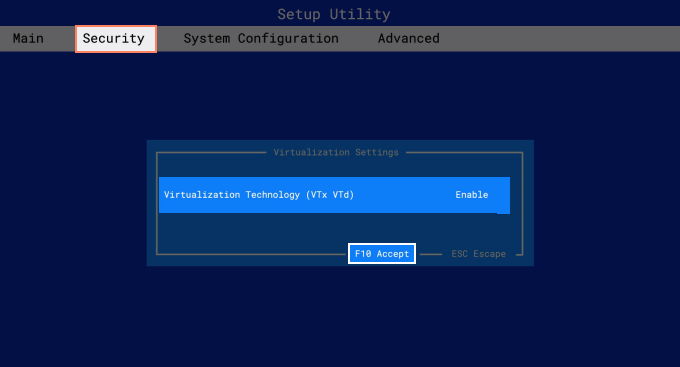
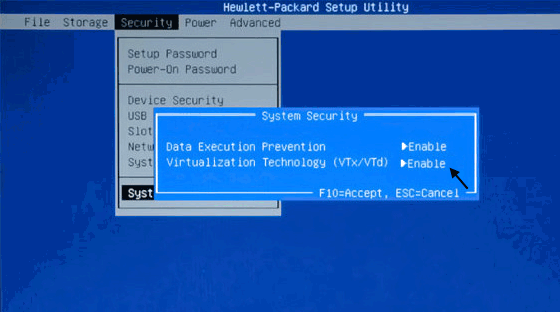
Turn on the HP computer and immediately press F10 to boot into the BIOS.
Under the Security tab, use the down arrow to select System Security and press Enter.
Select Virtualization Technology (VTx), press Enter, then Enable it.
When you are done, click F10 to save your changes and exit the BIOS.
Turn on your Dell computer. Press the F2 key to start the BIOS.
Select the Advanced tab, then select Intel Virtualization Technology and Enable it.
Press the F10 key and select Yes, then press the Enter to save changes and reboot to Windows.
Find virtualization in popular motherboard (Asus, MSI, Gigabyte)
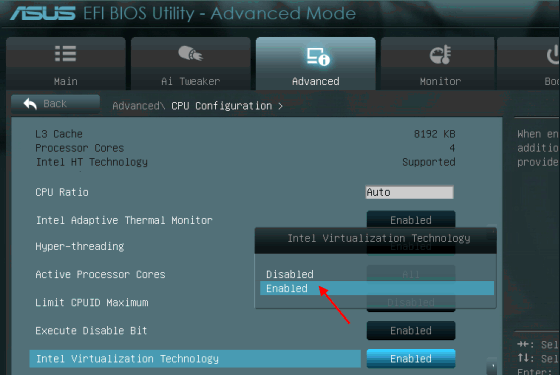
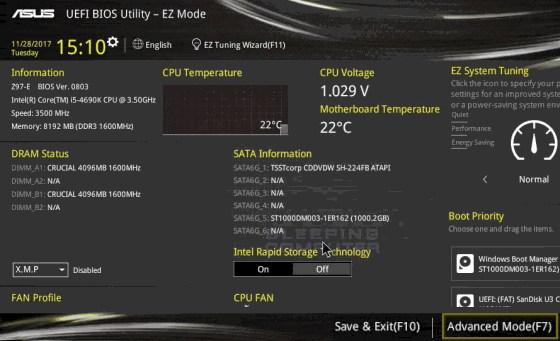
In the BIOS setup menu, press F7 key to open Advanced mode.
On the Advance menu, choose the CPU Configuration.
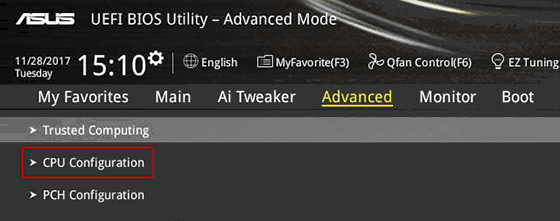
Find Intel Virtualization Technology and enable it.
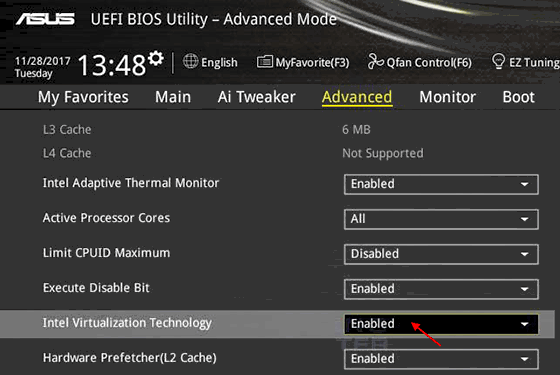
Save your changes and reboot to boot into the system.
Gigabyte
Intel virtualization:
In the BIOS setup menu, open the Chipset tab.
Select Intel VT for Directed I/O Configuration and then press Enter.
Select «Enabled» and press Enter.
Save this change and exit.
AMD virtualization:
In BIOS setup menu, open the M.I.T tab and select Advanced Frequency Setting.
Choose Advanced CPU Core Settings > SVM Mode.
In the BIOS setup menu, select the OC tab and press Enter.
Find Intel Virtualization Tech and choose to enable it.
Press the F10 to save your changes and reboot to Windows.


