- How to enter UEFI (BIOS) on Windows 10 PCs
- How to access UEFI (BIOS) using Settings
- How to access UEFI (BIOS) using boot key option
- More Windows 10 resources
- The Dell XPS 15 is our choice for best 15-inch laptop
- Halo: MCC’s live service elements make it better, not worse
- Microsoft’s Surface Duo is not ‘failing up’
- These are the best PC sticks when you’re on the move
- How to Enter Bios Settings on Windows 7
- Part 1: What is BIOS?
- Part 2: Why You Need BIOS?
- Part 3: How to Enter BiOS Settings on Windows 7
- Part 4: How to Enter BIOS Settings on Windows 10/8.1/8
- Part 5: Problems on Accessing BIOS Configuration on Windows 7
- How to Enter the BIOS on a Windows 10 PC
- How to enter BIOS on Windows 10 & Windows 7?
How to enter UEFI (BIOS) on Windows 10 PCs
 Source: Windows Central
On Computers, the Basic Input Output System (BIOS) is an essential low-level software that sits on one of the chips of the motherboard, and it’s responsible for basic operations, such as booting and configuring hardware (mouse, keyboard, memory, processor, etc.). The Unified Extensible Firmware Interface (UEFI) is a modern software designed to replace the legacy BIOS with additional benefits, such as improved security, faster boot times, large capacity hard drive support, and more.
Although these are different technologies, modern devices now use UEFI, but to avoid confusion, sometimes you’ll continue to hear the term «BIOS» to refer to «UEFI.»
If you use a Windows 10 device, usually, the firmware works automatically. However, sometimes you may still need to enter the motherboard BIOS to troubleshoot problems, enable or disable features (such as virtualization, RAID array, and secure boot), adjust memory and processor advanced settings, and more.
The only caveat is that the BIOS is a startup environment, which means that you can’t access it when Windows 10 is running. However, if you have to change some system settings, there are multiple methods to access the motherboard firmware.
In this Windows 10 guide, we’ll walk you through the steps to enter the BIOS/UEFI on your computer to change advanced system settings.
How to access UEFI (BIOS) using Settings
To enter the UEFI firmware from Windows 10, use these steps:
Warning: Changing the wrong firmware settings can prevent your computer from starting correctly. You should only access the motherboard firmware when you have an excellent reason. It’s assumed that you know what you’re doing.
- Open Settings.
- Click on Update & Security.
- Click on Recovery.
Under the «Advanced startup» section, click the Restart now button.
 Source: Windows Central
Click on Troubleshoot.
Source: Windows Central
Click on Advanced options.
Source: Windows Central
Click the UEFI Firmware settings option.
Quick tip: If you have a legacy BIOS, the option will not be available. Source: Windows Central
Click the Restart button.
Source: Windows Central
Once you complete the steps, the device will restart and boot into the UEFI firmware allowing you to change advanced settings, such as to disable or enable secure boot, change boot order, set up a hardware RAID array, enable virtualization, and other settings depending on the motherboard support.
How to access UEFI (BIOS) using boot key option
If you don’t have access to the Windows 10 desktop or you’re using a device with a legacy BIOS, then you can still access the firmware during boot.
To enter the UEFI or legacy BIOS during boot, use these steps:
- Press the Power button.
- See the screen splash to identify the key you must press to enter the firmware (if applicable).
- Press the required key repeatedly until you enter the setup mode. Usually, you need to press the ESC, Delete, or one of the Function keys (F1, F2, F10, etc.).
After you complete the steps, the device will access the BIOS or UEFI firmware, depending on the motherboard support. If you don’t see the information on the screen or the device boots too fast, restart the device again, and as soon as the boot starts, press the required key multiple times quickly.
If you can’t make the computer to access the firmware using the keyboard, you may need to check your device manufacturer to find out the key that you need to press during boot.
Here are some computer brands and their respective keys to access the motherboard firmware:
- Dell: F2 or F12.
- HP: ESC or F10.
- Acer: F2 or Delete.
- ASUS: F2 or Delete.
- Lenovo: F1 or F2.
- MSI: Delete.
- Toshiba: F2.
- Samsung: F2.
- Surface: Press and hold volume up button.
In the case that your device is using a UEFI firmware, and you can’t seem to access it during startup, then it’s recommended to use the Settings option from within Windows 10.
More Windows 10 resources
For more helpful articles, coverage, and answers to common questions about Windows 10, visit the following resources:
![]()
The Dell XPS 15 is our choice for best 15-inch laptop
For a lot of people, a 15-inch laptop is a perfect size that offers enough screen for multitasking, and in a lot of cases, some extra performance from powerful hardware. We’ve rounded up the best of the best at this size.
![]()
Halo: MCC’s live service elements make it better, not worse
Halo: The Master Chief Collection is more popular than ever, but some fans don’t agree with the live service approach 343 Industries has taken with it. Here’s why those elements are, at the end of the day, great for the game and for Halo overall.
![]()
Microsoft’s Surface Duo is not ‘failing up’
Microsoft announced this week that it was expanding Surface Duo availability to nine new commercial markets. While Surface Duo is undoubtedly a work in progress, this is not a sign of a disaster. It’s also doesn’t mean that Surface Duo is selling a ton either. Instead, the reason for the expansion is a lot more straightforward.
![]()
These are the best PC sticks when you’re on the move
Instant computer — just add a screen. That’s the general idea behind the ultra-portable PC, but it can be hard to know which one you want. Relax, we have you covered!
How to Enter Bios Settings on Windows 7
Part 1: What is BIOS?
The BIOS (short for basic input/output system) is a program stored on a small memory chip on the motherboard. BIOS instructs the computer to perform a number of basic functions such as booting and keyboard control. It is also used to check and configure the hardware in your computer such as the processor, hard drive, floppy drive, optical drive, CPU, memory, etc.
Part 2: Why You Need BIOS?
You can make different basic adjustments for hardware configuration, such as the boot order (where the computer will look to load the first program), change date and time for PC , set a password at BIOS level. You are capable of managing memory settings, configuring a new hard drive, changing the boot order, resetting the BIOS password, etc by enter BIOS configuration on windows 10/8.1/8/7 .
Part 3: How to Enter BiOS Settings on Windows 7
Follow the easy steps below to access the BIOS setup utility on DELL/HP/ASUS/
SONY/SAMSUNG laptop and PC:
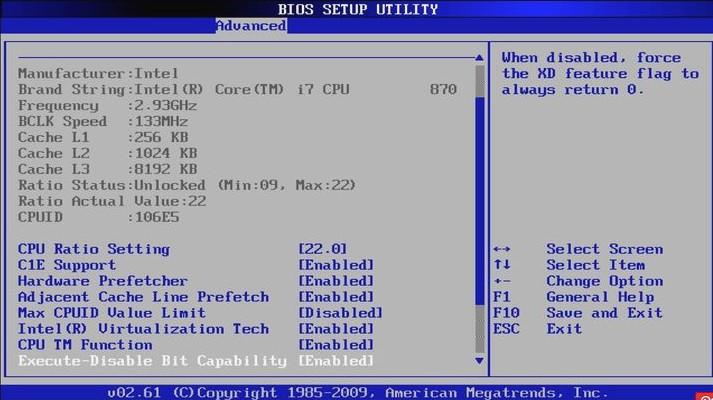
1, Start your computer. Pay close attention to the first screen that appears. Look for a notification that tells you which key or combination of keys to press to enter BIOS settings.
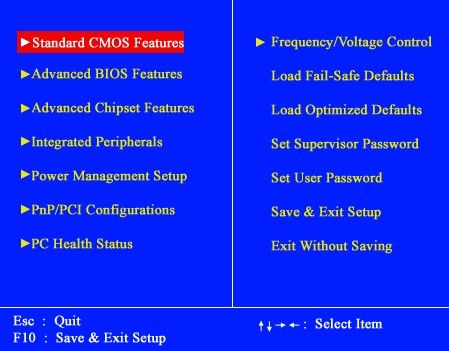
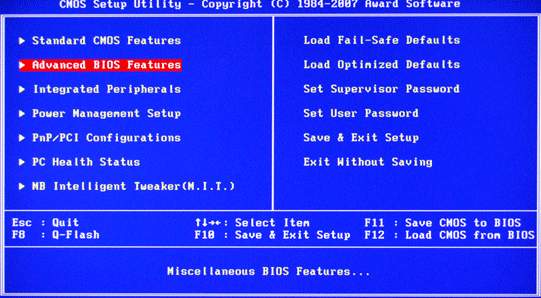
2, If you press in time, the BIOS screen opens (normally on a blue background). This is also called the CMOS setup program, as it saves all settings to a piece of memory known as the CMOS.
3. Use the arrow keys to highlight an option and Enter to select.
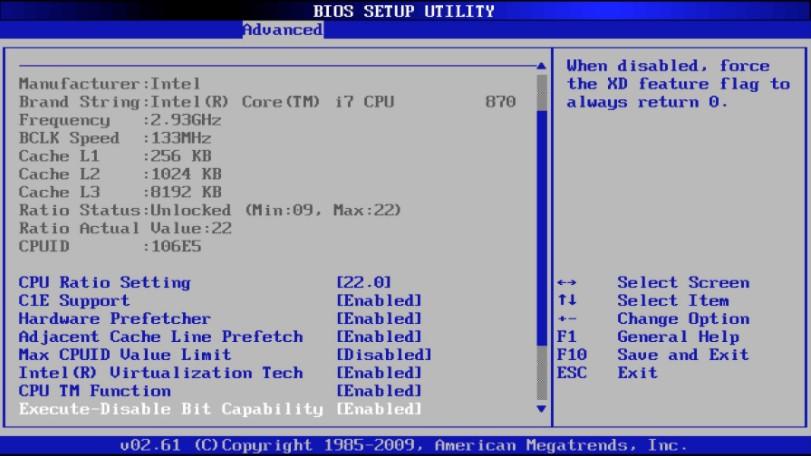
4. To change a setting, you normally use the ‘page up’ and ‘page down’ keys, but some systems require ‘-‘ and ‘+’ or to press enter and select from a list.
5. Usually the ESC key returns to the previous menu, but again, check what the screen tells you 1st.
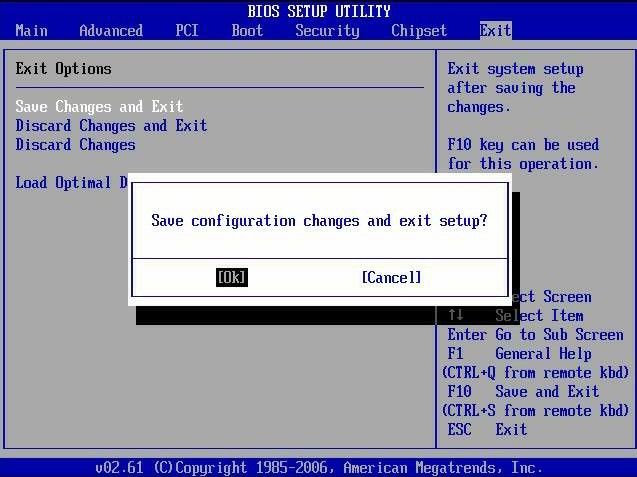
6.Once you have finished with the BIOS, press F10 to save the settings (or select «save and exit») and reboot your computer.
Part 4: How to Enter BIOS Settings on Windows 10/8.1/8
On Windows 8 and Windows 10, the fast startup feature is adopted, therefore, you cannot press the function key to enter BIOS configuration when booting the system. Here is how you can do it.
1, Press and hold Shift, then turn off the system.
2, Press and hold the function key on your computer that allows you to go into BIOS settings, F1, F2, F3, Esc, or Delete (please consult your PC manufacturer or go through your user manual). Then click the power button.
Note: DO NOT release the function key until you see the BIOS screen display.
3, Then you will find the BIOS configuration.
Part 5: Problems on Accessing BIOS Configuration on Windows 7
Entering BIOS can be tricky so here’s some more help based on some common scenarios that I’ve seen:
1, See a picture instead of a message?
Your computer may be configured to show your computer’s logo instead of important BIOS messages. Press Esc or Tab while the logo is showing to remove it.
2, See the message but didn’t catch which key to press?
Some computers start too quickly to see the BIOS access message. If this happens, press the Pause/Break key on your keyboard to freeze the screen during startup. Press any key to «unpause» your computer and continue booting.
3, Having troubles pausing the startup screen?
If you’re having problems pressing that pause button in time, turn on your computer with your keyboard unplugged. You should receive a keyboard error which will pause the startup process long enough for you to see the keys necessary to enter BIOS!
Now you can access BIOS in windows 7 without restarting. Just Share this post with your friends and families and help them when they have met the similar issues, or if you forgot or lost your login password, then we recommend you give Window Password Key a free try, which can help you create your own password reset CD/DVD or USB flash drive pro and access your PC freely!
How to Enter the BIOS on a Windows 10 PC
Windows 10 gives you a lot of options you can configure directly within the operating system, but on every laptop or desktop, there are some settings you can only change in the BIOS (basic input/output system). The BIOS is the software that is built into your computer’s motherboard and controls everything from the boot order of your drives to preboot security options to whether the Fn key on your keyboard activates a function key or a media control.
Unfortunately, because the BIOS is a pre-boot environment, you can’t access it directly from within Windows. On some older computers or those deliberately set to boot slowly, you can hit a function key such as F1 or F2 at power-on to enter the BIOS.

However, most computers made in the past four years boot Windows 10 too quickly to listen for a key press at startup. To access your BIOS on a Windows 10 PC, you must follow these steps.
How to Enter the BIOS on a Windows 10 PC
1. Navigate to settings. You can get there by clicking the gear icon on the Start menu.
2. Select Update & security.
3. Select Recovery from the left menu.
4. Click Restart Now under Advanced startup. The computer will reboot to a special menu.
5. Click Troubleshoot.
6. Click Advanced options.
7. Select UEFI Firmware Settings. If you don’t see this icon, then press Startup Settings, instead. When your PC is restarting, tap F1 (or F2) to access the BIOS.
8. Click Restart.
Your system will restart and take you to the BIOS.
How to enter BIOS on Windows 10 & Windows 7?
Last Updated: 3 years ago
Warning: Please DO NOT make changes to your BIOS settings unless you are well aware of the consequences.

BIOS stands for Basic Input/Output system. It is a software that checks the health of your computer’s hardware and allows Windows to start.
Your PC’s BIOS runs a power-on self-test (POST) every time you turn it on so as to ensure that the machine’s devices are connected and working properly. Your computer will turn on normally if it detects no problems, and your computer will be in control of the operating system that you have.
In BIOS, you can make some changes such as set a password, manage hardware and change the boot sequence. The instructions below shows you how to get into BIOS settings easily. But again, DO NOT make changes that you are not sure the function of.
On Windows 7 and previous builds
1) Start your computer. Pay close attention to the first screen that appears. Look for a notification that tells you which key or combination of keys to press to enter BIOS settings. You may be able to see the notification such as: Press DEL to enter SETUP; BIOS settings: Esc; Setup=Del or System configuration: F2.
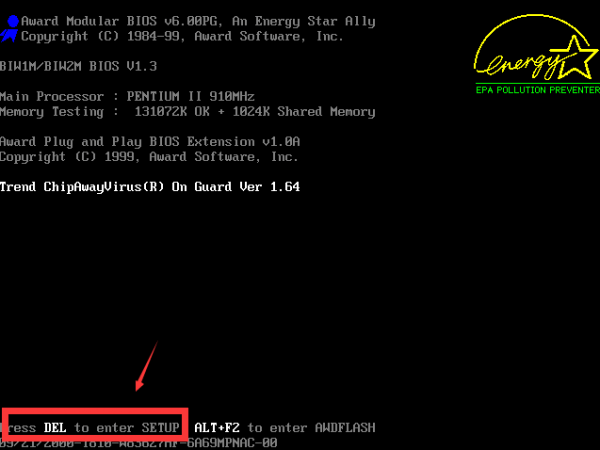
If you miss this notification the first time, just simply restart your computer again.
Usually, the key to press are likely to be: F1, F2, F3, Esc, or Delete. If you are not sure, consult the manufacturer of your computer for the answer.
2) When you are sure which key or combination of keys to press to enter BIOS, restart your computer again. Press the key to enter the BIOS settings and you will see yourself in the BIOS within a few seconds.
On Windows 10
On Windows 8 and Windows 10, the fast startup feature is adopted, therefore, you cannot press the function key to enter BIOS configuration when booting the system. Here is how you can do it.
1) Press and hold Shift, then turn off the system.
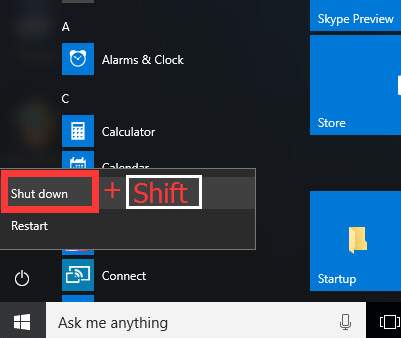
2) Press and hold the function key on your computer that allows you to go into BIOS settings, F1, F2, F3, Esc , or Delete (please consult your PC manufacturer or go through your user manual). Then click the power button.
Note: DO NOT release the function key until you see the BIOS screen display.


