- Create and print a single envelope
- What do you want to do?
- Set up a return address
- Verify printing options
- Create and print or save an envelope
- Envelope Windows
- What is the difference between envelopes with and without windows?
- Envelopes with window on right, peel and seal
- Ingenuity at Work
- Envelope Basics: Windows
- Window Placement
- Window Patches: Open or Closed
- Custom Window Envelopes
- Download Our Guide
- Make & Address Envelopes with Cricut – Free SVG Templates
- Materials for Cricut Envelopes
- Making Envelopes in Cricut Design Space
- Resize Envelope in Design Space
- Cutting Envelope
- How to Address Envelopes with your Cricut
- Addressing Envelopes using Cricut Pens
- Adding an Envelope Guideline
- Add Text
- Addressing Envelopes using Sticker and Print then Cut.
- Labels for Addressing Envelopes with Sticker Paper
- Addressing Envelopes using Iron-On/HTV
- Free SVG Envelope Templates
- More Envelopes ideas made with Cricut
- Sharing is Caring
Create and print a single envelope
If you want to include your return address on the envelope, you can set this up before you start working on the envelope.
When you have set up your envelope the way you want, you can print it, as well as save it so that you can reuse it.
What do you want to do?
Set up a return address
Click the File tab.
Scroll down, and under General, type your return address in the Mailing address box.
Note: Word stores the address so that you can use it whenever you want to insert your return address in an envelope, label, or other document.
Verify printing options
Before you run a batch of envelopes through your printer, you can verify that the printer options are set up correctly.
On the Mailings tab, in the Create group, click Envelopes.
Click Options, and then click the Envelope Options tab.
In the Envelope size box, click the choice that matches the size of your envelope. If none of the choices matches your envelope size, scroll to the bottom of the list, click Custom size, and then type the dimensions of your envelope in the Width and Height boxes.
Click the Printing Options tab.
The printer driver tells Word which way the envelope should be loaded into the printer, and this information is displayed in the Printing Options tab of the Envelope Options dialog box.
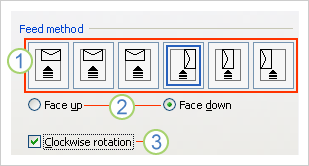
1. The feed method determines the position of the envelope (right, middle, left) and whether the long or short edge is being fed into the printer.
2. The envelope can be face up or face down. The face is the side that the address is printed on.
3. If the envelope is fed short edge first, the envelope may need to be rotated to prevent the text from appearing upside down on the face of the envelope.
The envelope in the illustration below is positioned to the right, face down, flap at the top, and the short edge is being fed into the printer, in accordance with the settings in the dialog box shown above.

Load the envelope as indicated in the dialog box.
Type some test text in the Delivery address box, and then click Print to print the envelope.
Verify that the envelope printed correctly.
If the envelope did not print correctly, do any of the following:
Consult your printer information, if available, to find out how to load the envelopes into the printer.
Update your printer driver.
Go back to the Printing Options tab of the Envelope Options dialog box, and make adjustments to the printing options. Print the envelope again. Repeat this process until you discover a configuration of printing options that yields the results that you want.
Create and print or save an envelope
On the Mailings tab, in the Create group, click Envelopes.
In the Delivery address box, type the mailing address.
If you want to use an address in the electronic address book installed on your computer, click Insert Address  .
.
If you want to format the text, select the text, right-click the selected text, and then click Font on the shortcut menu.
In the Return address box, type the return address or use the preconfigured one.
If you want to use an address in the electronic address book installed on your computer, click Insert Address .
If you want to keep the return address for future use, but you don’t want to include it on the current envelope, select the Omit check box.
If you have access to electronic postage, for example if you purchased it from a service on the World Wide Web, you can add it to your envelope.
Select the Add electronic postage check box.
If you do not have an electronic postage program installed, Microsoft Word prompts you to install one and offers to connect to the Office.com site. There, you can get more information and links to other sites that offer electronic postage.
To set options for the electronic postage programs that are installed on your computer, click E-postage Properties.
Do one of the following:
If you want to print the envelope without saving it for reuse, insert an envelope in the printer as shown in the Feed box, and then click Print.
If you want to save the envelope for reuse, click Add to Document, and then click the File tab, click Save As, and type a name for the document.
Word adds the envelope to the current document as Page 1. If you want, you can use the rest of the document for typing correspondence that will automatically be stored with the envelope.
To print the envelope, insert an envelope in the printer as shown in the Feed box on the Printing Options tab in the Envelope Options dialog box, and then click Print.
Envelope Windows
What is the difference between envelopes with and without windows?
Window envelopes have a clear area on the front to allow the address from inside the letter to be seen, this is to save writing out every address individually.
Many businesses deal with a constant flow of internal and external mail on a daily basis, employing dedicated teams or departments specifically to organise mail. Well maybe it’s time to free up some people power and finances by using envelopes with windows. This will eliminate the need for hand-addressing envelopes and printing address labels which both costs money and time.
The first windowed envelope was created by a man named A F Callahan from Chicago. He filed a patent for the window envelope on June 10th 1902 and described his invention as an envelope with holes for viewing the letter contents inside. The first windows were made from a lightly waxed rice paper which later developed to windows made from glassine, a shiny and almost transparent paper. Today, windows are made using clear plastic and often recycled and biodegradable corn options.
Callahan’s invention also meant that envelopes could be printed in colour, which is now a successful marketing method due to its attention grabbing properties. A new thinking is that the space saved on window envelopes can be used to market companies, advertising special offers and new products encapsulated in an eye catching message, font and colour.
This table shows the sizes of envelopes and where the window is situated and also its size, there are multiple copies of «DL» and «C4» due to both of these size envelopes having windows in more than one place and size.
Envelopes with window on right, peel and seal
These envelopes have a practical window on the right through which you can see the recipient’s address at first glance. It is best to always have a supply of envelopes at hand. Is the environment important to you? That is brilliant — but let people know! Automatically place the PEFC™ logo on your envelopes.
- C5, C4 or DL
- Printable on the front and back
- Interior with scrambled number security print or custom print
- Range of materials
- With PEFC™ certification depending on configuration
- In the right conditions, 80gsm to 110gsm offset white can be stored for at least five years
- With peel and seal strip
- Minimum order of 10 units


View product sample: envelopes sample set
Ingenuity at Work


Envelope Basics: Windows
«Envelope Basics: Windows» is part of an occasional series titled «Envelope Basics» that provides an in-depth look at all-things envelopes — elements, measurements, ordering tips and more*.
Envelope windows are a wonderful way to highlight something important. They can be used to show recipient or return addresses, showcase a product or promotion, or even call attention to the envelope itself when a custom window shape is featured.
If you’re “window shopping” for your next direct mail campaign and windows are an option, congratulations! You’ve come to the right place. Set your window envelope up for success by familiarizing yourself with these basics first.
Window Placement
At a minimum, windows should be placed 1/2″ from the side and the bottom of the face of the envelope to ensure adequate room for patch adhesive. Standard placement is 7/8″ from left and 1/2″ or 5/8″ from bottom. Standard envelope window size is considered 1 1/8″ x 4 1/2″ or 1 1/8″ x 4 3/4″. For details on how to measure a window envelope, see our blog post that features step-by-step instructions.
Window Patches: Open or Closed
Envelope window openings are either open-face or closed-face. Open-face, also called open panel, window openings are highly susceptible to tears and snags in the inserting process and postal steam.
Closed-face window panels have a window patch that is sealed to the envelope with Tension’s Solid Seal ® high-performance gum adhesive. The window patches are available in a variety of materials:
- Polystyrene – A translucent, petroleum-based material. The most common type of polystyrene patch is filmview. It is the most cost-effective, can be recycled and is postal approved. Trycite is another type of polystyrene window patch that is more brittle, prone to scratches, highly reflective and more expensive.
- Glassine – A milky, cloudy patch material made from wood products. It is susceptible to moisture and humidity.
Custom Window Envelopes
Custom window envelopes give limitless ways to add creative freedom and fun into your mailpiece. Make a statement with your policy mail with a large window shape on a large 9×12 open side booklet envelope. Create a shape that reflects your organization, such as our popular dog-bone shaped window. Work in the element of surprise with multiple windows or a window on the back (non-insertable side) of the envelope. Or, include some color and a call to action around the window to mimic the look of a sticky note direct mail envelope.
Download Our Guide 

Envelope Basics is a complete guide that details everything you need to select, measure and order the right envelope for your mail campaign.
Whether you’re a seasoned mailer or new to the mail industry, Envelope Basics includes helpful tips for your business or organization. Download your copy of Envelope Basics here.
Let your promotions (and creative side) shine through with envelope windows. Contact us today to talk about which options are right for your next campaign.
*This blog is intended for informational purposes only. Exact envelope specifications should be discussed in detail with your Sales Representative.
Make & Address Envelopes with Cricut – Free SVG Templates
Updated on July 16, 2020
In today’s tutorial, you’re going to learn how to make and address beautiful envelopes with your Cricut Maker or Explorer.
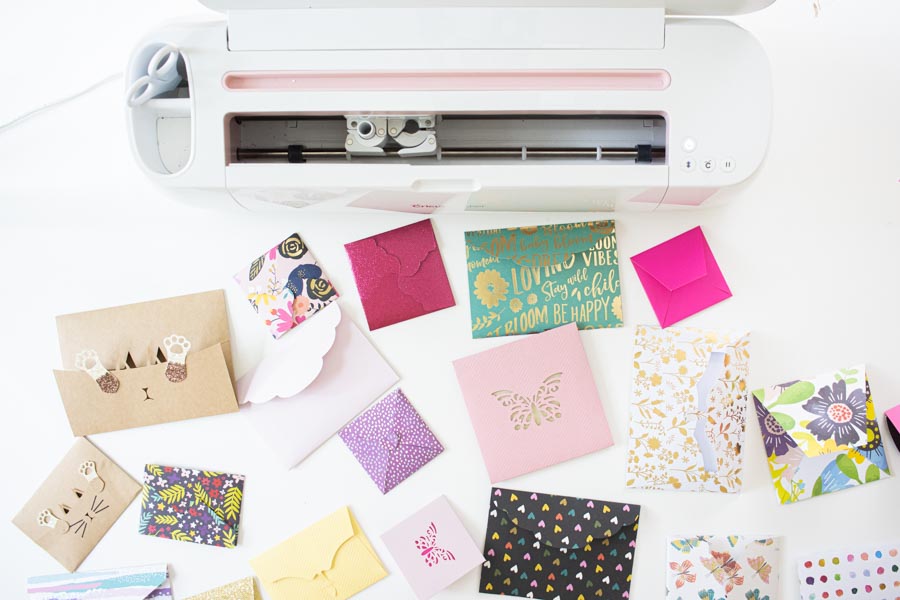
You will learn how to make super cute envelopes, and I will also provide you with 10+ Free SVG envelope templates for your personal projects.
All these templates are so beautiful (insert happy dance) and I can’t wait for you to download and play with them all!
Ideally, you will read this tutorial from the beginning because, as we go, we will be implementing the concepts mentioned in the previews steps.
In a nutshell, these are the topics I will be covering in this tutorial.
- Materials for Cricut envelopes
- Steps for cutting envelopes in Cricut Design Space
- Addressing Envelopes with your Cricut
- Using Cricut Pens
- With sticker paper
- With iron-on
- Free SVG templates (download the rest of envelopes)
- Photos of some of the envelopes you can make
Let’s Daydream Into Reality!
Materials for Cricut Envelopes
The materials for this project are quite simple, but I always like to emphasize that the final look will depend on the quality of the materials you use.
I recommend using high-quality paper and glue if you want professional-looking envelopes and not a kindergarten project.
High-quality paper can be expensive, but you can get good deals at Michael’s. I
For the Envelopes
- Fine Point Blade
- Green Mat (you can also use a new blue mat)
- Scoring Wheel or Stylus (if you have an Explore you can only use the stylus).
- Cricut Maker/Explorer
- Paper
- High-quality glue
For Addressing
There are three methods I will teach you, and you’ll need these extra tools/materials.
- Cricut Pens
- Sticker Paper and Printer
- Iron-On, iron (or EasyPress mini).
Click on the button down below to follow along.
The rest of the Free SVG templates are all in this article at the end of the step by step cutting and addressing process.
Making Envelopes in Cricut Design Space
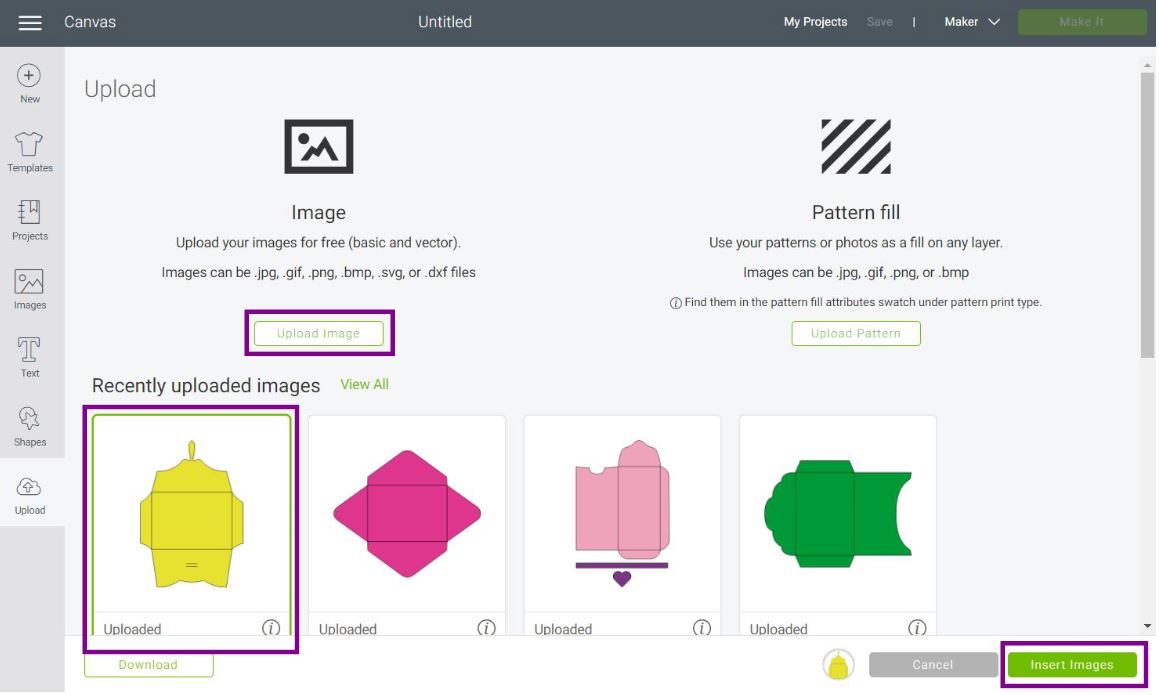
First, we need to upload the practice file.
Go to the canvas area in Design Space and click on the “Upload” button on the left panel of the canvas. Select “Upload Image” and follow the prompts to upload the template.
Once you upload the file, select it from “Recently uploaded images” and insert it to the canvas.
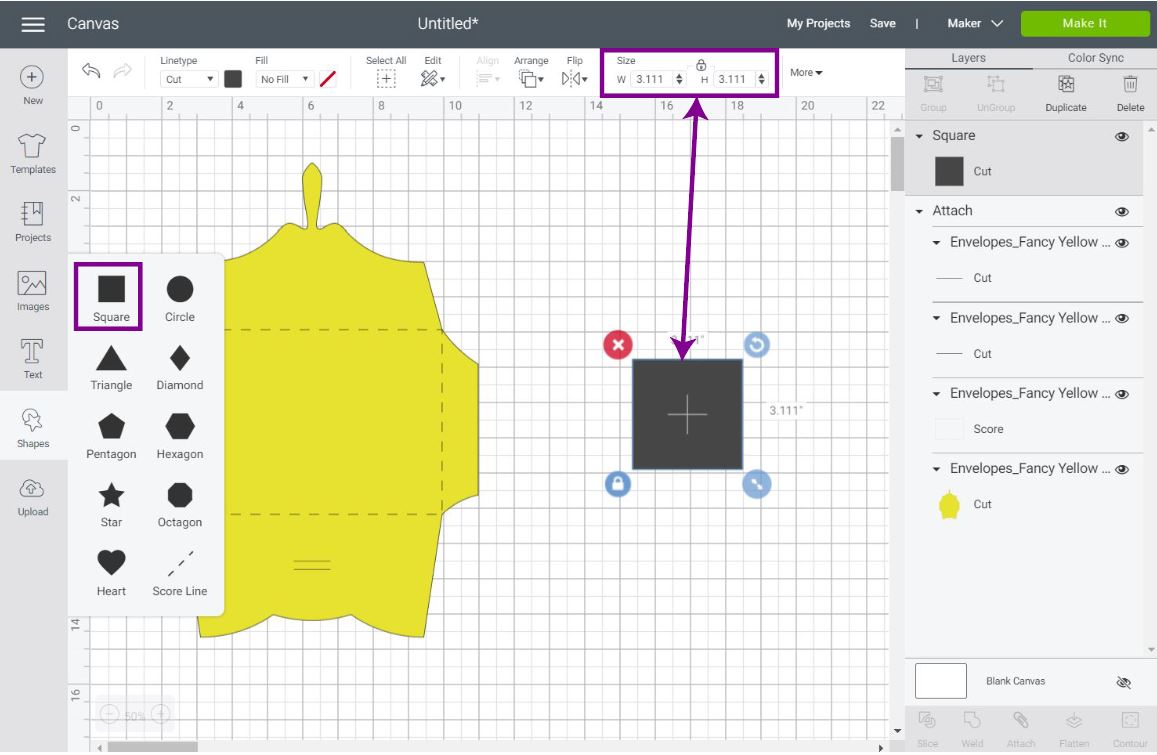
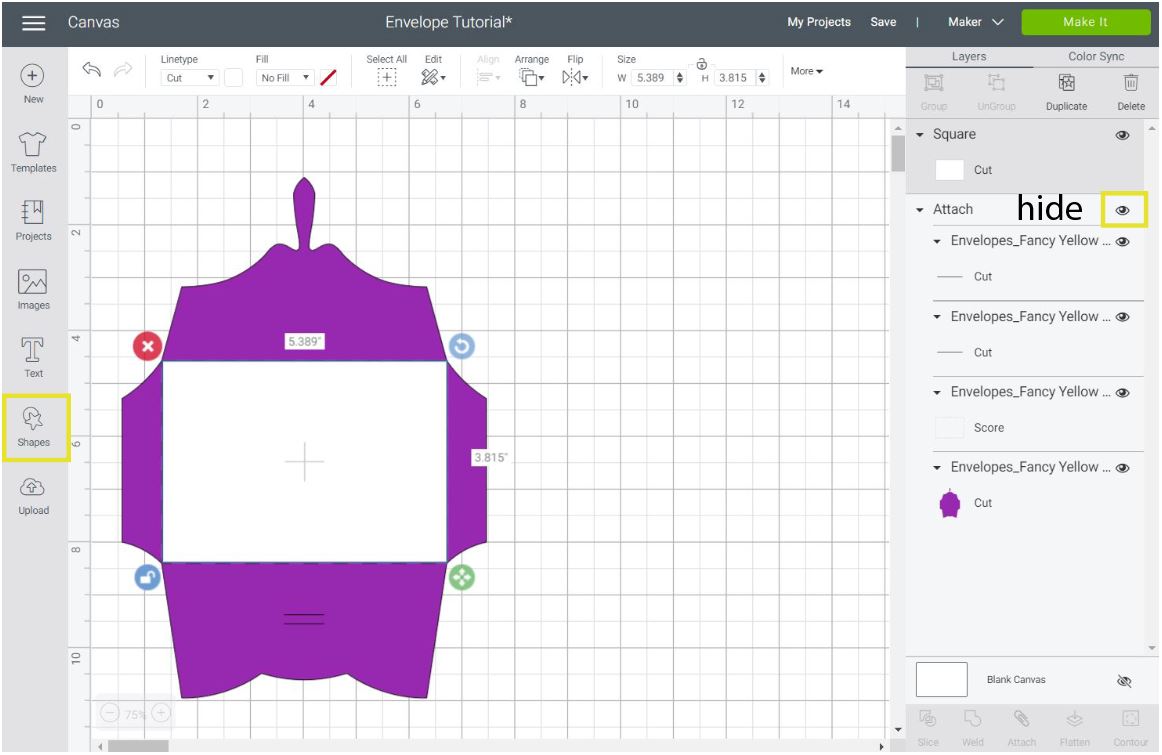
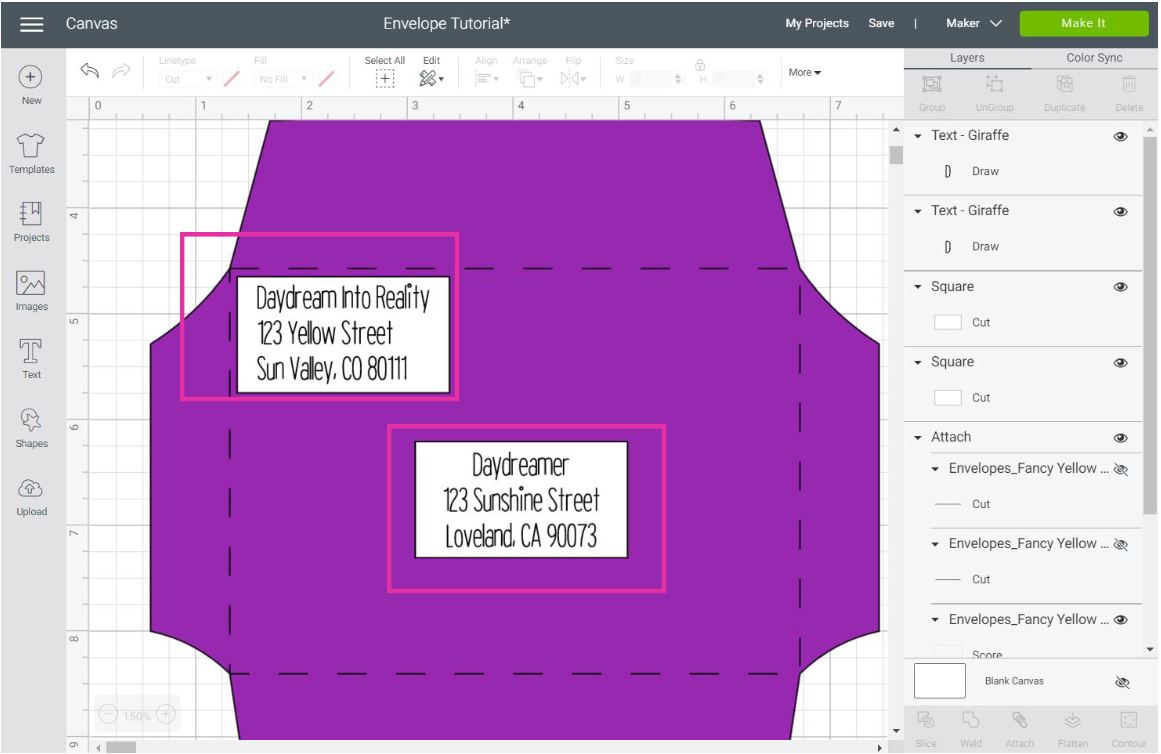
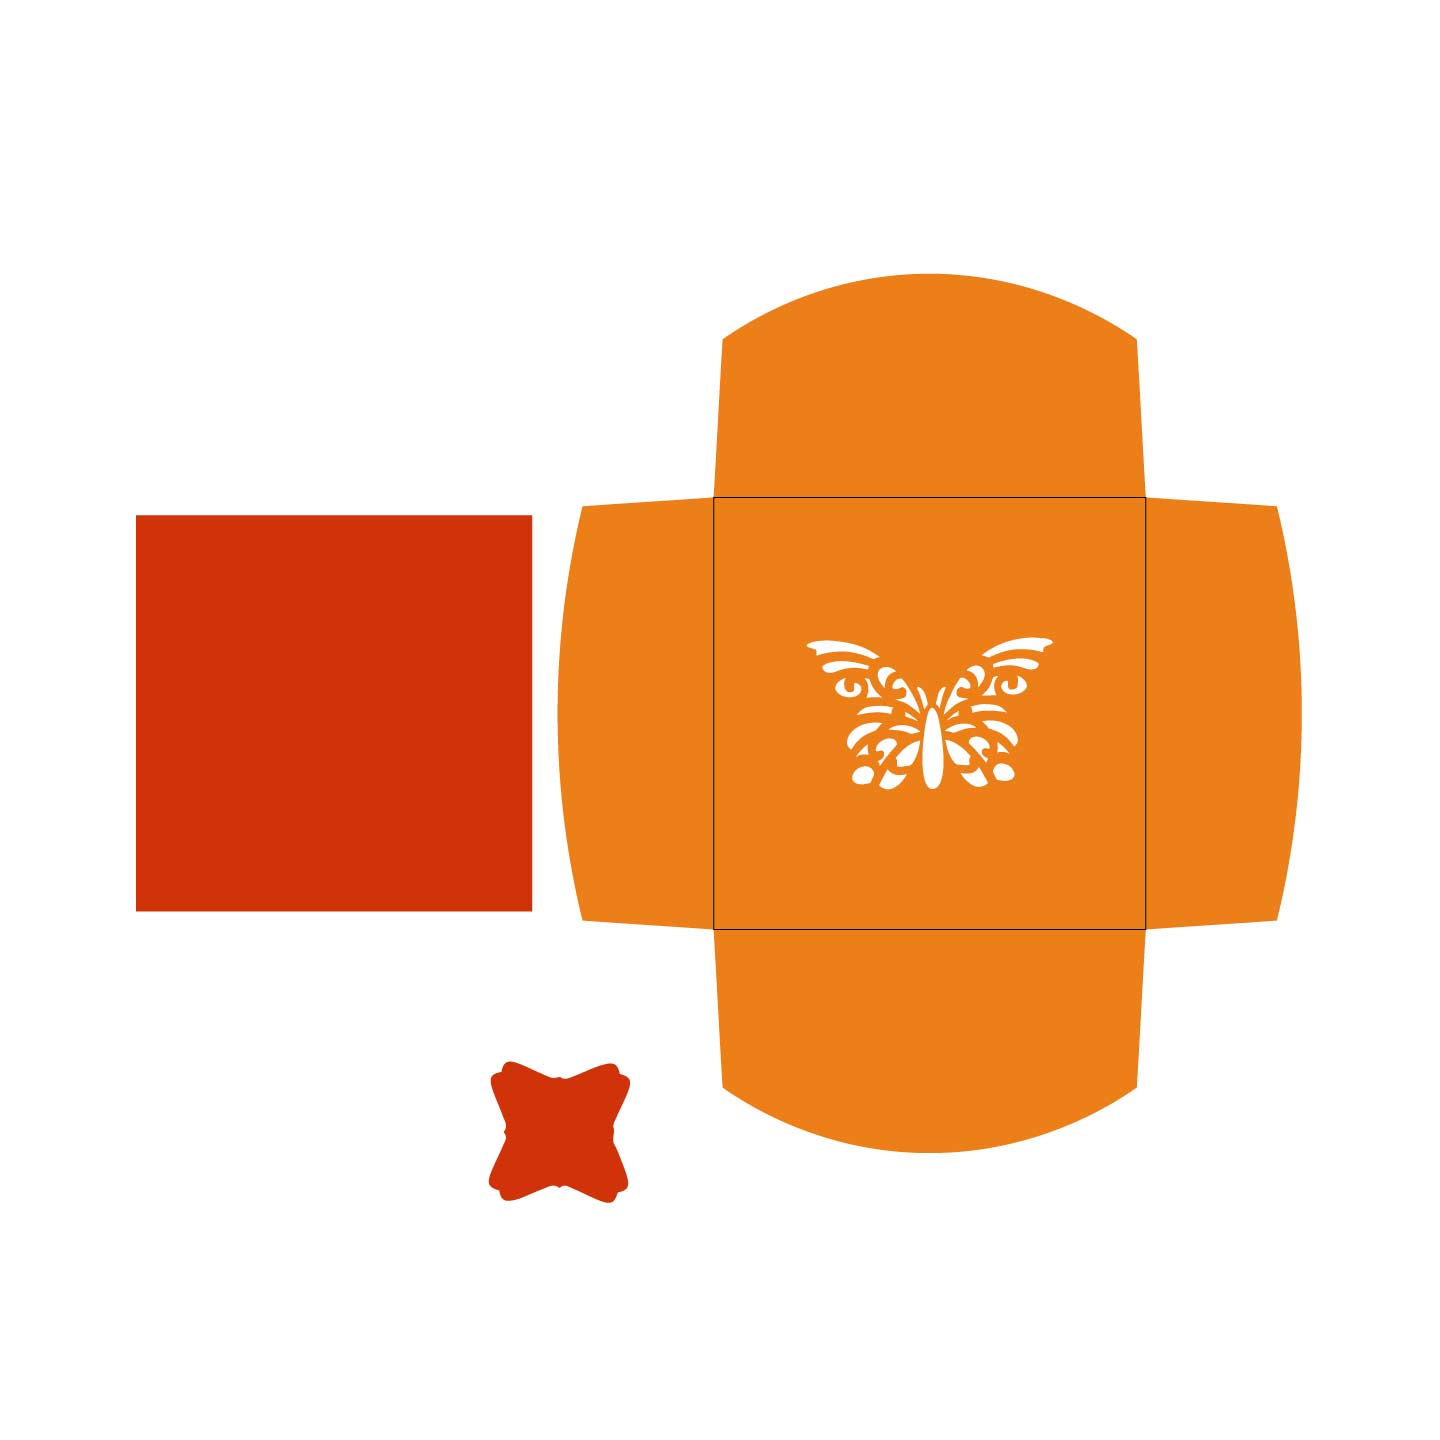
If you look on the layers panel of the envelope, you will see all the layers that are part of the design.
- Two cut lines to close the envelope.
- Square that goes where you need folds
- The envelope
To edit the envelope, first “Ungroup” the layers. Then select the square and change the “Linetype” to “Score” to tell your machine you need to use either the scoring wheel or the scoring stylus.
The cut lines need to be left with “Cut” as “Linetype.

Last but not least, select all layers and click “Attach” at the bottom of the Layers panel.
Attaching is very important; if you don’t do it when you click on “Make it,” your project will be all over the place.
Resize Envelope in Design Space
The easiest way to resize an envelope in Cricut Design Space is by creating a “card template.”
The card template is an “imaginary” shape sized according to your card size. Click on Shapes (left panel of the canvas) and select a square.
When the square appears in the designing area, select it, and change the size on the top panel area.
Most likely, you’ll need to click on the little lock to unlock the square’s proportions. The size of the card I wanted to use was 5″ x 3.5″.
Keep in mind that to make envelopes, you will need, in many cases, big sheets of paper.
In my experience, the most beautiful papers come in 12″ x 12″ sheets; therefore, your envelope can’t be larger than that size.
There are also limits when sizing in Design Space, and your project can’t be larger than 11.5″ x 11.5″; if using a regular mat, or 11.5″ x 23.5″. If Design Space brings an error is usually because your project is too big.
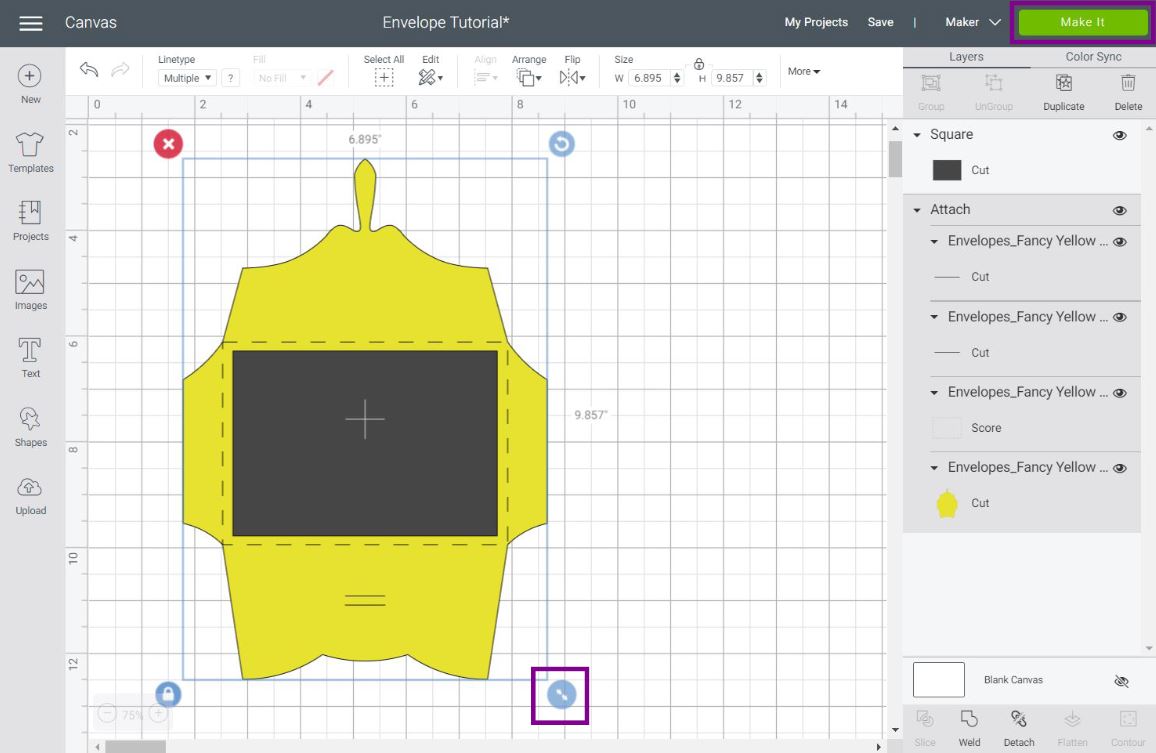
After sizing the square, select the envelope attachment and resize it, so the score lines wrap the card template. Leave a small margin, so you don’t have to force the real card inside the envelope.
Once your envelope is sized, delete the card template and click on “Make it.”
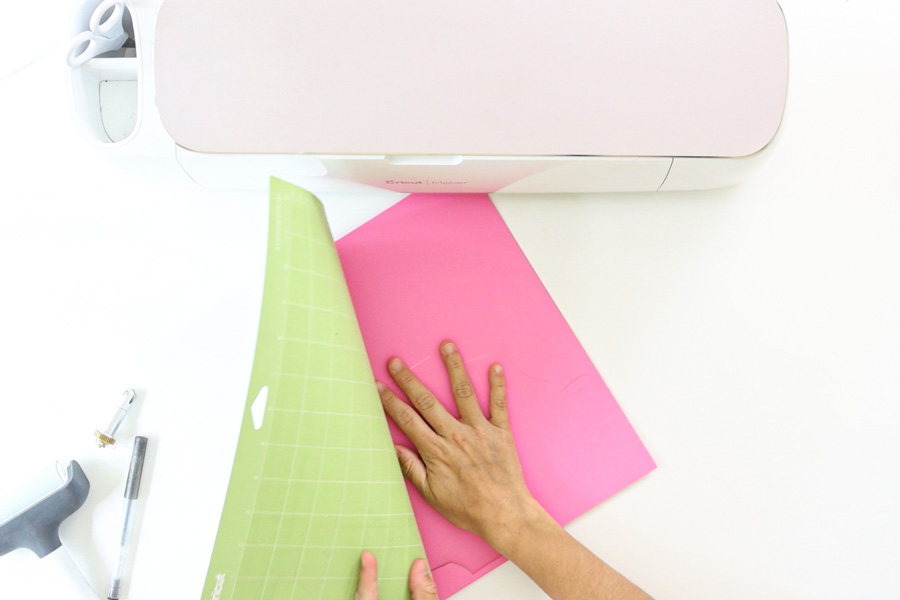
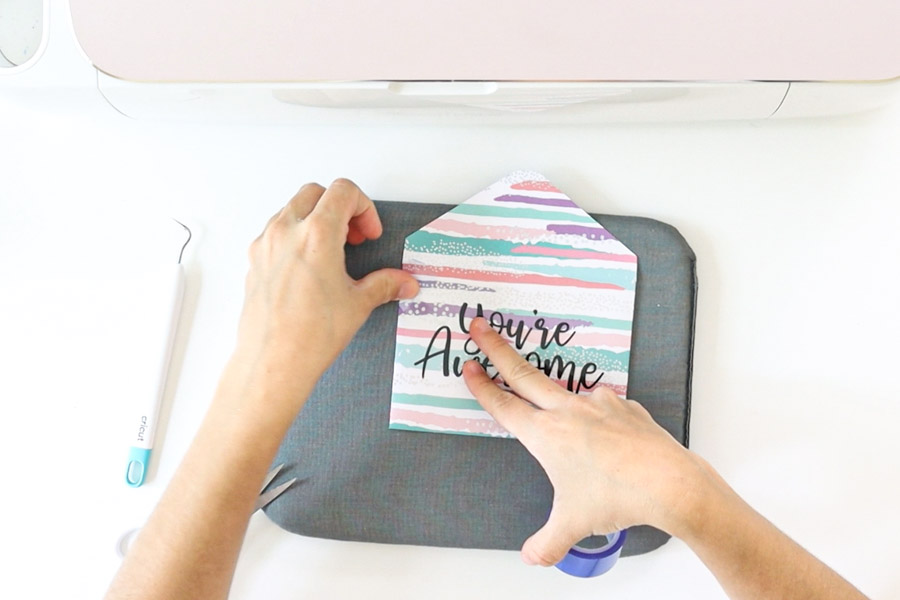
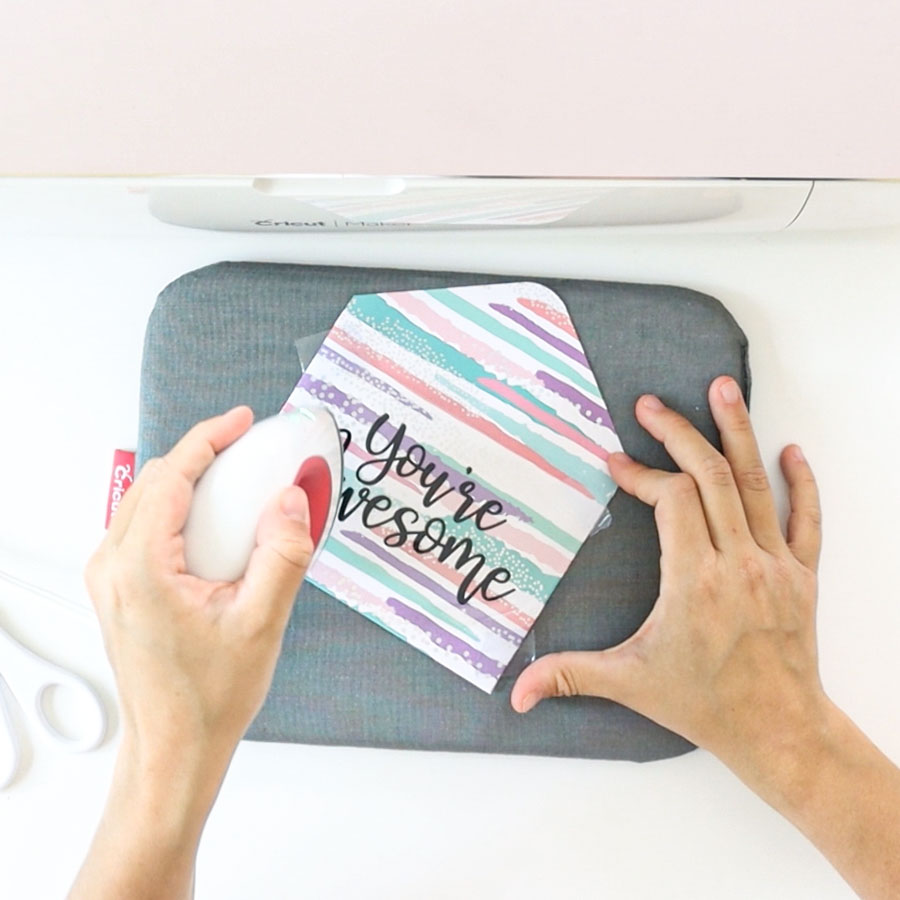
Cutting Envelope
The picture down below shows where you need to place the paper.
When making envelopes, boxes, or projects where you score, you always need to place your material coated or pretty size down.
Folds need to be towards the score lines, and the only way to do this is by scoring on the back of the paper. You can learn more about scoring with Cricut in this tutorial.
For this envelope (and all the others at the end of the tutorial), you don’t need to turn on “Mirror” because everything is proportional mathematically.
As a good practice, I recommend turning on “Mirror” whenever you are placing materials pretty or coated side down.
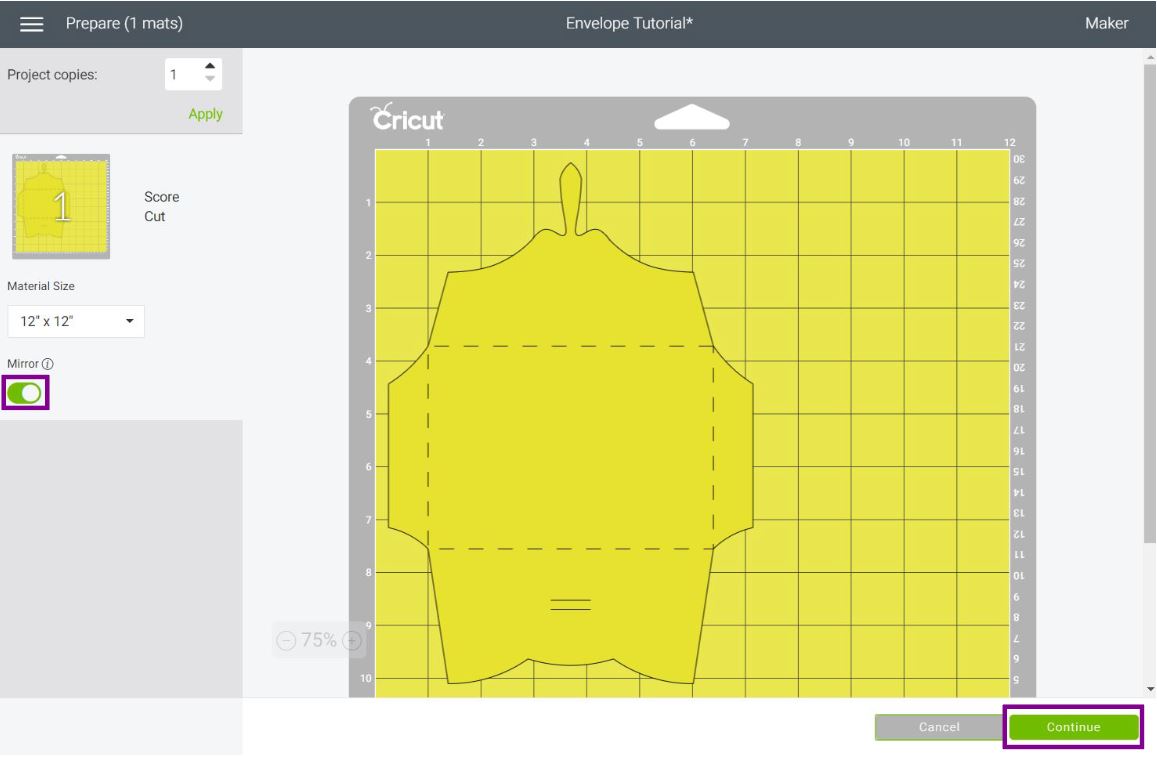
Click on “Continue.”
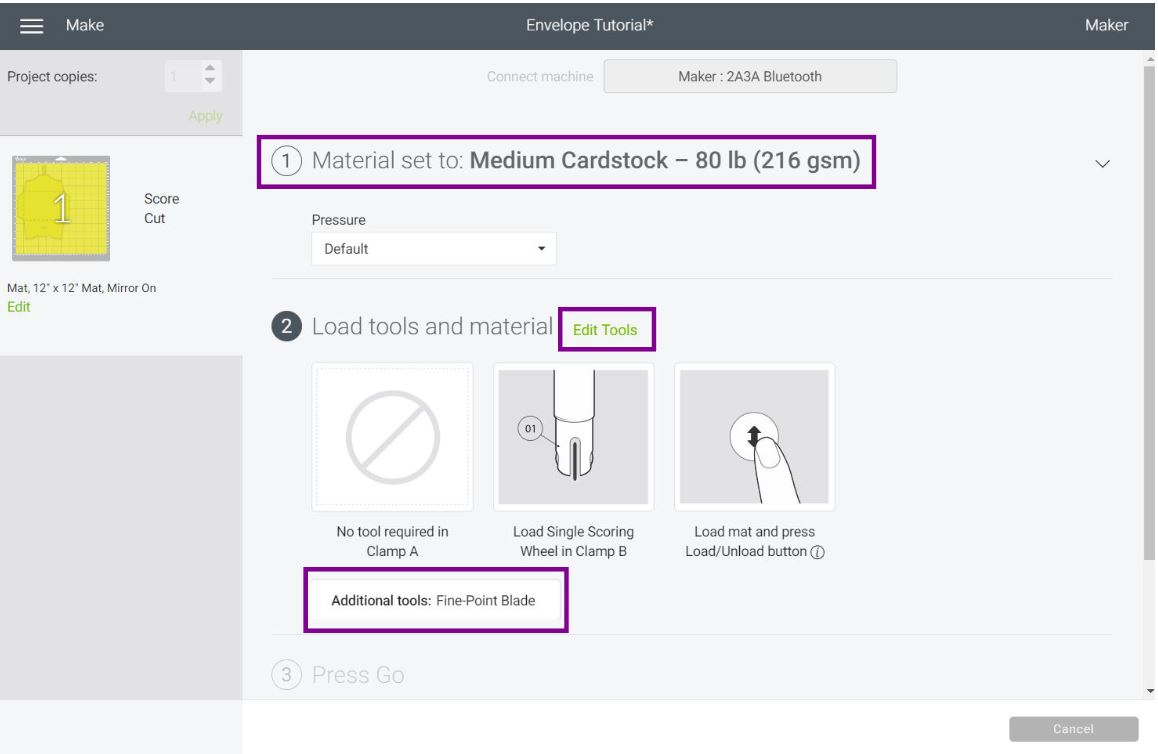
It’s time to select the materials and the tools you are going to use for your envelope. This choice is personal, but I’ve used cardstock, glitter cardstock, and sometimes, I’ve used thin patterned paper.
For this envelope, I used “Medium Cardstock.”
If you are working with a Cricut Explore machine, you will be using the Scoring Stylus for the folds. The good thing about the stylus is that you can install the Stylus and Fine Point blade simultaneously.
If you have a Cricut Maker, Design Space will select the scoring wheel for making scoring lines, if you don’t have it, click on “Edit Tools” and select “Scoring Stylus.”
Let’s move to real photos!
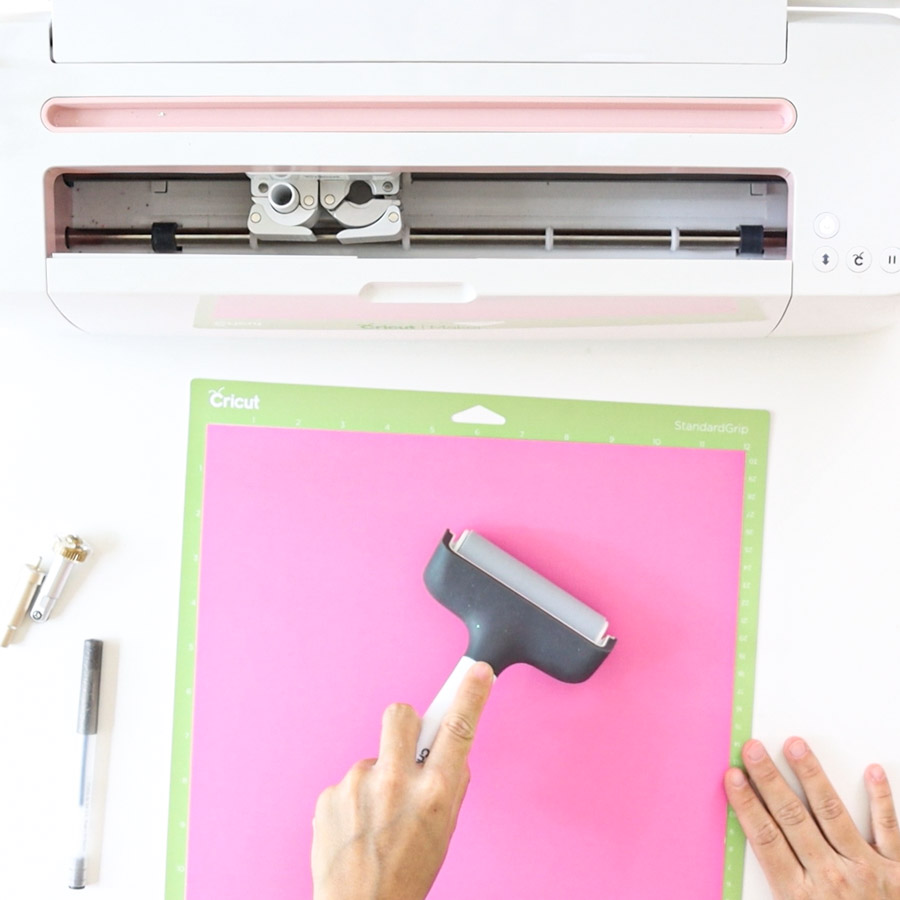
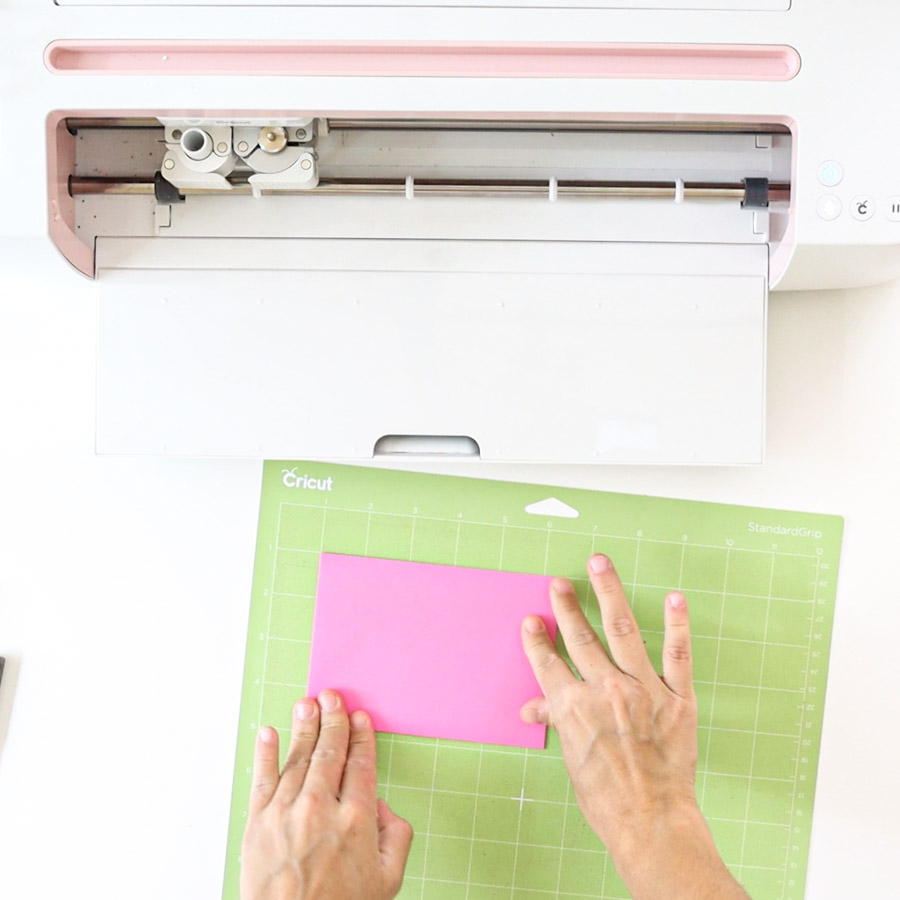
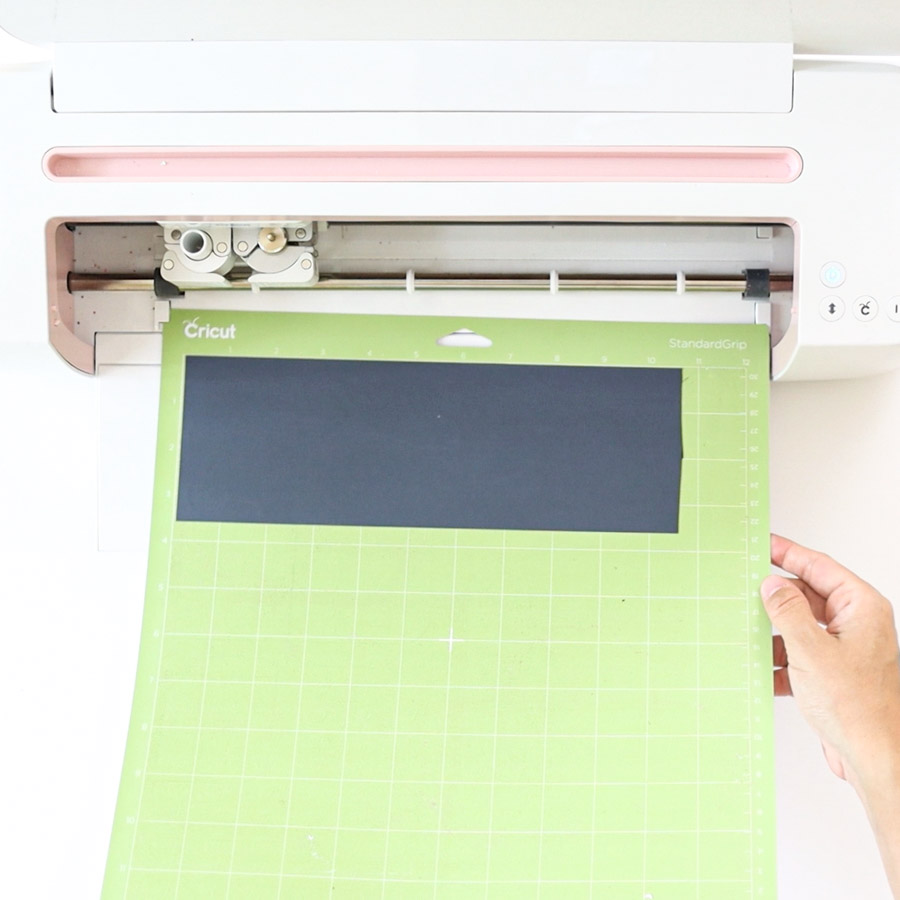
Place paper on mat coated or pretty side down. The paper I used had color on both sides, so it didn’t matter.
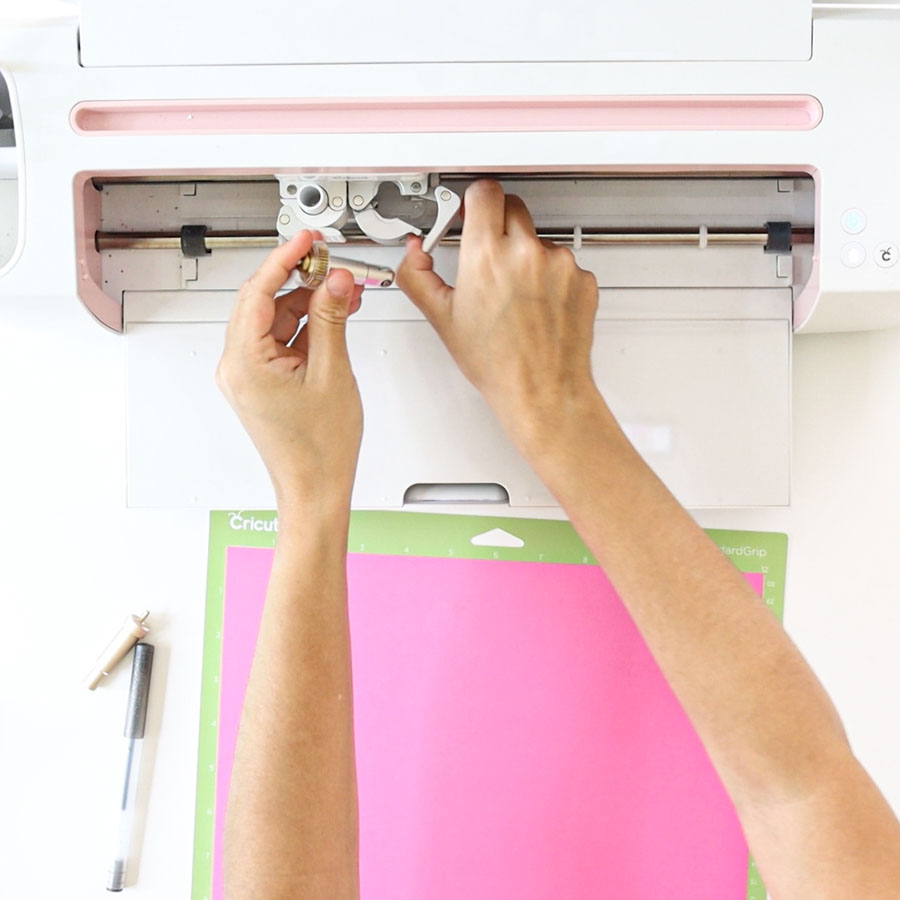
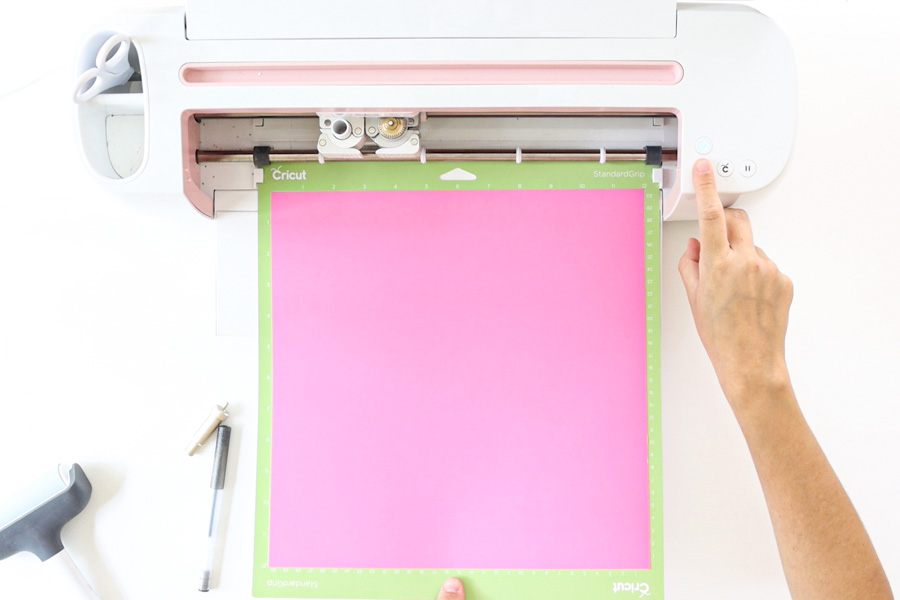
Install Scoring “Wheel/Scoring Stylus.” and Fine Point blade. Load mat to Cricut and press the flashing go button.
Note: If using the Scoring Wheel, you will need to install it first, then install the blade when your Cricut is done with the score lines.
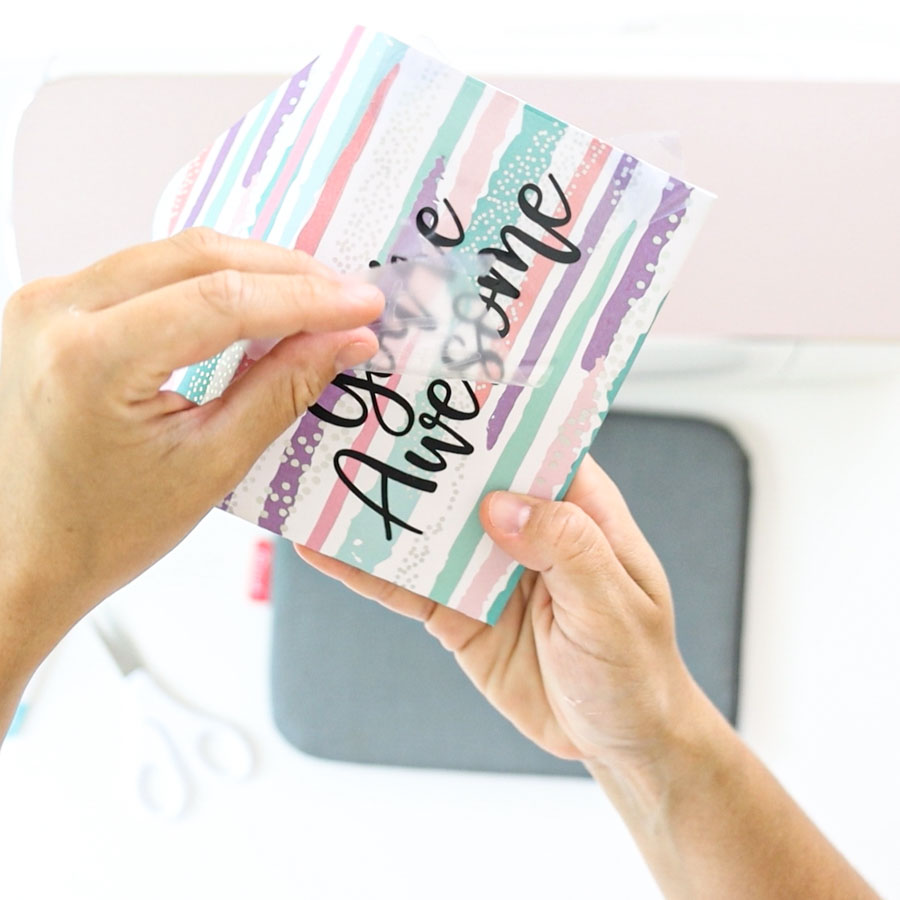
After cutting, unload the mat; I always bend the mat so gravity can help to remove the paper from the mat. It will also prevent your material from creating unwanted waves.
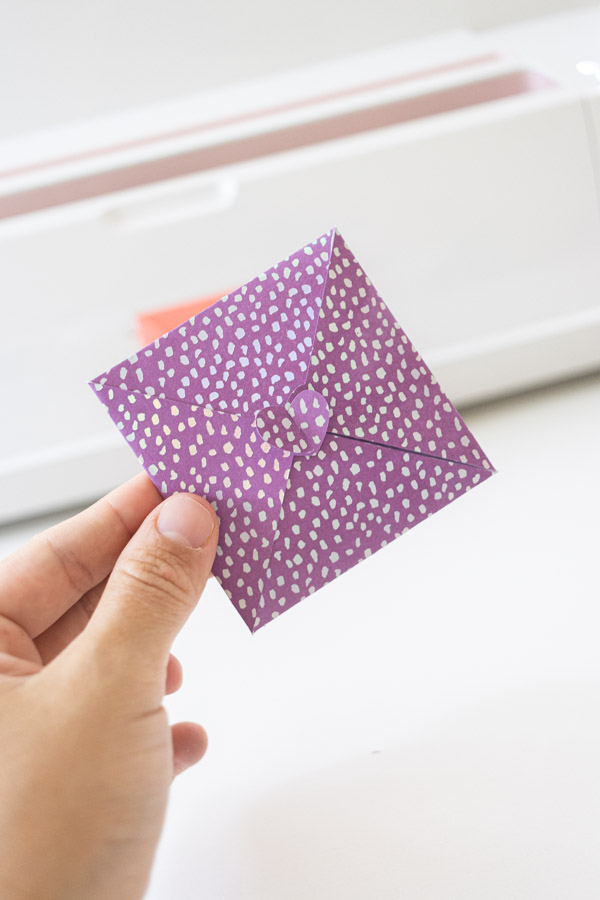
It’s time to assemble the envelope.
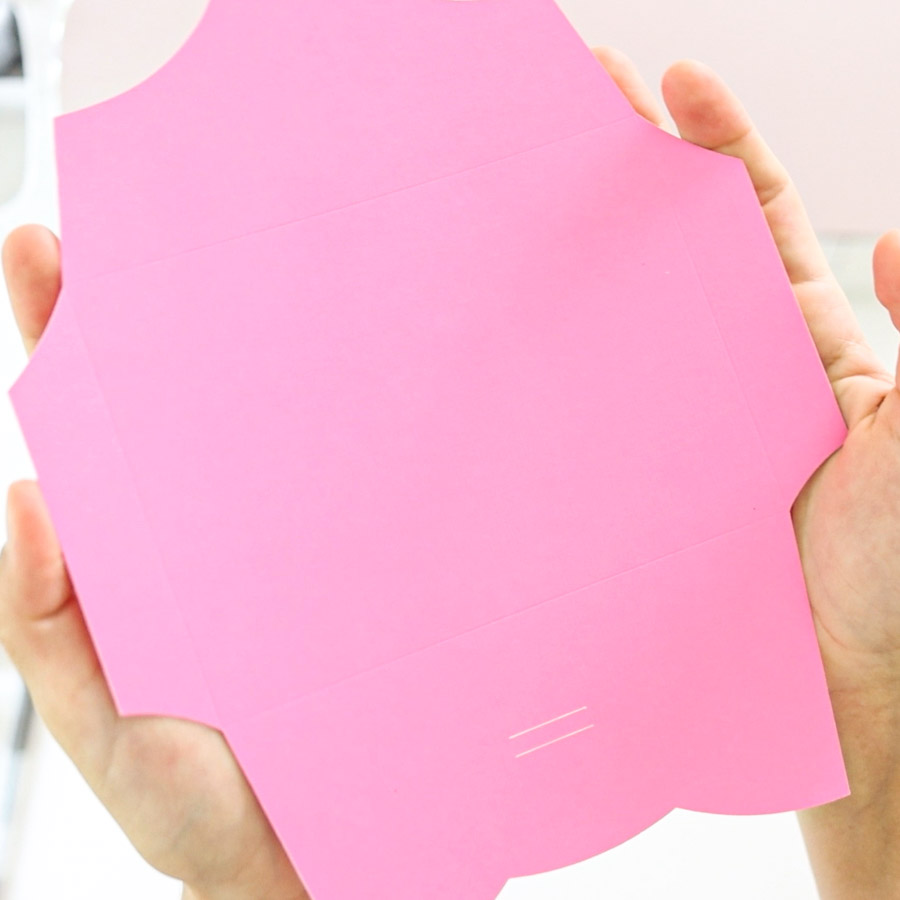
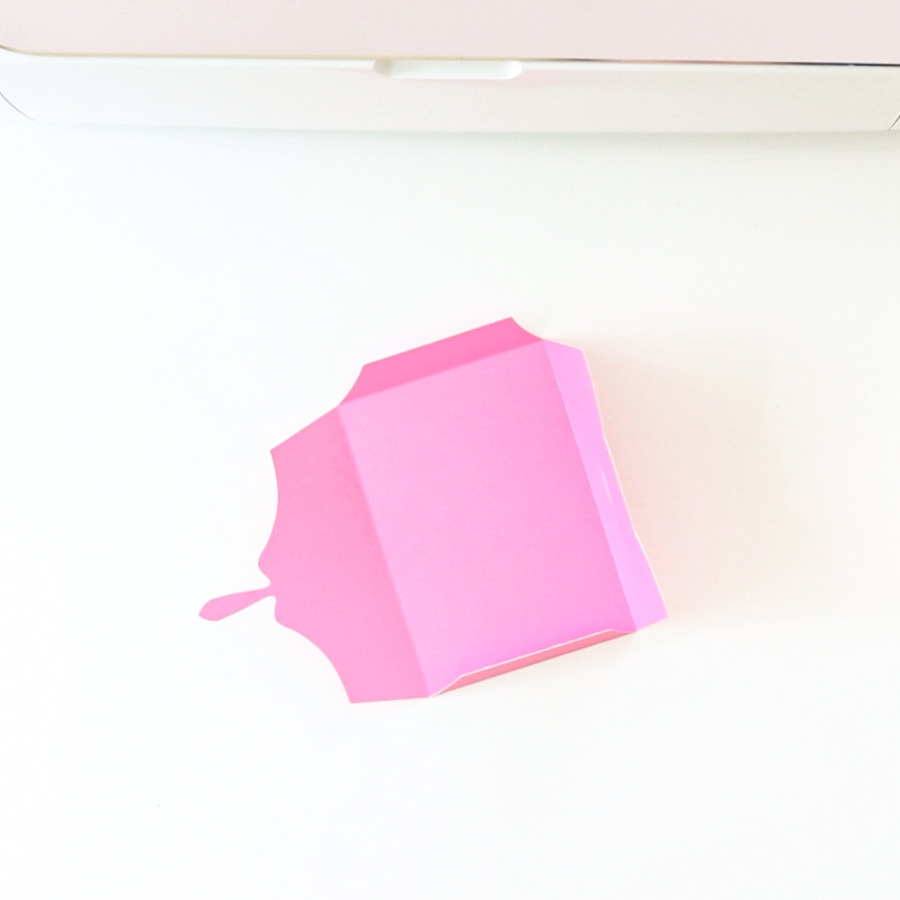
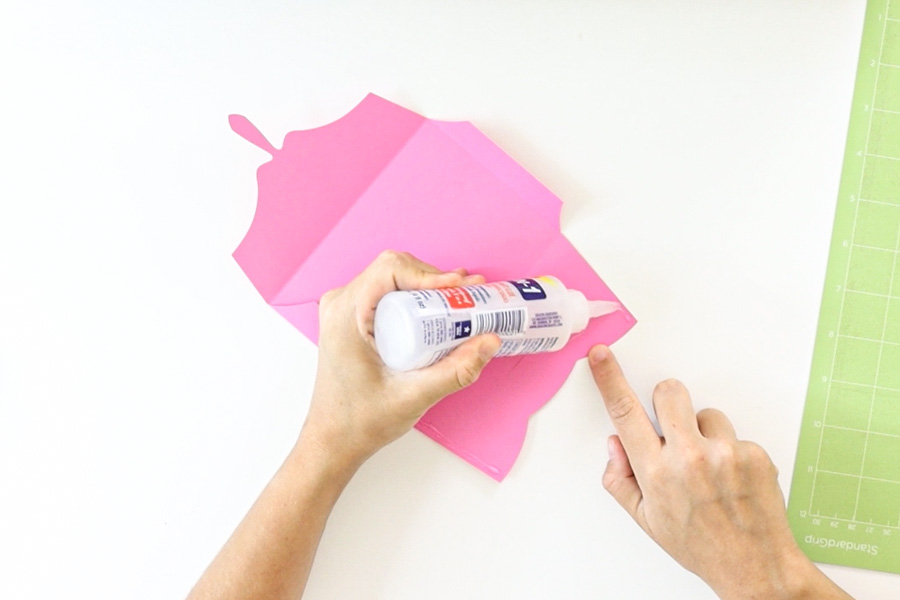
Fold towards the scoring lines and with a high-quality glue (run away from kids glue) connect the envelope.
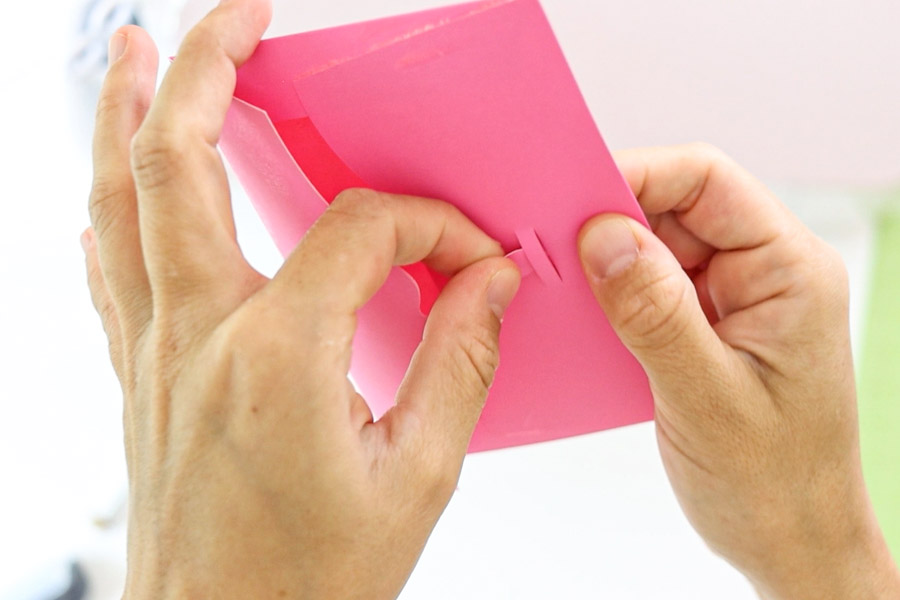
To close it, insert the little oval along with the two small cuts.
How to Address Envelopes with your Cricut
Addressing envelopes with your Cricut is very easy, and it can give your envelope a nice touch.
You can use any envelope you have on hand or any of the templates I provided you with.
There are three methods I will be covering today:
- Addressing with Cricut Pens
- Using Sticker Paper and Print then Cut
- Addressing with Iron-On (more like decorating).
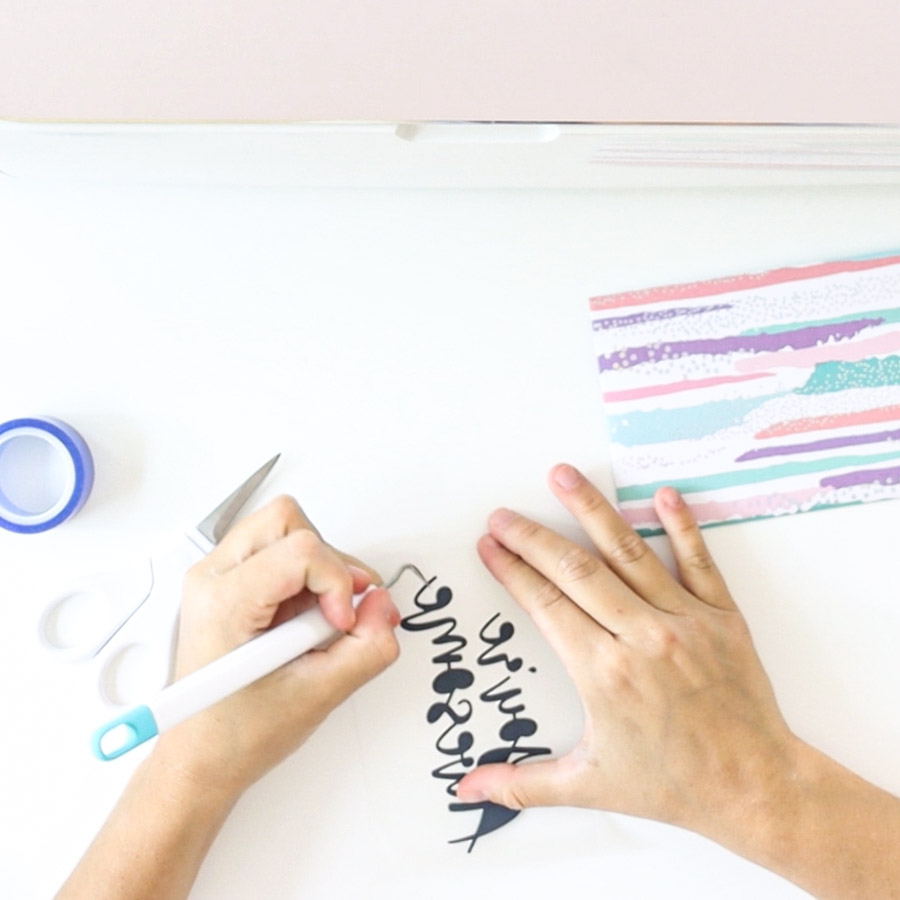
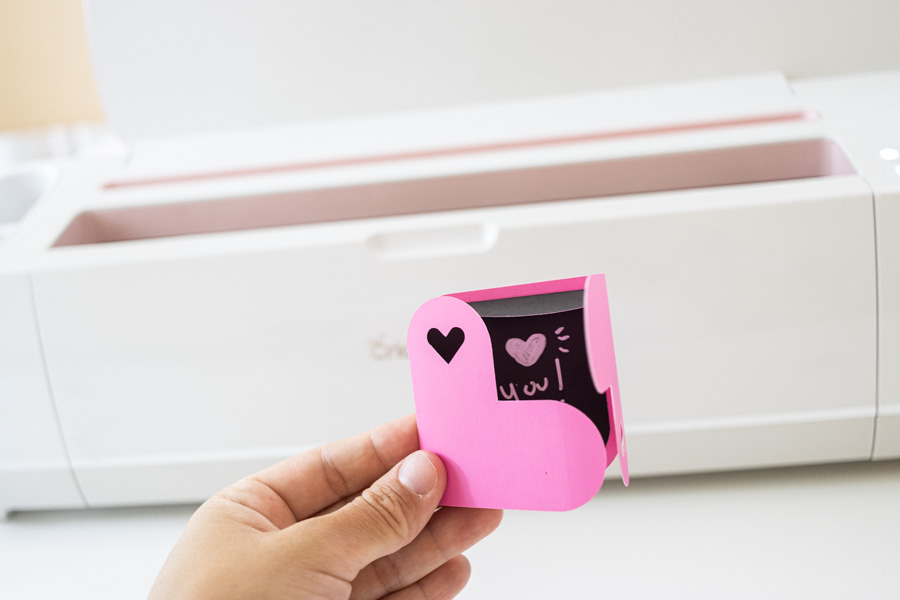
Addressing Envelopes using Cricut Pens
Using Cricut Pens to address envelopes is the method you’ll find across the web.
I love Cricut Pens, but they are so slow. If I was Addressing one envelope, sure, why not. Addressing for a whole wedding, no thank you!
Although we as crafters want the best-looking projects, we also need to be practical.
To teach you this method, let’s use the envelope and concepts we used on the previews steps.
Adding an Envelope Guideline
To determine the size of letters and the distribution between the sender and recipient, you need to create a guideline.
The guideline should be the size of your envelope once it’s folded. If you have a store-bought envelope, simply make a rectangle in Design Space using the with and height of your envelope.
For envelopes that you make in Design Space, drop a rectangle, unlock its proportions and then resize it, so it fits the middle of what it’s supposed to be the backside of the envelope.
Hide the envelope so you can have a clean workspace.
Add Text
Click on the Text button (left panel on the canvas) and type it in a paragraph with the sender’s information and then another with the receiver’s address.
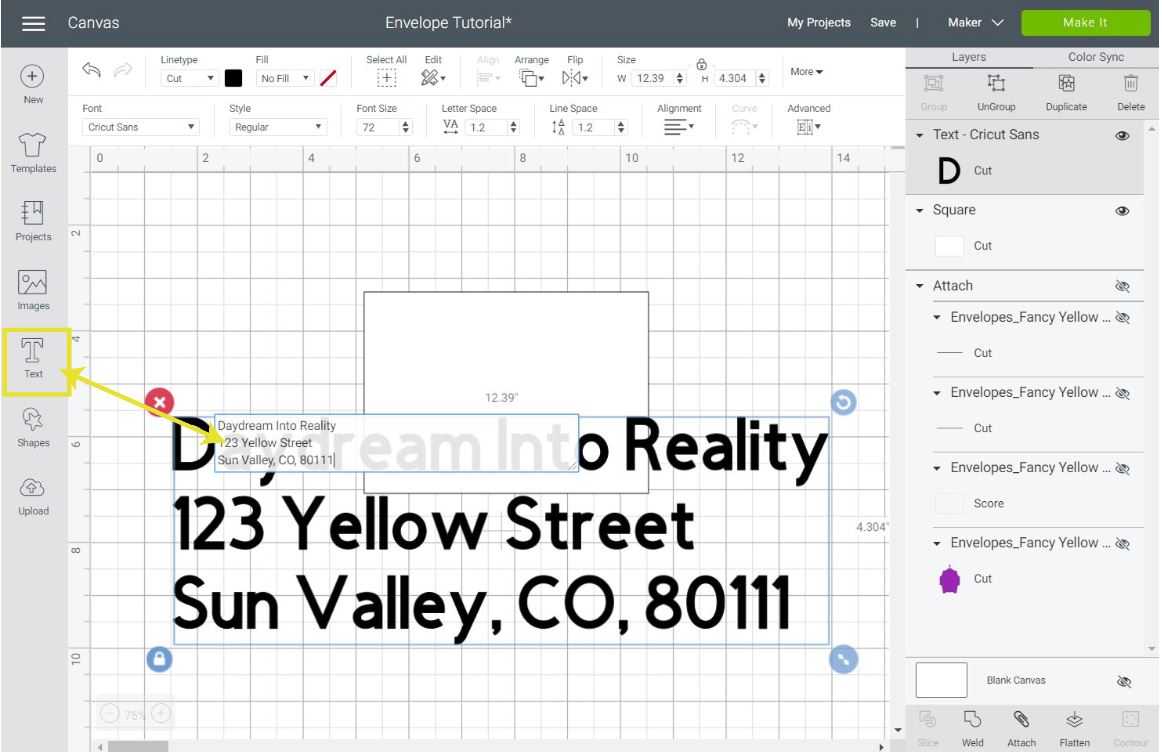
same number you got after resizing the sender’s info.
Tip: You can also center the receiver’s info by selecting the text, then click on “Alignment” and select “Center.”
Before you do anything else, you need to make sure you are using a writing font.
The font you have is set to “Cut” and we don’t want to cut, we want to write.
If you don’t have Cricut Access, this may cost. Your machine usually comes with a free writing font, but in case it doesn’t, you can always use a regular font and change the Linetype from “Cut” to “Draw.”
When drawing fonts instead of writing, you’ll have hollow letters. You can get around this using free fonts that are very thin. To see some of them, check out this Free & Paid Fonts for Cricut article I wrote.
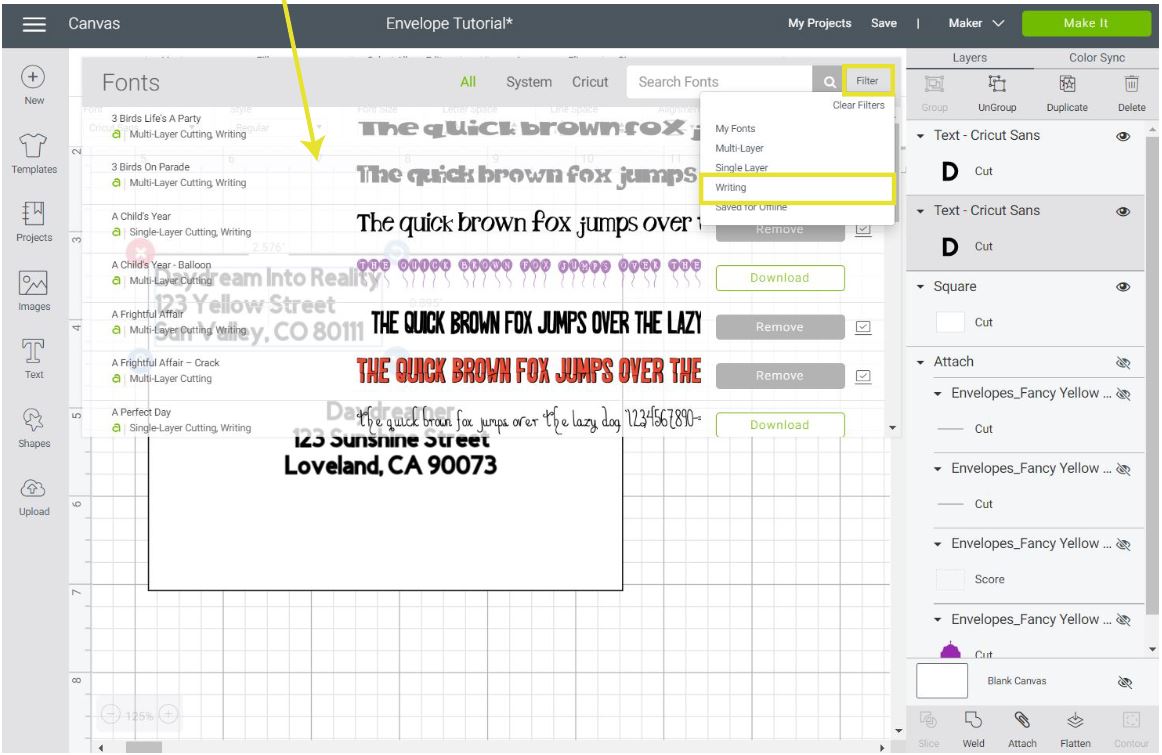
Cricut has charming writing fonts that you can use for your projects.
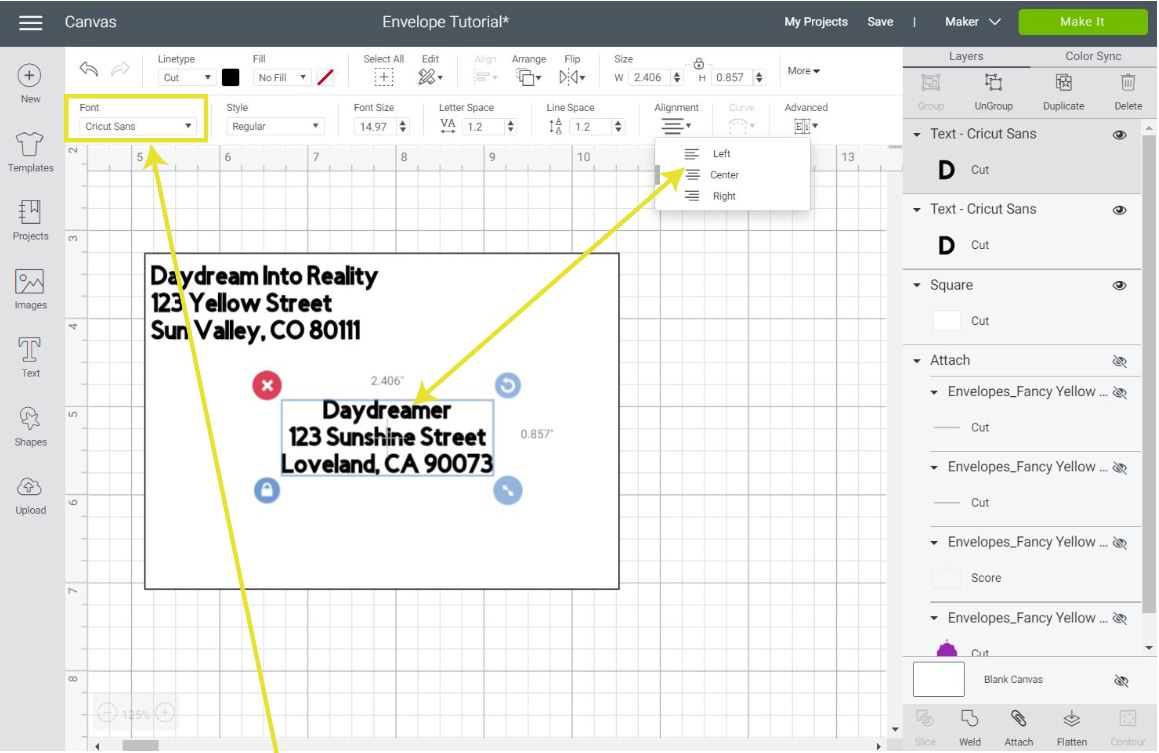
To change the font, select one paragraph at the time and click on “Font” (top panel).
A big window will slide open with the different types of fonts Cricut had. Click on “Filter” (upper-right corner of the window) and select writing.
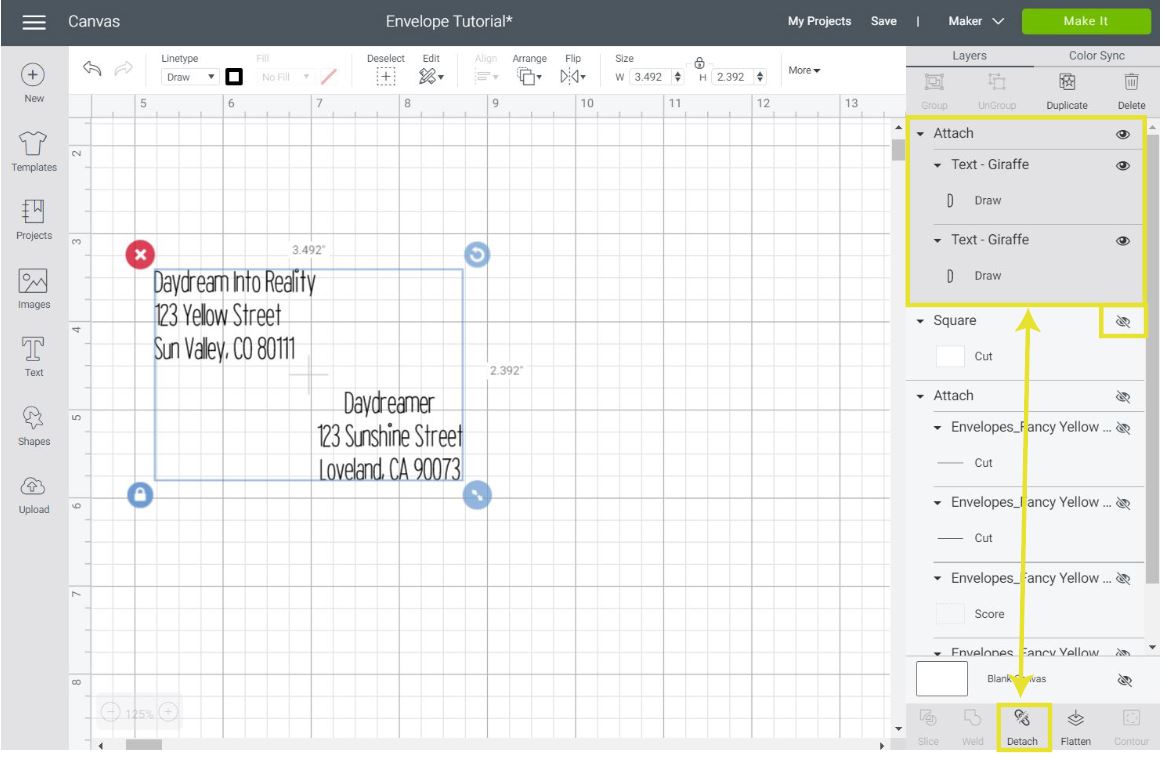
I picked the font “Giraffe” for this example. You want to pick something easy to read and understand. After changing fonts, you may have to resize and organize the paragraphs using the guideline one more time.
Once size and placement are ready, delete or hide the guideline and attach both the sender’s and the receiver’s paragraphs.
For more information about fonts and Cricut pens, check out these two helpful articles I wrote:
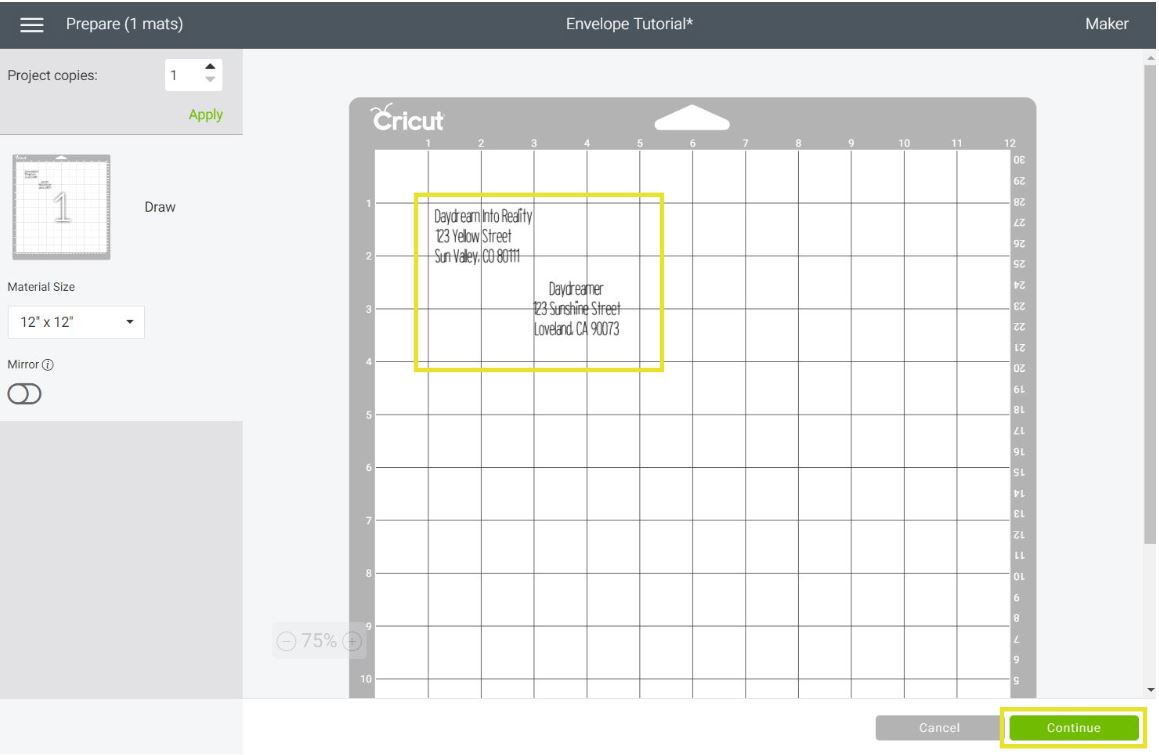
Click on “Make it” to write!
The mat preview looks a little bit different when using pens. Since we are not cutting anything, the mat color will be white.
Cricut always places things on the upper-left corner of the mat, but there’s a little caveat.
Cricut doesn’t start writing or cutting right on 0. There’s always a 0.25″ x 0.25″ added on each corner of the mat.
If you want to measure, go ahead, but if you like easy like me, visualize you are placing the envelope right at 1″ from the top and the left side of the mat and move the text to that area, leaving a small margin.
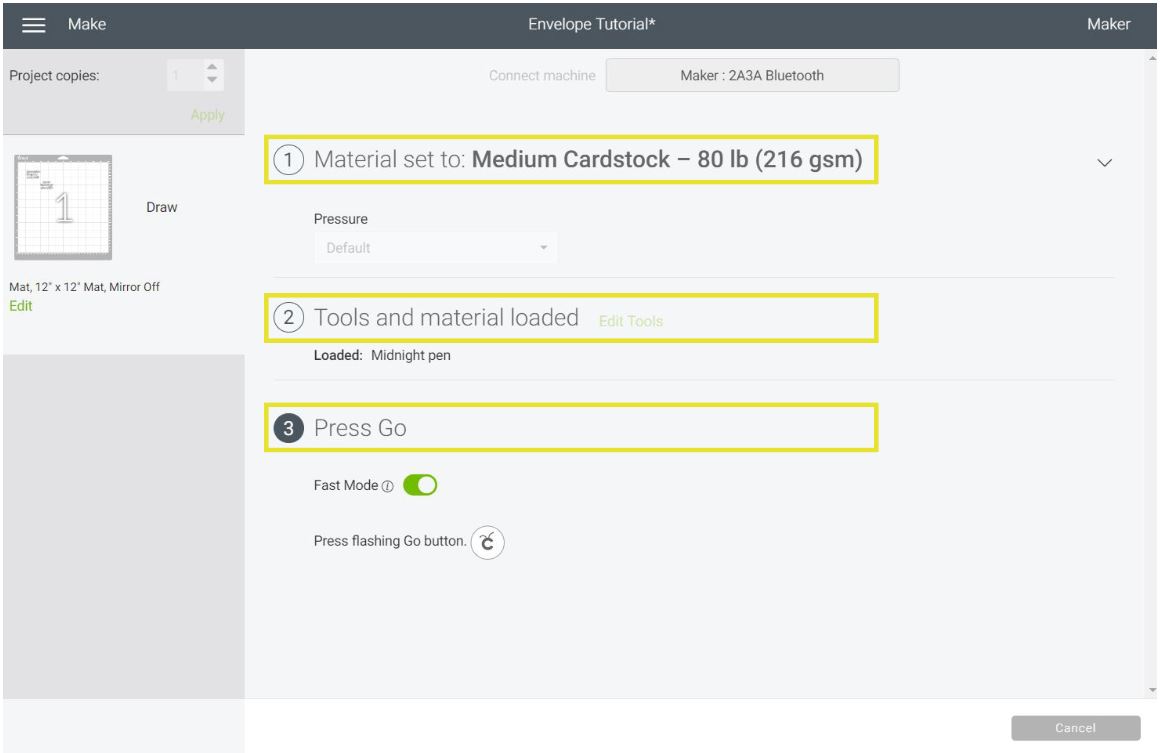
Click on continue, select the material you’re using, install the pen you want to use.
Let’s move to real photos again!
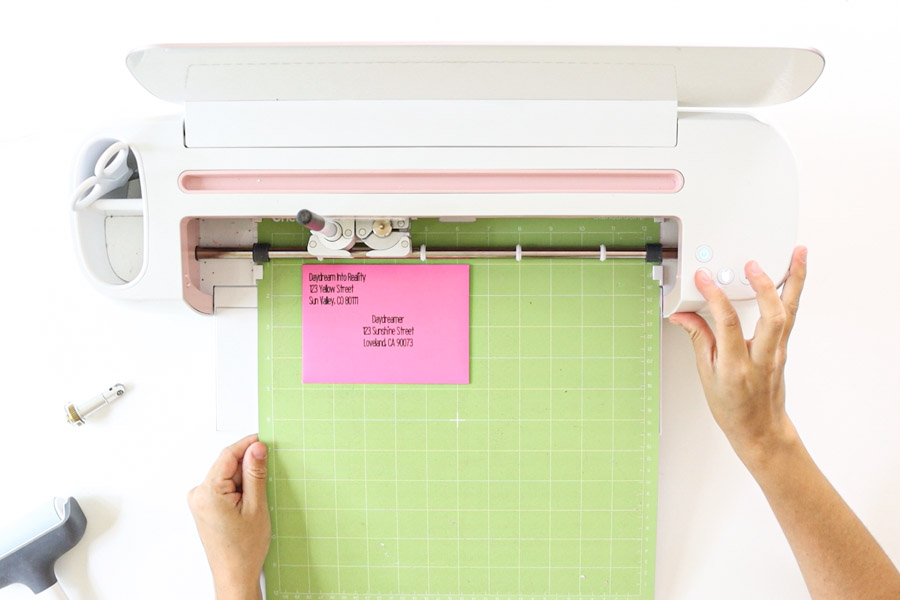
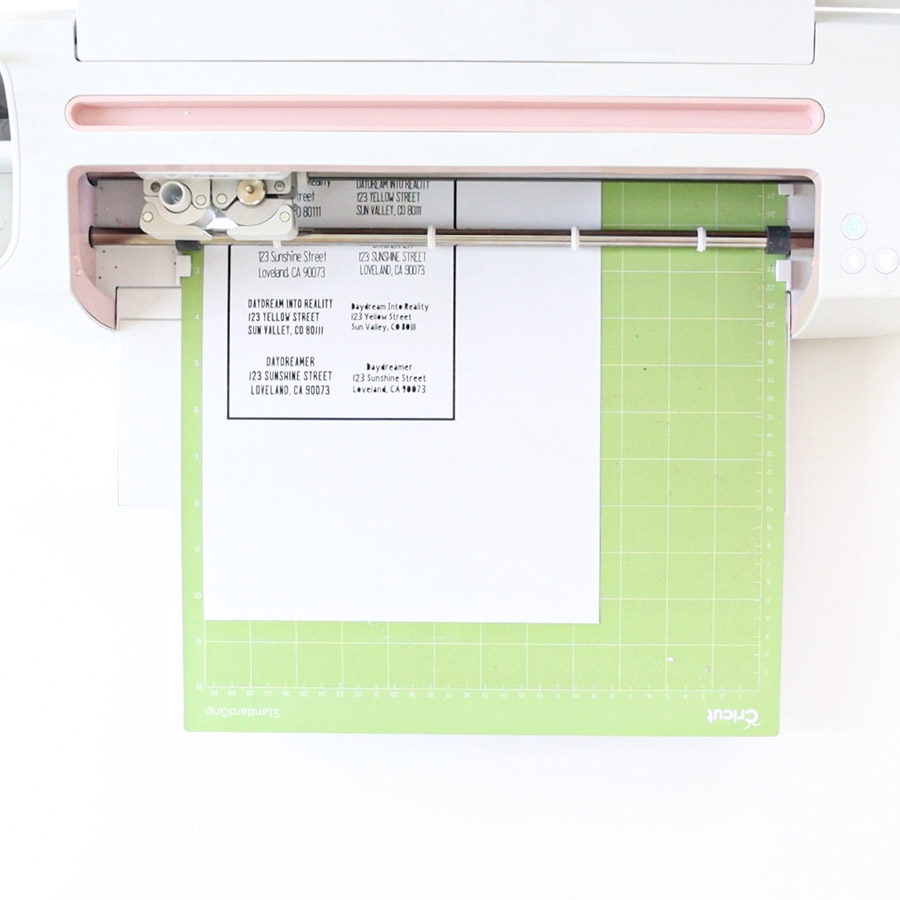
Place the envelope on the mat making sure it’s not moving. Remember where the text is located on the mat preview, that’s where you Cricut will write.
Once the pen is installed, load mat, tap on the go button, and there you have it, a beautifully addressed envelope.
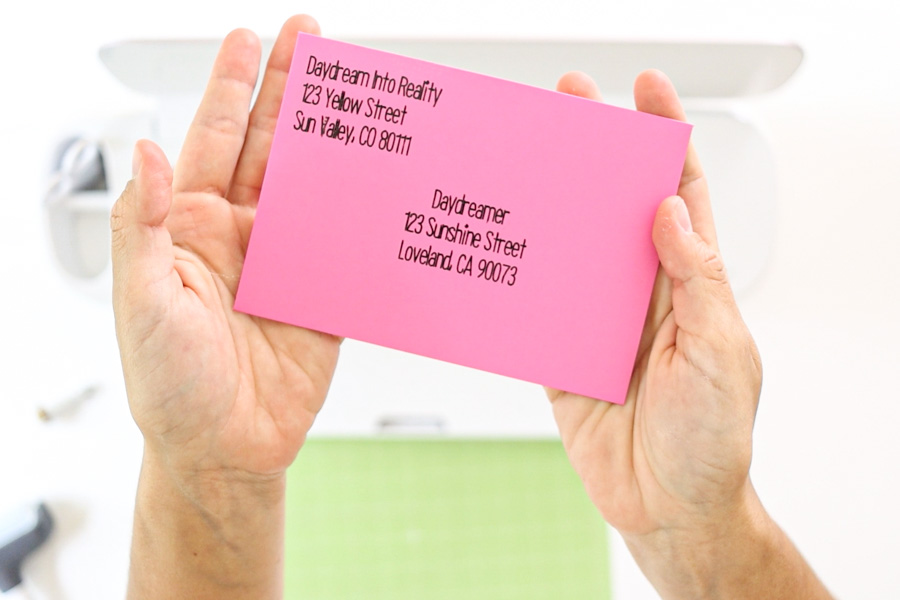
Doesn’t it look lovely?
Can you tell I love all things yellow, dreamy, and sunny?
Addressing Envelopes using Sticker and Print then Cut.
Another way to addressing envelopes is by using sticker paper, and the Print then Cut method.
If I were sending tons of invitations or Christmas cards, this is the method I would choose.
It’s fast, and it’s also pretty!
Maybe it’s not as cool as the first one, but trust me, using Cricut Pens for a single envelope will take you a long time.
Just think about it, is the person keeping or tossing the envelope?
Important: If using patterned paper, this method is essential because pens are hard to read on busy paper.
Labels for Addressing Envelopes with Sticker Paper
Making labels to address envelopes is quite easy!
At this point, you know how to add shapes and write text on the canvas.
Something cool is and that many don’t know is that you can use writing fonts if you want to give your text a handwritten style, that’s one of the main reasons people decide to use Cricut pens.
If using a physical envelope, with a ruler, visualize and measure two rectangles—one for the sender, the other one receiver. Then in Design Space, add these rectangles with text over them.
On the other hand, if you are making your envelopes in Design Space, you can directly make two rectangles (for sender and receiver) and place the text on them as I show you in the screenshot down below.
Once you measure, hide the envelope, and copy-paste the rectangles by selecting them and pressing Ctrl+C and then Ctrl+V.
Sticker paper is expensive, and you want to use it as much as you can.
Down below, you can see I made enough labels for four envelopes, and I also changed some of the fonts. The first four rectangles have writing fonts, and the other four have regular fonts.
Important: You can make enough labels until the entire project is 9.25″ x 6.75.”
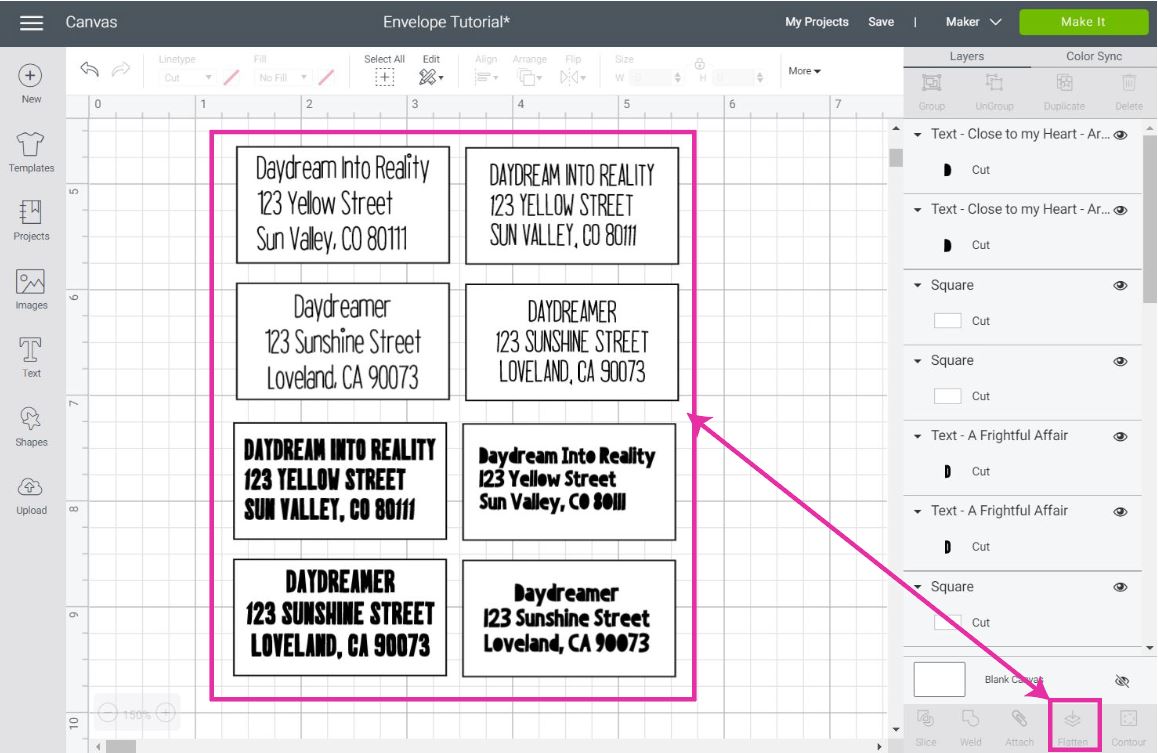
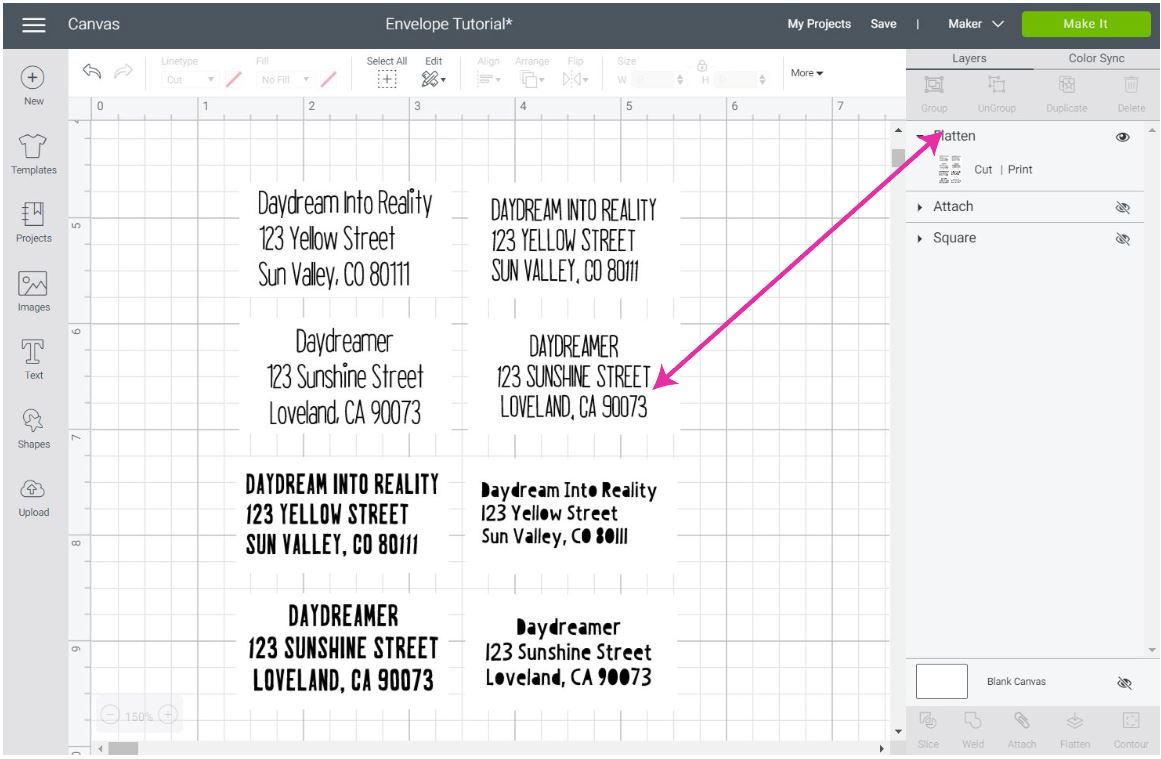
Before sending the project to print and then to cut, select all the rectangles and text and click on flatten located at the bottom of the Layers panel.
Check out how different the project looks now. The blade will go through the edges of each rectangle, and it will preserve the text inside it!
Now, click on “Make it.”
Here’s a preview of how the project will look like after you print; this is how you should also place your project on the mat.
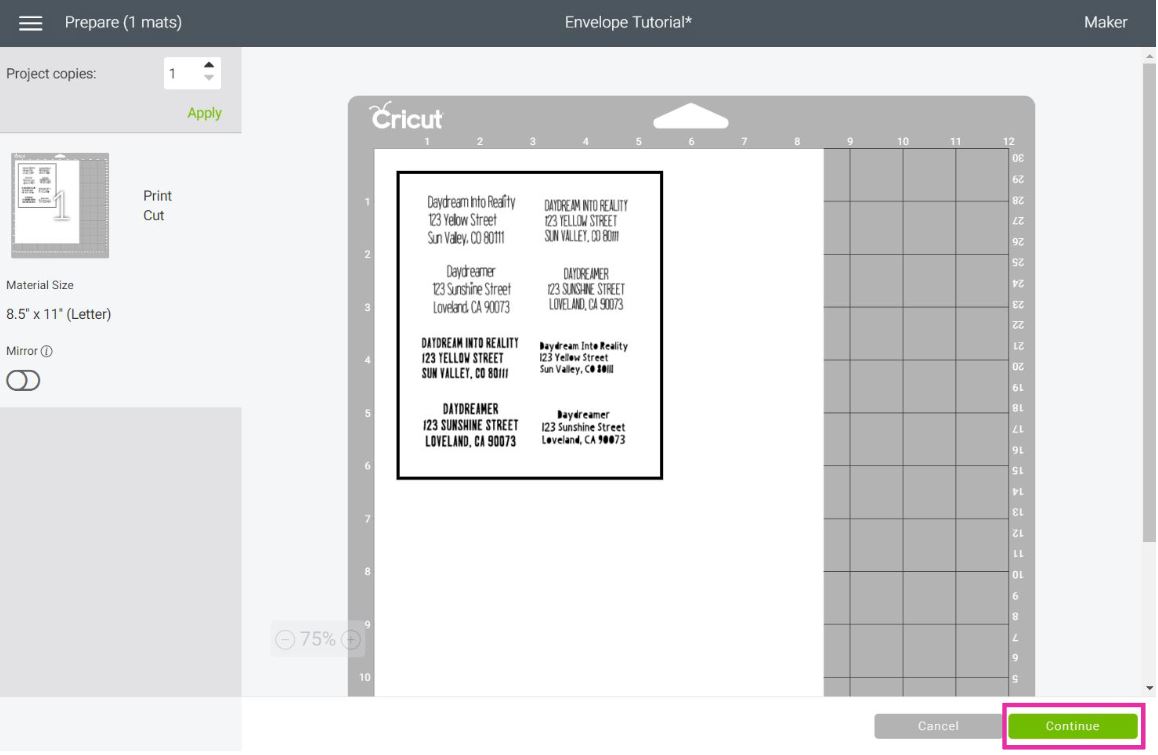
Now, send the project to your home printer by following the prompts.
I decided to use Silhouette’s sticker paper and choose “Sticker Paper, Removable.” I don’t like Cricut’s sticker paper is very thick, and it gets stuck in my printer.
If you aren’t using Cricut’s sticker paper, don’t select this material in Design Space because it will cut through the entire sticker sheet.
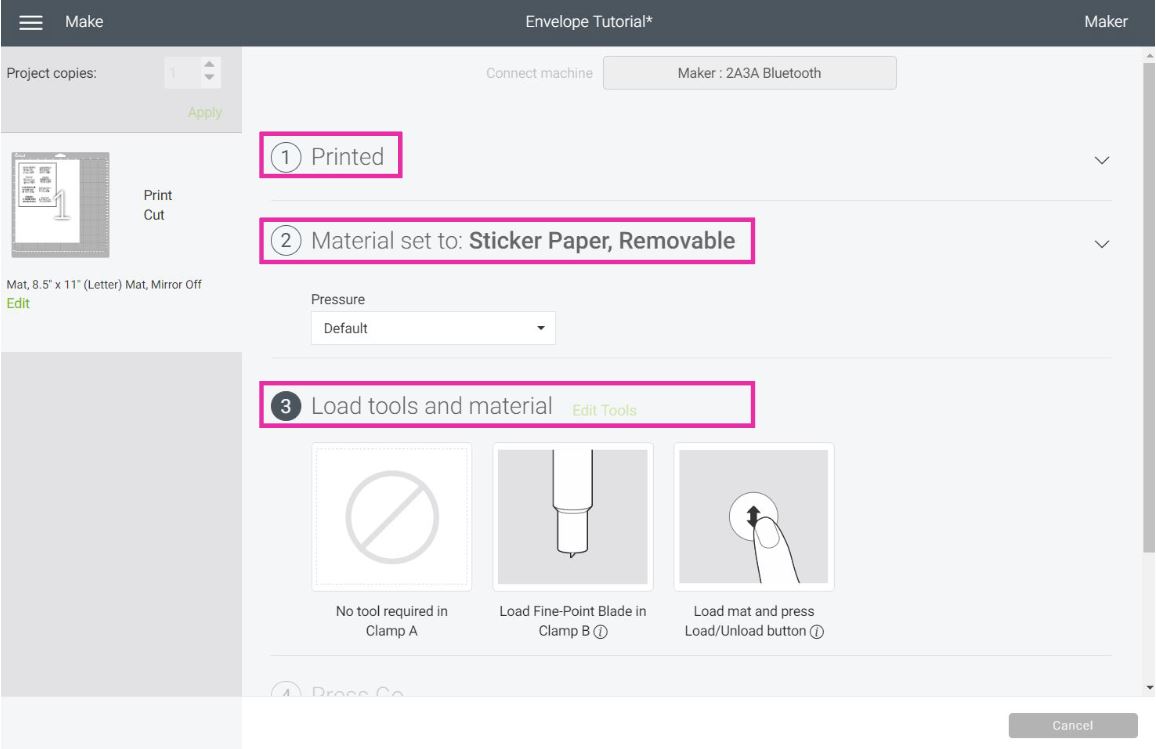
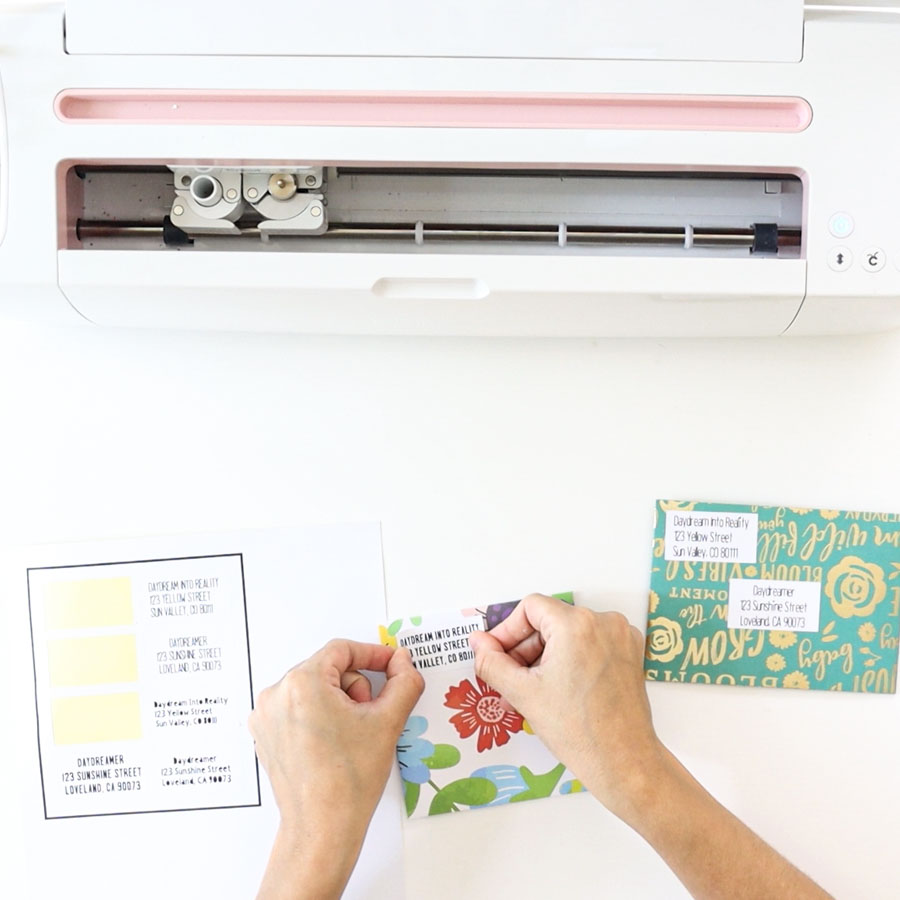
Place the printed copy on the mat, load to your Cricut, and see the magic happening before your eyes!
When Cricut is done cutting, unload mat, and place stickers on the envelope.
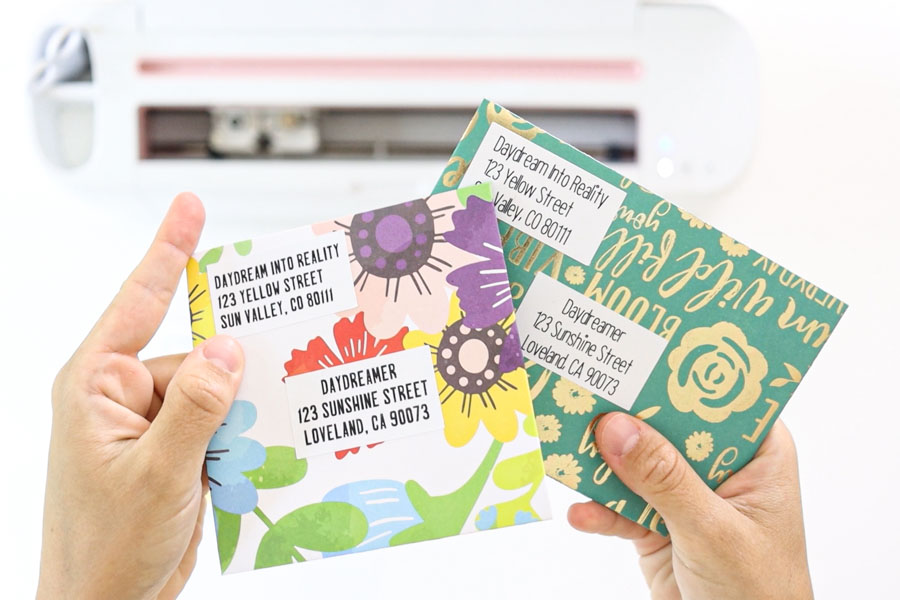
For these envelopes I used two heavy patterned papers. If I had used the pens, the text would’ve been tough to read.
I think they look fantastic, and in my opinion, It’s a better way to address envelopes than with Cricut Pens.
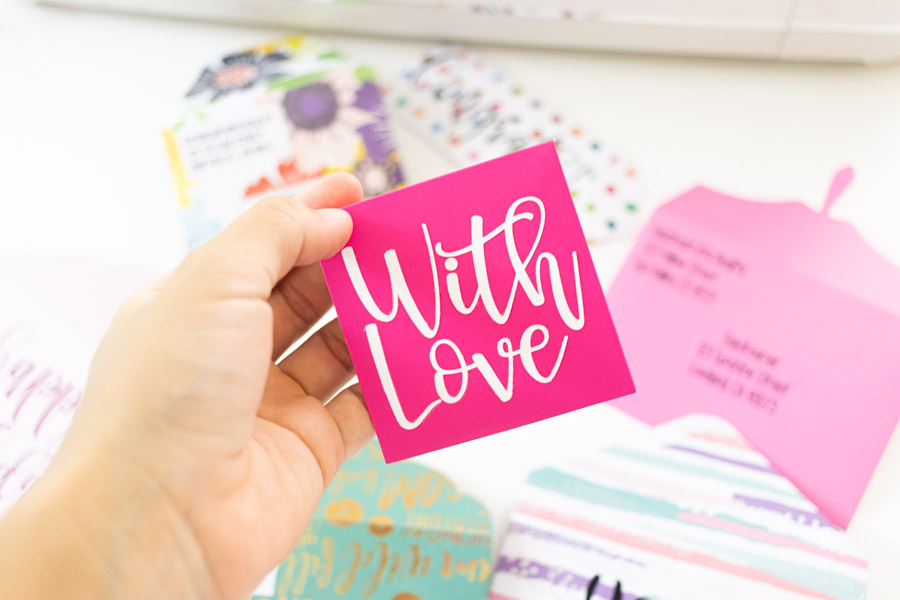
Addressing Envelopes using Iron-On/HTV
Many times you will be handing over envelopes personally!
Maybe it’s a birthday party, a baby shower, or just a special celebration you’re going to.
If that’s the case, you can have a little extra fun using Iron-On and address/decorate your envelopes.
If you’ve never worked with Iron-On before, I recommend you read this complete guide on Heat Transfer Vinyl; it covers everything you need to know about this material.
Download the practice file down below and upload it to Cricut Design Space.
Ungroup the file, and weld each of the words/phrases, so you have a single layer per expression. You can cut all of them, but I am using the “You’re Awesome” design for this example.
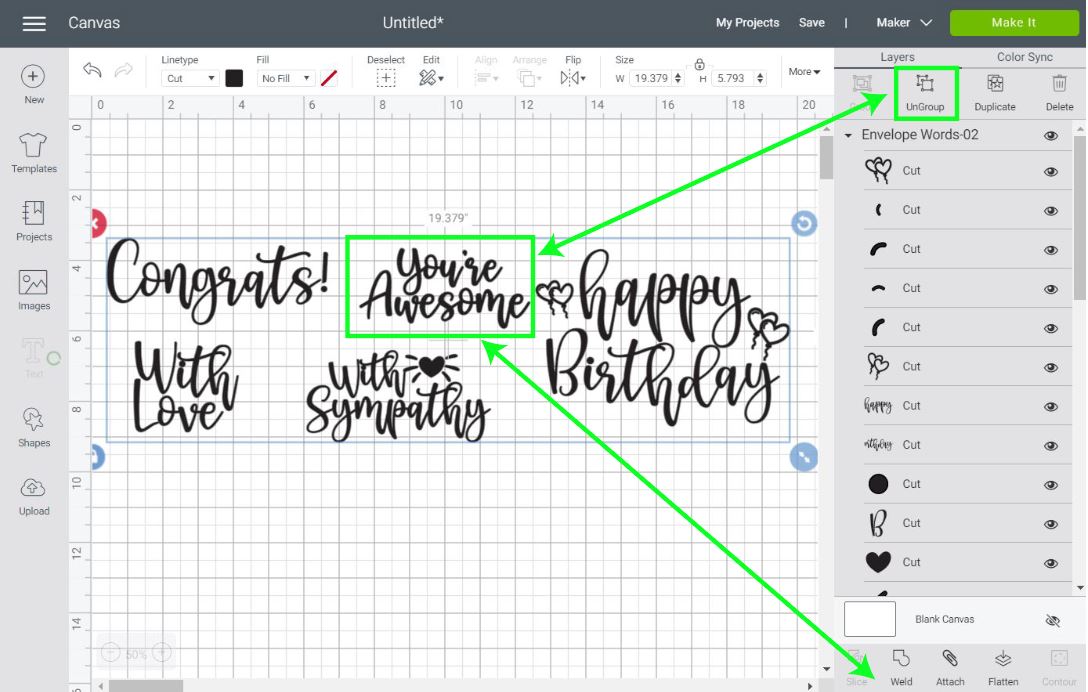
Resize it, so it fits the back of your envelope, and when you’re ready, click on make it.
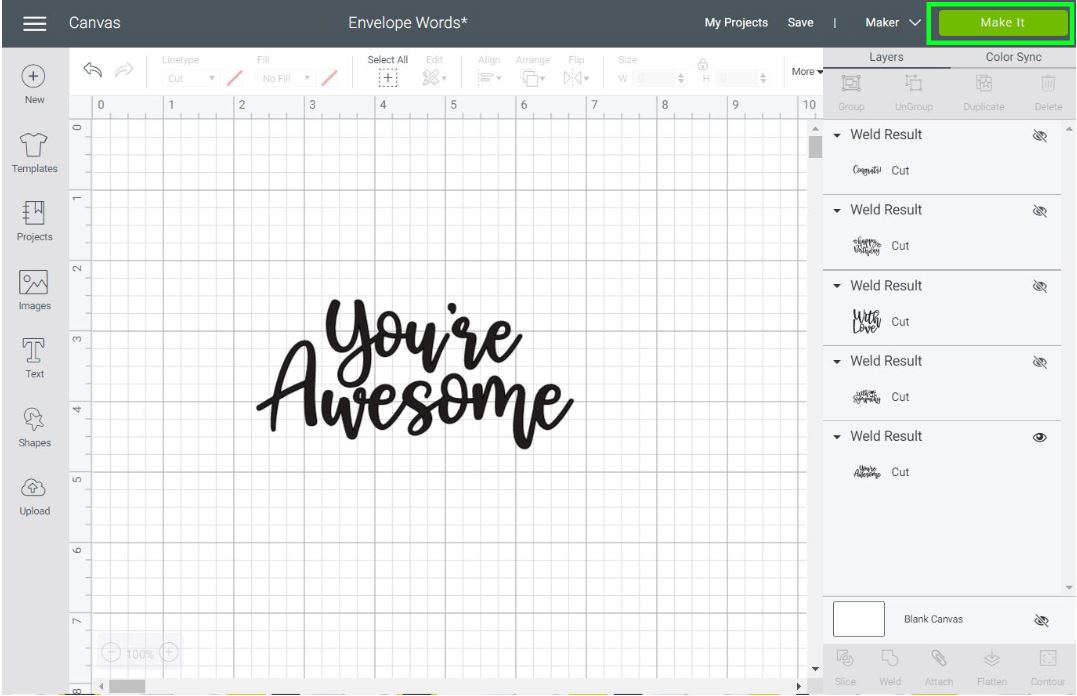
When using Iron-On, you need to place your material pretty/shiny side down on the mat, making sure to turn-on “Mirror.”
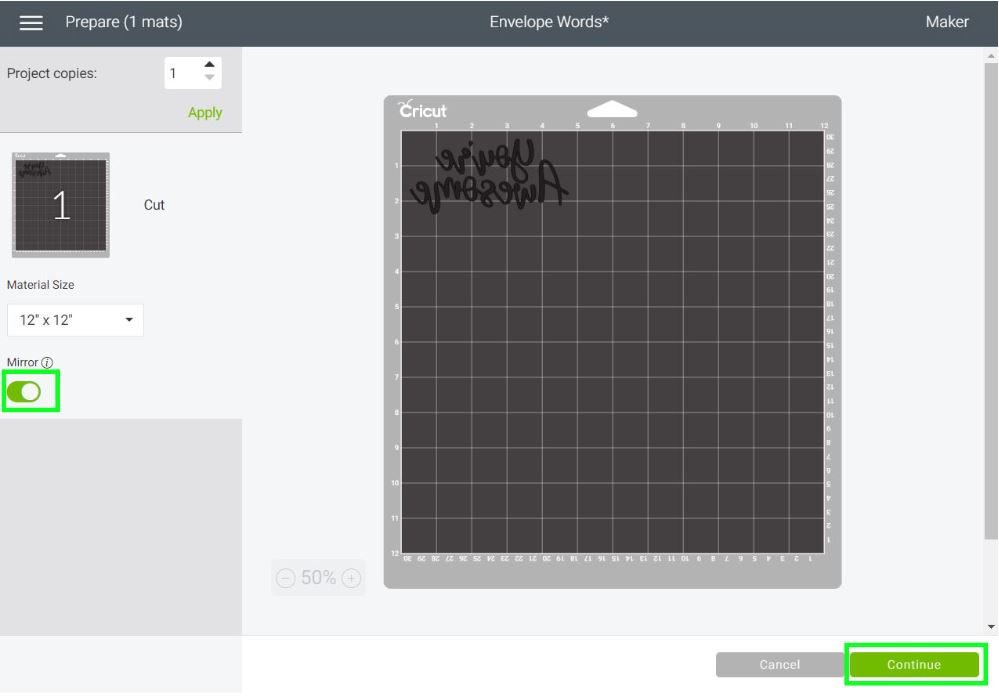
For this project, I used Everyday Iron-On.
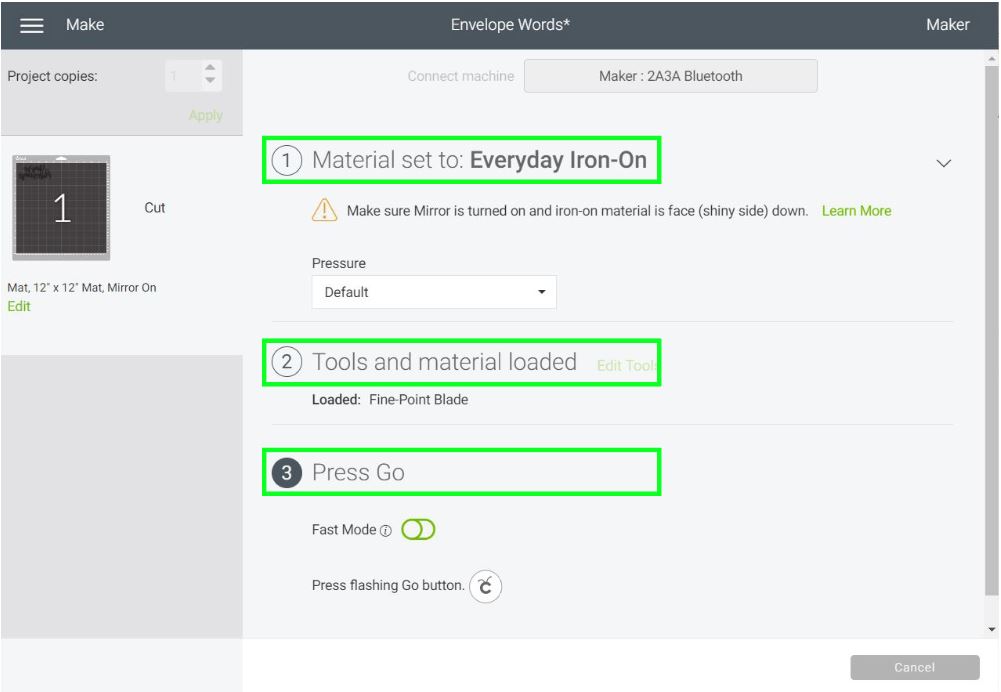
Install Fine Point blade, place Iron-On shiny side down on the mat, load it, and press the flashing go button.
When Cricut is done cutting, remove the vinyl from the mat, and use a weeder to get rid of the negative parts of the design.
Place design on the back of your envelope. Cricut recommends you use heat transfer tape when using iron-on on paper.
I used tape in this case, but, many times, I’ve skipped this step. Once you have the right amount of experience with iron-on and paper, I think you can forgo this step.
Practice first, though!
To transfer the Iron-On, you can use a regular iron (use heat resistant tape in this case) or and EasyPress Mini.
To find the exact temperature and directions, it’s always good to go to Cricut’s Heat Guide.

According to Cricut’s Guide, the combination of materials I am using (everyday iron-on and cardstock), these are the steps to follow.
- “Place iron-on material face down, liner side up
- Secure with tape, avoiding image area
- Press while moving with light pressure at low setting for 25 s (Note: Overlap iron-on edges by 0.5 in / 1.3 cm)
- Slowly remove liner while cool”.
These settings will change if you use other types of iron-on such as foil, or, holographic, etc.
If using a regular iron, you can use the same principles; I would set the temperature to 3/4 of the heat your iron can take.
Here are the other envelopes I made!
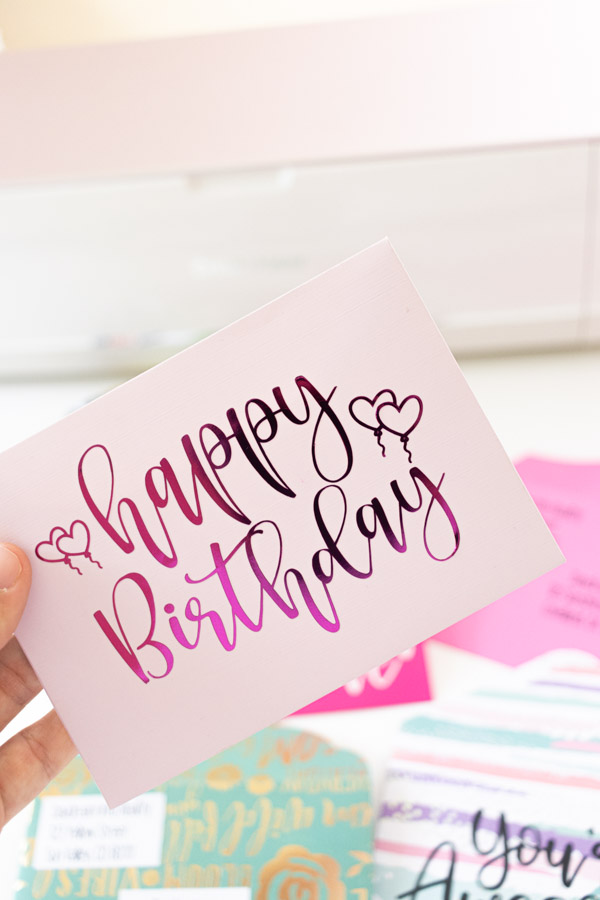

The “Happy Birthday” one I made using foil iron-on.
Doesn’t it look stunning?
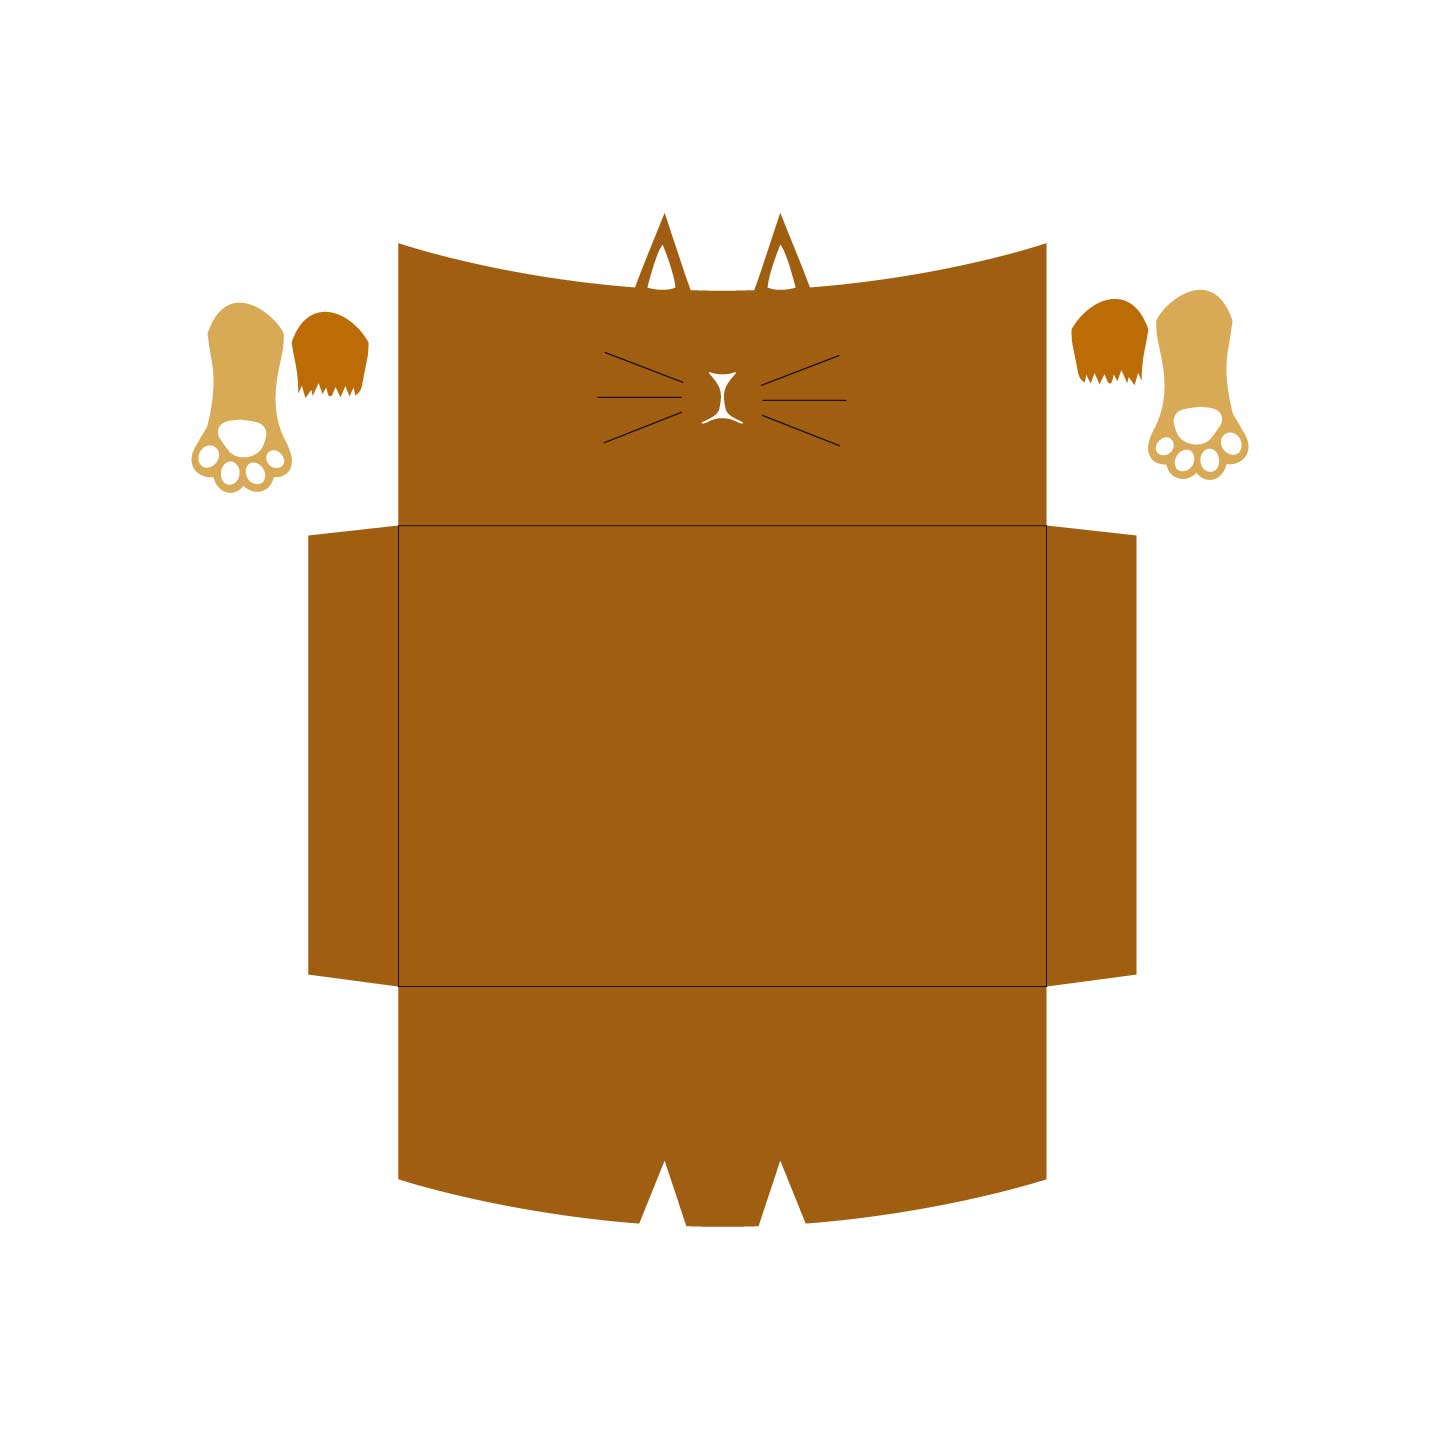
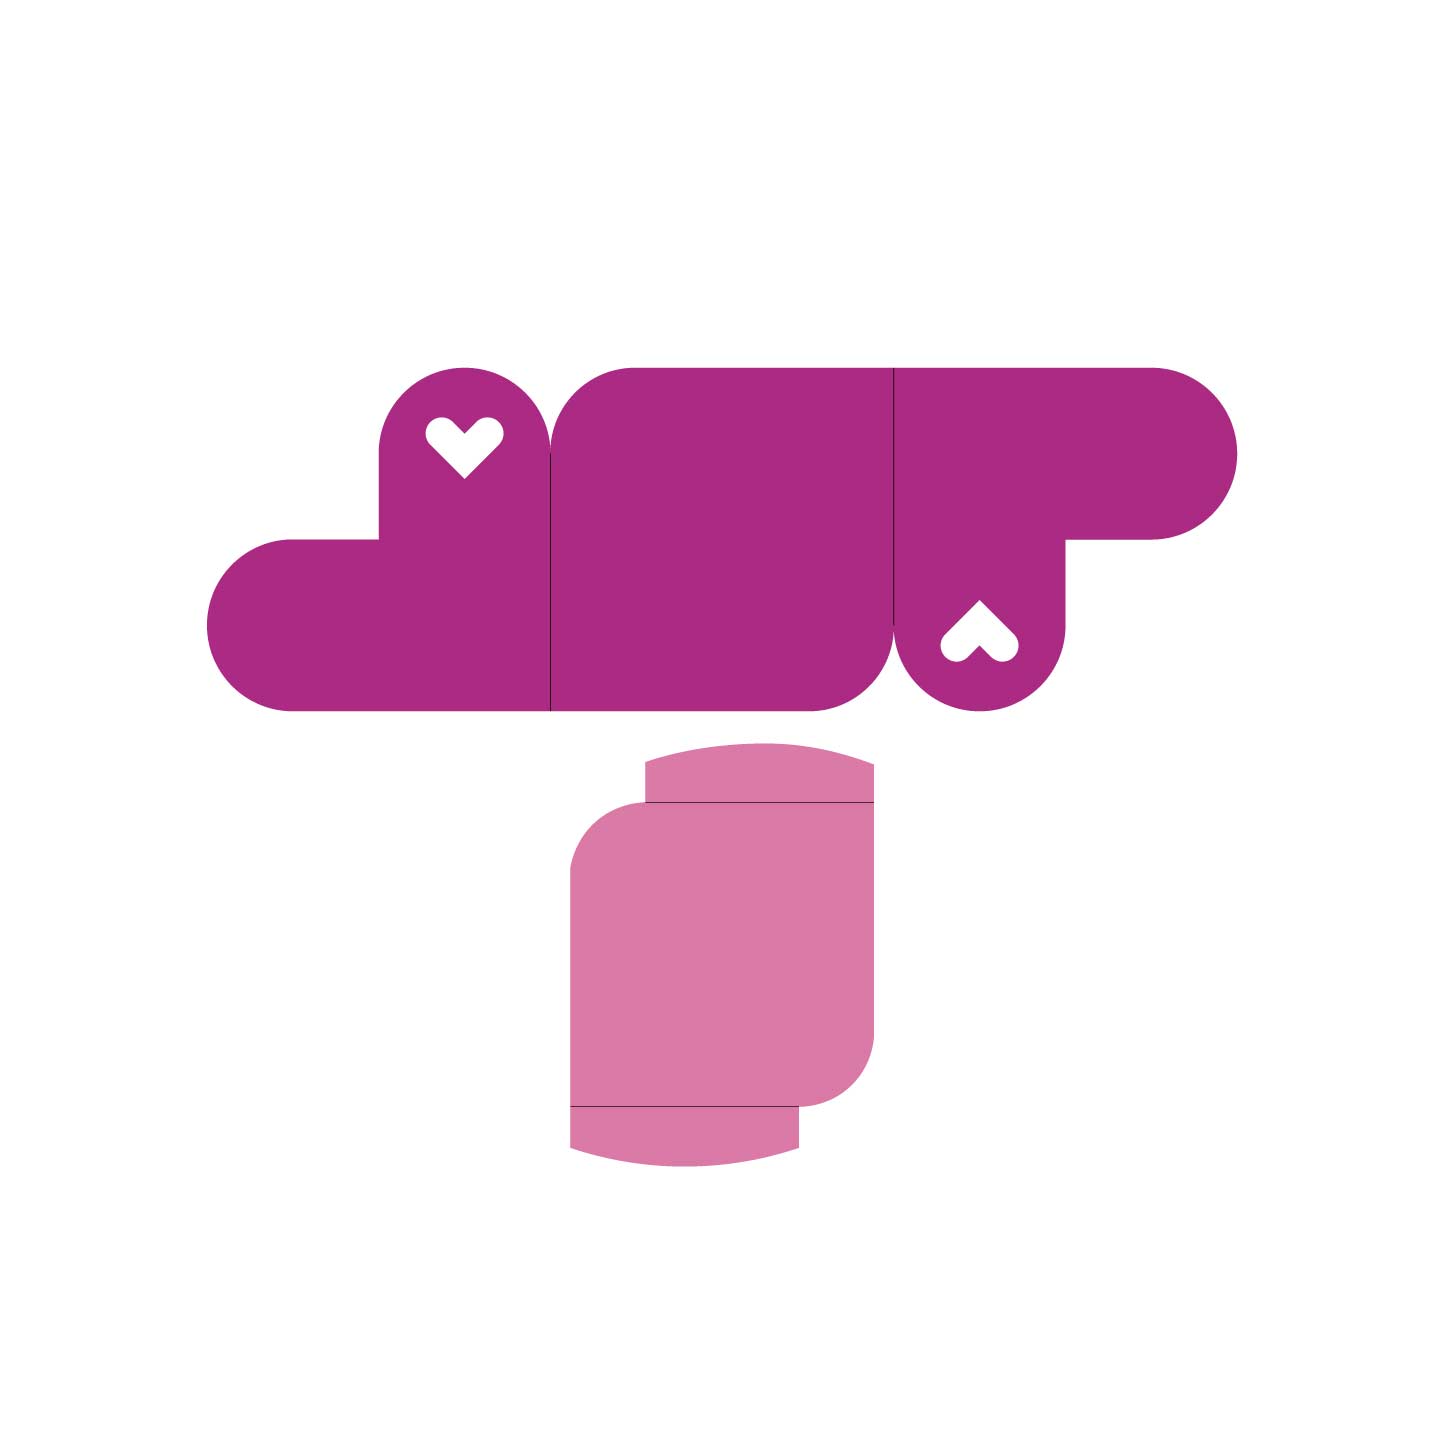
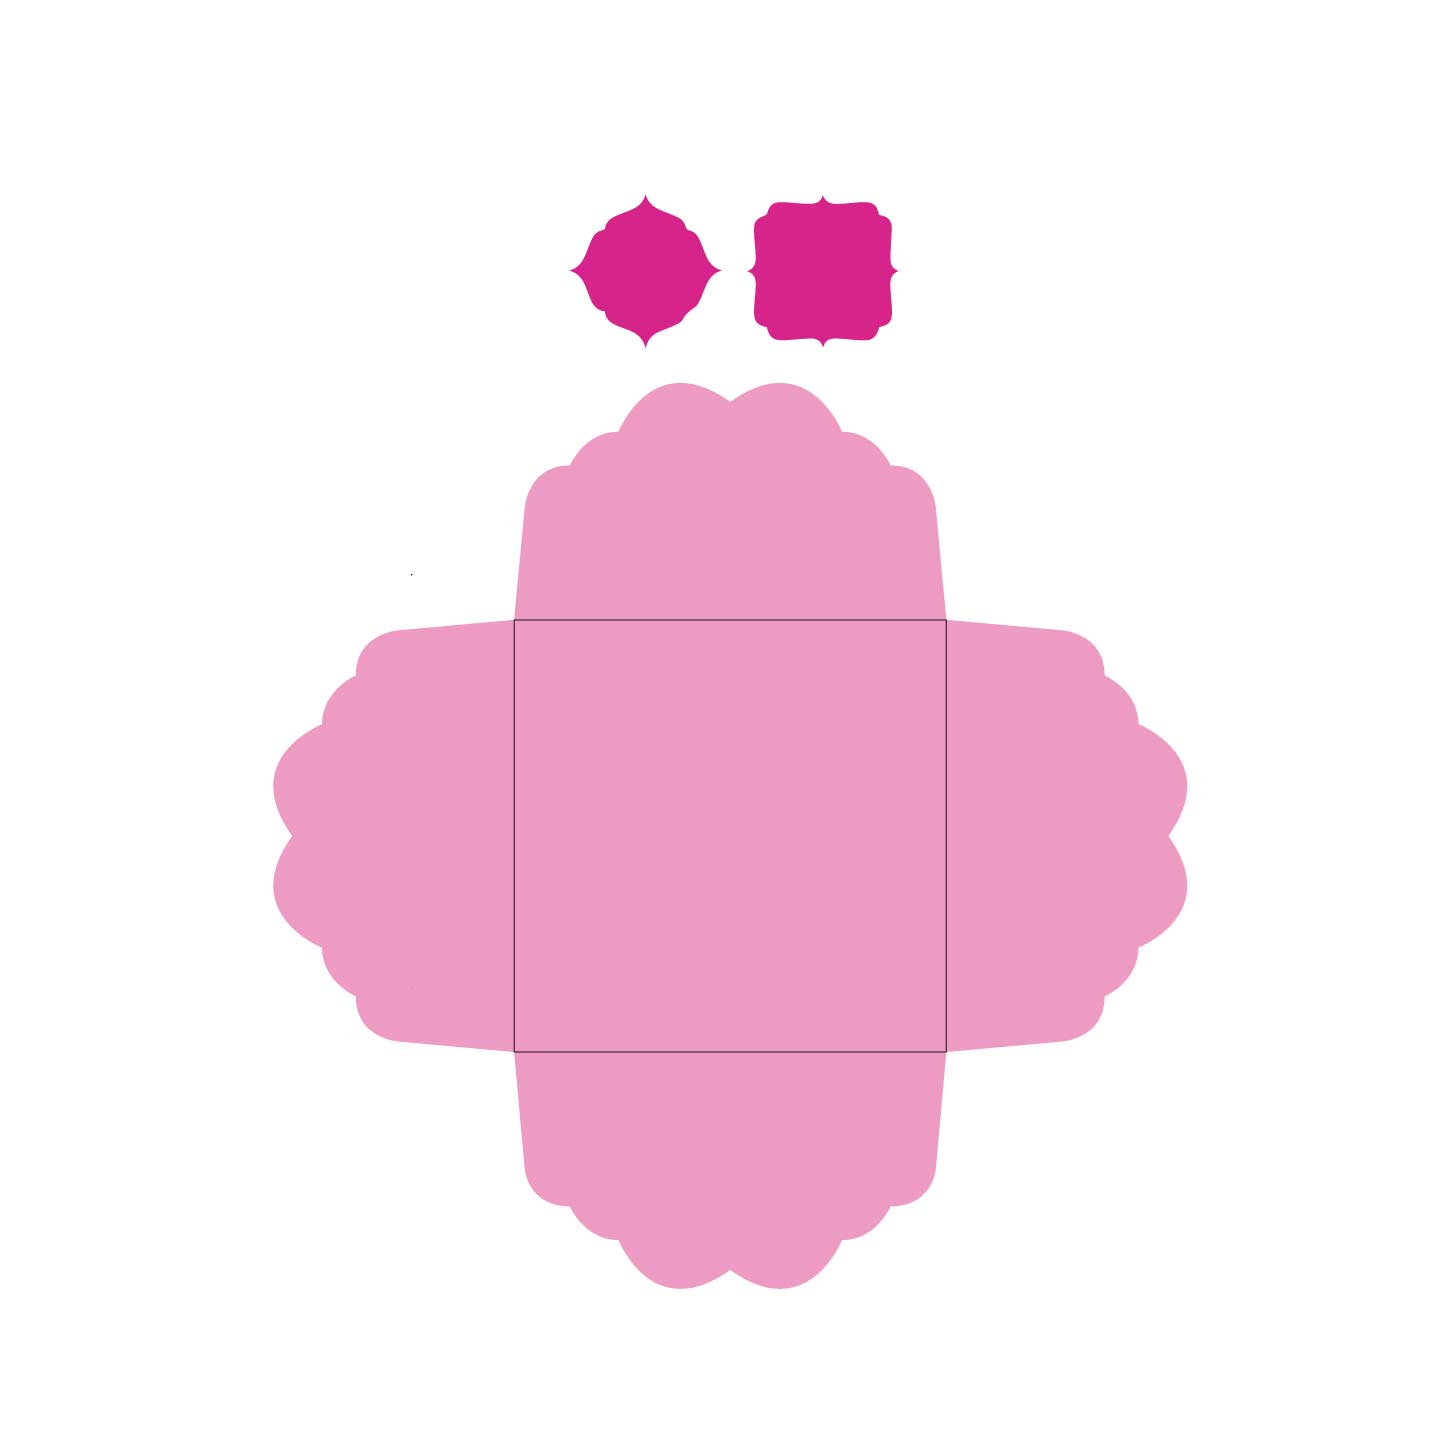
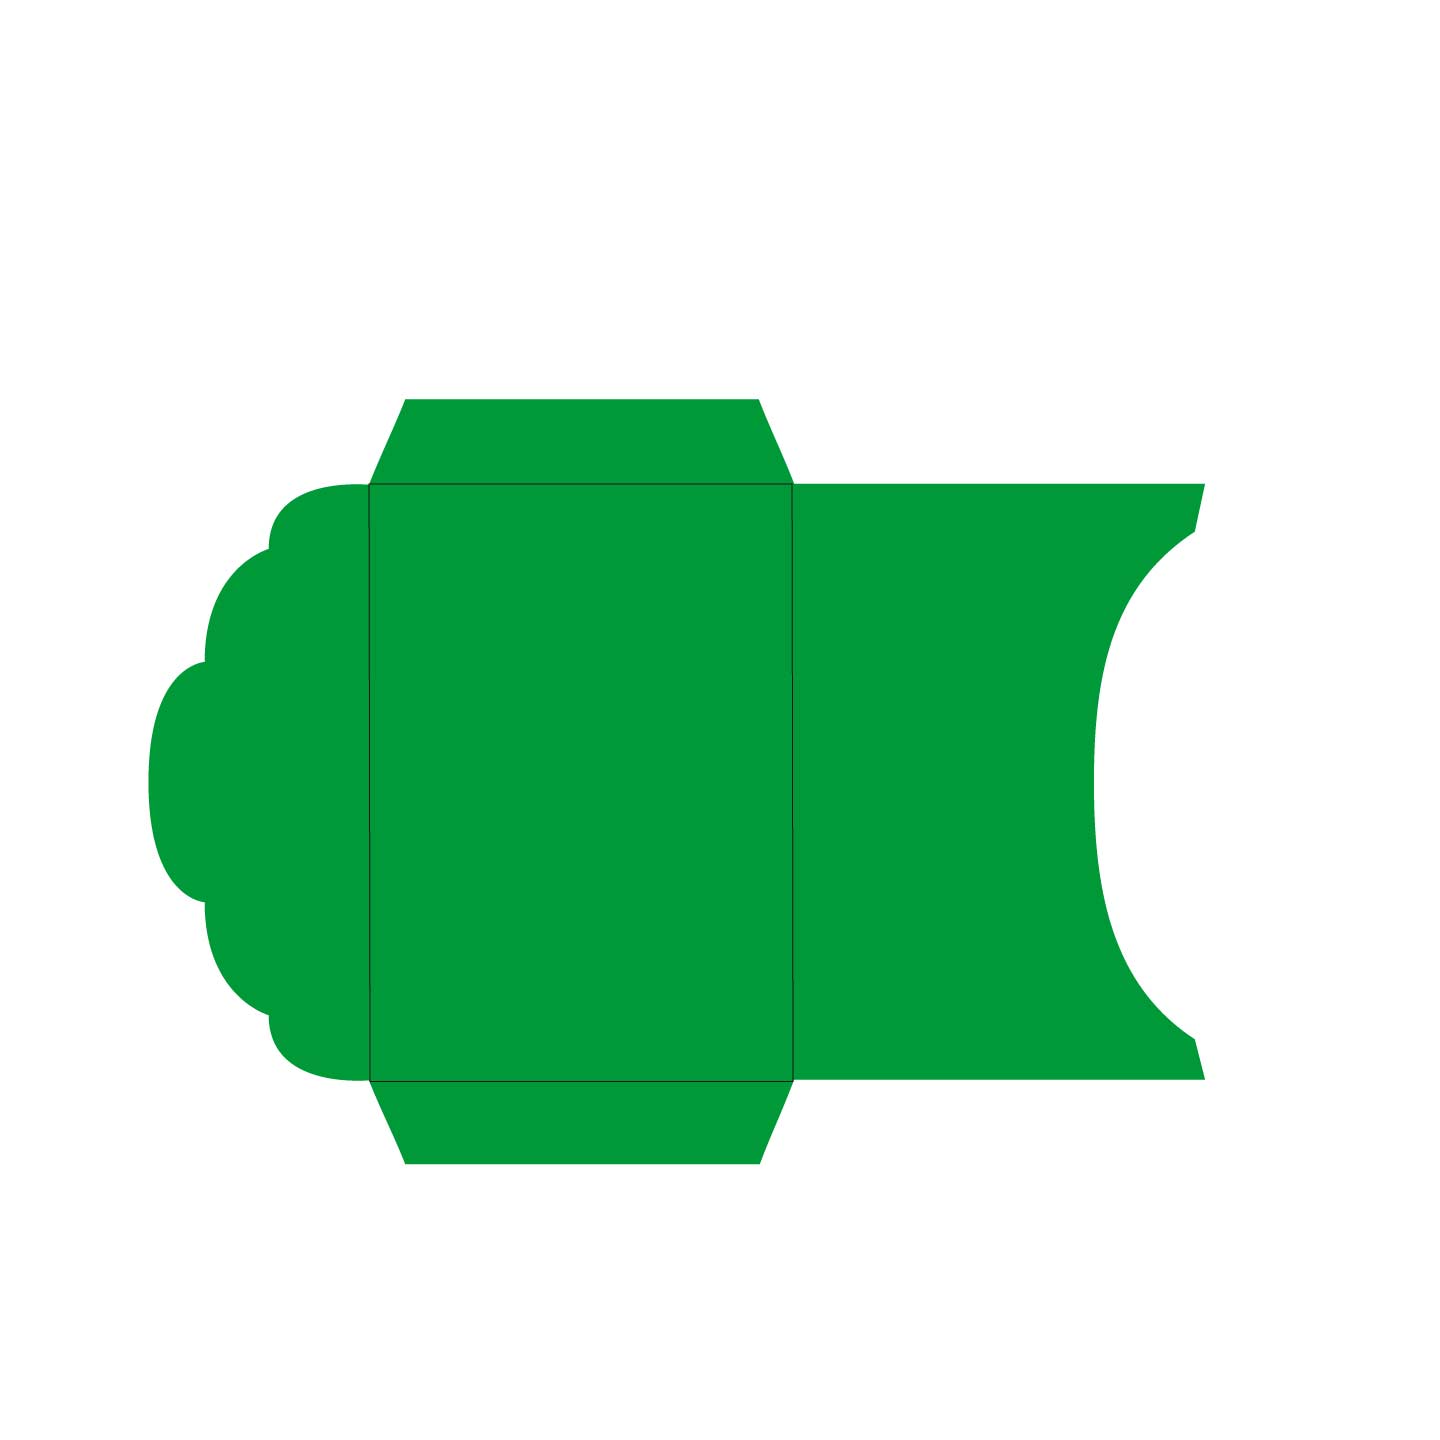
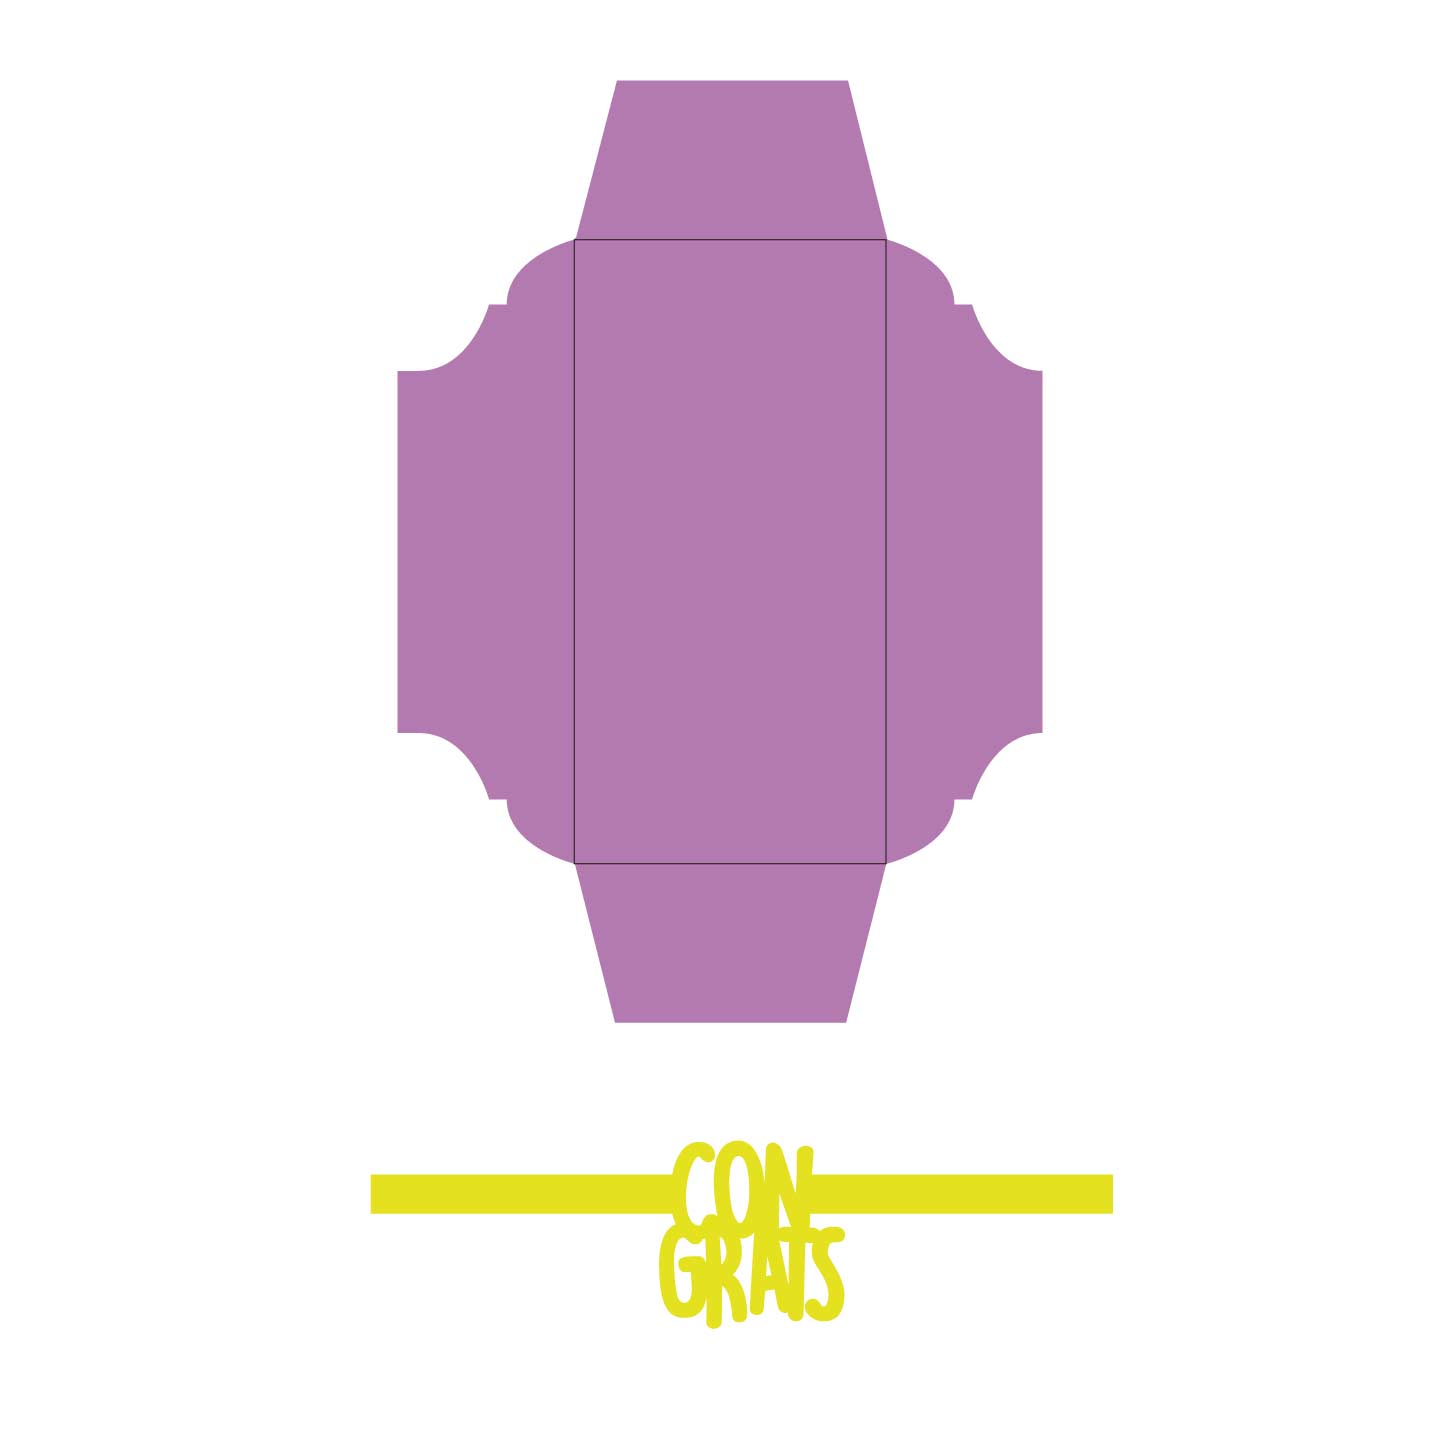
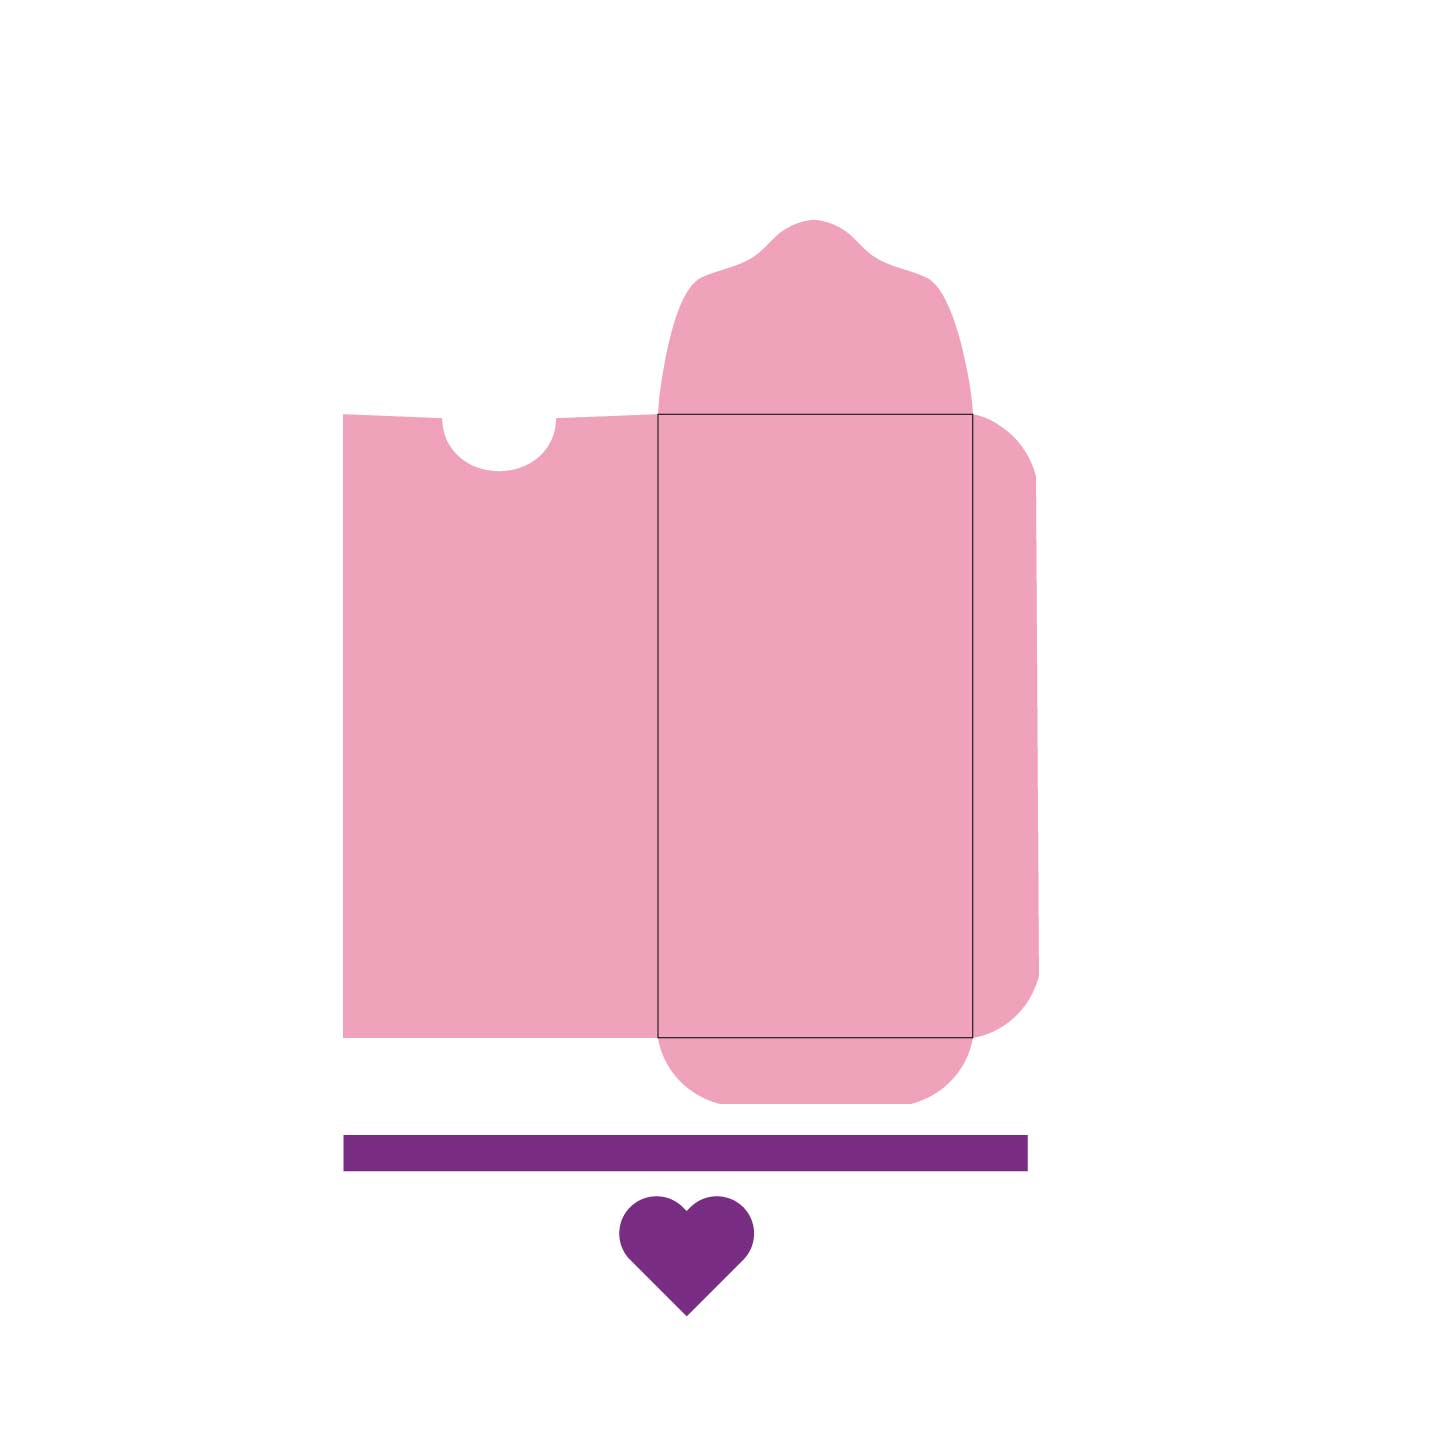
Free SVG Envelope Templates
Just as I promise, here are more envelope template you can use for your personal projects.
Some of them don’t even require glue!
They are all so beautiful, simply click on the download buttons on each image. At this time, they only work when working from desktop or laptop computers.
And just so you know, I also have a FREE growing library with tons of printables and SVG files ready to be cut.
I would love for you to be able to get access to all of them. It’s 100% Free for my daydreamers (aka subscribers). Check out a live preview here or get access here.


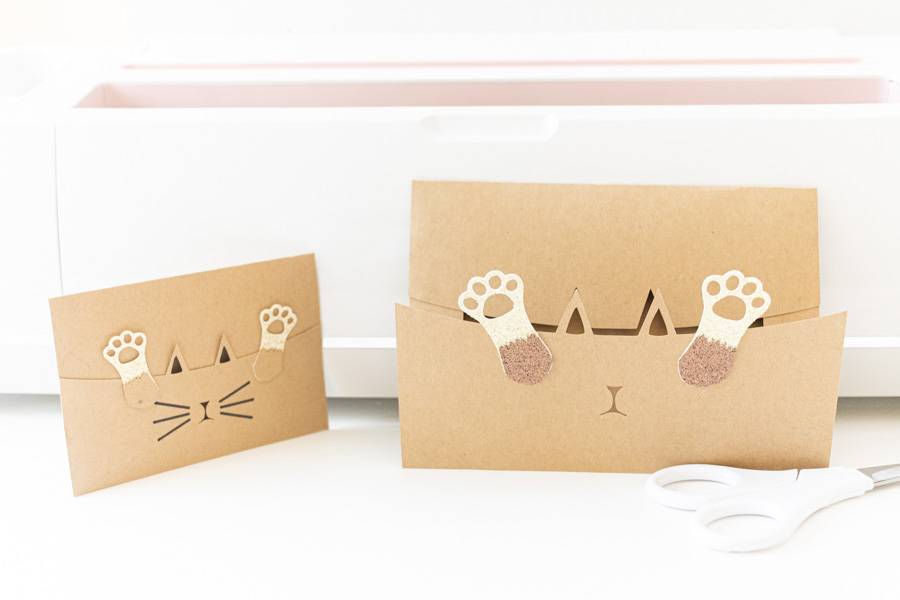
More Envelopes ideas made with Cricut
Here are more pics using the free SVG templates that I have for you in this article.
One of the cutest envelopes is the kitty one. There’s a caveat, though. I included some whiskers. If you want your Cricut to score, cut, and draw, you’ll need to break the rules.
To score, you need the paper side down, but to draw, you need it facing forward. Big decisions that only you can make!
You can also delete the whiskers, it looks just as cute, or do them with a ruler.
The sky is the limit!
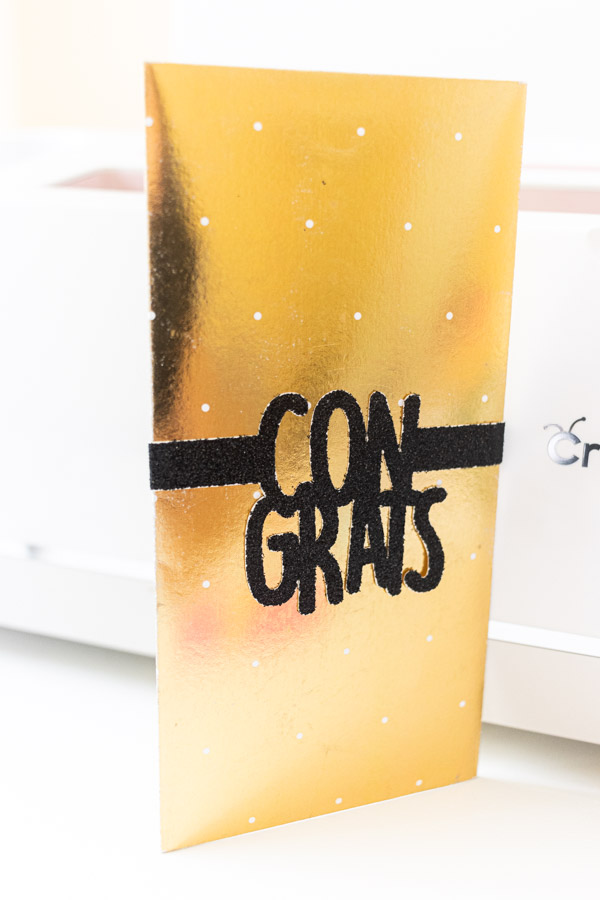
Look how using different papers you can give an envelope a different appearance.
You can use the golden one for a wedding, and the pink one for a regular birthday party.

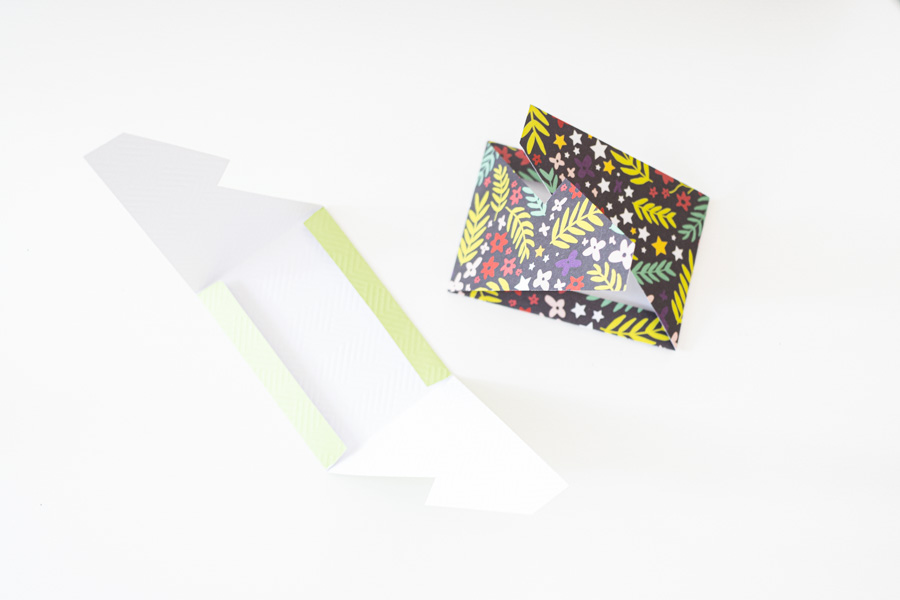
The following envelopes don’t need glue!
They don’t shut entirely flat either; they are like a super-thin box.
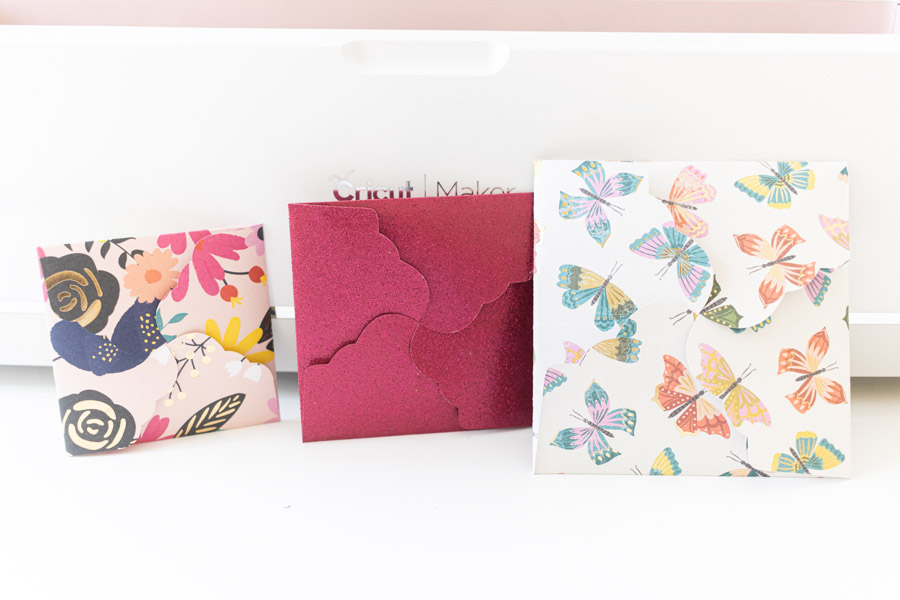
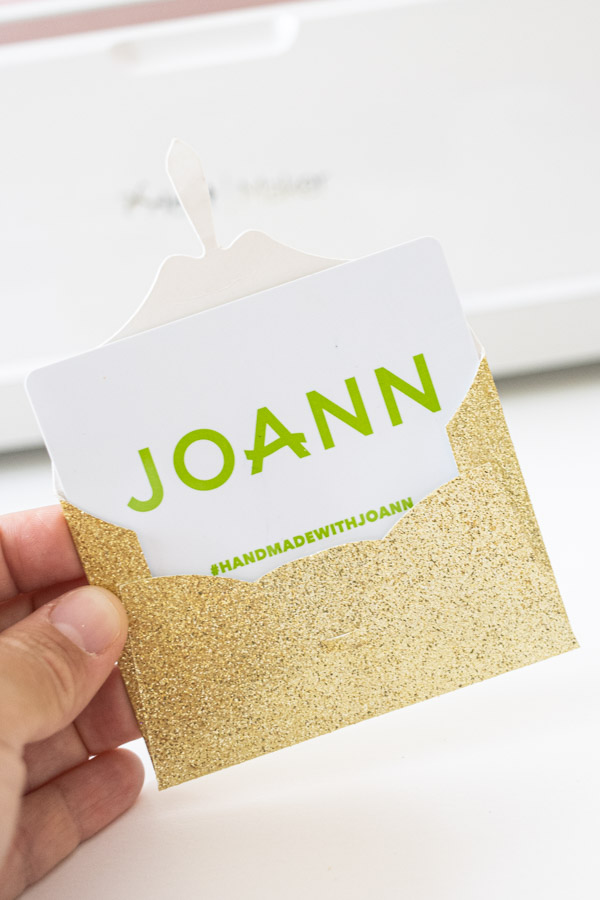
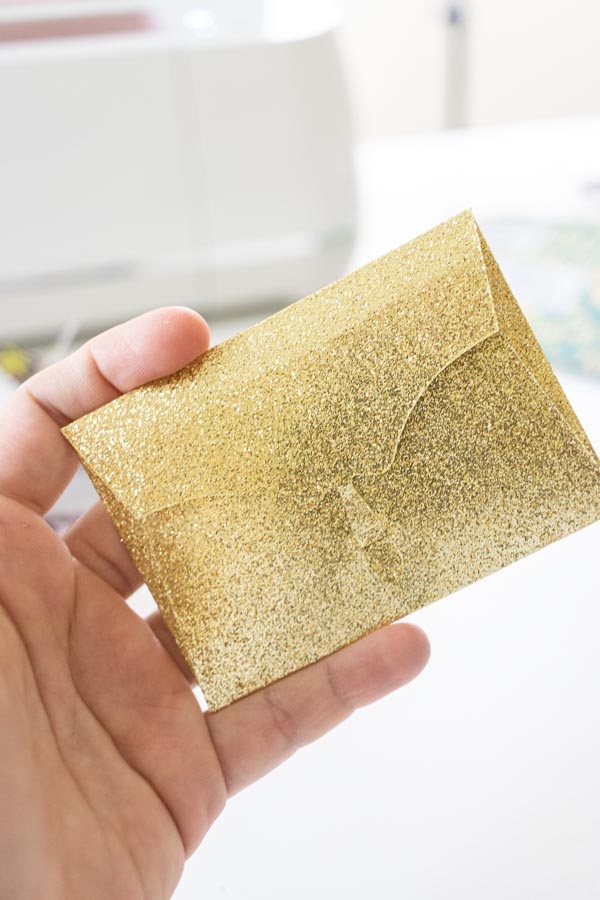
The best part about some of these envelopes is that you can use them to give some gift cards.
Aren’t they so pretty?
Look the same envelope we did on the step by step tutorial but cut to fit a gift card.
These last envelopes can be used for little notes. They don’t need glue, and they are perfect for adding inside a gift bag.
I love them all!
Sharing is Caring
I hope you enjoyed this tutorial and learned new things and concepts with it.
Do you know that it takes me over 25 hours of work to complete a single Cricut article? I know, it’s crazy! But I like to make sure that you understand EVERYTHING!
I would appreciate your support on Instagram / Pinterest / YouTube / as I am trying to grow my audience so I can keep producing great content!


