- Error writing to file on Windows 10 [Best Solutions]
- How can I fix error writing to file alerts?
- 1. Fix – Error writing to file
- Redirect Output from the Windows Command Line to a Text File
- How Windows Command Prompt Output Works
- Redirect Standard Output Write to New File
- Redirect Standard Output Writes to the Same File
- Redirect Standard Error To a File
- Redirect All Output Writes to a Same File
- Silencing Standard or Error Output Streams
Error writing to file on Windows 10 [Best Solutions]

- The Extract error writing to file message appears when installing certain software, preventing you to finish the installation.
- You will see that the Extract error writing to file in Windows 10 can be triggered by a Windows Installer bug.
- One way of fixing the Error writing file is to tweak the Windows Installer service using a line-command tool.
- It’s also important to know that you can fix this issue using the chkdsk command.

- Download Restoro PC Repair Tool that comes with Patented Technologies (patent available here).
- Click Start Scan to find Windows issues that could be causing PC problems.
- Click Repair All to fix issues affecting your computer’s security and performance
- Restoro has been downloaded by 0 readers this month.
Computer errors can occur from time to time, and sooner or later you’ll experience an error on your Windows 10 PC.
Users reported Error writing to file error message while installing certain software, and since this error can prevent you from installing new applications, it’s crucial to know how to properly fix it.
In this comprehensive article you will learn how to fix the Error writing to file for all the Windows 10 apps.
How can I fix error writing to file alerts?
1. Fix – Error writing to file
1. Register Windows Installer service
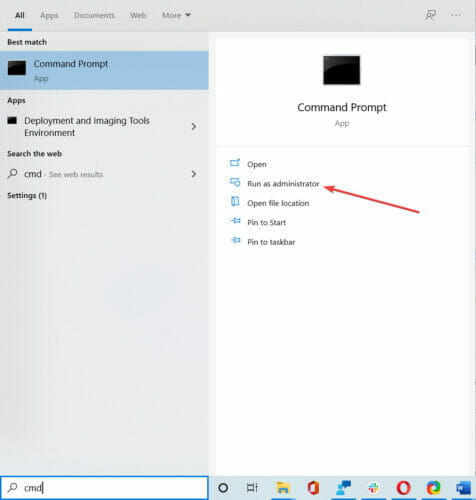
- Type cmd in the search tab and click on Run as administrator under Command Prompt to start it with full privileges.

- When Command Prompt opens, enter the following lines:
- msiexec /unregister
- msiexec /regserver
- After both commands are successfully executed, close Command Prompt.
If you’re trying to install a new software on your PC, you’ll have to use Windows Installer service.
This service is crucial for the installation process, but sometimes this service can become unregistered and prevent new applications from installing.
To fix this problem, you need to register Windows Installer service manually.
By running these commands you’ll manually unregister and reregister the Windows Installer service, and hopefully that will fix this error for you.
In you can’t access the Windows Installer, we have an excellent guide that will help you fix the problem.
2. Run the chkdsk command
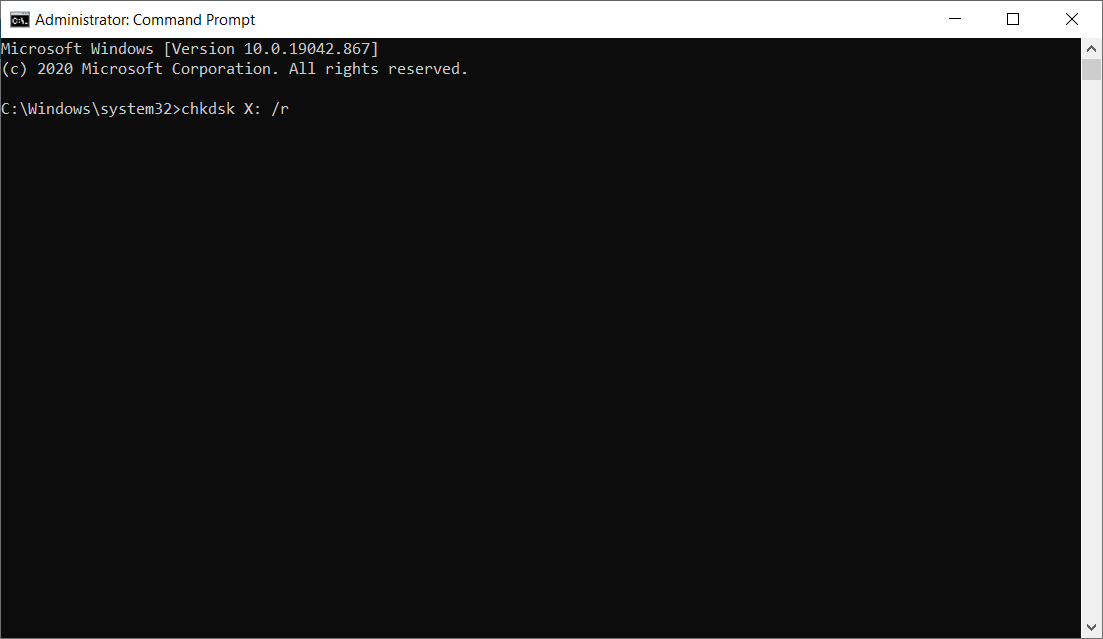
- Open Command Prompt as administrator as shown in the previous step.
- When Command Prompt opens, enter chkdsk X: /r and press Enter (Be sure to replace X with the letter that matches your hard drive partition that you’re to installing the application to).
- If you’re trying to scan your system partition you’ll have to schedule a restart and scan your partition before Windows 10 starts.
- If you’re trying to scan your system partition you’ll have to schedule a restart and scan your partition before Windows 10 starts.
- After the scan is completed, try to run the installation process again.
Sometimes Error writing to file message can appear if you have corrupt files that are interfering with the installation process.
One way to fix this problem is to perform a chkdsk scan and scan your hard drive partition for any corrupt files.
If chkdsk gets stuck follow this comprehensive guide to fix it quickly and continue with this fix.
3. Rename com.Apple.Outlook.client.resources folder
Users reported this error message while trying to install iTunes on their PC, and one way to fix this problem is to rename one of your folders.
According to users, com.Apple.Outlook.client.resources folder can cause this error to appear, therefore in order to fix this problem you need to find this folder and rename it to com.Apple.Outlook.client.resources_OLD.
After renaming the folder, try to perform the installation again and check if your problem is resolved.
4. Perform a Clean boot
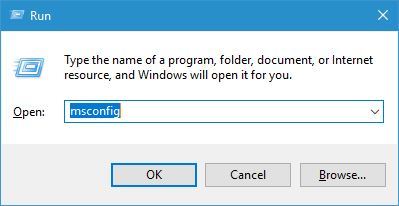
- Press Windows Key + R and enter msconfig. Press Enter or click OK.
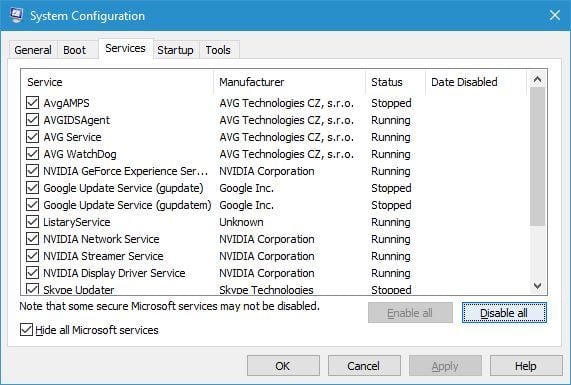
- When System Configuration window opens, go to Services tab.
- Check Hide all Microsoft services and then click on Disable all.
- Now go to Startup tab and click Open Task Manager.
- Task Manager will now open.
- In Startup tab, disable all startup applications. You can do that by right clicking the startup item and choosing Disable from the menu (Repeat this process for all startup applications).
- After all startup items are disabled, close Task Manager.
- Go back to System Configuration window and click Apply and OK to save the changes.
- Restart your PC.

Sometimes Error writing to file message can appear due to installed third-party applications. Certain applications and services can interfere with the setup process and cause this error to appear on your PC.
One way to fix this problem is to disable all startup applications and processes.
After your PC restarts, try to install the application again. If the application manages to install without any errors, repeat the same steps and enable all startup applications and services.
5. Change the security permissions for the ProgramData folder
5.1 Change the owner of the folder
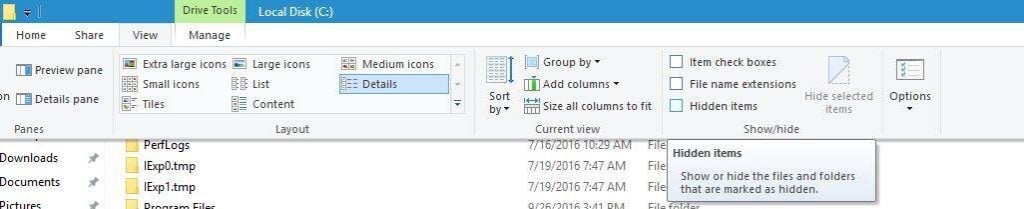
- Open File Explorer and navigate to C:.
- Locate the ProgramData folder.
- If you can’t see this folder, go to View tab and check Hidden items checkbox.
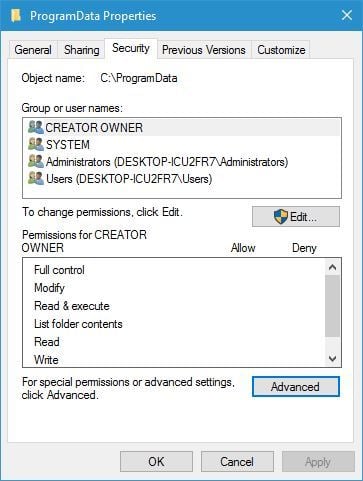
- Right-click the ProgramData folder and choose Properties.
- Go to the Security tab and click on Advanced button.
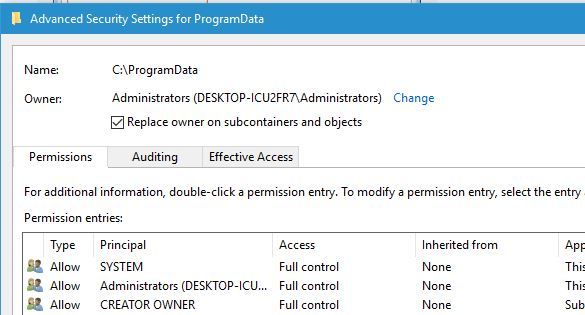
- Click the Change link next to the Owner name.
- In Enter the object name to select enter Administrators and click Check names. If everything is in order, click OK to save changes.
- Select the Replace the owner on subcontainers and objects.
- Click Apply and OK to save the changes.

Some applications rely on the ProgramData folder for their installation, and if you don’t have the necessary privileges to access this folder, you might get Error writing to file message.
To fix this problem, you need to change the security permissions, but since that is an advanced process, we strongly recommend that you create a System Restore point before making any security-related changes.
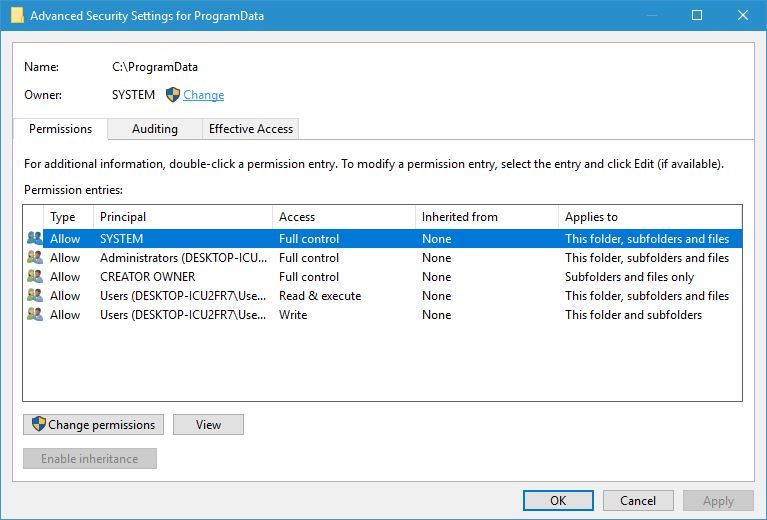
5.2 Change the permissions from the Advanced security settings
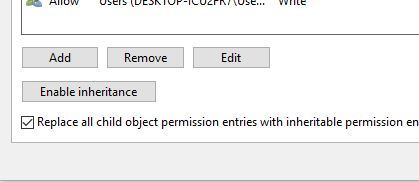
- When Advanced Security Settings window opens check if SYSTEM and Administrators group have Full control access.
- If one of the groups is missing, be sure to add it by clicking the Add button.
- In case any of the two groups doesn’t have Full control, you can simply change that by double-clicking the group and checking the Full control option.
- Check Replace all child object permissions entries with inheritable permissions entries from this object and click Apply and OK.
- After that, try to reinstall the application again.
Another way to change the permissions of a specific folder is to use Command Prompt. This is a faster, although a bit more advanced method, therefore use it with extra caution.
To do that, open Command Prompt as administrator, enter the following command, and press Enter: icacls «C:Config.Msi» /T /C /grant administrators:F
This is just an example, therefore be sure to replace C:Config.Msi with the path of the folder that you’re trying to modify.
Although we showed you how to change the permissions of the ProgramData folder in our example, sometimes in order to fix this problem you need to change the permissions of the installation directory instead.
6. Rename the Config.msi folder

Sometimes, certain Adobe applications can’t be installed on your PC due to the Config.Msi folder. One of the simplest ways to fix this is to locate the Config.Msi folder and rename it.
By default, this folder should be located in the C: directory, and you can easily rename it. If you can’t rename the folder, you have to change the permission settings for the Config.Msi folder and try again.
7. Run the setup file as administrator
You can fix the Error writing to file error message simply by running the installation process as an administrator. To do that, right-click the setup file and choose Run as administrator from the menu.
This isn’t a permanent solution, but it should allow you to install the desired application without any errors.
8. Disable McAfee’s EPO agent

McAfee tools such as McAfee EPO agent can sometimes interfere with the installation process and cause this error to appear.
According to users, McAfee EPO agent has a policy to block autorun, and this policy can prevent applications from installing.
After turning the McAfee EPO agent off, you should be able to install any application without problems.
9. Check your firewall

Sometimes this error can occur due to your firewall settings, and you should be able to fix it simply by changing those settings.
User reported this error while installing iTunes, and according to them, the error was caused because the QTTask.exe was prevented from accessing the Internet by the firewall.
After allowing QTTask.exe to access the Internet the issue was completely resolved.
This solution applies to iTunes, but if you’re installing or updating a different application, be sure to check if your firewall isn’t blocking any installation files.
Redirect Output from the Windows Command Line to a Text File
Avoid scrolling and/or save the generated output
One of the most useful ways to log and troubleshoot the behavior of commands or batch jobs that you run on Windows is to redirect output to a file.
However, there are a few different ways you can redirect command line writes to a file. The option you choose depends on how you want to view your command output.

How Windows Command Prompt Output Works
When you type a command in the Windows console (command prompt), the output from that command goes to two separate streams.
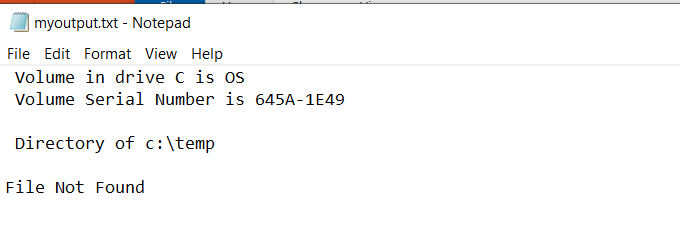
- STDOUT: Standard Out is where any standard responses from commands go. For example the standard response for the DIR command is a list of files inside a directory.
- STDERR: Standard Error is where any error messages go if there’s a problem with the command. For example if there aren’t any files in the directory, the DIR command will output “File Not Found” to the Standard Error stream.
You can redirect output to a file in Windows for both of these output streams.
Redirect Standard Output Write to New File
There are two ways you can redirect standard output of a command to a file. The first is to send the command output write to a new file every time you run the command.
To do this, open the command prompt and type:
The > character tells the console to output STDOUT to the file with the name you’ve provided.
When you run this command, you’ll notice that there isn’t any response in the command window except the error that the file doesn’t exist.
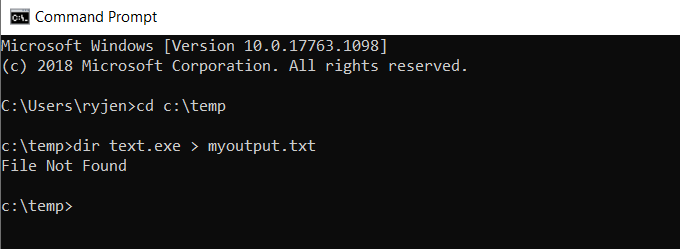
This is because the standard output for the command was redirected to a file called myoutput.txt. The file now exists in the same directory where you ran the command. The standard error output still displays as it normally does.
Note: Be careful to change the active directory for the command prompt before running the command. This way you’ll know where the output files are stored.
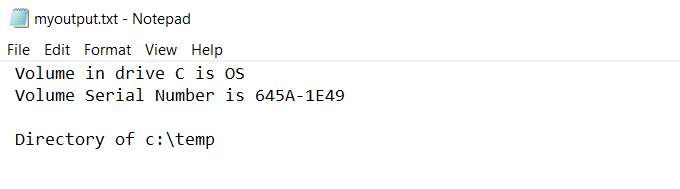
You can view the standard output that went to the file by typing “myoutput.txt” in the command window. This will open the text file in your default text file viewer. For most people, this is usually Notepad.exe.
The next time you run the same command, the previous output file will be deleted. A new output file will be recreated with the latest command’s output.
Redirect Standard Output Writes to the Same File
What if you don’t want to overwrite the same file? Another option is to use >> rather than > to redirect to an output file. In the case of this example, you would type:
You’ll see the same output (the error only).

But in this case, instead of overwriting the output file, this command appends the new output to the existing output file.
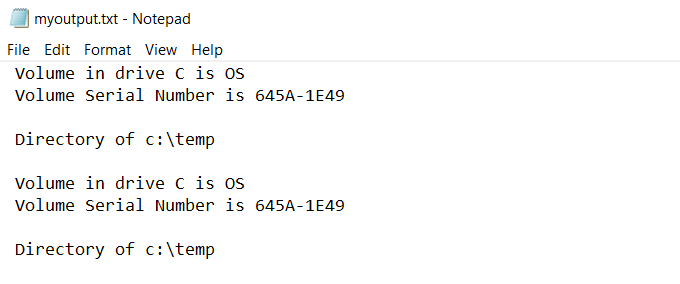
Every time you run a command and append the output to a file, it’ll write the new standard output to the end of the existing file.
Redirect Standard Error To a File
The same way you can redirect standard output writes to a file, you can also output the standard error stream to a file.
To do this, you’ll need to add 2> to the end of the command, followed by the output error file you want to create.
In this example, you’ll type the command:
This sends the standard output stream to myoutput.txt, and the standard error stream to output.err. The result is that no output stream at all gets displayed in the console window.
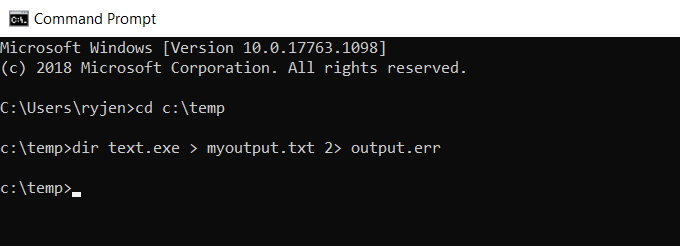
However, you can see the error messages by typing output.err. This will open the file in your default text file viewer.

As you can see, any error messages from the command are output to the error file. Just as with the standard output, you can use >> instead to append the error to errors from previously run commands.
Redirect All Output Writes to a Same File
All of the approaches above result in multiple files. One file is for the standard output stream and the other is for the standard error stream.
If you want to include both of these outputs to the same file, you can do that too. To do this, you just need to redirect all output to the same file using the following command.
Here’s how this command works:
- The standard output is directed to the output file identified by output number 1.
- The standard error output identified by the number 2 is redirected to the output file identified by number 1.
This will append the error output to the end of the standard output.
This is a useful way to see all output for any command in one file.
Silencing Standard or Error Output Streams
You can also turn off either Standard Output or Standard Error by redirecting the output to a NUL instead of a file.
Using the example above, if you only want Standard Output and no Standard Error at all, you can use the following command:
This will result in the same output file as the first example above where you only redirected the Standard Output, but with this command the error won’t echo inside the console. It won’t create an error log file either.
This is useful if you don’t care about any errors and don’t want them to become a nuisance.
You can perform any of the same output commands above from inside a BAT file and the output from that line will go to the output file you specify. This is a useful way to see whether any commands within a BAT file had any errors when they tried to run.
Ryan has been writing how-to and other technology-based articles online since 2007. He has a BSc degree in Electrical Engineering and he’s worked 13 years in automation engineering, 5 years in IT, and now is an Apps Engineer. Read Ryan’s Full Bio


