- Error windows cannot connect to the printer
- Возможные причины ошибки доступа к принтеру
- Разновидность ошибки
- Решение проблемы с подключением к принтеру
- Дополнительные методы решения ошибок 0x00000002, 0x0000000a, 0x00000006, 0x00000057
- FIX: Windows Cannot Connect to the Printer
- Solution 1: Create A New Local Port
- Solution 2: Copy mscms.dll manually
- Solution 3: If this is an HP Printer
- Solution 4: Remove Unnecessary Printer Drivers
- Solution 5: Delete Pre-existing Driver Files From Registry
- Solution 6: Run Microsoft’s Automated Printer Troubleshooter
- Solution 7: Resetting Printer Spooler
- Windows cannot connect to the printer
- What can I do if the printer is not connecting to the PC?
- 1. Check if your printer is listed under Unspecified Device state
- DriverFix
- Run a System Scan to discover potential errors
- 2. Temporarily disable your antivirus security software
- Bitdefender Antivirus Plus+
- 3. Check if your printer is compatible with Windows 10
- 4. Reboot your computer
- 5. Check Default printer settings
- 6. Perform a Windows Update
- 7. Clear spooler files and restart spooler service
- 8. Check with your manufacturer if Windows cannot connect to the printer
Error windows cannot connect to the printer
Добрый день! Уважаемые читатели и гости блога Pyatilistnik.org. В прошлый раз, я вам подробно объяснил как решается проблема, с печатью при ошибке «Не существует обработчик печати», она всего лишь, одна из тысячи, которая вам может повстречаться. Сегодня я покажу, что делать, если при попытке установить принтер, будь, то локальный или на терминальной ферме, вы получаете ошибку доступа, что вашей операционной системе Windows не удается подключиться к принтеру, хотя все права есть. Как и обычно, все оказывается очень просто.
Возможные причины ошибки доступа к принтеру
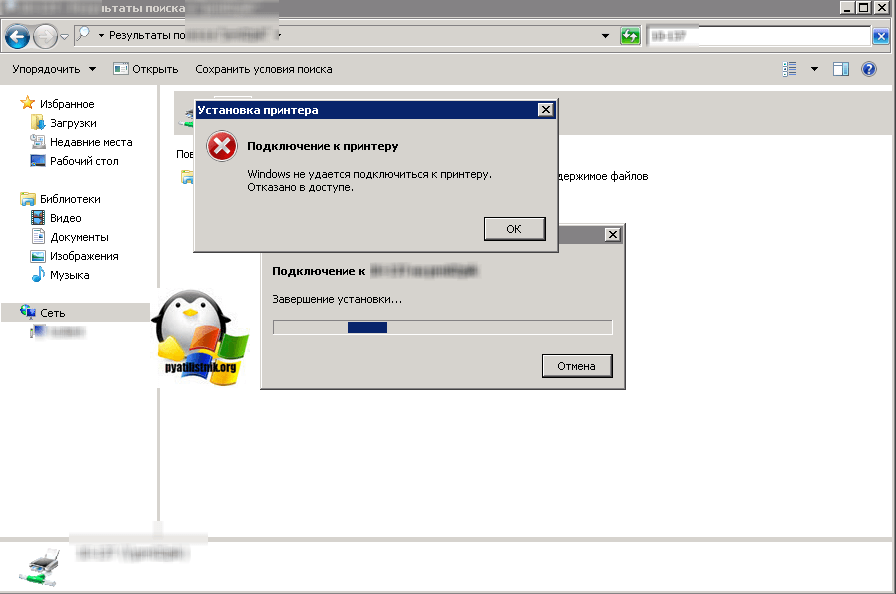
Давайте для начала опишу свою ситуацию. Есть терминальная ферма на Windows Server, если кто-то не знает, что это такое, то это мощный сервер или группа серверов, на которые заходят пользователи из вне, для работы с приложениями установленными на них, очень распространенный вариант сейчас в крупных и средних компаниях. Пользователь работая на терминальном сервере, пытается распечатать документ, но его принтер либо не видится вообще, либо при попытке к нему обратиться выдает сообщение с ошибкой:
И такое сообщение может быть и с локальным устройством, вплоть до последней версии Windows 10 Fall Creators Update.
Возможные причины, на что следует обратить внимание:
- Проверить права на доступ к принтеру, актуально для корпоративных принтеров, где системные администраторы, дают возможность пользоваться устройством, по принципу групп, подробнее читайте в статье, про безопасность принтеров и разграничение прав.
- Проблема с драйверами устройства, об этом ниже
- Физическая проблема с принтером
- Принтер находится в автономном режиме (Обязательно проверьте, что не установлена галка)
- Проблемы с SNMP трафиком (Попробуйте его отключить)
Разновидность ошибки
Давайте я приведу самые распространенные коды ошибок в данной ситуации, когда Windows не удается подключиться к принтеру. Отказано в доступе:
- 0x00000002
- 0x0000000a
- 0x00000006
- 0x00000057
- 0x00004005
- 0x0000007e
- 0x000003eb
- 0x00000214
- 0x00000bcb
Решение проблемы с подключением к принтеру
Причина одна и кроется она в цифровой подписи драйверов принтеров, а точнее в отсутствии данной подписи. Если драйвера на устройства подписаны не валидным с точки зрения Microsoft сертификатом или вообще без него, то он таки драйвера не принимает, считая это потенциальной угрозой, в следствии чего ваше устройство перестает работать. Это не новая проблема, но после очередного обновления KB3170455, проверка цифровой подписи драйверов, ужесточилась.
- Можете полностью отключить проверку цифровой подписи драйверов, как это делать я описывал, посмотрите. В Windows 10 она обязательная и ужесточенная.
- Можете удалить обновление KB3170455, но думаю это не лучший вариант, когда есть в разы проще.
- Правка реестра Windows.
Так как у меня в основном на работе операционная система windows 10 и с нее не удается подключиться к принтеру на терминальном сервере, где есть драйвера без цифровой подписи, чтобы не делать большого количества телодвижений и кучей перезагрузок, я для принтеров, которые испытывают проблемы, поставлю один параметр, который все поправит.
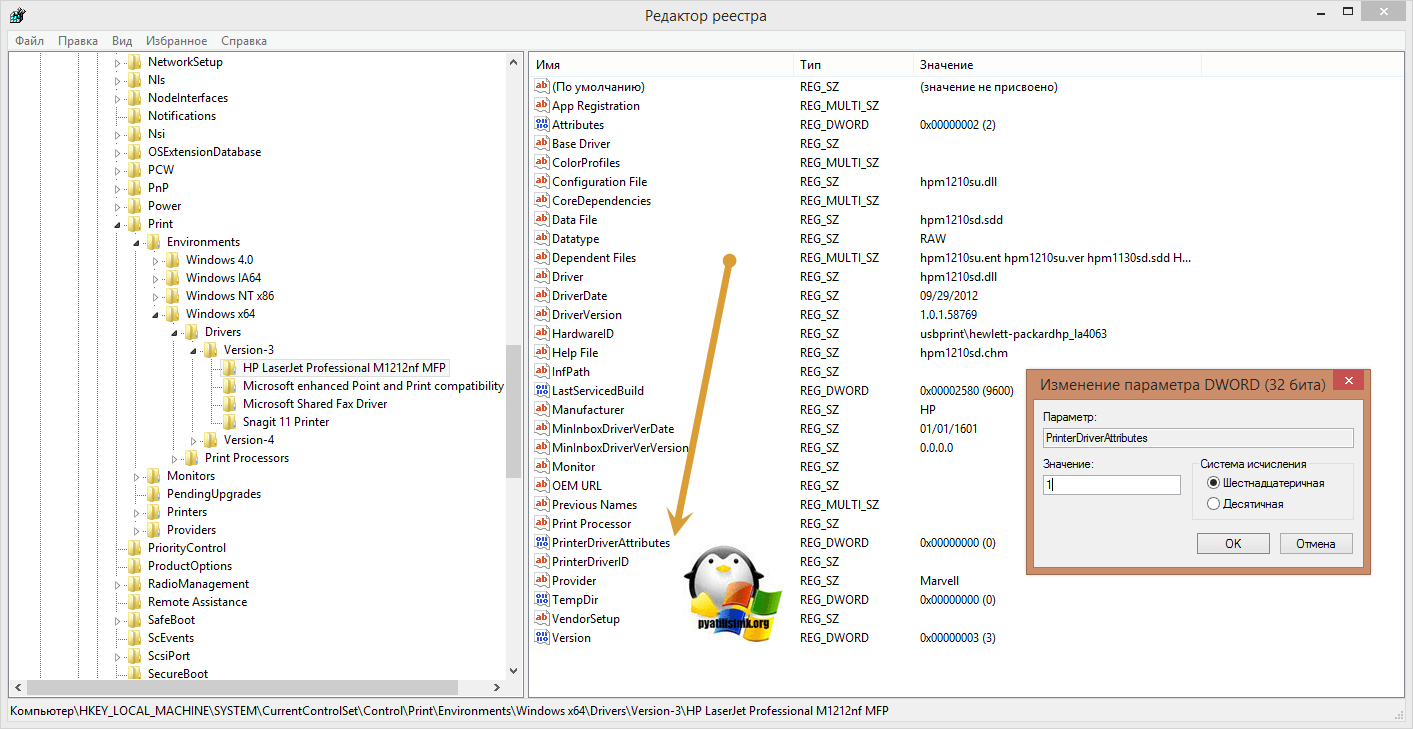
Что вы делаете, вы открываете реестр и переходите вот по такому пути, лично я для быстрого поиска по реестру использую утилиту register jump, делается это либо локально, если принтер подключен по USB, либо же на сервере терминалов, если используются они.
В моем случае это HP M1212, но таких полным полно, Canon, Xerox и так далее.
Находим там параметр PrinterDriverAttributes, по умолчанию там будет стоять значение 0, нужно поменять его на 1. После чего вы смело перезагружаете службу печати либо же сам сервер.
Данный метод, действует в 90 процентах случаев, если вам не помогло, то ниже я привожу дополнительные методы решения данной проблемы.
Дополнительные методы решения ошибок 0x00000002, 0x0000000a, 0x00000006, 0x00000057
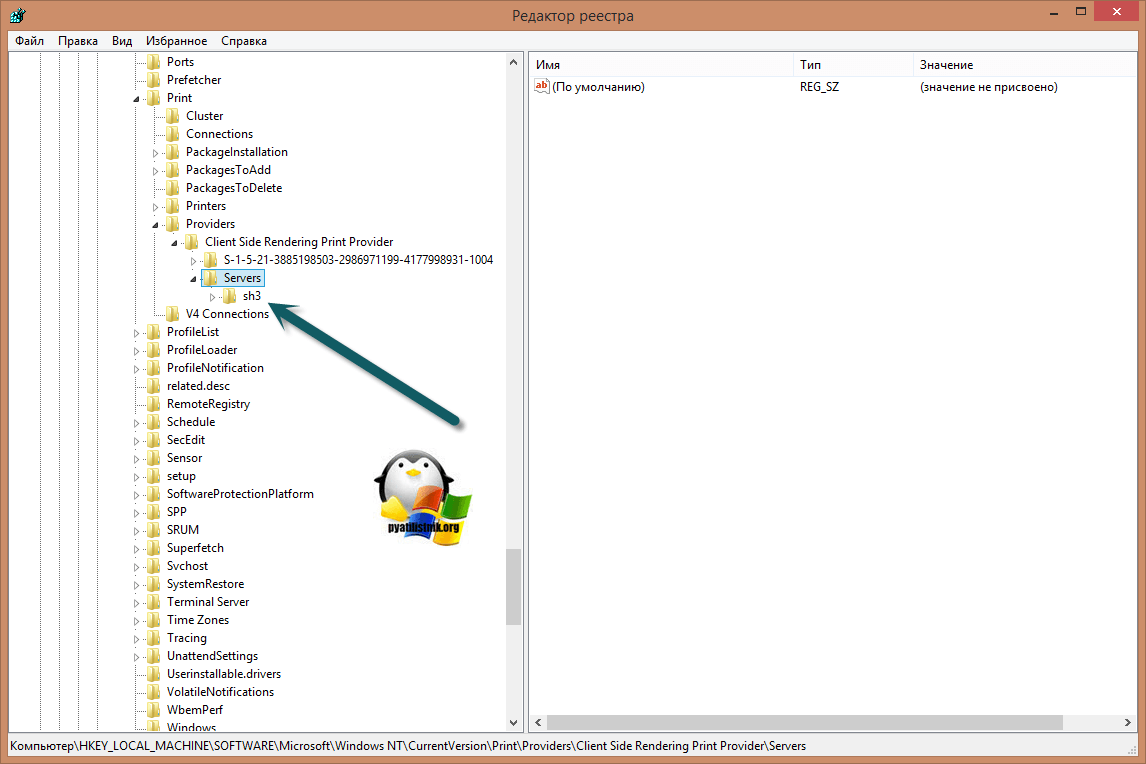
Если ваши клиенты так и не могут подключиться к терминальным принтерам, то попробуйте очистить ветку реестра:
В моем случае, я удалил серверы с сервера-печати, убедитесь, что у вас тут будет пусто. После чего можете перезапустить сервер или службу печати.
Еще на Windows 7 бывает ошибка 0x0000007e «Windows не удается подключиться к принтеру. Не существует обработчик печати» при попытке подключить те же сетевые принтеры, решается все пересозданием порта печати. Порт это некое указание, где искать ваше устройство.
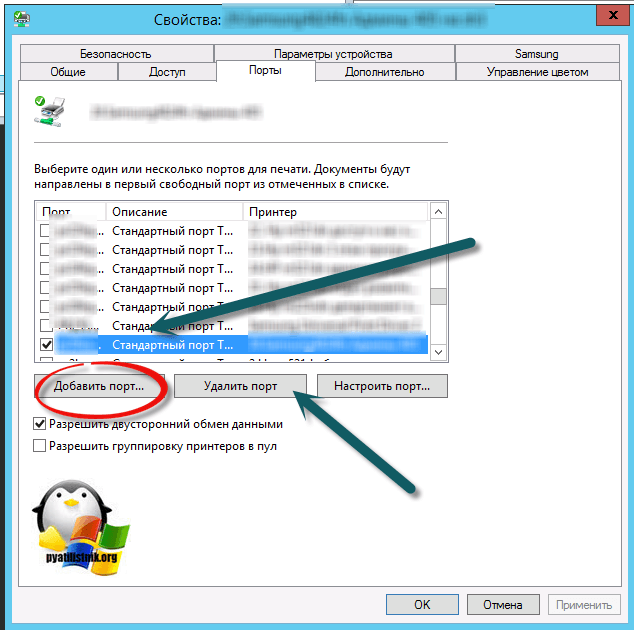
Через правый клик, перейдите в свойства печати, вкладка «Порты». Находите текущий порт, и удаляете его.Затем нажимаете добавить.
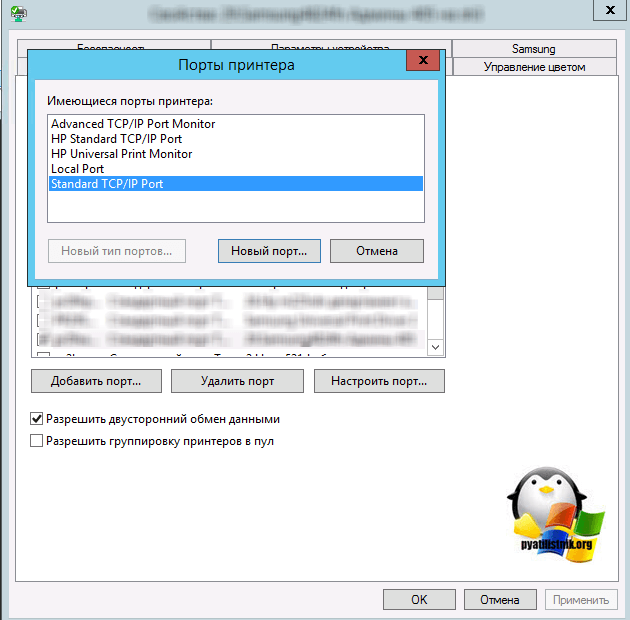
Указываем стандартный TCP/IP порт для сетевого принтера.
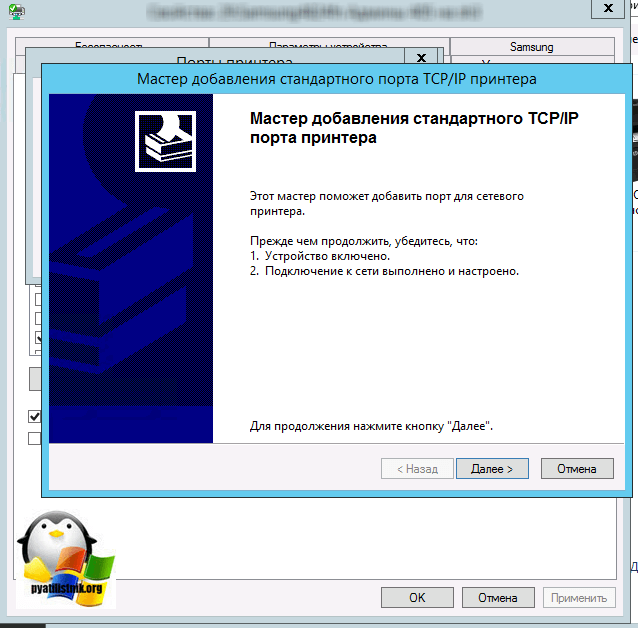
У вас откроется мастер добавления порта.
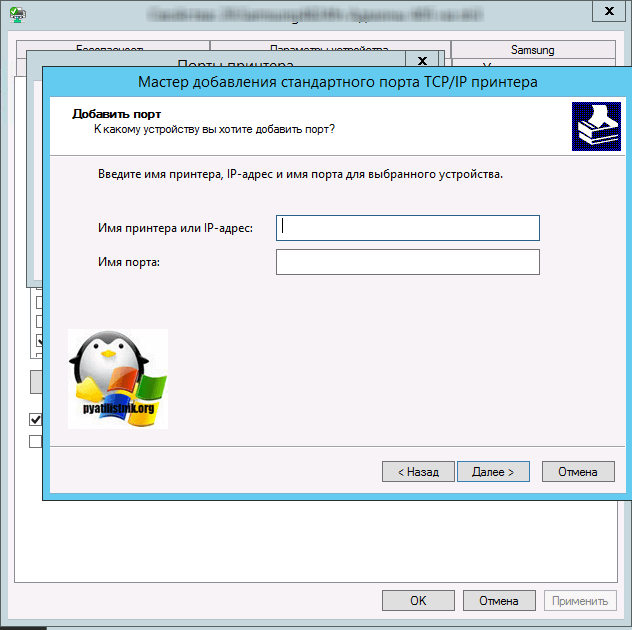
Указываем ip адрес или DNS имя принтера и имя порта.
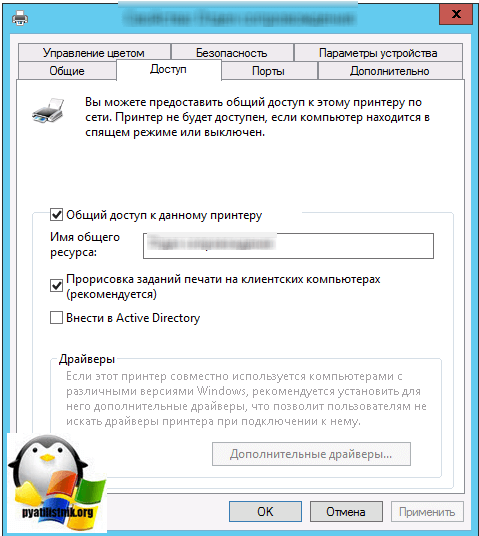
Так же можете проверить, что на вкладке «Доступ» стоит галка, разрешающая его. Теперь ваше устройство доступно по сети. Попробуйте снова к нему обратиться по UNC пути \\им вашего сервера печати (если есть)\имя принтера. Например, \\printserver\sumsungcolor
Еще советую попробовать утилиту диагностики Print-Spooler-Repair-Tool. Это поможет вам исправить ошибку 0x0000007e и, что не существует обработчик печати. Надеюсь данная заметка оказалась для вас полезной, если есть еще какие-либо методы, то пишите о них в комментариях.
FIX: Windows Cannot Connect to the Printer
Sometimes doing a simple thing such as adding a network shared printer can become a hell of a task when Windows cannot connect to the printer error is returned. The issue is usually seen with windows 7 based 64 bit systems, however it is not limited to it and many, around 30% of users running 32-bit have also reported this. The most common reason for this to occur is if the print spooler service is stucked, has a document pending in the que locked, a corruption or update and improper installation of the print-driver, more specifically the incorrect installation pushes the printer and the system to look for files in a subfolder different then windows\system32 subfolder. The printer may still work on the source system where it is physically connected to.
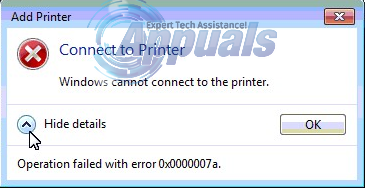
The error may have a different message then the one in the picture of which the most common is “Windows cannot connect to the printer 0x0000007e”
Solution 1: Create A New Local Port
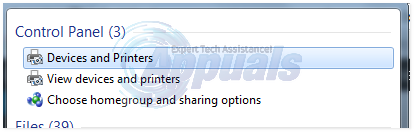
Click Start and search for “Devices and Printers“.
Open Devices and Printers and then Click the Add a printer on top of the window. Make sure you have Administration rights for this step on the computer.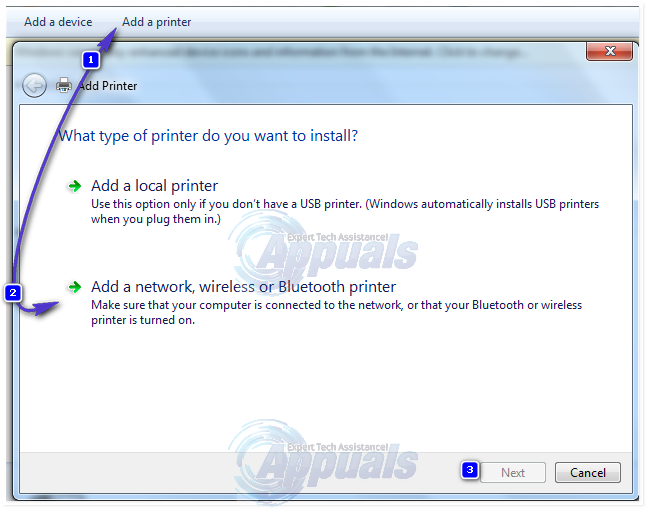
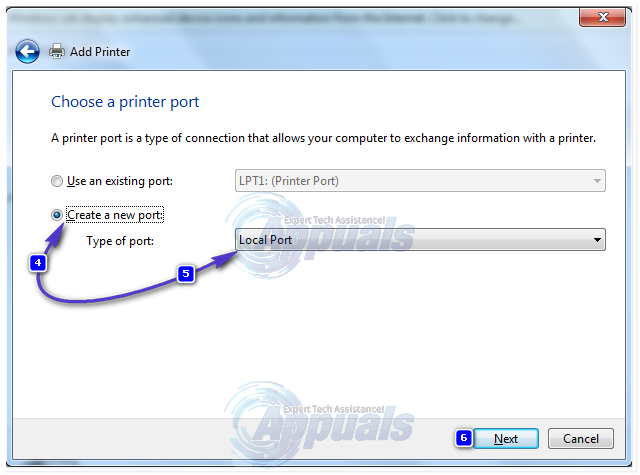
Select “Add a local printer” by clicking on it. Select “Create a new port” and make sure there is “Local Port” selected for “Type of port:”
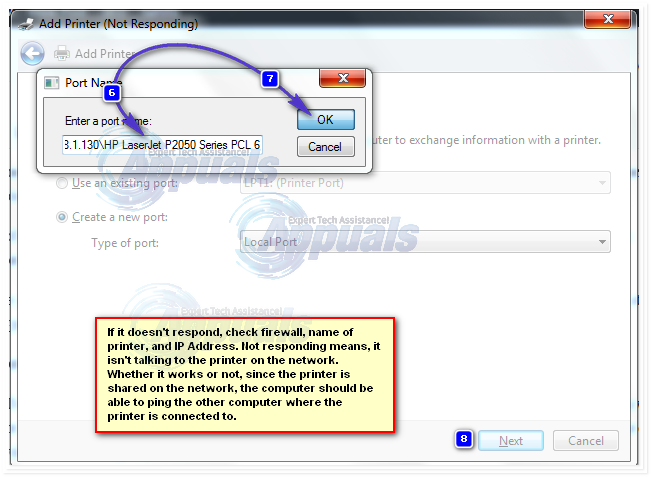
You will be asked for a port name in a new window. Type the printer’s address in the following format:
\\IP address or the Computer Name\Printer’s Name
For example, the printer’s name is HP LaserJet P2050 Series PCL 6, and IP address of the computer it’s attached with 192.168.1.130 so the port name will be
Now click OK and Next.
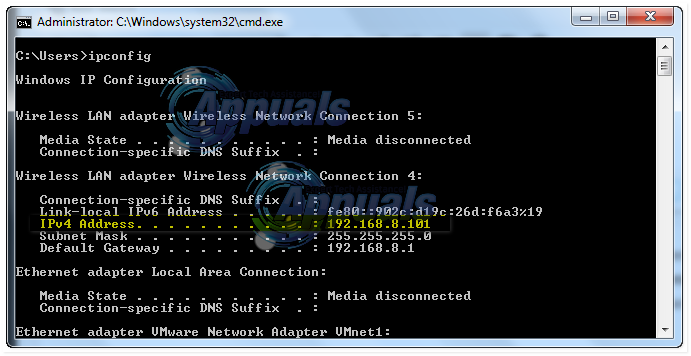
If you don’t know the IP Address of the computer where the printer is physically connected to and shared from, Hold Windows Key and Press R. Now type cmd in the run dialog and press enter. Type ipconfig in the black window and press enter. Look for IPv4 Address for the computer’s IP in the black window. Scroll up if you have to.
Select your printer model from the directory to install its drivers. Click Next. If you have a disk, insert the disk, click “Have Disk” and browse to the driver’s location in the disk. Click OK. Type in a name for your new printer. Click Next. Print a test page to check its connection. And click Finish. If it still won’t work, then run the hotfix from here before proceeding to Solution 2 and giving Solution 1 a try after applying the hotfix.
Solution 2: Copy mscms.dll manually
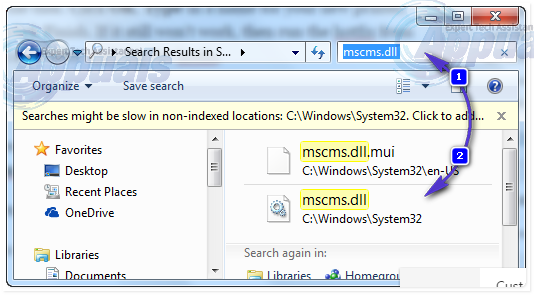
This mscms.dll is a color module which maybe failing to reach its destination folder. To copy it manually, press Windows Key + R. In the run dialog, type: Type system32 and press enter to open System32 folder.
Now type mscms.dll in the search bar. Copy the file exactly matching the name mscms.dll. (CTRL + C) to copy / (CTRL + V) to paste.
Now, if you have a 32 bit Windows installed, navigate to the following folder and paste the previously copied mscms.dll file in it:
And, If you have a 64 bit Windows installed, navigate to the following folder and paste the previously copied file in it:
Now try connecting to the printer. If it doesn’t connect, re-add the printer and test.
Solution 3: If this is an HP Printer
On the source maching where the printer is shared from, open Registry Editor and browse to the following registry path.
Locate the entry for
and delete it. Then, re-try connecting.
Solution 4: Remove Unnecessary Printer Drivers
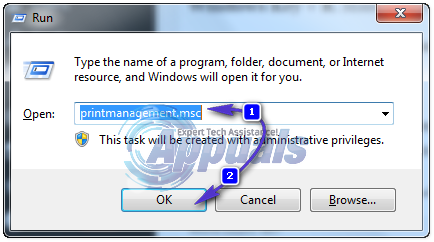
An installation of previous printer can prevent the printer spooler from adding new printers. To remove them, press Windows Key + R. Make sure you have Administration rights for this step on the computer. In the run window type printmanagement.msc and press enter.
Double click on “All Drivers”. Now delete any printer’s driver that is unnecessary or questionable. To delete, right click on the driver and click on delete in the pop up menu.

After removing the drivers for the printer in question, re-add it normally, and if it still doesn’t work then re-add it using Solution 1. If it still won’t work, move to Solution 3.
Solution 5: Delete Pre-existing Driver Files From Registry
An already existing but corrupted driver file can be stopping the windows from connecting to the printer.
Press Windows Key + R. Type regedit and press enter. Make sure you have Administration rights for this step on the computer. Registry editor’s new window will appear. In the left pane, navigate to the following location by double clicking on the folders:
Delete the “ICM” folder which is under the “CopyFiles” folder.
Now try connecting to the printer.
Solution 6: Run Microsoft’s Automated Printer Troubleshooter
Download the file from this link. Open the file with troubleshooting wizard.
Let the troubleshooter detect and fix the issues. Test it by clicking the Add new printer button. After the troubleshooting has finished, try re-adding the printer normally and if it still won’t work, then use Solution 1 again.
Solution 7: Resetting Printer Spooler
Follow the guide here to reset print spooler.
Windows cannot connect to the printer

- Worried that Windows cannot connect to the printer? Refer to the below tips to solve the issue.
- You may check the default printer settings or clear spooler files and restart the spooler service.
- If you want high-quality and fewer errors, just take a closer look at the best dot matrix printers.
- Similar issues do show up from time to time, so feel free to visit this Computer Peripherals Hub.
- Download Restoro PC Repair Tool that comes with Patented Technologies (patent available here).
- Click Start Scan to find Windows issues that could be causing PC problems.
- Click Repair All to fix issues affecting your computer’s security and performance
- Restoro has been downloaded by 0 readers this month.
If you recently upgraded your PC to Windows 10, or did an update to the latest Windows 10 version, and encountered an error that says: Windows cannot connect to the printer, fear not.
There are tried and trusted solutions to fix the issue, and this article covers these fixes.
If your printer stopped working and you’ve not updated or upgraded to Windows 10 recently, you’re covered.
If your PC runs on Windows 10 S, some printers may not work well with it, or you may experience limited functionality with your printer.
To see whether your device is compatible with Windows 10 S, check with the manufacturer.
What can I do if the printer is not connecting to the PC?
- Check if your printer is listed under Unspecified Device state
- Temporarily disable your antivirus security software
- Check if your printer is compatible with Windows 10
- Reboot your computer
- Check Default printer settings
- Perform a Windows Update
- Clear spooler files and restart spooler service
- Check with your manufacturer if Windows cannot connect to the printer
1. Check if your printer is listed under Unspecified Device state
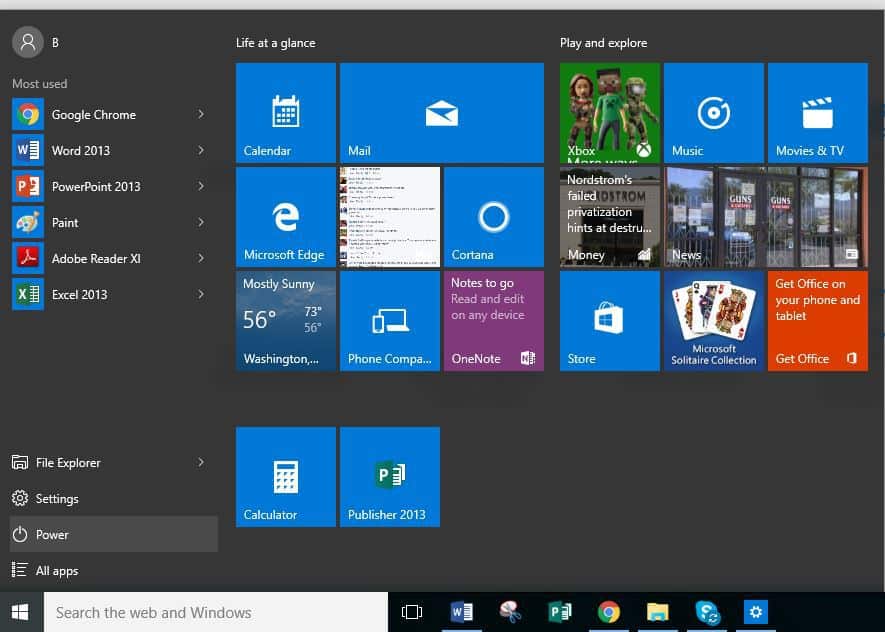
- Select Start.
- Click Settings.
- Choose Devices.
- Click Printers & Scanners on the left pane.

- Scroll down to Related Settings.

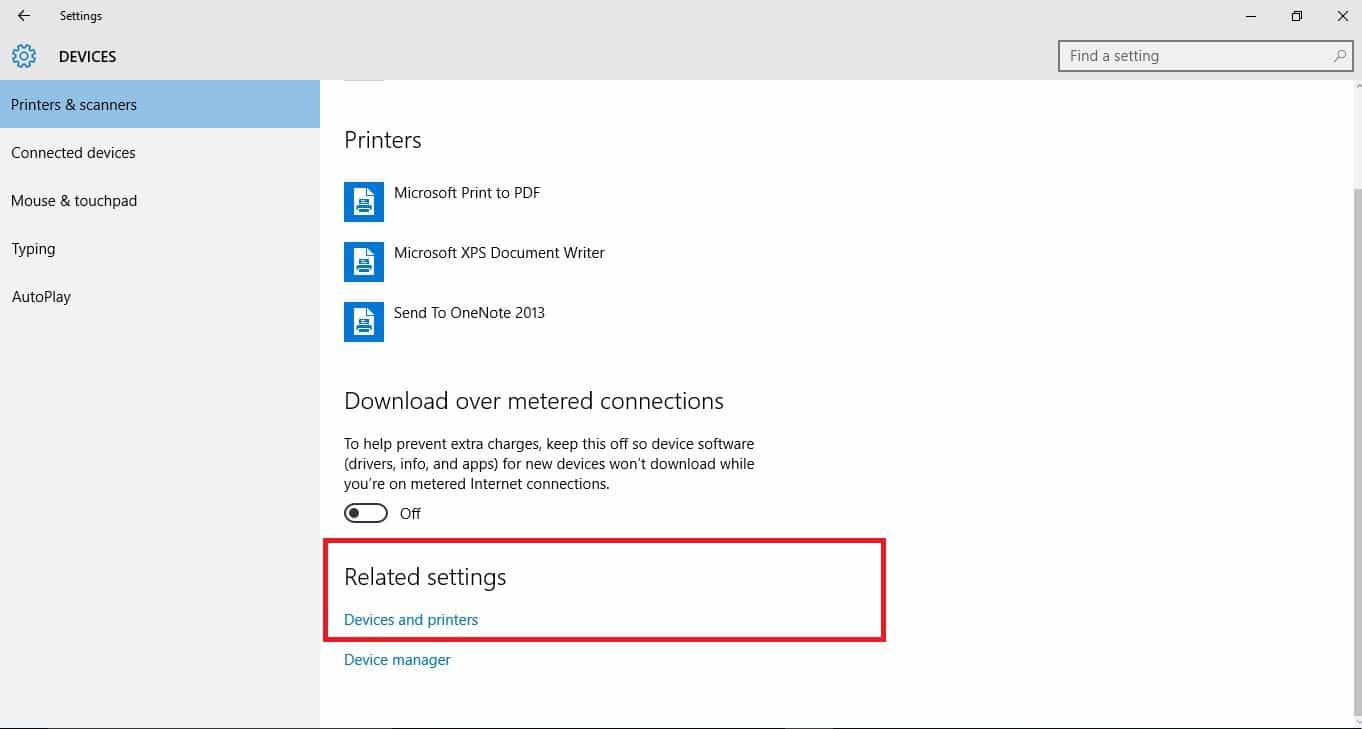
- Click Devices and Printers.
- Go to Devices list and locate your printer’s name and icon.
- Check if it is under the Unspecified section.
Once you confirm whether it is there or not, do these three things:
1. Update drivers

Driver software is needed for most printers to work properly. In the event you updated or upgraded to Windows 10, you may have to update your current printer driver as well.
After all, it should match the new Windows version. If you had recent power outages, viruses in your computer, or other issues, the drivers may have also been damaged.
Well, you can download and install the latest driver using Windows Update. To do this, go to Device Manager, then expand the Printers option to get the list of devices.
Then, right-click on your device and choose Update Driver. Select Search automatically for updated driver software.
Downloading and installing the driver manually is also an option to consider. Do this if Windows doesn’t automatically find a driver update for your printer, or you don’t have an installation disk.
You can check the manufacturer’s website then find the latest driver for your printer. And if you have the installation disc, it may contain the software for installing a driver for your printer.
Another method that you can use to update your drivers is by using a tool such as DriverFix. Install it and you’ll update all outdated drivers automatically with just a couple of clicks.

This method is perfect if you don’t want to search and download drivers manually, so be sure to try it out.
DriverFix
2. Ensure your printer is turned on and connected
Check the power switch if it is turned on, and ensure the printer’s power cable is plugged into an electrical outlet.
If you’re on a shared printer or network, ensure all computers and routers are turned on as well. Plugin your power surge protector and turn it on.
Plugin the printer’s USB cable properly to your PC. For wireless printers, turn on the wireless option from your printer then run the printer’s wireless connectivity test from the menu option.
If these are clear, and you still cannot connect the printer to Windows, then your computer may not be connecting to your wireless network.
3. Uninstall and reinstall your printer
- Select Start.
- Click Settings.
- Choose Devices.
- Click Printers & Scanners on the left pane.
- Find your printer and click on it.
- Select Remove device.
Run a System Scan to discover potential errors


Follow the above steps to remove your printer. Then, reinstall your printer (wireless or local) using the following procedure:
- Select Start.
- Click Settings.
- Choose Devices.
- Click Printers & Scanners on the left pane.
- Select Add a printer or scanner.
- Choose the printer you want to add then select Add device.
Note: You can print a test page to ensure the printer works correctly. If it is installed but doesn’t work, check the device’s manufacturer website for troubleshooting or driver updates.
To connect to a local printer, plug in the printer’s USB cable to an available USB port on your computer, then turn on the printer.
2. Temporarily disable your antivirus security software

Another option is to try uninstalling third-party software on your PC, such as computer cleaners or antivirus tools.
When it comes to protecting your PC – using an antivirus- temporarily disable it because you need it to prevent your computer from security threats.
Immediately after you’re done fixing the connection error, you can enable it back. However, if the antivirus is indeed causing this issue, perhaps this is a good moment to consider switching to a different one.
If you’re looking for a reliable antivirus that won’t interfere with your system in any way, try using Bitdefender Antivirus Plus +.
Bitdefender Antivirus Plus+
3. Check if your printer is compatible with Windows 10
- Right-click the Start button.
- Select Control Panel.
- Click on Hardware and Sound.
- Select Devices and Printers. You will see a list of devices and another for printers.
- Check under the Unspecified section to see if your printer is listed there.

Some printers may not necessarily work with Windows 10 or may have limited functionality altogether, so you need to check if your printer is in this category before using the solutions below.
Once you establish whether your printer is unspecified or not, go to the next solutions to fix the issue.
4. Reboot your computer

This is the first line of action whenever such an issue comes up (or any other issues with your computer and any other hardware you may be using along with it).
However, if you restart your computer and nothing happens on your printer, you can go to the last solution.
5. Check Default printer settings
- Click Start.
- Click Settings.
- Choose Devices.
- Click Printers & Scanners on the left pane.
- Scroll to Let Windows manage my default printer.
- Turn the option off.
If your printer keeps switching from the default one, you can change this setting on Windows 10, from the current printer to the one that you want to be using.
Do not hesitate to correct the default settings.
6. Perform a Windows Update
- Go to Start.
- In the search field, type Windows Updates.
- Click on Windows Updates Settings from the search results.
- Click Check for update.
- Install the latest Windows Updates.
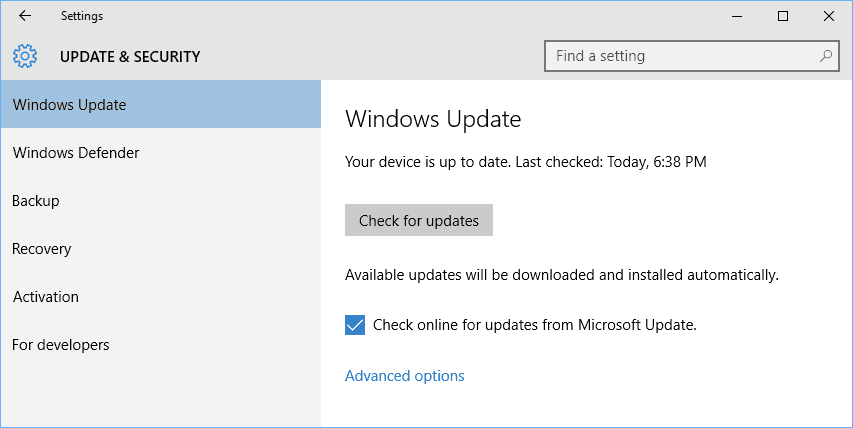
For a healthy computer, you need to keep updating Windows with the latest system updates, and drivers. This also helps resolve any issues or difficulties you may be experiencing.
Refer to the above steps in order to check and install the most recent Windows updates.
7. Clear spooler files and restart spooler service
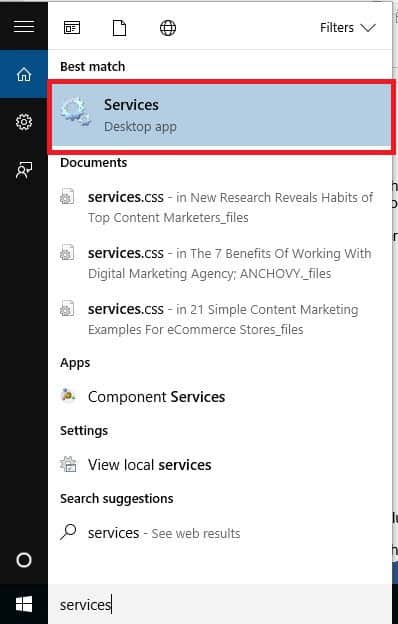
- Click Start.
- Go to the search field box and type Services.
- Click Services from the search results.
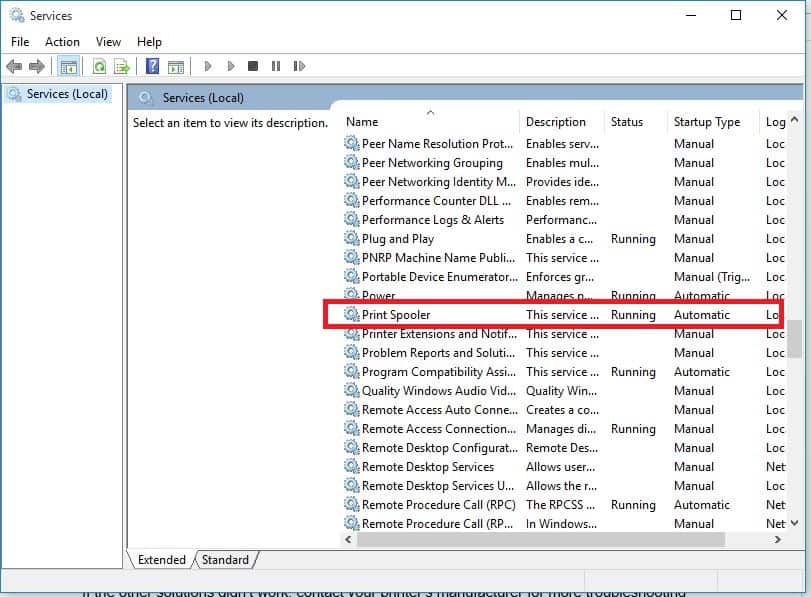
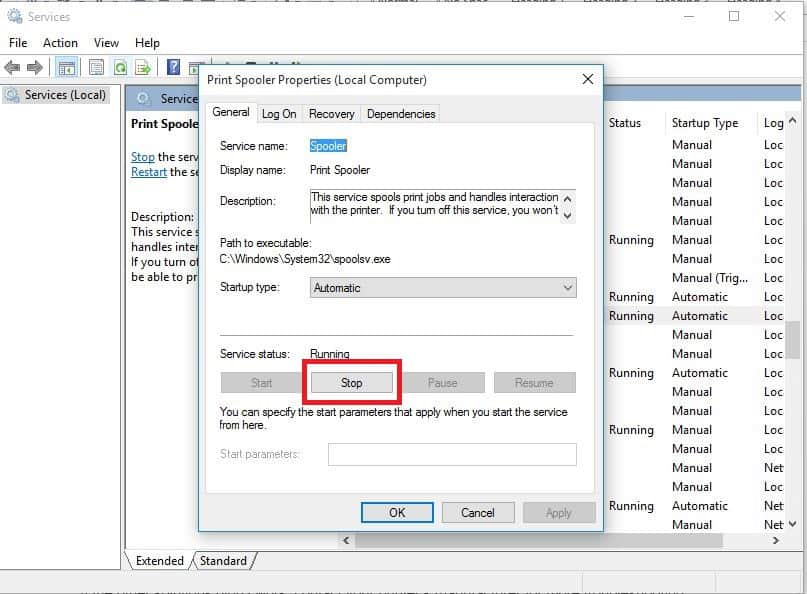
- Under Services, double click Print Spooler.
- Select Stop then OK.
After disabling the service, do the following:
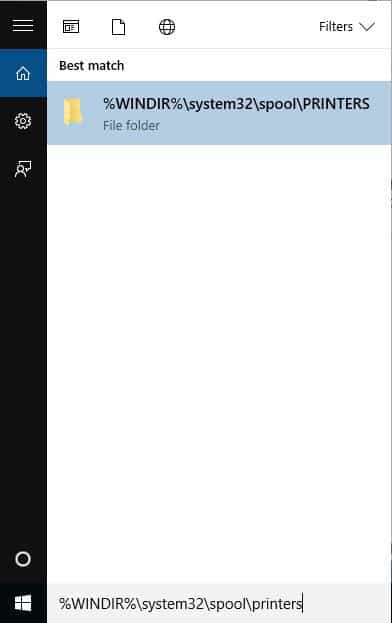
- Go to the search box again and type %WINDIR%system32spoolprinters
- Select the file folder. You need admin privileges to access it.
- Delete all the folders in the folder.
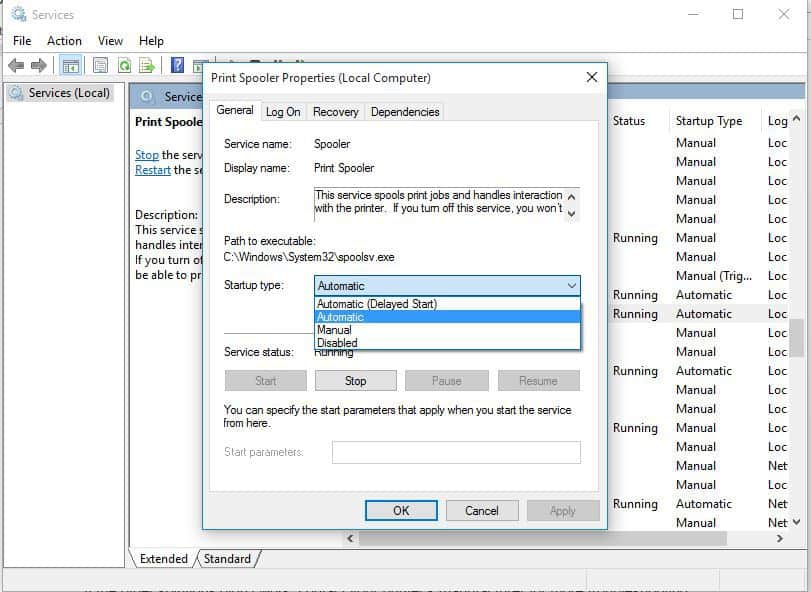
- Under Services, double-click Print Spooler again.
- Click Start.
- Go to the Startup Type list.
- Select the Automatic box.
- Click Apply then click Ok.
If the previous six solutions are unsuccessful, you may need to clear spooler files then restart the spooler service.
8. Check with your manufacturer if Windows cannot connect to the printer

If the other steps didn’t work, contact your printer’s manufacturer for more troubleshooting and support based on your specific issue.
Did any of these solutions work for you when you’re unable to connect to the printer? Share with us your experiences in the comments section below.


