- Flashing
- Flashing Software
- Flashing Parameters
- Baud Rate
- Crystal
- SPI Speed
- SPI Mode
- ESP82xx
- ESP32В
- Flash ESP32 with Espressif Download Tool
- Select “Developer Mode”
- Select “ESP32 DownloadTool”
- Select the bin file and offset of 0В
- Double check all parameters and start flashing
- Esptool
- Download Esptool If you do not have an installed copy of Python 2.x or 3.x download and install it from https://www.python.org/. Download Esptool Source code from https://github.com/espressif/esptool/releases to a known folder. Install Esptool Go to the known folder and install Esptool with command python setup.py install . Packages for Esptool are maintained for Debian and Ubuntu and can be installed with sudo apt install esptool . Download Tasmota Download the latest Tasmota release firmware file tasmota.bin to a known folder. Upload Tasmota Put device in firmware upload mode When performing a firmware upload do not connect the device to AC but use the power supply provided by your (FTDI type) serial interface. Put the device in firmware upload mode by grounding pin GPIO00 while applying power. Grounding pin GPIO00 can often be achieved by pressing button 1 on the Sonoff device or using a wire between GPIO00 and Gnd if the button is not available. Deviations may apply. Connect the serial interface of your PC to the device while GPIO00 to Gnd. Esptool uses the serial interface to communicate with your device. On Windows these interfaces are named COM1, COM2 etc. On Linux these interfaces are called /dev/ttyUSB0, /dev/ttyUSB1 etc. Before using Esptool make sure you know to which serial interface name your device is connected to. In the following commands I use COM5 as an example. Optional: Backup firmware Ensure the device is in firmware upload mode. Backup the current firmware with the following command: Erase firmware Ensure the device is in firmware upload mode. Erase the complete flash memory holding the firmware with the following command: NOTE2: It only takes a few seconds to erase 1M of flash. Upload firmware Ensure the device is in firmware upload mode. Load the downloaded Tasmota firmware file tasmota.bin with the following command: NOTE2: For a proper device initialization after first firmware upload power down and power up the device. ESPTOOL Executable (Windows & Linux) The executable version of esptool is maintained by Ivan Grokhotkov and releases are kept at https://github.com/igrr/esptool-ck/releases Download and Install For the purpose of simplicity only the Windows version will be explained here, but the command and parameters are the same for Windows, Linux and MAC/OSX. Download the latest release from https://github.com/igrr/esptool-ck/releases and extract the compressed file to a known location. Download Tasmota Download the latest Tasmota release firmware file tasmota.bin to a known folder (The same folder as where you have the esptool executable will work well for this process to be simpler) If you want features from the current development codebase which has not been included in the last release please download this tasmota.bin to a known folder (The same folder as where you have the esptool executable will work well for this process to be simpler) The information posted further up in this Wiki for placing the device into bootload / firmware upgrade mode may be followed as this process does not change irrespective whether you use the Python or executable version of esptool. Once the device is in firmware upload mode the following commands are recommended for completion of the firmware flashing. Erase the flash completely with the following command (substituting the COM port for the one which was used on your computer) esptool -cp COM3 -cb 115200 -ce -v Once the erase is complete, reset your device back into programming mode and then upload the firmware using the following command Источник Esp32 download tool linux ESP32 Flash Tool A desktop application for flashing production ESP32 firmware. App suports multiple platforms (Windows, MacOS, Linux) Simplify settings, clean UI and focus on mass manufacturing process where development and manufacturing are separated steps. ESP32 Flash Tool depends on pySerial version 3.0 or newer for serial communication with the target device. Hence, you should install Python before start run the app. To install pySerial manually by running something like: depending on your platform. (The official pySerial installation instructions are here). Firmware manufacturing process Imagine you have at least 5 steps from firmware development to flashing firmware into production board. The app would be used at Step 5 in the process flowing: Step 1: Develop & build firmware, you can use ESP32-IDF or Andruino core for esp32 Step 2: Build and get signed binary files Step 3: Create factory data specific binary file by using command line tools such as NVS Partition Generator Utility, Manufacturing Utility Step 5: Flash to ESP32 board by ESP32 Flash Tool Create a single compressed file for ESP32 Flash Tool ESP32 flash tool uses a single zipped file for flashing, just simply collect all required binaries, and create partitions.csv in the same folder then compress all into a zip file. partitions.csv file format ESP32 flash tool uses partitions.csv for identifying offsets of binary blobs. Sample of partitions.csv will be: About A simplify flashing tool of ESP32 boards on multiple platforms. Источник Downloadable ToolsВ¶ ESP-IDF build process relies on a number of tools: cross-compiler toolchains, CMake build system, and others. Installing the tools using an OS-specific package manager (like apt, yum, brew, etc.) is the preferred method when the required version of the tool is available. This recommendation is reflected in the Getting Started guide. For example, on Linux and macOS it is recommended to install CMake using an OS package manager. However, some of the tools are IDF-specific and are not available in OS package repositories. Furthermore, different versions of ESP-IDF require different versions of the tools to operate correctly. To solve these two problems, ESP-IDF provides a set of scripts for downloading and installing the correct versions of tools, and exposing them in the environment. The rest of the document refers to these downloadable tools simply as “tools”. Other kinds of tools used in ESP-IDF are: Python scripts bundled with ESP-IDF (such as idf.py ) Python packages installed from PyPI. The following sections explain the installation method, and provide the list of tools installed on each platform. This document is provided for advanced users who need to customize their installation, users who wish to understand the installation process, and ESP-IDF developers. If you are looking for instructions on how to install the tools, see the Getting Started Guide . Tools metadata fileВ¶ The list of tools and tool versions required for each platform is located in tools/tools.json. The schema of this file is defined by tools/tools_schema.json. This file is used by tools/idf_tools.py script when installing the tools or setting up the environment variables. Tools installation directoryВ¶ IDF_TOOLS_PATH environment variable specifies the location where the tools are to be downloaded and installed. If not set, IDF_TOOLS_PATH defaults to HOME/.espressif on Linux and macOS, and %USER_PROFILE%\.espressif on Windows. Inside IDF_TOOLS_PATH , the scripts performing tools installation create the following directories: dist — where the archives of the tools are downloaded. tools — where the tools are extracted. The tools are extracted into subdirectories: tools/TOOL_NAME/VERSION/ . This arrangement allows different versions of tools to be installed side by side. GitHub Assets MirrorВ¶ Most of the tools downloaded by the tools installer are GitHub Release Assets, which are files attached to a software release on GitHub. If GitHub downloads are inaccessible or slow to access, it’s possible to configure a GitHub assets mirror. To use Espressif’s download server, set the environment variable IDF_GITHUB_ASSETS to dl.espressif.com/github_assets . When the install process is downloading a tool from github.com , the URL will be rewritten to use this server instead. Any mirror server can be used provided the URL matches the github.com download URL format: the install process will replace https://github.com with https://$ for any GitHub asset URL that it downloads. The Espressif download server doesn’t currently mirror everything from GitHub, it only mirrors files attached as Assets to some releases as well as source archives for some releases. idf_tools.py scriptВ¶ tools/idf_tools.py script bundled with ESP-IDF performs several functions: install : Download the tool into $/dist directory, extract it into $/tools/TOOL_NAME/VERSION . install command accepts the list of tools to install, in TOOL_NAME or TOOL_NAME@VERSION format. If all is given, all the tools (required and optional ones) are installed. If no argument or required is given, only the required tools are installed. download : Similar to install but doesn’t extract the tools. An optional —platform argument may be used to download the tools for the specific platform. export : Lists the environment variables which need to be set to use the installed tools. For most of the tools, setting PATH environment variable is sufficient, but some tools require extra environment variables. The environment variables can be listed in either of shell or key-value formats, set by —format parameter: shell produces output suitable for evaluation in the shell. For example, Источник
- Install Esptool Go to the known folder and install Esptool with command python setup.py install . Packages for Esptool are maintained for Debian and Ubuntu and can be installed with sudo apt install esptool . Download Tasmota Download the latest Tasmota release firmware file tasmota.bin to a known folder. Upload Tasmota Put device in firmware upload mode When performing a firmware upload do not connect the device to AC but use the power supply provided by your (FTDI type) serial interface. Put the device in firmware upload mode by grounding pin GPIO00 while applying power. Grounding pin GPIO00 can often be achieved by pressing button 1 on the Sonoff device or using a wire between GPIO00 and Gnd if the button is not available. Deviations may apply. Connect the serial interface of your PC to the device while GPIO00 to Gnd. Esptool uses the serial interface to communicate with your device. On Windows these interfaces are named COM1, COM2 etc. On Linux these interfaces are called /dev/ttyUSB0, /dev/ttyUSB1 etc. Before using Esptool make sure you know to which serial interface name your device is connected to. In the following commands I use COM5 as an example. Optional: Backup firmware Ensure the device is in firmware upload mode. Backup the current firmware with the following command: Erase firmware Ensure the device is in firmware upload mode. Erase the complete flash memory holding the firmware with the following command: NOTE2: It only takes a few seconds to erase 1M of flash. Upload firmware Ensure the device is in firmware upload mode. Load the downloaded Tasmota firmware file tasmota.bin with the following command: NOTE2: For a proper device initialization after first firmware upload power down and power up the device. ESPTOOL Executable (Windows & Linux) The executable version of esptool is maintained by Ivan Grokhotkov and releases are kept at https://github.com/igrr/esptool-ck/releases Download and Install For the purpose of simplicity only the Windows version will be explained here, but the command and parameters are the same for Windows, Linux and MAC/OSX. Download the latest release from https://github.com/igrr/esptool-ck/releases and extract the compressed file to a known location. Download Tasmota Download the latest Tasmota release firmware file tasmota.bin to a known folder (The same folder as where you have the esptool executable will work well for this process to be simpler) If you want features from the current development codebase which has not been included in the last release please download this tasmota.bin to a known folder (The same folder as where you have the esptool executable will work well for this process to be simpler) The information posted further up in this Wiki for placing the device into bootload / firmware upgrade mode may be followed as this process does not change irrespective whether you use the Python or executable version of esptool. Once the device is in firmware upload mode the following commands are recommended for completion of the firmware flashing. Erase the flash completely with the following command (substituting the COM port for the one which was used on your computer) esptool -cp COM3 -cb 115200 -ce -v Once the erase is complete, reset your device back into programming mode and then upload the firmware using the following command Источник Esp32 download tool linux ESP32 Flash Tool A desktop application for flashing production ESP32 firmware. App suports multiple platforms (Windows, MacOS, Linux) Simplify settings, clean UI and focus on mass manufacturing process where development and manufacturing are separated steps. ESP32 Flash Tool depends on pySerial version 3.0 or newer for serial communication with the target device. Hence, you should install Python before start run the app. To install pySerial manually by running something like: depending on your platform. (The official pySerial installation instructions are here). Firmware manufacturing process Imagine you have at least 5 steps from firmware development to flashing firmware into production board. The app would be used at Step 5 in the process flowing: Step 1: Develop & build firmware, you can use ESP32-IDF or Andruino core for esp32 Step 2: Build and get signed binary files Step 3: Create factory data specific binary file by using command line tools such as NVS Partition Generator Utility, Manufacturing Utility Step 5: Flash to ESP32 board by ESP32 Flash Tool Create a single compressed file for ESP32 Flash Tool ESP32 flash tool uses a single zipped file for flashing, just simply collect all required binaries, and create partitions.csv in the same folder then compress all into a zip file. partitions.csv file format ESP32 flash tool uses partitions.csv for identifying offsets of binary blobs. Sample of partitions.csv will be: About A simplify flashing tool of ESP32 boards on multiple platforms. Источник Downloadable ToolsВ¶ ESP-IDF build process relies on a number of tools: cross-compiler toolchains, CMake build system, and others. Installing the tools using an OS-specific package manager (like apt, yum, brew, etc.) is the preferred method when the required version of the tool is available. This recommendation is reflected in the Getting Started guide. For example, on Linux and macOS it is recommended to install CMake using an OS package manager. However, some of the tools are IDF-specific and are not available in OS package repositories. Furthermore, different versions of ESP-IDF require different versions of the tools to operate correctly. To solve these two problems, ESP-IDF provides a set of scripts for downloading and installing the correct versions of tools, and exposing them in the environment. The rest of the document refers to these downloadable tools simply as “tools”. Other kinds of tools used in ESP-IDF are: Python scripts bundled with ESP-IDF (such as idf.py ) Python packages installed from PyPI. The following sections explain the installation method, and provide the list of tools installed on each platform. This document is provided for advanced users who need to customize their installation, users who wish to understand the installation process, and ESP-IDF developers. If you are looking for instructions on how to install the tools, see the Getting Started Guide . Tools metadata fileВ¶ The list of tools and tool versions required for each platform is located in tools/tools.json. The schema of this file is defined by tools/tools_schema.json. This file is used by tools/idf_tools.py script when installing the tools or setting up the environment variables. Tools installation directoryВ¶ IDF_TOOLS_PATH environment variable specifies the location where the tools are to be downloaded and installed. If not set, IDF_TOOLS_PATH defaults to HOME/.espressif on Linux and macOS, and %USER_PROFILE%\.espressif on Windows. Inside IDF_TOOLS_PATH , the scripts performing tools installation create the following directories: dist — where the archives of the tools are downloaded. tools — where the tools are extracted. The tools are extracted into subdirectories: tools/TOOL_NAME/VERSION/ . This arrangement allows different versions of tools to be installed side by side. GitHub Assets MirrorВ¶ Most of the tools downloaded by the tools installer are GitHub Release Assets, which are files attached to a software release on GitHub. If GitHub downloads are inaccessible or slow to access, it’s possible to configure a GitHub assets mirror. To use Espressif’s download server, set the environment variable IDF_GITHUB_ASSETS to dl.espressif.com/github_assets . When the install process is downloading a tool from github.com , the URL will be rewritten to use this server instead. Any mirror server can be used provided the URL matches the github.com download URL format: the install process will replace https://github.com with https://$ for any GitHub asset URL that it downloads. The Espressif download server doesn’t currently mirror everything from GitHub, it only mirrors files attached as Assets to some releases as well as source archives for some releases. idf_tools.py scriptВ¶ tools/idf_tools.py script bundled with ESP-IDF performs several functions: install : Download the tool into $/dist directory, extract it into $/tools/TOOL_NAME/VERSION . install command accepts the list of tools to install, in TOOL_NAME or TOOL_NAME@VERSION format. If all is given, all the tools (required and optional ones) are installed. If no argument or required is given, only the required tools are installed. download : Similar to install but doesn’t extract the tools. An optional —platform argument may be used to download the tools for the specific platform. export : Lists the environment variables which need to be set to use the installed tools. For most of the tools, setting PATH environment variable is sufficient, but some tools require extra environment variables. The environment variables can be listed in either of shell or key-value formats, set by —format parameter: shell produces output suitable for evaluation in the shell. For example, Источник
- Download Tasmota Download the latest Tasmota release firmware file tasmota.bin to a known folder. Upload Tasmota Put device in firmware upload mode When performing a firmware upload do not connect the device to AC but use the power supply provided by your (FTDI type) serial interface. Put the device in firmware upload mode by grounding pin GPIO00 while applying power. Grounding pin GPIO00 can often be achieved by pressing button 1 on the Sonoff device or using a wire between GPIO00 and Gnd if the button is not available. Deviations may apply. Connect the serial interface of your PC to the device while GPIO00 to Gnd. Esptool uses the serial interface to communicate with your device. On Windows these interfaces are named COM1, COM2 etc. On Linux these interfaces are called /dev/ttyUSB0, /dev/ttyUSB1 etc. Before using Esptool make sure you know to which serial interface name your device is connected to. In the following commands I use COM5 as an example. Optional: Backup firmware Ensure the device is in firmware upload mode. Backup the current firmware with the following command: Erase firmware Ensure the device is in firmware upload mode. Erase the complete flash memory holding the firmware with the following command: NOTE2: It only takes a few seconds to erase 1M of flash. Upload firmware Ensure the device is in firmware upload mode. Load the downloaded Tasmota firmware file tasmota.bin with the following command: NOTE2: For a proper device initialization after first firmware upload power down and power up the device. ESPTOOL Executable (Windows & Linux) The executable version of esptool is maintained by Ivan Grokhotkov and releases are kept at https://github.com/igrr/esptool-ck/releases Download and Install For the purpose of simplicity only the Windows version will be explained here, but the command and parameters are the same for Windows, Linux and MAC/OSX. Download the latest release from https://github.com/igrr/esptool-ck/releases and extract the compressed file to a known location. Download Tasmota Download the latest Tasmota release firmware file tasmota.bin to a known folder (The same folder as where you have the esptool executable will work well for this process to be simpler) If you want features from the current development codebase which has not been included in the last release please download this tasmota.bin to a known folder (The same folder as where you have the esptool executable will work well for this process to be simpler) The information posted further up in this Wiki for placing the device into bootload / firmware upgrade mode may be followed as this process does not change irrespective whether you use the Python or executable version of esptool. Once the device is in firmware upload mode the following commands are recommended for completion of the firmware flashing. Erase the flash completely with the following command (substituting the COM port for the one which was used on your computer) esptool -cp COM3 -cb 115200 -ce -v Once the erase is complete, reset your device back into programming mode and then upload the firmware using the following command Источник Esp32 download tool linux ESP32 Flash Tool A desktop application for flashing production ESP32 firmware. App suports multiple platforms (Windows, MacOS, Linux) Simplify settings, clean UI and focus on mass manufacturing process where development and manufacturing are separated steps. ESP32 Flash Tool depends on pySerial version 3.0 or newer for serial communication with the target device. Hence, you should install Python before start run the app. To install pySerial manually by running something like: depending on your platform. (The official pySerial installation instructions are here). Firmware manufacturing process Imagine you have at least 5 steps from firmware development to flashing firmware into production board. The app would be used at Step 5 in the process flowing: Step 1: Develop & build firmware, you can use ESP32-IDF or Andruino core for esp32 Step 2: Build and get signed binary files Step 3: Create factory data specific binary file by using command line tools such as NVS Partition Generator Utility, Manufacturing Utility Step 5: Flash to ESP32 board by ESP32 Flash Tool Create a single compressed file for ESP32 Flash Tool ESP32 flash tool uses a single zipped file for flashing, just simply collect all required binaries, and create partitions.csv in the same folder then compress all into a zip file. partitions.csv file format ESP32 flash tool uses partitions.csv for identifying offsets of binary blobs. Sample of partitions.csv will be: About A simplify flashing tool of ESP32 boards on multiple platforms. Источник Downloadable ToolsВ¶ ESP-IDF build process relies on a number of tools: cross-compiler toolchains, CMake build system, and others. Installing the tools using an OS-specific package manager (like apt, yum, brew, etc.) is the preferred method when the required version of the tool is available. This recommendation is reflected in the Getting Started guide. For example, on Linux and macOS it is recommended to install CMake using an OS package manager. However, some of the tools are IDF-specific and are not available in OS package repositories. Furthermore, different versions of ESP-IDF require different versions of the tools to operate correctly. To solve these two problems, ESP-IDF provides a set of scripts for downloading and installing the correct versions of tools, and exposing them in the environment. The rest of the document refers to these downloadable tools simply as “tools”. Other kinds of tools used in ESP-IDF are: Python scripts bundled with ESP-IDF (such as idf.py ) Python packages installed from PyPI. The following sections explain the installation method, and provide the list of tools installed on each platform. This document is provided for advanced users who need to customize their installation, users who wish to understand the installation process, and ESP-IDF developers. If you are looking for instructions on how to install the tools, see the Getting Started Guide . Tools metadata fileВ¶ The list of tools and tool versions required for each platform is located in tools/tools.json. The schema of this file is defined by tools/tools_schema.json. This file is used by tools/idf_tools.py script when installing the tools or setting up the environment variables. Tools installation directoryВ¶ IDF_TOOLS_PATH environment variable specifies the location where the tools are to be downloaded and installed. If not set, IDF_TOOLS_PATH defaults to HOME/.espressif on Linux and macOS, and %USER_PROFILE%\.espressif on Windows. Inside IDF_TOOLS_PATH , the scripts performing tools installation create the following directories: dist — where the archives of the tools are downloaded. tools — where the tools are extracted. The tools are extracted into subdirectories: tools/TOOL_NAME/VERSION/ . This arrangement allows different versions of tools to be installed side by side. GitHub Assets MirrorВ¶ Most of the tools downloaded by the tools installer are GitHub Release Assets, which are files attached to a software release on GitHub. If GitHub downloads are inaccessible or slow to access, it’s possible to configure a GitHub assets mirror. To use Espressif’s download server, set the environment variable IDF_GITHUB_ASSETS to dl.espressif.com/github_assets . When the install process is downloading a tool from github.com , the URL will be rewritten to use this server instead. Any mirror server can be used provided the URL matches the github.com download URL format: the install process will replace https://github.com with https://$ for any GitHub asset URL that it downloads. The Espressif download server doesn’t currently mirror everything from GitHub, it only mirrors files attached as Assets to some releases as well as source archives for some releases. idf_tools.py scriptВ¶ tools/idf_tools.py script bundled with ESP-IDF performs several functions: install : Download the tool into $/dist directory, extract it into $/tools/TOOL_NAME/VERSION . install command accepts the list of tools to install, in TOOL_NAME or TOOL_NAME@VERSION format. If all is given, all the tools (required and optional ones) are installed. If no argument or required is given, only the required tools are installed. download : Similar to install but doesn’t extract the tools. An optional —platform argument may be used to download the tools for the specific platform. export : Lists the environment variables which need to be set to use the installed tools. For most of the tools, setting PATH environment variable is sufficient, but some tools require extra environment variables. The environment variables can be listed in either of shell or key-value formats, set by —format parameter: shell produces output suitable for evaluation in the shell. For example, Источник
- Upload Tasmota Put device in firmware upload mode When performing a firmware upload do not connect the device to AC but use the power supply provided by your (FTDI type) serial interface. Put the device in firmware upload mode by grounding pin GPIO00 while applying power. Grounding pin GPIO00 can often be achieved by pressing button 1 on the Sonoff device or using a wire between GPIO00 and Gnd if the button is not available. Deviations may apply. Connect the serial interface of your PC to the device while GPIO00 to Gnd. Esptool uses the serial interface to communicate with your device. On Windows these interfaces are named COM1, COM2 etc. On Linux these interfaces are called /dev/ttyUSB0, /dev/ttyUSB1 etc. Before using Esptool make sure you know to which serial interface name your device is connected to. In the following commands I use COM5 as an example. Optional: Backup firmware Ensure the device is in firmware upload mode. Backup the current firmware with the following command: Erase firmware Ensure the device is in firmware upload mode. Erase the complete flash memory holding the firmware with the following command: NOTE2: It only takes a few seconds to erase 1M of flash. Upload firmware Ensure the device is in firmware upload mode. Load the downloaded Tasmota firmware file tasmota.bin with the following command: NOTE2: For a proper device initialization after first firmware upload power down and power up the device. ESPTOOL Executable (Windows & Linux) The executable version of esptool is maintained by Ivan Grokhotkov and releases are kept at https://github.com/igrr/esptool-ck/releases Download and Install For the purpose of simplicity only the Windows version will be explained here, but the command and parameters are the same for Windows, Linux and MAC/OSX. Download the latest release from https://github.com/igrr/esptool-ck/releases and extract the compressed file to a known location. Download Tasmota Download the latest Tasmota release firmware file tasmota.bin to a known folder (The same folder as where you have the esptool executable will work well for this process to be simpler) If you want features from the current development codebase which has not been included in the last release please download this tasmota.bin to a known folder (The same folder as where you have the esptool executable will work well for this process to be simpler) The information posted further up in this Wiki for placing the device into bootload / firmware upgrade mode may be followed as this process does not change irrespective whether you use the Python or executable version of esptool. Once the device is in firmware upload mode the following commands are recommended for completion of the firmware flashing. Erase the flash completely with the following command (substituting the COM port for the one which was used on your computer) esptool -cp COM3 -cb 115200 -ce -v Once the erase is complete, reset your device back into programming mode and then upload the firmware using the following command Источник Esp32 download tool linux ESP32 Flash Tool A desktop application for flashing production ESP32 firmware. App suports multiple platforms (Windows, MacOS, Linux) Simplify settings, clean UI and focus on mass manufacturing process where development and manufacturing are separated steps. ESP32 Flash Tool depends on pySerial version 3.0 or newer for serial communication with the target device. Hence, you should install Python before start run the app. To install pySerial manually by running something like: depending on your platform. (The official pySerial installation instructions are here). Firmware manufacturing process Imagine you have at least 5 steps from firmware development to flashing firmware into production board. The app would be used at Step 5 in the process flowing: Step 1: Develop & build firmware, you can use ESP32-IDF or Andruino core for esp32 Step 2: Build and get signed binary files Step 3: Create factory data specific binary file by using command line tools such as NVS Partition Generator Utility, Manufacturing Utility Step 5: Flash to ESP32 board by ESP32 Flash Tool Create a single compressed file for ESP32 Flash Tool ESP32 flash tool uses a single zipped file for flashing, just simply collect all required binaries, and create partitions.csv in the same folder then compress all into a zip file. partitions.csv file format ESP32 flash tool uses partitions.csv for identifying offsets of binary blobs. Sample of partitions.csv will be: About A simplify flashing tool of ESP32 boards on multiple platforms. Источник Downloadable ToolsВ¶ ESP-IDF build process relies on a number of tools: cross-compiler toolchains, CMake build system, and others. Installing the tools using an OS-specific package manager (like apt, yum, brew, etc.) is the preferred method when the required version of the tool is available. This recommendation is reflected in the Getting Started guide. For example, on Linux and macOS it is recommended to install CMake using an OS package manager. However, some of the tools are IDF-specific and are not available in OS package repositories. Furthermore, different versions of ESP-IDF require different versions of the tools to operate correctly. To solve these two problems, ESP-IDF provides a set of scripts for downloading and installing the correct versions of tools, and exposing them in the environment. The rest of the document refers to these downloadable tools simply as “tools”. Other kinds of tools used in ESP-IDF are: Python scripts bundled with ESP-IDF (such as idf.py ) Python packages installed from PyPI. The following sections explain the installation method, and provide the list of tools installed on each platform. This document is provided for advanced users who need to customize their installation, users who wish to understand the installation process, and ESP-IDF developers. If you are looking for instructions on how to install the tools, see the Getting Started Guide . Tools metadata fileВ¶ The list of tools and tool versions required for each platform is located in tools/tools.json. The schema of this file is defined by tools/tools_schema.json. This file is used by tools/idf_tools.py script when installing the tools or setting up the environment variables. Tools installation directoryВ¶ IDF_TOOLS_PATH environment variable specifies the location where the tools are to be downloaded and installed. If not set, IDF_TOOLS_PATH defaults to HOME/.espressif on Linux and macOS, and %USER_PROFILE%\.espressif on Windows. Inside IDF_TOOLS_PATH , the scripts performing tools installation create the following directories: dist — where the archives of the tools are downloaded. tools — where the tools are extracted. The tools are extracted into subdirectories: tools/TOOL_NAME/VERSION/ . This arrangement allows different versions of tools to be installed side by side. GitHub Assets MirrorВ¶ Most of the tools downloaded by the tools installer are GitHub Release Assets, which are files attached to a software release on GitHub. If GitHub downloads are inaccessible or slow to access, it’s possible to configure a GitHub assets mirror. To use Espressif’s download server, set the environment variable IDF_GITHUB_ASSETS to dl.espressif.com/github_assets . When the install process is downloading a tool from github.com , the URL will be rewritten to use this server instead. Any mirror server can be used provided the URL matches the github.com download URL format: the install process will replace https://github.com with https://$ for any GitHub asset URL that it downloads. The Espressif download server doesn’t currently mirror everything from GitHub, it only mirrors files attached as Assets to some releases as well as source archives for some releases. idf_tools.py scriptВ¶ tools/idf_tools.py script bundled with ESP-IDF performs several functions: install : Download the tool into $/dist directory, extract it into $/tools/TOOL_NAME/VERSION . install command accepts the list of tools to install, in TOOL_NAME or TOOL_NAME@VERSION format. If all is given, all the tools (required and optional ones) are installed. If no argument or required is given, only the required tools are installed. download : Similar to install but doesn’t extract the tools. An optional —platform argument may be used to download the tools for the specific platform. export : Lists the environment variables which need to be set to use the installed tools. For most of the tools, setting PATH environment variable is sufficient, but some tools require extra environment variables. The environment variables can be listed in either of shell or key-value formats, set by —format parameter: shell produces output suitable for evaluation in the shell. For example, Источник
- Put device in firmware upload mode When performing a firmware upload do not connect the device to AC but use the power supply provided by your (FTDI type) serial interface. Put the device in firmware upload mode by grounding pin GPIO00 while applying power. Grounding pin GPIO00 can often be achieved by pressing button 1 on the Sonoff device or using a wire between GPIO00 and Gnd if the button is not available. Deviations may apply. Connect the serial interface of your PC to the device while GPIO00 to Gnd. Esptool uses the serial interface to communicate with your device. On Windows these interfaces are named COM1, COM2 etc. On Linux these interfaces are called /dev/ttyUSB0, /dev/ttyUSB1 etc. Before using Esptool make sure you know to which serial interface name your device is connected to. In the following commands I use COM5 as an example. Optional: Backup firmware Ensure the device is in firmware upload mode. Backup the current firmware with the following command: Erase firmware Ensure the device is in firmware upload mode. Erase the complete flash memory holding the firmware with the following command: NOTE2: It only takes a few seconds to erase 1M of flash. Upload firmware Ensure the device is in firmware upload mode. Load the downloaded Tasmota firmware file tasmota.bin with the following command: NOTE2: For a proper device initialization after first firmware upload power down and power up the device. ESPTOOL Executable (Windows & Linux) The executable version of esptool is maintained by Ivan Grokhotkov and releases are kept at https://github.com/igrr/esptool-ck/releases Download and Install For the purpose of simplicity only the Windows version will be explained here, but the command and parameters are the same for Windows, Linux and MAC/OSX. Download the latest release from https://github.com/igrr/esptool-ck/releases and extract the compressed file to a known location. Download Tasmota Download the latest Tasmota release firmware file tasmota.bin to a known folder (The same folder as where you have the esptool executable will work well for this process to be simpler) If you want features from the current development codebase which has not been included in the last release please download this tasmota.bin to a known folder (The same folder as where you have the esptool executable will work well for this process to be simpler) The information posted further up in this Wiki for placing the device into bootload / firmware upgrade mode may be followed as this process does not change irrespective whether you use the Python or executable version of esptool. Once the device is in firmware upload mode the following commands are recommended for completion of the firmware flashing. Erase the flash completely with the following command (substituting the COM port for the one which was used on your computer) esptool -cp COM3 -cb 115200 -ce -v Once the erase is complete, reset your device back into programming mode and then upload the firmware using the following command Источник Esp32 download tool linux ESP32 Flash Tool A desktop application for flashing production ESP32 firmware. App suports multiple platforms (Windows, MacOS, Linux) Simplify settings, clean UI and focus on mass manufacturing process where development and manufacturing are separated steps. ESP32 Flash Tool depends on pySerial version 3.0 or newer for serial communication with the target device. Hence, you should install Python before start run the app. To install pySerial manually by running something like: depending on your platform. (The official pySerial installation instructions are here). Firmware manufacturing process Imagine you have at least 5 steps from firmware development to flashing firmware into production board. The app would be used at Step 5 in the process flowing: Step 1: Develop & build firmware, you can use ESP32-IDF or Andruino core for esp32 Step 2: Build and get signed binary files Step 3: Create factory data specific binary file by using command line tools such as NVS Partition Generator Utility, Manufacturing Utility Step 5: Flash to ESP32 board by ESP32 Flash Tool Create a single compressed file for ESP32 Flash Tool ESP32 flash tool uses a single zipped file for flashing, just simply collect all required binaries, and create partitions.csv in the same folder then compress all into a zip file. partitions.csv file format ESP32 flash tool uses partitions.csv for identifying offsets of binary blobs. Sample of partitions.csv will be: About A simplify flashing tool of ESP32 boards on multiple platforms. Источник Downloadable ToolsВ¶ ESP-IDF build process relies on a number of tools: cross-compiler toolchains, CMake build system, and others. Installing the tools using an OS-specific package manager (like apt, yum, brew, etc.) is the preferred method when the required version of the tool is available. This recommendation is reflected in the Getting Started guide. For example, on Linux and macOS it is recommended to install CMake using an OS package manager. However, some of the tools are IDF-specific and are not available in OS package repositories. Furthermore, different versions of ESP-IDF require different versions of the tools to operate correctly. To solve these two problems, ESP-IDF provides a set of scripts for downloading and installing the correct versions of tools, and exposing them in the environment. The rest of the document refers to these downloadable tools simply as “tools”. Other kinds of tools used in ESP-IDF are: Python scripts bundled with ESP-IDF (such as idf.py ) Python packages installed from PyPI. The following sections explain the installation method, and provide the list of tools installed on each platform. This document is provided for advanced users who need to customize their installation, users who wish to understand the installation process, and ESP-IDF developers. If you are looking for instructions on how to install the tools, see the Getting Started Guide . Tools metadata fileВ¶ The list of tools and tool versions required for each platform is located in tools/tools.json. The schema of this file is defined by tools/tools_schema.json. This file is used by tools/idf_tools.py script when installing the tools or setting up the environment variables. Tools installation directoryВ¶ IDF_TOOLS_PATH environment variable specifies the location where the tools are to be downloaded and installed. If not set, IDF_TOOLS_PATH defaults to HOME/.espressif on Linux and macOS, and %USER_PROFILE%\.espressif on Windows. Inside IDF_TOOLS_PATH , the scripts performing tools installation create the following directories: dist — where the archives of the tools are downloaded. tools — where the tools are extracted. The tools are extracted into subdirectories: tools/TOOL_NAME/VERSION/ . This arrangement allows different versions of tools to be installed side by side. GitHub Assets MirrorВ¶ Most of the tools downloaded by the tools installer are GitHub Release Assets, which are files attached to a software release on GitHub. If GitHub downloads are inaccessible or slow to access, it’s possible to configure a GitHub assets mirror. To use Espressif’s download server, set the environment variable IDF_GITHUB_ASSETS to dl.espressif.com/github_assets . When the install process is downloading a tool from github.com , the URL will be rewritten to use this server instead. Any mirror server can be used provided the URL matches the github.com download URL format: the install process will replace https://github.com with https://$ for any GitHub asset URL that it downloads. The Espressif download server doesn’t currently mirror everything from GitHub, it only mirrors files attached as Assets to some releases as well as source archives for some releases. idf_tools.py scriptВ¶ tools/idf_tools.py script bundled with ESP-IDF performs several functions: install : Download the tool into $/dist directory, extract it into $/tools/TOOL_NAME/VERSION . install command accepts the list of tools to install, in TOOL_NAME or TOOL_NAME@VERSION format. If all is given, all the tools (required and optional ones) are installed. If no argument or required is given, only the required tools are installed. download : Similar to install but doesn’t extract the tools. An optional —platform argument may be used to download the tools for the specific platform. export : Lists the environment variables which need to be set to use the installed tools. For most of the tools, setting PATH environment variable is sufficient, but some tools require extra environment variables. The environment variables can be listed in either of shell or key-value formats, set by —format parameter: shell produces output suitable for evaluation in the shell. For example, Источник
- Optional: Backup firmware Ensure the device is in firmware upload mode. Backup the current firmware with the following command: Erase firmware Ensure the device is in firmware upload mode. Erase the complete flash memory holding the firmware with the following command: NOTE2: It only takes a few seconds to erase 1M of flash. Upload firmware Ensure the device is in firmware upload mode. Load the downloaded Tasmota firmware file tasmota.bin with the following command: NOTE2: For a proper device initialization after first firmware upload power down and power up the device. ESPTOOL Executable (Windows & Linux) The executable version of esptool is maintained by Ivan Grokhotkov and releases are kept at https://github.com/igrr/esptool-ck/releases Download and Install For the purpose of simplicity only the Windows version will be explained here, but the command and parameters are the same for Windows, Linux and MAC/OSX. Download the latest release from https://github.com/igrr/esptool-ck/releases and extract the compressed file to a known location. Download Tasmota Download the latest Tasmota release firmware file tasmota.bin to a known folder (The same folder as where you have the esptool executable will work well for this process to be simpler) If you want features from the current development codebase which has not been included in the last release please download this tasmota.bin to a known folder (The same folder as where you have the esptool executable will work well for this process to be simpler) The information posted further up in this Wiki for placing the device into bootload / firmware upgrade mode may be followed as this process does not change irrespective whether you use the Python or executable version of esptool. Once the device is in firmware upload mode the following commands are recommended for completion of the firmware flashing. Erase the flash completely with the following command (substituting the COM port for the one which was used on your computer) esptool -cp COM3 -cb 115200 -ce -v Once the erase is complete, reset your device back into programming mode and then upload the firmware using the following command Источник Esp32 download tool linux ESP32 Flash Tool A desktop application for flashing production ESP32 firmware. App suports multiple platforms (Windows, MacOS, Linux) Simplify settings, clean UI and focus on mass manufacturing process where development and manufacturing are separated steps. ESP32 Flash Tool depends on pySerial version 3.0 or newer for serial communication with the target device. Hence, you should install Python before start run the app. To install pySerial manually by running something like: depending on your platform. (The official pySerial installation instructions are here). Firmware manufacturing process Imagine you have at least 5 steps from firmware development to flashing firmware into production board. The app would be used at Step 5 in the process flowing: Step 1: Develop & build firmware, you can use ESP32-IDF or Andruino core for esp32 Step 2: Build and get signed binary files Step 3: Create factory data specific binary file by using command line tools such as NVS Partition Generator Utility, Manufacturing Utility Step 5: Flash to ESP32 board by ESP32 Flash Tool Create a single compressed file for ESP32 Flash Tool ESP32 flash tool uses a single zipped file for flashing, just simply collect all required binaries, and create partitions.csv in the same folder then compress all into a zip file. partitions.csv file format ESP32 flash tool uses partitions.csv for identifying offsets of binary blobs. Sample of partitions.csv will be: About A simplify flashing tool of ESP32 boards on multiple platforms. Источник Downloadable ToolsВ¶ ESP-IDF build process relies on a number of tools: cross-compiler toolchains, CMake build system, and others. Installing the tools using an OS-specific package manager (like apt, yum, brew, etc.) is the preferred method when the required version of the tool is available. This recommendation is reflected in the Getting Started guide. For example, on Linux and macOS it is recommended to install CMake using an OS package manager. However, some of the tools are IDF-specific and are not available in OS package repositories. Furthermore, different versions of ESP-IDF require different versions of the tools to operate correctly. To solve these two problems, ESP-IDF provides a set of scripts for downloading and installing the correct versions of tools, and exposing them in the environment. The rest of the document refers to these downloadable tools simply as “tools”. Other kinds of tools used in ESP-IDF are: Python scripts bundled with ESP-IDF (such as idf.py ) Python packages installed from PyPI. The following sections explain the installation method, and provide the list of tools installed on each platform. This document is provided for advanced users who need to customize their installation, users who wish to understand the installation process, and ESP-IDF developers. If you are looking for instructions on how to install the tools, see the Getting Started Guide . Tools metadata fileВ¶ The list of tools and tool versions required for each platform is located in tools/tools.json. The schema of this file is defined by tools/tools_schema.json. This file is used by tools/idf_tools.py script when installing the tools or setting up the environment variables. Tools installation directoryВ¶ IDF_TOOLS_PATH environment variable specifies the location where the tools are to be downloaded and installed. If not set, IDF_TOOLS_PATH defaults to HOME/.espressif on Linux and macOS, and %USER_PROFILE%\.espressif on Windows. Inside IDF_TOOLS_PATH , the scripts performing tools installation create the following directories: dist — where the archives of the tools are downloaded. tools — where the tools are extracted. The tools are extracted into subdirectories: tools/TOOL_NAME/VERSION/ . This arrangement allows different versions of tools to be installed side by side. GitHub Assets MirrorВ¶ Most of the tools downloaded by the tools installer are GitHub Release Assets, which are files attached to a software release on GitHub. If GitHub downloads are inaccessible or slow to access, it’s possible to configure a GitHub assets mirror. To use Espressif’s download server, set the environment variable IDF_GITHUB_ASSETS to dl.espressif.com/github_assets . When the install process is downloading a tool from github.com , the URL will be rewritten to use this server instead. Any mirror server can be used provided the URL matches the github.com download URL format: the install process will replace https://github.com with https://$ for any GitHub asset URL that it downloads. The Espressif download server doesn’t currently mirror everything from GitHub, it only mirrors files attached as Assets to some releases as well as source archives for some releases. idf_tools.py scriptВ¶ tools/idf_tools.py script bundled with ESP-IDF performs several functions: install : Download the tool into $/dist directory, extract it into $/tools/TOOL_NAME/VERSION . install command accepts the list of tools to install, in TOOL_NAME or TOOL_NAME@VERSION format. If all is given, all the tools (required and optional ones) are installed. If no argument or required is given, only the required tools are installed. download : Similar to install but doesn’t extract the tools. An optional —platform argument may be used to download the tools for the specific platform. export : Lists the environment variables which need to be set to use the installed tools. For most of the tools, setting PATH environment variable is sufficient, but some tools require extra environment variables. The environment variables can be listed in either of shell or key-value formats, set by —format parameter: shell produces output suitable for evaluation in the shell. For example, Источник
- Erase firmware Ensure the device is in firmware upload mode. Erase the complete flash memory holding the firmware with the following command: NOTE2: It only takes a few seconds to erase 1M of flash. Upload firmware Ensure the device is in firmware upload mode. Load the downloaded Tasmota firmware file tasmota.bin with the following command: NOTE2: For a proper device initialization after first firmware upload power down and power up the device. ESPTOOL Executable (Windows & Linux) The executable version of esptool is maintained by Ivan Grokhotkov and releases are kept at https://github.com/igrr/esptool-ck/releases Download and Install For the purpose of simplicity only the Windows version will be explained here, but the command and parameters are the same for Windows, Linux and MAC/OSX. Download the latest release from https://github.com/igrr/esptool-ck/releases and extract the compressed file to a known location. Download Tasmota Download the latest Tasmota release firmware file tasmota.bin to a known folder (The same folder as where you have the esptool executable will work well for this process to be simpler) If you want features from the current development codebase which has not been included in the last release please download this tasmota.bin to a known folder (The same folder as where you have the esptool executable will work well for this process to be simpler) The information posted further up in this Wiki for placing the device into bootload / firmware upgrade mode may be followed as this process does not change irrespective whether you use the Python or executable version of esptool. Once the device is in firmware upload mode the following commands are recommended for completion of the firmware flashing. Erase the flash completely with the following command (substituting the COM port for the one which was used on your computer) esptool -cp COM3 -cb 115200 -ce -v Once the erase is complete, reset your device back into programming mode and then upload the firmware using the following command Источник Esp32 download tool linux ESP32 Flash Tool A desktop application for flashing production ESP32 firmware. App suports multiple platforms (Windows, MacOS, Linux) Simplify settings, clean UI and focus on mass manufacturing process where development and manufacturing are separated steps. ESP32 Flash Tool depends on pySerial version 3.0 or newer for serial communication with the target device. Hence, you should install Python before start run the app. To install pySerial manually by running something like: depending on your platform. (The official pySerial installation instructions are here). Firmware manufacturing process Imagine you have at least 5 steps from firmware development to flashing firmware into production board. The app would be used at Step 5 in the process flowing: Step 1: Develop & build firmware, you can use ESP32-IDF or Andruino core for esp32 Step 2: Build and get signed binary files Step 3: Create factory data specific binary file by using command line tools such as NVS Partition Generator Utility, Manufacturing Utility Step 5: Flash to ESP32 board by ESP32 Flash Tool Create a single compressed file for ESP32 Flash Tool ESP32 flash tool uses a single zipped file for flashing, just simply collect all required binaries, and create partitions.csv in the same folder then compress all into a zip file. partitions.csv file format ESP32 flash tool uses partitions.csv for identifying offsets of binary blobs. Sample of partitions.csv will be: About A simplify flashing tool of ESP32 boards on multiple platforms. Источник Downloadable ToolsВ¶ ESP-IDF build process relies on a number of tools: cross-compiler toolchains, CMake build system, and others. Installing the tools using an OS-specific package manager (like apt, yum, brew, etc.) is the preferred method when the required version of the tool is available. This recommendation is reflected in the Getting Started guide. For example, on Linux and macOS it is recommended to install CMake using an OS package manager. However, some of the tools are IDF-specific and are not available in OS package repositories. Furthermore, different versions of ESP-IDF require different versions of the tools to operate correctly. To solve these two problems, ESP-IDF provides a set of scripts for downloading and installing the correct versions of tools, and exposing them in the environment. The rest of the document refers to these downloadable tools simply as “tools”. Other kinds of tools used in ESP-IDF are: Python scripts bundled with ESP-IDF (such as idf.py ) Python packages installed from PyPI. The following sections explain the installation method, and provide the list of tools installed on each platform. This document is provided for advanced users who need to customize their installation, users who wish to understand the installation process, and ESP-IDF developers. If you are looking for instructions on how to install the tools, see the Getting Started Guide . Tools metadata fileВ¶ The list of tools and tool versions required for each platform is located in tools/tools.json. The schema of this file is defined by tools/tools_schema.json. This file is used by tools/idf_tools.py script when installing the tools or setting up the environment variables. Tools installation directoryВ¶ IDF_TOOLS_PATH environment variable specifies the location where the tools are to be downloaded and installed. If not set, IDF_TOOLS_PATH defaults to HOME/.espressif on Linux and macOS, and %USER_PROFILE%\.espressif on Windows. Inside IDF_TOOLS_PATH , the scripts performing tools installation create the following directories: dist — where the archives of the tools are downloaded. tools — where the tools are extracted. The tools are extracted into subdirectories: tools/TOOL_NAME/VERSION/ . This arrangement allows different versions of tools to be installed side by side. GitHub Assets MirrorВ¶ Most of the tools downloaded by the tools installer are GitHub Release Assets, which are files attached to a software release on GitHub. If GitHub downloads are inaccessible or slow to access, it’s possible to configure a GitHub assets mirror. To use Espressif’s download server, set the environment variable IDF_GITHUB_ASSETS to dl.espressif.com/github_assets . When the install process is downloading a tool from github.com , the URL will be rewritten to use this server instead. Any mirror server can be used provided the URL matches the github.com download URL format: the install process will replace https://github.com with https://$ for any GitHub asset URL that it downloads. The Espressif download server doesn’t currently mirror everything from GitHub, it only mirrors files attached as Assets to some releases as well as source archives for some releases. idf_tools.py scriptВ¶ tools/idf_tools.py script bundled with ESP-IDF performs several functions: install : Download the tool into $/dist directory, extract it into $/tools/TOOL_NAME/VERSION . install command accepts the list of tools to install, in TOOL_NAME or TOOL_NAME@VERSION format. If all is given, all the tools (required and optional ones) are installed. If no argument or required is given, only the required tools are installed. download : Similar to install but doesn’t extract the tools. An optional —platform argument may be used to download the tools for the specific platform. export : Lists the environment variables which need to be set to use the installed tools. For most of the tools, setting PATH environment variable is sufficient, but some tools require extra environment variables. The environment variables can be listed in either of shell or key-value formats, set by —format parameter: shell produces output suitable for evaluation in the shell. For example, Источник
- Upload firmware Ensure the device is in firmware upload mode. Load the downloaded Tasmota firmware file tasmota.bin with the following command: NOTE2: For a proper device initialization after first firmware upload power down and power up the device. ESPTOOL Executable (Windows & Linux) The executable version of esptool is maintained by Ivan Grokhotkov and releases are kept at https://github.com/igrr/esptool-ck/releases Download and Install For the purpose of simplicity only the Windows version will be explained here, but the command and parameters are the same for Windows, Linux and MAC/OSX. Download the latest release from https://github.com/igrr/esptool-ck/releases and extract the compressed file to a known location. Download Tasmota Download the latest Tasmota release firmware file tasmota.bin to a known folder (The same folder as where you have the esptool executable will work well for this process to be simpler) If you want features from the current development codebase which has not been included in the last release please download this tasmota.bin to a known folder (The same folder as where you have the esptool executable will work well for this process to be simpler) The information posted further up in this Wiki for placing the device into bootload / firmware upgrade mode may be followed as this process does not change irrespective whether you use the Python or executable version of esptool. Once the device is in firmware upload mode the following commands are recommended for completion of the firmware flashing. Erase the flash completely with the following command (substituting the COM port for the one which was used on your computer) esptool -cp COM3 -cb 115200 -ce -v Once the erase is complete, reset your device back into programming mode and then upload the firmware using the following command Источник Esp32 download tool linux ESP32 Flash Tool A desktop application for flashing production ESP32 firmware. App suports multiple platforms (Windows, MacOS, Linux) Simplify settings, clean UI and focus on mass manufacturing process where development and manufacturing are separated steps. ESP32 Flash Tool depends on pySerial version 3.0 or newer for serial communication with the target device. Hence, you should install Python before start run the app. To install pySerial manually by running something like: depending on your platform. (The official pySerial installation instructions are here). Firmware manufacturing process Imagine you have at least 5 steps from firmware development to flashing firmware into production board. The app would be used at Step 5 in the process flowing: Step 1: Develop & build firmware, you can use ESP32-IDF or Andruino core for esp32 Step 2: Build and get signed binary files Step 3: Create factory data specific binary file by using command line tools such as NVS Partition Generator Utility, Manufacturing Utility Step 5: Flash to ESP32 board by ESP32 Flash Tool Create a single compressed file for ESP32 Flash Tool ESP32 flash tool uses a single zipped file for flashing, just simply collect all required binaries, and create partitions.csv in the same folder then compress all into a zip file. partitions.csv file format ESP32 flash tool uses partitions.csv for identifying offsets of binary blobs. Sample of partitions.csv will be: About A simplify flashing tool of ESP32 boards on multiple platforms. Источник Downloadable ToolsВ¶ ESP-IDF build process relies on a number of tools: cross-compiler toolchains, CMake build system, and others. Installing the tools using an OS-specific package manager (like apt, yum, brew, etc.) is the preferred method when the required version of the tool is available. This recommendation is reflected in the Getting Started guide. For example, on Linux and macOS it is recommended to install CMake using an OS package manager. However, some of the tools are IDF-specific and are not available in OS package repositories. Furthermore, different versions of ESP-IDF require different versions of the tools to operate correctly. To solve these two problems, ESP-IDF provides a set of scripts for downloading and installing the correct versions of tools, and exposing them in the environment. The rest of the document refers to these downloadable tools simply as “tools”. Other kinds of tools used in ESP-IDF are: Python scripts bundled with ESP-IDF (such as idf.py ) Python packages installed from PyPI. The following sections explain the installation method, and provide the list of tools installed on each platform. This document is provided for advanced users who need to customize their installation, users who wish to understand the installation process, and ESP-IDF developers. If you are looking for instructions on how to install the tools, see the Getting Started Guide . Tools metadata fileВ¶ The list of tools and tool versions required for each platform is located in tools/tools.json. The schema of this file is defined by tools/tools_schema.json. This file is used by tools/idf_tools.py script when installing the tools or setting up the environment variables. Tools installation directoryВ¶ IDF_TOOLS_PATH environment variable specifies the location where the tools are to be downloaded and installed. If not set, IDF_TOOLS_PATH defaults to HOME/.espressif on Linux and macOS, and %USER_PROFILE%\.espressif on Windows. Inside IDF_TOOLS_PATH , the scripts performing tools installation create the following directories: dist — where the archives of the tools are downloaded. tools — where the tools are extracted. The tools are extracted into subdirectories: tools/TOOL_NAME/VERSION/ . This arrangement allows different versions of tools to be installed side by side. GitHub Assets MirrorВ¶ Most of the tools downloaded by the tools installer are GitHub Release Assets, which are files attached to a software release on GitHub. If GitHub downloads are inaccessible or slow to access, it’s possible to configure a GitHub assets mirror. To use Espressif’s download server, set the environment variable IDF_GITHUB_ASSETS to dl.espressif.com/github_assets . When the install process is downloading a tool from github.com , the URL will be rewritten to use this server instead. Any mirror server can be used provided the URL matches the github.com download URL format: the install process will replace https://github.com with https://$ for any GitHub asset URL that it downloads. The Espressif download server doesn’t currently mirror everything from GitHub, it only mirrors files attached as Assets to some releases as well as source archives for some releases. idf_tools.py scriptВ¶ tools/idf_tools.py script bundled with ESP-IDF performs several functions: install : Download the tool into $/dist directory, extract it into $/tools/TOOL_NAME/VERSION . install command accepts the list of tools to install, in TOOL_NAME or TOOL_NAME@VERSION format. If all is given, all the tools (required and optional ones) are installed. If no argument or required is given, only the required tools are installed. download : Similar to install but doesn’t extract the tools. An optional —platform argument may be used to download the tools for the specific platform. export : Lists the environment variables which need to be set to use the installed tools. For most of the tools, setting PATH environment variable is sufficient, but some tools require extra environment variables. The environment variables can be listed in either of shell or key-value formats, set by —format parameter: shell produces output suitable for evaluation in the shell. For example, Источник
- ESPTOOL Executable (Windows & Linux) The executable version of esptool is maintained by Ivan Grokhotkov and releases are kept at https://github.com/igrr/esptool-ck/releases Download and Install For the purpose of simplicity only the Windows version will be explained here, but the command and parameters are the same for Windows, Linux and MAC/OSX. Download the latest release from https://github.com/igrr/esptool-ck/releases and extract the compressed file to a known location. Download Tasmota Download the latest Tasmota release firmware file tasmota.bin to a known folder (The same folder as where you have the esptool executable will work well for this process to be simpler) If you want features from the current development codebase which has not been included in the last release please download this tasmota.bin to a known folder (The same folder as where you have the esptool executable will work well for this process to be simpler) The information posted further up in this Wiki for placing the device into bootload / firmware upgrade mode may be followed as this process does not change irrespective whether you use the Python or executable version of esptool. Once the device is in firmware upload mode the following commands are recommended for completion of the firmware flashing. Erase the flash completely with the following command (substituting the COM port for the one which was used on your computer) esptool -cp COM3 -cb 115200 -ce -v Once the erase is complete, reset your device back into programming mode and then upload the firmware using the following command Источник Esp32 download tool linux ESP32 Flash Tool A desktop application for flashing production ESP32 firmware. App suports multiple platforms (Windows, MacOS, Linux) Simplify settings, clean UI and focus on mass manufacturing process where development and manufacturing are separated steps. ESP32 Flash Tool depends on pySerial version 3.0 or newer for serial communication with the target device. Hence, you should install Python before start run the app. To install pySerial manually by running something like: depending on your platform. (The official pySerial installation instructions are here). Firmware manufacturing process Imagine you have at least 5 steps from firmware development to flashing firmware into production board. The app would be used at Step 5 in the process flowing: Step 1: Develop & build firmware, you can use ESP32-IDF or Andruino core for esp32 Step 2: Build and get signed binary files Step 3: Create factory data specific binary file by using command line tools such as NVS Partition Generator Utility, Manufacturing Utility Step 5: Flash to ESP32 board by ESP32 Flash Tool Create a single compressed file for ESP32 Flash Tool ESP32 flash tool uses a single zipped file for flashing, just simply collect all required binaries, and create partitions.csv in the same folder then compress all into a zip file. partitions.csv file format ESP32 flash tool uses partitions.csv for identifying offsets of binary blobs. Sample of partitions.csv will be: About A simplify flashing tool of ESP32 boards on multiple platforms. Источник Downloadable ToolsВ¶ ESP-IDF build process relies on a number of tools: cross-compiler toolchains, CMake build system, and others. Installing the tools using an OS-specific package manager (like apt, yum, brew, etc.) is the preferred method when the required version of the tool is available. This recommendation is reflected in the Getting Started guide. For example, on Linux and macOS it is recommended to install CMake using an OS package manager. However, some of the tools are IDF-specific and are not available in OS package repositories. Furthermore, different versions of ESP-IDF require different versions of the tools to operate correctly. To solve these two problems, ESP-IDF provides a set of scripts for downloading and installing the correct versions of tools, and exposing them in the environment. The rest of the document refers to these downloadable tools simply as “tools”. Other kinds of tools used in ESP-IDF are: Python scripts bundled with ESP-IDF (such as idf.py ) Python packages installed from PyPI. The following sections explain the installation method, and provide the list of tools installed on each platform. This document is provided for advanced users who need to customize their installation, users who wish to understand the installation process, and ESP-IDF developers. If you are looking for instructions on how to install the tools, see the Getting Started Guide . Tools metadata fileВ¶ The list of tools and tool versions required for each platform is located in tools/tools.json. The schema of this file is defined by tools/tools_schema.json. This file is used by tools/idf_tools.py script when installing the tools or setting up the environment variables. Tools installation directoryВ¶ IDF_TOOLS_PATH environment variable specifies the location where the tools are to be downloaded and installed. If not set, IDF_TOOLS_PATH defaults to HOME/.espressif on Linux and macOS, and %USER_PROFILE%\.espressif on Windows. Inside IDF_TOOLS_PATH , the scripts performing tools installation create the following directories: dist — where the archives of the tools are downloaded. tools — where the tools are extracted. The tools are extracted into subdirectories: tools/TOOL_NAME/VERSION/ . This arrangement allows different versions of tools to be installed side by side. GitHub Assets MirrorВ¶ Most of the tools downloaded by the tools installer are GitHub Release Assets, which are files attached to a software release on GitHub. If GitHub downloads are inaccessible or slow to access, it’s possible to configure a GitHub assets mirror. To use Espressif’s download server, set the environment variable IDF_GITHUB_ASSETS to dl.espressif.com/github_assets . When the install process is downloading a tool from github.com , the URL will be rewritten to use this server instead. Any mirror server can be used provided the URL matches the github.com download URL format: the install process will replace https://github.com with https://$ for any GitHub asset URL that it downloads. The Espressif download server doesn’t currently mirror everything from GitHub, it only mirrors files attached as Assets to some releases as well as source archives for some releases. idf_tools.py scriptВ¶ tools/idf_tools.py script bundled with ESP-IDF performs several functions: install : Download the tool into $/dist directory, extract it into $/tools/TOOL_NAME/VERSION . install command accepts the list of tools to install, in TOOL_NAME or TOOL_NAME@VERSION format. If all is given, all the tools (required and optional ones) are installed. If no argument or required is given, only the required tools are installed. download : Similar to install but doesn’t extract the tools. An optional —platform argument may be used to download the tools for the specific platform. export : Lists the environment variables which need to be set to use the installed tools. For most of the tools, setting PATH environment variable is sufficient, but some tools require extra environment variables. The environment variables can be listed in either of shell or key-value formats, set by —format parameter: shell produces output suitable for evaluation in the shell. For example, Источник
- Download and Install For the purpose of simplicity only the Windows version will be explained here, but the command and parameters are the same for Windows, Linux and MAC/OSX. Download the latest release from https://github.com/igrr/esptool-ck/releases and extract the compressed file to a known location. Download Tasmota Download the latest Tasmota release firmware file tasmota.bin to a known folder (The same folder as where you have the esptool executable will work well for this process to be simpler) If you want features from the current development codebase which has not been included in the last release please download this tasmota.bin to a known folder (The same folder as where you have the esptool executable will work well for this process to be simpler) The information posted further up in this Wiki for placing the device into bootload / firmware upgrade mode may be followed as this process does not change irrespective whether you use the Python or executable version of esptool. Once the device is in firmware upload mode the following commands are recommended for completion of the firmware flashing. Erase the flash completely with the following command (substituting the COM port for the one which was used on your computer) esptool -cp COM3 -cb 115200 -ce -v Once the erase is complete, reset your device back into programming mode and then upload the firmware using the following command Источник Esp32 download tool linux ESP32 Flash Tool A desktop application for flashing production ESP32 firmware. App suports multiple platforms (Windows, MacOS, Linux) Simplify settings, clean UI and focus on mass manufacturing process where development and manufacturing are separated steps. ESP32 Flash Tool depends on pySerial version 3.0 or newer for serial communication with the target device. Hence, you should install Python before start run the app. To install pySerial manually by running something like: depending on your platform. (The official pySerial installation instructions are here). Firmware manufacturing process Imagine you have at least 5 steps from firmware development to flashing firmware into production board. The app would be used at Step 5 in the process flowing: Step 1: Develop & build firmware, you can use ESP32-IDF or Andruino core for esp32 Step 2: Build and get signed binary files Step 3: Create factory data specific binary file by using command line tools such as NVS Partition Generator Utility, Manufacturing Utility Step 5: Flash to ESP32 board by ESP32 Flash Tool Create a single compressed file for ESP32 Flash Tool ESP32 flash tool uses a single zipped file for flashing, just simply collect all required binaries, and create partitions.csv in the same folder then compress all into a zip file. partitions.csv file format ESP32 flash tool uses partitions.csv for identifying offsets of binary blobs. Sample of partitions.csv will be: About A simplify flashing tool of ESP32 boards on multiple platforms. Источник Downloadable ToolsВ¶ ESP-IDF build process relies on a number of tools: cross-compiler toolchains, CMake build system, and others. Installing the tools using an OS-specific package manager (like apt, yum, brew, etc.) is the preferred method when the required version of the tool is available. This recommendation is reflected in the Getting Started guide. For example, on Linux and macOS it is recommended to install CMake using an OS package manager. However, some of the tools are IDF-specific and are not available in OS package repositories. Furthermore, different versions of ESP-IDF require different versions of the tools to operate correctly. To solve these two problems, ESP-IDF provides a set of scripts for downloading and installing the correct versions of tools, and exposing them in the environment. The rest of the document refers to these downloadable tools simply as “tools”. Other kinds of tools used in ESP-IDF are: Python scripts bundled with ESP-IDF (such as idf.py ) Python packages installed from PyPI. The following sections explain the installation method, and provide the list of tools installed on each platform. This document is provided for advanced users who need to customize their installation, users who wish to understand the installation process, and ESP-IDF developers. If you are looking for instructions on how to install the tools, see the Getting Started Guide . Tools metadata fileВ¶ The list of tools and tool versions required for each platform is located in tools/tools.json. The schema of this file is defined by tools/tools_schema.json. This file is used by tools/idf_tools.py script when installing the tools or setting up the environment variables. Tools installation directoryВ¶ IDF_TOOLS_PATH environment variable specifies the location where the tools are to be downloaded and installed. If not set, IDF_TOOLS_PATH defaults to HOME/.espressif on Linux and macOS, and %USER_PROFILE%\.espressif on Windows. Inside IDF_TOOLS_PATH , the scripts performing tools installation create the following directories: dist — where the archives of the tools are downloaded. tools — where the tools are extracted. The tools are extracted into subdirectories: tools/TOOL_NAME/VERSION/ . This arrangement allows different versions of tools to be installed side by side. GitHub Assets MirrorВ¶ Most of the tools downloaded by the tools installer are GitHub Release Assets, which are files attached to a software release on GitHub. If GitHub downloads are inaccessible or slow to access, it’s possible to configure a GitHub assets mirror. To use Espressif’s download server, set the environment variable IDF_GITHUB_ASSETS to dl.espressif.com/github_assets . When the install process is downloading a tool from github.com , the URL will be rewritten to use this server instead. Any mirror server can be used provided the URL matches the github.com download URL format: the install process will replace https://github.com with https://$ for any GitHub asset URL that it downloads. The Espressif download server doesn’t currently mirror everything from GitHub, it only mirrors files attached as Assets to some releases as well as source archives for some releases. idf_tools.py scriptВ¶ tools/idf_tools.py script bundled with ESP-IDF performs several functions: install : Download the tool into $/dist directory, extract it into $/tools/TOOL_NAME/VERSION . install command accepts the list of tools to install, in TOOL_NAME or TOOL_NAME@VERSION format. If all is given, all the tools (required and optional ones) are installed. If no argument or required is given, only the required tools are installed. download : Similar to install but doesn’t extract the tools. An optional —platform argument may be used to download the tools for the specific platform. export : Lists the environment variables which need to be set to use the installed tools. For most of the tools, setting PATH environment variable is sufficient, but some tools require extra environment variables. The environment variables can be listed in either of shell or key-value formats, set by —format parameter: shell produces output suitable for evaluation in the shell. For example, Источник
- Download Tasmota Download the latest Tasmota release firmware file tasmota.bin to a known folder (The same folder as where you have the esptool executable will work well for this process to be simpler) If you want features from the current development codebase which has not been included in the last release please download this tasmota.bin to a known folder (The same folder as where you have the esptool executable will work well for this process to be simpler) The information posted further up in this Wiki for placing the device into bootload / firmware upgrade mode may be followed as this process does not change irrespective whether you use the Python or executable version of esptool. Once the device is in firmware upload mode the following commands are recommended for completion of the firmware flashing. Erase the flash completely with the following command (substituting the COM port for the one which was used on your computer) esptool -cp COM3 -cb 115200 -ce -v Once the erase is complete, reset your device back into programming mode and then upload the firmware using the following command Источник Esp32 download tool linux ESP32 Flash Tool A desktop application for flashing production ESP32 firmware. App suports multiple platforms (Windows, MacOS, Linux) Simplify settings, clean UI and focus on mass manufacturing process where development and manufacturing are separated steps. ESP32 Flash Tool depends on pySerial version 3.0 or newer for serial communication with the target device. Hence, you should install Python before start run the app. To install pySerial manually by running something like: depending on your platform. (The official pySerial installation instructions are here). Firmware manufacturing process Imagine you have at least 5 steps from firmware development to flashing firmware into production board. The app would be used at Step 5 in the process flowing: Step 1: Develop & build firmware, you can use ESP32-IDF or Andruino core for esp32 Step 2: Build and get signed binary files Step 3: Create factory data specific binary file by using command line tools such as NVS Partition Generator Utility, Manufacturing Utility Step 5: Flash to ESP32 board by ESP32 Flash Tool Create a single compressed file for ESP32 Flash Tool ESP32 flash tool uses a single zipped file for flashing, just simply collect all required binaries, and create partitions.csv in the same folder then compress all into a zip file. partitions.csv file format ESP32 flash tool uses partitions.csv for identifying offsets of binary blobs. Sample of partitions.csv will be: About A simplify flashing tool of ESP32 boards on multiple platforms. Источник Downloadable ToolsВ¶ ESP-IDF build process relies on a number of tools: cross-compiler toolchains, CMake build system, and others. Installing the tools using an OS-specific package manager (like apt, yum, brew, etc.) is the preferred method when the required version of the tool is available. This recommendation is reflected in the Getting Started guide. For example, on Linux and macOS it is recommended to install CMake using an OS package manager. However, some of the tools are IDF-specific and are not available in OS package repositories. Furthermore, different versions of ESP-IDF require different versions of the tools to operate correctly. To solve these two problems, ESP-IDF provides a set of scripts for downloading and installing the correct versions of tools, and exposing them in the environment. The rest of the document refers to these downloadable tools simply as “tools”. Other kinds of tools used in ESP-IDF are: Python scripts bundled with ESP-IDF (such as idf.py ) Python packages installed from PyPI. The following sections explain the installation method, and provide the list of tools installed on each platform. This document is provided for advanced users who need to customize their installation, users who wish to understand the installation process, and ESP-IDF developers. If you are looking for instructions on how to install the tools, see the Getting Started Guide . Tools metadata fileВ¶ The list of tools and tool versions required for each platform is located in tools/tools.json. The schema of this file is defined by tools/tools_schema.json. This file is used by tools/idf_tools.py script when installing the tools or setting up the environment variables. Tools installation directoryВ¶ IDF_TOOLS_PATH environment variable specifies the location where the tools are to be downloaded and installed. If not set, IDF_TOOLS_PATH defaults to HOME/.espressif on Linux and macOS, and %USER_PROFILE%\.espressif on Windows. Inside IDF_TOOLS_PATH , the scripts performing tools installation create the following directories: dist — where the archives of the tools are downloaded. tools — where the tools are extracted. The tools are extracted into subdirectories: tools/TOOL_NAME/VERSION/ . This arrangement allows different versions of tools to be installed side by side. GitHub Assets MirrorВ¶ Most of the tools downloaded by the tools installer are GitHub Release Assets, which are files attached to a software release on GitHub. If GitHub downloads are inaccessible or slow to access, it’s possible to configure a GitHub assets mirror. To use Espressif’s download server, set the environment variable IDF_GITHUB_ASSETS to dl.espressif.com/github_assets . When the install process is downloading a tool from github.com , the URL will be rewritten to use this server instead. Any mirror server can be used provided the URL matches the github.com download URL format: the install process will replace https://github.com with https://$ for any GitHub asset URL that it downloads. The Espressif download server doesn’t currently mirror everything from GitHub, it only mirrors files attached as Assets to some releases as well as source archives for some releases. idf_tools.py scriptВ¶ tools/idf_tools.py script bundled with ESP-IDF performs several functions: install : Download the tool into $/dist directory, extract it into $/tools/TOOL_NAME/VERSION . install command accepts the list of tools to install, in TOOL_NAME or TOOL_NAME@VERSION format. If all is given, all the tools (required and optional ones) are installed. If no argument or required is given, only the required tools are installed. download : Similar to install but doesn’t extract the tools. An optional —platform argument may be used to download the tools for the specific platform. export : Lists the environment variables which need to be set to use the installed tools. For most of the tools, setting PATH environment variable is sufficient, but some tools require extra environment variables. The environment variables can be listed in either of shell or key-value formats, set by —format parameter: shell produces output suitable for evaluation in the shell. For example, Источник
- Esp32 download tool linux
- About
- Downloadable Tools
- Tools metadata file
- Tools installation directory
- GitHub Assets Mirror
- idf_tools.py script
Flashing
The programming procedures for flashing an ESP82xx and ESP32 via the serial port differ slightly.
In general the steps are the same to enter flashing mode on both types ESP boards:
Boot the node with GPIO-0 connected to GND
Start the flashing procedure
Most boards which already have an USB to serial on board, also have some circuit present to help booting into flash mode via the USB port. Such a circuit consists of 2 transistors and a few resistors to trigger the reset and GPIO-0 pin in the correct sequence. All flashing software is able to use this way of bootstrapping.
Some flashing tools also support different methods and thus require a parameter indicating the specific method to boot into flash mode. For ESP boards with an USB to serial adapter on board, the needed boot method is referred to as “NodeMCU” or some abbreviation of this name.
Flashing Software
A number of flashing tools is included in the nightly build ZIP files. The included tools are all for Windows.
ESP.Easy.Flasher.exe A flasher with graphic UI written by Grovkillen. This tool can also be used to send a number of commands to prepare the unit while still connected to the PC. For example to configure WiFi.
esptool.exe A command line ESP8266/ESP32 build and upload helper tool, maintained by Ivan Grokhotkov
FlashESP8266.exe A very simple flash tool “ESPEasy Flasher” for ESP82xx. Should be called from the same directory as the compiled bin files: C:\Download\ESPEasy\bin> ..\FlashESP8266.exe
Espressif Flash Download Tool located in the directory Espressif_flash_download_tool_v3.8.5 . New versions can be found Espressif Download
For Linux or Mac users, the recommended tool for ESP82xx/ESP32 is esptool.py
Flashing Parameters
Some flash tools allow to set specific parameters, like flash chip related settings. Those parameters are also defined in the compiled .bin files, but when set in the flash tool they are overridden for the boot sequence. As soon as the ESPEasy code is executed, the configured parameters at compile time will be used.
N.B. Not all parameters can be set in all flashing tools.
See the documentation of the flash tool for more information.
Baud Rate
Most flashing tools allow to set the communication speed. It is advised to use a baud rate of 115200 bps as this seems to be the best trade off between flashing speed and success rate. However it is possible to select a higher baud rate, which may reduce flashing time significantly.
Boards using a FTDI USB to serial chip seem to work fine when flashing at rates of upto 921600 bps. When they fail, it is often presented as a timeout. Try again with flashing at a lower baud rate.
Boards using a CH340 USB to serial chip are less likely to handle high baud rates without errors.
Crystal
On ESP8266, the tool will overwrite the 48th byte of RF parameter(default_init_data.bin) if chosen. This option will do nothing for ESP32 chips.
SPI Speed
This is the SPI clock speed to read/write SPI flash. (40Mhz default)
Usually 40Mhz is enough and safe, if you want to enable 80Mhz for SPI flash, make sure:
The flash you are using support 80Mhz.
Your PCB layout is good enough for 80Mhz.
The configure byte is in the 4th byte from flash address 0x0. So the tool will overwrite the 4th byte of bin file which is to be written to 0x0 address.
SPI Mode
This sets the SPI data mode for flash R/W operations.
From fastest to slowest mode:
QIO/QOUT: use /HOLD and /WP pin as SPI data2/data3, make sure your flash support Quad instructions before select. QIO and QOUT are almost the same. “QIO” will send address in quad mode, where “QOUT” will not.
DIO/DOUT: Use Dual mode instructions to read/write flash. DIO and DOUT are almost the same. “DIO” will send address in Dual mode, where “DOUT” will not.
Almost all flash chips used on ESP32 support DIO/DOUT mode.
Almost all ESPEasy builds are set to use “DOUT” mode.
ESP82xx
ESPEasy builds based on esp8266/Arduino library version 2.7.x and later can handle compressed .bin.gz files. When in doubt, just use the .bin files.
ESP32В
Flashing ESP32 nodes is slightly more complex compared to ESP82xx.
The main differences:
The binary layout on the flash is split in several parts each with their own specific offset from the start of the flash block.
ESP32 allows to have several fuses set (flags which can be set only once)
Most tutorials show the Espressif Download Tool with a number of separate binaries each with their own offset. This is rather error prone, and therefore the ESPEasy build process creates 2 different .bin files.
A binary with factory in the file name, used for flashing via serial.
A binary without factory in the file name, used for flashing via the web interface.
The factory bin file has all separate binaries with their offsets included in a single file. Therefore the needed offset for this factory bin file should be set to 0. (starting at the begin of the flash area)
When the ESP board later needs to update the firmware to a different version, there is no need for a serial connection. This can be done “OTA” (over the air) via the web interface. For OTA updates, use the bin file without factory in the file name.
Flash ESP32 with Espressif Download Tool
Select “Developer Mode”
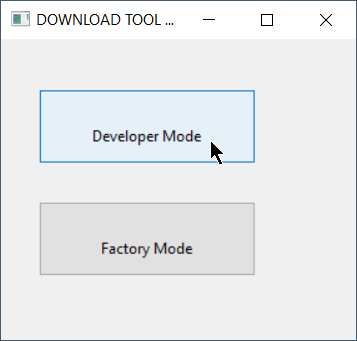
Select “ESP32 DownloadTool”
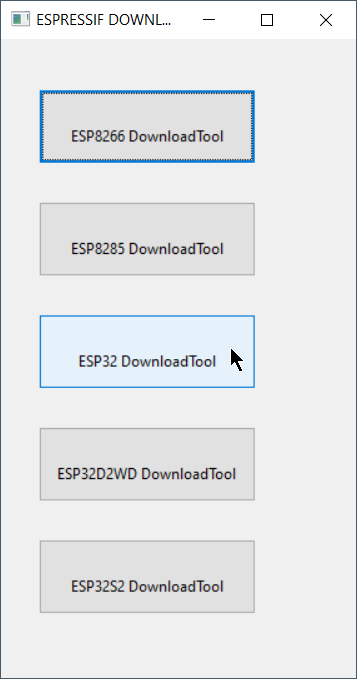
Select the bin file and offset of 0В
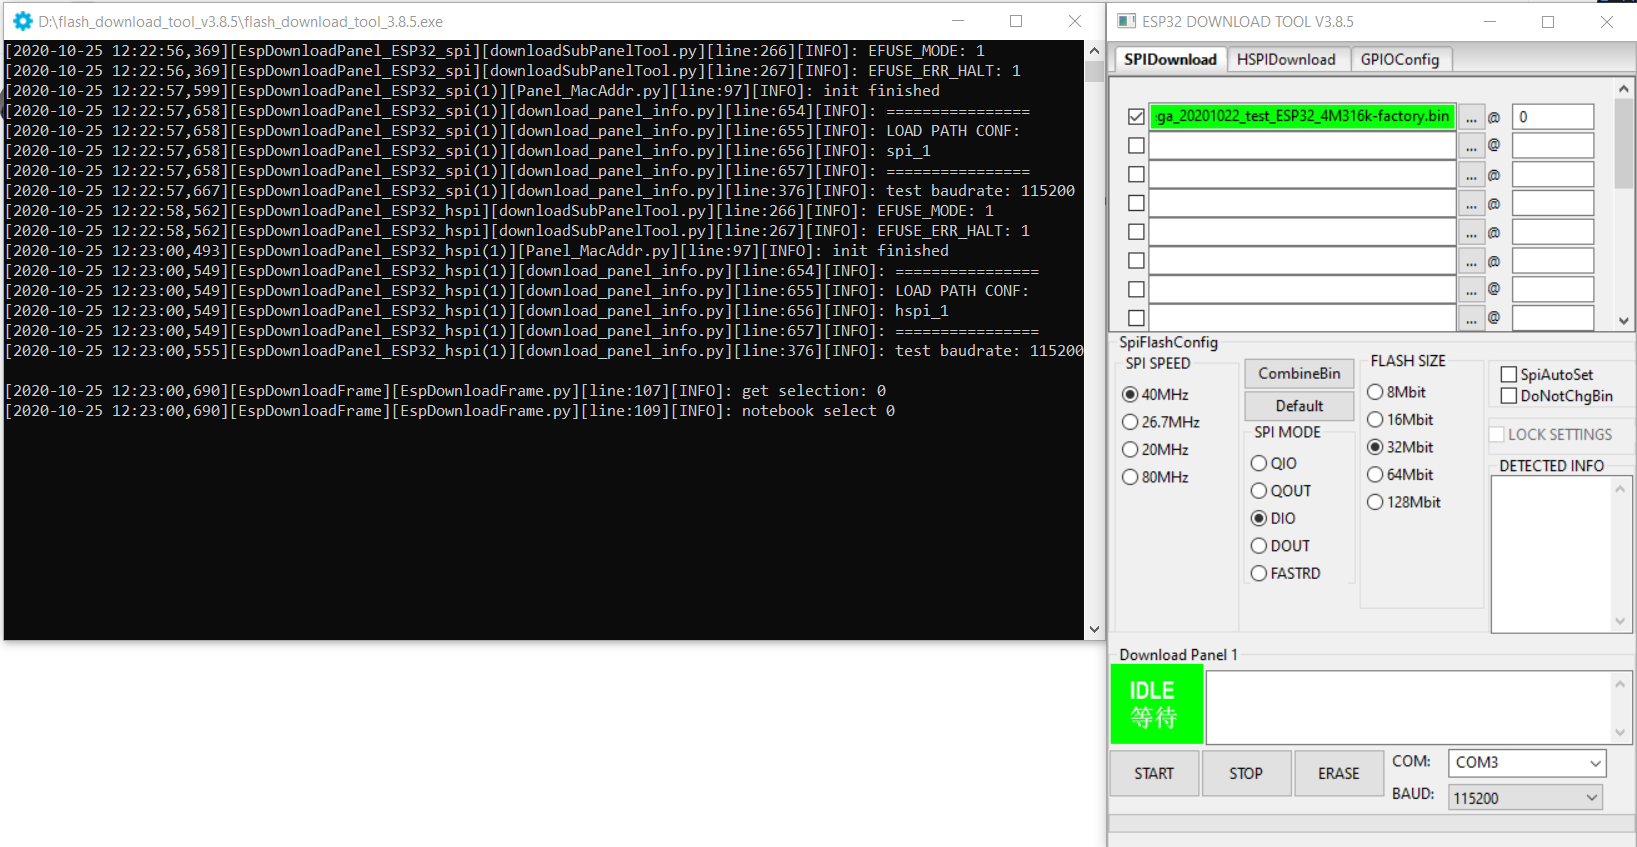
Double check all parameters and start flashing
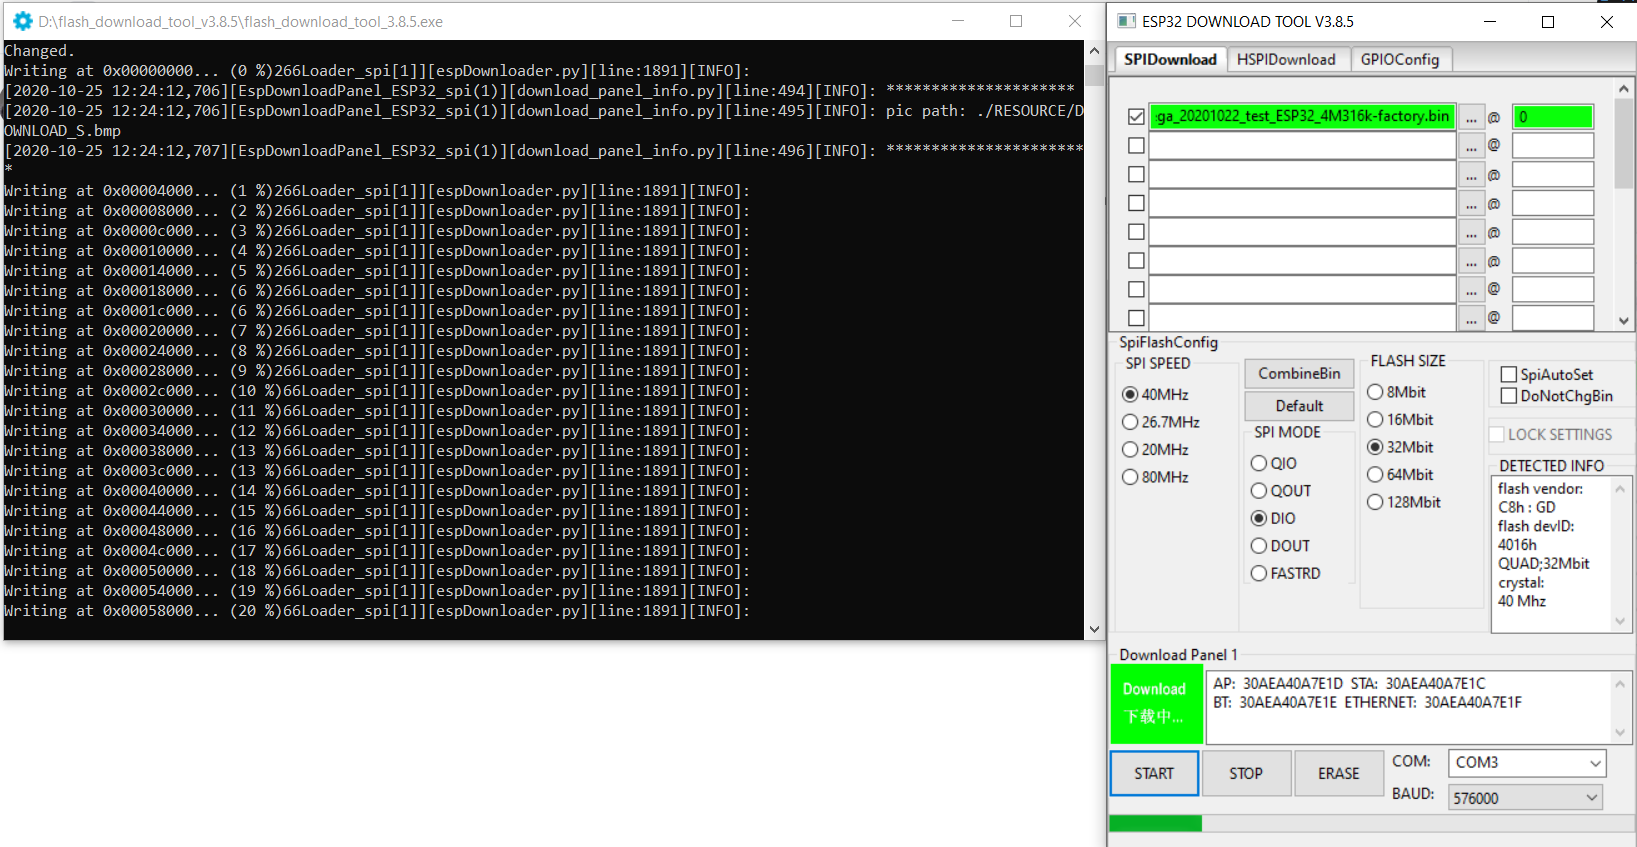
Support us by using one of these alternatives: Patreon Ko-Fi PayPal
© Copyright 2018-2021, ESP Easy.
Created using Sphinx 4.0.2.
Источник
Esptool
How to setup and configure Esptool for Tasmota upload.
The information below is for the Python version of esptool — If you want to use the Windows/Linux/OSX(MAC) executable version of esptool (as would be included in Arduino ESP8266 cores) then please go to the esptool executable (Windows & Linux) section at the bottom.
Download Esptool
If you do not have an installed copy of Python 2.x or 3.x download and install it from https://www.python.org/.
Download Esptool Source code from https://github.com/espressif/esptool/releases to a known folder.
Install Esptool
Go to the known folder and install Esptool with command python setup.py install .
Packages for Esptool are maintained for Debian and Ubuntu and can be installed with sudo apt install esptool .
Download Tasmota
Download the latest Tasmota release firmware file tasmota.bin to a known folder.
Upload Tasmota Put device in firmware upload mode
When performing a firmware upload do not connect the device to AC but use the power supply provided by your (FTDI type) serial interface.
Put the device in firmware upload mode by grounding pin GPIO00 while applying power.
Grounding pin GPIO00 can often be achieved by pressing button 1 on the Sonoff device or using a wire between GPIO00 and Gnd if the button is not available. Deviations may apply.
Connect the serial interface of your PC to the device while GPIO00 to Gnd.
Esptool uses the serial interface to communicate with your device. On Windows these interfaces are named COM1, COM2 etc. On Linux these interfaces are called /dev/ttyUSB0, /dev/ttyUSB1 etc.
Before using Esptool make sure you know to which serial interface name your device is connected to.
In the following commands I use COM5 as an example.
Optional: Backup firmware
Ensure the device is in firmware upload mode.
Backup the current firmware with the following command:
Erase firmware
Ensure the device is in firmware upload mode.
Erase the complete flash memory holding the firmware with the following command:
NOTE2: It only takes a few seconds to erase 1M of flash.
Upload firmware
Ensure the device is in firmware upload mode.
Load the downloaded Tasmota firmware file tasmota.bin with the following command:
NOTE2: For a proper device initialization after first firmware upload power down and power up the device.
ESPTOOL Executable (Windows & Linux)
The executable version of esptool is maintained by Ivan Grokhotkov and releases are kept at https://github.com/igrr/esptool-ck/releases
Download and Install
For the purpose of simplicity only the Windows version will be explained here, but the command and parameters are the same for Windows, Linux and MAC/OSX.
Download the latest release from https://github.com/igrr/esptool-ck/releases and extract the compressed file to a known location.
Download Tasmota
Download the latest Tasmota release firmware file tasmota.bin to a known folder (The same folder as where you have the esptool executable will work well for this process to be simpler)
If you want features from the current development codebase which has not been included in the last release please download this tasmota.bin to a known folder (The same folder as where you have the esptool executable will work well for this process to be simpler)
The information posted further up in this Wiki for placing the device into bootload / firmware upgrade mode may be followed as this process does not change irrespective whether you use the Python or executable version of esptool.
Once the device is in firmware upload mode the following commands are recommended for completion of the firmware flashing.
Erase the flash completely with the following command (substituting the COM port for the one which was used on your computer)
esptool -cp COM3 -cb 115200 -ce -v
Once the erase is complete, reset your device back into programming mode and then upload the firmware using the following command
Источник
Esp32 download tool linux
ESP32 Flash Tool
A desktop application for flashing production ESP32 firmware. App suports multiple platforms (Windows, MacOS, Linux)

Simplify settings, clean UI and focus on mass manufacturing process where development and manufacturing are separated steps.
ESP32 Flash Tool depends on pySerial version 3.0 or newer for serial communication with the target device. Hence, you should install Python before start run the app.
To install pySerial manually by running something like:
depending on your platform. (The official pySerial installation instructions are here).
Firmware manufacturing process
Imagine you have at least 5 steps from firmware development to flashing firmware into production board. The app would be used at Step 5 in the process flowing:

Step 1: Develop & build firmware, you can use ESP32-IDF or Andruino core for esp32
Step 2: Build and get signed binary files
Step 3: Create factory data specific binary file by using command line tools such as NVS Partition Generator Utility, Manufacturing Utility
Step 5: Flash to ESP32 board by ESP32 Flash Tool
Create a single compressed file for ESP32 Flash Tool
ESP32 flash tool uses a single zipped file for flashing, just simply collect all required binaries, and create partitions.csv in the same folder then compress all into a zip file.
partitions.csv file format
ESP32 flash tool uses partitions.csv for identifying offsets of binary blobs. Sample of partitions.csv will be:
About
A simplify flashing tool of ESP32 boards on multiple platforms.
Источник
Downloadable Tools
ESP-IDF build process relies on a number of tools: cross-compiler toolchains, CMake build system, and others.
Installing the tools using an OS-specific package manager (like apt, yum, brew, etc.) is the preferred method when the required version of the tool is available. This recommendation is reflected in the Getting Started guide. For example, on Linux and macOS it is recommended to install CMake using an OS package manager.
However, some of the tools are IDF-specific and are not available in OS package repositories. Furthermore, different versions of ESP-IDF require different versions of the tools to operate correctly. To solve these two problems, ESP-IDF provides a set of scripts for downloading and installing the correct versions of tools, and exposing them in the environment.
The rest of the document refers to these downloadable tools simply as “tools”. Other kinds of tools used in ESP-IDF are:
Python scripts bundled with ESP-IDF (such as idf.py )
Python packages installed from PyPI.
The following sections explain the installation method, and provide the list of tools installed on each platform.
This document is provided for advanced users who need to customize their installation, users who wish to understand the installation process, and ESP-IDF developers.
If you are looking for instructions on how to install the tools, see the Getting Started Guide .
Tools metadata file
The list of tools and tool versions required for each platform is located in tools/tools.json. The schema of this file is defined by tools/tools_schema.json.
This file is used by tools/idf_tools.py script when installing the tools or setting up the environment variables.
Tools installation directory
IDF_TOOLS_PATH environment variable specifies the location where the tools are to be downloaded and installed. If not set, IDF_TOOLS_PATH defaults to HOME/.espressif on Linux and macOS, and %USER_PROFILE%\.espressif on Windows.
Inside IDF_TOOLS_PATH , the scripts performing tools installation create the following directories:
dist — where the archives of the tools are downloaded.
tools — where the tools are extracted. The tools are extracted into subdirectories: tools/TOOL_NAME/VERSION/ . This arrangement allows different versions of tools to be installed side by side.
GitHub Assets Mirror
Most of the tools downloaded by the tools installer are GitHub Release Assets, which are files attached to a software release on GitHub.
If GitHub downloads are inaccessible or slow to access, it’s possible to configure a GitHub assets mirror.
To use Espressif’s download server, set the environment variable IDF_GITHUB_ASSETS to dl.espressif.com/github_assets . When the install process is downloading a tool from github.com , the URL will be rewritten to use this server instead.
Any mirror server can be used provided the URL matches the github.com download URL format: the install process will replace https://github.com with https://$
The Espressif download server doesn’t currently mirror everything from GitHub, it only mirrors files attached as Assets to some releases as well as source archives for some releases.
idf_tools.py script
tools/idf_tools.py script bundled with ESP-IDF performs several functions:
install : Download the tool into $
install command accepts the list of tools to install, in TOOL_NAME or TOOL_NAME@VERSION format. If all is given, all the tools (required and optional ones) are installed. If no argument or required is given, only the required tools are installed.
download : Similar to install but doesn’t extract the tools. An optional —platform argument may be used to download the tools for the specific platform.
export : Lists the environment variables which need to be set to use the installed tools. For most of the tools, setting PATH environment variable is sufficient, but some tools require extra environment variables.
The environment variables can be listed in either of shell or key-value formats, set by —format parameter:
shell produces output suitable for evaluation in the shell. For example,
Источник


