- Ethereum mining on linux
- My Attention Span is > 60 seconds
- Install Ethereum Software
- Create Ethereum Wallet
- Install (proprietary) nvidia driver
- Pick Ethereum Network
- Pick a Pool
- Run ethminer
- Profit
- Майнинг Эфира на Ubuntu
- Какая у нас задача?
- Что нужно сделать?
- Насколько трудно заниматься майнингом на Ubuntu?
- С чего начать?
- Установите Майнер
- Установите Mist Wallet
- Настройка Mist
- Майнинг Эфира на Ubuntu: Присоединиться к пулу
- Графический процессор
- Выводы
- How to Mine Ethereum on Ubuntu 16.04/20.04
- Add Ethereum Repository
- Installing Ethminer
- Install packages
- Pick a network
- Choose a wallet
- Solo mining or pool mining
- Start mining!
Ethereum mining on linux
Install/use Debian 8 or Ubuntu 16.04 then execute:
My Attention Span is > 60 seconds
Ethereum is a crypto currency similar to Bitcoin as it is based on the blockchain technology. Ethereum is not yet another Bitcoin clone though, since it has an additional feature called Smart Contracts that makes it unique and very promising. I am not going into details how Ethereum works, you can get that into great detail on the Internet. This post is about Ethereum mining. Mining is how crypto coins are created. You need to spent computing time to get coins out. At the beginning CPU mining was sufficient, but as the Ethereum network difficulty has increased you need to use GPUs as they can calculate at a much higher hashrate than a general purpose CPU can do.
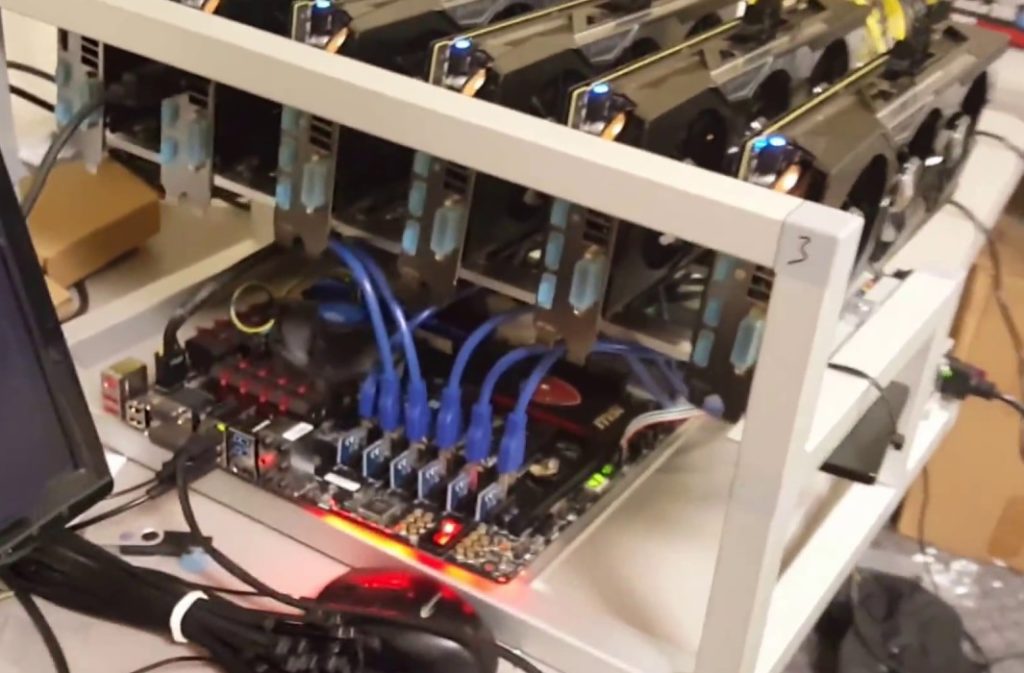
About 2 months ago I bought a new gaming rig, with a Nvidia GTX 1070 so I can experience virtual-reality gaming with a HTC Vive at a great framerate. As it turns out modern graphics cards are very good at hashing so I gave it a spin.
Initially I did this mining setup with Windows 10, as that is the operating system on my gaming rig. If you want to do Ethereum mining using your GPU, then you really want to use Linux. On Windows the GTX 1070 produced a hashrate of 6 MH/s (megahashes per second) while the same hardware does 25 MH/s on Linux. The hashrate multiplied by 4 by using Linux instead of Windows. Sounds good? Keep reading and follow this guide.
You have to pick a Linux distro to use for mining. As I am a Debian developer, all my systems run Debian, which is what I am also using for this guide. The same procedure can be done for Ubuntu as it is similar enough. For other distros you have to substitute the steps yourself. So I assume you already have Debian 8 or Ubuntu 16.04 installed on your system.
Install Ethereum Software
First we need the geth tool which is the main Ethereum «client». Ethereum is really a peer-to-peer network, that means each node is a server and client at the same time. A node that contains the complete blockchain history in a database is called a full node. For this guide you don’t need to run a full node, as mining pools do this for you. We still need geth to create the private key of your Ethereum wallet. Somewhere we have to receive the coins we are mining 
Add the Ethereum APT repository using these commands:
On Debian 8 (on Ubuntu you can skip this) you need to replace the repository name with this command:
Install ethereum, ethminer and geth:
Create Ethereum Wallet
A wallet is where coins are «stored». They are not really stored in the wallet because the wallet is just a private key that nobody has. The balance of that wallet is visible to everyone using the blockchain database. And this is what full nodes do, they contain and distribute the database to all other peers. So this this command to create your first private key for your wallet:
Be aware, that this passphrase protects the private key of your wallet. Anyone who has access to that file and knows your passphrase will have full control over your coins. And also do not forget the passphrase, as if you do, you lost all your coins!
The output of «geth account new» shows a long character/number sequence quoted in <>. This is your wallet address and you should write that number down, as if someone wants to send you money, then it is to that address. We will use that for the mining pool later.
Install (proprietary) nvidia driver
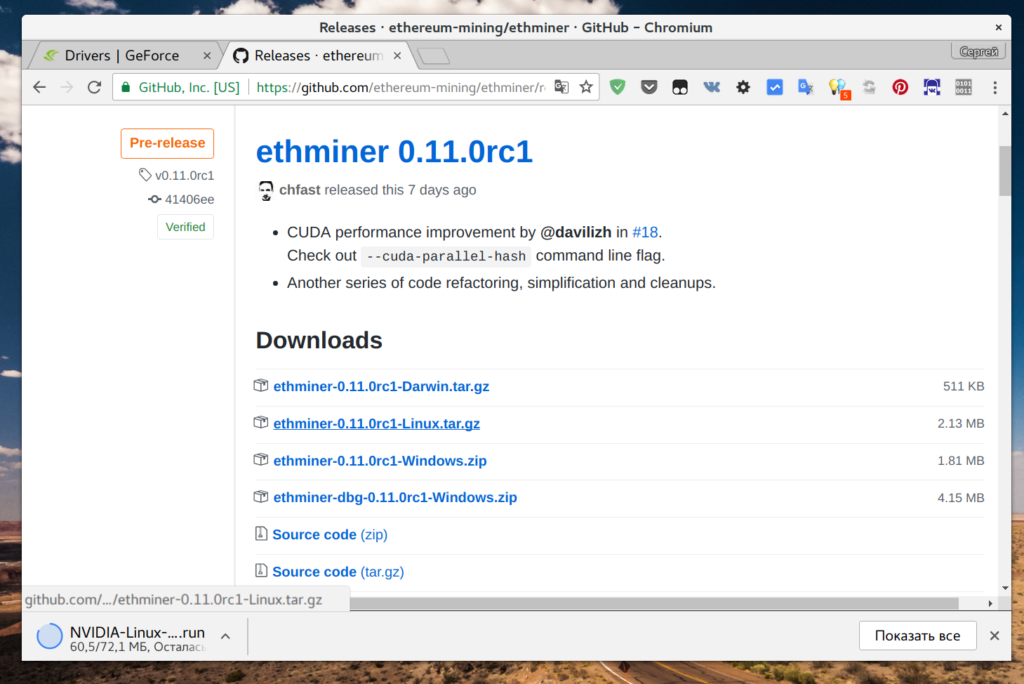
For OpenCL or CUDA to work with nvidia graphics cards, like my GTX 1070, you need to install this proprietary driver from nvidia. If you have an older card maybe the opensource drivers will work for you. For the GTX 9xx or 10xx you will need this driver package.
After you have agreed the terms, download the NVIDIA-Linux-x86_64-XXX.XX.run file. But before we can use that installer we need to install some dependencies that installer needs as it will have to compile a Linux kernel module for you. Install the dependencies using this command:
Now we can make the installer executable and run it like this:
If that step completed without error, then we should be able to run the mining benchmark!
The -M means «run benchmark» and the -G is for GPU mining. The first time you run it it will create a DAG file and that will takes a while. For me it took about 12 minutes on my GTX 1070. After that is should show a inner mean hashrate. If it says H/s that is hashes per second and KH is kilo (H/1000) and MH is megahashes per second (KH/1000). I had numbers around 25-30 MH/s, but for real mining you will see an average that is a balanced number and not a min/max range.
Pick Ethereum Network
Now it gets serious, you need to decide 2 things. First which Ethereum network you want to mine for and the second is using which pool.
Ethereum has 2 networks, one is called Ethereum One or Core, while the other is called Ethereum Classic. Ethereum has made a hardfork to undo the consequences of a software bug in the DAO. The DAO is a smart contract for a decentralized organization. Because of that bug, a blackhat could use that bug to obtain money from that DAO. The Ethereum developers made a poll and decided that the consequences will be undone. Not everyone agreed and the old network stayed alive and is now called Ethereum Classic short ETC. The hardfork kept its short name ETH.
This is important to understand for mining, because the hashing difficulty has a huge difference between ETH and ETC. As of writing, the hashrate of ETC is at 20% compared to ETH. Thus you need less computing time to get ETC coins and more time to get ETH coins. Differently said, ETC mining is currently more profitable.
Pick a Pool
Hmmmm, I want a swimming pool, thanks! Just kidding. You can mine without a pool, that is called solo mining, but you will get less reward. A mining pool are multiple computers that work on the same block to find a solution quicker than others. The pool has an aggregated hashrate that is higher than other solo miners. Each found block by anyone in this pool will be rewarded to everyone in the pool. The reward of 5 ether currently per block gets split in the same ratio of hashrate each member provides (minus the pool fee). So while you get less for a found block, you still have a steady lower income rate instead of higher with less chance of finding one (in time). Simply said: you have to find a new block faster than the others to receive the reward.
If you want to mine Ethereum Classic (ETC) use one of the pools listed here (at the bottom of the page).
If you want to mine Ethereum One / Core (ETH) use one of the pools listed here.
Run ethminer
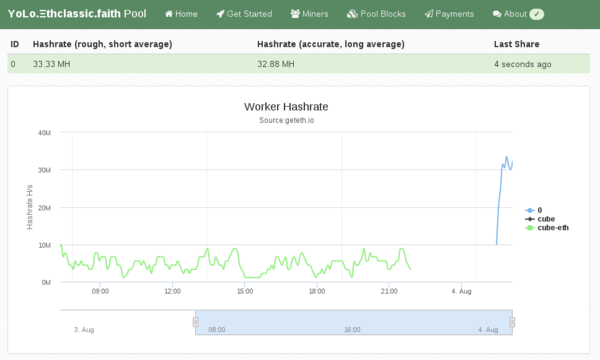
The instruction page of the pool website usually says how to start the miner program, but here is an example of the pool that I use (because pony!):
Profit
If this guide was helpful for you, you can tip me at ethereum:0x9ec1220d2f2fadd3f0c96e3007daa827bc83fbd6 or simply run the ethminer using my wallet address for a day or two:
Источник
Майнинг Эфира на Ubuntu
Это руководство было протестировано на Ubuntu 16.04, но многие принципы будут справедливо работающими и для других дистрибутивов. Так что если вы используете Elementary OS или другую систему основанную на Ubuntu это руководство будет полезным.
Какая у нас задача?
Настроить Ubuntu 16.04 для добычи Ethereum.
Что нужно сделать?
Работающая Ubuntu 16.04 с привилегиями root. Вам также нужен современный графический процессор с объемом памяти более 4 ГБ.
Насколько трудно заниматься майнингом на Ubuntu?
Легко. Все настраивается очень быстро.
Условные обозначения
# — требует, чтобы данная команда выполнялась с привилегиями root либо непосредственно как пользователь root, либо с помощью команды sudo
$ — данная команда должна выполняться как обычный непривилегированный пользователь
С чего начать?
Трудно не слышать об Эфириуме. Это самая горячая новая криптовалюта, которая все еще очень сильно растет. В отличие от Биткойнов, Ethereum по-прежнему практичен для добычи, и на него набирают массу людей. Если вы планируете добывать Ethereum, это руководство поможет вам начать использовать инструменты с открытым исходным кодом и Ubuntu.
Майнинг Эфира на Ubuntu очень легко настраивается даже новичком.
Прежде чем начать, установите AMDGPU-PRO на Ubuntu.
Установите Майнер
Очевидно, что вам нужно программное обеспечение для начала добычи. Разработчики, стоящие за валютой Ethereum, создали эти инструменты и упаковали их для Ubuntu. Все, что вам нужно сделать, это включить их PPA и установить пакеты.
Сначала установите одну зависимость.
$ sudo apt install software-properties-common
Затем вы можете включить репозиторий и обновить apt.
$ sudo add-apt-repository -y ppa: ethereum / ethereum
Теперь просто установите пакеты.
$ sudo apt install ethereum ethminer
Установите Mist Wallet
Есть много отличных вариантов для кошельков с криптовалютами, и большинство из них сейчас поддерживают Ethereum. Поскольку это руководство относится к Ethereum, оно будет сосредоточено на официальном кошельке Ethereum, но, если у вас есть предпочтение, не стесняйтесь использовать его.
Кстати, мы уже рассказывали о том, какой кошелек выбрать для криптовалюты.
Установите разрешения до получения Кошелька Mist.
$ sudo apt install libappindicator1 libindicator7
С установленными зависимостями вы можете скачать последнюю версию Mist с сайта Github проекта. Вы ищете пакет «Ethereum Wallet».
Установите пакет с dpkg.
$ sudo dpkg -i Ethereum-Wallet-linux64-0-9-0.deb
Настройка Mist
- Откройте Mist. Это программа GUI, поэтому вы можете получить доступ к ней, как правило, через Unity.
- Когда вы впервые запустите Mist, он спросит вас, хотите ли вы использовать основную сеть Ethereum или тестовую. Очевидно, что вы хотите подключиться к основной сети, чтобы иметь возможность фактически добывать криптовалюту и выполнять транзакции.
- Следующий экран спросит вас, есть ли у вас существующий файл кошелька. Если вы это сделаете, просто добавьте его. Если нет, вы можете просто пропустить эту часть.
- На следующем экране вам будет предложено создать пароль для вашего кошелька. Это пароль шифрования. Создайте сильную и запоминающуюся кодовую фразу здесь. Не забудь. Если вы потеряете свой пароль, ваш эфир исчезнет. Вы не можете его восстановить.
- После установки вы увидите свой фактический кошелек. Ваша учетная запись будет присутствовать на вашем кошельке. Это адрес, который вы будете использовать с каждого момента для отправки и получения Ethereum.
- Оставьте приложение открытым для синхронизации с сетью Ethereum. Для синхронизации всего потребуется некоторое время и значительное пространство на жестком диске. Приступим к следующему пункту, если говорить про Майнинг Эфира на Ubuntu.
Майнинг Эфира на Ubuntu: Присоединиться к пулу
Вам нужно присоединиться к пулу, если вы хотите добывать Эфириум. Несмотря на то, что можно запустить программу без участия пула, но ваши шансы на получение прибыли с одним узлом добычи очень низки. Бассейн увеличит ваши шансы.
Майнинг-пулы – это именно то, что объединяет системы майнеров. Люди собираются вместе и объединяют свои ресурсы добычи и справедливо распределяют прибыль, исходя из объема выполненной работы. В то время как соло-майнинг может быть удачным, Майнинг-пулы, гарантируют устойчивый поток доходов, пропорциональный вашей работе.
Есть много вариантов, так что проведите свое исследование. Вот несколько из наиболее популярных:
Графический процессор
После того, как вы создали свой пул и кошелек, вы можете, наконец, начать добычу. Вы будете добывать с использованием Ethminer, который использует ваш GPU для добычи. В команде, которую вы используете для запуска своей добычи, вы расскажете, какой пул вы используете.
Ваша команда может быть немного иной, в зависимости от вашего пула, но она будет выглядеть примерно так, как показано ниже.
$ ethminer -G -F your.poolurl.com:port/0xYOUR WALLET.COMPUTER NAME —farm-recheck 200
Флаг -G указывает графический процессор. -F позволяет вам сообщить пулу, что вы являетесь частью этого пула. Вы должны дать пул ваш адрес кошелька, чтобы он мог приписать вам вашу работу и заплатить вам. Большинство пулов отслеживают активность компьютера, так что это тоже включено. Имя компьютера является псевдонимом, поэтому ему не нужно указывать имя хоста или что-то в этом роде.
Выводы
Как вы поняли, Майнинг Эфира на Ubuntu настраивается очень быстро. Что является положительным моментом для каждого начинающего майнера. Мы постарались рассказать вам про все важные пункты настройки системы и оборудования для добычи криптовалюты. Если вам есть чем поделиться, то, обязательно напишите нам об этом в комментариях.
Добыча Ethereum может быть отличным способом заработать дополнительных денег или просто увлекательное техническое хобби. Всегда учитывайте затраты, прежде чем принимать участие в разработке криптовалютных средств и рассчитывайте свою прибыльность, прежде чем инвестировать.
Если у вас остались вопросы по теме «Майнинг Эфира на Ubuntu» — пишите нам об этом в форме комментариев.
Если вы нашли ошибку, пожалуйста, выделите фрагмент текста и нажмите Ctrl+Enter.
Источник
How to Mine Ethereum on Ubuntu 16.04/20.04

As of recently, a cryptocurrency craze has swept Internet communities. The people have found out that one does not need several thousand dollar-worth rig to mine cryptocurrency with a profit. Stores are short on graphics cards, and a gold fever has overtaken the miners. If you have a card with more than 2GB of VRAM, you too can attempt mining. Let’s take a look at the most common mining avenue – Ethereum.
Ethereum is considered to be a great coin to mine, with high potential profits. To mine Ethereum, you need a piece of software called ‘ethminer’, which is a command-line tool. It can be run on multiple Linux distributions, but in this article, we will focus on Ubuntu 16.0.4/20.04 and Debian 8.
Before we begin – in order to not waste your time, do not attempt mining with a card under 2GB of VRAM, as it’s unlikely it will be detected by the software and be able to mine anything. On top of that, if you are using a Nvidia card, you must use the proprietary driver. For AMD, the AMDGPU driver works just fine.
In this guide, I will show you how to install Ethminer on Ubuntu using the terminal.
Add Ethereum Repository
First off, we need to add the Ethereum repository, so run the following commands in your terminal:
If you are running Debian, the repository name needs to be replaced:
Installing Ethminer
We can finally get to installing ethminer. However, on top of that, we will need additional packages: Geth and Ethereum:
Install packages
Run the following to install the required packages:
To use ethminer required for coin mining, we have to download it from GitHub:
At the time of writing this tutorial, the latest version was ethminer 0.19.0-alpha.0
Type the following to download and extract the binary file:
Pick a network
There are two for Ethereum. Ethereum Classic, known as ETC, and Ethereum, known as ETH.
For a miner, the main difference is in price and difficulty of mining. The higher the difficulty, the less coins you will mine. You need to choose a coin, which will bring you the best profits. As of time of writing, ETH has a better ratio. A power of 20 megahashes will bring you $29 of profit, compared to ETC’s $15, with the same power consumption.
Choose a wallet
I’ll assume you’ll be mining ETH; thus, I suggest to use this wallet. The password you set is permanent, do not lose it, as you will lose everything you keep inside the wallet. Set it up, and then we will move onto the next point.
Solo mining or pool mining
Generally, at a low hashrate, you want to mine in a pool, because of greater rewards. It will also take you a longer time to receive profits from solo mining.
Pick a pool from this list.
There might be other pools than the one from the list – find one that you find suits you the best.
Start mining!
As stated by the application, by default, ethminer will try to use all device types it can detect. Optionally you can limit this behavior setting either of the following options:
Then, execute a mining command, usually stated on the pool website.
For dwarfpool, it’s:
Instead of YOUR_WALLET, paste your wallet address.
The output on a RX480 card should be:
Although the byte count will depend on how much VRAM does your specific model have. And here you go! You’re now mining Ethereum on Linux.
With just a few commands, you’ve got a cryptocurrency miner at your disposal. Ethminer has the advantage of being free over other solutions while keeping the same speed and efficiency as proprietary software. If you would like to know more about such great Linux software, stay tuned.
Источник


