evdev — Man Page
Generic Linux input driver
Synopsis
Description
evdev is an Xorg input driver for Linux´s generic event devices. It therefore supports all input devices that the kernel knows about, including most mice, keyboards, tablets and touchscreens. evdev is the default driver on the major Linux distributions.
The evdev driver can serve as both a pointer and a keyboard input device. Multiple input devices are supported by multiple instances of this driver, with one InputDevice section of your xorg.conf for each input device that will use this driver.
It is recommended that evdev devices are configured through the InputClass directive (refer to xorg.conf(5)) instead of manual per-device configuration. Devices configured in the xorg.conf(5) are not hot-plug capable.
Supported Hardware
In general, any input device that the kernel has a driver for can be accessed through the evdev driver. See the Linux kernel documentation for a complete list.
Configuration Details
Please refer to xorg.conf(5) for general configuration details and for options that can be used with all input drivers. This section only covers configuration details specific to this driver.
The following driver Options are supported:
Option «ButtonMapping» «string«
Sets the button mapping for this device. The mapping is a space-separated list of button mappings that correspond in order to the physical buttons on the device (i.e. the first number is the mapping for button 1, etc.). The default mapping is «1 2 3 . 32». A mapping of 0 deactivates the button. Multiple buttons can have the same mapping. For example, a left-handed mouse with deactivated scroll-wheel would use a mapping of «3 2 1 0 0». Invalid mappings are ignored and the default mapping is used. Buttons not specified in the user’s mapping use the default mapping.
Option «Device» «string«
Specifies the device through which the device can be accessed. This will generally be of the form «/dev/input/eventX», where X is some integer. The mapping from device node to hardware is system-dependent. Property: «Device Node» (read-only).
Option «DragLockButtons» «L1 B2 L3 B4«
Sets «drag lock buttons» that simulate holding a button down, so that low dexterity people do not have to hold a button down at the same time they move a mouse cursor. Button numbers occur in pairs, with the lock button number occurring first, followed by the button number that is the target of the lock button. Property: «Evdev Drag Lock Buttons».
Option «DragLockButtons» «M1«
Sets a «master drag lock button» that acts as a «Meta Key» indicating that the next button pressed is to be «drag locked». Property: «Evdev Drag Lock Buttons».
Option «Emulate3Buttons» «boolean«
Enable/disable the emulation of the third (middle) mouse button for mice which only have two physical buttons. The third button is emulated by pressing both buttons simultaneously. Default: off. Property: «Evdev Middle Button Emulation».
Option «Emulate3Timeout» «integer«
Sets the timeout (in milliseconds) that the driver waits before deciding if two buttons where pressed «simultaneously» when 3 button emulation is enabled. Default: 50. Property: «Evdev Middle Button Timeout».
Option «Emulate3Button» «integer«
Specifies the physical button number to be emitted if middle button emulation is triggered. Default: 2. Property: «Evdev Middle Button Button».
Option «EmulateWheel» «boolean«
Enable/disable «wheel» emulation. Wheel emulation means emulating button press/release events when the mouse is moved while a specific real button is pressed. Wheel button events (typically buttons 4 and 5) are usually used for scrolling. Wheel emulation is useful for getting wheel-like behaviour with trackballs. It can also be useful for mice with 4 or more buttons but no wheel. See the description of the EmulateWheelButton, EmulateWheelInertia, EmulateWheelTimeout, XAxisMapping, and YAxisMapping options. Default: off. Property «Evdev Wheel Emulation».
Option «EmulateWheelButton» «integer«
Specifies which button must be held down to enable wheel emulation mode. While this button is down, X and/or Y pointer movement will generate button press/release events as specified for the XAxisMapping and YAxisMapping settings. If the button is 0 and EmulateWheel is on, any motion of the device is converted into wheel events. Default: 4. Property: «Evdev Wheel Emulation Button».
Option «EmulateWheelInertia» «integer«
Specifies how far (in pixels) the pointer must move to generate button press/release events in wheel emulation mode. Default: 10. Property: «Evdev Wheel Emulation Inertia».
This value must be set for any device does not resemble a standard mouse. Specifically, on absolute devices such as tablets the value should be set to a reasonable fraction of the expected movement to avoid excess scroll events.
WARNING: the name «inertia» is a misnomer. This option defines the distance required to generate one scroll event similar to the VertScrollDelta and HorizScrollDelta options. It does not enable inertia in the physical sense, scrolling stops immediately once the movement has stopped.
Option «EmulateWheelTimeout» «integer«
Specifies the time in milliseconds the EmulateWheelButton must be pressed before wheel emulation is started. If the EmulateWheelButton is released before this timeout, the original button press/release event is sent. Default: 200. Property: «Evdev Wheel Emulation Timeout».
Option «EmulateThirdButton» «boolean«
Enable third button emulation. Third button emulation emits a right button event (by default) by pressing and holding the first button. The first button must be held down for the configured timeout and must not move more than the configured threshold for the emulation to activate. Otherwise, the first button event is posted as normal. Default: off. Property: «Evdev Third Button Emulation».
Option «EmulateThirdButtonTimeout» «integer«
Specifies the timeout in milliseconds between the initial button press and the generation of the emulated button event. Default: 1000. Property: «Evdev Third Button Emulation Timeout».
Option «EmulateThirdButtonButton» «integer«
Specifies the physical button number to be emitted if third button emulation is triggered. Default: 3. Property: «Evdev Third Button Button».
Option «EmulateThirdButtonMoveThreshold» «integer«
Specifies the maximum move fuzz in device coordinates for third button emulation. If the device moves by more than this threshold before the third button emulation is triggered, the emulation is cancelled and a first button event is generated as normal. Default: 20. Property: «Evdev Third Button Emulation Threshold».
Option «GrabDevice» «boolean«
Force a grab on the event device. Doing so will ensure that no other driver can initialise the same device and it will also stop the device from sending events to /dev/kbd or /dev/input/mice. Events from this device will not be sent to virtual devices (e.g. rfkill or the Macintosh mouse button emulation). Default: disabled.
Option «InvertX» «Bool« Option «InvertY» «Bool«
Invert the given axis. Default: off. Property: «Evdev Axis Inversion».
Option «IgnoreRelativeAxes» «Bool« Option «IgnoreAbsoluteAxes» «Bool«
Ignore the specified type of axis. Default: unset. The X server cannot deal with devices that have both relative and absolute axes. Evdev tries to guess wich axes to ignore given the device type and disables absolute axes for mice and relative axes for tablets, touchscreens and touchpad. These options allow to forcibly disable an axis type. Mouse wheel axes are exempt and will work even if relative axes are ignored. No property, this configuration must be set in the configuration.
If either option is set to False, the driver will not ignore the specified axes regardless of the presence of other axes. This may trigger buggy behavior and events from this axis are always forwarded. Users are discouraged from setting this option.
Option «Calibration» «min-x max-x min-y max-y«
Calibrates the X and Y axes for devices that need to scale to a different coordinate system than reported to the X server. This feature is required for devices that need to scale to a different coordinate system than originally reported by the kernel (e.g. touchscreens). The scaling to the custom coordinate system is done in-driver and the X server is unaware of the transformation. Property: «Evdev Axis Calibration».
Option «Mode» «Relative»|»Absolute»
Sets the mode of the device if device has absolute axes. The default value for touchpads is relative, for other absolute. This option has no effect on devices without absolute axes.
Option «SwapAxes» «Bool«
Swap x/y axes. Default: off. Property: «Evdev Axes Swap».
Option «XAxisMapping» «N1 N2«
Specifies which buttons are mapped to motion in the X direction in wheel emulation mode. Button number N1 is mapped to the negative X axis motion and button number N2 is mapped to the positive X axis motion. Default: no mapping. Property: «Evdev Wheel Emulation Axes».
Option «YAxisMapping» «N1 N2«
Specifies which buttons are mapped to motion in the Y direction in wheel emulation mode. Button number N1 is mapped to the negative Y axis motion and button number N2 is mapped to the positive Y axis motion. Default: «4 5». Property: «Evdev Wheel Emulation Axes».
Option «TypeName» «type»»
Specify the X Input 1.x type (see XListInputDevices(3)). There is rarely a need to use this option, evdev will guess the device type based on the device’s capabilities. This option is provided for devices that need quirks.
Option «VertScrollDelta» «integer«
The amount of motion considered one unit of scrolling vertically. Default: «1». Property: «Evdev Scrolling Distance».
Option «HorizScrollDelta» «integer«
The amount of motion considered one unit of scrolling horizontally. Default: «1». Property: «Evdev Scrolling Distance».
Option «DialDelta» «integer«
The amount of motion considered one unit of turning the dial. Default: «1». Property: «Evdev Scrolling Distance».
Option «Resolution» «integer«
Sets the resolution of the device in dots per inch. The resolution is used to scale relative motion events from mouse devices to 1000 DPI resolution. This can be used to make high resolution mice less sensitive without turning off acceleration. If set to 0 no scaling will be performed. Default: «0».
Supported Properties
The following properties are provided by the evdev driver.
Evdev Axis Calibration
4 32-bit values, order min-x, max-x, min-y, max-y or 0 values to disable in-driver axis calibration.
Evdev Axis Inversion
2 boolean values (8 bit, 0 or 1), order X, Y. 1 inverts the axis.
Evdev Axes Swap
1 boolean value (8 bit, 0 or 1). 1 swaps x/y axes.
Evdev Drag Lock Buttons
8-bit. Either 1 value or pairs of values. Value range 0-32, 0 disables a value.
Evdev Middle Button Emulation
1 boolean value (8 bit, 0 or 1).
Evdev Middle Button Timeout
1 16-bit positive value.
Evdev Middle Button Button
1 8-bit value, allowed range 0-32, 0 disables the button.
Evdev Wheel Emulation
1 boolean value (8 bit, 0 or 1).
Evdev Wheel Emulation Axes
4 8-bit values, order X up, X down, Y up, Y down. 0 disables a value.
Evdev Wheel Emulation Button
1 8-bit value, allowed range 0-32, 0 disables the button.
Evdev Wheel Emulation Inertia
1 16-bit positive value.
Evdev Wheel Emulation Timeout
1 16-bit positive value.
Evdev Scrolling Distance
3 32-bit values: vertical, horizontal and dial.
Источник
Драйверы входных событий
Интерфейс событий, экспортируемый подсистемой ввода, эволюционировал в стандарт, который понимают многие графические оконные системы. Для общения с устройствами ввода драйверы событий предлагают аппаратно-независимую абстракцию, так же как интерфейс кадрового буфера (этот вопрос рассматривается в Главе 12, «Драйверы Видео») представляет собой общий механизм для взаимодействия с устройствами отображения. Драйверы событий в тандеме с драйверами кадрового буфера изолируют графические пользовательские интерфейсы (GUI) от капризов базового оборудования.
Интерфейс Evdev
Evdev — это универсальный драйвер событий ввода. Каждый пакет события, создаваемый evdev, имеет следующий формат, определённый в include/linux/input.h :
struct timeval time; /* Метка времени */
__u16 type; /* Тип события */
__u16 code; /* Код события */
__s32 value; /* Значение события */
Чтобы узнать, как использовать evdev, давайте реализуем драйвер устройства ввода для виртуальной мыши.
Пример устройства: Виртуальная мышь
Вот как работает наша виртуальная мышь: приложение ( coord.c ) эмулирует движения мыши и отправляет информацию о координатах в драйвер виртуальной мыши ( vms.c ) через узел в sysfs, /sys/devices/platform/vms/coordinates . Драйвер виртуальной мыши (для краткости, драйвер vms ) отправляет эти движения наверх через evdev. Детали показаны на Рисунке 7.2.
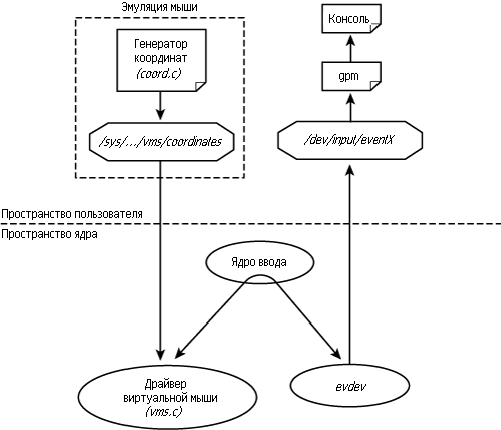
Рисунок 7.2. Драйвер ввода для виртуальной мыши.
Мышь общего назначения ( General-purpose mouse, gpm ) представляет собой сервер, который позволяет использовать мышь в текстовом режиме без помощи со стороны Х сервера. GPM понимает события evdev, так что драйвер vms может взаимодействовать с ним непосредственно. После того, как вы соберёте всё вместе, вы сможете увидеть курсор, танцующий на вашем экране, что соответствует движениям виртуальной мыши, передаваемым coord.c .
Распечатка 7.1 содержит программу coord.c , которая постоянно генерирует случайные координаты X и Y. Мышь, в отличие от джойстиков или сенсорных панелей, передаёт относительные координаты, и это то, что делает coord.c . Драйвер vms показан в Распечатке 7.2.
Распечатка 7.1. Приложение, эмулирующее движения мыши (coord.c)
main(int argc, char *argv[])
/* Открываем узел с координатами в sysfs */
sim_fd = open(«/sys/devices/platform/vms/coordinates», O_RDWR);
perror(«Couldn’t open vms coordinate file\n»);
/* Генерируем случайные относительные координаты */
if (x%2) x = -x; if (y%2) y = -y;
/* Отправляем съэмулированные координаты драйверу виртуальной мыши */
sprintf(buffer, «%d %d %d», x, y, 0);
write(sim_fd, buffer, strlen(buffer));
Распечатка 7.2. Драйвер ввода для виртуальной мыши (vms.c)
struct input_dev *vms_input_dev; /* Представление устройства ввода */
static struct platform_device *vms_dev; /* Структура устройства */
/* Метод для ввода из sysfs съэмулированных координат в драйвер виртуальной мыши */
write_vms(struct device *dev,
struct device_attribute *attr,
const char *buffer, size_t count)
/* Сообщаем относительные координаты через интерфейс событий */
input_report_rel(vms_input_dev, REL_X, x);
input_report_rel(vms_input_dev, REL_Y, y);
/* Подключаем метод записи sysfs */
DEVICE_ATTR(coordinates, 0644, NULL, write_vms);
static struct attribute *vms_attrs[] = <
static struct attribute_group vms_attr_group = <
/* Регистрируем устройство платформы */
vms_dev = platform_device_register_simple(«vms», -1, NULL, 0);
/* Создаём в sysfs узел для чтения съэмулированных координат */
/* Создаём структуру данных устройства ввода */
/* Сообщаем, что эта виртуальная мышь будет генерировать относительные координаты */
/* Регистрируемся в подсистеме ввода */
printk(«Virtual Mouse Driver Initialized.\n»);
/* Выход из драйвера */
/* Отменяем регистрацию в подсистеме ввода */
/* Освобождаем узел в sysfs */
/* Отменяем регистрацию драйвера */
Давайте внимательнее посмотрим на Распечатку 7.2. Во время инициализации драйвер vms регистрирует себя в качестве драйвера устройства ввода. Для этого он сначала выделяет память для структуры input_dev с использованием API ядра, input_allocate_device() :
Затем он объявляет, что виртуальная мышь генерирует события с относительными координатами:
set_bit(EV_REL, vms_input_dev->evbit); /* Типом события является EV_REL */
Далее он декларирует коды событий, которые создаёт виртуальная мышь:
set_bit(REL_X, vms_input_dev->relbit); /* Относительное движение по ‘X’ */
set_bit(REL_Y, vms_input_dev->relbit); /* Относительное движение по ‘Y’ */
Если ваша виртуальная мышь также способна генерировать нажатия на кнопки мыши, вы должны добавить к этому vms_init() :
set_bit(EV_KEY, vms_input_dev->evbit); /* Типом события является EV_KEY */
set_bit(BTN_0, vms_input_dev->keybit); /* Кодом события является BTN_0 */
И, наконец, регистрация:
write_vms() является методом sysfs store() , который связан с /sys/devices/platform/vms/coordinates . Когда coord.c пишет в этот файл пару X/Y, write_vms() выполняет следующие действия:
input_report_rel(vms_input_dev, REL_X, x);
input_report_rel(vms_input_dev, REL_Y, y);
Первый оператор генерирует событие REL_X , или относительное движение устройства по оси X. Второй создаёт событие REL_Y , или относительное движение по оси Y. input_sync() показывает, что это событие является полным, так что подсистема ввода собирает эти два события в один пакет evdev и отправляет его за дверь через /dev/input/eventX , где X представляет собой номер интерфейса, присвоенный драйверу vms. Приложение, читающее этот файл, получит пакеты событий в описанном ранее формате input_event . Чтобы попросить gpm подключиться к этому интерфейсу событий и, соответственно, погонять курсор по экрану, сделайте следующее:
bash> gpm -m /dev/input/eventX -t evdev
Драйвер контроллера сенсорного экрана ADS7846 и драйвер акселерометра, обсуждаемые позднее соответственно в разделах «Сенсорные контроллеры» и «Акселерометры», также являются пользователями evdev.
Дополнительная информация об интерфейсе событий
Драйвер vms использует общий интерфейс событий evdev, но устройства ввода, такие как клавиатуры, мыши и контроллеры касаний, имеют специальные драйверы событий. Мы рассмотрим их, когда будем обсуждать соответствующие драйверы устройств.
Чтобы написать свой собственный драйвер событий и экспортировать его в пользовательское пространство с помощью /dev/input/mydev , вы должны заполнить структуру, называемую input_handler , и зарегистрировать её в ядре ввода следующим образом:
static struct input_handler my_event_handler = <
.event = mydev_event, /* Обработка сообщений о событиях, посылаемых драйверами устройств ввода,
которые пользуются услугами этого драйвера событий */
.fops = &mydev_fops, /* Методы для управления /dev/input/mydev */
.minor = MYDEV_MINOR_BASE, /* Младший номер /dev/input/mydev */
.name = «mydev», /* Имя драйвера событий */
.id_table = mydev_ids, /* Этот драйвер событий может обрабатывать запросы с такими ID-ами */
.connect = mydev_connect, /* Вызывается, если есть совпадение ID */
.disconnect = mydev_disconnect, /* Вызывается для отмены регистрации драйвера */
static int __init
Для полноценного примера посмотрите на реализацию mousedev ( drivers/input/mousedev.c ) .
Источник


