- Use Windows Server Backup to back up Exchange
- What do you need to know before you begin?
- Use Windows Server Backup to back up Exchange
- How do you know this worked?
- Use Windows Server Backup to restore a backup of Exchange
- What do you need to know before you begin?
- Use Windows Server Backup to restore a backup of Exchange
- How do you know this worked?
- Резервное копирование почтовой базы Exchange 2013 средствами Windows Server Backup
- Using Windows Server Backup to back up and restore Exchange data
Use Windows Server Backup to back up Exchange
Applies to: Exchange Server 2013
You can use Windows Server Backup to back up and restore Exchange databases. Exchange includes a plug-in for Windows Server Backup that allows you to make Volume Shadow Copy Service (VSS)-based backups of Exchange data.
What do you need to know before you begin?
Estimated time to complete: 1 minute, plus the time it takes to back up the data
You need to be assigned permissions before you can perform this procedure or procedures. To see what permissions you need, see the «Mailbox recovery» entry in the Recipients Permissions topic.
The Windows Server Backup feature must be installed on the local computer.
During the backup operation, a consistency check of the Exchange data files is run to make sure that the files are in a good state and can be used for recovery. If the consistency check succeeds, Exchange data is available for recovery from that backup. If the consistency check fails, the Exchange data isn’t available for recovery. Windows Server Backup runs the consistency check on the snapshot taken for the backup. As a result, before copying files from the snapshot to backup media, the consistency of the backup is known, and the user is notified of the consistency check results.
Having problems? Ask for help in the Exchange forums. Visit the forums at Exchange Server.
Use Windows Server Backup to back up Exchange
Start Windows Server Backup.
Select Local Backup.
In the Actions pane, click Backup Once. to start the Backup Once Wizard.
On the Backup Options page, select Different options, and then click Next.
On the Select Backup Configuration page, select Custom, and then click Next.
On the Select Items for Backup page, click Add Items to select the volume(s) to be backed up, and then click OK.
Choose volumes and not individual folders. The only way to perform an application-level backup or restore is to select an entire volume.
Click Advanced Settings. On the Exclusions tab, click Add Exclusion to add any files or file types you want to exclude from the backup.
By default, volumes that contain operating system components or applications are included in the backup and can’t be excluded.
On the VSS Settings tab, select VSS full Backup, and then click OK, and then click Next.
On the Specify Destination Type page, select the location where you want to store the backup, and then click Next.
If you choose Local drives, the Select Backup Destination page appears. Select an option from the Backup destination dropdown, and then click Next.
If you choose Remote shared folder, the Specify remote folder page appears. Specify a UNC path for the backup files, configure access control settings. Choose Do not inherit if you want the backup to be accessible only through a specific account. Provide a username and password for an account that has write permissions on the computer hosting the remote folder, and then click OK. Alternatively, choose Inherit if you want the backup to be accessible by everyone who has access to the remote folder. Click Next.
On the Confirmation page, review the backup settings, and then click Backup.
On the Backup Progress page, you can view the status and progress of the backup operation.
Click Close to exit the Backup Progress page at any time. Any backup in progress will continue to run in the background.
How do you know this worked?
To verify that you’ve successfully backed up the data, do any of the following:
On the server on which Windows Server Backup was run, the last backup status will be displayed, which should say Successful. You can also verify that the backup completed successfully by viewing the Windows Server Backup logs.
Open Event Viewer and verify that a backup completion event was logged in the Application event log.
Run the following command in the Exchange Management Shell to verify that each database on the selected volume(s) was backed up successfully:
The SnapshotLastFullBackup and LastFullBackup properties of the database indicate when the last successful backup was taken, and if it was a VSS full backup.
Use Windows Server Backup to restore a backup of Exchange
You can use Windows Server Backup to back up and restore Exchange databases. Exchange includes a plug-in for Windows Server Backup that allows you to make and restore Volume Shadow Copy Service (VSS)-based backups of Exchange data. For additional information, see Using Windows Server Backup to back up and restore Exchange data.
What do you need to know before you begin?
Estimated time to complete: 1 minute, plus the time it takes to restore the data
You need to be assigned permissions before you can perform this procedure or procedures. To see what permissions you need, see the «Mailbox recovery» entry in the Recipients Permissions topic.
The Windows Server Backup feature must be installed on the local computer.
When restoring a database to its original location, the database can remain in a dirty shutdown state and be mountable by the system. When restoring to an alternate location (for example, in preparation to use a recovery database), the database must be manually brought into a clean shutdown state by using Exchange Server Database Utilities (Eseutil.exe).
Having problems? Ask for help in the Exchange forums. Visit the forums at: Exchange Server, Exchange Online, or Exchange Online Protection.
Use Windows Server Backup to restore a backup of Exchange
Start Windows Server Backup.
Select Local Backup.
In the Actions pane, click Recover. to start the Recovery Wizard.
On the Getting Started page, do either of the following:
If the data being recovered was backed up on the local server, select This server (ServerName), and then click Next.
If the data being recovered is from another server, or if the backup being recovered is located on another computer, select Another server, and then click Next. On the Specify location type page, select Local drives or Remote shared folder, and then click Next. If you select Local drives, select the drive containing the backup on the Select backup location page, and then click Next. If you select Remote shared folder, enter the UNC path for the backup data on the Specify remote folder page, and then click Next.
On the Select Backup Date page, select the date and time of the backup that you want to recover, and then click Next.
On the Select Recovery Type page, select Applications, and then click Next.
If Applications is not available as a selection, it indicates that the backup selected for restore was a folder-level backup, and not a volume level backup. You must perform backups at the volume level when backing up Exchange data with Windows Server Backup.
On the Select Application page, verify that Exchange is selected in the Applications field. Click View Details to view the application components of the backups. If the backup that you’re recovering is the most recent, the Do not perform a roll-forward recovery of the application database check box is displayed. Select this check box if you want to prevent Windows Server Backup from rolling forward the database being recovered by committing all uncommitted transaction logs. Click Next.
On the Specify Recovery Options page, specify where you want to recover the data, and then click Next:
Choose Recover to original location if you want to restore the Exchange data directly to its original location. If you use this option, you can’t choose which databases are restored; all backed up databases on the volume will be restored to their original locations.
Choose Recover to another location if you want to restore individual databases and their files to a specified location. Click Browse to specify the alternate location. If you use this option, you can choose which databases are restored. After being restored, the data files can then be moved into a recovery database, manually moved back to their original location, or mounted somewhere else in the Exchange organization using database portability. When you restore a database to an alternate location, the restored database will be in a dirty shutdown state. After the restore process has completed, you will need to manually put the database into a clean shutdown state using Eseutil.exe.
On the Confirmation page, review the recovery settings, and then click Recover.
On the Recovery Progress page, you can view the status and progress of the recovery operation.
Click Close when the recovery operation has completed.
How do you know this worked?
The Recovery Progress page will indicate whether or not the recovery process completed successfully. To further verify that you’ve successfully restored the data, do any of the following:
Examine the target directory of the backup and verify that the restored data exists.
On the server on which Windows Server Backup was run, verify that the job completed successfully by viewing the backup logs.
Open Event Viewer and verify that a restore completion event was logged in the Application event log.
Резервное копирование почтовой базы Exchange 2013 средствами Windows Server Backup
Для резервного копирования Exchange Server 2013 существует достаточно большое количество специализированных программных продуктов, каждый из которых обладает своими сильными и слабыми сторонами. Однако большинства из них платные, а их цена может нанести существенный удар по скромному ИТ-бюджету небольших российских компаний.
К счастью, можно воспользоваться функционалом Windows Server Backup (WSB) Features, который является встроенным модулем резервного копирования в Windows Server 2008 / 2008 R2. Конечно, его функционал не слишком радует количеством поддерживаемых функций и удобством управления, но как минимум позволяет в случае ЧП не остаться без актуальной резервной копией с базой почтовых ящиков пользователей.
Итак, имеем следующую конфигурацию: сеть с почтовым сервером Exchange Server 2013 (на Windows Server 2008 R2) с одной почтовой базой. Наша задача – настроить резервное копирование почтового хранилища Exchange 2013 с помощью стандартных средств Windows.
Несколько основных технических моментов касательно бэкапа почтовых баз Exchange 2013 средствами WSB:
- Резервное копирование выполняется с помощью службы теневого копирования томов (VSS — Volume Shadow Copy Service) на уровне тома целиком
- Возможен только локальный запуск и управление резервным копированием
- Резервную копию можно писать как на локальный диск, так и по сети в шару
- Возможно создать только полную (full) резервную копию базы. Инкрементальные, дифференциальные и т.п. бэкапы не поддерживаются.
- Возможен бэкап только активной базы DAG
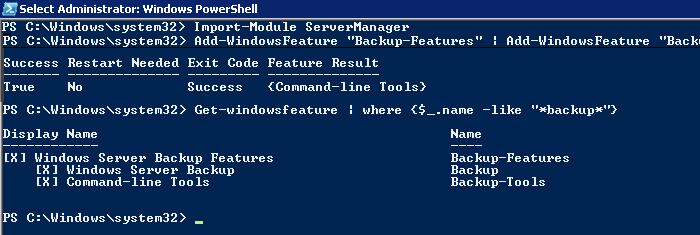
По умолчанию функционал Windows Server Backup в Windows Server 2008 R2 не установлен. Установим этот компонент из командной строки:
Проверить установлен ли компонент Backup-Features можно так:
Резервное копирование базы Exchange 2013 можно настроить из GUI Server Backup или с помощью Powershell. Рассмотрим 2 способ.
Импортируем команды Windows Backup в сессию Powershell:
Создадим новую политику резервного копирования, которая будет содержать все параметры резервного копирования и расписание его запуска.
Укажем диск, на котором хранится почтовая база Excnahge (в примере E:\)
Добавим диск в политику
Укажем диск или сетевую шару, куда будут складываться резервные копии (здесь нельзя указать системный диск или тот же самый диск с базой):
Добавим устройство хранения резервных копий в политику
Укажем, что для резервного копирования будет использоваться метод VSS Full Backup
Проверим политику на ошибки:
Проверим статус почтовой базы перед запуском бэкапа:
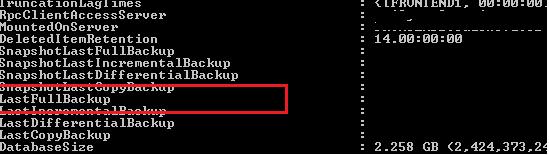
В данном случае видно, что резервное копирование почтовой базы ни разу не выполнялось.
Запустить резервное копирование почтовой базы Exchange 2013 можно немедленно:
Или по расписанию:
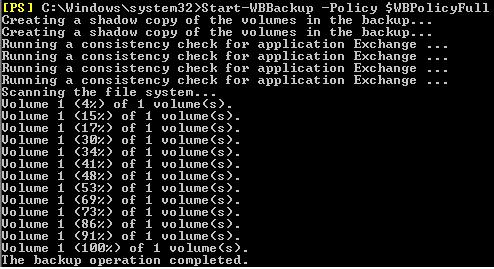
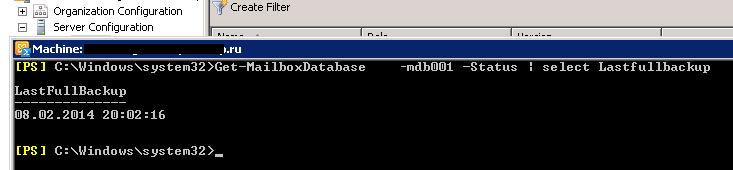
После завершения резервного копирования WSB обновит заголовок почтовой базы данных и запишет в него информацию о времени выполнения последнего бэкапа:
Вывести список резервных копий можно так:
Получить статус выполнения последнего задания:
Using Windows Server Backup to back up and restore Exchange data
Microsoft’s preferred architecture for Exchange Server leverages a concept known as Exchange Native Data Protection. Exchange Native Data Protection relies on native Exchange features to protect your mailbox data, without the use of traditional backups. But if you want to create backups, Exchange includes a plug-in for Windows Server Backup (WSB) that enables you to create Exchange-aware Volume Shadow Copy Service (VSS)-based backups of Exchange data. To take Exchange-aware backups, you must have the WSB feature installed.
The plug-in, WSBExchange.exe, runs as a service named Microsoft Exchange Server Extension for Windows Server Backup (the short name for this service is WSBExchange). This service is automatically installed and configured for manual startup on all Mailbox servers. The plug-in enables WSB to create Exchange-aware VSS backups.
Before using WSB to back up Exchange data, we recommend that you familiarize yourself with the following features and options for the plug-in:
Backups taken with WSB occur at the volume level, and the only way to perform an application-level backup or restore is to select an entire volume. To back up a database and its log stream, you must back up the entire volume containing the database and logs, not just the individual folders. You can’t back up any data without backing up the entire volume containing the data.
The backup must be run locally on the server being backed up, and you can’t use the plug-in to take remote VSS backups. There is no remote administration of WSB or the plug-in. You can, however, use Remote Desktop Services or Terminal Services to remotely manage backups.
The backup can be created on a local drive or on a remote network share.
Only full backups should be taken. Log truncation will occur only after a successful completion of a VSS full backup of a volume or folders containing an Exchange database.
When restoring data, it’s possible to restore only Exchange data. This data can be restored to its original location or to an alternate location. If you restore the data to its original location, WSB and the plug-in automatically handle the recovery process, including dismounting any existing database and replaying logs into the restored database.
The restore process doesn’t support the Exchange recovery database (RDB). If you want to use an RDB, you must restore the data to an alternate location and then manually copy or move the restored data from that location into the RDB folder structure.
When restoring Exchange data, all backed up databases must be restored together. You can’t restore a single database.
Bare metal restores are supported when using WSB; however, the recommended recovery approach for Exchange servers is to recover the Exchange server and then restore the data. If you’re using a third-party backup application (e.g., non-Microsoft), then support for bare metal restores of Exchange may be available from your backup application vendor.
The following table describes the supportability of the backup and recovery options available for Exchange Server with WSB.
| If you. | Then. |
|---|---|
| Back up the full server. | A VSS copy backup will be performed, and the transaction logs for the databases on the server will not be truncated. |
| Perform a custom backup and select one or more volumes to back up. | A VSS full backup can be selected, allowing the transaction logs for the databases on the selected volumes to be truncated at the completion of a successful backup. |
| Perform a custom backup and select one or more folders to back up. | A VSS full backup can be selected and the log files will be truncated; however, restoration of the backup will be limited to file restore, as an Application level restore will not be available as an option. |
For detailed steps to back up Exchange using WSB, see Use Windows Server Backup to back up Exchange.
For detailed steps to restore data from a backup taken with WSB, see Use Windows Server Backup to restore a backup of Exchange.


