- HowTo: Set an Environment Variable in Windows — Command Line and Registry
- Print environment variables
- Command Prompt
- Command Prompt — C:\>
- Output
- Command Prompt — C:\>
- Output
- Windows PowerShell
- Windows PowerShell — PS C:\>
- Output
- Windows PowerShell — PS C:\>
- Output
- Set Environment Variables
- User Variables
- Command Prompt — C:\>
- Command Prompt — C:\>
- Output
- System Variables
- Command Prompt — C:\>
- Registry
- Printing Environment Variables
- Share Environment Vars between WSL and Windows
- Summary
- What are Environment Variables?
- WSL and environment variables — before Insider 17063
- WSL and environment variables — after Insider 17063
- Passing vars with a script
- An Example with Go
- 1. Install Go on Windows & WSL
- 2. Grab VSCode
- 3. Set up the project
- 4. Set Environment Variables
- 5. Success
- Conclusion
- What happens if I set an environment var in WSLENV from Win32 which is already defined in WSL?
- What about the other way around (variable defined in Win32, then defined and shared from WSL?)
- What happens if I concatenate WSLENV to the end of my PATH environment var?
- Do the changes I make to WSLENV from WSL persist after I close WSL?
- Can I set WSLENV to an actual filesystem path or does it have to be set to an existing environment var?
- Переменные среды в Windows: использование, список и таблицы
- Пример использования переменной среды Windows
- Как посмотреть переменные среды Windows 10
- Доступ к переменным средам из реестра Windows
- Как посмотреть все переменные среды в командной строке
- Открытие списка переменных среды в Windows PowerShell
- Создание переменной среды в Windows
- Список переменных среды Windows в таблице
- Выводы статьи
HowTo: Set an Environment Variable in Windows — Command Line and Registry
Environment variables are not often seen directly when using Windows. However there are cases, especially when using the command line, that setting and updating environment variables is a necessity. In this series we talk about the various approaches we can take to set them. In this article we look at how to interface with environment variables using the Command Prompt and Windows PowerShell. We also note where in the registry the environment variables are set, if you needed to access them in such a fashion.
Print environment variables
You can use environment variables in the values of other environment variables. It is then helpful to be able to see what environment variables are set already. This is how you do it:
Command Prompt
List all environment variables
Command Prompt — C:\>
Output
Print a particular environment variable:
Command Prompt — C:\>
Output
Windows PowerShell
List all environment variables
Windows PowerShell — PS C:\>
Output
Print a particular environment variable:
Windows PowerShell — PS C:\>
Output
Set Environment Variables
To set persistent environment variables at the command line, we will use setx.exe . It became part of Windows as of Vista/Windows Server 2008. Prior to that, it was part of the Windows Resource Kit. If you need the Windows Resource Kit, see Resources at the bottom of the page.
setx.exe does not set the environment variable in the current command prompt, but it will be available in subsequent command prompts.
User Variables
Command Prompt — C:\>
Open a new command prompt.
Command Prompt — C:\>
Output
System Variables
To edit the system variables, you’ll need an administrative command prompt. See HowTo: Open an Administrator Command Prompt in Windows to see how.
Command Prompt — C:\>
Registry
The location of the user variables in the registry is: HKEY_CURRENT_USER\ Environment . The location of the system variables in the registry is: HKEY_LOCAL_MACHINE\ SYSTEM\ CurrentControlSet\ Control\ Session Manager\ Environment .
When setting environment variables through the registry, they will not recognized immediately. One option is to log out and back in again. However, we can avoid logging out if we send a WM_SETTINGCHANGE message, which is just another line when doing this programatically, however if doing this on the command line it is not as straightforward.
One way is to get this message issued is to open the environment variables in the GUI, like we do in HowTo: Set an Environment Variable in Windows — GUI; we do not need to change anything, just open the Environment Variables window where we can see the environment variables, then hit OK .
Another way to get the message issued is to use setx , this allows everything to be done on the command line, however requires setting at least one environment variable with setx .
Printing Environment Variables
With Windows XP, the reg tool allows for accessing the registry from the command line. We can use this to look at the environment variables. This will work the same way in the command prompt or in powershell. This technique will also show the unexpanded environment variables, unlike the approaches shown for the command prompt and for powershell.
Share Environment Vars between WSL and Windows
December 22nd, 2017
Hey WSL users—we have more features to share with you! Our latest Windows Insider build lets you share environment variables between WSL and Windows. Starting with Build 17063, let’s look at how you can leverage the new “WSLENV” to enhance environmental variable interop between Win32/WSL.
Summary
For the pros who’ve already heard about WSLENV and just want to know how it works, see below for a quick synopsis:
- WSLENV is a colon-delimited list of environment variables that should be included when launching WSL processes from Win32 or Win32 processes from WSL
- Each variable can be suffixed with a slash followed by flags to specify how it is translated
- The value is a path that should be translated between WSL paths and Win32 paths
- The value is a list of paths. In WSL, it is a colon-delimited list. In Win32, it is a semicolon-delimited list
- The value should only be included when invoking WSL from Win32
- The value should only be included when invoking Win32 from WSL
- You can set WSLENV in .bashrc or in the custom Windows environment for your user
A sample of how a WSLENV could possibly look:
What are Environment Variables?
Environment variables are a way to store configurable values across your entire system—all your programs have access to these. On Windows, you can find your environmental variables by going to “Edit environment variables for your account” in the Control Panel. It will show a window like the one below:
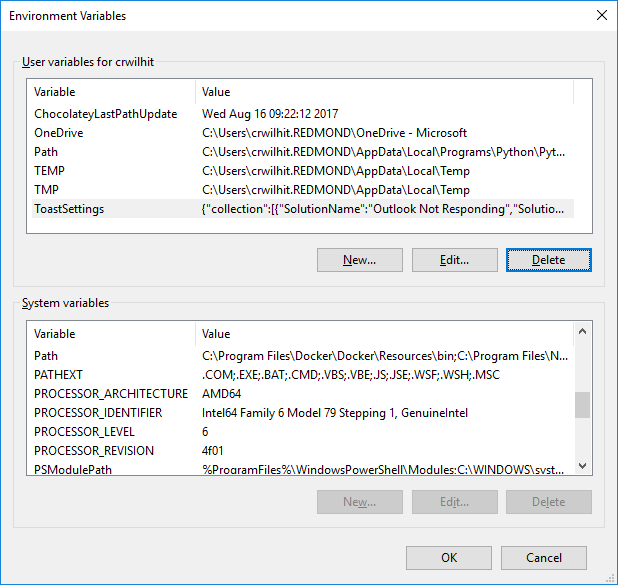
Notice the wide range of values in the example above—lists of directories, software versions, locations where temporary files are permitted to be stored, and more. Who sets these values? You can, newly installed software on your system can, or Windows has set some of them.
An example of a well-known environmental variable is PATH. Much like the name implies, PATH contains a list of directories (paths) separated by a semi-colon which point to the locations of numerous executables. Here’s a common example of how PATH is used:
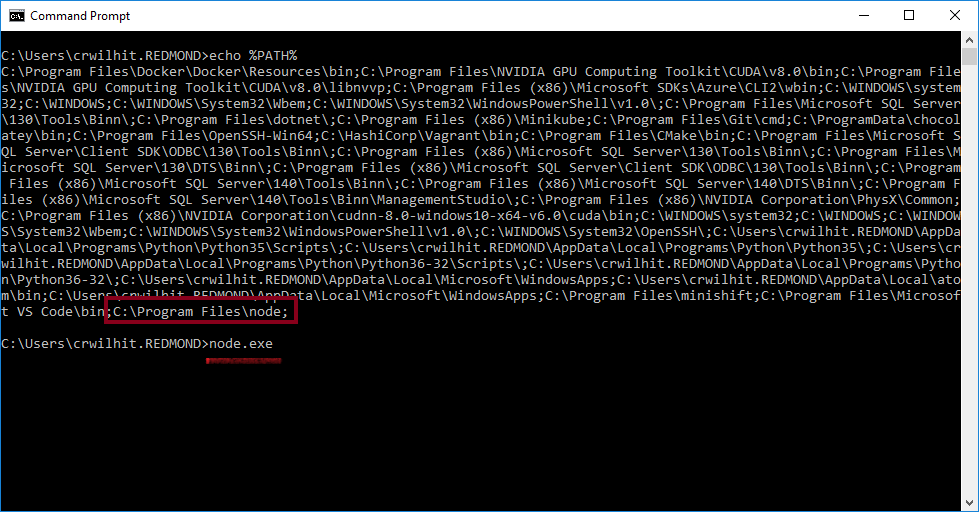
I’m about to invoke Node from the command line. When I enter this command, cmd reads the contents of PATH, searching for a directory that contains the executable “node.exe”. If it finds it, it stop the search immediately and invokes the executable it found. The image above has PATH printed to the console—and you’ll notice that the last entry in PATH points to a directory which does in fact contain Node.
WSL and environment variables — before Insider 17063
Referencing environment variables from *both *Windows and WSL introduces interop issues. Prior to 17063, the only Windows environment variable that WSL had access to was PATH (so you could launch Win32 executables from under WSL). But there was no way to set an environment variable in WSL, invoke a Win32 process, and expect for that variable to be fed through to the process.
Given these limitations, you couldn’t pass an environment var in WSL to a Win32 process without jumping though convoluted hoops. Since passing environment vars to processes is a common practice and we received plenty of feedback concerning how this was a pain point for our users, we wanted to make this a better experience.
WSL and environment variables — after Insider 17063
We’re introducing a special environmental var named WSLENV to assist in the flow between WSL and Win32. WSLENV is shared; it exists in both environments. A user sets the value of WSLENV to a concatenation of several other already-defined environment vars , each suffixed with a slash followed by flags to specify how the value should be translated. An example definition could be something like this:
There are four flags you can use to influence how they’re translated. Let’s walk through each:
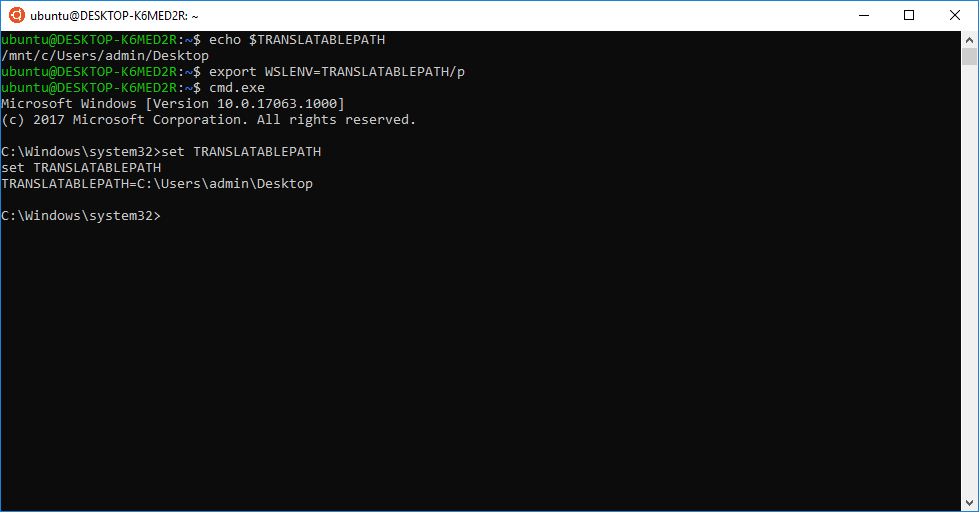
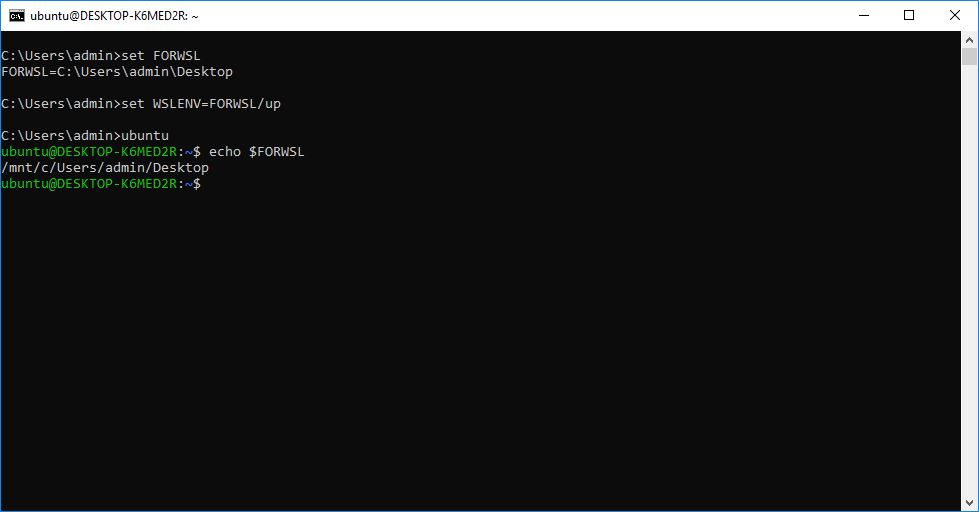
This flag indicates that a path should be translated between WSL paths and Win32 paths. Notice in the example below how we set the var in WSL, add it to WSLENV with the ‘/p’ flag, and then read the variable from cmd.exe and the path translates accordingly.
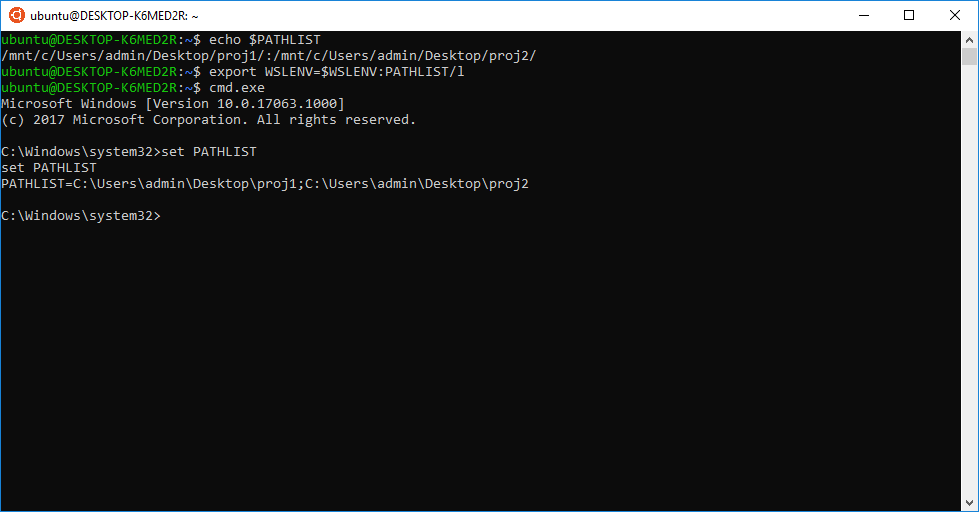
This flag indicates the value is a list of paths. In WSL, it is a colon-delimited list. In Win32, it is a semicolon-delimited list. See in the example below how PATHLIST is appropriately converted to a semi-colon separated list.
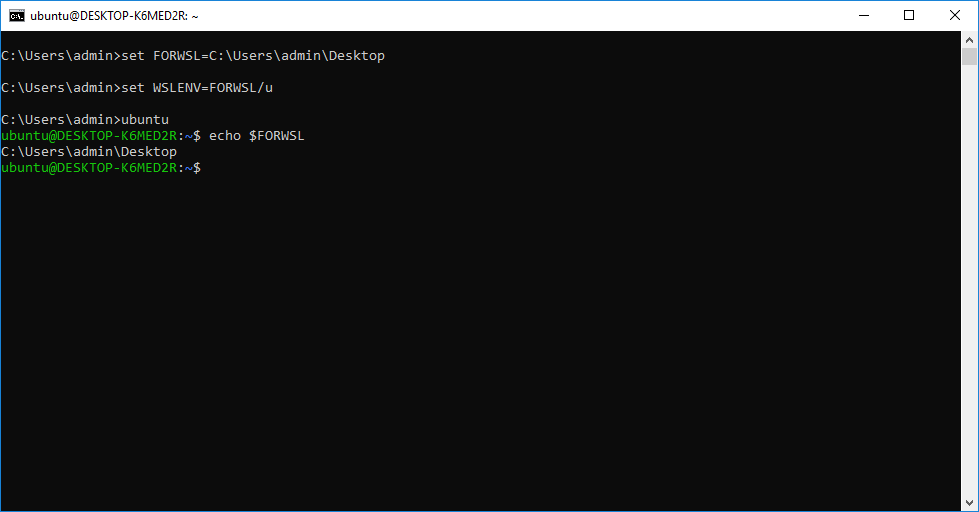
This flag indicates the value should only be included when invoking WSL from Win32. In the example below, we set FORWSL from cmd and it will show up in WSL.
Notice how it does not convert the path automatically—we need to specify the /p flag to do this. We can combine flags and do just that:
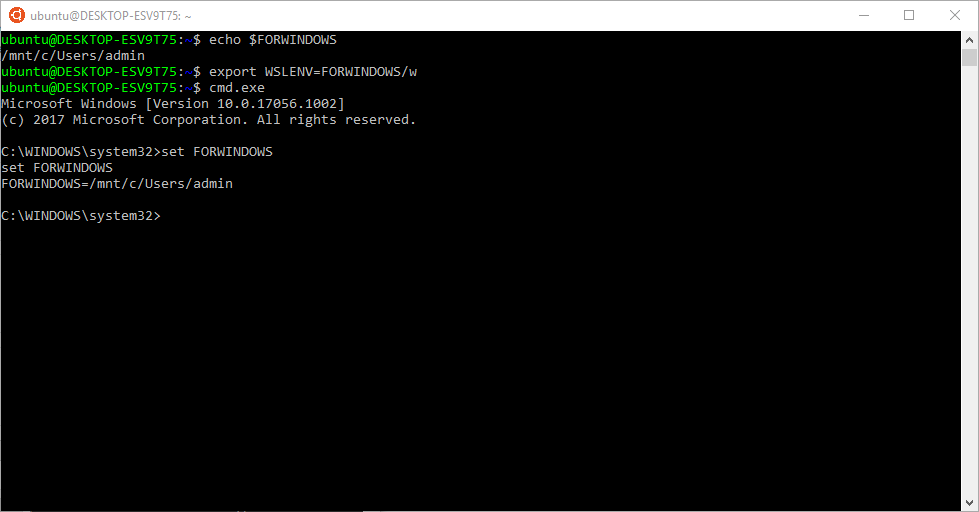
This flag indicates the value should only be included when invoking Win32 from WSL.
Passing vars with a script
If you’re writing a bash script and want to pass environment variables to some process that you will be invoking, you can do this:
One important thing to call out here is that I am appending the environment variable I want to pass to the process to WSLENV. We recommend this so you don’t wipe out the other vars previously set for WSLENV.
An Example with Go
For example, say you want to set up a dev environment with Go in WSL. With the WSLENV var, we can configure it to share GOPATH between WSL and Win32. If you’ve never used Go before, if your project directory is outside of the root directory where Go is installed then you need to set GOPATH. Let’s walk through an end-to-end example.
1. Install Go on Windows & WSL
First, we need to install Go on both platforms. To install on Windows, grab Go and select Windows as your platform. Click through and complete the installation. Next, install Go in WSL. We need to issue this command from WSL:
2. Grab VSCode
Next, we’ll want to install VSCode in Windows. If you don’t already have VSCode, you can get it from here.
3. Set up the project
Next, we need to set up our Go project. The project needs to be under the Windows file system (I’ll just make mine on my Desktop). Issue the following commands in PowerShell:
Open the newly created hello.go file with VSCode or your favorite text editor and add this text to it:
4. Set Environment Variables
Now we need to set our GOPATH to point to this project, and then add GOPATH to WSLENV. From PowerShell:
5. Success
That’s all you need to do. If you open the project file in VSCode, it will prompt you about missing package–click yes to install these. After they complete their installation, you will have full VSCode integration (intellisense, linting, etc). On the WSL side, now if you navigate to your project directory (it will be under /mnt/c/…) and try to “go build”, it will run successfully and output a Linux binary that you can run in WSL. Debugging from VSCode will produce a Windows executable that you can also run.
Conclusion
We hope using the new WSLENV environment variable will help with interoperating between WSL and Win32. Grab Insider Build **17063 **to try it out. We would love to get feedback on this feature. Is it too clunky? does it work the way you’d hoped? Leave a comment below and let us know.
What happens if I set an environment var in WSLENV from Win32 which is already defined in WSL?
The definition in WSL (via .profile or other) will override the value defined in WSLENV when accessed via WSL.
What about the other way around (variable defined in Win32, then defined and shared from WSL?)
The WSLENV definition will override the value previously defined in Win32 (the opposite of the above question).
What happens if I concatenate WSLENV to the end of my PATH environment var?
It will not concatenate anything—WSLENV gets chopped off.
Do the changes I make to WSLENV from WSL persist after I close WSL?
No, you’ll need to modify the appropriate config file (.profile, .bash_rc, etc) and set WSLENV to whatever you’d like.
Can I set WSLENV to an actual filesystem path or does it have to be set to an existing environment var?
You can set the value to whatever you’d like. Although, if you were to set a filesystem path, no translation occurs. That’s why we recommend setting WSLENV to the environment variable containing the path and you’ll get the path-translation flags for free.
Craig Wilhite
Program Manager, WSL, Containers, and Hyper-V
Переменные среды в Windows: использование, список и таблицы
Переменная среды (environment variable) — текстовая короткая ссылка на элемент операционной системы Windows, предназначенная для получения быстрого доступа к объекту системы, или к данным о каталогах и конфигурации компьютера. Переменная среды (переменная окружения) позволяет быстро перейти к нужному месту на компьютере, без использования имени пользователя или полного пути к объекту.
Переменные окружения Windows используются в командной строке, в диалоговом окне «Выполнить» и адресной строке Проводника. Переменная среды может содержать информацию о настройках системы или данные о текущем пользователе компьютера.
Переменные среды Windows делятся на два вида:
- Пользовательские переменные среды — содержат указания пути к пользовательским каталогам.
- Системные переменные среды — содержат информацию о каталогах ОС и конфигурации ПК.
Чаще всего переменные среды используются как путь к дискам, файлам или параметрам системы. Использование переменной среды позволяет быстро перейти к нужной директории операционной системы, без ввода полного пути, например, без ввода имени пользователя.
Переменные окружения часто используются при написании скриптов, или при работе в командной строке. Короткие переменные можно использовать вместо полного пути до файла или папки, например, при создании ярлыков, при вводе пути к объекту.
Пример использования переменной среды Windows
Рассмотрим следующий пример: пользователю нужно открыть системную папку «AppData», в которой находятся различные данные программ, установленных в операционную систему Windows. Скрытая папка «AppData» находится в профиле пользователя, обычно на диске «C:». Данные приложений расположены по пути:
Чтобы получить доступ к этой папке нужно выполнить несколько последовательных действий: открыть Проводник, включить в Windows отображение скрытых папок и файлов, а затем пройти по всему пути до нужной папки.
При помощи переменной «%APPDATA%» (переменная используется без кавычек) можно сразу открыть нужную директорию в системе, без ввода имени пользователя, включения отображения скрытых папок, ввода полного пути. Это экономит много времени.
Чтобы открыть нужный каталог достаточно лишь ввести «%APPDATA%» в поле поиска Windows, в адресную строку Проводника или в диалоговое окно «Выполнить», а затем нажать на клавишу «Enter».
Переменные среды Виндовс заключены в специальный оператор «%», который находится с двух сторон названия переменной. Это необходимо, чтобы система могла обработать запрос.
Пользователь может самостоятельно создавать переменные среды или изменять существующие. В статье мы рассмотрим несколько способов просмотра переменных среды и самостоятельное создание переменной. В руководстве вы найдете таблицу со списком переменных, применяемых в операционных системах Windows 10, Windows 8.1, Windows 8, Windows 7.
Как посмотреть переменные среды Windows 10
Сейчас мы посмотрим, как получить доступ к переменным средам в операционной системе Windows 10. В других версиях Windows необходимо выполнить аналогичные действия.
Чтобы посмотреть переменные окружения Windows 10, выполните следующее:
- Нажмите на клавиши» «Win» + «R».
- В окне «Выполнить» введите команду: «systempropertiesadvanced» (без кавычек), а затем нажмите на кнопку «ОК».
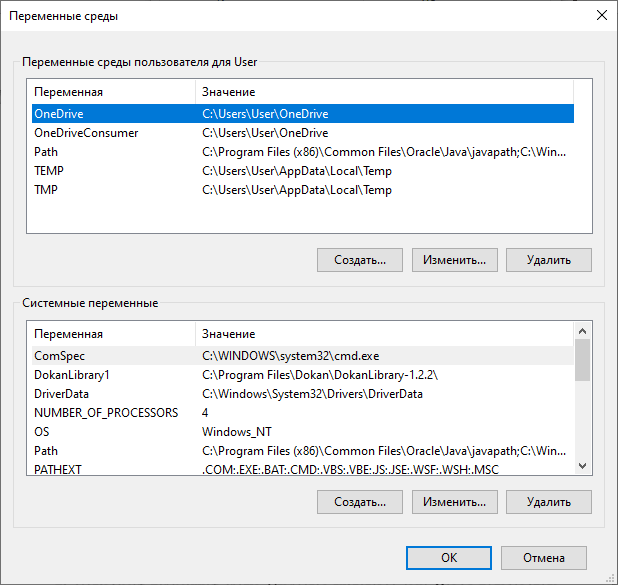
- В окне «Свойства системы», во вкладке «Дополнительно» нажмите на кнопку «Переменные среды…».
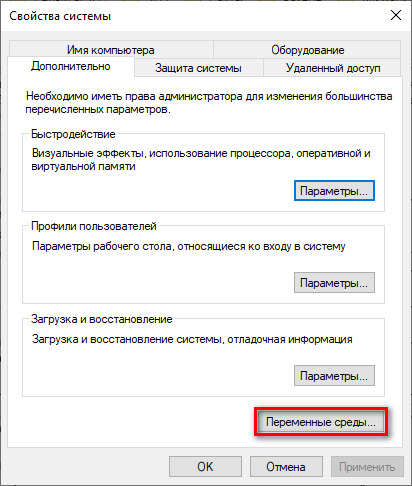
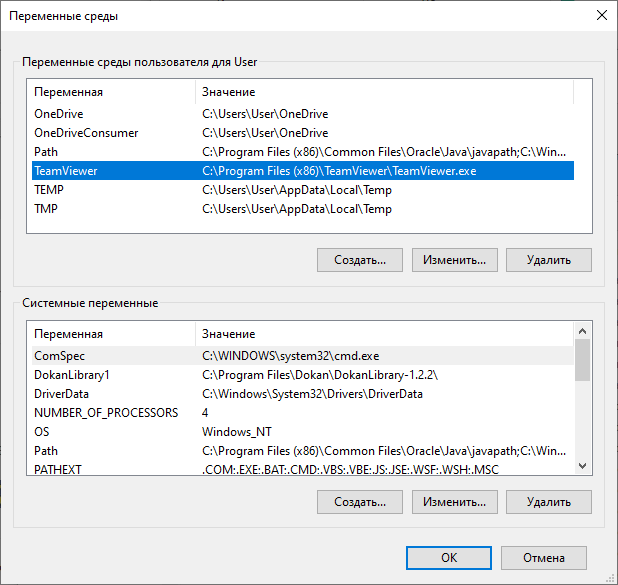
- В окне «Переменные среды» отображаются пользовательские переменные среды и системные переменные среды.
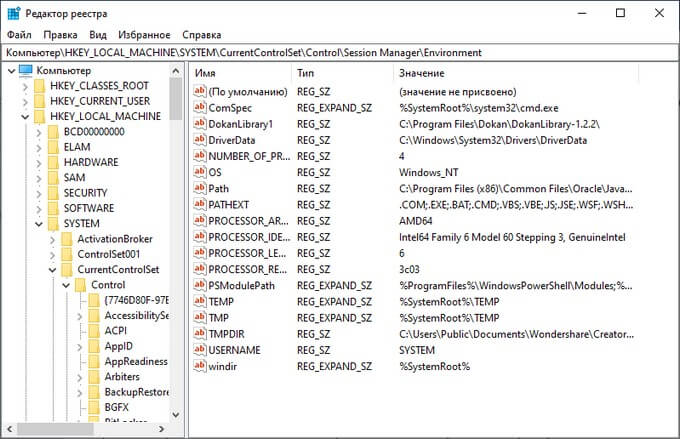
Доступ к переменным средам из реестра Windows
Есть возможность получить доступ к переменным средам из системного реестра Windows. Пользователю нужно будет открыть редактор реестра, а затем пройти по пути до определенной ветки.
Системные переменные среды находятся по следующему пути:
Переменные среды локального пользователя расположены в следующей ветке реестра:
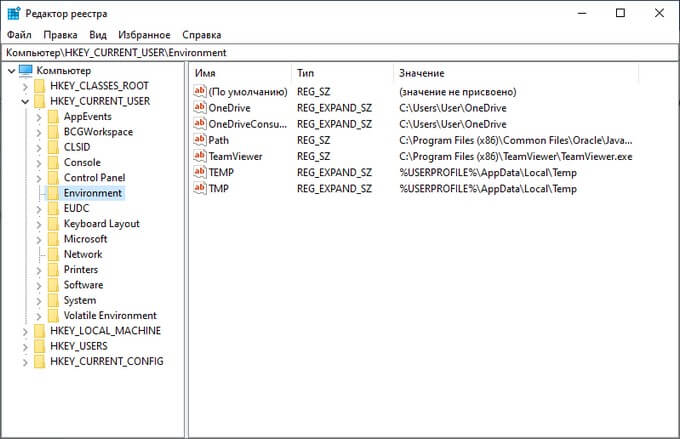
Вы можете создать в редакторе реестра новые переменные или изменить существующие.
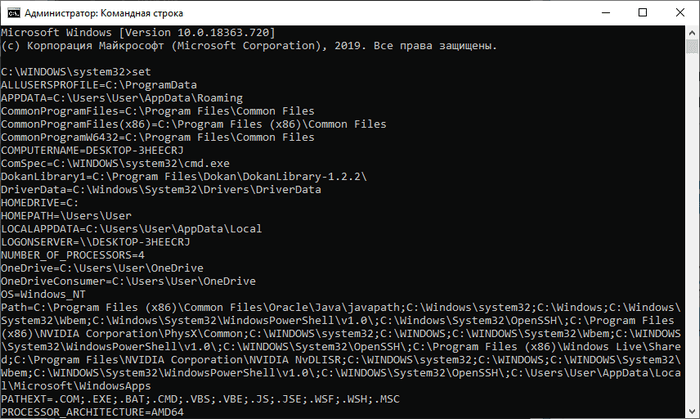
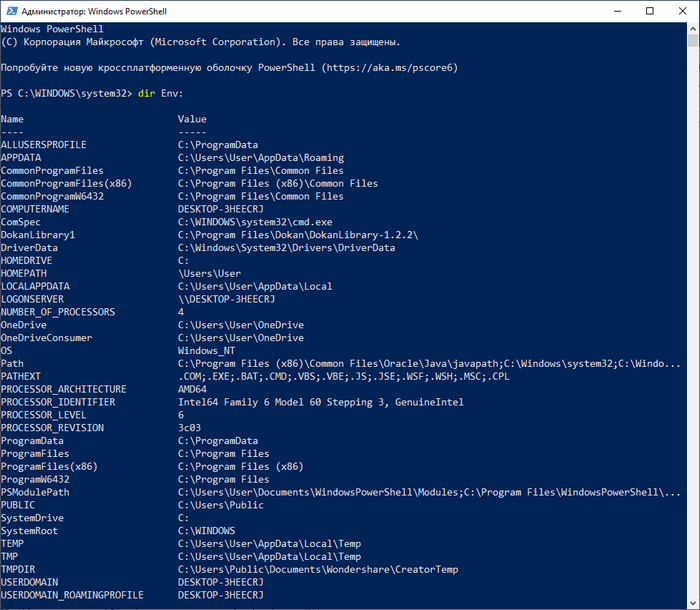
Как посмотреть все переменные среды в командной строке
Пользователь может получить список переменных среды при помощи системного инструмента — командной строки Windows.
В cmd переменные среды открываются следующим образом:
- Запустите командную строку от имени администратора.
- Выполните команду:
Для получения списка переменных в виде текстового файла, выполните в командной строке команду:
После выполнения этой команды, на Локальном диске «C:» появится текстовый файл с именем «Variables» (имя можно использовать любое), в котором находится список переменных среды Windows.
На моем компьютере файл имеет следующее содержание:
Открытие списка переменных среды в Windows PowerShell
Открытие списка переменных среды возможно при помощи системного средства Windows PowerShell.
Выполните следующие действия:
- Запустите Windows PowerShell от имени администратора.
- Введите команду, а затем нажмите на клавишу «Enter»:
- В окне PowerShell откроется список переменных среды Windows.
Создание переменной среды в Windows
Пользователь может самостоятельно создать новую переменную для открытия директорий на компьютере, или для запуска программ.
- В окне «Переменные среды» выберите одну из групп переменных: пользовательские или системные переменные.
- Нажмите на кнопку «Создать…».
На этом примере я создам отдельную переменную среды для запуска программы TeamViewer.
- В окне «Изменение пользовательской переменной» добавьте имя переменной, а в поле «Значение переменной:» введите полный путь к исполняемому файлу.
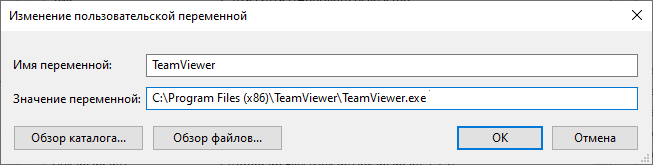
- В окне переменных сред добавилась новая переменная. Нажмите на кнопку «ОК» для применения изменений.
- В диалоговом окне «Выполнить» введите «%Имя_переменной%», в нашем случае, «%TeamViewer%», нажмите на кнопку «ОК».
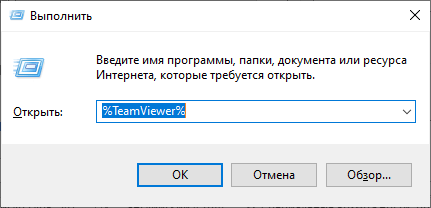
- На Рабочем столе компьютера откроется окно запущенной программы.
Подобным способом, после ввода переменной в адресную строку Проводника, выполняется запуск программы или открытие директории на ПК.
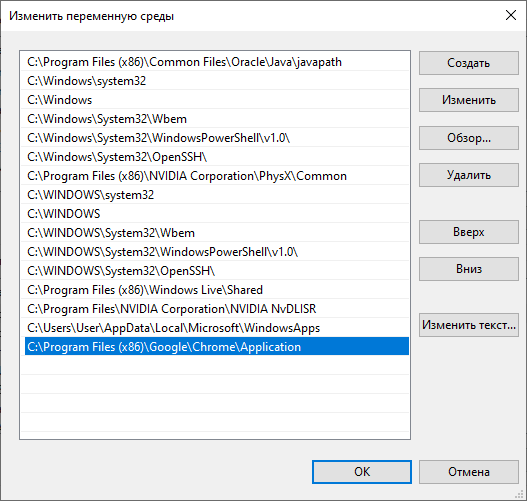
Переменная среды пути «Path» содержит список директорий на компьютере, в которых система должна искать исполняемые файлы. Переменная среды пути «PATH» не добавляется к исполняемым файлам, а только к директориям, где находятся данные файлы.
Если добавить в переменную среды Path Windows путь к директории с исполняемым файлом, например, для браузера Google Chrome: C:Program Files (x86)GoogleChromeApplication , то программа запустится из командной строки, после выполнения команды «chrome», без ввода полного пути к исполняемому файлу.
При необходимости, пользователь может удалить ненужную переменную из операционной системы Windows.
Список переменных среды Windows в таблице
Для удобства посетителей сайта я собрал в общую таблицу переменные, их описание и значения в операционной системе Windows. В подавляющем большинстве случаев, системная папка расположена на диске «C:», поэтому пути в значениях даны для этого диска.
| Переменная | Назначение | Значение переменной |
|---|---|---|
| %ALLUSERSPROFILE% | Папка ProgramData | C:\ProgramData |
| %APPDATA% | Папка размещения данных программ | C:\Users\User\AppData\Roaming |
| %CommonProgramFiles% | Папка Common Files в Program Files | C:\Program FilesCommon Files |
| %CommonProgramW6432% | Папка Common Files в Program Files | C:\Program Files\Common Files |
| %COMPUTERNAME% | Имя компьютера | DESKTOP-XXXXXXX |
| %ComSpec% | Запуск командной строки | C:\WINDOWS\system32\cmd.exe |
| %DriverData% | Папка DriverData | C:\Windows\System32\Drivers\DriverData |
| %HOMEDRIVE% | Системный диск | C: |
| %HOMEPATH% | Папка профиля пользователя | C:\Users\User |
| %LOCALAPPDATA% | Папка локальных данных приложений | C:\Users\User\AppData\Local |
| %LOGONSERVER% | Имя контроллера домена | \DESKTOP-XXXXXXX |
| %NUMBER_OF_PROCESSORS% | Количество потоков процессора | |
| %OneDrive% | Папка OneDrive | C:\Users\User\OneDrive |
| %Path% | Путь поиска исполняемых файлов | C:\Windows\system32;C:\Windows;C:\Windows\System32\Wbem;… |
| %PATHEXT% | Исполняемые расширения файлов | .COM; .EXE; .BAT; .CMD; .VBS; .VBE; .JS; .JSE; .WSF; .WSH; .MSC |
| %PROCESSOR_ARCHITECTURE% | Архитектура процессора | AMD64; x86; IA64 |
| %PROCESSOR_IDENTIFIER% | Описание процессора | |
| %PROCESSOR_LEVEL% | Номер модели процессора | |
| %PROCESSOR_REVISION% | Ревизия процессора | |
| %ProgramData% | Папка ProgramData | C:\ProgramData |
| %ProgramFiles% | Папка ProgramFiles | C:\Program Files |
| %ProgramFiles(x86)% | Папка ProgramFiles(x86) | C:\Program Files (x86) |
| %ProgramW6432% | Папка ProgramFiles | C:\Program Files |
| %PROMPT% | Возвращение параметров командной строки | |
| %PSModulePath% | Пути к расположению модулей PowerShell | C:\Program Files\WindowsPowerShell\Modules;C:\WINDOWS\system32\WindowsPowerShell\v1.0\Modules |
| %PUBLIC% | Папка «Общие» в профиле пользователей | C:\Users\Public |
| %SystemDrive% | Системный диск с Windows | C: |
| %SystemRoot% | Папка Windows | C:\Windows |
| %TEMP% | Временный каталог | C:\Users\User\AppData\Local\Temp |
| %TMP% | Временный каталог | C:\Users\User\AppData\Local\Temp |
| %USERDOMAIN% | Имя домена | DESKTOP-XXXXXXX |
| %USERNAME% | Имя пользователя | User |
| %USERPROFILE% | Профиль пользователя | C:\Users\User |
| %Windir% | Папка Windows | C:\Windows |
Выводы статьи
Переменные окружения Windows позволяют пользователю экономить время во время работы на компьютере. Переменными средами Windows могут пользоваться обычные пользователи или системные администраторы для быстрого доступа к объектам операционной системы, чтобы открыть нужную директорию на компьютере, или запустить программу.


