- Как экспортировать журналы событий Windows в Excel — Вокруг-Дом — 2021
- Table of Contents:
- Открыть Event Viewer и экспортировать журналы в файл CSV
- Шаг 1
- Шаг 2
- Шаг 3
- Шаг 4
- Шаг 5
- Шаг 6
- Шаг 7
- Шаг 8
- Открыть файл CSV в Excel и отсортировать по событию
- Шаг 1
- Шаг 2
- Шаг 3
- Шаг 4
- Шаг 5
- Шаг 6
- Шаг 7
- Шаг 8
- Шаг 9
- Шаг 10
- Шаг 11
- It’s a Boy Girl Thing (Апрель 2021).
- Windows Setup Log Files and Event Logs
- WindowsВ Setup Event Logs
- To view the WindowsВ Setup event logs
- To Export the log to a file
- Exporting event logs with Windows PowerShell
- Instruments
- Research
- Putting all together
- Scheduling the task
- Conclusion
- How-To Export Windows Event Logs
- Purpose
- Solution
- Method 1: Export EVTX with Display Information (MetaData)
- Method 2: Export as CSV
- Method 3: Collect entire log folder from Windows.
- Which Logs to Export
Как экспортировать журналы событий Windows в Excel — Вокруг-Дом — 2021
Table of Contents:
Средство просмотра событий Microsoft Windows регистрирует события, происходящие на компьютере под управлением Microsoft Windows. В журналах записываются различные события, в том числе информация о входе и выходе из учетной записи, информация о системе, предупреждения и ошибки. Журнал событий — это бесценный инструмент для устранения неполадок в сбое приложений или других системных ошибках. В собственном формате файлы журнала событий доступны для просмотра только в консоли просмотра событий. Однако журналы событий можно экспортировать из средства просмотра событий и импортировать в документ Excel. После сохранения в Excel список идентификаторов событий можно сортировать и анализировать по мере необходимости.

Сохраните ценную системную информацию вашего компьютера, экспортируя журналы событий в Excel.
Открыть Event Viewer и экспортировать журналы в файл CSV
Шаг 1
Щелкните правой кнопкой мыши значок «Компьютер» на рабочем столе. Если значок «Компьютер» отсутствует на рабочем столе, нажмите кнопку «Пуск», чтобы найти значок «Компьютер» в программах «Пуск».
Шаг 2
Нажмите «Управление» в окне параметров, чтобы открыть консоль Средства управления компьютером.
Шаг 3
Нажмите стрелку вправо перед группой «Просмотр событий», чтобы открыть доступные журналы просмотра событий.
Шаг 4
Щелкните правой кнопкой мыши журнал, который нужно экспортировать, например «Журнал событий безопасности». В доступных параметрах нажмите «Сохранить все события как…».
Шаг 5
Нажмите стрелку вниз в поле «Сохранить как тип:» и выберите «CSV (значение, разделенное запятыми) (* CSV)».
Шаг 6
Нажмите в поле «Имя файла:» и введите имя файла и сохраните местоположение для файла. Например: «c: SecurityEventLog» сохранит файл с именем SecurityEventLog и поместит его на диск C :.
Шаг 7
Нажмите «Сохранить», чтобы сохранить файл CSV на диске C :.
Шаг 8
Закройте консоль управления компьютером, нажав «X» в верхнем правом углу окна консоли.
Открыть файл CSV в Excel и отсортировать по событию
Шаг 1
Откройте Microsoft Excel, нажав «Пуск», «Все программы», «Microsoft Office» и «Microsoft Office Excel».
Шаг 2
Нажмите кнопку «Офис» в верхнем левом углу приложения Excel и нажмите «Открыть».
Шаг 3
Введите «C: SecurityEventLog.cvs» в поле «имя файла:» и нажмите «Открыть», чтобы запустить мастер импорта текста.
Шаг 4
Выберите «С разделителями» на первой странице мастера импорта текста и нажмите «Далее».
Шаг 5
Выберите «Запятая» и отмените выбор «Tab» в разделе «Разделители» и нажмите «Далее».
Шаг 6
Выберите «Общие» в поле «Формат данных столбца» и нажмите «Готово», чтобы открыть журнал просмотра событий в Excel.
Шаг 7
Нажмите на заголовок столбца «Идентификатор события», чтобы выделить весь столбец идентификаторов событий.
Шаг 8
Нажмите «Данные» в меню в верхней части приложения Excel.
Шаг 9
Нажмите «Сортировка» на вкладке меню «Данные», выберите «Расширить выбор», когда появится окно «Предупреждение о сортировке», и нажмите «Сортировка».
Шаг 10
Нажмите «Идентификатор события» в раскрывающемся списке «Сортировать по», укажите порядок сортировки, выбрав один из доступных вариантов в раскрывающемся списке «Порядок», и нажмите «ОК».
Шаг 11
Просмотрите список идентификаторов событий Windows в Excel и сохраните файл для дальнейшего использования.
It’s a Boy Girl Thing (Апрель 2021).
Windows Setup Log Files and Event Logs
Windows® Setup creates log files for all actions that occur during installation. If you are experiencing problems installing Windows, consult the log files to troubleshoot the installation.
WindowsВ Setup log files are available in the following directories:
| Log file location | Description | ||||||||||
|---|---|---|---|---|---|---|---|---|---|---|---|

| KB ID: | 1873 |
| Product: | Veeam Backup & Replication |
| Version: | All |
| Published: | 2014-04-21 |
| Last Modified: | 2021-01-01 |
| Languages: | IT | ES |
Purpose
When submitting a support case for technical assistance, it is sometimes necessary to upload relevant Windows event logs in addition to the Veeam logs. Event logs exported using default settings can be missing important information. This article describes three different methods of exporting Windows event logs and which logs tend to be most useful for certain types of support cases.
Solution
Below are the three common methods a Veeam Support Engineer may request you gather event logs for them. If they have specified a specific method, please use the requested method.
Click here to see what logs should be collected for common issues.
Method 1: Export EVTX with Display Information (MetaData)
An .evtx file alone does not contain the text of most events, so uploading an .evtx file without the associated Display Information can delay resolution of your support case. Even with the display information, an .evtx contains only the UTC time of the events and not the source time zone (Event viewer adjusts the displayed time to your local time zone).
Steps to Export .evtx with Display Information
- Open Event Viewer (eventvwr.msc).
- Locate the log to be exported in the left-hand column.
- Right-click the name of the log and select Save All Events As…
- Enter a file name that includes the log type and the server it was exported from.
For example, when exporting the Application event log from server named HV01, enter Application_HV01. - In Save as type , select Event Files .
- Include display information.
Be sure to include the LocaleMetaData folder when packaging logs for upload.
Please package all files into a single .zip archive. For information on uploading files to Support, see: Steps to Compile Logs
To export and then archive an event log from the command line, see: Archive an Event Log
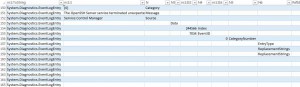
Method 2: Export as CSV
- Open Event Viewer (eventvwr.msc).
- Locate the log to be exported in the left-hand column.
- Right-click the name of the log and select Save All Events As…
- Enter a file name that includes the log type and the server it was exported from.
For example, when exporting the Application event log from server named HV01, enter Application_HV01.
In Save as type , select CSV (Comma Separated) .
Please package all files into a single .zip archive. For information on uploading files to Support, see: Steps to Compile Logs
To export and then archive an event log from the command line, see: Archive an Event Log
Method 3: Collect entire log folder from Windows.
- Navigate to C:\Windows\System32\winevt\Logs
- Archive (ZIP\7z\RAR) the entire contents of the Logs folder.
Please package all files into a single .zip archive. For information on uploading files to Support, see: Steps to Compile Logs
To export and then archive an event log from the command line, see: Archive an Event Log
Which Logs to Export
Veeam Support will request logs as needed, but you can speed up resolution of a new case by checking to see if it falls into one of the categories below and uploading appropriate event logs during case creation.
- For Hyper-V Snapshot (Shadow Copy) Failures
- Export the following event logs from the standalone Hyper-V host or from all cluster nodes:
- Windows Logs > System
- Windows Logs > Application
- Applications and Services Logs>Microsoft>Hyper-V-VMMS>Admin
- If Application-Aware Image Processing is enabled in the Backup or Replication job settings, test whether the failure occurs with that setting disabled.
- If the problem occurs only when Application-Aware is enabled, export the Hyper-V-Integration log from the Hyper-V host managing the VM, then see Guest Processing Issues below.
Note:For Hyper-V 2016 or newer this step can be skipped, as this section was removed in Server 2016.- Applications and Services Logs>Microsoft>Hyper-V-Integration>Admin
- Export the following event logs from the standalone Hyper-V host or from all cluster nodes:
- For Guest Processing Issues
Note: For “Guest Processing Skipped” seeKB1855.- Common examples include failure to truncate Exchange or SQL transaction logs, “VSSControl” error codes, and unexpected behavior occuring with the VM guest OS during backup.
- Export these logs from the affected VM guest OS:
- Windows Logs > System
- Windows Logs > Application
- You will typically also want to collect the Veeam VSS logs from the VM – see KB1789.
- For Problems with Backup Infrastructure Servers
- In all scenarios below, export the following from the appropriate server. When in doubt, export from the Veeam Backup server:
- Windows Logs > System
- Windows Logs > Application
- If the error message is:
- «task failed unexpectedly” — Export events from the Veeam Backup server.
- referring to backup files on a Windows server — Export events from the repository server.
- referring to backup files on a CIFS/SMB share — Export events from the gateway server, or from the Veeam Backup server and all proxies if no gateway was specified in the repository settings.
- In all scenarios below, export the following from the appropriate server. When in doubt, export from the Veeam Backup server:


