- How to Extend Volume in Windows 10 (2 Methods)?
- Scenario
- Why need to extend volume in Windows 10?
- How to extend volume in Windows 10 (2 methods)?
- Method 1. Extend volume by deleting adjacent volume
- Method 2. Extend volume without data loss
- Conclusion
- Extend a basic volume
- To extend a volume by using Disk Management
- To extend a volume by using PowerShell
- Расширение базового тома Extend a basic volume
- Расширение тома с помощью компонента управления дисками To extend a volume by using Disk Management
- Расширение тома с помощью PowerShell To extend a volume by using PowerShell
How to Extend Volume in Windows 10 (2 Methods)?
Learn how to extend volume in Windows 10 in this article. It will demonstrate you 2 methods to perform it.

By Dylan  / Last Updated September 30, 2020
Scenario
How to extend my system volume?
I have 1 TB HDD with 2 partitions in my Windows 10 PC. C partition and D partition. But the C partition is running out of space, and there is some free space on the D partition. How can I extend the system partition?»
— Question from microsoft.com
Why need to extend volume in Windows 10?
Have you ever had such problem as the scenario? Sometimes, you might find one of your volumes is out of space. Esepecially, if the C volume is full, the computer running speed can be dramatically slowed down. Even you delete all unnecessary files, the thing won’t get better. In this circumstance, you can extend the volume to increase the space on it.
Extending a partition means reassigning free space in a hard disk. It is important if you want to make good use of your disk space. Besides, you will need to save some free space for the C drive to guarantee that everything runs smoothly.
Next, this post will demonstrate you how to extend volume in Windows 10 with 2 methods.
How to extend volume in Windows 10 (2 methods)?
There are 2 methods provided here: extend volume by deleting adjacent volume, and employing a professional disk space manager. the method 1 is applied to the situation where you have the adjacent volume behind the volume needs to be extended. In other conditions, please turn to method 2.
Method 1. Extend volume by deleting adjacent volume
вњЌ Attentionпјљ
1. There has to be some adjacent unallocated space after the volume you want to extend.
2. If there is no such unallocated space, you can delete the adjacent partition to have it. If there are some space on it, you can turn to the method 2.
Step 1. Press “Win + R” to open Run box, and input “diskmgmt.msc” and press Enter to open Disk Management.
Step 2. In the Disk Management, the disk and partition information will be demonstrated on the main interface.
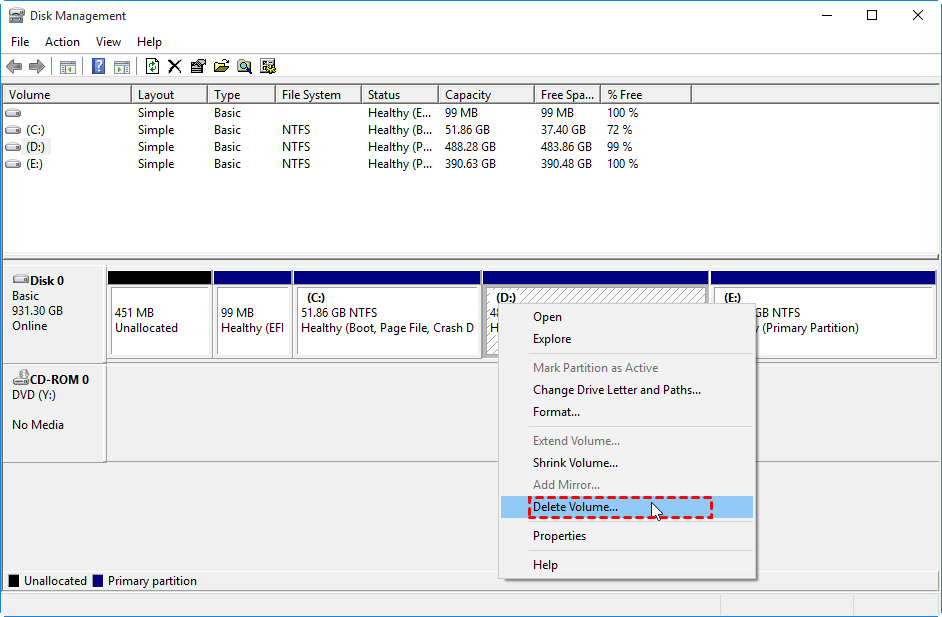
Step 3. Right-click on the D drive or an adjacent partition, and choose “Delete Volume”.
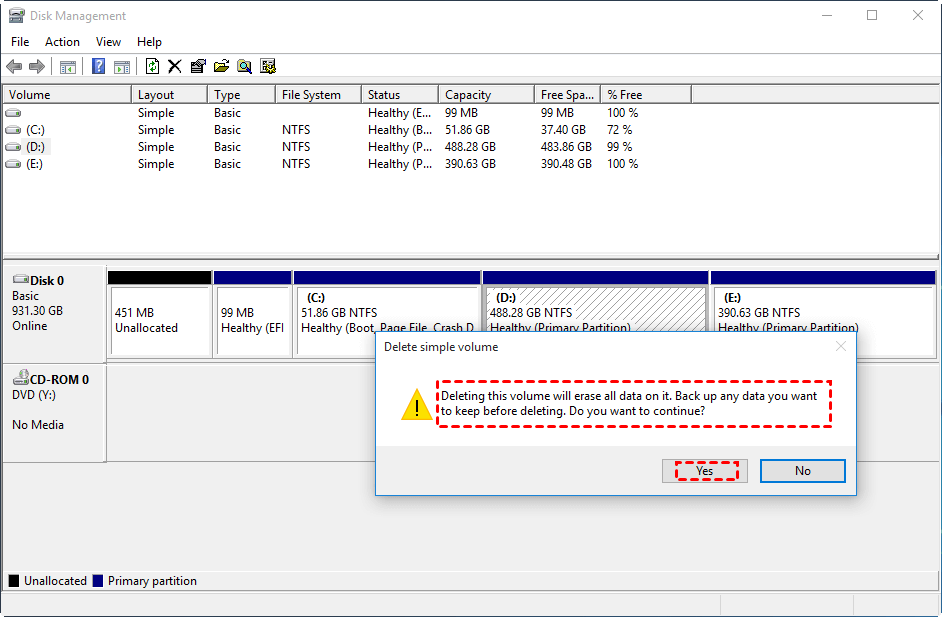
Step 4. Disk Management will warn you the data on the partition will be deleted, click “Yes” to continue.
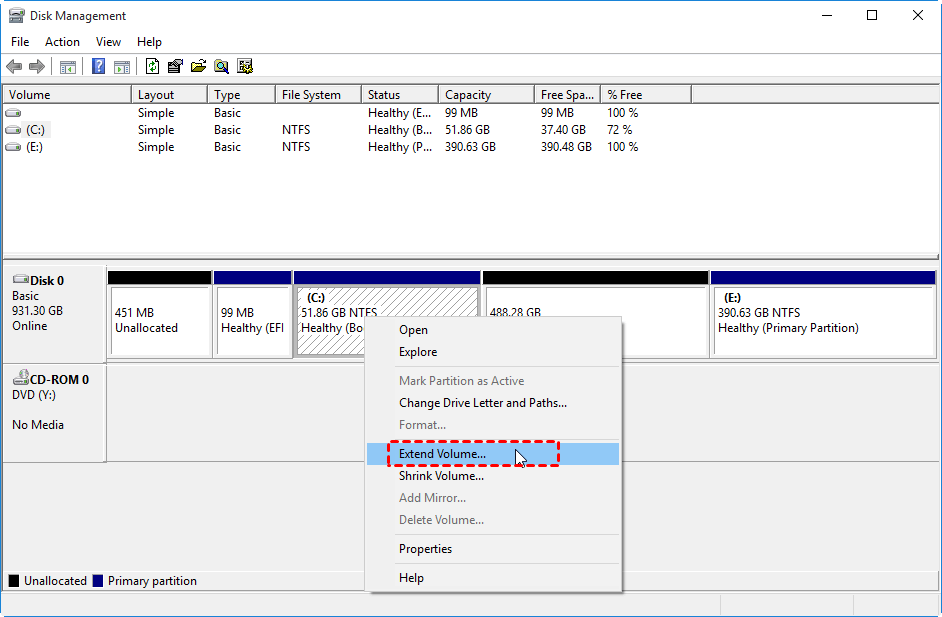
Step 5. And right-click on the partition you want to extend, and choose “Extend Volume”.
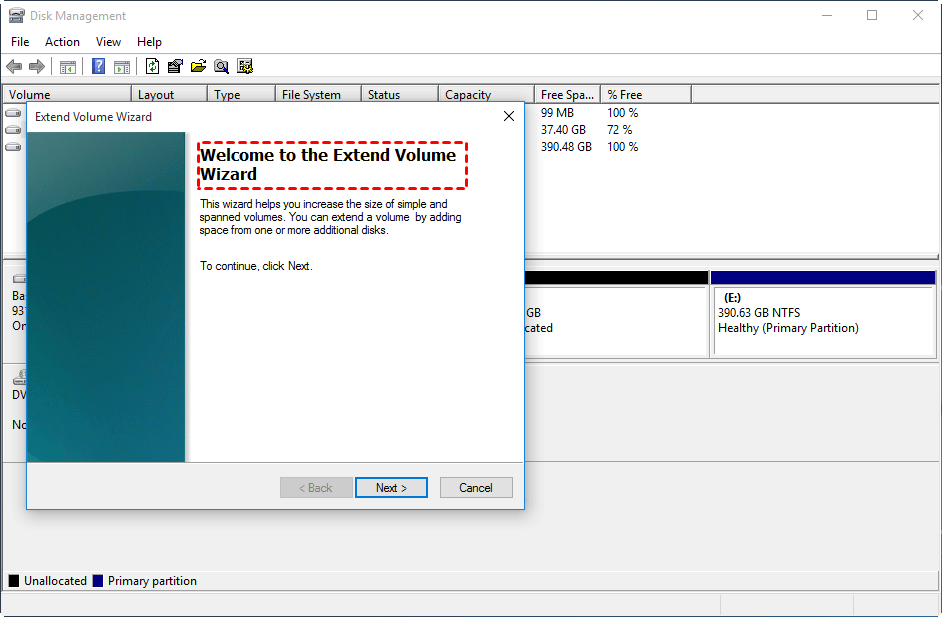
Step 6. And the Extend Volume Wizard will be launch, follow the prompts and finish the operation.
Method 2. Extend volume without data loss
Method 1 will lose all your data on the adjacent partition, so you may don’t want to delete the whole volume. And even you use Disk Management to shrink a volume for unallocated space, it can’t be added to the volume you want to extend because the unallocated space would not closed to it.
Then you can turn to a free disk and partition manager-AOMEI Partition Assistant Professional. This software helps you to directly extend a volume in Windows 10, 8, 7 with free space on other partitions even there is no contiguous unallocated space. So you don’t need to delete any volume.
And just download the Demo version and follow the steps below to see how to extend volume without data loss in Windows 10.
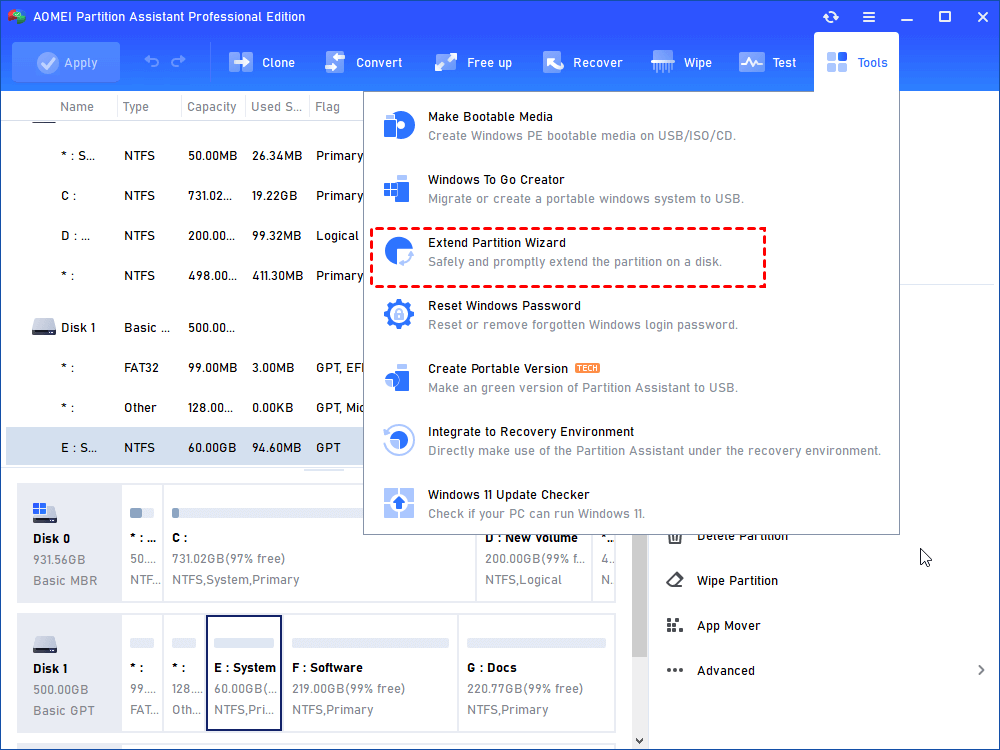
Step 1. Open AOMEI Partition Assistant, click «All Tools» > «Extend Partition Wizard».
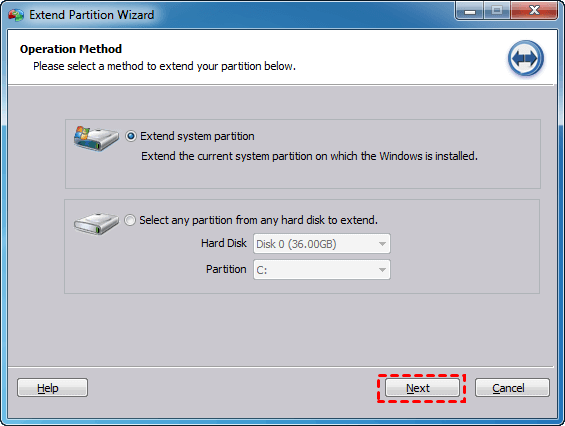
Step 2. In the pop-up window, you can choose «Extend system partition» to extend the system partition, or «Select any partition from any hard disk to extend» to enlarge any other partition.
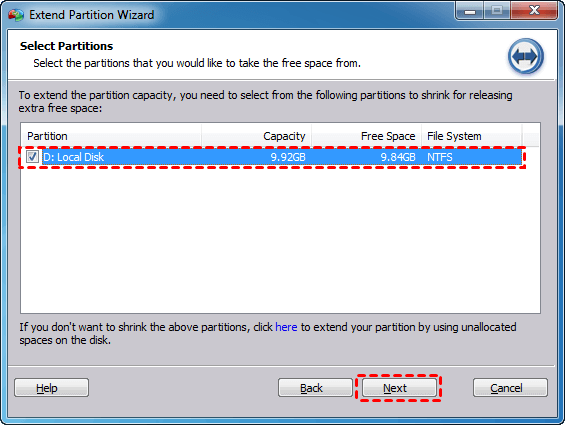
Step 3. Choose a partition that has enough free space. Then click «Next».
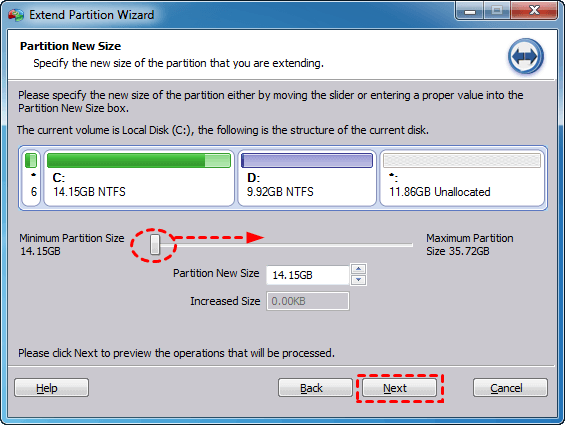
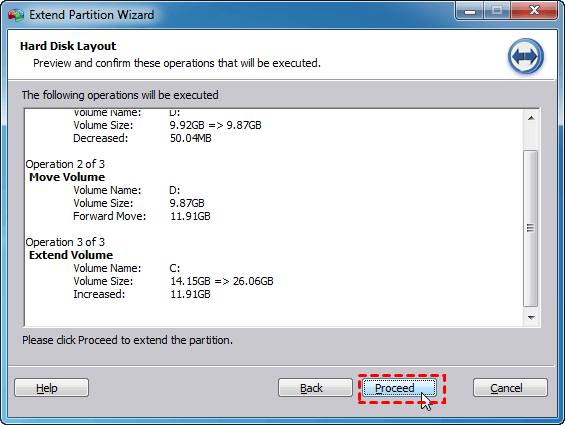
Step 4. You can move the bar to specify the size of the extending volume.
 Step 5. Click «Proceed» to commit the task.
Conclusion
You can extend volume in Windows 10 with the 2 ways. But by contrast, AOMEI Partition Assistant is the better choice because you can perform it without any data loss. Besides, it provides a “Allocated Free Space” feature that allows you to reallocate free space to the volume you want to extend. And there is AOMEI Partition Assistant Server for Windows Server operating systems.
Extend a basic volume
Applies To: Windows 10, Windows 8.1, Windows Server (Semi-Annual Channel), Windows Server 2019, Windows Server 2016, Windows Server 2012 R2, Windows Server 2012
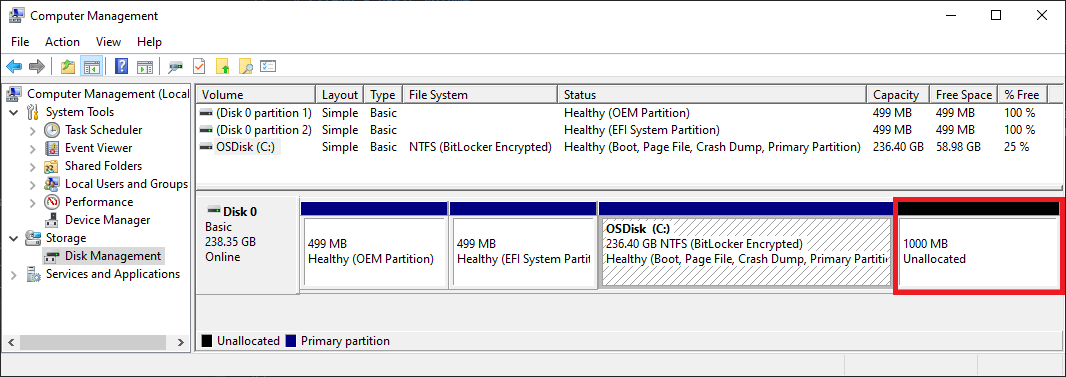
You can use Disk Management to add space to an existing volume, extending it into empty space on the drive, but only if the empty space doesn’t have a volume on it (it’s unallocated) and comes immediately after the volume you want to extend, with no other volumes in-between, as shown in the following image. The volume to extend also must be formatted with the NTFS or ReFS file systems.

To extend a volume by using Disk Management
Here’s how to extend a volume into empty space immediately after the volume on the drive:
Open Disk Management with administrator permissions.
An easy way to do so is to type Computer Management in the search box on the taskbar, select and hold (or right-click) Computer Management, and then select Run as administrator > Yes. After Computer Management opens, go to Storage > Disk Management.
Select and hold (or right-click) the volume that you want to extend, and then select Extend Volume.
If Extend Volume is grayed out, check the following:
- Disk Management or Computer Management was opened with administrator permissions
- There is unallocated space directly after (to the right) of the volume, as shown in the graphic above. If there’s another volume in-between the unallocated space and the volume you want to extend, you can either delete the in-between volume and all files on it (make sure to back up or move any important files first!), use a non-Microsoft disk partitioning app that can move volumes without destroying data, or skip extending the volume and instead create a separate volume in the unallocated space.
- The volume is formatted with the NTFS or ReFS file system. Other file systems can’t be extended, so you’d have to move or back up the files on the volume and then format the volume with the NTFS or ReFS file system.
- If the disk is larger than 2 TB, make sure that it’s using the GPT partitioning scheme. To use more than 2 TB on a disk, it must be initialized using the GPT partitioning scheme. To convert to GPT, see Change an MBR disk into a GPT disk.
- If you still can’t extend the volume, try searching the Microsoft community — Files, folders, and storage site, and if you don’t find an answer, post a question there and Microsoft or other members of the community will try to help, or Contact Microsoft Support.
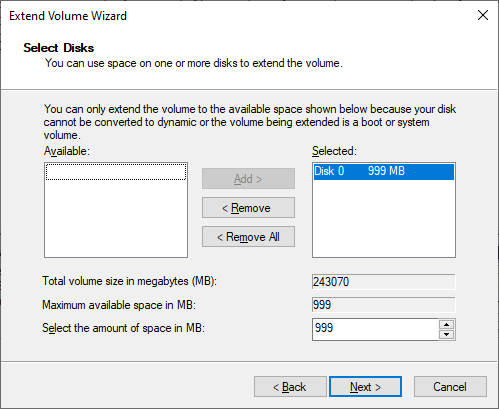
Select Next, and then on the Select Disks page of the wizard (shown here), specify how much to extend the volume. Typically you’ll want to use the default value, which uses all available free space, but you can use a smaller value if you want to create additional volumes in the free space.
Select Next and then Finish to extend the volume.
To extend a volume by using PowerShell
Select and hold (or right-click) the Start button and then select Windows PowerShell (Admin).
Enter the following command to resize the volume to the maximum size, specifying the drive letter of the volume you want to extend in the $drive_letter variable:
Расширение базового тома Extend a basic volume
Относится к: Windows 10, Windows 8.1, Windows Server (Semi-Annual Channel), Windows Server 2019, Windows Server 2016, Windows Server 2012 R2, Windows Server 2012 Applies To: Windows 10, Windows 8.1, Windows Server (Semi-Annual Channel), Windows Server 2019, Windows Server 2016, Windows Server 2012 R2, Windows Server 2012
С помощью компонента управления дисками вы можете добавить в существующий том дополнительное пространство за счет пустого места на диске, но только если пустое пространство не содержит томов (то есть не распределено) и располагается сразу за расширяемым томом без других промежуточных томов, как показано на следующем изображении. You can use Disk Management to add space to an existing volume, extending it into empty space on the drive, but only if the empty space doesn’t have a volume on it (it’s unallocated) and comes immediately after the volume you want to extend, with no other volumes in-between, as shown in the following image. Для расширения базовый том должен быть отформатирован в файловую систему NTFS или ReFS. The volume to extend also must be formatted with the NTFS or ReFS file systems.
Расширение тома с помощью компонента управления дисками To extend a volume by using Disk Management
Чтобы расширить том в пустое пространство, расположенное на диске сразу за этим томом, сделайте следующее. Here’s how to extend a volume into empty space immediately after the volume on the drive:
Откройте модуль управления дисками с правами администратора. Open Disk Management with administrator permissions.
Для этого введите Управление дисками в поле поиска на панели задач, выберите и удерживайте (или щелкните правой кнопкой мыши) Управление дисками, а затем выберите Запуск от имени администратора > Да. An easy way to do so is to type Computer Management in the search box on the taskbar, select and hold (or right-click) Computer Management, and then select Run as administrator > Yes. Когда откроется компонент управления компьютером, перейдите в раздел Хранилище > Управление дисками. After Computer Management opens, go to Storage > Disk Management.
Щелкните и удерживайте (или щелкните правой кнопкой мыши) тот том, который вы хотите расширить, а затем выберите Расширить том. Select and hold (or right-click) the volume that you want to extend, and then select Extend Volume.
Если действие Расширить том неактивно, проверьте следующее: If Extend Volume is grayed out, check the following:
- Компонент управления дисками или управления компьютером открыты с правами администратора; Disk Management or Computer Management was opened with administrator permissions
- существует нераспределенное пространство непосредственно после нужного тома (справа от него), как показано на рисунке выше. There is unallocated space directly after (to the right) of the volume, as shown in the graphic above. Если между расширяемым томом и нераспределенным местом существует другой том, вы можете удалить этот промежуточный том и все файлы в нем (не забудьте сначала заархивировать или переместить все важные данные!), применить приложение сегментирования стороннего поставщика (не Майкрософт), которое может перемещать тома без уничтожения данных, или остановить процесс расширения тома и создать на нераспределенном пространстве новый том. If there’s another volume in-between the unallocated space and the volume you want to extend, you can either delete the in-between volume and all files on it (make sure to back up or move any important files first!), use a non-Microsoft disk partitioning app that can move volumes without destroying data, or skip extending the volume and instead create a separate volume in the unallocated space.
- Жесткий диск форматируется в файловую систему NTFS или ReFS. The volume is formatted with the NTFS or ReFS file system. Для других файловых систем расширение не поддерживается, поэтому вам придется заархивировать или переместить нужные файлы с этого тома и заново отформатировать его в файловую систему NTFS или ReFS. Other file systems can’t be extended, so you’d have to move or back up the files on the volume and then format the volume with the NTFS or ReFS file system.
- Если размер диска превышает 2 ТБ, к нему должна быть применена схема секционирования GPT. If the disk is larger than 2 TB, make sure that it’s using the GPT partitioning scheme. Чтобы использовать более 2 ТБ на одном диске, его необходимо инициализировать с использованием схемы секционирования GPT. To use more than 2 TB on a disk, it must be initialized using the GPT partitioning scheme. См. сведения о том, как изменить стиль раздела диска с MBR на GPT. To convert to GPT, see Change an MBR disk into a GPT disk.
- Если и после этого не удается расширить том, проверьте возможные проблемы на сайте сообщества Майкрософт в разделе «Файлы, папки и хранилища». Если здесь нет готового ответа, задайте свой вопрос, чтобы сотрудники корпорации Майкрософт или другие члены сообщества попытались вам помочь, или обратитесь в службу поддержки Майкрософт. If you still can’t extend the volume, try searching the Microsoft community — Files, folders, and storage site, and if you don’t find an answer, post a question there and Microsoft or other members of the community will try to help, or Contact Microsoft Support.
Щелкните Далее, а затем на странице мастера Выбор дисков (показано здесь) укажите, какой объем нужно добавить к расширяемому тому. Select Next, and then on the Select Disks page of the wizard (shown here), specify how much to extend the volume. Обычно лучше всего использовать вариант по умолчанию, то есть все свободное пространство, но вы можете указать меньшее значение, если хотите создать дополнительные тома в свободном пространстве. Typically you’ll want to use the default value, which uses all available free space, but you can use a smaller value if you want to create additional volumes in the free space.

Щелкните Далее, а затем Готово, чтобы выполнить расширение. Select Next and then Finish to extend the volume.
Расширение тома с помощью PowerShell To extend a volume by using PowerShell
Щелкните и удерживайте (или щелкните правой кнопкой мыши) кнопку «Пуск», а затем выберите Windows PowerShell (администратор). Select and hold (or right-click) the Start button and then select Windows PowerShell (Admin).
Введите следующую команду, чтобы изменить размер тома до максимально возможного, и укажите букву расширяемого диска в переменной $drive _letter. Enter the following command to resize the volume to the maximum size, specifying the drive letter of the volume you want to extend in the $drive_letter variable:


