- How to Install a Window
- Preparing a Rough Opening
- Mounting a Window
- Finishing a Window
- Installing a Window In New Construction
- How To Extend C Drive in Windows 10/8/7?
- When do you need to extend C drive in Windows 10/8/7?
- Possible methods to increase C drive free space
- Method 1: How to extend system partition in Disk Management?
- Method 2: How to extend C drive in Windows 10 with DiskGenius?
- Method 3: How to extend system partition via DiskPart command?
- Conclusion on resizing Windows partition
How to Install a Window
January 29, 2021
Step-by-step instructions for how to open up a wall, and mount and finish a pre-hung window.
Many windows are sold “pre-hung,” meaning they come assembled with frames. Because you install the entire unit, installation of pre-hung windows is far easier than the method of building a frame and installing a window in it.
The task does require moderate carpentry skills and materials. If you do not feel confident about tackling this job on your own, call in a qualified window installer.
Following are general instructions for how to install a pre-hung window. Directions will vary slightly from product to product, so always read your manufacturer’s instructions before beginning.
Also note: You will need to open up the interior side of the wall and rough frame an opening where the window will go. This rough framing will include extra wall studs on each side, a doubled 2-by-4 sill, and a header over the window, as discussed in depth in Wall Framing for a Window .  A clad window’s mounting flange is screwed to sheathing; a level is used to check for plumb. ©Don Vandervort, HomeTips
Below are the steps for installing a new window in a newly-framed rough opening.
To gain an overview of this job, here is a pretty helpful video that shows a similar project. Some of the steps are a little different than the ones we show in the photos below, but the principles are basically the same. The primary differences are with how the moisture seal is applied because the video shows working with an opening where the siding has been removed beyond the trim.
Preparing a Rough Opening
1 From inside the house, drive nails through the wall to mark the corners of the window. Then, outside, outline the opening for the window.
2 Cut through the siding and the sheathing with a power saw, making sure to use the correct blade. Place the window up to the opening and check for fit. Continue trimming if necessary.  Use a power saw to cut the window’s opening.
3 Place the window into the opening to verify that it will fit. Be sure to make the opening slightly larger than the actual window. Check the manufacturer’s instructions to see exactly how much space you should leave. Cut through the siding and drywall again, if necessary, to provide ample space.
4 Line the opening with 8-inch-wide strips of moisture seal and tuck them into the siding. Slit the corners of the moisture seal diagonally with a utility knife, and fold the pieces toward the interior. Trim the strips if necessary until they extend just inside the interior edge of the opening. Then staple them, working from the bottom up.
5 At this point, put two small 1/2-inch spacers at the bottom of the opening, about 1/2 inch in from the sides. Check for level, and add shims if needed.
Use dabs of silicone or two 6d (2-inch) nails per pair of shims to affix them to the opening (if you use nails, pre-drill nail holes). After they are secured, cut them so they are flush with the siding.  Check the sill of the opening for level.
After preparing the opening for a new window (see How to Install a Window), it’s time to actually mount the window. Here are the steps to follow:
Mounting a Window
From outside the house, rest the bottom of the window on the spacers, and then slowly push the top into the opening. Be sure it is right-side up—it may have drain holes at the bottom that allow moisture to drain.
Drive a nail partway through the trim at one of the upper corners. Check that the window is level, make any necessary adjustments to the shims, and then finish driving the nail. Re-check the level.
Then go inside and make sure everything looks okay from that side.
Drive nails at the other corners and then around the perimeter.  After positioning the window, secure the flange.
Insert shims along the sides near the top and bottom of the window and at the midpoint, and adjust them as needed until the window is plumb. Check to make sure the window is operational, and then secure the window to the opening by driving nails into the brick mold or casing. Apply flashing and sealant (outside and inside) according to the manufacturer’s instructions.
Finishing a Window
Affix the trim on the outside, and caulk the space between the window and the siding, according to the manufacturer’s directions.
On the inside, check the window for level and add shims around the sides until the window is snug in the opening.
Using 8d (2 1/2-inch) finishing nails, nail through the jamb and the shims into the trimmer studs; use a nailset to set the nailheads just below the surface. Add insulation between the jambs and the trimmer studs, cut the shims so they are flush with the wall, and then affix the interior trim. ![]() Shim and fasten the window frame.
Shim and fasten the window frame.
Inside, you can apply molding to complete your project: a stool, apron, and side casings for single- or double-hung windows.
Installing a Window In New Construction
Installing a window in new construction is easier than putting one in an existing wall, thanks to the fact that you don’t have deal with interior wallboard, exterior siding, existing trim, and the like.
Here is an excellent video from This Old House on the right way to do this job:
How To Extend C Drive in Windows 10/8/7?
Position: How Tos — Partition Management — How to extend C drive in Windows 10/8/7?
Summary
DiskGenius — Free disk partition software to safely resize, extend, shrink and split partition without data loss.
Table of Contents:
If your hard drive is not properly partitioned, for example, system drive is not large enough, you are likely to encounter the low disk space issue on C drive. When you install any application or save any data to system partition, some amount of space will be taken. Using your system for a long time, one day C drive will be running out of space due to Windows update, caches, cookies, etc. Even though it is not full of data, the speed of your computer also degrades. C drive (system partition) should has some free space to guarantee operating system works smoothly. Are you wondering if it is possible to change partition size for system drive in Windows 10 or Windows 7 without data loss? The amount of data in system partition grows as time passes, and you need to learn some solution to increase its size when low disk space issue appears. If you haven’t gotten a proper solution, read through this page to learn the resizing process.
When do you need to extend C drive in Windows 10/8/7?
Users are always advised to partition a large hard drive into two or more partitions when setting it up for computer. Such advice is provided and accepted for a couple of reasons, for example you can use multiple partitions to separate operating system and installed applications from individual data, and organize and manage data with high efficiency and safety. With this, when one partition gets damaged, files stored on other partition stay undisturbed as long as the entire hard drive is not corrupted.
Although we benefit a lot from partitioning a hard drive, there is limitation on drive C. For instance, Windows updates and many other kinds of files are written to C drive every day, partitions on your computer might not be created with proper size, or you are not skilled in managing disk space and data, system partition maybe running out of space sooner or later. Then you will get messages like:
Low Disk Space. You are running out of disk space on Local Disk (C:). To free space on this drive by deleting old or unnecessary files, click here…
Low Disk Space. You are running out of disk space on Local Disk (C:). Click here to see if you can free space on this drive.
Low Disk Space. You are running very low on disk space on Local Disk (C:). Click here to see if you can free space on this drive.
Free up storage space. Your computer’s running low on storage space. Visit storage settings to free some up.
Low disk space issue on system drive can be annoying, as your computer will become considerably slow or even freeze. Since most applications are installed in system partition and they create and save caches and temporary files to system drive automatically during working. When C drive does not have enough free space to save those data, your computer slows down or sometimes freezes. Besides, if you decide to reinstall operating system, you will have to take large amount of time to backup data, install OS, custom settings, install application, etc.
Apart from facing low disk space issue, some users attempt to increase C drive space for other reason, such as expand system partition to upgrade system to Windows 10 from Windows 7. In general, the higher operating system takes more disk space in running software. Thus, upgrading to an advanced OS, you should make sure there is enough free space beforehand. Besides, you do not plan to spend money on new & larger hard drive, you can try to increase C drive by moving disk space from other partition.
Possible methods to increase C drive free space
There are several solutions you can try when system partition on your computer is running out of space:
- Uninstall unnecessary applications from computer. Some software is installed to system drive by default and takes large disk space, and you can remove it from C drive. Besides, if possible, you can install some applications to other partition, such as D drive. Removing programs in Control Panel is very easy: In Windows 10, right-click on Start menu and choose Settings, after which you can select Program from pop-up window; select the program you want to remove and click Uninstall button.
- Delete junk files and remove temporary files using Disk Cleanup. This is a useful system utility which is designed to help users delete unnecessary files easily. In File Explorer, right-click on C drive (system partition) and choose «Properties» option. Click Disk Cleanup button and then «Cleanup system files button». After that you can select files you want to delete to free up space.
- Replace current disk with a larger one. Some users install system on SSD which is not large enough as time goes by, and thus you can change it to a larger disk.
- Repartition hard drive. Repartitioning a hard drive removes current partitions and creates new partition with specified size and number. However, this solution is time-consuming, as you need to back up data and reinstall OS & application.
- Extend C drive without data loss. You can increase partition size for system drive via Disk Management or third-party partition manager software. You can easily move free disk space among partitions based on your requirements.
In this article, we’ll focus on the solution to extend system drive partition (C:) in Windows 10, Windows 8 and Windows 7 without losing any data. The rest part will discuss several methods to help you increase C (system) drive space.
Method 1: How to extend system partition in Disk Management?
Simply put, extending a partition is the process to move free space from one partition to another or add unallocated space to a partition on the same disk. Disk Management, Windows built-in functionality, is one of the popular utilities to manage disk and partition, and it is able to extend partition by adding unallocated space to partition. If there is unallocated space adjacent to C drive, you can easily add it to system volume. Let’s see how to resize Windows system partition in Windows10:
Step 1 Right-click on Start menu and select Disk Management, and this launches Disk Management.
Step 2 Right-click on the partition (C:) you want to increase space and select «Extend Volume» from context menu.
Note: If there is not unused space close to the C: drive (usually to the right), the «Extend Volume» option will not be available.

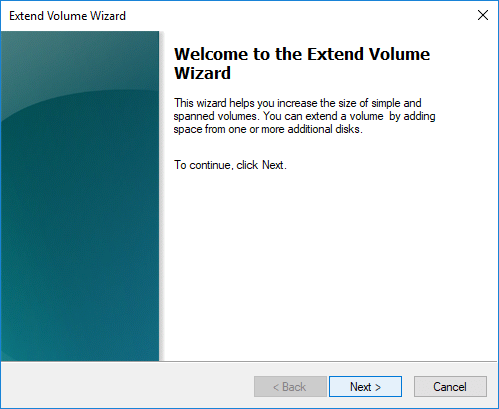
Step 3 Now the «Extend Volume Wizard» shows up and it will help you increase volume size by adding space from one or more additional disks. Click Next button to continue.
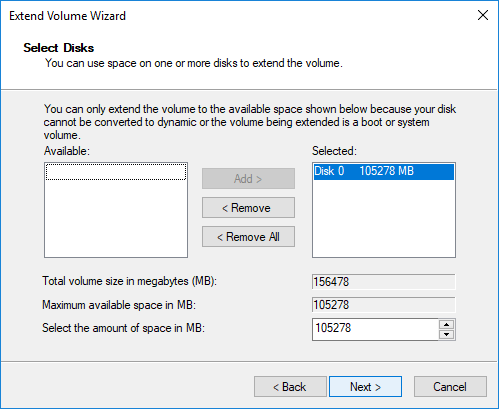
Step 4 Set the amount of space you want to add to the partition and click Next button.
Disk Space is calculated in MB and you can only extend the volume to the available space shown below, because the disk cannot be converted to dynamic or the volume being extended is a boot or system volume.
Step 5 Click Finish button to complete the wizard. Then you should see the C drive is extended in Disk Management console
Limitations on Disk Management
Though Windows Disk Management is able to extend system partition without data loss, it has limitations. There should be contiguous unallocated space next to the C system volume, otherwise, the «extend volume» will be grayed out. For example, you have C, D and unallocated free space on hard drive, and you can only add free space to D drive, as C drive is not next to free space. In this case, you may have to delete the adjacent partition of C drive in order get free disk space. Deleting partition removes all data on the partition, and you need to back up data to a different location before deletion.
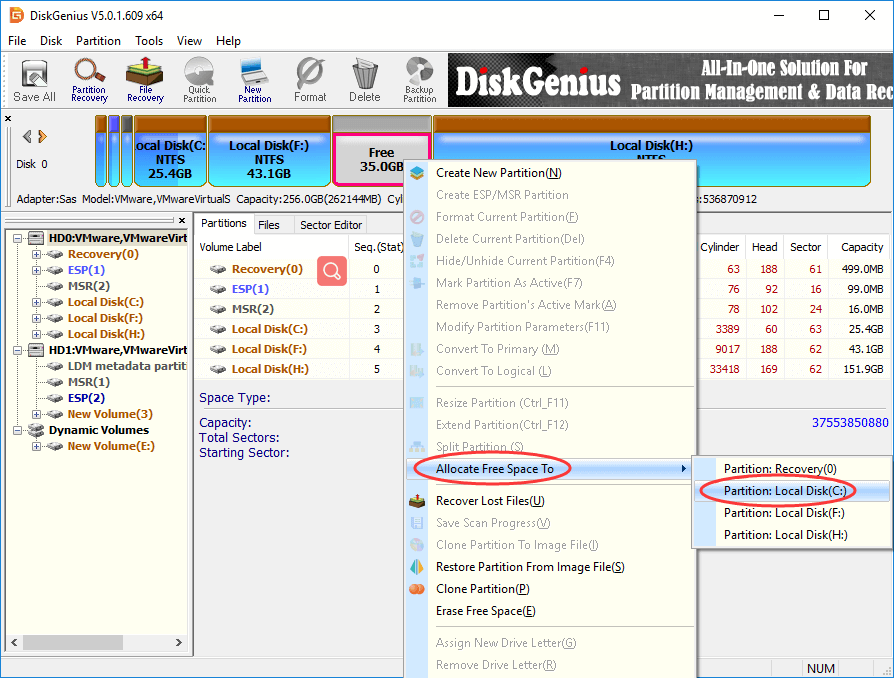
Since Disk Management can add free space to adjacent partition, you may wonder what to do with unallocated space which is not next to C drive? You can either create a new partition on unallocated space or add free disk space to system volume with third-party software. For instance, there is unallocated disk space between partition F and H, and you can use DiskGenius to add it to C drive, as below: right-click on free disk space and choose «Allocate Free Space To», after which you can specify which partition to add the space.
Method 2: How to extend C drive in Windows 10 with DiskGenius?
To lift the limitation on Disk Management, you can use free third-party disk partition software DiskGenius. DiskGenius Free allows users to add unallocated space to any partition as well as move disk space between partitions. Besides, it is also able to resize partition and split partition without losing data. It enables you to change partition size for NTFS, exFAT, FAT32, EXT2, EXT3 and EXT4 drives.
Step 1 Download and install DiskGenius Free Edition, and then launch it from your computer.
If you need more advanced features, then use DiskGenius Standard Edition or DiskGenius Professional Edition.
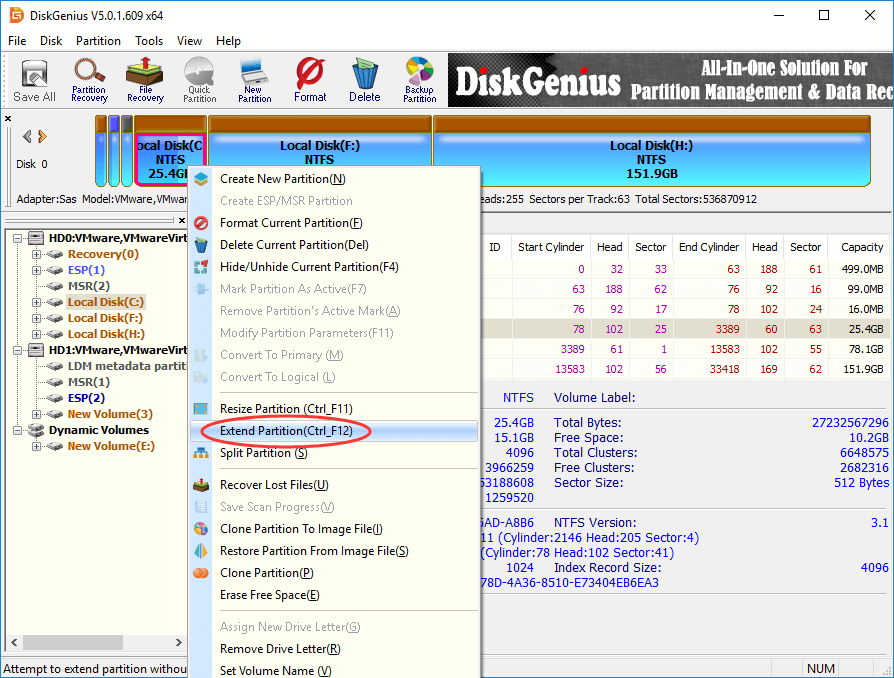
Step 2 Right-click on the C drive you want to extend in DiskGenius, and select «Extend Partition«, as follows.
Step 3 In the pop-up windows, click a partition from which you want to move free space. You can select a partition which contain enough free space so that you can move it to system partition.
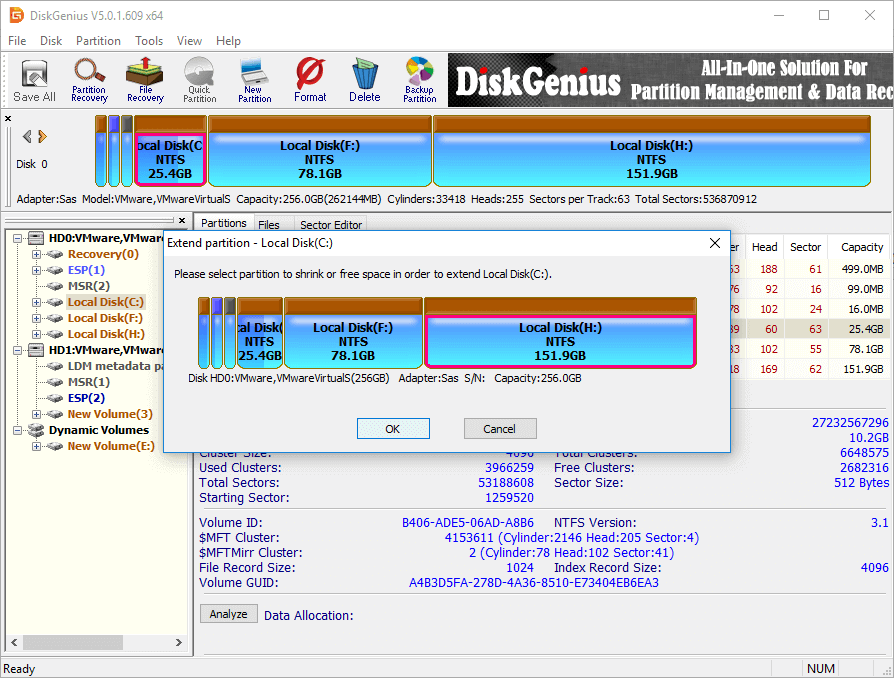
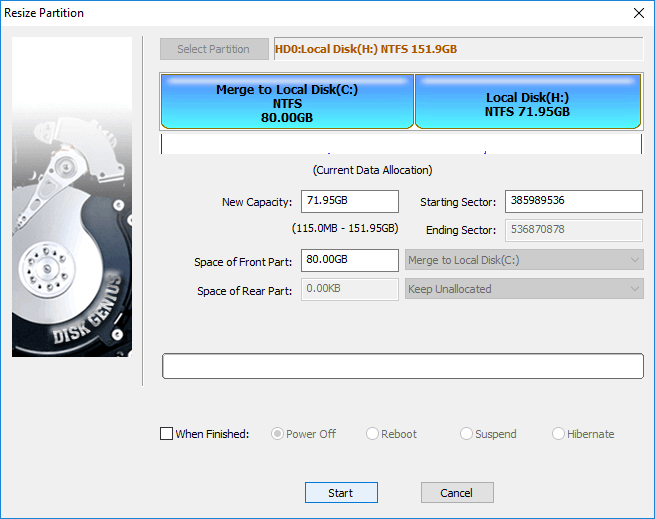
Step 4 Set disk space you want to move to C drive and click Start button.
You can drag the arrow between partition bars or enter the exact disk space to be moved to C drive. As shown below, 80GB space from the front part of Local Disk (H:) will be moved to Local Disk (C:).
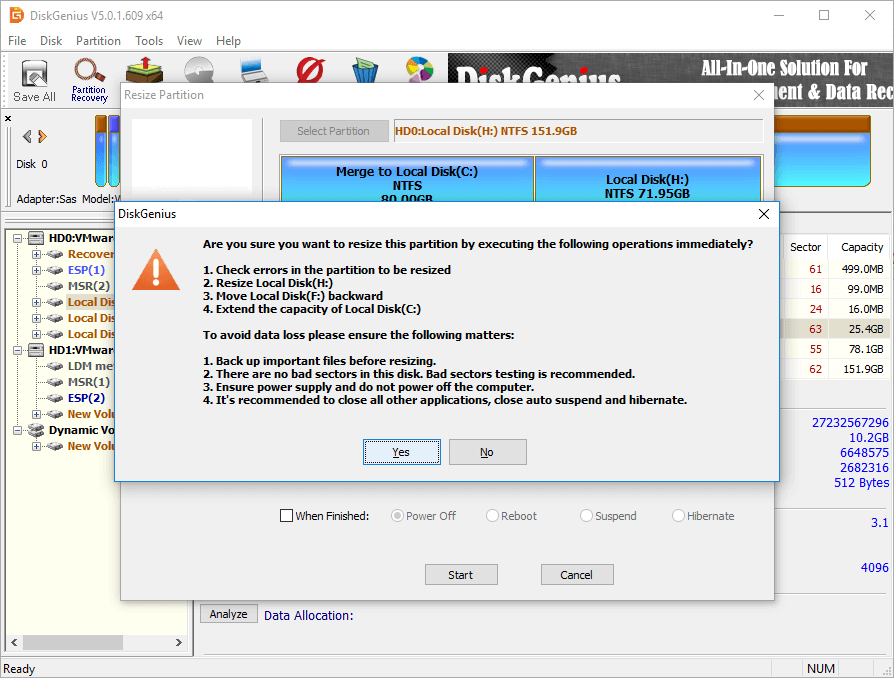
Step 5 Click Yes button to continue when DiskGenius lists operations to be done during the partition resizing process.
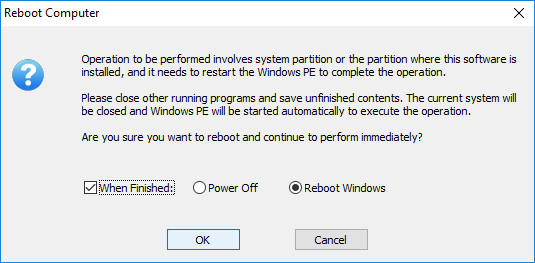
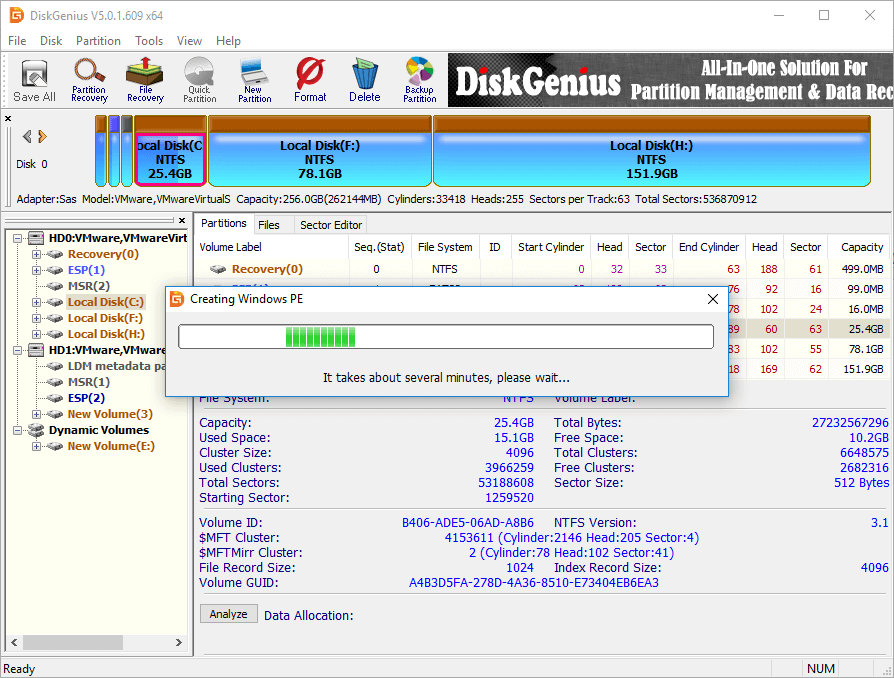
Step 6 Boot to DiskGenius WinPE Edition to complete the partition extending process.
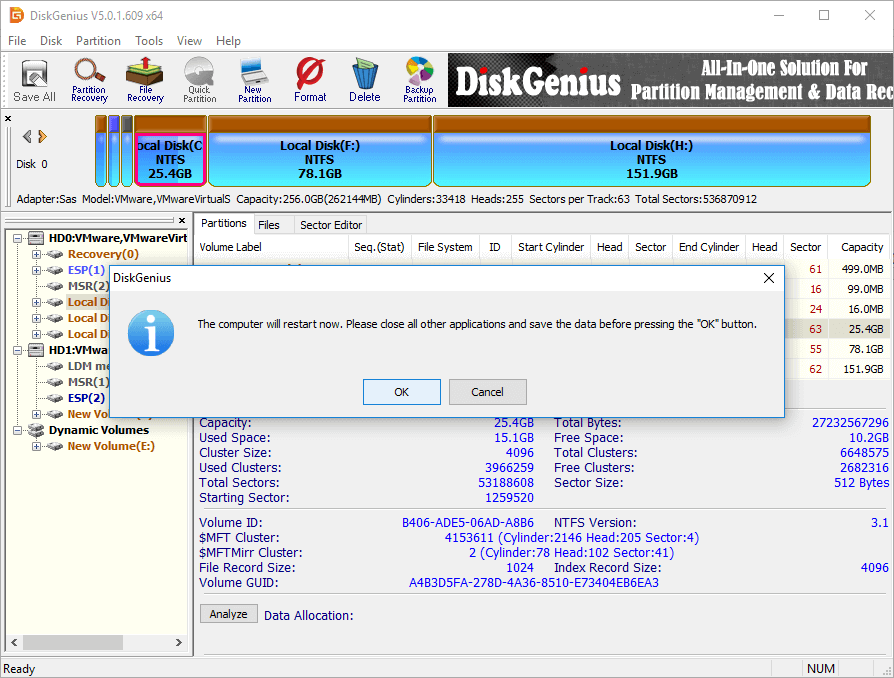
Note: Since the partition to be extended is system drive and the rest process should be done by the DiskGenius WinPE Edition. Please close all other programs and save unfinished content, and click OK button.
DiskGenius is preparing WinPE environment.
Click OK and computer will boot to DiskGenius WinPE Edition automatically.
DiskGenius WinPE Edition continues to extending C drive and computer will boot to Windows automatically once the process completes.
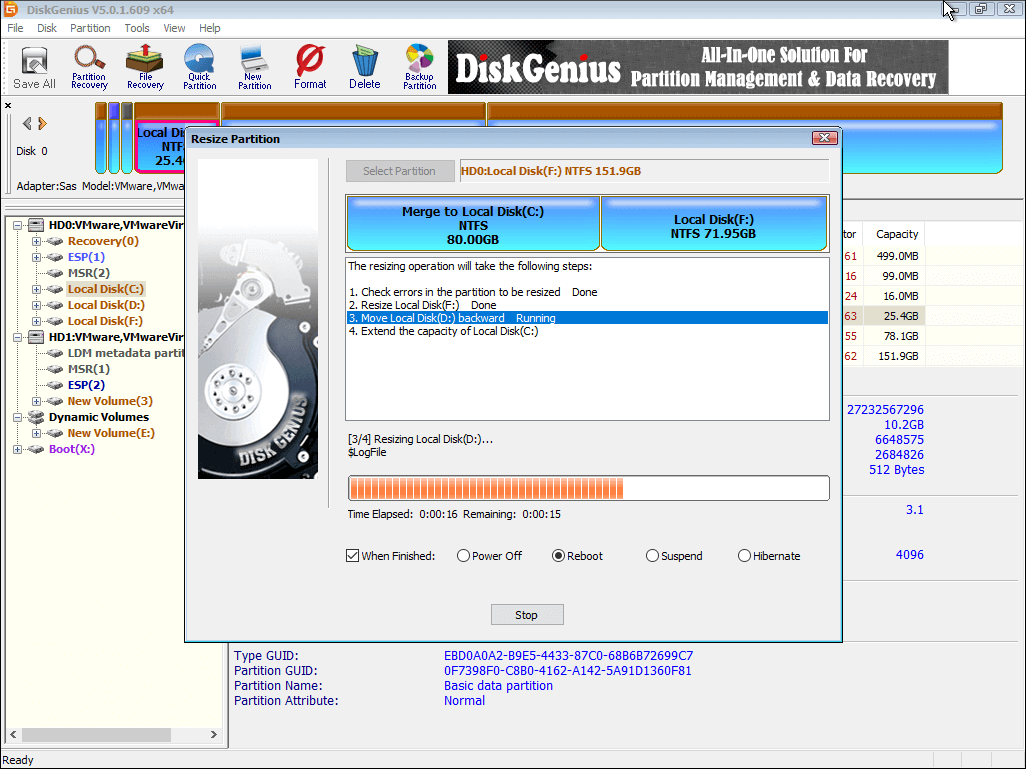
Please do not close the program when the partition resizing is ongoing, as partition may get corrupted if you force to interrupt the process.
Changing size of partition will modify the start and end position, move data, modify parameters in MBR and DBR of related partitions. Thus, it is not risk-free even though the disk partition software is reliable and effective. If partition contains errors or operating system is not working well, or there is power failure during resizing partition, there is possibility that partition might got corrupted and data got lost. Therefore, it is recommended to make a backup for related partitions in advance in case of any unexcepted errors.
Besides, it is not advised to resize, extend, split or shrink partition when hard drive has a hardware failure such as bad sector.
Method 3: How to extend system partition via DiskPart command?
It is not recommended to resize partition via DiskPart commands unless you are specialized user, for it is easy to make mistake if you are not familiar with these operations and the result is data loss, partition damage, system failure, etc.
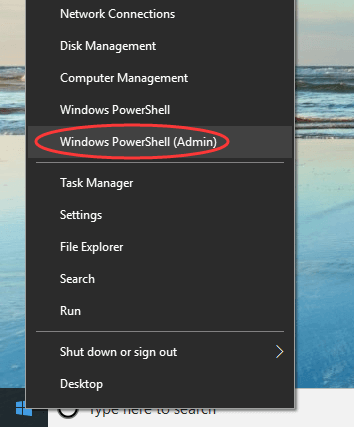
Step 1 Right-click on Start button and select «Windows PowerShell (Admin)», we below.
Step 2 In Windows PowerShell, type diskpart and press Enter key to launch diskpart command.
Step 3 Type follow commands one by one and press Enter key after each command.
list volume (this command lists all volumes on your computer, identify the number of system drive)
select volume # (replace # with the volume number that presents system partition)
extend size = XXXX (replace XXXX with disk size in MB you want to add to C drive.)
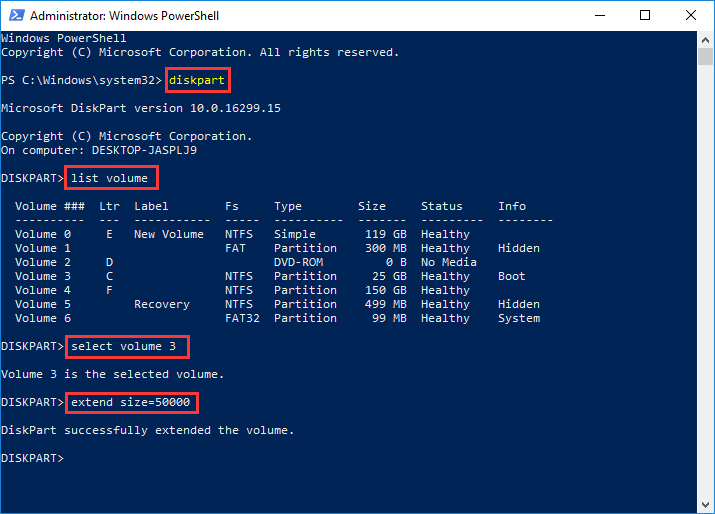
Note: Similar to Disk Management, diskpart can extend system partition only when there is unallocated disk space next to system volume; otherwise you may receive error message «There is not enough usable space for this operation». If this is the case, you can follow steps in Method 2 to expand system partition.
Conclusion on resizing Windows partition
Above all, it is surprisingly easy to extend C drive without repartitioning hard drive or reinstalling operating system. If your system partition is running low on space, you can follow solutions above to increase C drive space easily and quickly. When Disk Management cannot complete the task, you can use DiskGenius to manage disk space, as it is able to move disk space between partitions and allocate free space to any partition. If you need any help on using DiskGenius, you may contact us via support center.
DiskGenius — Free Windows partition manager software to increase C drive space without losing data.


