- pdfimages: Extract and Save Images From A Portable Document Format ( PDF ) File
- pdfimages syntax
- Ubuntu Genius’s Blog
- Cool UBUNTU Tips & Tricks brought to you by OzzyFrank
- How to Extract Images from PDF Documents in Ubuntu/Linux
- How to Extract Embedded Images from a PDF File in Ubuntu Using PDFImages
- What is PDFImages?
- Download and Install
- Usage
- Conclusion
- How to Extract Images from PDF on Linux
- How to Extract Images from PDF on Linux
- How to Extract Images from PDF on Windows and Mac
- Step 1: Enter Editing Mode
- Step 2: Extract Images from PDF on Windows
- Step 3: Save the Extracted Image
- Step 1: Extract Images from PDF on Mac
- Step 2: Save the Extracted Image
pdfimages: Extract and Save Images From A Portable Document Format ( PDF ) File
Q. How do I extract images from a PDF file under Linux / UNIX shell account?
A. pdfimages works as Portable Document Format (PDF) image extractor under Linux / UNIX operating systems. It saves images from a PDF file as Portable Pixmap (PPM), Portable Bitmap (PBM), or JPEG files. Pdfimages reads the PDF file PDF-file, scans one or more pages, and writes one PPM, PBM, or JPEG file for each image, image-root-nnn.xxx, where nnn is the image number and xxx is the image type (.ppm, .pbm, .jpg).
pdfimages is installed using poppler-utils package under various Linux distributions:
# yum install poppler-utils
OR
# apt-get install poppler-utils
pdfimages syntax
pdfimages /path/to/file.pdf /path/to/output/dir
Extract the PDF file called bar.pdf and save every image as image-00<1,2,3..N>.ppm, enter:
$ pdfimages bar.pdf /tmp/image
$ ls /tmp/image*
Sample output:
- No ads and tracking
- In-depth guides for developers and sysadmins at Opensourceflare✨
- Join my Patreon to support independent content creators and start reading latest guides:
- How to set up Redis sentinel cluster on Ubuntu or Debian Linux
- How To Set Up SSH Keys With YubiKey as two-factor authentication (U2F/FIDO2)
- How to set up Mariadb Galera cluster on Ubuntu or Debian Linux
- A podman tutorial for beginners – part I (run Linux containers without Docker and in daemonless mode)
- How to protect Linux against rogue USB devices using USBGuard
Join Patreon ➔
Normally, all images are written as PBM (for monochrome images) or PPM (for non-monochrome images) files. With the -j option, images in DCT format are saved as JPEG files. All non-DCT images are saved in PBM/PPM format as usual:
$ pdfimages -j bar.pdf /tmp/image
The -f option Specifies the first page to scan. To scan first 5 pages, enter:
$ pdfimages -j -f 5 bar.pdf /tmp/image
The -l option specifies the last page to scan. To scan last 5 pages, enter:
$ pdfimages -j -l 5 bar.pdf /tmp/image
🐧 Get the latest tutorials on Linux, Open Source & DevOps via
Источник
Ubuntu Genius’s Blog
Cool UBUNTU Tips & Tricks brought to you by OzzyFrank
How to Extract Images from PDF Documents in Ubuntu/Linux
February 4, 2012 by Ubuntu Genius
PDF (Portable Document Format) documents are a handy way to present text and images to others knowing they’ll look the same no matter what word processor or operating system they use. Basically, they’re a snapshot of a document, so saving images from them can be a hassle, even if your viewer lets you right-click them and save them as files. There are a few programs around that can do this for you, but it’s actually much easier and faster doing this from the command-line.
The pdfimages command is part of poppler-utils , which should already be installed on your system ( sudo apt-get install poppler-utils in the terminal if it isn’t). To extract the images from a PDF, just open a terminal in the folder with the document, and run a command like the following:
pdfimages -j Cool-Pix-of-2011.pdf cool2011
Note that when extracting from files with spaces in the name, you will need to enclose the filename in single quotes. Eg:
pdfimages -j ‘Cool Pix of 2011.pdf’ cool2011
The text at the end of the command is what each extracted image will begin with, so the resulting filenames will be cool2011-000.jpg onwards (note that numbering starts at 000, not 001). Once again, if you’d prefer to have spaces in the target names, for example to mirror the name of the original PDF, then enclose that in single quotes too (eg: ‘Cool Pix of 2011 ‘ – note the space at the end, just to provide a bit more separation between ‘2011’ and the hyphen preceding the automatic numbering; this is of course optional, and you can pretty much do what you want). Eg:
pdfimages -j ‘Cool Pix of 2011.pdf’ ‘Cool Pix of 2011 ‘
Your pictures will now be extracted into the folder with names starting with Cool Pix of 2011 -000.jpg .
Also, the -j option is to save the images in the .jpg format, otherwise they will be saved in .ppm (Portable Pixmap) format, with each file being over a megabyte. This can mean, for example, that an 18Mb document with 120 images can extract to 154Mb of files, whereas exporting them as .jpg ends up with a total of 18Mb, just like the original document. Of course, if you’d prefer to save them as .ppm images, simply leave out the -j option.
If you would like to include the page numbering in the file names, add the -p option. Eg:
pdfimages -j -p ‘Cool Pix of 2011.pdf’ ‘Cool Pix of 2011 ‘
Lastly, don’t worry if you see the following in the terminal for each image being extracted:
Error (18468081): Missing ‘endstream’
Error: Unknown operator ‘endstream’
Error: Unknown operator ‘endobj’
You shouldn’t see that with every PDF you try to extract from, but even when you do you should find the target images have been created without issue.
Extra Notes :
For more options for this command, run pdfimages -? . For example, you can specify a start and end page, but personally I find it easier to just extract the whole document and delete any images I don’t want afterwards. But if you need to specify a password, you will find the option here.
Did this information make your day? Did it rescue you from hours of headache? Then please consider making a donation via PayPal, to buy me a donut, beer, or some fish’n’chips for my time and effort! Many thanks!
Источник
How to Extract Embedded Images from a PDF File in Ubuntu Using PDFImages

While we already know how to edit existing PDF files in Ubuntu, there are times when the requirement is to use all or some of the images contained in a PDF file. Manual copy-pasting is definitely an option, but it’s not a time-saving one, especially when the PDF file contains a large number of images.
A tool exists, dubbed PDFImages, that makes image extraction from PDF files a cakewalk. In this article we will discuss this tool using easy-to-understand examples. Note that all the examples used in the article are tested on Ubuntu 14.04 LTS using version 0.24.5 of the tool.
What is PDFImages?
As already discussed, PDFImages is a command line tool that you can use to extract images from a PDF file. The tool’s man page says that it reads the input PDF file, scans it, and produces one Portable Pixmap (PPM), Portable Pixmap (PBM), or JPEG file for each image it encounters in the PDF file.
Download and Install
If the tool isn’t already installed on your Ubuntu box, you can download and install it using the following command:
In addition to PDFImages, the package “poppler-utils” also contains several other command line utilities for getting information from PDF documents, converting them to other formats, or manipulating them.
Usage
The command line tool PDFImages, in its most basic form, requires two arguments: input PDF file and the path to the directory in which you want the tool to save the images. For example, in my case I tried extracting images from a PDF file named “christmas_story.pdf” and saving them to a directory named “pdfimages”.
The above command produced the following files in the target directory:
As you can see in the output above, the name of the files begins with a hyphen (-) followed by a number. For those wondering why the name begins with a hyphen, the tool gives you the flexibility to prefix any word before the hyphen so that you can create custom names for the output images. You can do this by adding that particular word to the path of the destination directory while running the command.
For example, I added the word “image” to the path of the destination directory:
And the output files produced in this case carried the following name:
It’s worth mentioning that contrary to what the tool’s man page says, two images are produced for each image in the PDF file of which one is blank while the other is usable. In my case, the odd numbered images were blank:

Moving on, you can also change the output image file format from “ppm” to “jpeg,” which you can do by using the -j option. Keep in mind, however, that with this option, only images in DCT format are saved as JPEG files – all non-DCT images are saved in PBM/PPM format as usual.
You can also specify which pages you want the tool to scan. This way you’ll only get those images in output which are there on these pages. To enable this option, you have to use the -f option (followed by the page number) and -l (followed by the page number) to specify start and end pages respectively.
For example, I wanted the tool to only extract images present on the first page of the PDF file, so I used the following command:
And in the destination directory, only two images (total of four including the blank ones) were produced:
Conclusion
PDFImages is definitely a handy tool if your work involves dealing with PDF files and the images they contain, and as you might have observed by now, it’s easy to learn as well as simple to use. To learn more about the tool, head to its man page.
Himanshu Arora is a freelance technical writer by profession but a software programmer and Linux researcher at heart. He covers software tutorials, reviews, tips/tricks, and more. Some of his articles have been featured on IBM developerworks, ComputerWorld, and in Linux Journal.
Источник
How to Extract Images from PDF on Linux

Elise Williams
2021-08-25 19:51:01 • Filed to: Knowledge of PDF • Proven solutions
One of the easiest ways to convert PDF files to editable text on Linux is to use the pdftotext command line tool. But as you may well know, this only works for the text part and you may need to extract images from PDF on Linux. In this guide, we are going to be looking at how you can extract images from PDF in Linux OS. We are also going to provide you with an effective solution to extract images from PDF in Windows and Mac.
How to Extract Images from PDF on Linux
To extract the images from a PDF document on Linux, you need another command tool line known as «pdfimages». This tool is part of the poppler-utils package and may already be installed in your system. If it is not, you can find the steps to install it online. Once it is installed, follow these simple steps to use this tool to extract images from the PDF document:
Step 1: Press «Ctrl + Alt + T» to open a Terminal window on your Linux system and then type in the following command.
pdfimages /home/lori/Documents/SampleWithImages.pdf /home/lori/Documents/ExtractedImages/image
Note: Replace first path and the PDF filename in all commands in this tutorial with the filename of the PDF whose images you want to extract.
Step 2: Once you press «Enter» in the command, the images will be extracted from the document in PPM (portable pixamap) or PBM (portable bitmap) format. To create JPG files from the extracted images, enter the following format.
pdfimages -j /home/lori/Documents/SampleWithImages.pdf /home/lori/Documents/ExtractedImages/image This will however only convert the first images to JPG. If you want to convert all the images in the PDF to JPG, enter the following command:
pdfimages -l 1 -j /home/lori/Documents/SampleWithImages.pdf /home/lori/Documents/ExtractedImages/image
How to Extract Images from PDF on Windows and Mac
Extracting images from a PDF in Windows and Mac is a much simpler process, especially when you have PDFelement. This PDF management tool makes it easier for you to easily extract any images from any PDF document. Some of the features that make it the most ideal solution include the following:
- It is very easy to use. All functions can be completed in just a few simple steps as we shall see shortly.
- It can be used to edit both the text and images in the PDF document. For example, you can delete and add images to the PDF or even change the size and location of any images within the document.
- It can also be used to convert PDF documents to a variety of other formats including Word, Excel, PPT, TXT, HTML, JPG and more.
- You can make comments and markups to the PDF documents.
- It is easy to protect your PDF document by applying passwords, permissions and redaction.
- It is easy for you to share, print the PDF file.
- It has an OCR function that can be very useful when editing scanned PDFs.
The following simple steps show you how you can extract images from a PDF using PDFelement in both Windows and Mac:
Step 1: Enter Editing Mode
Download and install PDFelement on to your computer. After installation, launch the program and in the main window, click on «Open File» to open the PDF document that you want to extract images from. Once the document is open click on «Edit» in the main menu to enter the program’s «Edit Mode».
Step 2: Extract Images from PDF on Windows
Click on the image you would like to extract to select it. Right-click on the image and then choose «Extract Image» from the options presented.
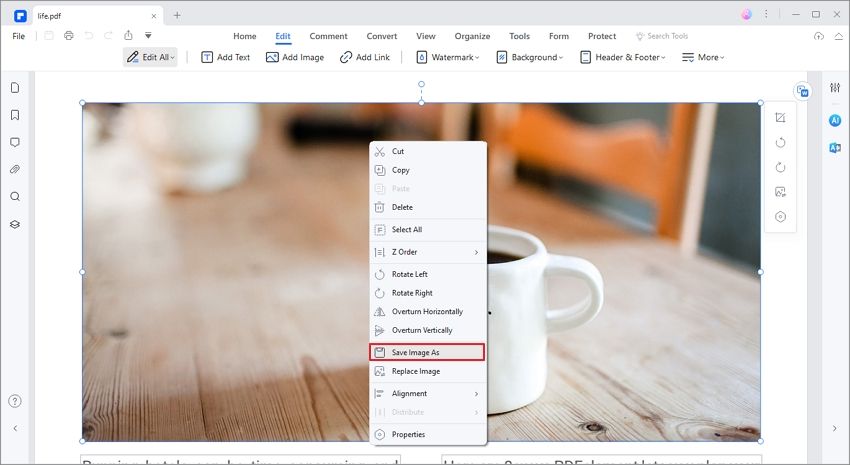
Step 3: Save the Extracted Image
A «Save As» dialogue box will open, allowing you to save the extracted image. Here, you can change the output folder to save the image. In the «Save as Type» section, ensure that the format is «JPG» and then click «Save» to complete the process.

Step 1: Extract Images from PDF on Mac
Open the PDF document you would like to extract the image from. The easiest way to do that is to simply drag and drop the PDF to the program’s main window. Once the document is open, click on «Image» from the tools on the left and then click on the image you want to extract to select it.

Click on the «Extracting» from the tools at the top to begin the extraction process.
Step 2: Save the Extracted Image
A «Save As» popup box will appear. Here, you can change the filename of the exported image and change the output folder under «Where». Once you are happy with your output folder selection, click on «Save» to save the extracted image.
Источник


