- How to Extract an INSTALL.WIM file that contains several INSTALL.WIM files
- How to extract an install.wim file that contains more than one install.wim files.
- How to extract MSI files from an EXE installer
- Problem:
- Solution:
- How to Extract Files from Windows 10 ISO or DVD (Install.wim)
- So, why do you need the install.wim extraction method?
- Extract individual files from Windows 10 DVD or ISO (install.wim)
- Method 1: Using 7-Zip to extract files from Install.wim
- Method 2: Using DISM to mount Install.wim and extract the contents
- Install.esd vs Install.wim
- Извлекаем файлы из установочного образа Windows
How to Extract an INSTALL.WIM file that contains several INSTALL.WIM files
Last updated on December 13th, 2017
The install.wim file (Windows Image File) is a compressed file which contains a set of many files and associated file system metadata and is included in any Windows installation Media under the «sources» folder (sources\install.wim). Sometimes when Windows 10 or 8 crashes, due to corrupted system files or for any other reason, there is a need to repair the Windows file system, by using the install.wim file, as the repair source.
- DISM /Online /Cleanup-Image /RestoreHealth /Source:WIM:X:\Sources\install.wim
But, an install.wim file may contain several install.wim files (each one for different Windows 10 Edition e.g. Pro, Home, etc.), which are referenced either by their numerical index or by their unique name. For that reason there is the need to extract the install.wim and get a valid (according to the installed Windows Edition), install.wim file, in order to repair Windows 10 or Windows 8. (e.g. by using DISM).
In this tutorial you ‘ll find detailed instructions on how to extract an install.wim file, that contains install.wim files for different Windows 10 (or Windows 8) Editions (e.g. Windows 10 Pro, Windows 10 Home, Windows 10 Education, etc.).
How to extract an install.wim file that contains more than one install.wim files.
1. Attach or mount* the Windows installation media on your system.
* Note: If you are using Windows 8/8.1, then read this article on: How to mount ISO files.
2. Right click at Start menu  and select Command Prompt (Admin).
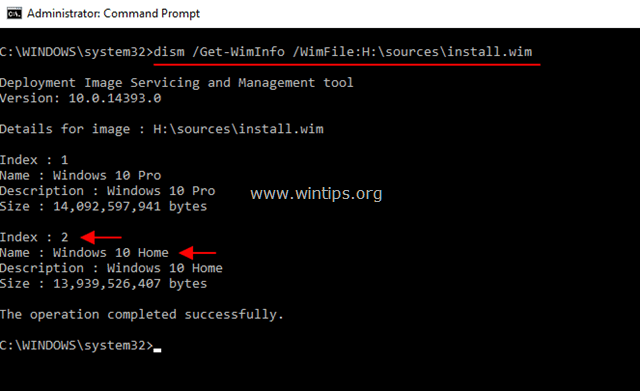
3. Then type the following command and press Enter, in order to find which images are in the «install.esd» file: *
- dism /Get-WimInfo /WimFile: X :\sources\install.wim
* Note: Replace the » X » drive letter according to your case. At this example the Windows installation media is located at drive H:, so the command will be:
4. According to your Windows installed Edition take note of the index number. *
* e.g.: If you have installed the Windows 10 Home edition on your system, then the Index number is «2».
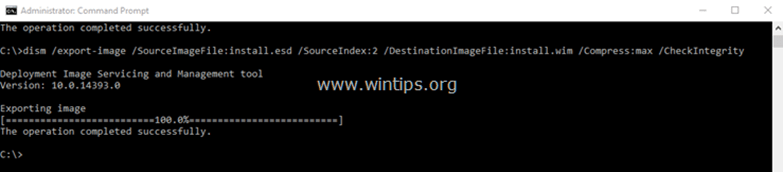
5. Then give the command below to extract the corresponding to your Windows version «install.wim» file (Index number): *
- dism /export-image /SourceImageFile: H :\sources\install.wim /SourceIndex: IndexNumber /DestinationImageFile:C:\install.wim /Compress:max /CheckIntegrity
* Note: Replace the IndexNumber according to your Windows 10 installed version or the Windows version that your want to extract from the source INSTALL.WIM file.
e.g. For this example (for a Windows 10 Home based computer) we want to extract the install.wim file with Index number=2. So, the command will be:
- dism /export-image /SourceImageFile:H:\sources\install.wim /SourceIndex:2 /DestinationImageFile:C:\install.wim /Compress:max /CheckIntegrity

7. When the process is completed you should have a valid Windows 10 Home install.wim on the drive C: (C:\install.wim).
That’s it! Let me know if this guide has helped you by leaving your comment about your experience. Please like and share this guide to help others.
How to extract MSI files from an EXE installer
Problem:
You need to extract an .msi file from an .exe installer.
Solution:
There are at least three ways of solving this problem, but none of them is universal. You might need to go through all of them to find the one that works for the EXE installer that you have.
CodeTwo strongly advises against extracting (and using) MSI files from the EXE installers of the CodeTwo software. Unless the product website allows such an operation (or unless you are instructed/allowed to do so by CodeTwo Support), use the .exe setup files.
The first method is based on the fact that most installers extract their .msi files to the temporary files folder during the installation process. To extract an MSI file from an EXE installer, you need to:
- Launch your .exe file.
- When you see the first prompt (e.g. a question about whether you want to continue installation, accept a license agreement, etc.), do not click anything in this window and do not close it.
- Open Windows Explorer, type %temp% in the address bar and press Enter.
- Sort the files in the folder by the modification date. The newest file on the list should be the .msi file you are looking for.
- Copy the MSI file to a safe location before you close the installer prompt window (see step 2). Be aware that if you close the installer window, the MSI file will be immediately deleted from the temporary files folder.
The second method uses a free third-party tool called 7-Zip to browse the content of the .exe installer file. Follow the steps below.
- Download 7-Zip from this page and install it.
- Right-click on the .exe file (from which you want to extract an .msi file) and from the shortcut menu choose 7-Zip >Open Archive.
- Do not extract any files yet. Instead, browse and look for the folder MSI within the contents. It might take some time to find this folder because it is not always located directly in the root directory (its location may vary depending on the installer).
- When you locate the MSI folder, you will notice that it most likely does not contain any .msi files, but a file or files with no extensions and rather cryptic names such as 132. Despite these misleading names, these are actually the MSI files you are looking for.
- Drag and drop these files to any desired folder or select them and extract them with 7-Zip. Close 7-Zip after that.
- Change the names of the extracted files so that they include the .msi extension.
- If there are two files, the larger one is the 64-bit installer, and the smaller one is the 32-bit version. Use the one you need.
The third method works with InstallShield based projects. To get the MSI file from your EXE installer, you need to:
- Log on to a computer where the software (the installer of which you would like to access) is not installed. This is because this method forces the uninstalling process to trigger extraction of the .msi file. If you already have this software installed, this method will remove it, which might not be desired.
- Run Windows Command Prompt (cmd) (in Windows 10: open the Start menu, type cmd and press Enter) and go to the folder where your EXE file is located.
- Execute the command below:
replace with the name of your .exe file and with the path to the folder where you want the .msi file to be extracted (for example C:\Folder ).
As described in this thread, the switches for the command above do the following:
- /s /x — silently ( /s ) uninstalls ( /x ) the product from the system;
- /b — defines the target path for the .msi file;
- /v — passes desired arguments to the installer. In this case, the argument is /qn — it disables GUI and any prompts.
How to Extract Files from Windows 10 ISO or DVD (Install.wim)

There are situations where you need a specific Windows system file from the install.wim image present in a Windows 10 setup disk or ISO. In the case of missing system files, the DISM & SFC procedure will automatically restore them. Alternatively, you can restore missing Windows system files (of any version) from the WinBindex.
So, why do you need the install.wim extraction method?
In some circumstances, extracting from install.wim in Windows ISO/DVD is the only option possible. Let’s say you want to repair or restore the Windows Recovery Environment on a computer. For that, you’ll need the WinRE.wim image present inside the install.wim or install.esd in a Windows 10 DVD or ISO.
(For a piece of brief information about ESD & WIM formats, go to the end of this article.)
There are at least two ways to extract files from the Windows 10 Setup DVD or ISO. Though the title says “Windows 10”, the instructions below apply to Windows Vista through Windows 10.
Extract individual files from Windows 10 DVD or ISO (install.wim)
In this example, let’s see how to extract a file named WinRE.wim from the Windows 10 Setup disk or ISO.
Method 1: Using 7-Zip to extract files from Install.wim
- Download and install 7-Zip from http://7-zip.org/
- Insert your Windows 10 DVD and browse to the Sources folder inside the DVD. If you have a Windows 10 ISO, double-click the ISO to mount the ISO to a drive letter.
Note: You can see the list of indexes and the corresponding editions using DISM. This is explained in Method 2 of this article.
As a side note, I’ve found that the WinRE.wim (Windows Recovery Environment image) file size is precisely the same in every Windows 10 Edition. However, the best practice would be to get a copy only from the specific index folder in the install.wim.
The ISOs downloaded from Microsoft site contain multiple Windows images combined into a single .wim file. If you have a custom ISO or DVD (e.g., distributed by your organization) has a single Windows image (Pro, Home, Education Edition, etc.), the index number folders won’t exist.
Using the above method, you can extract any file from the install.wim or install.esd .
7-Zip supports the ESD format as well. That means you don’t have to convert the install.esd to install.wim to extract its contents.
Method 2: Using DISM to mount Install.wim and extract the contents
DISM (Deployment Image Servicing and Management tool) tool is to service online and offline Windows images. To mount the install.wim file and extract its contents, follow these steps:
Note: If you have install.esd instead of install.wim , you’ll need to convert the ESD to WIM format before you can mount it using DISM.
- Insert your Windows 10 DVD and browse to the Sources folder inside the DVD. If you have a Windows 10 ISO, double-click the ISO to mount the ISO to a drive letter.
- Open an elevated Command Prompt window.
- Find the list of indexes and the corresponding editions found in the install.wim , by running the following command:
… where G:\ is the drive letter of the mounted ISO or Windows Setup DVD.
In the case of ISOs downloaded from Microsoft, you’ll see more indexes (Meaning: Multiple windows images or different editions combined into the install.wim). For example, here’s the list of indexes found inside the Windows 10 ISO from Microsoft:
Now, let’s mount the image #6 (Windows 10 Pro) to a folder using the following commands:
The 2nd command-line takes a few minutes to complete. It extracts/maps the install.wim (the specified index #) to the mentioned folder so that you can access its contents using File Explorer.
If you skip the /ReadOnly parameter accidentally, the following error would pop-up:
You do not have permissions to mount and modify this image.
Verify that you have Read/Write permissions or mount the image using the /ReadOnly option. Note that you cannot commit changes to an image with read-only permissions.
When I ran the Unmount command above, the following error displayed in the console:
The directory could not be completely unmounted. This is usually due to applications that still have files open within the mount directory. Close these files and unmount again to complete the unmount process.
However, since the entire directory was already empty, all I had to do was delete the WinMount folder manually. I didn’t have to run the DISM unmount command-line again.
Gigabytes of data are written to or removed from the file system when you mount and unmount the Windows image. Unlike Method 1, each DISM command-line would take a few minutes to complete.
Using 7-Zip or any third-party archiver (as discussed in Method 1) is the fastest method to view and extract the contents of a Windows image file (*.wim).
Install.esd vs Install.wim
Some Windows 10 ISO have install.esd instead of install.wim . ESD is a highly compressed format whose file size comes around 80% compared to the WIM image.
But the ESD image format is read-only and thus has drawbacks. For instance, it can’t be deployed using a WDS server. So you need to convert the ESD file to a WIM file to service the image or to deploy it.
7-Zip can handle ESD as well as WIM. Whereas, DISM would throw the following error when you try to mount an ESD file ( install.esd ).
An attempt was made to load a program with an incorrect format.
So, if you plan to use DISM to view or extract from the image, you must first convert the ESD file into WIM format using DISM, nLite, or any other utility. This is discussed in the article How to Convert ESD to WIM Using DISM or NTLite in Windows 10.
Извлекаем файлы из установочного образа Windows
Иногда может возникнуть необходимость заменить поврежденный или удаленный системный файл Windows. Имея установочный DVD-диск (или ISO-образ) можно извлечь из него необходимые файлы без необходимости устанавливать систему заново.
Начиная с Windows Vista\Server 2008 установка операционной системы производится не копированием файлов, а путем развертывания готовой системы из образа. В качестве образа используется файл формата WIM (Windows Imaging Format), и чтобы добраться до файлов, нам надо подмонтировать этот образ в виде папки и достать из него необходимые файлы.
Для подключения образа используем утилиту Dism, входящую в состав операционной системы. Порядок действий следующий.
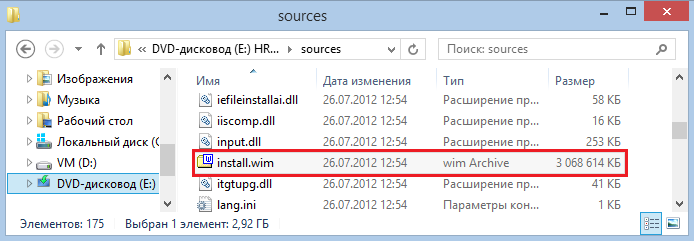
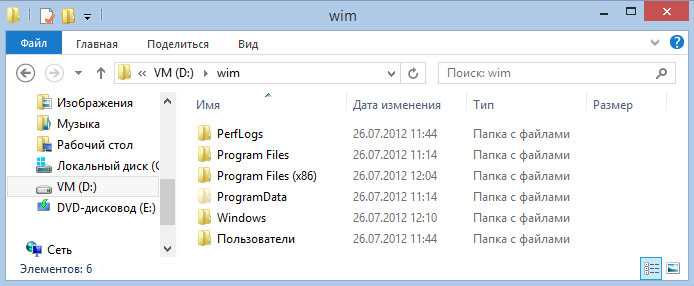
Открываем дистрибутивный диск, переходим в папку Sources и находим файл install.wim, который является установочным образом. Копируем его в любое удобное место, например я скопировал его в корень диска D.
Wim-образ может содержать несколько редакций операционной системы, и чтобы выбрать нужную, нам надо уточнить содержимое образа. Открываем командную консоль с правами администратора и вводим команду:
Dism /Get-WimInfo /WimFile:D:\install.wim
Как видите, в образе содержится четыре редакции операционной системы. Выбираем нужную и запоминаем ее индекс или имя.

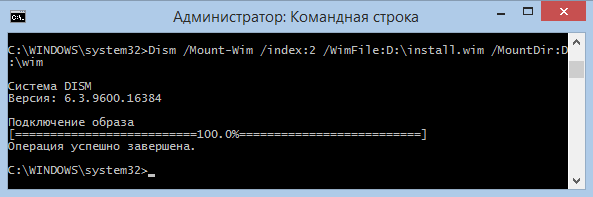
Теперь создаем на диске D папку wim, в которую будет монтироваться образ. Монтируем образ в эту папку командой:
Dism /Mount-Wim /index:2 /WimFile:D:\install.wim /MountDir:D:\wim
Ключ /index:2 указывает на нужную нам редакцию системы. Вместо индекса можно указать имя, например так:
Dism /Mount-Wim /name:″Windows Server 2012 Serverstandard″ /WimFile:D:\install.wim /MountDir:D:\wim
Примечание. В качестве папки для монтирования образа install.wim нельзя указывать корень системного диска.
После подключения образа заходим в папку wim, выбираем нужные файлы и копируем их на место поврежденных\удаленных.
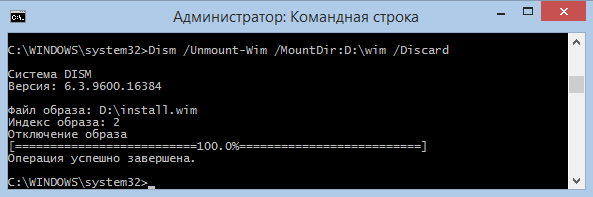
И отключаем образ командой:
Dism /Unmount-Wim /MountDir:D:\wim /Discard
Примечание. Утилита Dism может применяться для редактирования Wim-образов, а ключ /Discard предназначен для отмены изменений. Также есть ключ /Commit, сохраняющий изменения. Хотя в нашем случае изменений не производилось, так что можно использовать любой из них.
Этот способ может использоваться на всех серверных и клиентских операционных системах Windows, начиная с Windows Server 2008 и Windows Vista.


