- Failed to add drivers to an offline windows image перевод
- Add and Remove Drivers to an offline Windows Image
- Driver types
- Add drivers to an offline Windows image
- Remove drivers from an offline Windows image
- Add drivers to an offline Windows image by using an unattended answer file
- Установка Windows 7 с USB на системы с набором системной логики Intel 100-й и 200-й серии
- Создаем загрузочную флешку с Windows 7
- Патчим установочный диск Windows 7
Failed to add drivers to an offline windows image перевод
Сообщения: 474
Благодарности: 38
| Конфигурация компьютера |
| ОС: Windows 7 Ultimate |
——-
Information must be free!
Если же вы забыли свой пароль на форуме, то воспользуйтесь данной ссылкой для восстановления пароля.
| Конфигурация компьютера |
| Материнская плата: ASUS P5Q Pro |
| HDD: 2xWD Caviar Black 1 Тб SATA2 RAID0 |
| Звук: int. HD-Audio codec (Realtek ALC1200) |
| CD/DVD: Oprtiarc DVD RW AD-7173S |
| ОС: Windows 8 64 bit |
| Прочее: Antec P183, AVerMedia SUPER 009 |
| 2010-12-31 17:06:54, Error DISM DISM.EXE: Failed to access the image folder or image’s windows folder. » |
| 2010-12-31 17:06:54, Info CBS Executing DISM: «C:\Windows\system32\dism.exe» /image:»g:\Mount» /sysdrivedir:»g:\Mount» /norestart /logpath:»g:\Logs\drivers.log.txt» /apply-unattend:»g:\xml\Drivers.xml» » |
——-
Omnia mutantur, nos et mutamur in illis (лат.), все меняется, и мы меняемся
| Конфигурация компьютера |
| ОС: Windows 7 Ultimate |
——-
Information must be free!
| Конфигурация компьютера |
| Материнская плата: ASUS P5Q Pro |
| HDD: 2xWD Caviar Black 1 Тб SATA2 RAID0 |
| Звук: int. HD-Audio codec (Realtek ALC1200) |
| CD/DVD: Oprtiarc DVD RW AD-7173S |
| ОС: Windows 8 64 bit |
| Прочее: Antec P183, AVerMedia SUPER 009 |
——-
Omnia mutantur, nos et mutamur in illis (лат.), все меняется, и мы меняемся
Это сообщение посчитали полезным следующие участники:
| Конфигурация компьютера |
| ОС: Windows 7 Ultimate |
——-
Information must be free!
Add and Remove Drivers to an offline Windows Image
You can use DISM to install or remove driver (.inf) files in an offline Windows or WinPE image. You can either add or remove the drivers directly by using the command prompt, or apply an unattended answer file to a mounted .wim, .ffu, .vhd, or .vhdx file.
When you use DISM to install a device driver to an offline image, the device driver is added to the driver store in the offline image. When the image is booted, Plug and Play (PnP) runs and associates the drivers in the store to the corresponding devices on the computer.
To add drivers to a WindowsВ 10 image offline, you must use a technician computer running WindowsВ 10, Windows ServerВ 2016, or Windows Preinstallation Environment (WinPE) for WindowsВ 10. Driver signature verification may fail when you add a driver to a WindowsВ 10 image offline from a technician computer running any other operating system.
To learn how to add a driver on a running Windows PC, see Add a driver online in audit mode or Install a plug and play device. To learn how to add a driver to a PC running WinPE, see Drvload command line options.
Driver types
- .inf-style drivers: Many drivers include an information file (with an .inf extension) to help install the driver. These can be installed using tools described in this topic.
- .exe-style drivers: Drivers without an .inf file often must be installed like typical Windows desktop applications. To learn how to add these, see Add a driver online in Audit Mode
- Boot-critical drivers: Graphics and storage drivers may sometimes need to be added to the Windows image (as shown in this topic), as well as the Windows PE image, and in the Windows recovery (WinRE) image.
Add drivers to an offline Windows image
To add drivers to an offline image, you have to mount an image prior to adding drivers.
If you’re adding drivers to a WinPE image, you can add them to the WinPE image in the output folder you specified when you ran copype, for example: C:\WinPE_amd64\media\sources\boot.wim . This ensures that drivers will be included in WinPE each time you build WinPE media from that folder.
- Mount a Windows image. For example:
- Add a driver to the image.
To install all of the drivers from a folder and all its subfolders, point to the folder and use the /Recurse option.
To see all DISM driver servicing command line options, see DISM driver servicing command-line options.
Using /Recurse can be handy, but it’s easy to bloat your image with it. Some driver packages include multiple .inf driver packages, which often share payload files from the same folder. During installation, each .inf driver package is expanded into a separate folder. Each individual folder has a copy of the payload files. We’ve seen cases where a popular driver in a 900MB folder added 10GB to images when added with the /Recurse option.
To install an unsigned driver, use /ForceUnsigned to override the requirement that drivers installed on X64-based computers must have a digital signature.
- Check to see if the driver was added. Drivers added to the Windows image are named Oem*.inf. This guarantees unique naming for newly added drivers. For example, the files MyDriver1.inf and MyDriver2.inf are renamed Oem0.inf and Oem1.inf.
- Commit the changes and unmount the image.
Remove drivers from an offline Windows image
- At an elevated command prompt, mount the offline Windows image:
- Remove a specific driver from the image. Multiple drivers can also be removed on one command line.
Removing a boot-critical driver package can make the offline Windows image unbootable. For more information, see DISM Driver Servicing Command-Line Options. пїЅ
- Commit the changes and unmount the image.
Add drivers to an offline Windows image by using an unattended answer file
- Gather the device driver .inf files that you intend to install on the Windows image.
All drivers in the directory and subdirectories that are referenced in the answer file are added to the image. You should manage the answer file and these directories carefully to address concerns about increasing the size of the image with unnecessary driver packages.
- Use WindowsВ System Image Manager (WindowsВ SIM) to create an answer file that contains the paths to the device drivers that you want to install.
- Add the Microsoft-Windows-PnpCustomizationsNonWinPE\DriverPaths\PathAndCredentials\Credentials component to your answer file in the offlineServicing configuration pass.
For each location that you intend to access, add a separate PathAndCredentials list item by right-clicking on DriverPaths in the Answer File pane and clicking Insert New PathAndCredentials.
See Configure components and settings in an answer file for information on how to modify an answer file.
- For each path in Microsoft-Windows-PnpCustomizationsNonWinPE , specify the path to the device driver and the credentials that are used to access the file, if the file is on a network share.
When you include multiple device driver paths by adding multiple PathAndCredentials list items, you must increment the value of Key for each path. For example, you can add two separate driver paths where the value of Key for the first path is equal to 1 and the value of Key for the second path is equal to 2.
- Save the answer file and exit WindowsВ SIM. The answer file must resemble the following sample.
- Mount the Windows image that you intend to install the drivers to by using DISM:
If you’re working with a VHD or FFU, specify /Index:1 .
- Apply the answer file to the mounted Windows image:
For more information about how to apply an answer file, see DISM Unattended Servicing Command-Line Options.
The .inf files referenced in the path in the answer file are added to the Windows image.
- Check to see if the driver was added. Drivers added to the Windows image are named Oem*.inf. This guarantees unique naming for newly added drivers. For example, the files MyDriver1.inf and MyDriver2.inf are renamed Oem0.inf and Oem1.inf.
For example, type:
- Unmount the .wim file and commit the changes. For example, type:
If you need drivers for WinPE to see the local hard disk drive or a network, you must use the windowsPE configuration pass of an answer file to add drivers to the WinPE driver store and to reflect boot-critical drivers required by WinPE. For more information, see Add Device Drivers to Windows During Windows Setup.
Установка Windows 7 с USB на системы с набором системной логики Intel 100-й и 200-й серии
Те, кто впервые устанавливает операционную систему Windows 7 на платформы с набором системной логики Intel 100/200-й серии при помощи USB-накопителя, столкнутся с невозможностью продолжения установки из-за отсутствия специального драйвера.
Собственно в моем новом корпусе Fractal Design Define Mini C (о котором мы еще поговорим отдельно) вообще отсутствует место для установки DVD-привода (ODD), так что единственный вариант – установка операционной системы с USB флеш-накопителя.
Проблема заключается в том, что ОС Windows 7 использует устаревший набор драйверов, в то время как все системные платы на базе чипсетов 100-й и 200-й серии требуют новый драйвер. Под данное ограничение подпадает огромное количество системных плат на базе логики Intel B150, B250, H110, H170, H270, Z170 и Z270; в частности это все новые конфигурации на базе процессоров Intel Skylake и Kaby Lake (сокет LGA1151, 6 и 7 поколение процессоров).
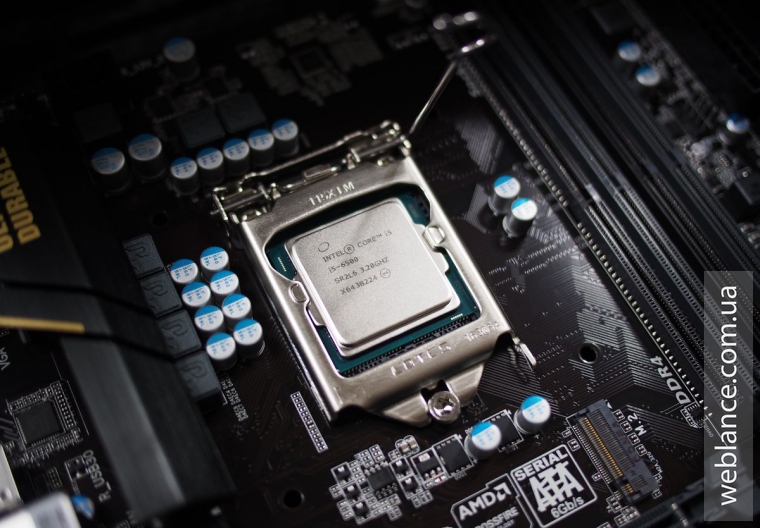
В конкретно моем случае это материнская плата GA-Z170M-D3H производства Gigabyte и процессор Intel Core i5-6500. И да, можно было взять i5-7400/7500, но ПК собирался в январе 2017-го, в то время как заметку я пишу только сейчас. Так что сейчас не об этом.
В общем, если вы попытаетесь установить Windows 7, получите следующую ошибку:
No device drivers were found. Make sure that installation media contains the correct drivers, and then click OK.
Select the driver to be installed.
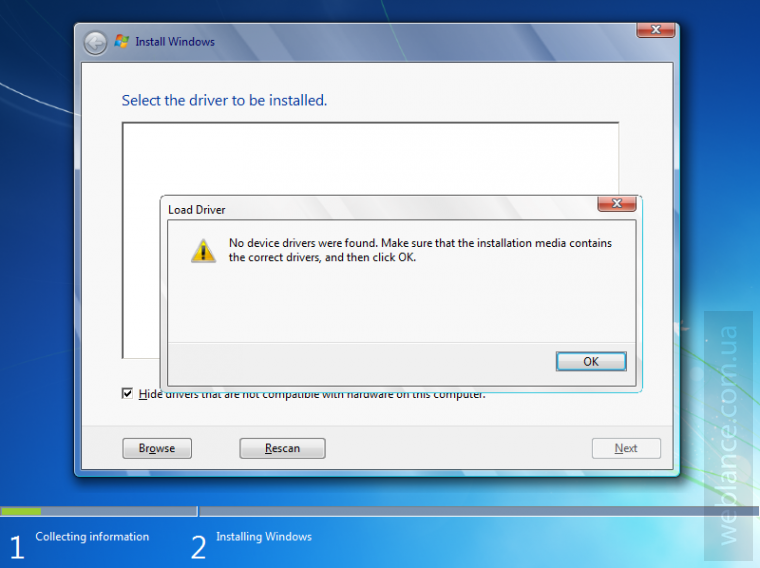
В переводе это обозначает: не обнаружены драйвера устройства. Убедитесь что установочное устройство содержит подходящие драйверы и затем нажмите OK. Выберите драйвер для установки.
Что же делать? Ничего сложного нет, проблема решается достаточно просто, правда вам потребуется:
- дополнительный компьютер или ноутбук со свободным портом USB;
- диск с Windows 7 (x32 либо x64) или ISO-образ;
- USB-накопитель на 4-8 ГБ
Также для дальнейшей работы необходимо скачать 2 дополнительные утилиты, обо всем по порядку.
Создаем загрузочную флешку с Windows 7
Просто скопировать файлы дистрибутива Windows на флешку нельзя, поскольку дополнительно необходимо создать загрузочные записи.
Для создания загрузочной установочной флешки с Windows 7, лично я предпочитаю использовать фирменную утилиту от Microsoft под названием «Windows USB/DVD Download Tool». Скачать её можно абсолютно бесплатно с ресурсов Microsoft по ссылке чуть выше.

Шаг 1. Запускаем Windows USB/DVD Download Tool и следуем подсказкам мастера. На первом этапе (Shoose ISO file) следует выбрать исходный ISO-файл (образ) с дистрибутивом Windows 7. Какой образ и какую версию использовать – решать вам, это может быть как образ оригинального имеющегося у вас DVD-диска, либо официальный MSDN-образ. Лично я предпочитаю использовать официальный образ, без стороннего вмешательства «умельцев». Главное, чтобы версия Windows 7 совпадала с имеющейся у вас лицензией, в противном случае вы не сможете выполнить активацию ОС имеющимся ключом.
Напротив Source file нажимаем Browse и указываем дистрибутив, в конкретном примере это ru_windows_7_professional_with_sp1_x64_dvd_u_677024.iso, после чего нажимаем Next (далее).
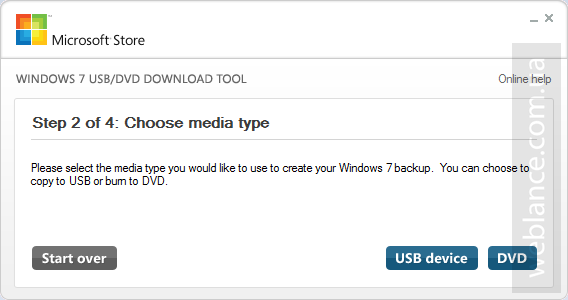
Шаг 2. На втором этапе (Choose media type) следует выбрать тип конечного носителя, на который будет записан дистрибутив. Доступно всего 2 варианта – USB device и DVD. Как несложно догадаться, нам нужен первый вариант, нажимаем USB device.
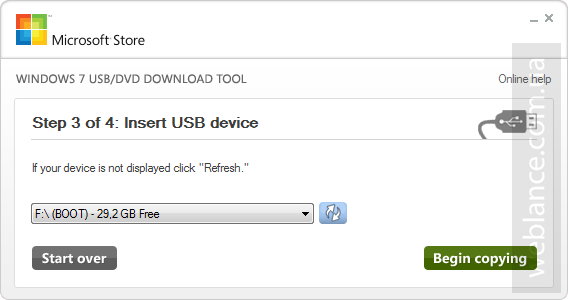
Шаг 3. В появившемся новом окне (Insert USB device) необходимо в выпадающем списке необходимо выбрать конечный накопитель, после чего нажать Begin copying (начать копирование).
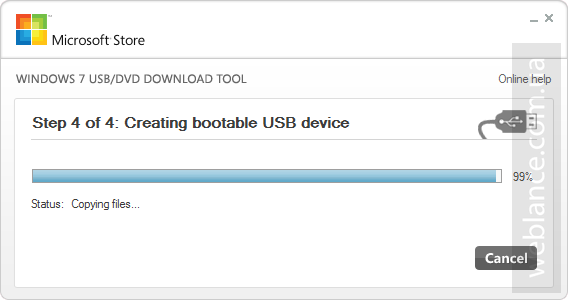
Шаг 4. Процесс копирования файлов (Copying files) и создания загрузочного USB-устройства (Creating bootable USB device) занимает некоторое время, наберитесь терпения и дождитесь завершения процесса. Скорость зависит от характеристик флешки, чем быстрее флешка – тем быстрее процесс создания. Иногда может показаться, что процесс завис, не спешите отменять задание, просто подождите пару минут.
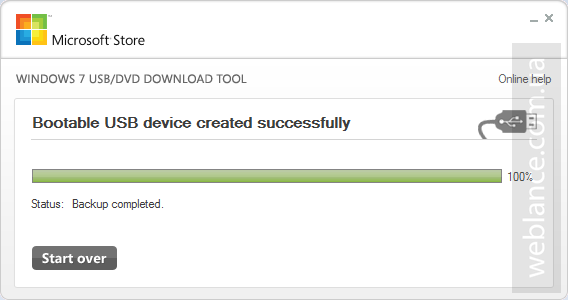
Статус Bootable USB Device created successfully говорит о том, что диск успешно создан, нажимаем Start over либо закрываем окно и переходим к следующему этапу.
Патчим установочный диск Windows 7
После того как успешно создан загрузочный установочный диск, его необходимо пропатчить, а точнее, добавить в него необходимые драйверы. Просто скопировать файлы нельзя, поэтому используем софт под названием Windows USB Installation Tool.
Утилита Windows USB Installation Tool едина для всех материнских плат на системной логике 100-й и 200-й серии, так что подойдет не только для материнских плат от Gigabyte.
Скачать Windows USB Installation Tool можно на сайте Gigabyte в разделе загрузок (Support – Downloads – Utility) для любой платы на базе чипсетов 100/200 серии. Есть аналогичные утилиты и у ASRock, и у MSI. Оболочки разные, но суть одинаковая – добавить драйвер в образ.
Ниже прямые ссылки на загрузку утилиты:
На момент написания, актуальна версия B16.1102.1, если ссылки не работают – ищите утилиту на официальном сайте.
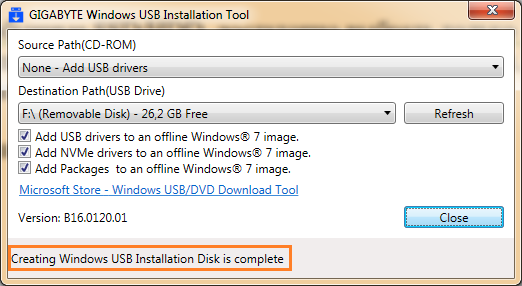
После скачивания необходимо разархивировать файл, ничего устанавливать не требуется, просто запустите WindowsImageTool.exe
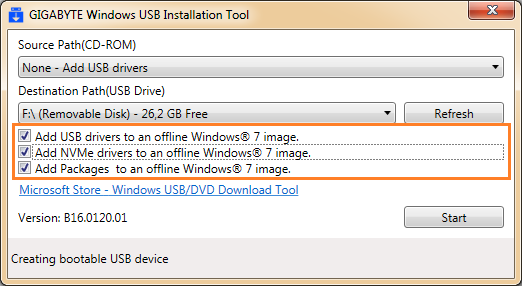
В выпадающем списке Source Patch (CD-ROM) необходимо выбрать None — Add USB drivers, т.е. нам требуется добавить драйверы на уже существующую флешку. В принципе, этой же утилитой можно копировать оригинальный диск на флешку.
Далее в выпадающем списке Destination Path (USB Drive) выбираем свой накопитель.
После выбора накопителя, следует установить одну или несколько опций, всего их три.
- Add USB drivers to an offline Windows 7 image – добавление драйвера USB к установочному образу. В частности это драйверы Intel USB 3.0 eXtensible Host Controller, Intel USB 3.1 eXtensible Host Controller и Asmedia USB Host Controller;
- Add NVMe drivers to an offline Windows 7 image – добавление драйверов Intel NVMe и Samsung NVMe к дистрибутиву. Данную опцию следует обязательно устанавливать только в том случае, если предусматривается установка операционной системы на SSD-накопители NVMe.
- Add Packages to an offline Windows 7 image – добавит в дистрибутив исправления (Hotfix) для NVM Express. В частности для 32-разрядной версии ОС это Windows6.1-KB2990941-v3-x86 и Windows6.1-KB3087873-v2-x86, для 64-битных систем – Windows6.1-KB2990941-v3-x64 и Windows6.1-KB3087873-v2-x64.
Если вы устанавливаете Windows 7 на обычные SSD/HDD, достаточно выбрать только первую опцию. Если же выбрать все опции, установки займет продолжительное время, но при помощи данной флешки можно будет установить ОС на любую систему.
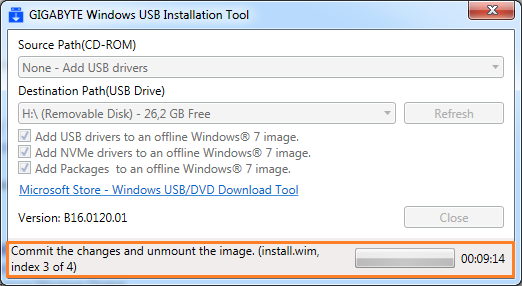
Нажимаем Start и дожидаемся завершения процесса. На этом собственно всё, теперь можно загружаться с флешки и приступать к установке операционной системы.
Для последующей более удобной и быстрой установки обновлений, уже после установки ОС, можно воспользоваться пакетом UpdatePack7R2.


