- Настройка OpenVPN в macOS
- Настройка для Tunelblick
- Настройка для Viscosity
- Настройка для OpenVPN Connect 3
- Строим OpenVPN мост под Mac OSX
- OpenVPN Connect for Mac OS
- The Interface
- Frequently Asked Questions
- Can the new and old client co-exist?
- Can i connect to multiple servers at the same time?
- Is the old client still available?
- Where can I get this for other OS?
- Should I use this client or the client from my instance of Access Server?
- How do I install the Mac client?
- How do I install the client directly from my Access Server?
- How do I import a profile from a server?
- How do I import a profile from my computer?
- Why did I receive an error message that TAP mode is not supported when importing a profile?
- Why am I getting a certificate error? How can I fix using a self-signed certificate?
- Where do I find my Access Server Hostname and credentials?
- What do I enter for “Title”?
- What does “import autologin profile” mean?
- Why did I get this message: “In this version compression was disabled by default. If you need it, please re-enable this setting.”
Настройка OpenVPN в macOS
Настройка для Tunelblick
Если ваша версия macOS старшее MacOS X Leopard, вы можете воспользоваться клиентом OpenVPN Tunnelblick.
Tunnelblick также работает и на современных версиях macOS. Для настройки работы Tunellblick выполните следующие действия:
1. Скачайте инсталятор Tunelblick Tunnelblick и установите его.


2. Распакуйте конфигурационные файлы, выданные техподдержкой. Вы также можете их скачать в личном кабинете.
3. Откройте файл с конфигурационного файла ovpn в программе Tunnelblick.

4. Выберите в меню Tunelblick пункт Connect config. При запросе логина и пароля, ввести их, взяв из файла pass.txt,
который также был в архиве с конфигурационными файлами.


5. Для проверки работы сервиса, можете обратитесь к странице https://whoer.net/ru. В отчете Вы можете увидеть текущий IP-адрес.
После окончания работы с VPN, кликните в меню Tunelblick выберите Disconnect config.
Настройка для Viscosity
Если у Вас Mac OS X Leopard или новее, наиболее удобной в использовании является клиент OpenVPN Viscosity.
В этом случае настройка VPN-сервиса сводится к следующим действиям:
1. Скачайте последнюю версию программы Viscosity и установите.
2. Распакуйте конфигурационные файлы, доступные в ваших заказах, в любой каталог.

3. Откройте конфигурационный файл ovpn в программе Viscosity.

4. Далее в верхнем меню рядом с часами кликаем на икноку Viscosity и в выпадающем меню программы выбираем Connect,
в диалоговом окне вводим имя пользователя и пароль (находятся в файле pass.txt в архиве в Ваших заказах).
5. Для проверки работы сервиса, можете обратитесь к странице https://whoer.net/ru. В отчете Вы можете увидеть текущий IP-адрес.
После окончания работы с VPN, кликните в меню Viscosity выберите Disconnect.
Настройка для OpenVPN Connect 3
1. Скачайте дистрибутив OpenVPN Connect 3 с официального сайта openvpn.net и установите его.
2. Скачайте конфигурационные файлы из личного кабинете и распакуйте их
3. Чтобы добавить конфигурационный файл в OpenVPN Connect просто переместите файл на приложение.

4. Отметье галочкой — Connect after import и нажмите Add

5. При появлении ошибки Connection error — Missing external certificate, нажмите Continue.

6. Вы можете избежать появления данной ошибки в будущем, добавив в конфигурационый файл ovpn строчку
после этого, изменённый конфигурационный файл нужно снова передобавить в OpenVPN Connect.
7. Впн подключение активируется, вы сможете управлять им в OpenVPN Connect.
Источник
Строим OpenVPN мост под Mac OSX
Однажды у меня появилась необходимость иметь доступ к локальной сети из удаленного места. Для выполнения данной задачи на iMac был поставлен OSX server в котором был настроен удаленный доступ VPN. Все работало вполне сносно кроме mDNS(Bonjour). Как оказалось данная реализация VPN не поддерживает мультикаст. А он был жизненно необходим из за наличия некоторых специальных приложений которые работают только в локальной сети.
После непродолжительного поиска нашлось несколько решений данной проблемы. Одно из них бесплатное предполагало установку программы «Network Beacon» и прописывания в ней руками путей к службам «Bonjour». Другое решение было платным и предполагало установку специального приложения «ShareTool» которое во первых может строить собственные SSH туннели и во вторых передавать по туннелю информацию о службах на стороне сервера.
Минусов у этого решения два. Первый это то что надо покупать лицензию на каждую машину. Ну и второй заключается в том что это решение все равно костыль. А мне хотелось все сделать как можно чище.
Решением оказалась постройка VPN моста на базе OpenVPN с виртуальным адаптером «tap».
Но как это сделать? В сети я нашел много разных инструкций по настройке подобной конфигурации но ни одного варианта постройки моста под OSX.
И тут я вспомнил как настраивал мост для расширения беспроводной сети и решил сделать все похожим образом.
Шаг первый — Настраиваем OpenVPN
Все последующие шаги будут требовать прав суперпользователя. По этому открываем терминал и сразу переходим в режим безграничных возможностей.
Для начала устанавливаем драйвер TunTap
Загрузить его можно по этой ссылке: tuntap_20111101.tar.gz
Распаковываем, запускаем инсталлятор. После окончания установки загружаем модули в ядро.
Далее устанавливаем и сам OpenVPN посредством MacPorts.
Для тех кто еще не знает — Easy-RSA больше не входит в состав пакета OpenVPN по этому качаем его отдельно по ссылке:
easy-rsa-release-2.x.zip
Для большего удобства копируем содержимое папки «openvpn2» в «/etc/openvpn».
Распаковываем в нее Easy-RSA 2.
Правим под себя vars и генерируем ключи. Правка «vars» заключается в исправлении информации о держателе сертификата и ключа а также изменении (при необходимости) длинны параметров Диффи — Хеллмана.
В заключении генерируем параметры Диффи — Хеллмана.
Правим образец из «/etc/openvpn/sample-config-files/» или создаем новый «server.conf».
Для примера мой вариант
Теперь переходим к следующему этапу создаем мост средствами самой MacOS.
Шаг второй — «Мостостроительство»
Запускаем Системные настройки и выбираем Сеть. 
Жмем на шестеренку и выбираем «Управлять виртуальными интерфейсами».
Далее кликаем на плюс и выбираем «Новый мост…».
Здесь мы никогда не увидим наш интерфейс «tap» даже при запущенном сервере OpenVPN. Но как оказалось при всей «дружественности» MacOs дает возможность создать сетевой мост с одним интерфейсом. А это как раз то что нам необходимо. Выбираем адаптер которым мы подключены к сети и обзываем мост по своему усмотрению. Жмем «создать» и «готово».
Далее настраиваем подключение моста также как был настроен сетевой интерфейс и кликаем Применить.
Все, сеть настроена и окно можно закрывать. Оно больше не понадобится.
Теперь можно проверить в терминале наличие моста с одним членом. Запускаем команду «ifconfig» и убеждаемся в наличии моста bridge0 с одним членом в роли которого выступает интерфейс который мы выбрали при его создании.
Следующий этап представляет из себя создание скрипта который должен выполнить две функции. Во первых убедить ядро пропускать пакеты и во вторых добавить интерфейс «tap» в мост.
Шаг третий — Запуск
Создаем файл «/etc/openvpn/scripts/up.sh».
Сохраняем и делаем его исполняемым.
Путь к этому скрипту прописывается в конфигурации сервера и запускается после создания виртуального интерфейса.
Сервер запустился? Если да то убиваем его «Control+C». Если вылетел с ошибками то смотрим с какими и исправляем.
Теперь переходим к автозапуску сервера.
Создаем файл «/Library/LaunchDaemons/org.openvpn.bridge.plist» следующего содержания.
Сохраняем и запускаем сервер.
Все, с запуском сервера справились. Переходим к клиенту.
Шаг четвертый — Клиент
Я коротко опишу только вариант запуска клиента из под MacOS. Так как я подключаюсь к этому серверу с МакБука, и у меня не было необходимости ставить на него Xcode и MacPorts, я решил использовать решение типа «все включено» каким является «Tunnelblick».
Создаем папку конфигурации. Например на рабочем столе. Делать это проще на сервере. Далее будет понятно почему.
В папке создаем файл «config.ovpn» и прописываем конфигурацию.
Сохраняем и копируем в ту же папку ключи и сертификаты созданные в начале.
После копирования ключей и сертификатов необходимо поменять им владельца. Он должен совпадать с пользователем под которым мы строим конфигурацию. За одно покидаем рай суперпользователей.
Далее переименовываем папку с конфигурацией и ключами (имя папки будет названием конфигурации в «Tunnelblick») и добавляем расширение «.tblk»
После этого переносим конфигурацию на клиент с установленным «Tunnelblick» любым удобным способом. После чего открываем «Finder» находим расположение конфигурации и щелкаем по ней дважды. Она автоматически добавится к конфигурациям.
Запускаем «Tunnelblick», выбираем из списка свою конфигурацию и жмем кнопку «Соединится». И если все сделано правильно то через несколько секунд у нас уже есть полный доступ к удаленной локальной сети включая все мультикаст протоколы.
Источник
OpenVPN Connect for Mac OS
This is the official OpenVPN Connect client software for Mac OS developed and maintained by OpenVPN Inc. This is the recommended client program for the OpenVPN Access Server. The latest version of OpenVPN Connect client for Mac is available on our website.
If you have an OpenVPN Access Server, it is recommended to download the OpenVPN Connect client software directly from your own Access Server, as it will then come preconfigured for use. The version available here contains no configuration to make a connection, although it can be used to update an existing installation and retain settings.
sha256 signature: 221fe99f9eaa998a2f39f02ffdb16005eb5fae890dce1c1474bbd4b5fa691171
For mac OS versions titled Yosemite, El Capitan, Sierra, High Sierra, Mojave, Catalina, Big Sur, and Monterey.
Previous generation OpenVPN Connect V2 is available here:
sha256 signature: 2b49e35d0c1b8ee83d1b7067e07f382beacb626e8f5bb7d75fe92debeda42dbc
The Interface
Our latest line of OpenVPN Connect software available for the major platforms features a new and improved user interface, making the experience of installing and using the OpenVPN software a snap. With an easy to use import feature you can import profiles straight from your OpenVPN Access Server or just import a saved profile from disk.


Frequently Asked Questions
Can the new and old client co-exist?
Yes, you may continue to use both v2 and v3 on the same connect device and import the profiles desired into each. If you like, you can run either one or both.
Can i connect to multiple servers at the same time?
No, the client cannot connect to multiple servers at once. It does support multiple connection profiles, giving you the option to switch easily from one server to the next, but you can only be connected to one at a time. This is by design, to prevent unexpected traffic paths when connecting to multiple VPN servers at the same time. If you are a system administrator and you require a complex setup where multiple connections are active at the same time, there is the option to use the open source community OpenVPN client software available from our website.
Is the old client still available?
The OpenVPN client v1 was called “OpenVPN Desktop Client” and is no longer available. It is also not safe to use this anymore as it hasn’t been maintained for many years. It was replaced with the OpenVPN client v2. The OpenVPN client v2 is called “OpenVPN Connect Client” and has been in use for many years. It is still available from our website and offered in the OpenVPN Access Server client web interface itself. The OpenVPN client v3 is called “OpenVPN Connect” and is the latest generation of our software. It is available on our website as a beta version, and will be included soon in Access Server releases.
Where can I get this for other OS?
Should I use this client or the client from my instance of Access Server?
This is the official OpenVPN Connect software for Windows workstation platforms developed and maintained by OpenVPN Inc. This is the recommended client program for the OpenVPN Access Server. The latest versions are available on our website. If you have an OpenVPN Access Server, you can download the OpenVPN Connect client software directly from your own Access Server, and it will then come pre-configured for use. The version available here contains no configuration to make a connection, although it can be used to update an existing installation and retain settings.
How do I install the Mac client?
- Download the DMG file
- Open the file and double click the box icon to begin the installation.
- Give permissions to install on your Mac by entering your credentials when prompted.
- Click Close when you get the “installation was successful” message.
- You can move or keep the OpenVPN Connect installer, simply choose the appropriate action when prompted.
- Open the Launchpad app from the app bar and click on OpenVPN Connect to send it to your app bar.
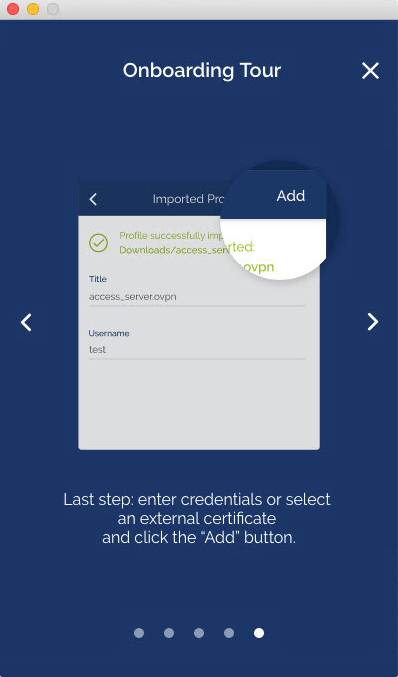
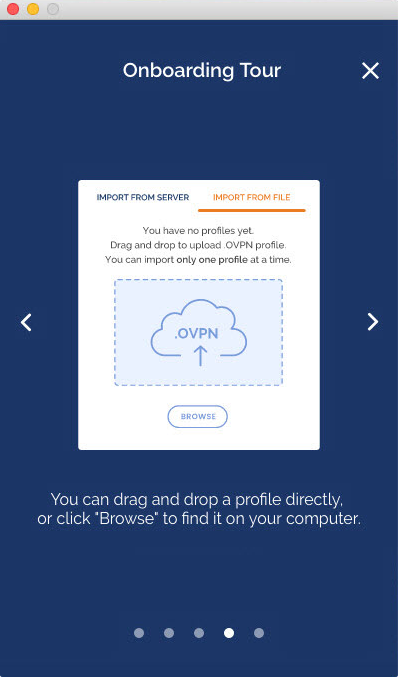
- Click on the icon to start the Onboarding Tour.
- Review how to import a profile from a server by entering the Access Server Hostname and credentials or uploading a profile from your computer.
- Agree to the data collection use and retention policies after reviewing them.
- Import a profile, either from the server or from file.
How do I install the client directly from my Access Server?
Directions found here for installing the client directly from Access Server for your macOS computer. This install is preconfigured with your connection settings from your server.
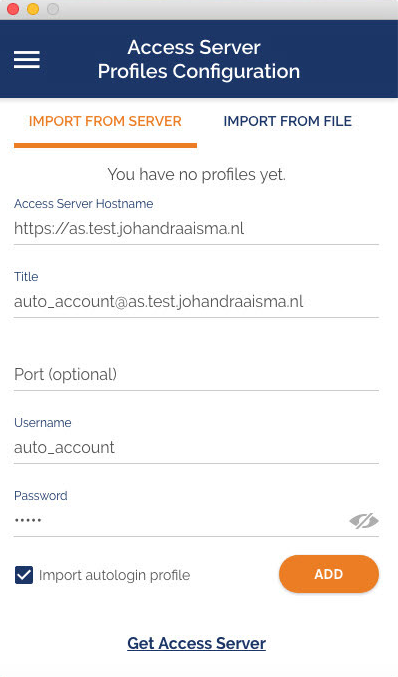
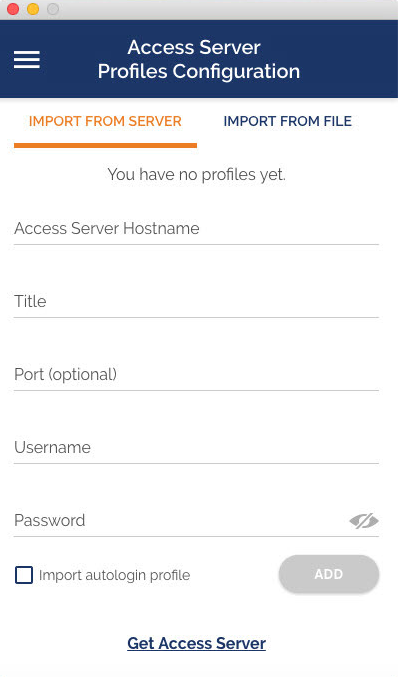
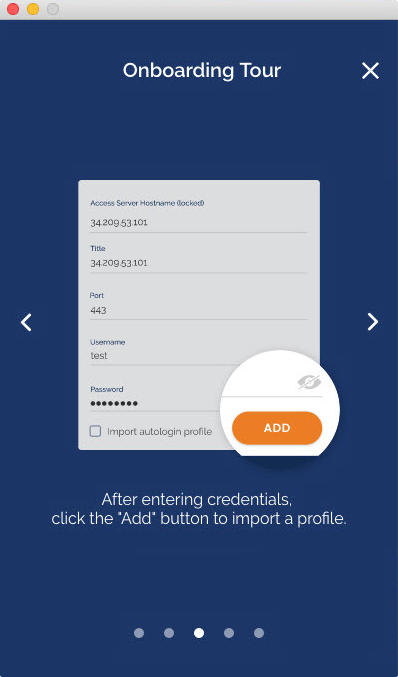
How do I import a profile from a server?
- From the OpenVPN Connect UI, choose “Import from Server”.
- Enter your Access Server Hostname, Title, Port (optional), and your credentials—username and password.
- Click Add.
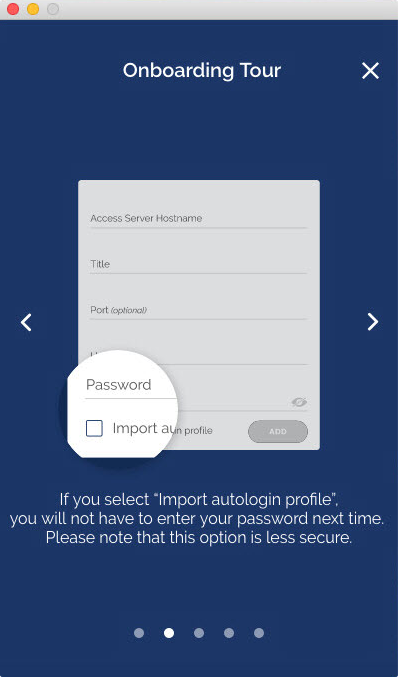
- If you choose to Import autologin profile, it is less secure, but you won’t need to re-enter credentials.
How do I import a profile from my computer?
- Choose “Import from File”.
- Drag and drop a .OVPN file or click on Browse to navigate to the location on your computer.
- The message displays that the profile is successfully imported and displays the hostname and the title. You can change the title if desired.
- Click on Add to complete the import.
Why did I receive an error message that TAP mode is not supported when importing a profile?
Layer 2 bridging (TAP) is no longer supported. Switch over to TUN Mode to resolve this issue.
Why am I getting a certificate error? How can I fix using a self-signed certificate?
OpenVPN Access Server starts with a self-signed certificate. With this, you will receive warnings from your web browser about the site not being secure as well as a certificate error when importing a profile with the Connect Client. You can simply override the warnings or add an exception for your web browser. To resolve this, you can set up a DNS host name that resolves to the public address of your Access Server and install a valid SSL certificate that corresponds to that DNS host name. Going forward, you would use that hostname to access your server instead of the IP address. This is also the recommended method as validated SSL certificates can only ever function with a valid public DNS hostname.
Where do I find my Access Server Hostname and credentials?
Your Access Server Hostname is the address at which your Access Server can be reached. For example it could be https://vpn.yourcompany.com/. If a DNS hostname is not set up, it is also possible to specify the IP address where your Access Server. For example:https://55.193.55.55 Your credentials are your username and password. You may need to get that information from your Access Server administrator if you don’t know it.
What do I enter for “Title”?
Title is the name for the profile. It is automatically defined as the username with the hostname or IP address(example: user1@hostname). It differentiates between multiple profiles. You can define it manually as well. The title can be anything you want is just so you can see which profile is which.
What does “import autologin profile” mean?
Choosing this option allows you to import an autologin profile with the address and credentials for your Access Server, then simply start the connection with the tap of a button. You would not need to re-enter credentials each time you connect. The autoprofile itself contains an embedded secure certificate that identifies and authorizes your connection automatically. It is an optional setting on the OpenVPN Access Server that the administrator of the server can choose to make available to you. If you find you cannot import the autologin profile, your administrator may not have allowed autologin through user permissions.
Why did I get this message: “In this version compression was disabled by default. If you need it, please re-enable this setting.”
During investigation of a vulnerability called VORACLE, it was found that using compression to make the data that goes through the VPN tunnel smaller, and thus faster, has an adverse effect on security. To learn more about this see our security notification on our website regarding the VORACLE attack vulnerability. In order to protect our customers, we are disabling compression by default. Some servers of the open source variety can be configured in such a way that the client must do compression, or else the client may not connect successfully. In such a case, you should get the server updated to disable compression. But we understand that this is not always possible, and you may need to be able to connect to such a server. In that event you can go into the settings and re-enable compression.
Источник


