- Изменить скорость вращения кулера на Корпусе, CPU и GPU
- Изменить скорость вращения кулера на ЦП и корпусе через BIOS
- 3-pin и 4-pin
- Изменить скорость вращения кулера на видеокарте
- How to increase CPU fan speed in Windows 10
- How can I control my CPU fan speed in Windows 10?
- 1. Use a third-party solution for fan control
- How to Control the CPU Fan on Windows 10
- Access fan settings and gain fan speed control for better PC performance
- What to Know
- What Type of CPU Fan Do You Have?
- Control CPU Fan in the BIOS
- CPU Fan Control With Speedfan
- Fan Control in Windows 10 With a Fan Controller
- Do You Need Windows 10 Fan Control?
Изменить скорость вращения кулера на Корпусе, CPU и GPU
Каждый компьютер или ноутбук имеет встроенные вентиляторы для охлаждения, чтобы компоненты как процессор или видеокарта не перегревались. Если вы запустите массивную игру, которая требует мощных характеристик компьютера, то можете услышать как вентиляторы начинают работать быстрее и издавать больше шума. Если вы запустите на ноутбуке много вкладок в Chrome, то ноутбук начнет работать с большей отдачей ресурсов, и соответственно начнет больше греться, что приведет к увеличению скорости вращения кулера. Дело в том, что в компьютере или ноутбуке имеются датчики, которые периодически отслеживают температуру вашей системы, и когда она достигает определенного порога, они начинают вращаться быстрее, чтобы охладить тот или иной компонент оборудования.
К примеру у меня была видеокарта Readon 4870, это была из первых картах, которая имела турбо выдув, и её рабочая температура была все время 83 ℃. До этого на рынке были обычные карты в виде открытой платы, но Readon 4870 была в пластмассовой коробке и работала на выдув горячего воздуха. В летнее время температура доходила до 94 ℃, что заставило меня волноваться, и я решил вручную увеличить скорость вращения кулера, что позволило скинуть температуру до 73 ℃, жертвуя диким шумом.
Если вы хотите контролировать скорость вращения кулера в Windows 10, то это можно сделать при помощи изменения параметров в BIOS или при помощи сторонних программ. Вы должны понимать, что не все кулеры будут регулироваться программами, так как они могут быть подключены напрямую через блок питания или иметь двух или трех пиновый разьем. Я тестировал популярные программы как RivaTuner, SpeedFan, HWiNFO, и ни одна не сработала для моего железа.
Изменить скорость вращения кулера на ЦП и корпусе через BIOS
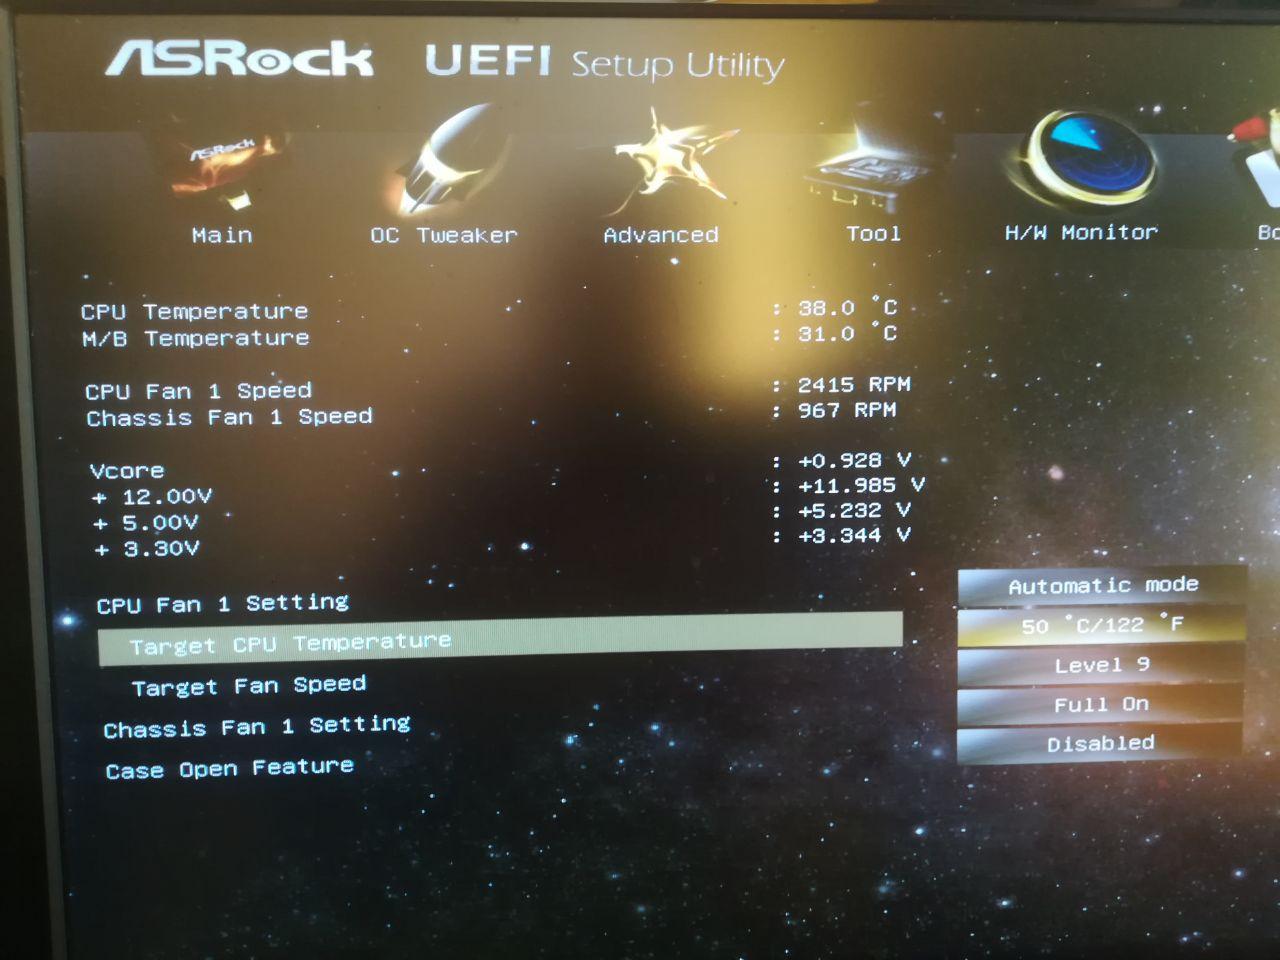
Это самый оптимальный вариант, так как ни одна сторонняя программа мне не помогла, чтобы изменить скорость вращения кулера на центральном процессоре и корпусе. При включении компьютера или ноутбука, сразу нажимайте кнопку на клавиатуре DEL или F2, чтобы войти в параметры BIOS. Так как производители материнских плат имеют разный BIOS или UEFI я буду показывать пример на Asrcok, но вы можете загуглить в картинках свою модель. В большинстве случаях вам нужно найти слово FAN или Speed. В моем случае имеем:
- CPU Fan 1 Setting установить значение напротив Automatic mode. Далее появится Target CPU Temperature и Target Fan Speed.
- Target CPU Temperature мы установим 50℃, а в Target Fan Speed установим Level 9. Получится, что при температуре выше 50℃, кулер начнется крутиться быстрее с уровнем 9. Уровень 9 это максимальный уровень вращения вентилятора. Вы можете задать свои температуры и уровень вращения.
- Параметр Chsssis Fan 1 Setting отвечает за вентиляторы, которые присоединены через материнскую плату в 4 пиновый разьем. Это могут быть вентиляторы, которые находятся на корпусе. Но если корпусные вентиляторы подсоединены напрямую через блок питания, то этот параметр работать не будет.
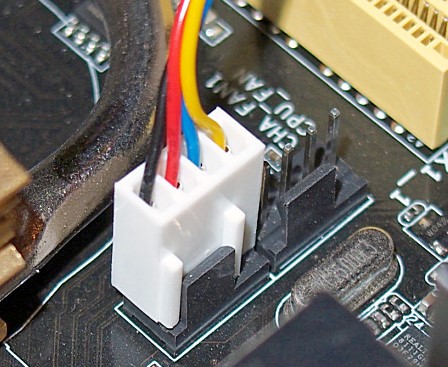
3-pin и 4-pin
3-pin — Провод отвечающий за сигнал передаёт скорость вращения кулера при нормальном напряжении 4 или 12 вольт. Одним словом, скорость кулера контролируется увеличением или уменьшением напряжения по силовому кабелю. Если вы подключили дополнительный кулер и он сильно шумит, то скорее всего вы его подключили к 12 вольт.
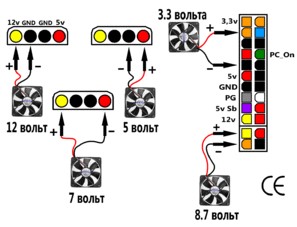
4-pin — Четвертый провод имеет регулятор оборотов, использует отправку сигналов на вентилятор у которого имеется чип. Чип и контролирует скорость вращения кулера.
Изменить скорость вращения кулера на видеокарте
Чтобы изменить скорость вращения кулера на видеокарте лучше воспользоваться программой msi afterburner . При первом запуске вы увидите параметры регулировки видеокарты. Найдите графу Fan Speed и нажмите в углу на Auto, чтобы была возможность вносить изменения. Задайте ползунком в процентном соотношении скорость вращения кулера на видеокарте и нажмите на галочку, чтобы проверить заданные параметры.
How to increase CPU fan speed in Windows 10

- Resource-consuming software can increase your CPU’s temperature and turn your PC’s housing unit in a cooking stove.
- There’s a bunch of software solutions that can help you change the speed of your fan without significant efforts.
- You can use a third-party solution for CPU fan speed control, and it will become an indispensable part of your daily workflow.
- Also, there is a fan setting hidden in the BIOS, so be sure to check the fan speed options. Read on to see the correct steps.
- Download Restoro PC Repair Tool that comes with Patented Technologies (patent available here).
- Click Start Scan to find Windows issues that could be causing PC problems.
- Click Repair All to fix issues affecting your computer’s security and performance
- Restoro has been downloaded by 0 readers this month.
The collaboration of software and hardware is what makes your system working as intended. Let’s take the CPU as an example – an essential part of a PC configuration, small but remarkably sturdy.
However, if exposed to abnormal temperatures for an extended period (gamers, we’re looking at you), the CPU might fail.
Now, there are various ways to avoid that (extra cooling fans is probably the best of those), and today we’ll show you one that’s rather important – how to increase the speed of the CPU fan.
This is the first line of defense, and even though your motherboard controls the CPU fan’s speed, sometimes it’s best to tend to that on your own.
If you’re not accustomed to changing the CPU fan’s speed in Windows 10, make sure to check the steps below.
How can I control my CPU fan speed in Windows 10?
- Use a third-party solution for fan control
- Check BIOS for fan speed options
1. Use a third-party solution for fan control
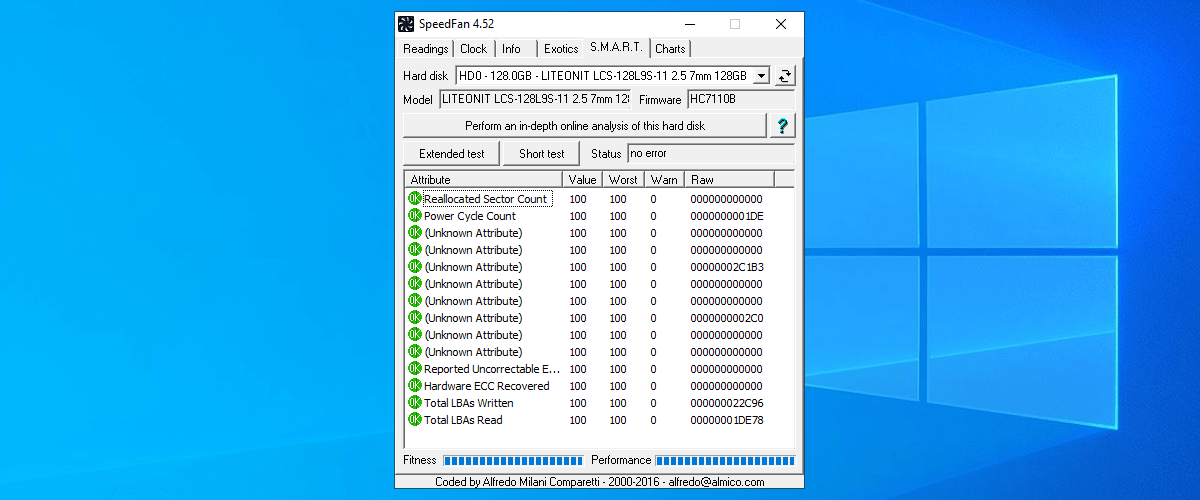
- DownloadSpeedFan for Windows 10.
- You should see the CPU and GPU fans in the left panel.
- There, you can choose the percentage of fan speed (100% is full throttle). On the right side, you should see the current temperatures of CPU cores individually.
- Regulate speed as you like manually, or you can automatize SpeedFan to increase the RPM (revolutions per minute) once the temperatures surpass the acceptable values.
Most of the time, the CPU fan speed is controlled by built-in resources. However, if you want to take matters into your own hands, there’s nothing as suitable as SpeedFan.
There are some conditions you’ll need to fulfill in order to use it and configuring it isn’t exactly a walk in the park, but once you get the hold of it, SpeedFan will become an indispensable part of your everyday workflow.
The conditions we mentioned are considering motherboard support for fan control. However, that’s in question only if you decide to add extra cooling fans.
Regarding CPU and GPU fans, you should be able to control them without any problems. Laptops are an exception, and SpeedFan won’t be of any use with portable computers, except for monitoring.
Your CPU speed should never cross 70 degrees Celsius, and around 60 degrees is an acceptable limit for an extended period of time.
How to Control the CPU Fan on Windows 10
Access fan settings and gain fan speed control for better PC performance
:max_bytes(150000):strip_icc()/JonMartindale-212236-455c6b37c6484d348179beac08f76d86.jpg)
What to Know
- Determine what kind of CPU you have and what kind of connector (3-pin, 4-pin, etc.) it uses.
- The easiest way to control a cooling fan is from the BIOS. Choose a fan type (DC or PWM), set a mode, and set a temperature threshold.
- Speedfan is a popular third-party software option for controlling a CPU.
This article explains how to take charge of CPU fan control in a Windows 10 computer. This involves going inside the PC case, so wear an anti-static wristband. Alternatively, touch something metal like the PC case before and periodically during your investigation. This grounds you and prevents static from shorting out any components.
What Type of CPU Fan Do You Have?
Before you can officially take control of your CPU fan speed, you need to make sure that its connector lets you do so. To do so, follow these steps.
Turn off your PC and disconnect the power cable.
Remove the left-hand side panel when viewing from the front. There should be some screws at the rear that when removed, let the panel pop off.
In the majority of computers, the left-hand side panel is the one you will need to remove. If you happen to have a computer with a right-hand side panel (they’re pretty rare), the instruction are the same once the panel is removed.
Find your CPU cooler. It will likely be in the top-third of your motherboard. The fan on it should have a cable that runs away from it.
» data-caption=»» data-expand=»300″ data-tracking-container=»true»/>
The end of that cable will tell you everything you need to know. If it’s a chunky, four pin connector that plugs into a similar looking cable before routing to your power supply unit (PSU), it’s plugged in using a two or 4-pin Molex connector. If it’s a thinner cable that runs to your motherboard with a 3-pin female connector on the other end, it’s a DC fan. If it runs to a 4-pin female connector, it’s a PWM fan.
Here’s a quick explainer about those different types:
- Molex connectors take all their power from the PSU. They cannot be dynamically controlled and can only be limited using a resistor cable.
- 3-pin DC connectors also run at full power, but your motherboard can limit the voltage going to them, thereby altering the speed.
- 4-pin PWM (pulse width modulation) can be dynamically controlled by software and hardware very easily.
Control CPU Fan in the BIOS
The easiest way to adjust CPU fan speed is through the BIOS.
Every BIOS is different, so instructions may differ from computer to computer, but you need to look for a tab or screen to do with Hardware monitoring. In the screenshot below, it was listed as PC Health Status.
:max_bytes(150000):strip_icc()/bios011-bbe9ccecf7aa46fba94c5a422733c3d4.jpg)
Look for a section to do with the CPU Fan. Once there, try some of these settings below to see what adjustments you can make.
- Set the fan to your fan type (DC or PWM).
- Select what mode you want the fan to run at. Examples might include Full speed, Performance, Silent.
- Set a temperature threshold. Typically you don’t want a CPU to go over 70 degrees, so make sure that your fan runs fast once it gets that hot, and preferably starts to spin up quicker at lower temperatures.
CPU Fan Control With Speedfan
If your motherboard can dynamically control fan speeds, then you may be able to make more in-depth adjustments with Windows software. One of the most popular and long-lasting software suites is Speedfan.
:max_bytes(150000):strip_icc()/speedfan011-323eba3f58a04854af41e0616a7be409.jpg)
Be aware that if you set your fan speeds too low, you may overheat your PC. So monitor temperatures carefully.
Download Speedfan from the official website and install it like you would any other program.
Spend some time getting to grips with the application. It can be a little opaque to start with and certain temperature settings may seem way off (ours recorded a temperature of 97 for «Auxtin1») which suggests an erroneous reading because you don’t have a temperature sensor there.
Speedfan is designed to be ubiquitous, so it hits all the bases, even if your system doesn’t support it. What that means is that you may see false readings for a number of different types of sensors that are not installed on your computer. Just look for the components that are installed and ignore the others.
When you feel you’re ready to take some control, you can select Automatic fan speed to have Speedfan automatically control your system. Otherwise, select Configure then select the Advanced tab.
Choose your CPU from the drop down menu. The labelling isn’t ideal, so you may need to play around to find the right one for your system.
Find your CPU fan among the list based on what cable it connects to your motherboard and what port it connects to. Then set that to Manual. Alternatively, if you want to control every fan in your system, set them all to Manual.
Select OK and head back to the main Speedfan page. Use the arrow keys next to your respective fan(s) to adjust the speed up and down. If it’s working correctly, you should see the RPM increase or decrease and hear your PC get louder or quieter, respectively.
Fan Control in Windows 10 With a Fan Controller
If you want more control over your CPU fan and other aspects of your system, a fan controller is a good bet. Cases like NZXT’s H-series i versions have a built-in link box which gives you software control over your CPU fan in much the same way as Speedfan, but in a more intuitive manner. It also adds support for RGB lighting and multiple fan configurations, profiles, and fan curves.
Standalone fan controllers can give you more tangible controls. Some, like the Thermaltake Commander FT, gives you touchscreen controls for your system’s various fans, where others have physical knobs and dials you can use to control them.
You’ll need to follow the included instructions for those, as their setup and management are unique to their respective designs.
Do You Need Windows 10 Fan Control?
If your PC is working just fine and you’re happy with how loud its fans are, you don’t need to adjust your CPU fan settings. Controlling the CPU fan speed in your PC (or all the fans, in fact) is a way to give you more control over your Windows 10 experience. You can make sure that the system isn’t too loud, with the fan only spinning up faster when your PC gets warm. Or you can have it cranking away at full tilt all the time to make sure your CPU stays cool, potentially giving yourself some headroom to overclock the CPU.
Fan speed control is about choice. If you want it, here’s how to get it.


