- Fast User Switching
- Как отключить быстрое переключение пользователей в Windows 10
- Как отключить быстрое переключение пользователей используя редактор локальной групповой политики
- Как отключить быстрое переключение пользователей используя файл реестра
- Windows 10: Enable or Disable Fast User Switching
- Option 1 – Group Policy
- Option 2 – Registry
- You Might Also Like
- Reader Interactions
- Comments
- Did this help? Let us know! Cancel reply
- Primary Sidebar
- Recent Posts
- Who’s Behind Technipages?
- Как отключить Fast User Switching в Windows 10
- Отключение Fast User Switching с помощью Редактора групповых политик
- Как отключить быстрое переключение пользователей через редактор реестра
Fast User Switching
When a user logs onto a computer, the system loads their profile. Because each user has a unique user account, this allows multiple users to share a computer. When a user logs on, the desktop settings, files, favorites, and history they see are theirs; they cannot be accessed by other users. When that user logs off, their profile is preserved for the next time that they log on. In older operating systems, a user was required to log off before another user could log on. As of WindowsВ XP, a user does not have to log off to allow another user to log on. Instead, it is possible for multiple users to log on and switch quickly between their open accounts. This feature is referred to as fast user switching. Switching to another account does not change the state of the applications that a user is currently running. Suppose, for instance, that one user allows another user to switch to their account while the first user is logged on. When the first user switchs back to their account, their applications are running and their network connections are preserved. Therefore, it appears that both users are simultaneously using the computer.
If your applications comply with the WindowsВ 2000 logo requirements, they should work with fast user switching on WindowsВ XP and later operating systems. However, it is important to keep this scenario in mind when developing an application so that it behaves as users would expect. Use the following guidelines when writing your applications:
- Implement true profile separation. The system provides an underlying infrastructure that supports separation of user data, user settings, and computer settings. For example, use the user’s Documents folder to store user-created data. To locate a directory for application-specific data, use the known folder system with FOLDERID_RoamingAppData) or, for older operating systems, the CSIDL system with CSIDL_APPDATA). Use FOLDERID_LocalAppData or CSIDL_LOCAL_APPDATA for data that should not be available to the user on other computers, such as temporary files.
- Register for notification of a user switch. Typically, an application does not need to be notified when the switch occurs. However, if your application must be notified of a session change, it can register to receive a WM_WTSSESSION_CHANGE message.
- Be aware of other instances of your application. For example, there are times when an application must download an update from the Internet. The update can fail if another user is simultaneously running an instance of the application in another session. Even if the update succeeds, the update can cause other running instances of the application to behave in an unpredictable manner. Therefore it is best to perform a dynamic upgrade only if no other instances of the application are running. Before downloading an application update, it might be appropriate to implement a method that signals all running instances of the application to save data and exit cleanly.
Как отключить быстрое переключение пользователей в Windows 10

В данной статье показаны действия, с помощью которых можно отключить быстрое переключение пользователей (Fast User Switching) в операционной системе Windows 10.
Функция быстрого переключения пользователей позволяет выполнять переключение между учетными записями пользователей без закрытия открытых приложений и документов. Учетные записи в которые ранее был выполнен вход, по прежнему будут потреблять какое-то количество ресурсов компьютера, что может замедлить работу системы.
При необходимости можно отключить быстрое переключение пользователей (скрыть точки входа в меню «Пуск», на экране входа, на экране безопасности и в диалоге «Завершение работы Windows»), и после этого чтобы переключиться на другую учетную запись, вам будет необходимо полностью завершить сеанс текущего пользователя, что освободит ресурсы компьютера.
Чтобы отключить быстрое переключение пользователей (скрыть точки входа), необходимо войти в систему с правами администратора
Как отключить быстрое переключение пользователей используя редактор локальной групповой политики
Редактор локальной групповой политики доступен в Windows 10 редакций Pro, Enterprise, Education.
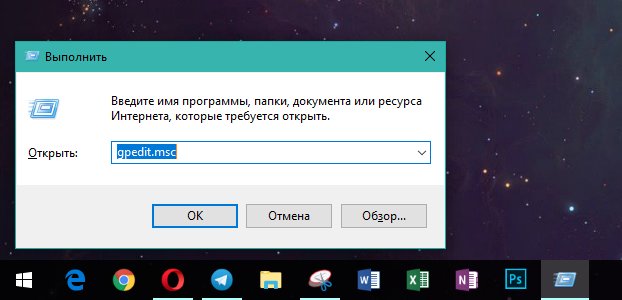
Чтобы отключить быстрое переключение пользователей, откройте редактор локальной групповой политики, для этого нажмите сочетание клавиш  + R, в открывшемся окне Выполнить введите (скопируйте и вставьте) gpedit.msc и нажмите клавишу Enter ↵.

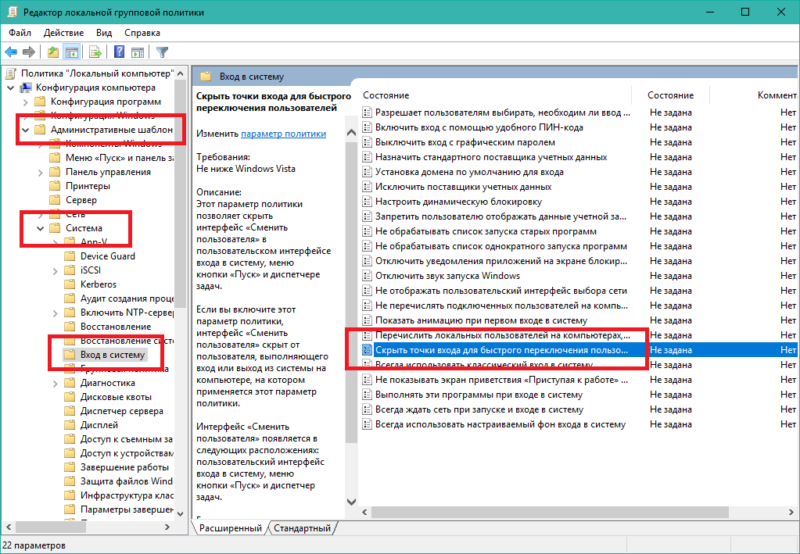
В открывшемся окне редактора локальной групповой политики, разверните следующие элементы списка:
Конфигурация компьютера ➯ Административные шаблоны ➯ Система ➯ Вход в систему
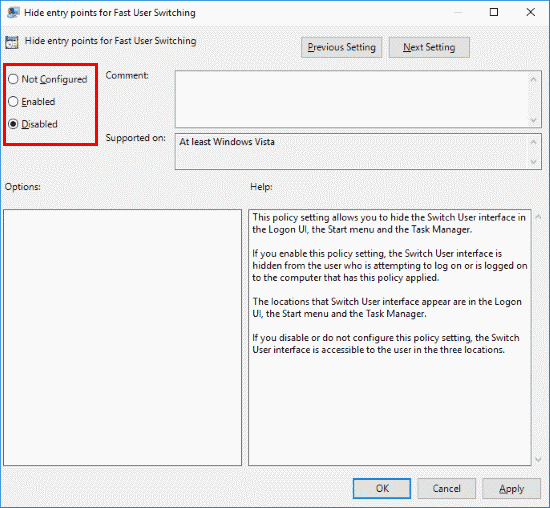
Далее, в правой части окна дважды щелкните левой кнопкой мыши по параметру политики с названием Скрыть точки входа для быстрого переключения пользователей

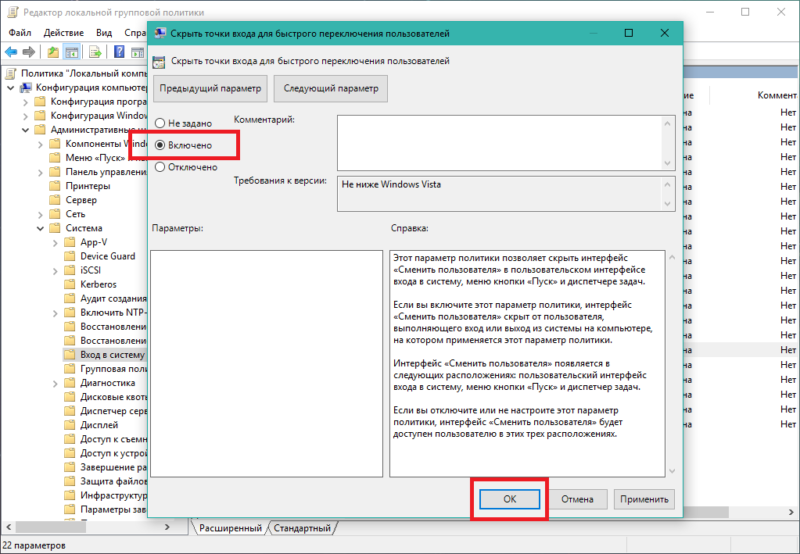
В окне «Скрыть точки входа для быстрого переключения пользователей» установите переключатель в положение Включено и нажмите кнопку OK.

Изменения вступают в силу сразу. Ниже на скриншотах показан пример включенной и отключенной функции быстрого переключения пользователей в меню «Пуск».

Как отключить быстрое переключение пользователей используя файл реестра
Данный способ актуален для Windows 10 Домашняя, так как в ней отсутствует редактор локальной групповой политики, но также подходит для всех редакций операционной системы Windows 10.
Данный способ позволяет отключить быстрое переключение пользователей с помощью внесения изменений в системный реестр Windows посредством файла реестра.
Прежде чем вносить какие-либо изменения в реестр, настоятельно рекомендуется создать точку восстановления системы
Все изменения производимые в редакторе реестра отображены ниже в листингах файлов реестра.
Чтобы отключить быстрое переключение пользователей, создайте и примените файл реестра следующего содержания:
Windows Registry Editor Version 5.00.
Чтобы включить быстрое переключение пользователей, создайте и примените файл реестра следующего содержания:
Windows Registry Editor Version 5.00.
После применения файлов реестра, чтобы изменения вступили в силу, перезагрузите компьютер.
Используя рассмотренные выше действия, можно отключить (включить) быстрое переключение пользователей в операционной системе Windows 10.
Windows 10: Enable or Disable Fast User Switching
By Mitch Bartlett 23 Comments
The Fast User Switching feature in Microsoft Windows 10 allows users to login to a PC while keeping other users logged in and their applications running. This allows multiple users to use the computer without interrupting what other users are working on.
You can enable or disable fast user switching using these steps.
Option 1 – Group Policy
- Hold the Windows Key and press “R” to bring up the Run dialog box.
- Type “gpedit.msc” then press “Enter“.
- The Local Group Policy Editor appears. Expand the following:
- Local Computer Policy
- Computer Configuration
- Administrative Templates
- System
- Logon
- Open “Hide Entry Points for Fast User Switching“.
- Select “Enabled” to turn Fast User Switching off. Set it to “Disable” to turn it on.

Option 2 – Registry
- Hold the Windows Key and press “R” to bring up the Run dialog box.
- Type “regedit” then press “Enter“.
- Expand the following:
- HKEY_LOCAL_MACHINE
- SOFTWARE
- Microsoft
- Windows
- CurrentVersion
- Policies
- System
- Look for a value called “HideFastUserSwitching“. If it does not exist, right-click the “System” folder, select “New DWORD 32-bit value“, then type a name of “HideFastUserSwitching“. Press “Enter” to create the value.
- Double-click “HideFastUserSwitching“. Change the “Value data” to “1” to disable Fast User Switching, set it to “0” to enable it.
You Might Also Like
Filed Under: Windows Tagged With: Windows 10
Reader Interactions
Comments
@R Torbert
The 32 bit vs 64 bit has to do with the length of the value, nothing to do with the OS.
if you need a 32 bit value you would still use 32-bit.
In the regedit option, if your system is 64-bit… would you still select “New DWORD 32-bit value“?
There is a “New DWORD 64-bit value“ … which seems more appropriate for a 64-bit system.
I tried both options and it’s still not working. It only worked once, which was a few days ago, but after I ran some registry cleaner it stopped working. I guess the registry cleaner has deleted some other keys that might be related somehow.
Thank you so much, worked a treat.
Enoch Ideal says
thanks a lot you helped me. God bless you
this worked, thanks.
Thanks Mitch. I always forget where to find and change this setting. Love the photo of you and the kid. 🙂
Karen Jones says
Thank you so very much … was looking for this answer for hours!
I am using Pro but neither option makes a difference, nor the ore the suggested in the comments.
never had a problem with this until recently…. “helpful” update must have sabotaged my setup…. wish they’d just quit screwing with things without notice
Here is the fix
gpedit.msc
computer configuration > administrative templates > system > Logon
Always use classic logon set to enabled.
the switch user icon will now show on lock screen.
Works as described. Thanks!
I try option 2 and found the value called “HideFastUserSwitching”. But it will not allow me to set it to “0” to enable it.
I get the message “Cannot edit HideFastUserSwitching: Error writing the value’s new contents.”
John Vekich says
Thanks for publishing such a clear solution! Few things more frustrating than knowing something is there but not being able to find it. Puzzled by finding no “switch user” ability in Win 10 out of the box. Problem solved. Finding this in policy menus is last place I would have looked with my limited Win 10 experience. Went from Win 7 to Win 10 and found I was not in Kansas anymore.
Biswajit Gorai says
The first option won’t work if you have the free Windows 10, you’ll need the “Pro” one because that is the only one that has the file gpedit.msc, the registry editor (regedit) is in almost all (if not all, I don’t know) Windows, so that includes all Windows 10 and makes the second option always work.
Thank you very much
You need the Pro version in Windows 10 to get gpedit.msc
Hi I have no option to “Hide Entry Points for Fast User Switching“.
Looked for half an hour before finding this which worked! (I used the regedit option)
Using Option 1, I get an error message that Windows can’t find “gpedit.msc”. The 2nd option seems to have worked (though I don’t know how I’ll know!). I just exited from the regedit box since I didn’t see a “save” or any other way to leave.
Did this help? Let us know! Cancel reply
This site uses Akismet to reduce spam. Learn how your comment data is processed.
Primary Sidebar
Recent Posts
Who’s Behind Technipages?
 My name is Mitch Bartlett. I’ve been working in technology for over 20 years in a wide range of tech jobs from Tech Support to Software Testing. I started this site as a technical guide for myself and it has grown into what I hope is a useful reference for all.
Follow me on Twitter, or visit my personal blog.
Как отключить Fast User Switching в Windows 10

Функция быстрого переключения пользователей или “Fast User Switching” появилась еще в Windows XP и на самом деле является очень полезной на устройствах, которыми пользуются несколько пользователей. За счет этой возможности переключиться на другую учетную запись можно за считанные секунды, без необходимости выходить из другого профиля.
Надо понимать, что несмотря на свою полезность, Fast User Switching имеет несколько недочетов. К примеру, если вы работаете за компьютером с активной другой учетной записью, отключение устройства может привести к потере данных профиля. И если в этом случае система предупредит пользователя о необходимости выйти из другой записи для сохранения информации, второй минус Fast User Switching более ощутимый. Дело в том, что при работе с компьютером остальные профили, вошедшие в систему, потребляют ресурсы компьютера, поэтому могут замедлить работу вашего ПК.
Отключение Fast User Switching оставит возможность работать за устройством нескольким пользователям, но избавит от вышеописанных недостатков. Учтите, что эта инструкция не удаляет из Windows 10 Fast User Switching полностью, лишь прячет так называемую «точку входа» из меню Пуск, экрана входа в систему или Диспетчера задач. После отключения быстрого переключения, пользователи должны будут закрывать все свои приложения, сохранять документы и затем выходить из профиля, чтобы переключиться на другую учетную запись.
Примечание: все действия этой инструкции выполняются от имени Администратора. Вам понадобится учетная запись Админа, либо пароль от нее.
Избавиться от функции быстрого переключения пользователей можно двумя способами. Выбор будет зависеть от того, какая редакция операционной системы у вас используется:
- С помощью Редактора локальных групповых политик. Метод не подходит для редакции Windows 10 Домашняя.
- С помощью Редактора реестра. Метод подходит для всех версий Windows 10.
Также обратите внимание на то, что эта инструкция поможет вам отключить Fast User Switching на Windows 8.1 / 8 и Windows 7.
Отключение Fast User Switching с помощью Редактора групповых политик
- Нажмите Win+ R и введите gpedit.msc. На запрос разрешения UAC. Опционально, вы можете отключить Контроль учетных записей.
- В левой части экрана перейдите по пути: Конфигурация компьютера – Административные шаблоны – Система – Вход в систему.
- В правой части окна найдите пункт Отключить точки входа для быстрого переключения пользователей. Дважды кликните на него.
- Установите переключатель в положение Включено.
- Нажмите Применить, а затем Ок.
- Закройте все окна и перезагрузите компьютер.
- После выполнения этих действий в меню действий для учетной записи в меню Пуск исчезнет опция переключения на другой профиль.
Чтобы вернуть все назад, проделайте все те же шаги, только вместо Включено установите Не задано.
Как отключить быстрое переключение пользователей через редактор реестра
Метод для тех, у кого установлена Windows 10 Home или Windows 10 Home Single Language. На этих двух версиях операционной системы нет редактора групповых политик, поэтому придется воспользоваться редактором реестра. Разумеется, этот же метод применим и для остальных редакций Windows 10, вроде Профессиональной или Корпоративной.
- Нажмите Win+ R и введите regedit. Нажмите Ok или Enter на клавиатуре. Откроется редактор реестра.
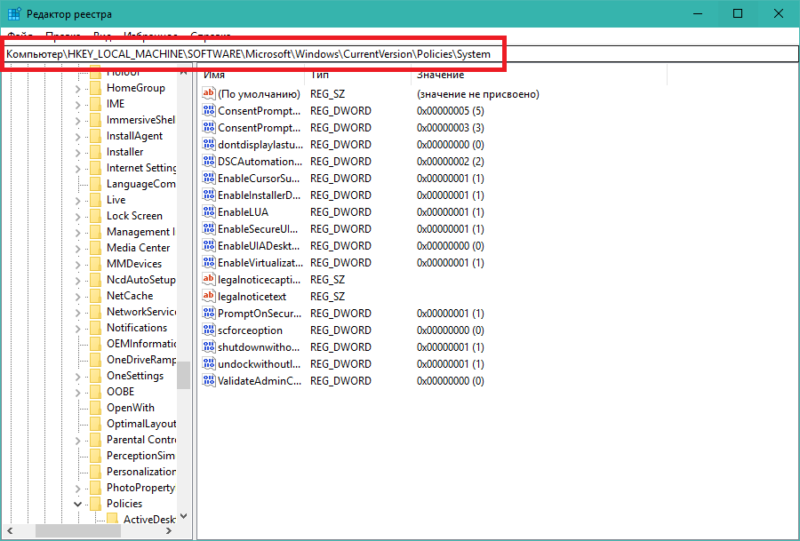
- Перейдите по пути: HKEY_LOCAL_MACHINE\SOFTWARE\Microsoft\Windows\CurrentVersion\Policies\System. Учтите, что на компьютерах с Windows 10 Creators Update 1703 и выше, можно скопировать путь прямо в окно адреса редактора реестра. Это избавляет пользователя от необходимости блуждать по дебрям реестра Windows.
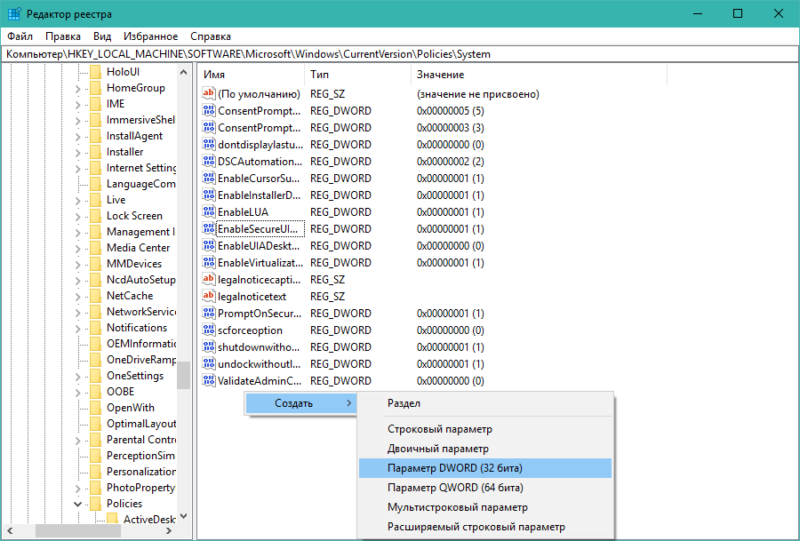
- В правой части окна кликните правой кнопкой мыши по пустому месту и выберите Создать – ПараметрDWORD(32 бита).
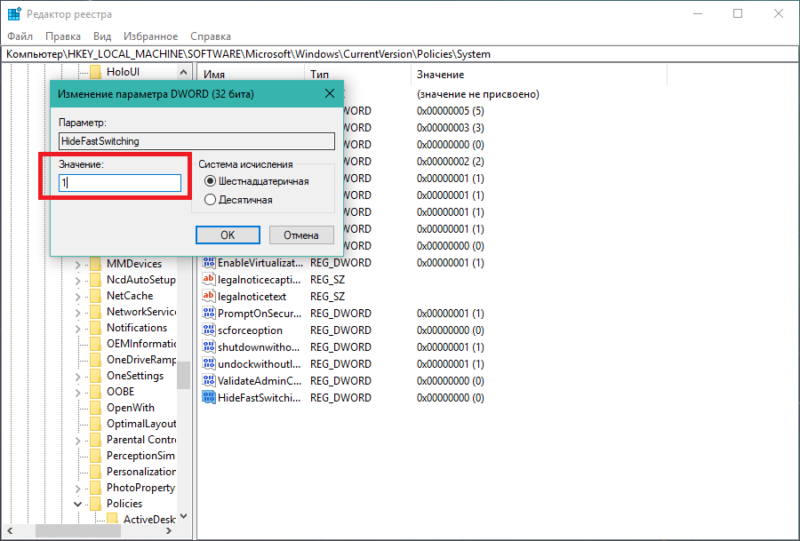
- Назовите новый параметр HideFastSwitching. Кликните по нему дважды и установите значение 1. Нажмите Ок.
- Закройте все окна и перезагрузите компьютер.
Вернуть все назад можно простой сменой значения созданного параметра с 1 на 0, либо просто удалить HideFastSwitching. После этого не забудьте перезагрузить компьютер.


