- How to use FFMPEG to capture a browser’s tab content
- 1 Answer 1
- ffmpeg command line for capturing (and recording) audio and video in 720p from decklink card using Windows 7
- ffmpeg -list_devices true -f dshow -i dummy
- ffmpeg -list_options true -f dshow -i video=»Decklink Video Capture»
- ffmpeg -list_options true -f dshow -i audio=»Decklink Audio Capture»
- This is the stream information for my current video/audio source, connected to the decklink card’s hdmi port
- 1 Answer 1
- Syntax
- Selecting the input card
- Surviving the reboot
- ALSA mixer tool
- Input options
- Examples
- Record audio from your microphone
- Record audio from an application
- Record audio from an application while also routing the audio to an output device
- Pruffme BLOG .
- Инструкция по установке и работе с программой FFMPEG на Windows
- С ЧЕГО НАЧАТЬ?
How to use FFMPEG to capture a browser’s tab content
I’m working on a project where I need to record HTML5 animations that are going to play in different browser’s tabs.
So I’ve been reading a bit, and apparently it could be done using FFMPEG, maybe using the gdigrab device: https://www.ffmpeg.org/ffmpeg-devices.html#gdigrab
Where you can even grab from a specific window (like record calc.exe using title=Calculator)
I want to use this logic to capture each of the multiple browser tabs contents. (or at least one) But I don’t know the Firefox/Chrome tabs «title» or if they even work as windows.
I’d also need to record audio, so I would need to either mix the computer’s output device with the video from the tab.
If anyone has more information on how I could do this, I would greatly appreciate it.

1 Answer 1
Tabs are within the browser’s application logic so I don’t think you can target a tab. If you detach the tab as a separate window, you can capture it. You need the string that shows up in Task Manager. This is the Window Title.
First run tasklist /v /fi «imagename eq firefox.exe» /fo list | findstr Window
This will produce a set of lines of all the separate windows controlled by firefox.exe
Suppose you wanted to capture this current page, the findstr output would be
You can move the window while recording but if you resize it, the recording will end at that point. If there are other tabs in that window, and you switch to them, they will get captured. So, best to isolate the desired tab into its own window.
For audio, you will need to use a directshow input device. See docs and the examples on how to list them.
ffmpeg command line for capturing (and recording) audio and video in 720p from decklink card using Windows 7
I am trying to capture audio and video from a blackmagic decklink capture card using Windows 7 @ 720p, but I cant seem to get the ffmpeg command line settings right.
ffmpeg -list_devices true -f dshow -i dummy
ffmpeg -list_options true -f dshow -i video=»Decklink Video Capture»
ffmpeg -list_options true -f dshow -i audio=»Decklink Audio Capture»
This is the stream information for my current video/audio source, connected to the decklink card’s hdmi port
Ultimately I will need to display this video on screen. And simultaneously be able to start and stop recording, while the preview keeps playing.
My idea was to use ffmpeg to capture the video and audio signal and transmit this to a network stream (eg 127.0.0.1:6666). Then use VLC player to display the stream (the preview). And ultimately start and/or stop another ffmpeg to save that same stream to disk.
In my mind this works, but I am no audio/video expert so if anyone with more experience could help out, I would appreciate it.
I have been able to display the video using ffplay, with the following command :
Next step is streaming it so I can view the stream (preview) with VLC.
Tried to use this command :
Which does not give any errors, so appears to work. But when I try to open the stream in VLC I get the following error :
SDP required: A description in SDP format is required to receive the RTP stream. Note that rtp:// URIs cannot work with dynamic RTP payload format (65).
After a bit of reading it seems I should not be streaming to rtp:// but rather to udp://
And when I try to open it now in VLC I get no error, no warning, but also no video.
Time for some more reading.
1 Answer 1
Finally got it working. My setup has this all running on a single machine.
For taking the video and serving it via UDP I use the following command :
- The -f dshow tells ffmpeg we need to use direct show.
- -video_size 1280×720 sets the source size, since I am using a 720p60 source, this is it.
- 702000k is really important since without it the realtime buffer would be full in a matter of seconds.
- -framerate 60 tells ffmpeg the source is using 60fps.
- The option: video=»Decklink Video Capture»:audio=»Decklink Audio Capture» tells ffmpeg to use those device as input, but by specifying them in this fashion, the lag between audio and video will be substantially less (and/or gone).
- -r 30 forces the output to be 30fps instead of the 60fps in source.
- -threads 4 does what you think, use 4 threads.
- -vcodec libx264 encodes the source stream to h264 while broadcasting.
- -crf 0 sets the «constant rate factor» (quantizer scale) to 0, meaning lossless.
- -preset ultrafast means we dont have any patience, so use as little compression as possible. This causes a high bitrate, but that’s fine for my purpose.
- -f mpegts option tells ffmpeg to use MPEG-TS packets, this will «force» ffmpeg to use a constant bitrate mpeg format, since mpeg itself is normally variable bitrate.
- Finally the option udp://239.255.12.42:6666 specifies that we want to broadcast this stream to the multicast address 239.255.12.42 using port 6666 over udp. The reason I chose to use a multicast address here is simply because I need to display the stream (preview) and record at the same time, with as least processing as possible. This prevents me from having to copy the audio and video stream to two different network addresses.
For capturing this video using VLC player, I open the following network streaming address :
Finally for recording the stream I spawn a new process and issue the following command :
- The -y option is for always overwriting the file if it exists without questions.
- The -threads 4 option does what you think, it uses 4 threads.
- The -i udp://239.255.12.42:6666 connects to the stream we are broadcasting.
- The -map 0 tells ffmpeg that we need all streams (both video and audio).
- The -acodec copy and -vcodec copy are there to ensure that the streams are taken as is, instead of doing any compression/transcoding.
The only thing left to do (which is a work in progress atm) is creating a c# gui for this. Basic workflow will be to spawn the stream process when the form loads. Use the vlc com+ control to display the video in the application.
Then when the record button is pushed, spawn another process to record and stop that process to end the recording.
I do however stop the stream when I start to record, this makes the recording/detection go much more smoothly. If the stream stays on and I start recording it will take some time before the recording process can «tune in» to the stream. By stopping the stream, starting the recording (which will do nothing until the stream is back on) and starting the stream again, the recording will pickup from the first frame without any problems.
This small delay/flicker is totally acceptable for my purposes.
Syntax
Capturing audio with ffmpeg and ALSA is pretty much straightforward:
Selecting the input card
input_device tells ffmpeg which audio capturing card or device you would like to use. To get the list of all installed cards on your machine, you can type arecord -l or arecord -L (longer output).
To list recording cards or devices:
We can see there are 2 audio cards installed that provide capturing capabilities, namely «card 0» (Intel ICH5) and «card 1» (Microphone on the USB web cam). The easiest thing to do is to reference each of them directly using -f alsa -i hw:0 or -f alsa -i hw:1 :
That will give us a 30 seconds WAV audio output, recorded from our USB camera’s default recording device (microphone). The default recording device can be selected using the alsamixer tool (see below) or specifying the device using an additional parameter Y in hw: , , where =card, =device. For example, to select «MIC2 ADC» from Intel card (look above at the list), we would use:
The best way is to select your card and default recording device with the alsamixer tool, because some audio cards have a complicated way of selecting the default input through the ffmpeg command line.
Surviving the reboot
If you reboot your machine, you will notice sometimes your cards get reordered, so «card 0» is listed as USB Audio and «card 1» is listed as Intel audio card. You might want to play with udev rules, but there is an easier solution for this. Typing arecord -L will give us a little bit more detailed listing of recording devices:
We can tell ffmpeg exactly what card we want to use, specifying the exact card’s name, no matter which ordering it is, like this:
This way, you’re always asking for the input from that certain device (the default recording device from the USB Audio device) and will never mix things up.
ALSA mixer tool
You might find useful a tool named alsamixer .

It will let you visually select, for each specified card (Intel or USB), which recording device do you want to use (if the specified card has got multiple inputs, like Line-In, CD-In, Mic, etc), so you can just run alsamixer , press F6 to choose the card, and then use TAB key to switch to recording devices (pressing it multiple times just switches between playback/recording/all devices), after that just use arrow keys to highlight desired device and just hit the SPACEBAR key to select it (and up/down, page up/dn keys to change the input volume).
Input options
The only useful audio input options for ALSA input are -sample_rate (audio sample rate) and -channels (audio channels).
- Specifying audio sampling rate/frequency will force the audio card to record the audio at that specified rate. Usually the default value is «48000» (Hz).
- Specifying audio channels will force the audio card to record the audio as mono, stereo or even 2.1/5.1 (if supported by your audio card). Usually the default value is «1» (mono) for Mic input and «2» (stereo) for Line-In input.
Examples
Record audio from your microphone
When doing screencast recordings, you usually want to record your voice too:
Looking at our example device listing, this would be the same as this:
Record audio from an application
Load the snd_aloop module:
Set the default ALSA audio output to one substream of the Loopback device in your .asoundrc (or /etc/asound.conf )
You can now record audio from a running application using:
Record audio from an application while also routing the audio to an output device
Load the snd_aloop module:
Set up your .asoundrc (or /etc/asound.conf ) like so:
where the output pcm points to the output device you want the audio to go to.
You can now record audio from a running application using:
Pruffme BLOG .
Платформа для создания и проведения вебинаров и автовебинаров, онлайн-курсов, тестов и опросов Pruffme.com
Инструкция по установке и работе с программой FFMPEG на Windows
Информация для тех, кто хотел бы научиться на своём компьютере/ноутбуке редактировать записи вебинаров через специальную программу!
Программа FFMPEG предназначена для конвертирования видео и аудио файлов через специальные команды в командной строке Вашего компьютера/ноутбука, благодаря которым возможно самостоятельно:
1. Изменить формат и качество записи;
2. Изменить разрешение и битрейт для видео и аудио;
3. Нарезать фрагменты записи на отдельные записи;
4. Замедлить и ускорить воспроизведение видео и аудио;
5. Склеить видео и аудио в единый файл;
6. Удалить аудио из видео, а также извлечь аудио из видео.
(Более подробную информацию см. в шаге №5).
С ЧЕГО НАЧАТЬ?
Шаг №1. Скачиваем программу на Windows
Для начала Вам необходимо перейти на официальный сайт разработчиков и скачать файл программы. Ссылка на скачивание программы: https://yadi.sk/d/_ybZxA8VN2pBmQ
Шаг №2. Установка программы
Этот шаг требует особого внимания, так как работа с FFMPEG происходит через командную строку, поэтому разберём по пунктам алгоритм установки FFMPEG:
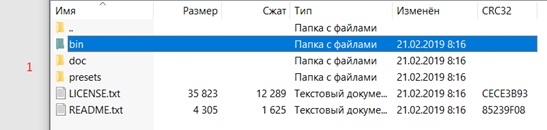
1. Вы скачали архивный файл и Вам необходимо его открыть;
2. Открываем скачанный архивный файл и находим папку «bin», внутри которой располагается файл-приложение «ffmpeg.exe»;
Примечание! Если у Вас нет архиватора для открытия файла, то можно скачать архиватор WinRar на официальном сайте разработчиков.
Ссылка на скачивание: https://winrar-pro-download.com

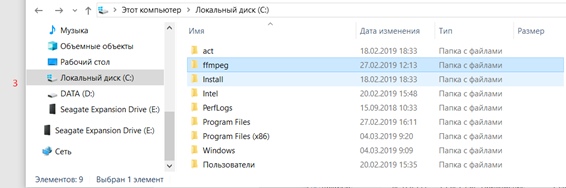
3. Извлекаем файл «ffmpeg.exe» в заранее созданную папку «ffmpeg» на корневом диске (как правило, это диск «C»);
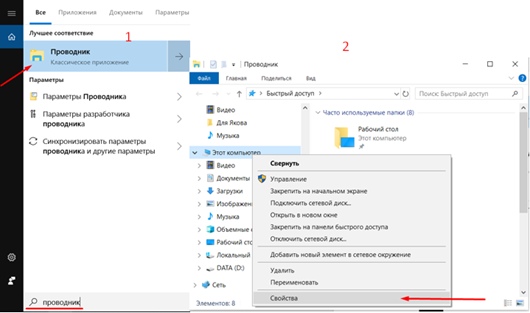
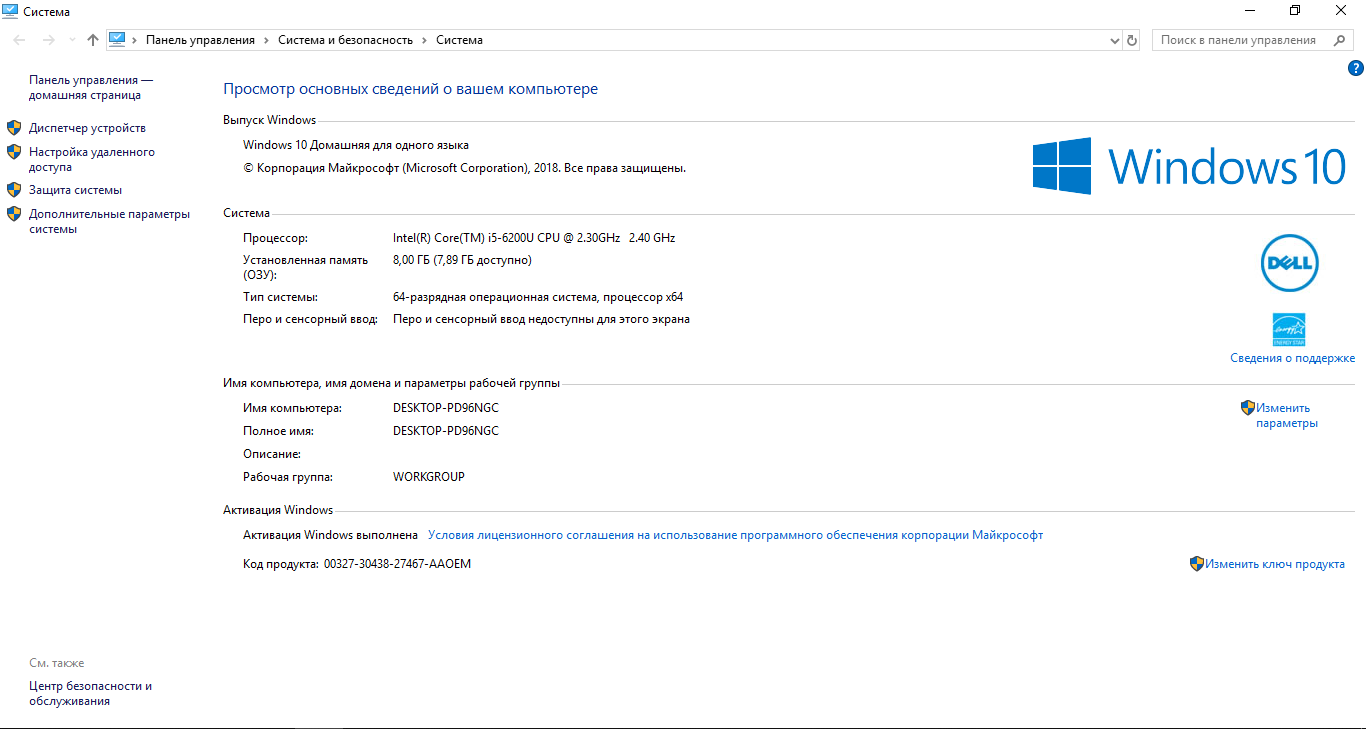
4. Далее заходим в проводник (иконка «лупа») и находим «Мой компьютер». Нажимаем на него правой кнопкой мыши и выбираем «свойства», после чего появится следующее окно:
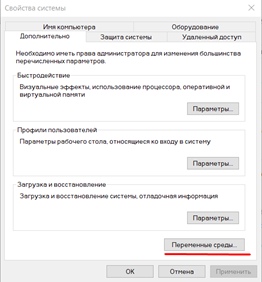
5. Нажимаем на «Дополнительные параметры системы» и заходим в «переменные среды»;
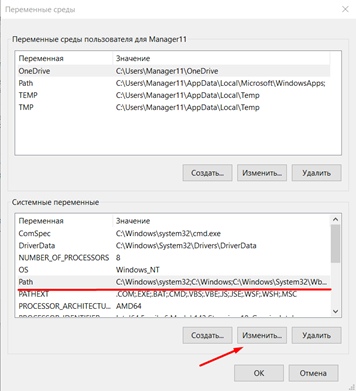
6. Находим в окошке «системные примененные» пункт «Path», нажимаем «изменить»;
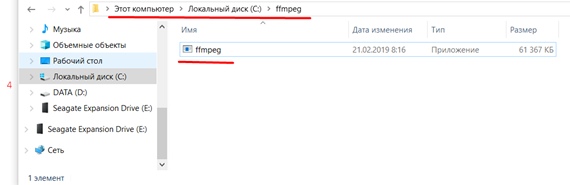
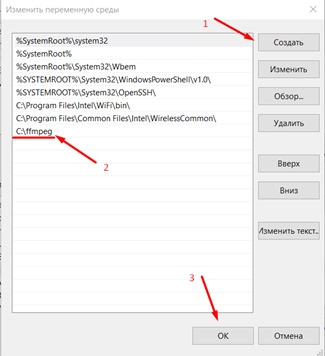
7. В появившемся окне нажимаем на кнопку «создать» и указываем путь к файлу ffmpeg. Для этого переходим в папку с ffmpeg и кликаем на строчку, выделенную красным (см. на картинке), после чего нажмите сочетание клавиш Ctrl+C;
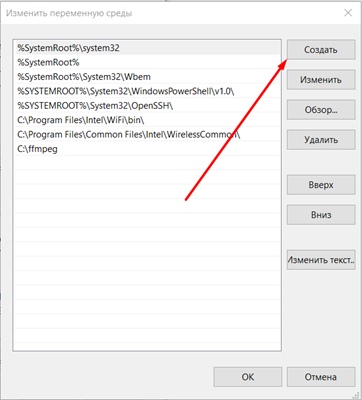

8. После того, как нажали клавишу «Создать» (1), вставляем скопированное в строку (2) и нажимаем на «Ок» (3).
Шаг №3. Запускаем программу
1) Если вы используете ОС Windows10, то вам достаточно нажать на значок «поиск»(лупа) и ввести английскими буквами «cmd»:
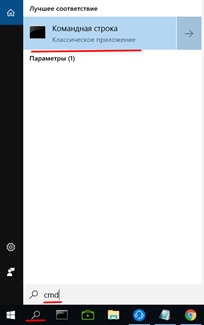
(Прим. Если же Вы используете более ранние версии Windows (7,8), то Вам нужно зайти в меню «пуск» и строка «поиск» будет в самом низу).
2) Далее, заходим в командную строку и проверяем – работает ли программа. Для этого вводим: ffmpeg, после чего нажимаем кнопку Enter. Если Вы всё сделали правильно, у Вас будет примерно следующий отклик в командной строке:

(Прим. Если же у Вас появляются строки красного цвета, то вероятно – Вы сделали что-то не так. Попробуйте повторить алгоритм по новой).
Шаг №4. Используемые файлы
Для начала работы с видео-файлом необходимо, чтобы файл находился в директории доступных дисков. Например: имеется видео-файл «Testovii File.mp4». Я расположил его прямо на диск D.
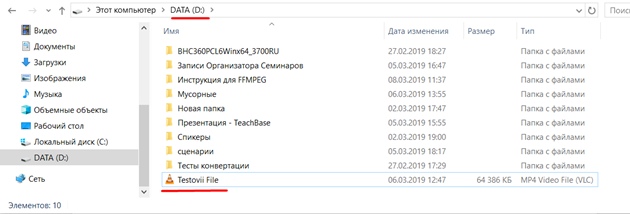
Таким же образом разместите остальные файлы, с которыми вы собираетесь работать в ffmpeg.
Либо, если не хотите перетаскивать файл, вам нужно будет скопировать путь к файлу(об этом позже).
(Прим. Рекомендуется использовать английские буквы в названии файлов, с которыми собираетесь работать)
Теперь с файлами можно работать.
Запускаем командную строку. Как правило, по умолчанию в командной строке указан путь к корневой папке, например:
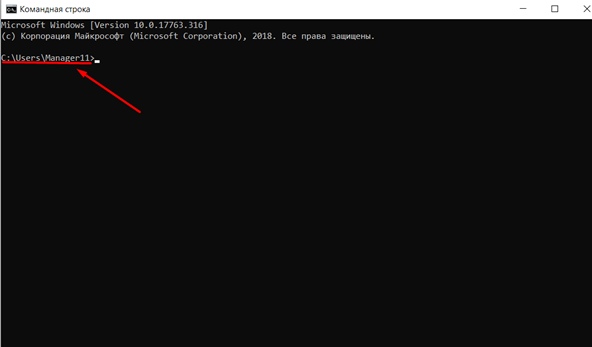
Чтобы начать обрабатывать файл, необходимо указать тот диск, где расположен нужный файл. В нашем случае, это Диск D. Для смены диска, в строке прописываем команду: D:
После чего нажимаем Enter и видим, что теперь у нас отображается Диск D:


Теперь мы можем начать работать с файлами. Любая команда начинается со слова ffmpeg в строке:

Далее будет представлен ряд простых команд, где input.mp4 – название исходного видео-файла; input.mp3 – название исходного аудио-файла; output.format – название полученного файла; а ключ «–i» -это то, что необходимо прописывать перед обрабатываемым файлом (input.mp4/input.mp3).
Шаг №5. Основные команды
1) Для того, чтобы перевести видео в другой видеоформат:
ffmpeg –i Z\input.avi output.mp4
(Прим. – Z\ — путь к файлу input.avi, пример: выбираем нужный файл в папке (1), кликаем на него, затем кликаем на строку с его расположение (2), и копируем правой кнопкой мышки; также следует помнить, что при попытке форматирования из более легкого файла(Mp4) в более тяжелый(avi) – полученный файл будет в более плохом качестве)
2) Для того, чтобы перевести видео в аудио:
ffmpeg –i Z\input.mp4 output.mp3
(Прим. – Если появляется красная строка при нажатии ENTER, то попробуйте поместить input.mp4 в Кавычки – «input.mp4»)
3) Для того, чтобы вырезать фрагмент из видео:
Способ : 1 – обрезать концовку.
ffmpeg -i input.mp4 –t 00:00:00 output.mp4
(Прим. -t 00:00:00 – указывается время продолжительности видео от начала)
Способ : 2 – вырезать кусок из любой точки.
ffmpeg -ss 00:00:00 -i input.mp4 -t 00:00:00 output.mp4
(Прим. –ss 00:00:00 – указывается время начала желаемого куска; -t 00:00:00 – указывается время продолжительности желаемого куска;
Если появляется красная строка, то попробуйте поместить input.mp4 в Кавычки – «input.mp4»)
P.S Применимо как к видео, так и к аудио файлам!
4) Команда для склеивания пустого видео файла и аудио файла:
ffmpeg -i input.mp3 -i input.mp4 output.mp4
(Прим. Если вы используете разные по длительности файлы, то у них вседа будет совпадать начало, а длительность конечного файла будет равна самому длинному исходному файлу, пример:
Аудиофайл.mp3 – длительность 00:05:00 + Видеофайл.mp4 – длительность 00:03:00 = финальный файл.mp4 – длительность 00:05:00)
5) Команда для удаления аудио из видео:
ffmpeg -i input.avi -vcodec copy –an output.avi
6) Команда для ускорения/замедления видео:
ffmpeg –i input.avi -vf setpts=X*PTS output.avi
(Прим. X больше 1 – замедление; X меньше 1 — ускорение)
7) Команда для ускорения/замедления аудио:
Ffmpeg –I input.mp3 -filter:a «atempo=X» –vn output.mp3
(Прим. X значение больше нуля – ускорение; X значение меньше нуля (0.5;0.8) – замедление)
8) Команда для ускорения/замедления файла с аудио и видео:
ffmpeg -i input.mp4 -filter_complex «[0:v]setpts=X*PTS[v];[0:a]atempo=Y[a]» -map «[v]» -map «[a]» output.mp4
(Прим. X больше 1 – замедление; X меньше 1 – ускорение;
Y значение больше нуля – ускорение; Y значение меньше нуля (0.5;0.8) – замедление)
9) Для того, чтобы изменить параметр «качество»:
ffmpeg -i input.avi -q X output.avi
(Прим. X от 23 до 50, где 50 – минимальное качество; данная опция помогает уменьшить размер файла)
ffmpeg -i input.mp4 -crf X output.mp4
10) Для того, чтобы изменить Битрейт:
Для аудио: ffmpeg -i input.mp4 -b:a 128k output.mp4
(Прим. Где 128k– цифра, обозначающая размер битрейта)
Для видео: ffmpeg -i input.mp4″ -b:v 1000k output.mp4
11) Для того, чтобы изменить разрешение видео:
ffmpeg -i input.mp4 -s X output.mp4
(Прим. X – разрешение, например: «-s 800×600»)
Для общего сжатия видео:
13) ffmpeg -i input.mp4 -codec:a copy -vcodec libx264 -preset fast -crf 32 output.mp4
В этой статье были рассмотрены:
— Способ установки ffmpeg для Windows
— Была представлена выжимка из самых распространённых команд, которая позволит использовать программу «ffmpeg» для решения, пусть не самых сложных, но всё-же возникающих задач.
Команды в программе ffmpeg не ограничиваются тем списком, что был представлен в данной статье. Как было сказано выше, в интернете существует более 200 страниц со всевозможными командами, призванными проводить манипуляции с видео\аудио-файлами, которыми, как правило, пользуются продвинутые пользователи.
Мы же предоставили краткий мануал по основным возможностям, и надеемся, что этот материал окажется полезным для наших пользователей!


