- Ffmpeg windows build msvc
- Setting the environment
- Build
- Problem solving
- Debug Builds
- Compiling FFmpeg with external libraries
- libx264
- libopenh264
- Ffmpeg windows build msvc
- The way of building stand-alone executable FFmpeg by MSVC
- 1. Brief Introduction
- 2. Generate static FFmpeg library
- microsoft/vcpkg
- Vcpkg helps you manage C and C++ libraries on Windows, Linux and MacOS. This tool and ecosystem are constantly…
- mcmtroffaes/ffmpeg-msvc-build
- Scripts for building FFmpeg with MSVC on AppVeyor. The script uses vcpkg which closely follows the official…
- 3. Build stand-alone binary file
- Is it possible to build ffmpeg x64 on Windows?
- 4 Answers 4
- FFmpeg начало работы с Visual Studio
Ffmpeg windows build msvc
FFmpeg can be built on Windows with Visual Studio. The official guide is quite clear, but a little bit out-of-date.
FFmpeg can be built with MSVC 2012 or earlier using a C99-to-C89 conversion utility and wrapper, or with MSVC 2013 or later natively.
You will need the following prerequisites:
First, you need to unzip and copy the prerequisites into a folder, for example, c:\c99 .
Then, you need to add the folder c:\c99 into your PATH environment variable.
Rename the yasm executable you will use to yasm.exe .
Finally, create an INCLUDE environment variable, and point it to c:\c99 ; this is the location where the compiler will find inttypes.h .
Note: If it complains of MSVCR100.dll not found when running yasm, install the Microsoft 2010 VC redistributable.
Setting the environment
In order to build a program with the VisualStudio tools, you need to setup a proper environment in order to make sure that the configure and build system will be able to find the tools.
In particular, the build system will use the cl compiler and the link linker bundled with the employed version of VisualStudio. In order to setup the enviroment it is so necessary to set the PATH , LIB , and INCLUDE variables to appropriate values.
This can be done by launching a cmd.exe native shell from the VisualStudio GUI. This can be done for example adding a tool from the Tools menu: Tools -> External tools. -> Add
To build 64bit you need to run this command to enable the 64bit compiler and linker:
Installed in the Visual Studio VC directory (for example: C:\Program Files (x86)\Microsoft Visual Studio 12.0\VC ). Depending on the system the argument might be x86_amd64 or similar.
Finally, to set up a proper MSYS environment, you need to run msys.bat (or the equivalent mingw32_shell.bat ) from the command prompt.
Now, make sure that the cl and link program are not override by other programs with the same name from MSYS/MinGW (in particular, note that MinGW provides a program named link ). In order to do so, you can set the MSYS path so that the VisualStudio tools are used instead, for example with the command:
or when building for 64bit
or removing or renaming the link binary provided by MSYS.
Next, make sure any other headers and libs you want to use, such as zlib, are located in a location that the compiler can see. Do so by modifying the LIB and INCLUDE environment variables to include the Windows-style paths to these directories. Alternatively, you can try and use the —extra-cflags / —extra-ldflags configure options.
Build
Finally, run: For MSVC:
For 64 bit builds specify target and architecture:
or the following:
—enable-shared will generate the dynamic linked lib (dlls)
Note: You might see an error saying cl can’t generate executable; this is because you installed the link.exe from MSYS. It conflicts with the link.exe of Visual Studio. This can also indicate that you are mixing 64bit and 32bit versions of cl.exe and link.exe .
You can try which link.exe to verify if it is the case. If you see /bin/link.exe , then you can simply rm /bin/link.exe . For more info see #3203 Windows MSVC configure failed.
The right link.exe should come from this location:
or in the case of 64bit builds
Problem solving
You might see three problems when building ffmpeg :
A solution is posted at MSYS pr not found. Basically, pr.exe is removed from MSYS. You need to download it and copy pr.exe to the msys/bin folder.
- The compiler might complain about redefinition issues of stdint.h , because both msinttypes and Visual Studio have stdint.h . I removed stdint.h from c:\c99 to let the compiler uses the one provided by Visual Studio.
In the end of configuration, you might also see pkg-config not found issue. That won’t affect compilation, you can ignore it. It is said that installing pkg-config to MSYS is kinda tiresome.
- common.mak:140: *** missing separator. Stop.
This can happen if you try to build from a cloned git repository and have git configured to replace line endings in your local working copy. Be sure that you have the git option core.autocrlf set to false when cloning the git repo.
To make sure that MSVC finds the zlib files, add the include and lib path from the Visual Studio Command Line prior to launching MSYS2:
Debug Builds
How to build debug version?
Compiling FFmpeg with external libraries
In order to build FFmpeg with support to external libraries, you need to make sure that the libraries and headers are placed in a location specified by the INCLUDE and LIB directories referenced by the VC compiler and linker. In case multiple libraries are used, you could use a common prefix to install all the libraries, so that you have to specify a single location.
Also, you may need to compile the libraries themselves with VC in order to make it possible to link them when building the FFmpeg DLLs.
The following subsections document how you can build some of the external libraries employed by FFmpeg using VC. Note that the setup step is the same for all the libraries (so it can be done just once, then you can build several libraries using the same MSYS terminal session).
libx264
The following example command will configure libx264:
The NO_PREFIX flag may be necessary to make linkable libraries.
libopenh264
libopenh264 provides no configuration system, so the build parameters have to be specified either by editing the Makefile, or by setting the parameters on the commandline. The following command will build the openh264 library with VC:
Ffmpeg windows build msvc


Scripts for building FFmpeg with MSVC on AppVeyor.
The script uses vcpkg which closely follows the official instructions.
The purpose of this repository is:
- To enable the latest git version of ffmpeg to be built with vcpkg, with a few minimal patches on top of upstream vcpkg.
- Do full feature testing for windows, linux, and osx (far more in-depth compared to what upstream vcpkg continuous integration is testing).
- Provide a few lightweight builds for convenience. Given that there are so many different combinations of features that might make sense for specific purposes, and given the one hour time limit on appveyor, what is currently provided is an LGPL build including all standard libraries (avcodec, avformat, avfilter, avdevice, swresample, and swscale), vpx (one of the best LGPL video codecs), opus (one of the best LGPL audio codecs), and nvcodec (to provide x264 and x265 hardware encoding support if you have an nvidia GPU).
Clone the repository and run the following in powershell or cmd:
You can pick another triplet, or another set of features. See the vcpkg ffmpeg CONTROL file for a list of all features. The above will result in a minimal ffmpeg library build with standard codecs, formats, filters, and devices, along with audio resampling and video scaling support.
Prebuilt static LGPL builds for Visual Studio 2019 can be found here. See the vcpkg export documentation for more information on how to use these pre-built packages.
All scripts for creating the builds are licensed under the conditions of the MIT license.
The builds themselves are covered by the relevant license for your build (see here for full details).
The way of building stand-alone executable FFmpeg by MSVC

Feb 29, 2020 · 4 min read
1. Brief Introduction
We all know the FFmpeg is the cornerstone of may media players. It can be used to and change video file format, re-encode and play video by FFplay which is the media player from FFmpeg. Today I will introduce how to build stand-alone executable FFmpeg through MSVC. It can be divided into two parts: one is how to generate static FFmpeg library, the other is how to build FFmpeg C binary file by MSVC a.k.a Microsoft Visual Studio C/C++.
2. Generate static FFmpeg library
To generate C library of FFmpeg, two tools will be used: MSVC and vcpkg. The MSVC is not only the IDE created by Microsoft and also it support many useful command. If you want to program on the Windows platform by native way, MSVC is necessary and strong tool. The vcpkg is another project creared by Microsoft team too. It provide many the external packages(like FFmpeg, libx264 and so on), you can use this project to download and install automatically. The project link is below:
microsoft/vcpkg
Vcpkg helps you manage C and C++ libraries on Windows, Linux and MacOS. This tool and ecosystem are constantly…
And open git bash…
Open powershell, cd to your vcpkg directory and type commands like instruction to setup environment…
There must have another convenient way to do this. So I search on the GitHub to see if someone use it to build FFmpeg. Fortunately, someone kind already used it before and made scripts for building FFmpeg easily. The link is below:
mcmtroffaes/ffmpeg-msvc-build
Scripts for building FFmpeg with MSVC on AppVeyor. The script uses vcpkg which closely follows the official…
And open powershell cd to …..
The build.ps1 is expired. For now, you can use exports.ps1 or exports.bat to build it(edited at 2020/11/13)
-platform, -runtime_library, -linkage and -toolset are deprecated, Use -triplet instead. More info about triplet of vcpkg: https://vcpkg.readthedocs.io/en/latest/users/triplets/
If you want build FFplay, you need to get SDL2 library by vcpkg
It needs to take a long time to do this. Library will be stored in vcpkg\installed\ \lib
Tips: We can check our library is x64 or x86 by dumpbin which is from MSVC tool with CMD. You can export the MSVC tool path to environment variable. It may be
so you can straightly use these command in CMD, or you can do this in CMD like below:
3. Build stand-alone binary file
First, you need to create a new blank c/c++ project with MSVC, and right click you project name → choose property → choose which bits you wnat →VC++ Directories → add path of your header files and library files
Notice: some header files will need to copy from FFmpeg source code project(like os_support.h, config.h… and so on).
You can find the source code in \buildtrees\ffmpeg\src

and go to link option →input →additional dependencies to add your library and some dll files you need to link when building binary file
The dll files you need to link is listed below:
The final step is run debug or release your project, you just need choose the os, bits and click Local Windows Debugging in the menu bar.

After building binary file succeed, You need to check if it is real stand-alone or not. The simple and direct way is run it in another PC which is not install FFmpeg before. Or, you can use another tool , called Dependencies, to check it out. The link is below:
Is it possible to build ffmpeg x64 on Windows?
The real answer is probably «no», but still, just to double check. Has anyone ever been able to build ffmpeg x64 on Windows (VS2013 or VS2015)? I know it is not possible with publicly available sources without heavy modifications. However, if somebody did it and if he is willing to share a few tips.
Edit: It is interesting how most of the required x64 tools for running the «configure» are distributed without dependencies and it is impossible to get them anywhere. Looks like a professional trolling.
Edit2: There are thousands of errors like this:
features.h is missing as many other header files. Is there a fix for that, or switching to Linux is the only option?
4 Answers 4
No, it cannot be done. MS compiler doesn’t support #include_next. Plus, many other problems. You need MinGW.
I used to compile ffmpeg on a linux machine with MinGW, but now I’m able to compile on a windows machine, in my case Windows 10.
NOTE: For me it only worked for ffmpeg versions >= 3.0 and I tested using VS 2013 and 2015
Few steps but very important:
Download and install (except YASM):
- Install MSYS2 to a fixed folder (eg.: C:\Dev\msys64)
- Run msys2.exe
- Execute command «pacman -S make gcc diffutils» and press «Y» to install
- Close msys2
- Rename C:\Dev\msys64\usr\bin\link.exe to some other name (eg.: msys2_link.exe)
- Copy and rename «yasm—win64.exe» to «C:\Dev\yasm.exe»
- Add «C:\Dev» to environment variables PATH
- Run VS2013/2015 x86 (for x86) or x64 for (x64) Command Prompt
- Execute «C:\Dev\msys64\msys2_shell.cmd -msys -use-full-path»
- On the msys2 window execute «which cl» and you should see the path of your VS
- Execute «which link» and you should also see the path of your VS
- Go to the ffmpeg source path (eg.: «cd /c/ffmpeg3.3»)
- Run ./configure and make
I use this configuration:
NOTE2: If you used the last line —prefix=/c/ffmpeg3.3/DLLS, as a final step, run make install and the binaries will be copied to that path
FFmpeg начало работы с Visual Studio
Привет! Начну с того, что я занимаюсь разработкой программы определения автомобильных номеров на дешевом слабомощном процессоре типа Intel ATOM Z8350. Мы получили достаточно хорошие результаты в определении российских номеров на статической картинке (до 97%) с неплохим быстродействием без применения нейронных сетей. Дело осталось за малым — работа с IP-камерой рис 1.
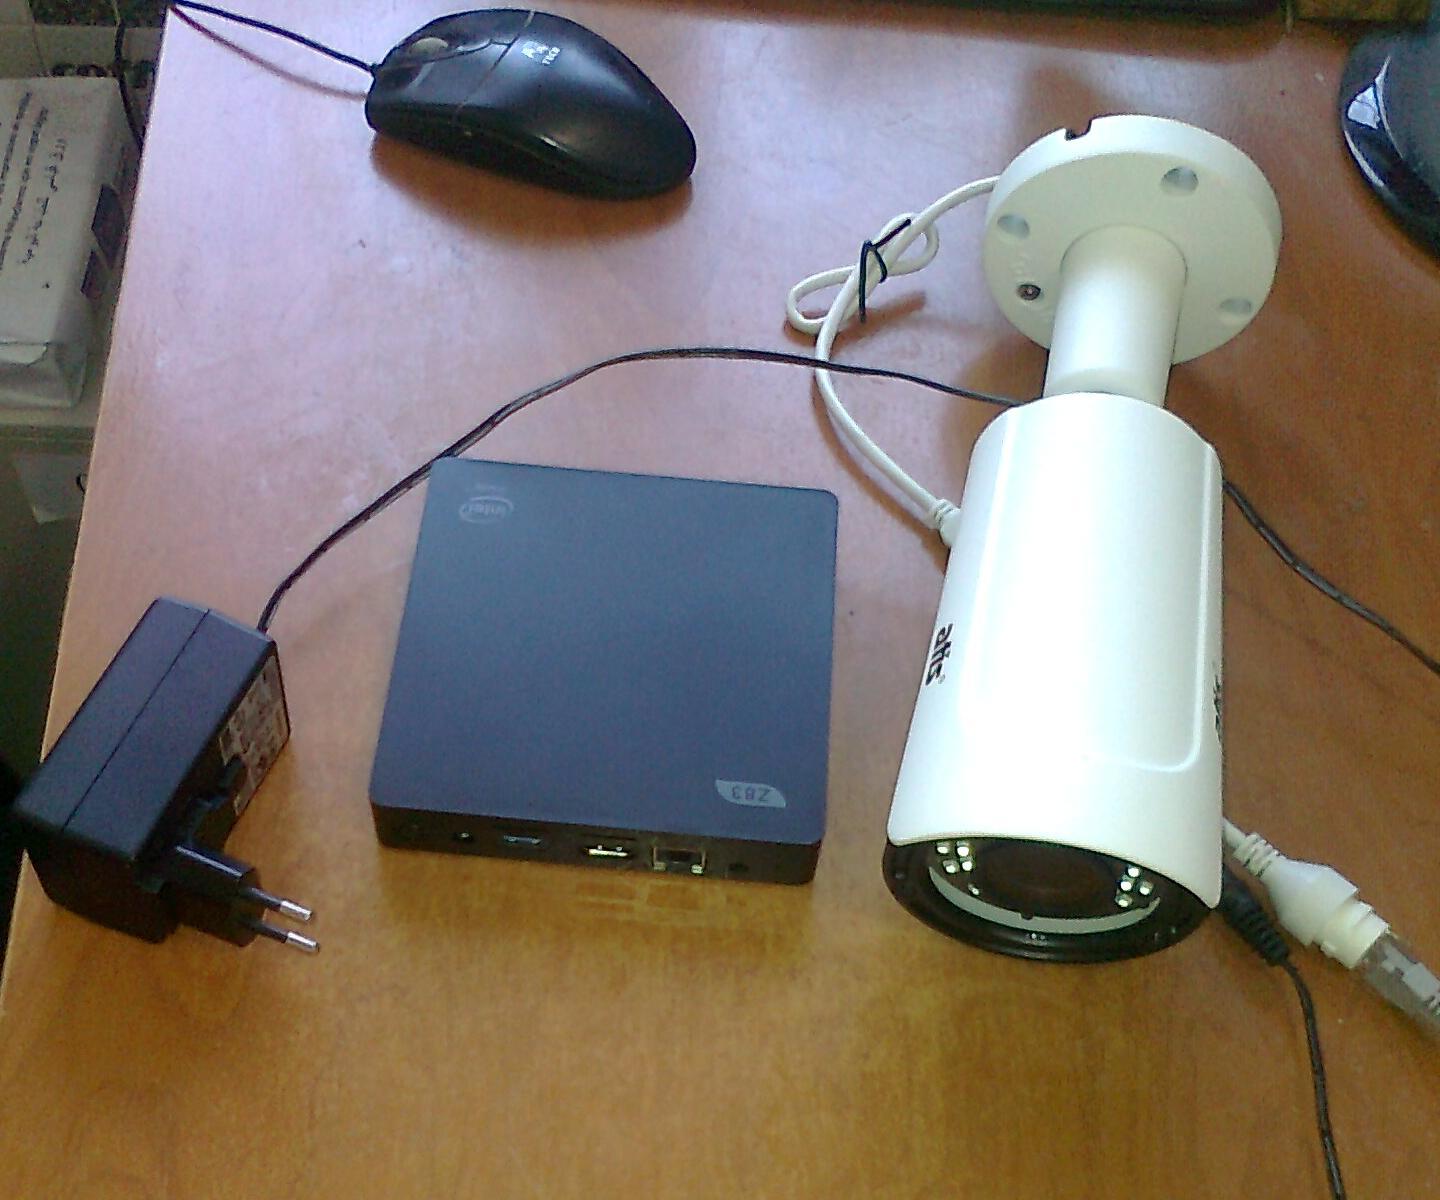
рис.1 Компьютер Intel ATOM Z83II и IP-камера ATIS
FFmpeg – это библиотека для создания видеоприложений или даже утилит общего назначения, которая берет на себя всю тяжелую работу по обработке видео, выполняя все декодирование, кодирование, мультиплексирование и демультиплексирование для вас.
Задача: Full HD IP-камера в стандарте h.264 передает RTSP поток. Размер распакованного кадра 1920×1080 пикселей, частота 25 кадров в секунду. Нужно получать декодированные кадры в оперативную память и каждый 25 кадр сохранять на диск.
В данном примере мы будем декодировать кадры программно. Цель — научиться использовать FFmpeg и в дальнейшем сравнить результаты, получаемые с помощью аппаратного декодирования. Вы увидите, FFmpeg – это просто!
Установка FFmpeg: многие предлагают собирать FFmpeg под свою аппаратную часть. Я же предлагаю воспользоваться сборками zeranoe, это значительно упрощает задачу. Очень важно, что сборки zeranoe включают поддержку DXVA2, что пригодится нам в дальнейшем для аппаратного декодирования.
Переходим на сайт https://ffmpeg.zeranoe.com/builds/ и качаем 2 архива shared и dev перед этим выбрав 32 или 64 бит. В архиве dev хранятся библиотеки (.lib) и include. Архив shared содержит необходимые .dll которые необходимо будет переписать в папку с вашей будущей программой.
Итак создадим на диске C:\ папку ffmpeg. В нее мы перепишем файлы из архива dev.
Подключение FFmpeg к Visual Studio 2017: создаем новый проект. Заходим в свойства проекта (Проект — свойства ). Далее C/C++ и выбираем «Дополнительные каталоги включаемых файлов». Задаем значение: «C:\ffmpeg\dev\include;». После этого идем в Компоновщик-Дополнительные каталоги библиотек и задаем значение «C:\ffmpeg\dev\lib;». Все. FFmpeg подключен к нашему проекту.
Первый проект с FFmpeg: программное декодирование видео и запись каждого 25 кадра на диск. Принцип работы с видео файлом в FFmpeg представлен в блок-схеме рис.2
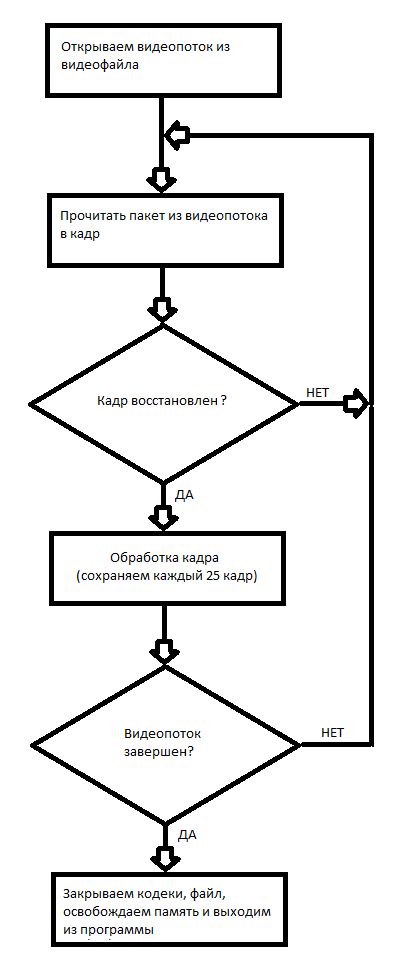
рис.2 Блок-схема работы с видеофайлом.
Т.к. у меня IP-камера имеет IP 192.168.1.168, то вызов программы:
Также данный пример умеет декодировать и видеофайлы, достаточно указать место его размещения.
И так, в этом примере мы научились программно декодировать видео файлы и сохранять полученные кадры на диск. Кадры сохраняются в формате .ppm. Для открытия этих файлов вы можете воспользоваться IrfanView 64 или GIMP в Windows.
Вывод: программное декодирование потока RTSP Full HD H.264 занимает до двух ядер Intel ATOM Z8350 к тому же периодически происходит потеря пакетов, из-за чего часть кадров декодировано неправильно. Данный способ более применим для декодирования записанных видео файлов, т. к. не нужна работа в реальном масштабе времени.


