- File Accessed/Modified date/times are reversed in Windows 10
- Replies (7)
- Disable NTFS Last Access Time Updates in Windows 10
- Last Access Time Stamp
- To Disable NTFS Last Access Time Updates in Windows 10.
- To Change the Last Access Time Stamp for NTFS with fsutil,
- About Sergey Tkachenko
- 3 thoughts on “ Disable NTFS Last Access Time Updates in Windows 10 ”
File Accessed/Modified date/times are reversed in Windows 10
After Windows 10 upgrade whenever I execute a file (.exe or .lnk) by clicking on it, the last access date remains unchanged and the last modified date gets updated. This is exactly the opposite of what’s expected and what used to happen in Windows 7.
Anyone else having this problem? Anyway to fix it? I would rather turn off any date updates rather than have the file modified dates changed every time I execute a file.
Replies (7)
![]()
Thank you for posting your query in Microsoft Community.
I understand your concern, and we in Community will try to help you in the best possible way
This issue occurs may occur if the system file is corrupted or damaged.
Firstly I suggest that you follow the methods below.
Method 1: System File Checker is a utility in Windows that allows users to scan for corruptions in Windows system files and restore corrupted files.
Click on the link provided below to know how to run SFC
Method2: Run DISM or System Update Readiness tool
The DISM or System Update Readiness tool may help you to fix some Windows corruption errors.
Click on the link provided below to know how to run DISM.
Note: Article for 8.1 also applicable for Windows 10
Your reply is very important for us to ensure a proper resolution.
For further assistance, you can post your query in Microsoft Community.
Was this reply helpful?
Sorry this didn’t help.
Great! Thanks for your feedback.
How satisfied are you with this reply?
Thanks for your feedback, it helps us improve the site.
How satisfied are you with this reply?
Thanks for your feedback.
I ran both sfc and dism. They found adcjavas.inc as being corrupt and it could not be repaired. The problem still persists after these two system utilities were run.
I have noticed that there are a lot of postings about adcjavas.inc being corrupt but no apparent solution.
Was this reply helpful?
Sorry this didn’t help.
Great! Thanks for your feedback.
How satisfied are you with this reply?
Thanks for your feedback, it helps us improve the site.
How satisfied are you with this reply?
Thanks for your feedback.
![]()
We appreciate your time and effort for getting back to us a nd I apologize for the delay in responding.
I suggest you to perform repair upgrade and check your issue is resolved. Follow the steps given in the below article:
Note: To be on the safer side, I suggest you to make a back up of your files and data’s before performing Repair upgrade.
Let us know the status of the issue. Please get back to us for future support, we’ll be glad to assist you further.
Was this reply helpful?
Sorry this didn’t help.
Great! Thanks for your feedback.
How satisfied are you with this reply?
Thanks for your feedback, it helps us improve the site.
How satisfied are you with this reply?
Thanks for your feedback.
Thanks. As I write this I am downloading Windows 10 installation to a USB flash drive. Will I need a License key? In the past I have not been able to do this. I was able to do a WIndows 10 upgrade in place via Windows Update. What are the steps to perform repair upgrade. I do not want to screw up my systems which is working fine except for the last modified date problem.
Also note that I have turned off last access date update via «fsutil behavior set disablelastaccess 1». So it is proper that last access dates are not changing. The problem is that majority of .exe files get a new last modified date/time when executed. But not all. A few are OK.
Was this reply helpful?
Sorry this didn’t help.
Great! Thanks for your feedback.
How satisfied are you with this reply?
Thanks for your feedback, it helps us improve the site.
How satisfied are you with this reply?
Thanks for your feedback.
![]()
Thank you for the response.
The free upgrade to Windows 10 is only available to you if you’re running genuine Windows on an eligible device. Before you can upgrade, you’ll need to activate your current version of Windows using a product key.
If you have a product key for your current version of Windows, but it doesn’t work when you try to use it, go to the product activation article for more help.
If you don’t have a product key or you’re unable to activate your current version of Windows, you’ll need to use installation media for Windows 10 . For more info on how to create installation media for Windows 10 , go to the Microsoft software download website.
To perform the repair installation:
a. Insert the installation DVD or USB and boot Windows 10 from it.
b. In the ‘Windows setup’ page select the ‘language to install’ , ‘Time and currency format’ and the ‘ keyboard or input method’ and click on ‘next’ and follow the onscreen instructions.
Disable NTFS Last Access Time Updates in Windows 10
How to Enable or Disable NTFS Last Access Time Updates in Windows 10
NTFS is the standard file system of modern Windows versions. Windows keeps updated the ‘Last Access Time’ timestamp for each file and folder to store a time when they was last accessed on an NTFS volume.
NTFS is the standard file system of the Windows NT operating system family. Starting with Windows NT 4.0 Service Pack 6, it supported the concept of permissions which can be configured to permit or restrict access to files, folders, and other objects locally and over a network. Modern NTFS supports advanced features like alternative data streams.
Also, NTFS supports compression for files and folders. Unlike ZIP file compression, with this compression type, you do not need to create an archive file. Compression will happen on-the-fly and the files can be accessed transparently as they were before compressing. Windows 10 supports NTFS compression natively like previous versions of the OS, but it supports a number of newer algorithms including LZX, which was not available prior to Windows 10.
Last Access Time Stamp
In older Windows versions, you could enable or disable the Last Access Time Stamp feature. Disabling it reduces the impact of logging updates to the Last Access Time stamp on files and directories and improves the speed of file and directory access.
The recent versions of Windows 10 support four different modes which you can set instead of just disabling it. The modes are:
- User Managed, Last Access Updates Enabled
- User Managed, Last Access Updates Disabled
- System Managed, Last Access Updates Enabled 128GB), it is a performance-maintenance trade off.
When in ‘User Managed’ mode, the last access time stamp remains unchanged during the boot, regardless of the volume size. When enabled, the OS changes it only when a user activity occur.
Setting the ‘System Managed, Last Access Updates Disabled’ mode completely disables the the Last Access Time Stamp feature for NTFS.
There are two methods you can use to change the the last access time stamp policy. Let’s review them.
To Disable NTFS Last Access Time Updates in Windows 10.
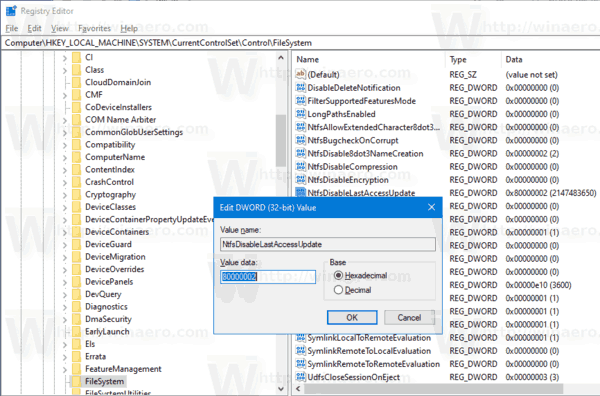
- Open the Registry Editor app.
- Go to the following Registry key.
HKEY_LOCAL_MACHINE\SYSTEM\CurrentControlSet\Control\FileSystem
See how to go to a Registry key with one click. - On the right, modify or create a new 32-Bit DWORD value NtfsDisableLastAccessUpdate.
Note: Even if you are running 64-bit Windows you must still create a 32-bit DWORD value.
- Set it to one of the following values:
- 80000000 (hex) = User Managed, Last Access Updates Enabled
- 80000001 (hex) = User Managed, Last Access Updates Disabled
- 80000002 (hex) = System Managed, Last Access Updates Enabled
- 80000003 (hex) = System Managed, Last Access Updates Disabled
- Use the 80000003 (hex) = System Managed, Last Access Updates Disabled value to disable the Last Access Time Stamp updates.
- Restart Windows 10.
You are done. You can download the ready-to-use Registry files below.
Alternatively, you can use the console tool fsutil to configure the Last Access Time Stamp feature for NTFS.
Windows comes with a special console tool, fsutil. Fsutil targets advanced users and system administrators. It performs tasks that are related to file allocation table (FAT) and NTFS file systems, such as managing reparse points, managing sparse files, or dismounting a volume. If it is used without parameters, Fsutil displays a list of supported subcommands. The tool is available in Windows starting in Windows XP.
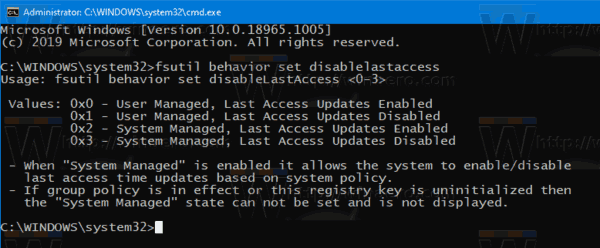
To Change the Last Access Time Stamp for NTFS with fsutil,
- Open an elevated command prompt.
- Type or copy-paste the following command: fsutil behavior set disablelastaccess .
- Substitute the portion with one of the following values:
- 0 = User Managed, Last Access Updates Enabled
- 1 = User Managed, Last Access Updates Disabled
- 2 = System Managed, Last Access Updates Enabled
- 3 = System Managed, Last Access Updates Disabled
- The default value is 2.
Winaero greatly relies on your support. You can help the site keep bringing you interesting and useful content and software by using these options:
Share this post
About Sergey Tkachenko
Sergey Tkachenko is a software developer from Russia who started Winaero back in 2011. On this blog, Sergey is writing about everything connected to Microsoft, Windows and popular software. Follow him on Telegram, Twitter, and YouTube.
3 thoughts on “ Disable NTFS Last Access Time Updates in Windows 10 ”
The fsutil last access help output shown in your post and in my powershell match. However … the actual output results shown in my powershell is just the opposite. Is it indicating something wrong with everyone’s system, my system or some type of convoluted thought process of the result I’m missing? What does your system show when you do this yourself?
My actual output was as follows:
PS C:\> fsutil behavior set disablelastaccess 0
DisableLastAccess = 0 (User Managed, Disabled)
PS C:\> fsutil behavior set disablelastaccess 1
DisableLastAccess = 0 (User Managed, Enabled)
PS C:\> fsutil behavior set disablelastaccess 2
DisableLastAccess = 2 (System Managed, Disabled)
PS C:\> fsutil behavior set disablelastaccess 3
DisableLastAccess = 3 (System Managed, Enabled)
New Windows 10 installation on ssd on laptop. Tried fsutil in cmd bit it kept resetting back to enabled (according to TweakSSD). Tried to set hexadecimal to 3 in registry but it has reset back to enabled as well.
I believe I have solved the problem!! You have to do the registry edit or fsutil command in Safe Mode for it to work properly.


