- ‼️ 4 способа запустить команды Linux в Windows
- Использование команд Linux внутри Windows
- 1. Используйте оболочку Linux Bash в Windows 10
- 2. Используйте Git Bash для запуска команд Bash в Windows
- 3. Использование команд Linux в Windows с Cygwin
- 4. Используйте Linux на виртуальной машине
- Команда file в Linux
- Синтаксис и опции file
- Примеры использования file
- Выводы
- Working across Windows and Linux file systems
- File storage and performance across file systems
- View your current directory in Windows File Explorer
- Filename and directory case sensitivity
- Interoperability between Windows and Linux commands
- Run Linux tools from a Windows command line
- Mixing Linux and Windows commands
- Run Windows tools from Linux
- Share environment variables between Windows and WSL with WSLENV
- WSLENV flags
- Disable interoperability
‼️ 4 способа запустить команды Linux в Windows

Краткое описание: Хотите использовать команды Linux, но не хотите выходить из Windows? Вот несколько способов запуска команд Linux bash в Windows.
Если вы изучаете скрипты оболочки, вероятно, как часть вашей учебной программы, вам нужно использовать команды Linux для практики команд и скриптов.
В вашей школьной лаборатории может быть установлен Linux, но лично у вас нет ноутбука с Linux, а обычный компьютер с Windows, как и у всех.
Ваша домашняя работа должна выполняться с командами Linux, и вы задаетесь вопросом, как запускать команды и скрипты Bash в Windows.
Вы можете установить Linux вместе с Windows в режиме двойной загрузки.
Этот метод позволяет вам выбрать Linux или Windows при запуске компьютера.
Но взять на себя все усилия, чтобы связываться с разделами с единственной целью запуска команды Linux, может быть не для всех актуальна.
Вы также можете использовать терминалы Linux онлайн, но ваша работа не будет сохранена.
Хорошая новость заключается в том, что есть несколько способов запуска команд Linux внутри Windows, как и в любом обычном приложении. Разве это не круто?
Использование команд Linux внутри Windows
Как “промоутер” Linux, я бы хотел, чтобы все больше и больше людей использовали «настоящий» Linux, но я понимаю, что иногда это не является приоритетом.
Если вы просто хотите попрактиковаться в Linux, вы можете использовать один из этих методов для запуска команд Bash в Windows.
1. Используйте оболочку Linux Bash в Windows 10
Знаете ли вы, что вы можете запустить дистрибутив Linux внутри Windows 10?
Подсистема Windows для Linux (WSL) позволяет запускать Linux внутри Windows.
В следующей версии WSL будет использоваться настоящее ядро Linux внутри Windows.
Этот WSL, также называемый Bash для Windows, дает вам дистрибутив Linux в режиме командной строки, работающий как обычное приложение Windows.
Не пугайтесь режима командной строки, потому что ваша цель – запускать команды Linux. Это все, что вам нужно.
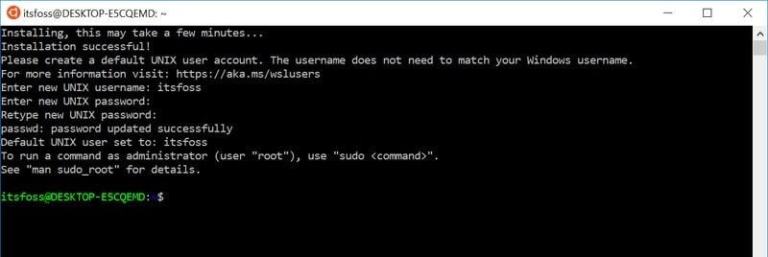
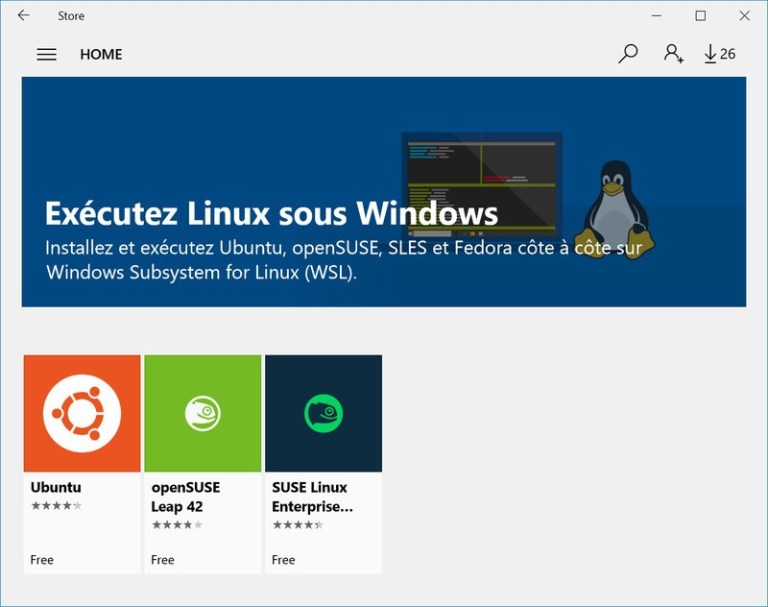
Вы можете найти некоторые популярные дистрибутивы Linux, такие как Ubuntu, Kali Linux, openSUSE и т. д. В Магазине Windows.
Вам просто нужно скачать и установить его, как любое другое приложение Windows.
После установки вы можете запускать все необходимые вам команды Linux.
2. Используйте Git Bash для запуска команд Bash в Windows
Вы, наверное, знаете, что такое Git.
Это система контроля версий, разработанная создателем Linux Линусом Торвальдсом
Git для Windows – это набор инструментов, который позволяет использовать Git как в командной строке, так и в графических интерфейсах.
Одним из инструментов, включенных в Git для Windows, является Git Bash.
Приложение Git Bash предоставляет и слой эмуляции для командной строки Git.
Помимо команд Git, Git Bash также поддерживает множество утилит Bash, таких как ssh, scp, cat, find и т. д.
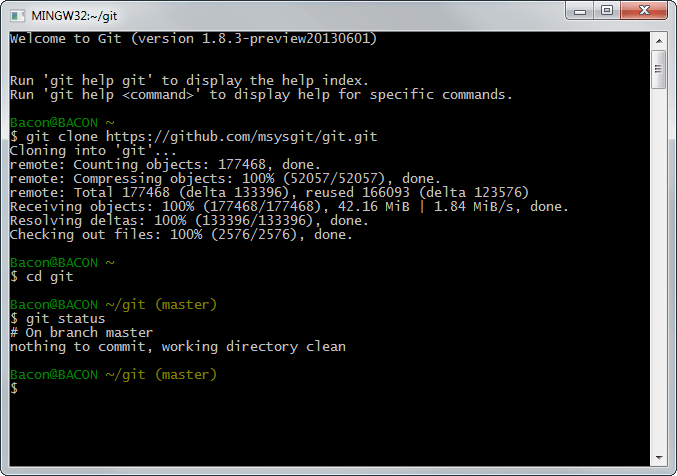
Другими словами, вы можете запускать множество общих команд Linux / Bash, используя приложение Git Bash.
Вы можете установить Git Bash в Windows, скачав и бесплатно установив инструмент Git для Windows с веб-сайта:
3. Использование команд Linux в Windows с Cygwin
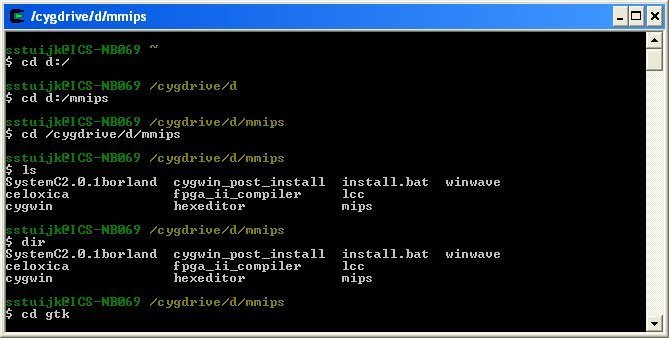
Если вы хотите запускать команды Linux в Windows, рекомендуется Cygwin.
Cygwin был создан в 1995 году для обеспечения POSIX-совместимой среды, которая изначально работает в Windows.
Cygwin – это бесплатное программное обеспечение с открытым исходным кодом, поддерживаемое сотрудниками Red Hat и многими другими добровольцами.
В течение двух десятилетий пользователи Windows используют Cygwin для запуска и выполнения команд Linux / Bash.
Вы можете скачать Cygwin с официального сайта, который будет показан ниже.
4. Используйте Linux на виртуальной машине
Другой способ – использовать программное обеспечение для виртуализации и установить в него Linux.
Таким образом, вы устанавливаете дистрибутив Linux (с графическим интерфейсом) внутри Windows и запускаете его как обычное приложение Windows.
Этот метод требует, чтобы в вашей системе было достаточно оперативной памяти, по крайней мере, 4 ГБ, но лучше, если у вас более 8 ГБ.
Здесь хорошо то, что вы по-настоящему почувствуете использование настольного Linux. Если вам нравится интерфейс, вы можете позже полностью перейти на Linux.
Существует два популярных инструмента для создания виртуальных машин в Windows: Oracle VirtualBox и VMware Workstation Player.
Вы можете использовать любой из двух. Лично я предпочитаю VMware.
Источник
Команда file в Linux
Команда file — одна из самых полезных, поскольку позволяет узнать тип данных, которые на самом деле содержатся внутри документа. Если у вас есть какой-либо файл, взятый из ненадёжного источника, не поленитесь проверить его с помощью этой команды, прежде чем нажать кнопку Открыть. Возможно, такая предосторожность покажется лишней, но она оградит вас от «встречи» с нежелательным контентом.
В большинстве дистрибутивов Linux утилита file (работу которой и запускает одноимённая команда) входит в стандартный набор программного обеспечения.
Синтаксис и опции file
Синтаксис команды file достаточно простой. Записывать её в эмуляторе терминала или консоли следует так:
file опции название_документа
Что же касается опций, то их у этой команды несколько десятков. Мы рассмотрим лишь основные:
- -b, —brief — запрет на демонстрацию имен и адресов файлов в выводе команды;
- -i, —mime — определение MIME-типа документа по его заголовку;
- —mime-type, —mime-encoding — определение конкретного элемента MIME;
- -f, —files-from — анализ документов, адреса которых указаны в простом текстовом файле;
- -l, —list — список паттернов и их длина;
- -s, —special-files — предотвращение проблем, которые могут возникнуть при чтении утилитой специальных файлов;
- -P — анализ определенной части файла, которая обозначается различными параметрами;
- -r, —raw — отказ от вывода /ooo вместо непечатных символов;
- -z — анализ содержимого сжатых документов.
Для того, чтобы ознакомиться с полным списком опций, выполните в терминале команду:
Примеры использования file
Если вам нужно всего лишь посмотреть тип файла, использовать опции не обязательно. Достаточно прописать имя команды, а также название файла и путь к нему, при условии, что он находится не в корневой папке:
Случается, что нужно проверить не один, а несколько файлов. Чтобы не выполнять команду много раз подряд, перечисляйте названия всех файлов через пробел:
file /home/main-user/losst/test-file1.zip /home/main-user/losst/test-file2.tiff

Как видно на примере, картинки с расширениями gif и tiff в действительности оказались текстовыми документами, а архив с расширением zip — PDF документом. Кстати, команда file даёт возможность не только проверить, является ли архив архивом, но и заглянуть внутрь, чтобы узнать, что в нём содержится. Для этой цели используется опция -z:
file -z /home/main-user/losst/testarchive.zip

Как вы успели заметить, команда, возвращая ответ, постоянно выводит названия файлов, что в некоторых случаях бывает удобно, но зачастую только усложняет чтение результатов. Отключить эту функцию легко — воспользуйтесь опцией -b:
file -b /home/main-user/losst/test-file.gif /home/main-user/losst/test-file1.zip /home/main-user/losst/test-file2.tiff

Иногда нужно узнать не просто тип файла, а его MIME-тип. В таком случае на помощь приходит опция -i:
file -i -b /home/main-user/losst/fileA.sbin /home/main-user/losst/fileG.aspx /home/main-user/losst/fileH.lua

Нередко по каким-либо причинам утилита не может найти указанный файл: например, вы ошиблись буквой в его названии или неверно указали папку, в которой он находится. Тогда вывод информации об этом файле предваряет фраза cannot open. Впрочем, есть возможность видоизменить результат, добавив в него сообщение об ошибке. Для этого используйте опцию -E.
Сравните вывод команды с опцией -E и без неё:
file -E -b /home/main-user/losst/test-file1.zip /home/main-user/losst/test-file4.raw /home/main-user/losst/test-file.gif
file -b /home/main-user/losst/test-file1.zip /home/main-user/losst/test-file4.raw /home/main-user/losst/test-file.gif

Еще один способ работы с утилитой file — запись названий и адресов документов в простой текстовый файл. Применяя этот способ на практике, не забывайте добавлять к команде опцию —files-from, после которой указывайте имя файла, содержащего список документов, и путь к нему.
file —files-from /home/main-user/losst/list_of_files.txt

Выводы
Команда file помогает избежать ситуаций, когда вам приходится открывать подозрительные файлы, не будучи уверенными в их содержимом. Также вы можете использовать её для проверки содержимого нескольких архивов, если есть необходимость найти потерявшийся в большом массиве файлов документ, но нет желания просматривать все архивы вручную.
Источник
Working across Windows and Linux file systems
There are a number of considerations to keep in mind when working between Windows and Linux file systems. We have outlined a few of them for you in this guide, including some examples of interoperability support for mixing Windows and Linux-based commands.
File storage and performance across file systems
We recommend against working across operating systems with your files, unless you have a specific reason for doing so. For the fastest performance speed, store your files in the WSL file system if you are working in a Linux command line (Ubuntu, OpenSUSE, etc). If you’re working in a Windows command line (PowerShell, Command Prompt), store your files in the Windows file system.
For example, when storing your WSL project files:
- Use the Linux file system root directory: \\wsl$\Ubuntu-18.04\home\ \Project
- Not the Windows file system root directory: /mnt/c/Users/ /Project$ or C:\Users\ \Project
When you see /mnt/ in the file path of a WSL command line, it means that you are working from a mounted drive. So the Windows file system C:/ drive ( C:\Users\ \Project ) will look like this when mounted in a WSL command line: /mnt/c/Users/ /Project$ . It is possible to store your project files on a mounted drive, but your performance speed will improve if you store them directly on the \\wsl$ drive.
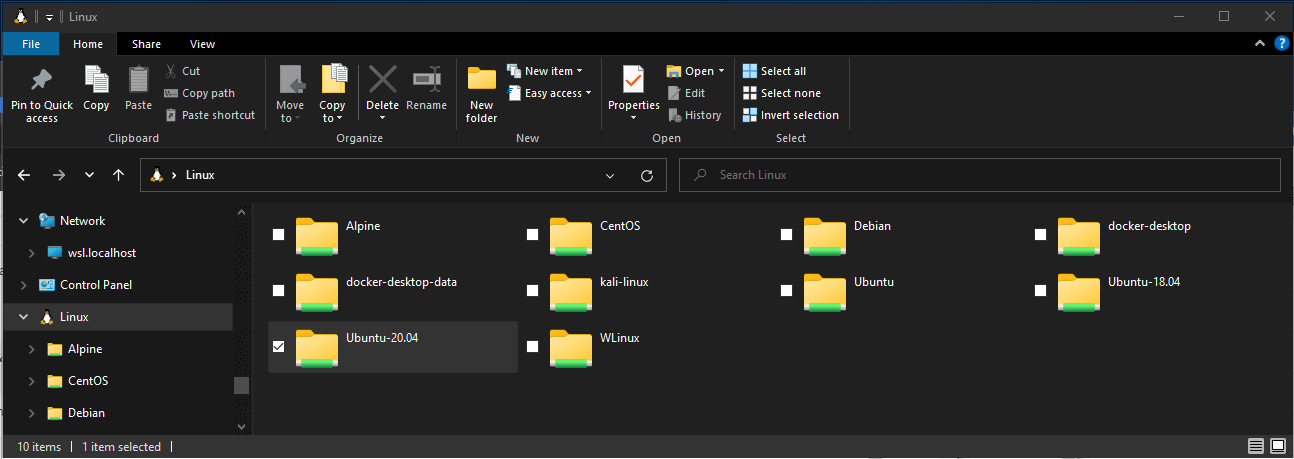
View your current directory in Windows File Explorer
You can view the directory where your files are stored by opening the Windows File Explorer from the command line, using:
Alternatively, you can also use the command: powershell.exe /c start . Be sure to add the period at the end of the command to open the current directory.
To view all of your available Linux distributions and their root file systems in Windows File explorer, in the address bar enter: \\wsl$
Filename and directory case sensitivity
Case sensitivity determines whether uppercase (FOO.txt) and lowercase (foo.txt) letters are handled as distinct (case-sensitive) or equivalent (case-insensitive) in a file name or directory. Windows and Linux file systems handle case sensitivity in different ways — Windows is case-insenstive and Linux is case-sensitive. Learn more about how to adjust case sensitivity, particularly when mounting disks with WSL, in the Adjust case sensitivity how-to article.
Interoperability between Windows and Linux commands
Windows and Linux tools and commands can be used interchangeably with WSL.
- Run Windows tools (ie. notepad.exe) from a Linux command line (ie. Ubuntu).
- Run Linux tools (ie. grep) from a Windows command line (ie. PowerShell).
- Share environment variables between Linux and Windows. (Build 17063+)
Run Linux tools from a Windows command line
Run Linux binaries from the Windows Command Prompt (CMD) or PowerShell using wsl (or wsl.exe ).
Binaries invoked in this way:
- Use the same working directory as the current CMD or PowerShell prompt.
- Run as the WSL default user.
- Have the same Windows administrative rights as the calling process and terminal.
The Linux command following wsl (or wsl.exe ) is handled like any command run in WSL. Things such as sudo, piping, and file redirection work.
Example using sudo to update your default Linux distribution:
Your default Linux distribution user name will be listed after running this command and you will be asked for your password. After entering your password correctly, your distribution will download updates.
Mixing Linux and Windows commands
Here are a few examples of mixing Linux and Windows commands using PowerShell.
To use the Linux command ls -la to list files and the PowerShell command findstr to filter the results for words containing «git», combine the commands:
To use the PowerShell command dir to list files and the Linux command grep to filter the results for words containing «git», combine the commands:
To use the Linux command ls -la to list files and the PowerShell command > out.txt to print that list to a text file named «out.txt», combine the commands:
The commands passed into wsl.exe are forwarded to the WSL process without modification. File paths must be specified in the WSL format.
To use the Linux command ls -la to list files in the /proc/cpuinfo Linux file system path, using PowerShell:
To use the Linux command ls -la to list files in the C:\Program Files Windows file system path, using PowerShell:
Run Windows tools from Linux
WSL can run Windows tools directly from the WSL command line using [tool-name].exe . For example, notepad.exe .
Applications run this way have the following properties:
- Retain the working directory as the WSL command prompt (for the most part — exceptions are explained below).
- Have the same permission rights as the WSL process.
- Run as the active Windows user.
- Appear in the Windows Task Manager as if directly executed from the CMD prompt.
Windows executables run in WSL are handled similarly to native Linux executables — piping, redirects, and even backgrounding work as expected.
To run the Windows tool ipconfig.exe , use the Linux tool grep to filter the «IPv4» results, and use the Linux tool cut to remove the column fields, from a Linux distribution (for example, Ubuntu) enter:
Let’s try an example mixing Windows and Linux commands. Open your Linux distribution (ie. Ubuntu) and create a text file: touch foo.txt . Now use the Linux command ls -la to list the direct files and their creation details, plus the Windows PowerShell tool findstr.exe to filter the results so only your foo.txt file shows in the results:
Windows tools must include the file extension, match the file case, and be executable. Non-executables including batch scripts. CMD native commands like dir can be run with cmd.exe /C command.
For example, list the contents of your Windows files system C:\ directory, by entering:
Or use the ping command to send an echo request to the microsoft.com website:
Parameters are passed to the Windows binary unmodified. As an example, the following command will open C:\temp\foo.txt in notepad.exe :
This will also work:
Share environment variables between Windows and WSL with WSLENV
WSL and Windows share a special environment variable, WSLENV , created to bridge Windows and Linux distributions running on WSL.
Properties of WSLENV variable:
- It is shared; it exists in both Windows and WSL environments.
- It is a list of environment variables to share between Windows and WSL.
- It can format environment variables to work well in Windows and WSL.
- It can assist in the flow between WSL and Win32.
Prior to 17063, only Windows environment variable that WSL could access was PATH (so you could launch Win32 executables from under WSL). Starting in 17063, WSLENV begins being supported. WSLENV is case sensitive.
WSLENV flags
There are four flags available in WSLENV to influence how the environment variable is translated.
- /p — translates the path between WSL/Linux style paths and Win32 paths.
- /l — indicates the environment variable is a list of paths.
- /u — indicates that this environment variable should only be included when running WSL from Win32.
- /w — indicates that this environment variable should only be included when running Win32 from WSL.
Flags can be combined as needed.
Read more about WSLENV, including FAQs and examples of setting the value of WSLENV to a concatenation of other pre-defined environment vars, each suffixed with a slash followed by flags to specify how the value should be translated and passing variables with a script. This article also includes an example for setting up a dev environment with the Go programming language, configured to share a GOPATH between WSL and Win32.
Disable interoperability
Users may disable the ability to run Windows tools for a single WSL session by running the following command as root:
To re-enable Windows binaries, exit all WSL sessions and re-run bash.exe or run the following command as root:
Disabling interop will not persist between WSL sessions — interop will be enabled again when a new session is launched.
Источник


