Handle v4.22
By Mark Russinovich
Published: June 14, 2019
 Download Handle (887 KB)
Introduction
Ever wondered which program has a particular file or directory open? Now you can find out. Handle is a utility that displays information about open handles for any process in the system. You can use it to see the programs that have a file open, or to see the object types and names of all the handles of a program.
You can also get a GUI-based version of this program, Process Explorer, here at Sysinternals.
Installation
You run Handle by typing «handle». You must have administrative privilege to run Handle.
Usage
Handle is targeted at searching for open file references, so if you do not specify any command-line parameters it will list the values of all the handles in the system that refer to open files and the names of the files. It also takes several parameters that modify this behavior.
usage: handle [[-a] [-u] | [-c [-l] [-y]] | [-s]] [-p
| Parameter | Description |
|---|---|
| -a | Dump information about all types of handles, not just those that refer to files. Other types include ports, Registry keys, synchronization primitives, threads, and processes. |
| -c | Closes the specified handle (interpreted as a hexadecimal number). You must specify the process by its PID. WARNING: Closing handles can cause application or system instability. |
| -l | Dump the sizes of pagefile-backed sections. |
| -y | Don’t prompt for close handle confirmation. |
| -s | Print count of each type of handle open. |
| -u | Show the owning user name when searching for handles. |
| -p | Instead of examining all the handles in the system, this parameter narrows Handle’s scan to those processes that begin with the name process. Thus: handle -p exp would dump the open files for all processes that start with «exp», which would include Explorer. |
| name | This parameter is present so that you can direct Handle to search for references to an object with a particular name. For example, if you wanted to know which process (if any) has «c:\windows\system32» open you could type: handle windows\system The name match is case-insensitive and the fragment specified can be anywhere in the paths you are interested in. |
Handle Output
When not in search mode (enabled by specifying a name fragment as a parameter), Handle divides its output into sections for each process it is printing handle information for. Dashed lines are used as a separator, immediately below which you will see the process name and its process id (PID). Beneath the process name are listed handle values (in hexadecimal), the type of object the handle is associated with, and the name of the object if it has one.
When in search mode, Handle prints the process names and id’s are listed on the left side and the names of the objects that had a match are on the right.
More Information
You can find more information on the Object Manager in Windows Internals, 4th Edition or by browsing the Object Manager name-space with WinObj.
Download Handle (887 KB)
File handling in windows programming
So far the operations using C program are done on a prompt / terminal which is not stored anywhere. But in the software industry, most of the programs are written to store the information fetched from the program. One such way is to store the fetched information in a file. Different operations that can be performed on a file are:
- Creation of a new file (fopen with attributes as “a” or “a+” or “w” or “w++”)
- Opening an existing file (fopen)
- Reading from file (fscanf or fgets)
- Writing to a file (fprintf or fputs)
- Moving to a specific location in a file (fseek, rewind)
- Closing a file (fclose)
The text in the brackets denotes the functions used for performing those operations.
Functions in File Operations: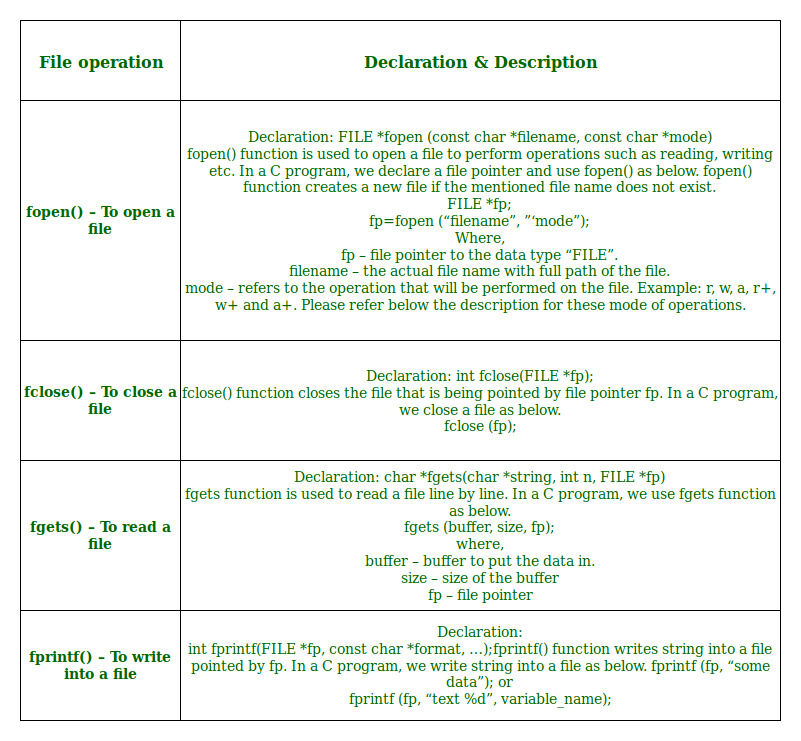
Opening or creating file
For opening a file, fopen function is used with the required access modes. Some of the commonly used file access modes are mentioned below.
File opening modes in C:
As given above, if you want to perform operations on a binary file, then you have to append ‘b’ at the last. For example, instead of “w”, you have to use “wb”, instead of “a+” you have to use “a+b”. For performing the operations on the file, a special pointer called File pointer is used which is declared as
The second parameter can be changed to contain all the attributes listed in the above table.
- Reading from a file –
The file read operations can be performed using functions fscanf or fgets. Both the functions performed the same operations as that of scanf and gets but with an additional parameter, the file pointer. So, it depends on you if you want to read the file line by line or character by character.
And the code snippet for reading a file is as:
Writing a file –:
The file write operations can be perfomed by the functions fprintf and fputs with similarities to read operations. The snippet for writing to a file is as :
Closing a file –:
After every successful fie operations, you must always close a file. For closing a file, you have to use fclose function. The snippet for closing a file is given as :
Example 1: Program to Open a File, Write in it, And Close the File
File Handling
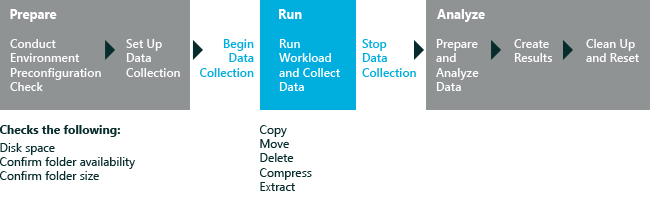
The File Handling assessment provides an automated way to exercise common file operations and capture metrics. This assessment measures durations and throughput while copying, moving, compressing, extracting, and deleting files and folders on your computer. The results help you understand how well the computer performs during these operations. For more information about the results, see Results for the File Handling Assessment.
Warning
The File Handling assessment is only supported on English (United States) versions of Windows. Running this assessment on non-English (United States) versions of Windows might prompt you with an error and the assessment might stop running.
The following graphic illustrates the assessment process.
System Requirements
The first-run help tips in Windows 8.1 can negatively affect assessment results. To disable these, run the following command from an elevated command prompt, and reboot the computer: reg.exe add «HKLM\Software\Policies\Microsoft\Windows\EdgeUI» /v DisableHelpSticker /t REG_DWORD /d «1» /f
Run this assessment only while the desktop is full screen. Do not run this assessment if you have another Microsoft Store app opened side-by-side with the desktop.
When running this assessment on Windows 8.1, make sure the Collect Analysis Trace setting is unchecked when assessing expected battery life. When checked, this option will produce an incorrect estimation.
Enable analysis trace collection only when you need additional information to investigate other energy-related problems.
You can run this assessment on the following operating systems:
Supported architectures include x86-based, x64-based, and ARM-based systems. The assessment isn’t supported for use on virtual machines.
You can run this assessment on Windows RT in either of the following ways:
Package the assessment job in the Windows Assessment Console and then run it on Windows RT. For more information, see Package a job and run it on another computer.
Use Windows Assessment Services to run assessments on Windows RT. For more information, see Windows Assessment Services.
Workloads
A workload is a set of automated tasks that simulate user activity in a predefined, repeatable manner. This assessment measures durations and throughput for the following workloads, and it captures the metrics in the results file.
Programmatic Workloads. These workloads use the API to perform file functions. These workloads measure only the underlying file functionality. File operations include copypg, movepg, and deletepg.
Scripted Workloads. These workloads simulate user activity in File Explorer on a computer running Windows 8. File operations include copyuxxs, deleteuxs, moveuxs, and zipuxs. Scripted workloads can’t be used if you’re running the assessment on a computer running Windows 7.
For more information about choosing a workload, see Settings.
Note
You can also use the File Handling assessment as a workload in an energy-efficiency job. For more information about energy-efficiency jobs, see Create and run an energy efficiency job.
Settings
By default, this assessment uses the recommended settings. Microsoft defines these settings so that you can compare the results across multiple computer configurations or over time on the same computer. When you review the results, the run information includes metadata that indicates whether the assessment used the recommended settings.
You can also customize the settings if you want to gather data that’s different from what the assessment captures by default. However, if you change the default source or destination folders or supply your own files, comparisons may no longer be relevant.
Note
After you run the assessment, all files in the Recycle Bin may be permanently deleted. Therefore, before you run the assessment, review any files in the Recycle Bin because they won’t be available or restorable after the assessment concludes.
The following table describes the assessment settings, recommended values, and alternative values for each setting.
| Setting | Description | |||||||||||||||||||||||||
|---|---|---|---|---|---|---|---|---|---|---|---|---|---|---|---|---|---|---|---|---|---|---|---|---|---|---|
| Member Constant | Stands For | Access | ||||||
|---|---|---|---|---|---|---|---|---|
| in * | input | File open for reading: the internal stream buffer supports input operations. | ||||||
| out | output | File open for writing: the internal stream buffer supports output operations. | ||||||
| binary | binary | Operations are performed in binary mode rather than text. | ||||||
| ate | at end | The output position starts at the end of the file. | ||||||
| app | append | All output operations happen at the end of the file, appending to its existing contents. | ||||||
| trunc | truncate | Any contents that existed in the file before it is open are discarded. Default Open Modes :
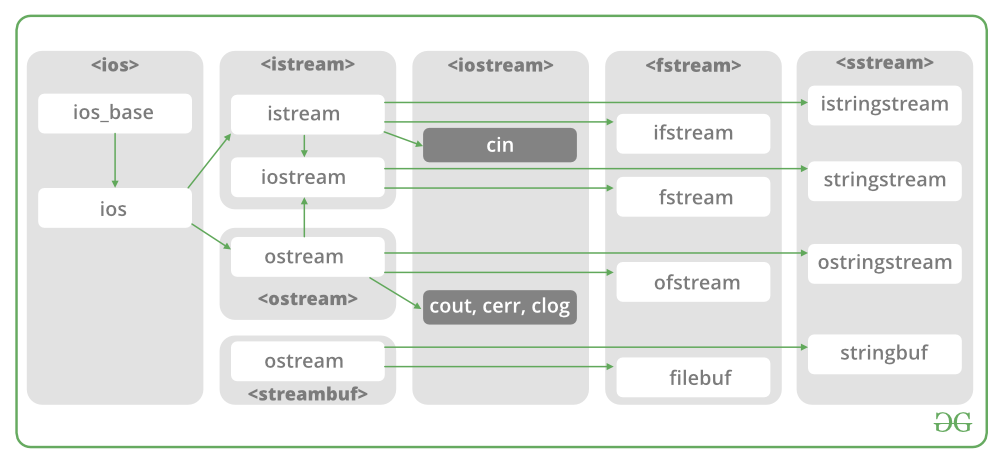
Problem Statement : To read and write a File in C++. Recommended: Please try your approach on first, before moving on to the solution.Below is the implementation by using ifsream & ofstream classes. |


