- macFUSE File system integration made easy
- What is macFUSE?
- Features
- How It Works
- Free up storage space on your Mac
- Find out how much storage is available on your Mac
- Manage storage on your Mac
- Store in iCloud
- Optimize Storage
- Empty Trash Automatically
- Reduce Clutter
- Where to find the settings for each feature
- Other ways that macOS helps automatically save space
- How to free up storage space manually
- How to erase an Intel-based Mac
- Before erasing your Mac
- Use Disk Utility to erase your Mac
- If you don’t see Macintosh HD in Disk Utility
- File system formats available in Disk Utility on Mac
- Apple File System (APFS)
- Mac OS Extended
- Windows-compatible formats
macFUSE
File system integration made easy
What is macFUSE?
macFUSE allows you to extend macOS’s native file handling capabilities via third-party file systems.
Features
As a user, installing the macFUSE software package will let you use any third-party FUSE file system. Legacy MacFUSE file systems are supported through the optional MacFUSE compatibility layer.
As a developer, you can use the FUSE SDK to write numerous types of new file systems as regular user space programs. The content of these file systems can come from anywhere: from the local disk, from across the network, from memory, or any other combination of sources. Writing a file system using FUSE is orders of magnitude easier and quicker than the traditional approach of writing in-kernel file systems. Since FUSE file systems are regular applications (as opposed to kernel extensions), you have just as much flexibility and choice in programming tools, debuggers, and libraries as you have if you were developing standard macOS applications.
How It Works
In more technical terms, FUSE implements a mechanism that makes it possible to implement a fully functional file system in a user-space program on macOS. It provides multiple APIs, one of which is a superset of the FUSE API (file system in user space) that originated on Linux. Therefore, many existing FUSE file systems become readily usable on macOS.
The macFUSE software consists of a kernel extension and various user space libraries and tools. It comes with C-based and Objective-C-based SDKs. If you prefer another language (say, Python or Java), you should be able to create file systems in those languages after you install the relevant language bindings yourself.
The filesystems repository contains source code for several exciting and useful file systems for you to browse, compile, and build upon, such as sshfs, procfs, AccessibilityFS, GrabFS, LoopbackFS, SpotlightFS, and YouTubeFS.
Источник
Free up storage space on your Mac
Save space by storing your content in iCloud or using built-in tools to find and remove large or unneeded files.
The Optimized Storage features of your Mac help you save storage space by storing your content in iCloud and making it available on demand:
- When storage space is needed, files, photos, movies, email attachments, and other files that you seldom use are stored in iCloud automatically.
- Each file stays right where you last saved it, and downloads when you open it.
- Files that you’ve used recently remain on your Mac, along with optimized versions of your photos.
If you haven’t yet upgraded to macOS Sierra or later, learn about other ways to free up storage space.
Find out how much storage is available on your Mac
Choose Apple menu > About This Mac, then click Storage. Each segment of the bar is an estimate of the storage space used by a category of files. Move your pointer over each segment for more detail.
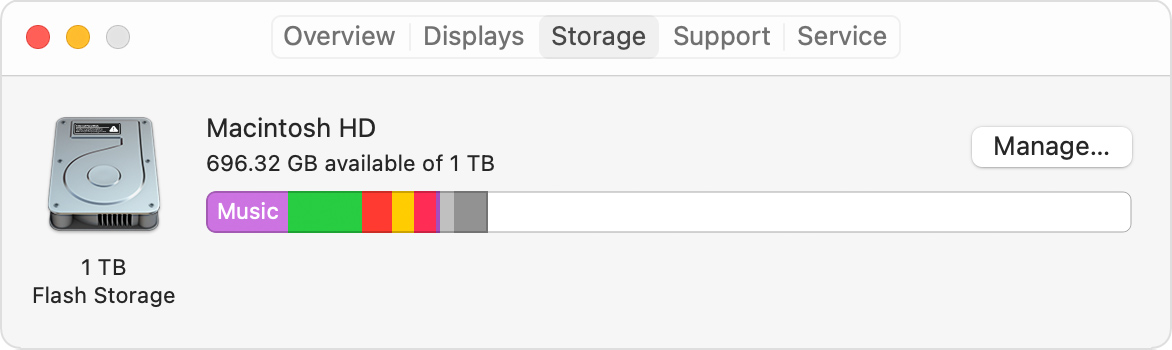
Click the Manage button to open the Storage Management window, pictured below.
Manage storage on your Mac
The Storage Management window offers recommendations for optimizing your storage. If some recommendations are already turned on, you will see fewer recommendations.
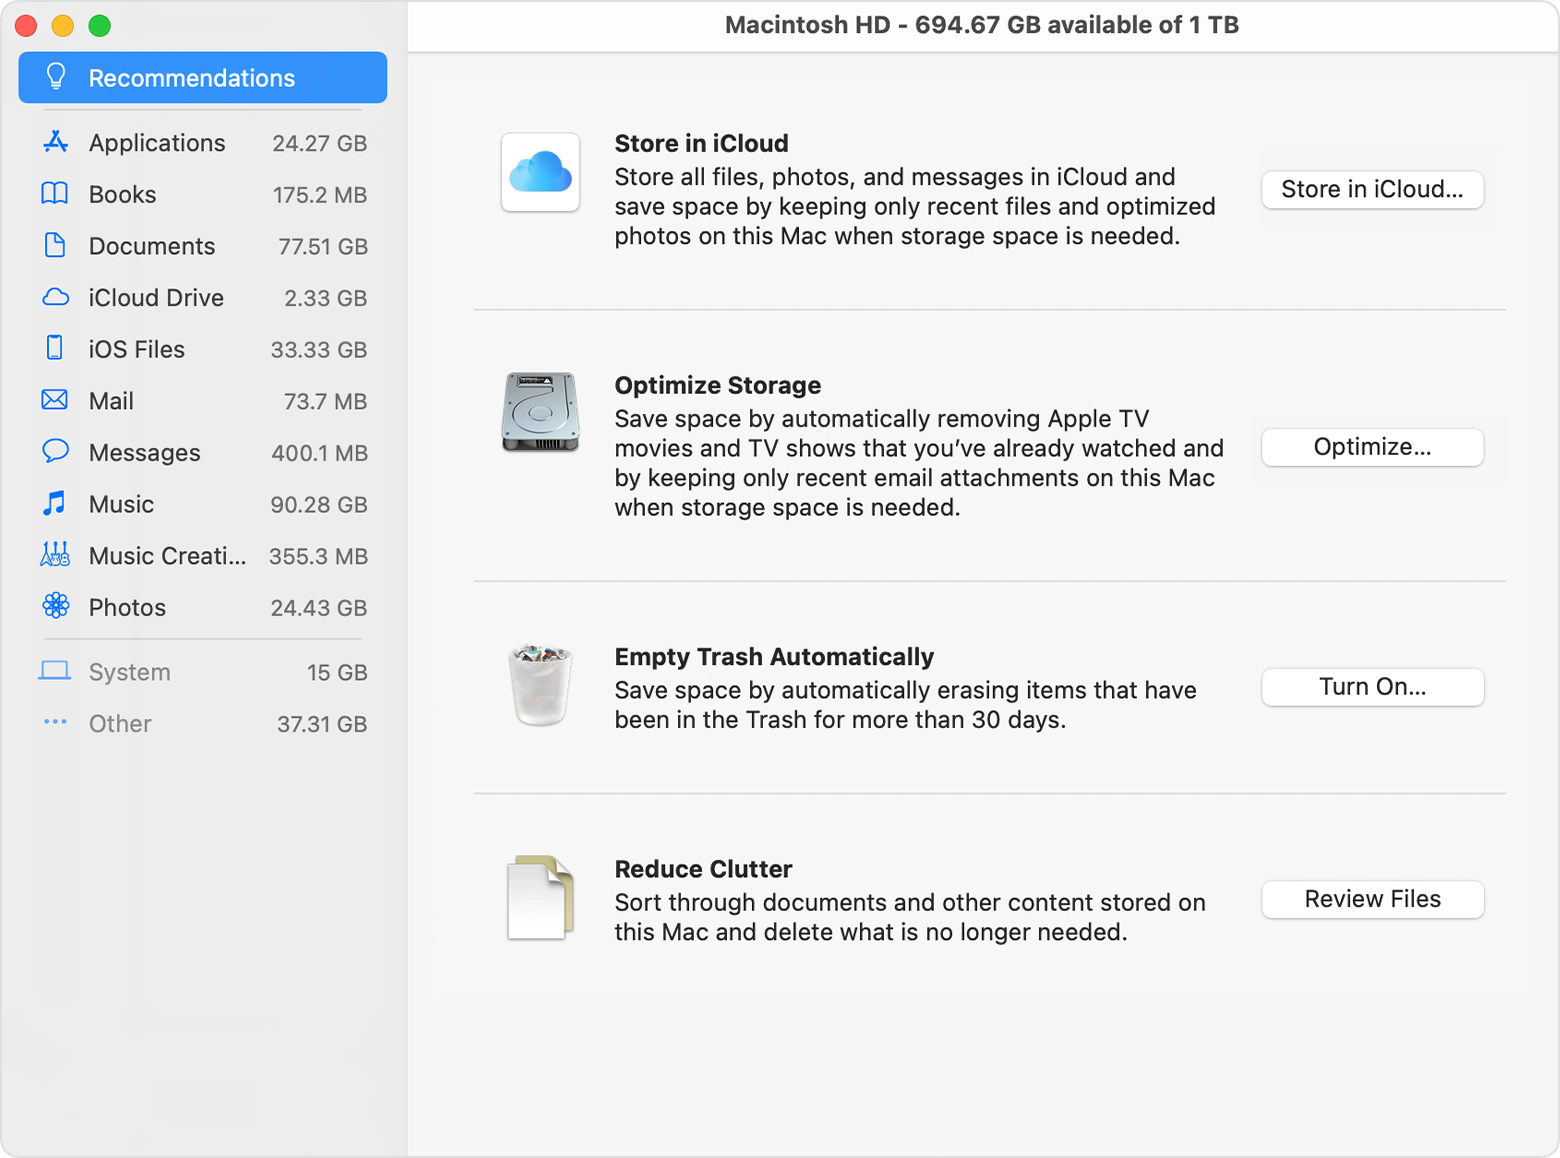
Store in iCloud
Click the Store in iCloud button, then choose from these options:
- Desktop and Documents. Store all files from these two locations in iCloud Drive. When storage space is needed, only the files you recently opened are kept on your Mac, so that you can easily work offline. Files stored only in iCloud show a download icon , which you can double-click to download the original file. Learn more about this feature.
- Photos. Store all original, full-resolution photos and videos in iCloud Photos. When storage space is needed, only space-saving (optimized) versions of photos are kept on your Mac. To download the original photo or video, just open it.
- Messages. Store all messages and attachments in iCloud. When storage space is needed, only the messages and attachments you recently opened are kept on your Mac. Learn more about Messages in iCloud.
Storing files in iCloud uses the storage space in your iCloud storage plan. If you reach or exceed your iCloud storage limit, you can either buy more iCloud storage or make more iCloud storage available. iCloud storage starts at 50GB for $0.99 (USD) a month, and you can purchase additional storage directly from your Apple device. Learn more about prices in your region.
Optimize Storage
Click the Optimize button to save space by automatically removing watched movies and TV shows. When storage space is needed, movies or TV shows that you purchased from Apple and already watched are removed from your Mac. Click the download icon next to a movie or TV show to download it again.
Your Mac will also save space by keeping only recent email attachments on this Mac when storage space is needed. You can manually download any attachments at any time by opening the email or attachment, or saving the attachment to your Mac.
Optimizing storage for movies, TV shows, and email attachments doesn’t require iCloud storage space.
Empty Trash Automatically
Empty Trash Automatically permanently deletes files that have been in the Trash for more than 30 days.
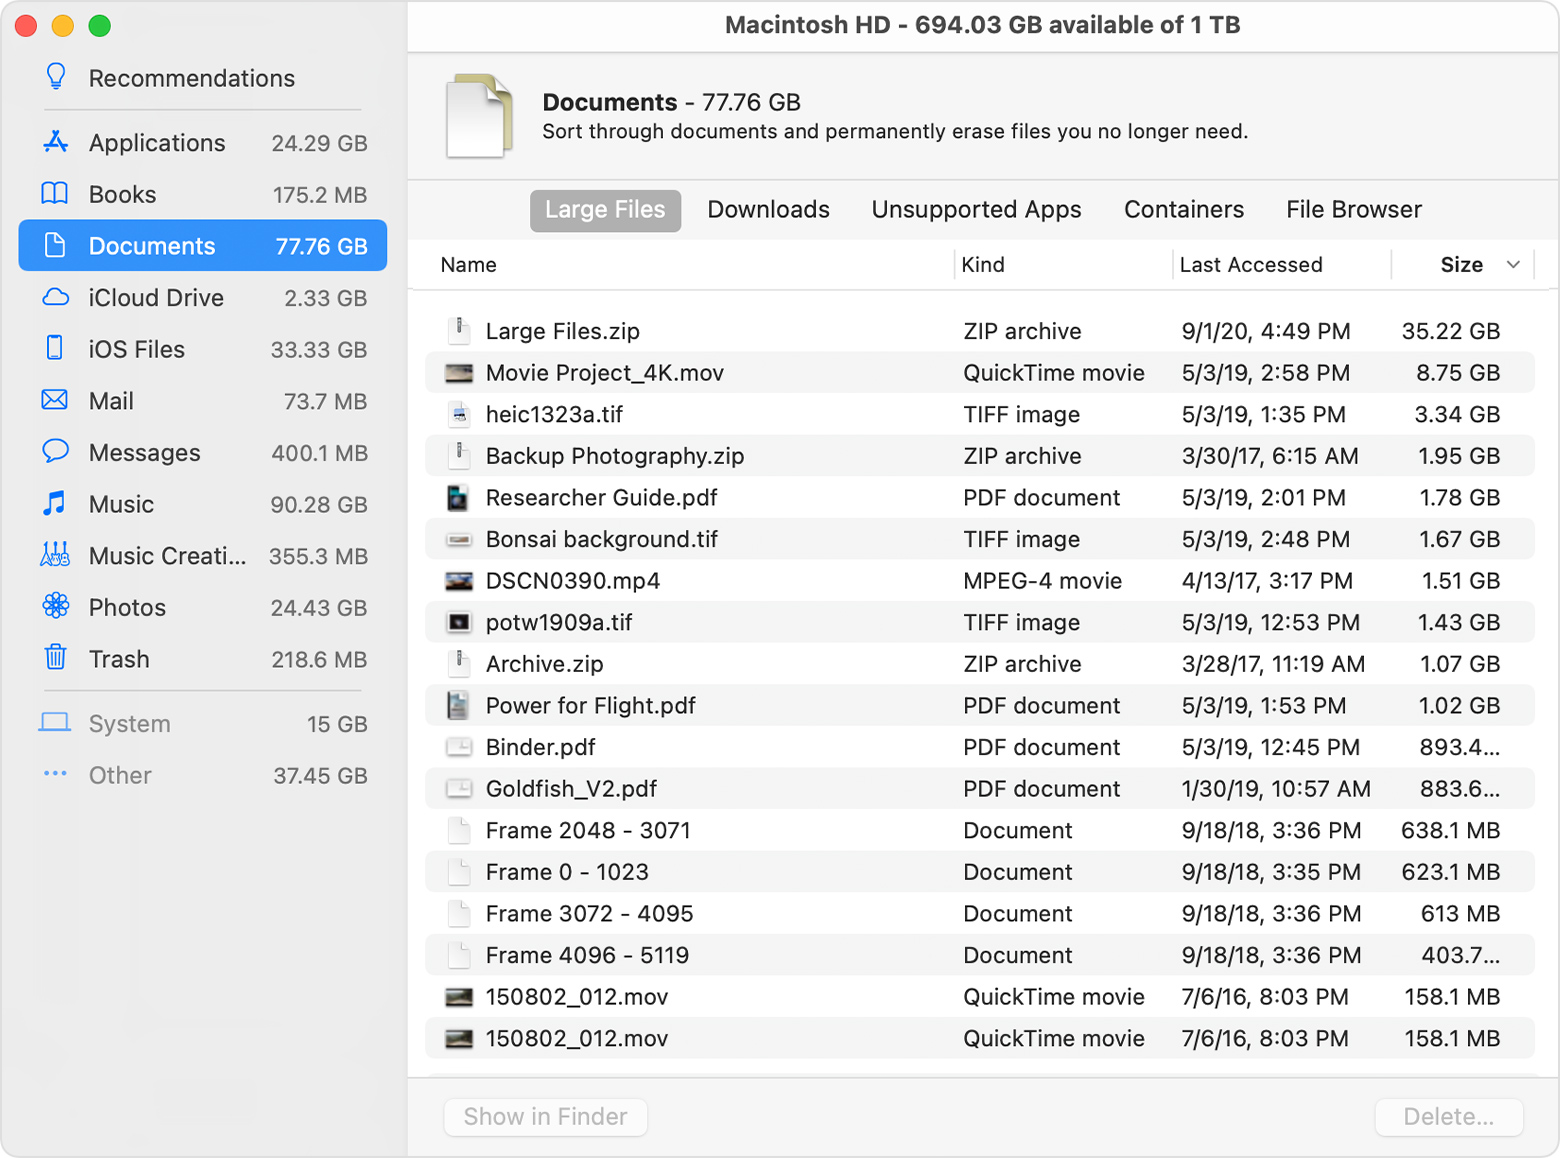
Reduce Clutter
Reduce Clutter helps you identify large files and files you might no longer need. Click the Review Files button, then choose any of the file categories in the sidebar, such as Applications, Documents, Music Creation, or Trash.
You can delete the files in some categories directly from this window. Other categories show the total storage space used by the files in each app. You can then open the app and decide whether to delete files from within it.
Where to find the settings for each feature
The button for each recommendation in the Storage Management window affects one or more settings in other apps. You can also control those settings directly within each app.
- If you’re using macOS Catalina or later, choose Apple menu > System Preferences, click Apple ID, then select iCloud in the sidebar: Store in iCloud turns on the Optimize Mac Storage setting on the right. To turn off iCloud Drive entirely, deselect iCloud Drive.
- If you’re using macOS Mojave or earlier, choose Apple menu > System Preferences, click iCloud, then click Options next to iCloud Drive. Store in iCloud turns on the Desktop & Documents Folders and Optimize Mac Storage settings.
- In Photos, choose Photos > Preferences, then click iCloud. Store in iCloud selects iCloud Photos and Optimize Mac Storage.
- In Messages, choose Messages > Preferences, then click iMessage. Store in iCloud selects Enable Messages in iCloud.
- If you’re using macOS Catalina or later, open the Apple TV app, choose TV > Preferences from the menu bar, then click Files. Optimize Storage selects “Automatically delete watched movies and TV shows.”
- In you’re using macOS Mojave or earlier, open iTunes, choose iTunes > Preferences from the menu bar, then click Advanced. Optimize Storage selects “Automatically delete watched movies and TV shows.”
- In Mail, choose Mail > Preferences from the menu bar, then click Accounts. In the Account Information section on the right, Optimize Storage sets the Download Attachments menu to either Recent or None.
Empty Trash Automatically: From the Finder, choose Finder > Preferences, then click Advanced. Empty Trash Automatically selects “Remove items from the Trash after 30 days.”
Other ways that macOS helps automatically save space
With macOS Sierra or later, your Mac automatically takes these additional steps to save storage space:
- Detects duplicate downloads in Safari, keeping only the most recent version of the download
- Reminds you to delete used app installers
- Removes old fonts, languages, and dictionaries that aren’t being used
- Clears caches, logs, and other unnecessary data when storage space is needed
How to free up storage space manually
Even without using the Optimized Storage features described in this article, you can take other steps to make more storage space available:
- Music, movies, and other media can use a lot of storage space. Learn how to delete music, movies, and TV shows from your device.
- Delete other files that you no longer need by moving them to the Trash, then emptying the Trash. The Downloads folder is good place to look for files that you might no longer need.
- Move files to an external storage device.
- Compress files.
- Delete unneeded email: In the Mail app, choose Mailbox > Erase Junk Mail. If you no longer need the email in your Trash mailbox, choose Mailbox > Erase Deleted Items.
Источник
How to erase an Intel-based Mac
Erase (format) built-in startup disk of an Intel-based Mac.
These steps do not apply to Mac computers with Apple silicon. The steps to erase a Mac with Apple silicon are different.
Before erasing your Mac
- Make a backup of any files that you want to keep. Erasing your Mac permanently deletes its files.
- If you want to restore your Mac to factory settings, such as to prepare it for a new owner, first learn what to do before you sell, give away, or trade in your Mac. Then erase your Mac as the final step.
Use Disk Utility to erase your Mac
- Start up from macOS Recovery: Turn on your Mac, then immediately press and hold these two keys until you see an Apple logo or other image: Command (⌘) and R.
- If asked, select a user you know the password for, then enter their administrator password.
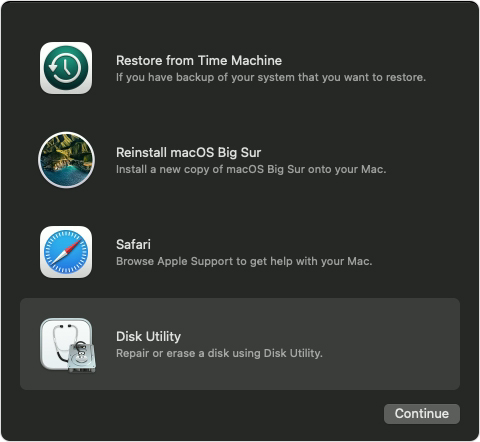
- From the utilities window, select Disk Utility and click Continue.

- Select Macintosh HD in the sidebar of Disk Utility. Don’t see Macintosh HD?
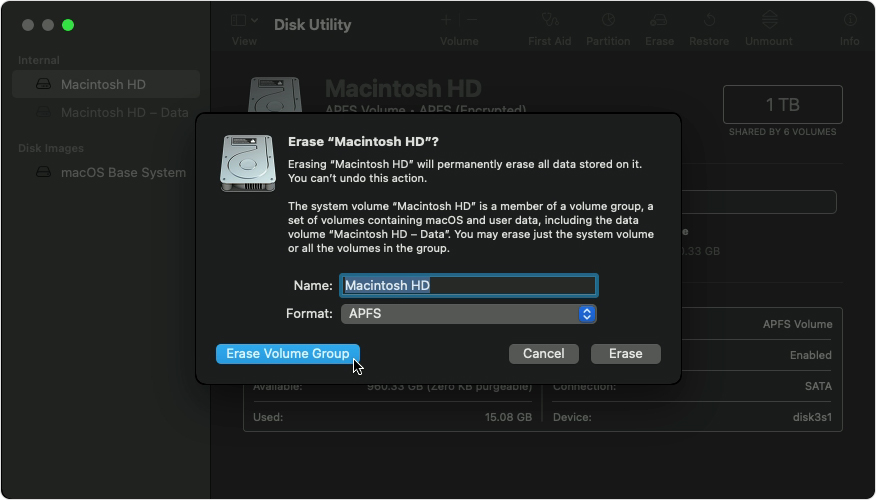
- Click the Erase button in the toolbar, then enter the requested details:
- Name: Macintosh HD
- Format: APFS or Mac OS Extended (Journaled), as recommended by Disk Utility
- Click Erase Volume Group. If you don’t see this button, click Erase instead.
- If asked, enter your Apple ID. Forgot your Apple ID?
- After the erase is done, select any other internal volumes in the sidebar, then click the delete volume (–) button in the toolbar to delete that volume.
During this step, disregard any internal volume named Macintosh HD or Macintosh HD — Data, as well as any volumes in the External and Disk Images sections of the sidebar. - Quit Disk Utility to return to the utilities window.
- If you want to start up again from the disk you erased, select Reinstall macOS in the utilities window, then click Continue and follow the onscreen instructions to reinstall macOS.
If you don’t see Macintosh HD in Disk Utility
Your built-in startup disk should be the first item listed in the Disk Utility sidebar. It’s named Macintosh HD, unless you changed its name. If you don’t see it there, choose Apple menu > Shut Down, then unplug all nonessential devices from your Mac and try again.
If your disk still doesn’t appear in Disk Utility, or Disk Utility reports that the erase process failed, your Mac might need service. If you need help, please contact Apple Support.
Источник
File system formats available in Disk Utility on Mac
Disk Utility on Mac supports several file system formats:
Apple File System (APFS): The file system used by macOS 10.13 or later.
Mac OS Extended: The file system used by macOS 10.12 or earlier.
MS-DOS (FAT) and ExFAT: File systems that are compatible with Windows.
Apple File System (APFS)
Apple File System (APFS), the default file system for Mac computers using macOS 10.13 or later, features strong encryption, space sharing, snapshots, fast directory sizing and improved file system fundamentals. While APFS is optimised for the Flash/SSD storage used in recent Mac computers, it can also be used with older systems with traditional hard disk drives (HDD) and external, direct-attached storage. macOS 10.13 or later supports APFS for both bootable and data volumes.
APFS allocates disk space within a container (partition) on demand. When a single APFS container has multiple volumes, the container’s free space is shared and automatically allocated to any of the individual volumes as needed. If desired, you can specify reserve and quota sizes for each volume. Each volume uses only part of the overall container, so the available space is the total size of the container, minus the size of all the volumes in the container.
Choose one of the following APFS formats for Mac computers using macOS 10.13 or later.
APFS: Uses the APFS format. Choose this option if you don’t need an encrypted or case-sensitive format.
APFS (Encrypted): Uses the APFS format and encrypts the volume.
APFS (Case-sensitive): Uses the APFS format and is case-sensitive to file and folder names. For example, folders named “Homework” and “HOMEWORK” are two different folders.
APFS (Case-sensitive, Encrypted): Uses the APFS format, is case-sensitive to file and folder names and encrypts the volume. For example, folders named “Homework” and “HOMEWORK” are two different folders.
You can easily add or delete volumes in APFS containers. Each volume within an APFS container can have its own APFS format — APFS, APFS (Encrypted), APFS (Case-sensitive) or APFS (Case-sensitive, Encrypted).
Mac OS Extended
Choose one of the following Mac OS Extended file system formats for compatibility with Mac computers using macOS 10.12 or earlier.
Mac OS Extended (Journaled): Uses the Mac format (Journaled HFS Plus) to protect the integrity of the hierarchical file system. Choose this option if you don’t need an encrypted or case-sensitive format.
Mac OS Extended (Journaled, Encrypted): Uses the Mac format, requires a password, and encrypts the partition.
Mac OS Extended (Case-sensitive, Journaled): Uses the Mac format and is case-sensitive to folder names. For example, folders named “Homework” and “HOMEWORK” are two different folders.
Mac OS Extended (Case-sensitive, Journaled, Encrypted): Uses the Mac format, is case-sensitive to folder names, requires a password, and encrypts the partition.
Windows-compatible formats
Choose one of the following Windows-compatible file system formats if you are formatting a disk to use with Windows.
MS-DOS (FAT): Use for Windows volumes that are 32GB or less.
ExFAT: Use for Windows volumes that are over 32GB.
Источник


